Privacy is a hot topic lately in all circles so naturally themes like private or incognito browsing pop up immediately as discussion topics. Naturally, when discussing private or incognito browsing it is very important to understand what exactly private or incognito browsing is, what does it do and how it works in order to shed some light on is it really private and safe as we are told.
So, when you browse the internet normally websites have tendencies to save your browsing data, save cookies, remember passwords, etc in order to provide you with a better surfing experience next time you visit that same site. Private or incognito browsing treats you as a completely new user which is the first time visiting a given website. It clears all your data, including your browsing history, cookies, etc., on exiting. Every website you visit in private or incognito mode treats you as a new visitor, even if you have visited it before in incognito mode.
And basically, that's it. So is it really private? No, it is just a non-remembering mode of internet browsing where after your browsing session history and other data is cleared from the browser, but while you are on the internet you are pretty visible to all like any other normal user.
There are a lot of misconceptions and wrong thinking about browsing the internet in this mode so let's take a look at some typical ones.
Many people think that the Government cannot trace their identity when they surf privately. This is only a myth. There are many ways by which the Government can reach you if you do something illegal. When you surf online, you are connected with an ISP of your area, which helps the officials track your location.
Many people think that private mode protects them from virus and malware attacks. It is not true because malware and viruses can enter your PC through a software download, phishing email, etc. To protect your PC from virus and malware attacks, you should have good security software.
This is not 100% true. If you search “What is my IP” in incognito and standard mode, you will get the same results. This means that websites can view your IP address in private mode also. Using a VPN would be a good option if you want to hide your IP.
Since cookies are deleted after exiting private browsing, many people think that ads cannot track them. When you surf in incognito mode, the browser saves cookies in a temporary mode, allowing ads to track you during your entire private browsing session.
You may think if you sign in to your Gmail or other social media accounts in private mode, no one will see you online. This is not true. It does not matter whether you have signed into your account in normal mode or incognito mode; others can always spot you online.
In your regular browsing mode, you may have some addons, extensions, themes, etc installed and you can use them. They may track your activities. The data is deleted when you exit the browser.
When you use the private browsing mode, the browser is loaded in its original form, typically without the installed addons, extension, themes, etc. The data gets deleted when you exit the browser. This mode doesn’t save data to disk but keeps it in memory during the current session.
If you are really concerned about your privacy we have articles about using DuckDuckGo and deep web where you can be sure that your browsing sessions are encrypted.

“There were problems installing some updates, but we’ll try again later. If you keep seeing this and you want to search the web or contact support for information, this may help: 2018-03 Cumulative Update for Windows 10 Version 1709 for x64-based Systems (KB4088776) – Error 0X800F0900”This kind of Windows Update error is most likely caused by some corrupted files in the system. It is also possible that the Windows Database might have become corrupted as well. So if you are currently experiencing this problem, refer to the options given below and see which one of them works best for you.
DISM.exe /Online /Cleanup-Image /RestoreHealth /Source:C:RepairSourceWindows /LimitAccess
net stop wuauserv net start cryptSvc net start bits net start msiserver
net start wuauserv net start cryptSvc net start bits net start msiserver
Customers will most likely encounter the “We couldn’t update system reserved partition” error when upgrading to Windows 10 from Windows 7 or Windows 8.1. This error may also come with error code 0xc1900104 or error code 0x800f0922.
 Error Cause
“We couldn’t update system reserved partition” Windows 10 upgrade error is normally caused by too little space on the System Reserved Partition (SRP). The System Reserve Partition is an additional small partition created by Windows, which stores boot files. The SRP can be filled up with security apps and third-party anti-virus. Once this partition has insufficient space, the system will not be able to upgrade to Windows 10.
Caution: The following steps are complex and need to be done by experienced users especially using the command line. Once an error is made in entering commands, there’s a chance that your device can be put in a no-boot situation, or data stored on the device can possibly get lost.
To upgrade to Windows 10, your device needs to have at least 15MB free space on the System Reserved Partition. Follow the procedure below and then try upgrading again.
NOTE: While in Admin mode, some apps like OneNote will not run.
Doing this method will make a permanent, but small increase in the free space of the device’s SRP.
a. Open the Run window by pressing the Windows key + R. Type diskmgmt.msc then hit Enter. b. Select System Reserve partition then right-click on it.
c. Choose Change Drive Letter and Paths then select Add.
d. Type Y for the drive letter then click OK.
e. Click on the Start button and search for cmd. In the results, right-click on Command Prompt then choose Run as administrator. The command prompt window will appear.
f. Type Y: at the command prompt then press Enter.
g. Once you’ve switched to drive Y, type takeown /d y /r /f . then hit Enter.
NOTE: Ensure that the space and period after “f” is included in order for the command to work properlyh. Type icacls Y:* /save %systemdrive%NTFSp.txt /c /t then hit Enter to back up the permission to the drive.
NOTE: Ensure that all files are marked as successful and that no files are marked as failed.
i. Type whoami then hit Enter. Record the username that appears. Afterwards, type icacls . /grant <username you got from whoami>:F /t then press Enter.
NOTE: Ensure that there’s no space between the username and “:F” or the command will not work.j. In the File Explorer, open the SRP drive and select the Boot folder. Choose the language folders you want to permanently delete. Language folders are named with four letters split with a hyphen. For example: de-DE is the German language while en-US is the U.S. English language.
2. Truncate the NTFS Log:
a. Open the Command Prompt then type chkdsk /L Y: to check the size of the NTFS Log. If the NTFS Log size is less than 5000KB, you need not truncate the file.
b. Type chkdsk /L:5000 /X /F then hit Enter to truncate the NTFS Log.
c. Return to Disk Management window. Select Action menu then select Check if the device’s SRP now has a larger amount of free space. Once there’s enough space, right click the System Reserve Partition then select Change Drive Letter and Paths. Choose Y: then select Remove.
3. If there’s still not enough available space after truncating the NTFS Log, resize the USN journal:
a. Open the command prompt then type fsutil usn queryjournal Y: to display the size in hex value. Convert the hex value to decimal then divide it by 1048576. The result you will get will be in MB. If the journal size is 30MB or more, proceed with truncating the file.
NOTE: To convert the Hex value to Decimal, open the Calculator app in Windows then choose View menu. Select Programmer then choose Hex. Type the Hex value then choose Dec.
b. Type fsutil usn deletejournal /D /N Y: then hit Enter to delete the journal. Type fsutil usn createjournal m=1500 a=1 Y: to recreate the journal having the new log size value.
a. Type icacls Y: /restore %systemdrive%NTFSp.txt /c /t in the Command Prompt. Check if the files were successfully processed before proceeding. If you see a message saying some files failed while processing, this is normal since some of the files have already been deleted before performing a backup. However, if there are no successful files indicated, the command was not properly executed.
b. Type icacls . /grant system:f /t then hit Enter to adjust the ACL back to System. Now, you can set the owner of the drive by typing icacls Y: /setowner “SYSTEM” /t /c then press Enter.
c. Check if the device’s SRP now has enough free space by going back to Disk Management and refreshing the data. If the SRP already has sufficient space, you can now remove the drive letter. Right-click on the System Reserved Partition then choose Change Drive Letter and Paths. Select the Y: drive then choose Confirm deleting the drive letter by clicking OK.
This method makes a larger, but temporary, increase in the SRP free space.
1. Be sure you have an external drive having at least 250 MB free space and formatted as NFTS.2. Open Run by pressing the Windows key + R. Type mscthen to choose the Recovery Partition. Right-click on it then choose Change Drive Letter and Paths.
3. Select Add then type Y for the drive letter, click
4. Click on the Start screen then type cmd in the search bar. In the results, right-click on Command Prompt then choose Run as administrator. The command prompt window will appear.
5. Switch to another drive by typing Y: in the command prompt. Once you’re in the drive Y, type takeown /d y /r /f .
NOTE: Ensure that space and period after “f” are included in order for the command to work properly.
 Netflix was one that made streaming service standard and even after some stumbles even today it is still a respected service.
So in that spirit, we are bringing you the list of all new and old movies and TV series releasing to NETFLIX this September.
Netflix was one that made streaming service standard and even after some stumbles even today it is still a respected service.
So in that spirit, we are bringing you the list of all new and old movies and TV series releasing to NETFLIX this September.
TranslationBuddy is a browser extension developed by MindSpark Inc. for Google Chrome. This extension allegedly offers users the ability to translate any text to any language. From the Author: Now enjoy immediate access to the FREE web, email, and text translations, Multilanguage Virtual Keyboards, words of the day, and more! This extension configures your New Tab page to TranslationBuddy™ to provide these features.
 The true cause is that there is no working Border Gateway Protocol (BGP) routes into Facebook's sites. BGP is the standardized exterior gateway protocol used to exchange routing and reachability information between the internet top-level autonomous systems (AS). Most people, indeed most network administrators, never need to deal with BGP.
Cloudflare VP Dane Knecht was the first to report the underlying BGP problem. This meant, as Kevin Beaumont, former Microsoft's Head of Security Operations Centre, tweeted,
"By not having BGP announcements for your DNS name servers, DNS falls apart = nobody can find you on the internet. Same with WhatsApp btw. Facebook has basically de-platformed themselves from their own platform."
Many people are very annoyed by this and with the fact that they cannot use their social media platforms but it seems that Facebook employees are in even bigger annoyance as it was reported that Facebook employees can't enter their buildings because their "smart" badges and doors were also disabled by this network failure. If true, Facebook's people literally can't enter the building to fix things.
Reddit user u/ramenporn, who claimed to be a Facebook employee working on bringing the social network back from the dead, reported, before he deleted his account and his messages:
"DNS for FB services has been affected and this is likely a symptom of the actual issue, and that's that BGP peering with Facebook peering routers has gone down, very likely due to a configuration change that went into effect shortly before the outages happened (started roughly 1540 UTC). There are people now trying to gain access to the peering routers to implement fixes, but the people with physical access is separate from the people with knowledge of how to actually authenticate to the systems and people who know what to actually do, so there is now a logistical challenge with getting all that knowledge unified. Part of this is also due to lower staffing in data centers due to pandemic measures."
Ramenporn also stated that it wasn't an attack, but a mistaken configuration change made via a web interface.
Both BGP and DNS are down, the "connection to the outside world is down, remote access to those tools don't exist anymore, so the emergency procedure is to gain physical access to the peering routers and do all the configuration locally."
Technicians on site don't know how to do that and senior network administrators aren't on site.
It seems that it will all be down for a couple of more hours before the issue is resolved.
The true cause is that there is no working Border Gateway Protocol (BGP) routes into Facebook's sites. BGP is the standardized exterior gateway protocol used to exchange routing and reachability information between the internet top-level autonomous systems (AS). Most people, indeed most network administrators, never need to deal with BGP.
Cloudflare VP Dane Knecht was the first to report the underlying BGP problem. This meant, as Kevin Beaumont, former Microsoft's Head of Security Operations Centre, tweeted,
"By not having BGP announcements for your DNS name servers, DNS falls apart = nobody can find you on the internet. Same with WhatsApp btw. Facebook has basically de-platformed themselves from their own platform."
Many people are very annoyed by this and with the fact that they cannot use their social media platforms but it seems that Facebook employees are in even bigger annoyance as it was reported that Facebook employees can't enter their buildings because their "smart" badges and doors were also disabled by this network failure. If true, Facebook's people literally can't enter the building to fix things.
Reddit user u/ramenporn, who claimed to be a Facebook employee working on bringing the social network back from the dead, reported, before he deleted his account and his messages:
"DNS for FB services has been affected and this is likely a symptom of the actual issue, and that's that BGP peering with Facebook peering routers has gone down, very likely due to a configuration change that went into effect shortly before the outages happened (started roughly 1540 UTC). There are people now trying to gain access to the peering routers to implement fixes, but the people with physical access is separate from the people with knowledge of how to actually authenticate to the systems and people who know what to actually do, so there is now a logistical challenge with getting all that knowledge unified. Part of this is also due to lower staffing in data centers due to pandemic measures."
Ramenporn also stated that it wasn't an attack, but a mistaken configuration change made via a web interface.
Both BGP and DNS are down, the "connection to the outside world is down, remote access to those tools don't exist anymore, so the emergency procedure is to gain physical access to the peering routers and do all the configuration locally."
Technicians on site don't know how to do that and senior network administrators aren't on site.
It seems that it will all be down for a couple of more hours before the issue is resolved. Each time when you press WINDOWS + PrtScn key on your keyboard a screenshot is taken and saved on your Hard drive, to be more precise, it is saved in a specific folder which is in c:\Users\Your user name\Pictures\Screenshots. Now, this specific location is not anything that's bad but it is a little deep and not so user-friendly for quick access.
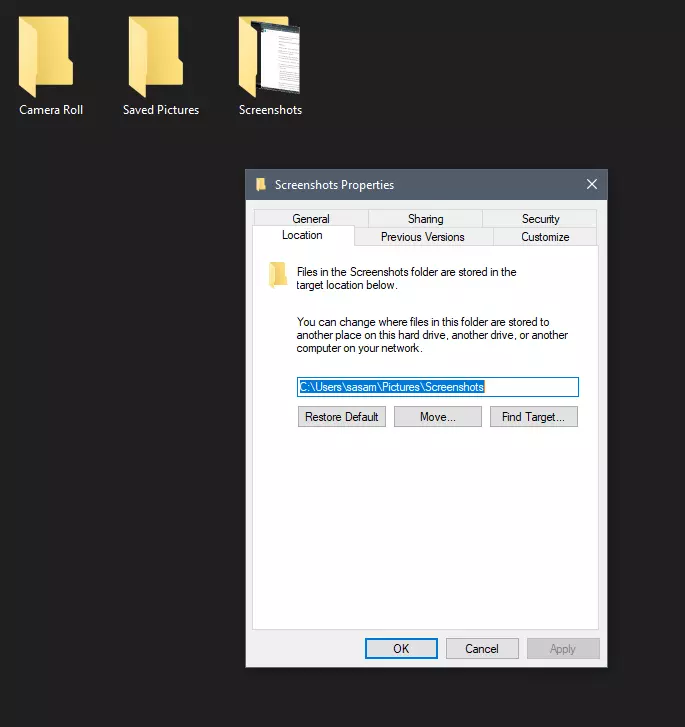
Luckily this default location can be changed into any folder that you like.
First thing is to open File Explorer and then navigate to your PC. Once you go to your PC, go to Pictures, and inside right-click on the Screenshots folder. If there is no screenshots folder inside, this means that since Windows was installed no screenshots were taken with WINDOWS + PrtScn key combination. Please note that just by pressing PrtScn you will create a screenshot but you will place it inside the clipboard ready to be pasted somewhere, with WINDOWS + PrtScn you are saving the screenshot directly in a file on your hard drive.
So once you clicked on the Screenshots folder, go to the bottom and click on properties. Inside properties go to the Location tab. In the location, tab clicks on MOVE and browse to your new location where you would like screenshots to be saved. Once you select the folder for screenshots, click on the Select Folder button and confirm with OK. After this, Windows will ask you would you like to move existing screenshots into the chosen folder. Click YES or NO, depending on your preference.
After this easy setup, all of your new screenshots will be placed now inside the chosen folder.
Thank you for reading and I hope to see you tomorrow. Take care.