So, you have finished with work, game, movie, music, email, or whatever on your PC, you look at the clock, it is late, you decide to go to sleep or outside, you click on the power button and choose shutdown. Now when a PC is shut down you feel good and go with your business but the next time you power it up you get the same error like the computer never really shut down in the first place. You wonder why and reboot it, just in case and all of the sudden error is gone.
If something similar has happened to you or you had the feeling that after shutting down your computer has not really felt like shutting it down, do not seek professional help, everything is OK with you because when you click on shut down, your computer does not really shut down!
Truth is that Microsoft has changed how to shut down works and how rebooting works in Windows with an update but has not publicly said anything about it so some users may experience this feeling of not shutdown phenomenon and might even think there is something wrong with their PC.
Why this change?
A few years ago shutdown button and option in Windows were really shutting down OS, but things changed when Microsoft wanted to increase boot-up speed. Now when that decision was made shutdown option was changed. So, what was changed? Well in order to increase Windows booting time, the shutdown will now turn off power to PC components and it will look like everything is indeed shutdown but the Windows kernel will actually be saved to a hard drive with all settings and just awaken once the PC is turned back ON. This will result in all errors and other stuff being just still present same as they were once the system was instructed to be turned off.
Rebooting your PC will now clear kernel and file from the hard drive and you will get a clean system startup without any issues tied with the kernel itself.
Workaround
Now that we know why and what change has been made to Windows logical question is can we shut down our PC at all properly? Luckily for us, the answer is yes and we will not need any external application to do it, we can still do it inside Windows itself and it is quite quick and easy.
Bringing back the old shutdown
In order to bring the old shutdown functionality of your PC please follow the instructions but be aware that by doing this your PC will boot a little bit slower since it will have to load the kernel from scratch each time computer is turned ON.
First thing is to go to settings and go to System
Then once you are inside the system, navigate to the power and sleep and click on it to select it. Once you have it selected to all the way to the right and click on additional power settings.
When you click on advanced power settings you should be led to the control panel's power options. Inside this panel click on top left link where it says Choose what the power button does.
Inside options, you will need to untick the box next to Turn on fast startup (recommended), this option has been ticked ON by the Windows update and probably without notifying you. Option means exactly what was described, it will save kernel state on the hard drive for faster boot time but sadly it can cause some issues since it will never be reloaded from 0.
If you are unable to uncheck the box click on the text beside the shield icon that says: Change settings that are currently unavailable (you will have to be logged in as administrator).
Conclusion
Altho turning off fast startup and shutting down the PC completely will for sure extend your bootup time I still believe that it is the right choice since sometimes a lot of clutter and bad things accumulate over time inside the OS and can cause a vast variety of problems in a long run. So stay safe and shut down that PC as it used to be in the past.
In case you don’t know, Windows now comes with an all-new Light Mode theme which gives a light accent color to the Taskbar, Start, and Notification Area. Aside from that, it also brings new improvements and features. This new theme is somewhere between dark and completely white and in this post, you will be guided on how you can enable this new feature in your Windows 10 computer.
Although the Light Mode sure looks stunning and a lot of users love it, it actually switches all the apps plus the Taskbar and Start Menu to the light mode which was not the case before. In addition, the icons in the system tray area, as well as the notification center, are also inverted. To resolve that, there are several ways you can customize the light mode theme as well as activate it in the Windows 10 v1903. How? Refer to each one of the options given below.
Option 1 – Via Theme settings
Windows 10 brought a new theme called “Windows (Light)” which will enable the light mode automatically and will set the accent colors to automatic. This will also apply the new Windows 10 wallpaper on your desktop. To enable Windows (Light), all you have to do is right-click on the desktop and select Themes from the left menu. After that, select the Windows (Light) option under the Change Themes section. This will apply to the Windows (Light) mode.
Option 2 – Via Color settings
The second and more customizable way to activate the light mode is via Settings. Aside from the Light and Dark, Windows also introduced a Custom color option which allows you to decide the default Windows and App mode independently. To enable Light mode via Settings, refer to the steps below.
First, open Settings and go to Personalization.
After that, select “Colours” from the left menu.
Next, select Light under the “Choose your color” section to activate the light mode in Windows 10. This will activate light mode all over your computer.
Note: If after activating light mode, you find that you don’t like it and you want to keep things as they were before (Light App Mode and Dark Windows Mode), you can achieve that using the Custom option. All you have to do is select Custom from the drop-down menu to decide the default Windows and app mode independently. After that, select light under the default app mode and dark under the default Windows mode so that you can keep things as they were before the update. On the other hand, you can also try the opposite version of the light Windows mode and Dark app mode since Windows increased the level of customizability which allows users to use an option of a completely light mode.
Location services is a built-in tool in Windows 10 is a useful tool that offers users location information even when your laptop or desktop computer does not have a GPS since it uses Wi-Fi positioning as well as your device’s IP address. However, there are instances when you might encounter some problems when using this service. One instance is when you suddenly find the toggle button for Location service greyed out.
This kind of program could be due to some glitch in the system or some third-party application on your computer. Because of this problem, you won’t be able to toggle the Location service on or off and you won’t be able to make any changes in its settings. Worry not, for this post will guide you on what you can do to fix the greyed-out toggle button of Location services in Windows 10.
Before you perform some troubleshooting steps, you might want to restart your computer and see if it fixes the problem. If it didn’t, then this problem is not just some minor glitch. Thus, you have to follow the potential fixes provided below to fix the problem but before you do that, make sure that you create a System Restore point first. After that, follow each one of the following options.
Option 1 – Put your PC in a Clean Boot State
The first thing you can do to resolve the problem is to put your computer in a Clean Boot State. It could be that there is a third-party program that’s preventing the toggle button from functioning. To isolate this possibility, you need to put your computer in a Clean Boot State.
Log onto your PC as an administrator.
Type in MSConfig in the Start Search to open the System Configuration utility.
From there, go to the General tab and click “Selective startup”.
Clear the “Load Startup items” check box and make sure that the “Load System Services” and “Use Original boot configuration” options are checked.
Next, click the Services tab and select the “Hide All Microsoft Services” check box.
Click Disable all.
Click on Apply/OK and restart your PC. (This will put your PC into a Clean Boot State. And configure Windows to use the usual startup, just simply undo the changes.)
Now check if you can now use the toggle button of the Location service or not.
Option 2 – Try to use the Registry Editor
If putting your computer in a Clean Boot state didn’t fix the problem, you might want to make some adjustments in the Windows Registry via Registry Editor.
Tap the Win + R keys to open the Run utility and type “regedit” in the field and then tap Enter to open the Registry Editor.
After that, navigate to this registry path: HKEY_LOCAL_MACHINESYSTEMCurrentControlSetServiceslfsvcTriggerInfo
From there, select the Key (folder) named as “3” and right-click on it, and then delete it.
Once done, exit the Registry Editor and restart your computer.
Option 3 – Try to use the Windows Services Manager
Tap the Win + R keys to open the Run dialog box and type “services.msc” in the field and hit Enter to open the Services Manager.
Next, look for the “Geolocation Service” entry from the list of services.
Once you find it, right-click on it and select Properties. This will open a new mini window.
From there, make sure that it is “Running” and its Startup Type is set to “Automatic”.
After that, close the Services Manager and check if the problem is now resolved.
Option 4 – Try to use the Group Policy Editor
Tap the Win + R keys to launch Run and type “gpedit.msc” in the field and click OK to open the Group Policy Editor.
After that, navigate to this path: Administrative TemplatesWindows ComponentsLocation and Sensors
Next, double click on each one of the following settings and select the “Not configured” or “Disabled” option.
Turn off location scripting
Turn off location
Turn off sensors
Once done, navigate to this path: Administrative TemplatesWindows ComponentsLocation and SensorsWindows Location Provider
From there, double click on the “Turn off Windows Location Provider” policy setting and set its configuration to either “Disabled” or “Not configured”. You should see the following description of the policy setting in the window:
“This policy setting turns off the Windows Location Provider feature for this computer. If you enable this policy setting, the Windows Location Provider feature will be turned off, and all programs on this computer will not be able to use the Windows Location Provider feature. If you disable or do not configure this policy setting, all programs on this computer can use the Windows Location Provider feature.”
Socket Error 10060 is a typical Outlook Express error. This error often occurs when the connection to the server fails. It specifically refers to a timeout while communicating with the email providers servers.
The vast majority of all emails use SMTP for outgoing mail. Socket error 10060 in most instances is related to the SMTP settings for the user’s email.
The error message is sometimes displayed in the following format:
Outlook Express Socket Error10060 - The connection to the server failed Account:’ your account’
Another thing you must know about this error is that it only stops the user from sending emails. This means that you can only receive emails, not send them.
Solution
Error Causes
The cause of this error code is hard to narrow down typically because there are many causes that can trigger the socket error code 10060. Some of the most common causes of this error code are:
Issues in email settings
Authentication settings
Firewall settings
Malware
Though this is not a critical error code it is advisable to fix it immediately without any delays.
This error can hamper your communication via email and slow down your work productivity especially if you use Outlook for communication across the organization.
Further Information and Manual Repair
Here are some of the many methods to fix and resolve this error code. To help you resolve this issue, we have selected and listed down the best, quick, and easy do-it-yourself methods. Try them and repair Socket error code 10060 all by yourself without any professional assistance.
Method 1 - Check the Names of POP3 and SMTP Servers
To begin with, first check the names of the POP3 and SMTP servers to ensure that they are correct. Then check the outgoing SMTP port. Contact your email provider to determine the correct settings.
Sometimes email providers change this value more than any other in their individual settings. Get it verified. Change the settings if needed.
Method 2 - Outgoing SMTP Server Requires Authentication
Sometimes the error code may occur due to authentication issues. If this is the reason then, don’t worry it is easy to fix. Simply go to the settings options and check the box ‘My server requires authentication’.
Once you check the box, try sending the email again. This is most likely to resolve the socket error 10060 on your PC.
Method 3 - Disable Firewall
Your Firewall security may sometimes be the reason for socket error 10060 too. Therefore if after trying method 1 and 2, the error still persists, then it is advisable to disable firewall.
Once you disable it, try sending an email using your Outlook account. If it works, the error is resolved.
Method 4 - Scan for Malware
There is a possibility that the Socket error 10060 is popping on your PC due to malware infection. If so, then it is advisable to download Restoro.
This is a highly functional and a user-friendly PC fixer deployed with a powerful antivirus and several other scanners. Run it on your PC to scan for malware. It detects and removes all types of malware including Trojans, viruses, adware, spyware, and more in seconds.
Click here to download Restoro to resolve socket error 10060 on your system today.
NDIS or Network Driver Interface Specification is a programming interface for the network interface cards that aids in the proper functioning of a system driver in a computer network. The NDIS helps the computer system in order to communicate with other connected devices and hardware components on a computer network. In relation, the ndis.sys file is a critical system file developed by Microsoft for the Windows operating system. As you know, sys files or system files are important parts of the Windows operating system as well as a repository of system driver settings used by Windows to communicate with the connected hardware and devices.
The ndis.sys files are stored mostly in a driver folder at C:/Windows/System32/drivers and as mentioned, these files are essential for the system to function properly. Although the presence of ndis.sys system file is not yet known to affect the normal functioning of the Windows OS, some of the Windows 10 users reported that they encountered ndis.sys blue screen errors on their PCs. Blue Screen of Death errors or Stop errors usually occurs when you open a program or a function. Moreover, it could also occur when the driver gets loaded during the system startup or during system shutdown.
It isn’t yet clear what really causes the ndis.sys blue screen error. However, like other Stop errors, it may occur due to corrupted files, misconfigured device drivers, bad drivers, corrupted Windows Registry, missing or damaged system files, and malicious programs. Aside from the aforementioned reasons, the ndis.sys blue screen error might also occur if your hard disk is damaged and if the RAM is corrupted. In such cases, a lot of users usually disable the ndis.sys file. However, it won’t really resolve the issue since the file is required for the normal functioning of the operating system and even when you disable the file, it’s pretty useless as the file will start all over again. In addition, you might want to disable security programs or firewalls and antivirus programs in the meantime to check if these programs are the ones that are causing the error. And if you’ve determined that none of the security programs or firewalls and antivirus programs are to blame, refer to the options below that might help you resolve the DRIVER_IRQL_NOT_LESS_OR_EQUAL or ndis.sys Blue Screen of Death error.
Option 1 – Try to update or reinstall the PC device driver
The Ndis.sys Blue screen error can occur when the device driver in your computer is outdated or corrupted. Thus, you either have to update or reinstall it to fix the issue.
Tap the Win + R keys to launch Run.
Type in devmgmt.msc into the box and tap Enter or click OK to open the Device Manager.
After that, a list of device drivers will be displayed. If you see a red or yellow sign that shows up against the driver, right-click on the driver’s name and select “Update Driver Software” or “Uninstall”. And if you find any “Unknown device”, you need to update it as well.
Select the “Search automatically for updated driver software” option and then follow the instructions to complete the process.
Restart your PC.
Option 2 – Rollback your Network drivers
If you have updated the driver software as of late and you suddenly got this BSOD error, you might have to roll back the device driver – in other words, switch back to the previous working version. To do that, follow these steps:
Tap the Win + R keys to launch the Run window and then type in the “devmgmt.msc” command and hit Enter to open the Device Manager window.
Under the Device Manager, you will see a list of drivers. From there, look for the Network Adapters and expand it.
Next, select the driver entries that are labeled appropriately other than anything in the context of the WAN Miniport.
Then select each one of them and double-click to open a new mini window.
After that, make sure that you’re on the Driver tab and if you are not, just navigate to it then click the Roll Back Driver button to switch back to the previous version of your Network adapters.
Now restart your computer to successfully apply the changes made.
Option 3 – Try running the System File Checker
The SFC or System File Checker scan could detect and automatically repair damaged system files that could be causing the ndis.sys Blue Screen of Death error. SFC is a built-in command utility that helps in restoring corrupted files as well as missing files. It replaces bad and corrupted system files with good system files. To run the SFC command, follow the steps given below.
Tap Win + R to launch Run.
Type in cmd in the field and tap Enter.
After opening Command Prompt, type in sfc /scannow and hit Enter.
The command will start a system scan which will take a few whiles before it finishes. Once it’s done, you could get the following results:
Windows Resource Protection did not find any integrity violations.
Windows Resource Protection found corrupt files and successfully repaired them.
Windows Resource Protection found corrupt files but was unable to fix some of them.
Option 4 – Try running the CHKDSK utility
Running the CHKDSK utility might also help you resolve the Netwtw04.sys failed BSOD error. If your hard drive has issues with integrity, the update will really fail as the system will think that it’s not healthy and that’s where the CHKDSK utility comes in. The CHKDSK utility repairs hard drive errors that might be causing the problem.
Open Command Prompt with admin privileges.
After opening Command Prompt, execute the following command and hit Enter:
chkdsk /f /r
Wait for the process to be completed and then restart your computer.
Option 5 – Run the DISM Tool
The DISM tool is another command-line tool in the Windows operating system that could help users fix various corrupted system files. To use it, follow these steps:
Open the Command Prompt as admin.
Then type in this command: DISM /Online /Cleanup-Image /RestoreHealth
The DISM command you entered will repair the corrupted system image. Do not close the window if the process takes a while as it will probably take a few minutes to finish.
Restart your PC.
Option 6 – Perform a System Restore
Performing a System Restore on your computer can also help you fix the ndis.sys Blue Screen of Death error. You can do this option either by booting into Safe Mode or in System Restore. If you are already in the Advanced Startup Options, just directly select System Restore and proceed with the next steps. And if you have just booted your PC into Safe Mode, refer to the steps below.
Tap the Win + R keys to open the Run dialog box.
After that, type in “sysdm.cpl” in the field and tap Enter.
Next, go to the System Protection tab then click the System Restore button. This will open a new window where you have to select your preferred System Restore point.
After that, follow the on-screen instructions to finish the process and then restart your computer and check if the problem is fixed or not.
If you got an error message saying, “Windows could not start the Windows Update service on Local Computer, Error 87. The parameter is incorrect” while you were trying to start the Windows update service on your computer, then this post could help you resolve the problem. Along with this error, you might also get any of these error codes such as 0x80240034, 0x80244019, 0x80070643, and so on. Aside from these error codes, you will also notice that the Windows Update service has been stopped.
To fix this issue, here are a couple of suggestions that might help but before you go on, you need to create a System Restore point first.
Option 1 – Try checking Services Dependencies
Dependencies of a Windows Service in Windows 10 are when windows services depend on other services. Such is the case with the Windows Update service – it also depends on three different services such as the Remote Procedure Call or RPC service, DCOM Server Process Launcher, and the RPC Endpoint Mapper. Meaning to say, if two of these services are not working as expected, then the dependant service will also be affected. This could be the reason why the Windows Update service could not start.
Tap the Win + R keys to open the Run dialog box.
Next, type “services.msc” in the field and hit Enter to open Windows Services.
From the list of Services, look for the following services:
Remote Procedure Call (RPC) Service
DCOM Server Process Launcher
RPC Endpoint Mapper
After you find these services, double click on each one of them and check whether the Startup type for all is set to Automatic and the Service status is set to Running or not.
If the service status is not running, then click the Start button. Afterward, check if you can now run the Windows Update service.
Option 2 – Check the Background Intelligent Service and the Cryptographic Service
Tap the Win + R keys to open the Run dialog box.
Next, type “services.msc” in the field and hit Enter or click OK to open Services.
From the list of Services, look for the following services and make sure that their Startup type is as follows:
Background Intelligent Transfer Service – Manual
Cryptographic Service – Automatic
After that, check if the Service status of the listed services above is set to Running. If they’re not, click on the Start button to start these services and then check if you can now enable the Windows Update service or not.
Option 3 – Reset Windows Update components
If the first two options did not work then you might want to reset the Windows Update components manually. Follow the steps below to reset them.
Open Command Prompt with admin privileges.
After that, type each one of the following commands and hit Enter after you key in one after the other.
net stop wuauserv
net stop cryptsvc
net stop bits
net stop msiserver
Note: The commands you entered will stop the Windows Update components such as Windows Update service, Cryptographic services, BITS, and MSI Installer.
After disabling WU components, you need to rename both the SoftwareDistribution and Catroot2 folders. To do that, type each one of the following commands below, and don’t forget to hit Enter after you type one command after the other.
Next, restart the services you’ve stopped by entering another series of commands. Don’t forget to hit Enter after you key in one command after the other.
net start wuauserv
net start cryptsvc
net start bits
net start msiserver
Close Command Prompt and reboot your PC.
Option 4 – Run the Windows Update Troubleshooter
If resetting the Windows Update components didn’t work, you could also try running the Windows Update Troubleshooter as it could also help in fixing any issues related to Windows Update including this one. To run it, go to Settings and then select Troubleshoot from the options. From there, click on Windows Update and then click the “Run the troubleshooter” button. After that, follow the next on-screen instructions and you should be good to go.
Option 5 – Try removing a value from the Windows Registry
If running the Windows Update troubleshooter didn’t help and you receive a message instead saying, “Service Registration is Missing or Corrupt”, you can try to remove a value from the Windows Registry.
Tap the Win + R keys to open the Run dialog box.
Then type “Regedit” in the field and hit Enter to open the Windows Registry.
Next, navigate to this path: HKEY_LOCAL_MACHINESOFTWAREMicrosoftWindowsSelfHostApplicability
From this path, look for a value named “ThresholdOptedIn” and if you find it, delete it.
Exit the Registry Editor and see if you can now enable the Windows Update service.
This post will guide you in fixing the (1058) ERROR_SERVICE_DISABLED error you can encounter when trying to launch various games. Usually, this error pops up during startup and prevents you from running the game. In fact, this error has become quite a headache for many users. Some of the games it affects are Smite, Paladins, Far Cry, and many more.
In most cases, this error is caused by missing or corrupted game files. It could also be caused by the anti-cheat utility you might have installed along with your games. Whichever the cause is, you can try to check out the possible fixes given below to resolve the (1058) ERROR_SERVICE_DISABLED error.
Option 1 – Verify the Integrity of the Game files
This is the first option you can try no matter what kind of issues you are having with Steam games.
Double click on the game’s icon located on your Desktop and then go to the Library tab in the Steam window.
From there, look for GTA V from the list of games installed in your library.
Next, right-click on its entry and select Properties.
After that, navigate to the Local Files tab and click the “Verify Integrity of Game Files” button.
Now, wait for the tool to complete checking the game’s integrity. You should see that some of the files may have been downloaded.
Reopen the game and see if it now runs properly without crashing.
Option 2 – Apply some tweaks in the Service’s startup settings
As pointed out earlier, the error can also occur due to the anti-cheat tools that were installed alongside the game. These tools are usually used by games to check if you are running something which might give you an unfair advantage over other players. These anti-cheat tools include but are not limited to BattlEye, EasyAntiCheat, and PunkBuster. The error might occur if the service’s startup settings are not correctly configured which is why you can apply some tweaks in order to resolve the problem.
Tap the Win + R keys to open the Run dialog box.
Next, type “services.msc” in the field and hit Enter or click OK to open Services.
From the list of Services, look for any of the services mentioned above such as BattlEye, EasyAntiCheat Service, or PunkBuster Service. Then right-click on the service and select Properties from the context menu.
After that, check if the service is started by checking the Service status. If it is started, click on the Stop button to stop the service and if it is already stopped, leave it as it is, at least for now.
Next, make sure that the Startup type menu in the Service’s properties is set to Automatic before you go on.
Now confirm any dialog boxes that may appear as you set the Startup type and then click on the Start button located in the middle before you exit Properties.
Note: You might get the following error message when you click on the Start button:
“Windows could not start the service on Local Computer. Error 1079: The account specified for this service differs from the account specified for other services running in the same process.”
If you got the error message above, then here’s how you can fix it:
Tap the Win + R keys to open the Run dialog box.
Next, type “services.msc” in the field and hit Enter or click OK to open Services.
From the list of Services, look for any of the services mentioned above such as BattlEye, EasyAntiCheat Service, or PunkBuster Service. Then right-click on the service and select Properties from the context menu.
Now go to the Log On tab and click on the “Browse…” button.
After that, type in your account’s name under the “Enter the object name to select” box and click on Check Names then wait for the name to be recognized.
Then click OK once you’re done and type in the password in the Password field when you are prompted to do so. This should resolve the issue.
Option 3 – Try reinstalling the Anti-cheat program
If the first two options did not work out, you can try reinstalling the anti-cheat program.
Open Steam from your Desktop or by searching for it in the Start menu.
After opening the Steam client, go to the Library tab in the Steam window and then look for the Rust entry from the list.
Next, right-click on the game’s icon in the library and select Properties.
Now go to the Local Files tab under Properties and click the Browse Local Files button.
From there, look for BattlEye, EasyAntiCheat, or PunkBuster folder depending on the game, and then double click on it to open the folder.
Then right-click on EasyAntiCheat_setup.exe or the BattlEye installed file in the folder or PunkBuster and select the Run as administrator option.
Exit the Steam client by clicking Steam > Exit from the menu located at the top.
Error Code 0x8007000d is a common error code that can be found on the Windows 10 Operating system, although it can also appear in previous versions of the operating system, as well.
Common symptoms include:
Inability to download new updates.
Inability to run the Update tool through to completion.
There are four basic ways to try to resolve Error Code 0x8007000d on your Windows machine. Three of these are pretty simple for even the most basic users, while the final method requires some familiarity with running commands in the Command Prompt. If you don’t feel that you have the skill or confidence to complete the steps listed below, it is generally recommended that you get in touch with a qualified computer repair technician that can assist you in error resolution.
Error Causes
The main cause for the appearance of Error Code 0x8007000d on a Windows machine is that one of the files that the Update tool uses to run one or more updates cannot be found or has experienced damage. Fortunately, there are a few things that you can try on your machine that can be used to attempt to resolve the issues at hand.
Further Information and Manual Repair
Three primary methods exist for the resolution of Error Code 0x8007000d on a Windows machine. As mentioned above, two of these methods can usually be accomplished by basic users, while the third requires some degree of familiarity with the tools associated with the Command Prompt. If you don’t feel that you have the knowledge or skill necessary to follow these steps, contact a computer repair technician to aid you.
Here are the best ways to try to resolve Error Code 0x8007000d on your device:
Method One: Use the Troubleshooting Tool from Windows Update
From the Windows Update tool, you can attempt to run a scan using the Windows Update Troubleshooter, which can try to identify the specific issue that is occurring and to fix it automatically.
Not only will this tool often fix the problem at hand, but it can also help you to avoid other errors that you may have encountered later on in the Update process. This tool should always be your starting point when you encounter an error as you attempt to download or install updates for your Windows machine.
After the tool has been run, restart your computer to apply any changes and then reopen the Update tool to reattempt installation.
Method Two: Reset Your Computer
In some cases, the missing or corrupted files may be extensive enough that you need to restore your computer to an earlier point. If you create regular backups of your information or have a past version of the software that you can install, this can help you to resolve the issue. Otherwise, you may need to restore your device to its factory settings to resolve the error.
Always make sure to backup your important files and information before you perform a reset of your device, in order to ensure that you are able to return the computer to its original state when you have finished.
Method Three: Use Command Line Tools to Resolve the Issue
One of the ways that you can try to resolve this particular error code is the use a DISM tool. This is accessed through the Command Prompt. In order to use this method, follow the steps below:
Step One: Open up the search bar in the Start Menu and type in the words “Command Prompt,” selecting it and choosing to run it as an administrator.
Step Two: Enter each of the commands below, hitting the “Enter” key when you finish each one:
exe /Online /Cleanup-image /Scanhealth
exe /Online /Clean-upimage /Restorehealth
Exit
Step Three: Attempt to run the Update program again. In some cases, you may want to restart your computer before you attempt to run the Update tool again.
If you have not been able to resolve the error code using the steps above or if you are unsure of your ability to follow these steps on your own, get in touch with a trusted computer repair professional that is familiar with the Update process and the errors associated with it.
Stop 0x00000000 error code is a type of a Stop error popularly known as a blue screen of death error code. This is a critical error.
It can pop up while loading or using the Windows program on your PC. When this error occurs, the computer screen turns blue and you, the user, get locked out of the program. Furthermore, it can also result in sudden system shut down or system freeze.
If not fixed timely, the error may start to pop up more and more frequently which then may lead to complete system corruption and system crash.
Solution
Error Causes
The two most common causes for the STOP 0x00000000 error code are:
Malware infection
Registry corruption
This is a fatal system error and must be resolved immediately. Delay may lead to system crashes and data loss. And recovering lost data is not easy.
Further Information and Manual Repair
Though this is a fatal error the good news is that it is easy to resolve. To repair the STOP 0x00000000 error on your system, here are some methods that you can try:
Method 1 - Use System Restore to Bring Your Computer Back to its Previous State
To resolve this error on your system, try using the System Restore tool. Use this tool to bring your computer back to its previous state. The Windows System Restore utility is one of the most valuable recovery tools.
To use it, simply type System Restore in the search box. Once you find it, click on it and select a restore point to bring your PC back to its normal state. To activate changes, reboot the PC.
Method 2 - Scan for Viruses
If the underlying cause of the Stop 0x00000000 error code is related to malware infection, then you must download a powerful antivirus to resolve it. Run it to scan your entire PC.
Make sure you remove all types of malware including adware, spyware, viruses, and Trojan. Once your PC is malware-free, the error will be fixed in no time.
Method 3 - Clean and Repair the Registry
The registry is an important part of the PC. It stores practically all the activities you perform on your system.
It saves all the files including both important and unnecessary files such as junk files, cookies, internet history, bad and invalid entries. If these obsolete and unnecessary files are not deleted frequently and keep on accumulating it takes up all the registry space and corrupts it.
This results in registry errors like runtime and BSoD errors and sometimes may also lead to disk fragmentation.
To resolve it is advisable to repair the registry. This can be done manually but that will take too much time and also require technical expertise. However, another way to resolve it is to download Restoro.
This is a user-friendly PC Fixer with a powerful registry cleaner. It removes all obsolete and unnecessary files, cleans the registry and repairs the damaged files, thereby removing the error right away.
Click here to download Restoro and resolve Stop 0x00000000 today!
Valve has released a big update to its online store and distribution platform Steam. Among typical bugs fixing and making the user experience a little more fluid, we have received some major updates as well. Please take note that you need to update Steam itself to the latest version in order to get new features.
Storage management Page update
The storage management page has received a complete redesign and UX overhaul and it is now much easier to manage your game libraries and create new ones. The page itself looks and feels a little console more like but thanks to that it offers a much easier and clearer look and feel.
Another thing with the Steam store management page is the ability to move installation files from one location to another. Let’s say that you have two or more hard disk drivers in your machine and that you have SSD that you use for running stuff since it is fast and larger and slower one for storage. Now you can easily and quickly move one installation from one to another in order to take advantage of your faster SSD for quicker LOAD game times without making a new installation.
Steam Download page improvements
The download page has also received some love from Valve by enabling us to now see the installation progress. So far on the download page of Steam, you would only get download progress but it has been updated to show installation progress after download as well now making it more straightforward and giving you a general idea of how much more time there is to wait in order to start gaming.
Also, you can now drag and drop items in the download bracket to reorder download orders or place them as active downloads to start downloading right away.
As more and more people get into insider preview of upcoming Windows 11 we will see more and more different takes and opinions on it.
Generally speaking, the first wave was quite positive when it was previewed but how time is passing more and more limitations and frustration comes to the surface.
Some of the limitation that is inside it, which have been confirmed by Microsoft itself includes features missing that we had in Windows 10 like moving the application to the taskbar in order to pin it, moving the file in the taskbar to open it in default application and some big annoyances like Windows opening widgets always in Edge no matter what is your default browser. Not being able to move the taskbar from the bottom is also one of many illogical things.
There is not really a point in these missing features since they were working fine in Windows 10 and many users liked them since they could customize Windows more to their liking, now with this new look at limitations it reminds me personally much of apple macOS and I will be honest, I am not a big fan of that kind of thinking.
If I wanted that kind of OS I would have gotten myself a MAC, not custom build PC, but hey, Linux is always a free alternative, and how Microsoft itself is pushing limitations and in my opinion bad design choices along with awful system requirements that might just be a case for a lot of users.
I am really not sure what is logic behind these moves and I am sure they have their reasons but this time it seems that their take on the new OS is not resonating well with the overall user population, well at least what I have heard so far. Things of course can still be changed and made for the better and I would rather see release postponed and issues addressed than getting more system hogging and limited new OS that at its current state looks like reskinned Windows 10 with limitations.


 Storage management Page update
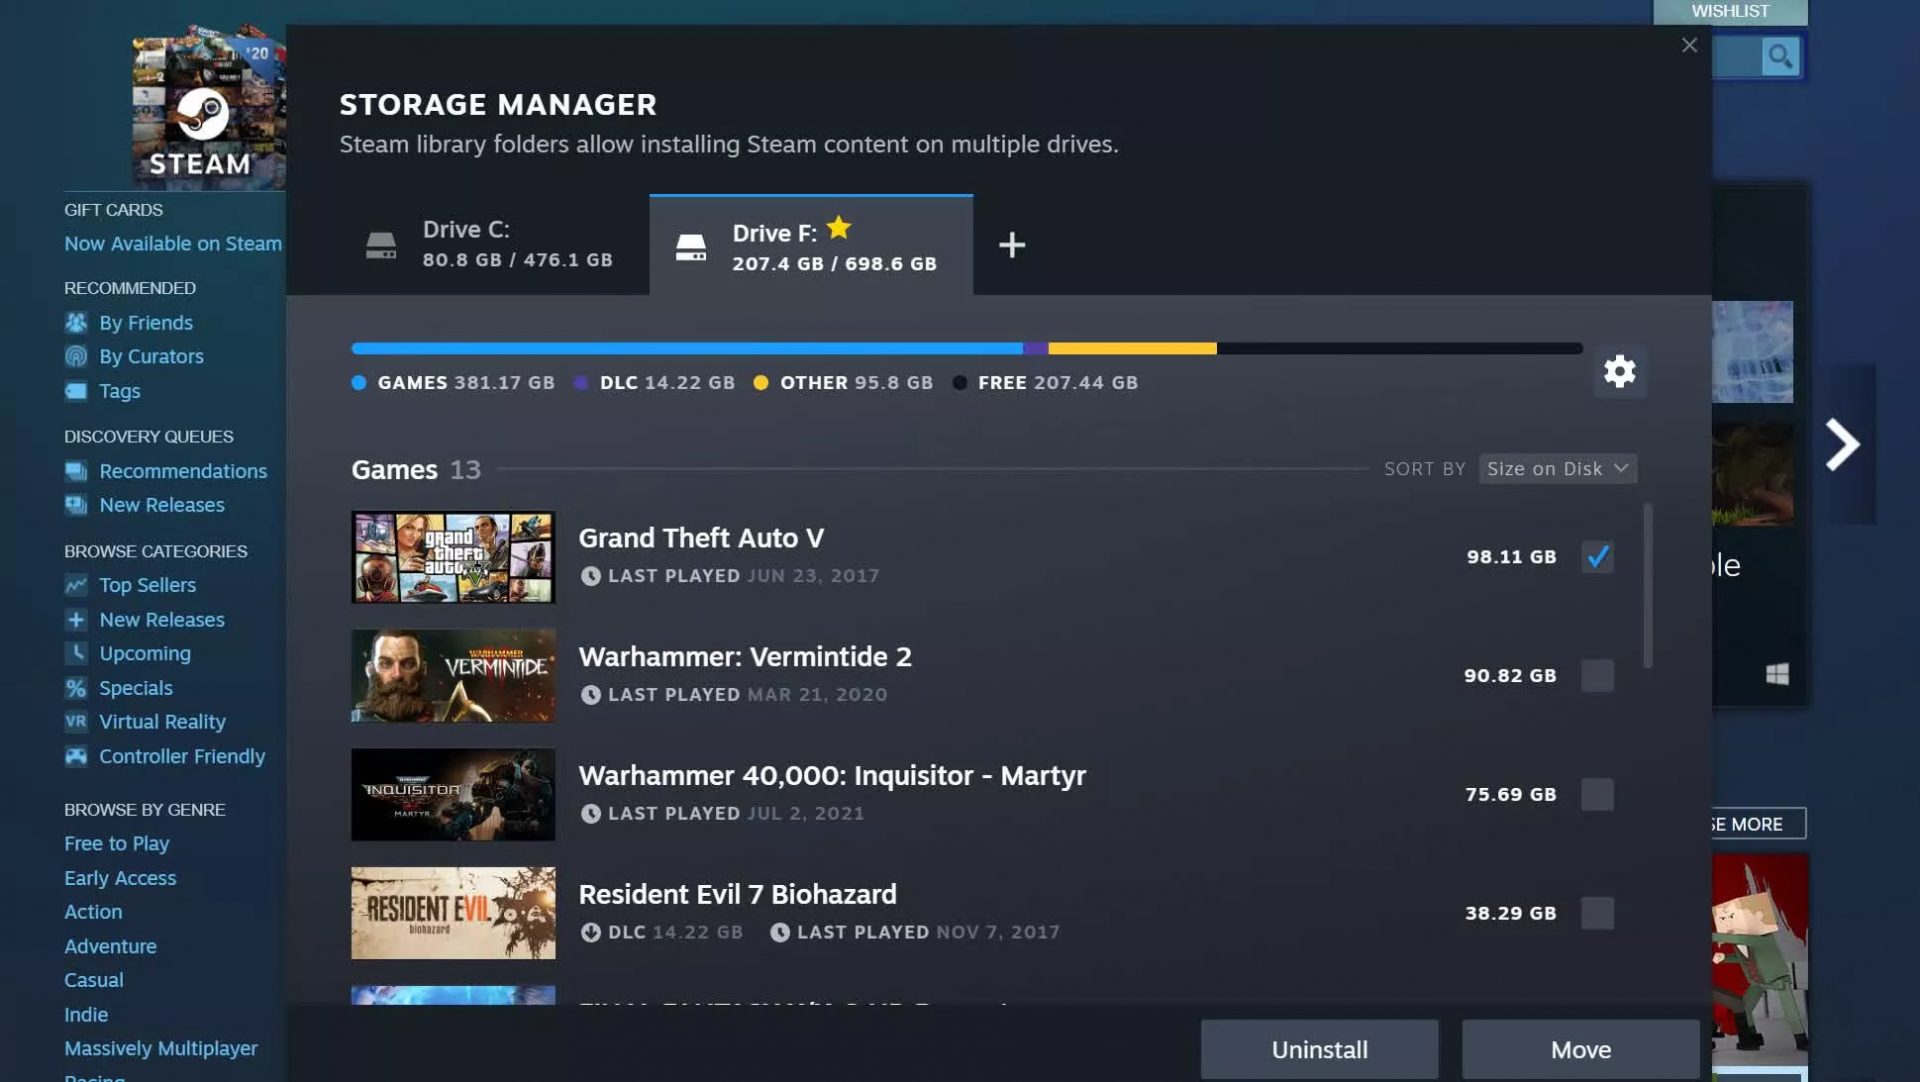 Another thing with the Steam store management page is the ability to move installation files from one location to another. Let’s say that you have two or more hard disk drivers in your machine and that you have SSD that you use for running stuff since it is fast and larger and slower one for storage. Now you can easily and quickly move one installation from one to another in order to take advantage of your faster SSD for quicker LOAD game times without making a new installation.
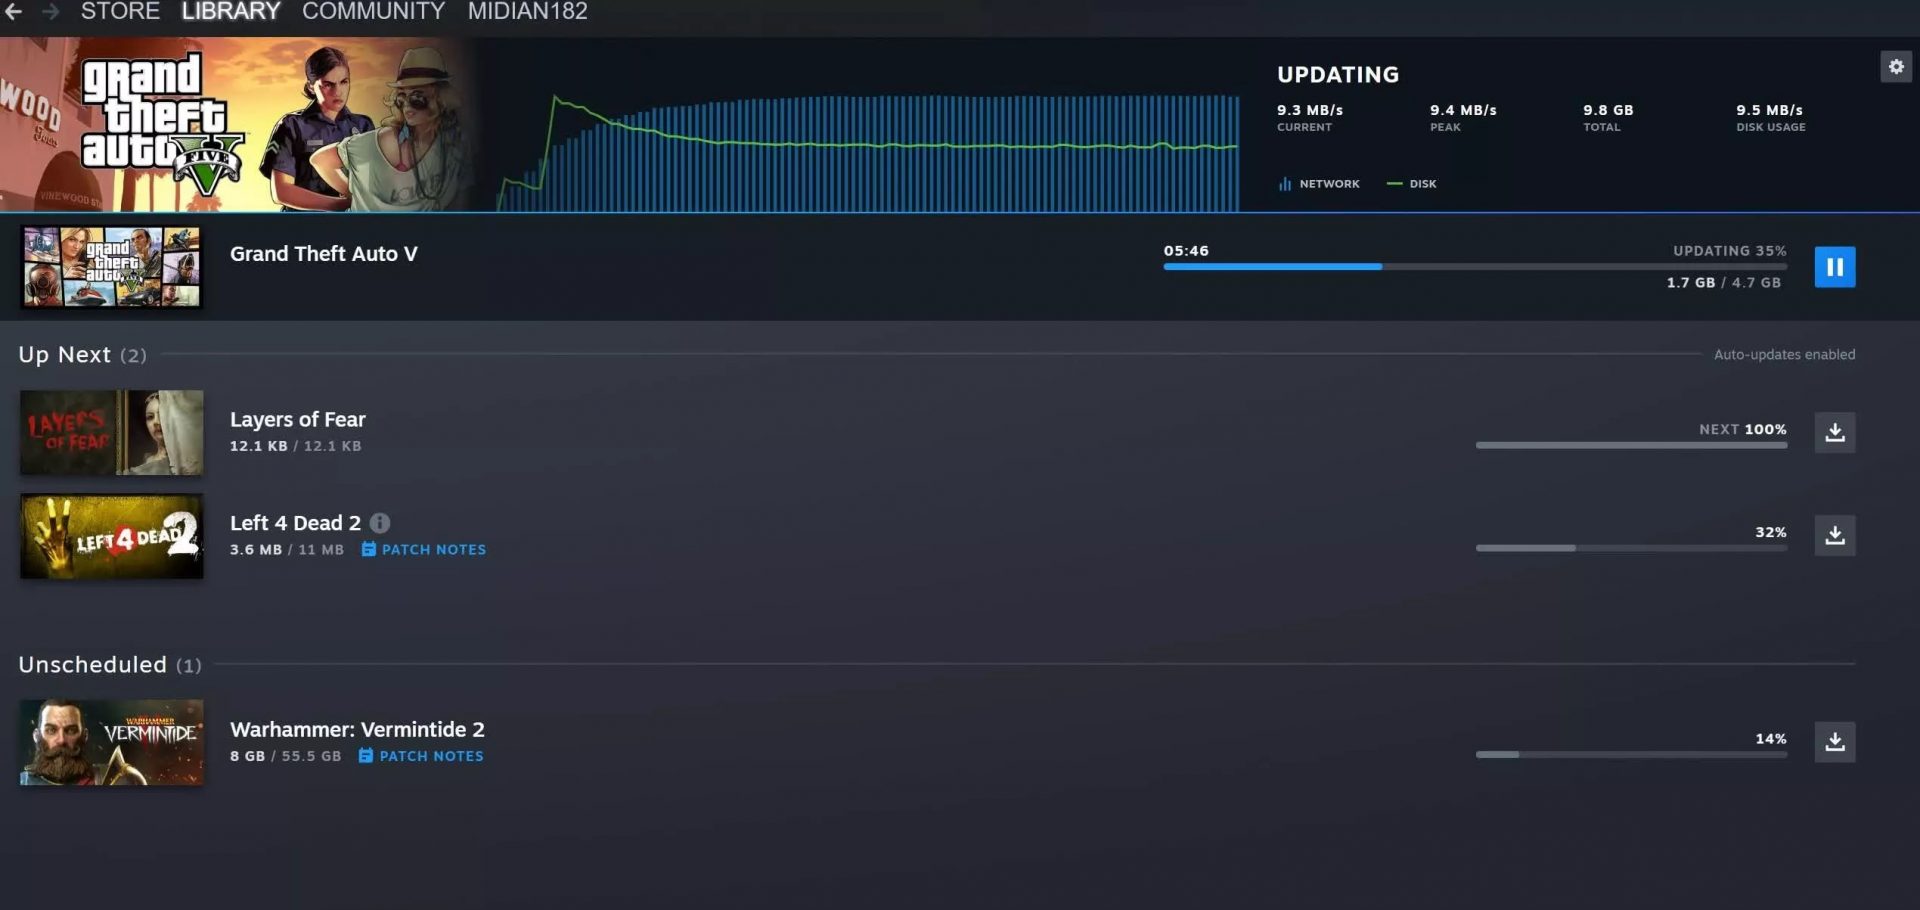 Also, you can now drag and drop items in the download bracket to reorder download orders or place them as active downloads to start downloading right away.
  As more and more people get into insider preview of upcoming Windows 11 we will see more and more different takes and opinions on it.
Generally speaking, the first wave was quite positive when it was previewed but how time is passing more and more limitations and frustration comes to the surface.
Some of the limitation that is inside it, which have been confirmed by Microsoft itself includes features missing that we had in Windows 10 like moving the application to the taskbar in order to pin it, moving the file in the taskbar to open it in default application and some big annoyances like Windows opening widgets always in Edge no matter what is your default browser. Not being able to move the taskbar from the bottom is also one of many illogical things.
There is not really a point in these missing features since they were working fine in Windows 10 and many users liked them since they could customize Windows more to their liking, now with this new look at limitations it reminds me personally much of apple macOS and I will be honest, I am not a big fan of that kind of thinking.
If I wanted that kind of OS I would have gotten myself a MAC, not custom build PC, but hey, Linux is always a free alternative, and how Microsoft itself is pushing limitations and in my opinion bad design choices along with awful system requirements that might just be a case for a lot of users.
I am really not sure what is logic behind these moves and I am sure they have their reasons but this time it seems that their take on the new OS is not resonating well with the overall user population, well at least what I have heard so far. Things of course can still be changed and made for the better and I would rather see release postponed and issues addressed than getting more system hogging and limited new OS that at its current state looks like reskinned Windows 10 with limitations.
As more and more people get into insider preview of upcoming Windows 11 we will see more and more different takes and opinions on it.
Generally speaking, the first wave was quite positive when it was previewed but how time is passing more and more limitations and frustration comes to the surface.
Some of the limitation that is inside it, which have been confirmed by Microsoft itself includes features missing that we had in Windows 10 like moving the application to the taskbar in order to pin it, moving the file in the taskbar to open it in default application and some big annoyances like Windows opening widgets always in Edge no matter what is your default browser. Not being able to move the taskbar from the bottom is also one of many illogical things.
There is not really a point in these missing features since they were working fine in Windows 10 and many users liked them since they could customize Windows more to their liking, now with this new look at limitations it reminds me personally much of apple macOS and I will be honest, I am not a big fan of that kind of thinking.
If I wanted that kind of OS I would have gotten myself a MAC, not custom build PC, but hey, Linux is always a free alternative, and how Microsoft itself is pushing limitations and in my opinion bad design choices along with awful system requirements that might just be a case for a lot of users.
I am really not sure what is logic behind these moves and I am sure they have their reasons but this time it seems that their take on the new OS is not resonating well with the overall user population, well at least what I have heard so far. Things of course can still be changed and made for the better and I would rather see release postponed and issues addressed than getting more system hogging and limited new OS that at its current state looks like reskinned Windows 10 with limitations.