A Quick Fix Guide to Resolving Xinput1_3.dll Error Code
Xinput1_3.dll - What is it?
Xinput1_3.dll is a type of dynamic link library. It is an essential component of Microsoft DirectX.
This is a technology that makes Windows OS compatible with programs rich in multimedia elements It helps your graphic card in creating a detailed virtual and stimulus environment.
Games and programs with high graphics and sounds require DirectX to form a consonance with Windows PC to run successfully.
The Xinput1_3.dll error occurs when games supported by DirectX are unable to run smoothly. This error is common on Windows 7. The error message is displayed in the following format:
"The file xinput1_3.dll is missing"
"File xinput1_3.dll not found"
"Xinput1_3.dll not found. Reinstalling might help fix this."
"Xinput1_3.DLL Not Found"
Solution
Error Causes
The causes of Xinput1_3.dll error include:
Damaged and Corrupt Xinput1_3.dll files
Missing Microsoft DirectX file
Viruses and malware on your system
Driver issues
Registry overloaded with invalid entries
If you come across this error, make sure you fix it timely.
It is recommended to do so because it not only stops you from accessing and playing your desired games and using high graphic applications but also can lead to system failure and crash if the underlying cause of the error is related to the registry.
Further Information and Manual Repair
To resolve this error code, here are some of the best do it yourself methods:
Restart Your PC
Sometimes due to minor concurrence, PC is unable to load the file Xinput1_3.dll from the directory. If this is the cause, then you are lucky. All you have to do to resolve it and restart your computer. Once the computer restarts, re-launch the program.
Install the Latest DirectX Version
Search for the latest versions of the DirectX utility version. Try extracting the Xinput1_3.dll files individually from the DirectX downloadable package on your PC. Once downloading is complete, try running your desired application again and see if the error code pops up or not.
Update the Graphics Card
Being an element of Microsoft DirectX, Xinput1_3.dll is directly related to the video/graphics card assimilated.
There can be a possibility of a mismatch between the Xinput1_3.dll file and graphic card drivers. If this is the case, then the best way to resolve the error is to update the graphic drivers by installing the latest version drivers of your video/graphics card.
Nonetheless, after trying all the solutions discussed above if the error still persists, then this triggers two things either the error is triggered by a viral infection that you are unaware of or the problem is related to the registry.
Install Restoro
Whichever might be the cause, in such as scenario the best quick fix to it is to download Restoro. This is an advanced, cutting edge, and multi functional PC repair that is deployed with several utilities including a registry cleaner, an antivirus, Active X controls, and class detector, and a system optimizer.
The registry cleaner utility removes all the unnecessary files from the registry that could be damaging the dll files and the registry. It clears the disk space, repairs dll files, and restores the registry back to normal.
Simultaneously the antivirus module scans your system for all possible malicious software. It removes viruses, Trojans, malware, spyware, and adware thereby resolving the Xinput1_3.dll error right away.
Total System Care is safe, bug-free, and has a user-friendly interface with easy navigation. It is compatible with all Windows versions.
Click here to download Restoro and resolve the Xinput1_3.dll error right away!
Do you come across this error message “Receiving’ reported error (0x800ccc92): “Your e-mail server rejected your login”? Verify your user name and password in your account properties. The server responded: - ERR invalid user names and password” when you try to send or open emails using your Outlook account?
If yes, then this article is a must-read for you as we explain why this error occurs and how you can resolve it.
To begin with, 0x800ccc92 is a common Microsoft Outlook error.
This error restricts your ability to send and receive emails on your Outlook email address. In other words, it locks you out and hampers your ability to use your account successfully causing a great deal of inconvenience especially if you use your Outlook account for communication in and across your office.
Solution
Error Causes
The 0x800ccc92 error message may occur due to numerous reasons so narrowing it down to one particular reason for occurrence is not easy. However, here we have listed down some of the most common causes of this error code:
Incorrect Outlook configuration settings
Invalid password or username
PST file crosses its fixed file size limit
Failure of POP3 and Protocol STMP in database server connection
Improper synchronization between Outlook and the server
Virus Infection
Invalid registry entries
Further Information and Manual Repair?
To fix the error code 0x800ccc92 on your system, here are some quick, effective, and easy DIY solutions that you can try:
Solution 1:
Sometimes the error code may occur due to an invalid password and usernames entry. Therefore, first, cross-check user ID and password. If you’ve entered the wrong password, try inserting the correct password to access your account.
Solution 2:
If the error still persists, then try installing the latest available Server Service Pack for Exchange. This solution works best if compatibility is the issue and the underlying reason for the error is improper synchronization between Outlook and the server.
Solution 3:
The presence of malware and viruses can also lead to such errors. Therefore, it is advisable to scan your entire PC for malware and viruses using a powerful antivirus.
Solution 4:
If the issue occurs due to bad and invalid registry entries, then it is important that you remove them right away. Due to such entries, you may experience the 0x800ccc92 error on your PC. To remove them, you need to download a registry cleaner.
Downloading two programs an antivirus and a registry cleaner separately may slow down the speed of your PC. Therefore, to ensure this does not happen it is recommended you install Restoro
Restoro is an advanced and multi-functional PC Fixer. This software is deployed with an intuitive algorithm and multiple powerful PC repair utilities including a registry cleaner, anti-virus, and a system optimizer. It is a one-stop solution for all PC-related issues.
Using this tool, you can scan your entire PC and remove all types of malicious software including malware, viruses, spyware, and Trojans corrupting your PC in seconds. Simultaneously, it also removes all bad registry keys and entries and files the damaged system file, thereby restoring the registry back to normal.
The system optimizer utility ensures your PC speed is not compromised due to the repair process.
This software is safe, bug-free, efficient, and user-friendly. It is compatible with all Windows versions.
Click here to download Restoro on your PC to instantly remove viruses and invalid registry entries to resolve the 0x800ccc92 error message on your system now!
Google Docs has cemented itself as a great free alternative to Microsoft Office Word. Most of the time people just share links to google Docs among themselves but sometimes you need to save and download files.
Luckily Google docs let you download easily files in various formats including PDF as well. In this short tutorial we will explain how can you download your Google document as a PDF file.
Saving Google Docs as a PDF
Open the Google document inside the browser and click on the File drop-down menu. In the file drop-down menu go to Download and choose PDF document. Next, choose the location where you would like your file to be saved and click on SAVE.
And that's all that needs to be done. Also, you can edit PDF files as well in google docs if you need to.
Do you often use MS-Outlook for communicating in your work environment? If so, you should be aware that all e-mails messages you send and receive, attachments, contacts, and schedule items you be, the files you create and the details you include are all stored within an Outlook Data File folder.
This includes 2 kinds of files .OST and .PST.
OST is the offline Storage Table that allows Outlook users to gain access to the e-mail account with no internet access. But this document is vulnerable to corruption.
So you need to change it into the PST (Personal Storage Table) file structure.
This document keeps data protected and saves all of the data in your view e-mail accounts including e-mails, calendar items, contact info, notifications, and accessories in your local hard drive securely.
For security and privacy purposes password protection is necessary.
How can the PST File get locked?
However, with a lot of work to do, a lot of people frequently have a tendency to overlook and easily forget the Outlook password.
This affects the user's capability to gain access to the account and execute the associated e-mail features.
That is very difficult for those who have contacts stored in it and significant e-mails which one would like to see instantly.
In this case, there is also the threat of losing the data that was significant in the long term. Sadly, Outlook will not provide an easy method without removing all of your own personal data to regain this password.
Why Should I Use Stellar Phoenix Outlook PST Repair Tool
Stellar Phoenix Outlook PST Repair tool may be the best fix software out there. It's easy to use, secure, dependable, and quick. You do not have to be a pro to use it.
In just a couple of clicks, your password can be recovered, without losing any of your crucial data, including associates contacts and e-mail communications.
This repair tool is full of special characteristics. It's compatible with most if not all variants of Windows, including 2000 and Vista, Win7, Windows 2003. Additionally, it helps fix all MS-outlook versions like 2010 and 2000, 2002, 2003, 2007.
Here is what you should do
Just click here Download and install Stellar Phoenix Outlook PST Repair tool in your computer. Run it to regain all of your data within your e-mail account and to regain your lost MS-Outlook PST File Password.
Besides assisting you to regain your PST file password, it can be utilized to solve malfunctions in the PST Files and any other associated problems. For instance, this repair tool can help to fix damaged and corrupted PST file size limit errors as well as PST files.
If you use MS Outlook 2002 version on your PC and you use it quite often and prefer not to delete emails in it, then you might come across the PST file size 2GB limit error.
This error occurs when you reach or exceed the 2 gigabytes memory limit. If this happens, your ability to send and receive emails through your MS-Outlook account is greatly hindered.
You can't add new contacts either. In instances such as these, Stellar Phoenix Outlook PST Repair Tool is useful. It helps increase the GB limit twice as much as normal.
This means that your memory limit rises from 2-4GB making Stellar PST Outlook Repair a crucial tool for all MS Outlook users.
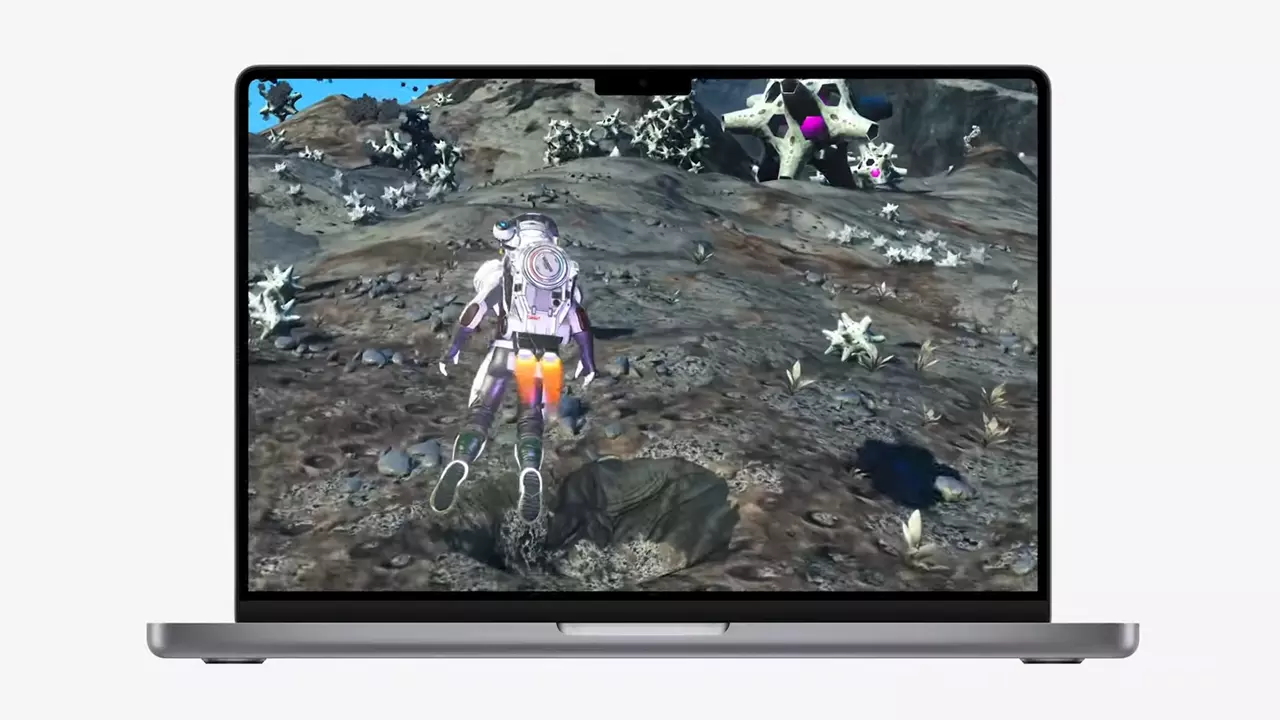
New Apple's upscaling technology called MetalFX will place iOS and macOS devices back into the gaming world. Apple had great games back in the old days and some all-time hits like the prince of Persia have been made first for apple but along the way, it just lost it.
Same as NVIDIA's DLSS and Intel's XeSS systems, Apple MetalFX also uses AI algorithms to upscale the resolution of output game frames. So, for example, the GPU inside your MAC might render the game at 1080p, but through MetalFX and AI upscaling it will look like a 4K image but have a good frame rate since it is rendered in base resolution.
The ability to make AI strike a good balance between performance and image quality is a key to technology in today's modern gaming and having this technology will help developers a ton to be able to achieve great results on Apple hardware.
The First MetalFX Games
So far three official games that will use this technology and be released natively for Appl hardware are Resident Evil 8 Village, GRID legends, and No Man's Sky. All three games have been confirmed and Resident Evil 8 Village is already sent for review people are impressed since the game can run smoothly on all Apple devices, even ones with an M1 CPU.
Apple is back into gaming
When you say Apple gaming is probably the last thing that comes to your mind but truth be told Apple makes more money from games than Microsoft, Nintendo and Sony combined. Also, Apple itself was a big player once regarding computer games as well, Myst and Prince of Persia are games that were made and have been released for Apple first. Bungie was also founded by Apple developers and Halo was originally announced as a Mac game.
Apple has been trying and pushing gaming on its platform since it kind of died down. Today all Sony, Nintendo, and Microsoft controllers work without any issues with all Apple products. Apple also has its own gaming subscription service, Apple Arcade, and its Apple TV is packed with GPU that can rival Xbox ones.
MetalFX API ties and brings it all together, it is designed to get the most performance from the hardware by minimizing overhead.
Now, computers and laptops do not hold any large numbers if we look at the user base, and that could deter developers but if we look at iPad and iPhone things are different there, much different. How same CPU power these devices and how MetalFX is available across all products it is clear that there is a market for games there. No Man's Sky is coming to iPad using these technologies and bringing full computer experience to tablets.
0x0000007B is the most common Windows stop error.
The error is displayed on the blue-colored screen which is also called the blue screen of death. You may receive a 0x0000007B error message during Windows XP setup or while running the setup program.
The message is often displayed as ‘a problem has been detected and Windows has been shut down to prevent damages’ or ‘inaccessible boot device error’.
Solution
Error Causes
The 0x0000007B error code is usually triggered by:
Poor Window XP installation
Registry corruption
Device Drivers Issues
Boot sector viruses
Further Information and Manual Repair
The 0x0000007B error makes your system vulnerable and reduces its speed significantly. And besides, you can’t run the programs smoothly on your PC either. Therefore, it’s advisable to fix the error right away.
To fix and repair the 0x0000007B error successfully, you must first understand the cause of the error. Let’s take a look at all the solutions available to fix the 0x0000007B error.
Cause: Boot Sector Viruses
Solution: If your computer is infected with boot sector viruses, then you will first have to download a powerful antivirus. After downloading the antivirus program, run it on your PC to check your computer for viruses. Delete the viruses found and click the repair option.
Sometimes even an antivirus program may fail to remove the virus and repair the system. In such cases, you must repartition and format your hard disk and also reinstall Windows XP.
Cause: Device Driver Issues
Solution: Device driver issues may occur if the boot controller is not properly configured or the driver is not up to date. If device driver configuration is the cause of the 0x0000007B error on your PC, then all you need to do is restart your PC, and while restarting press F8 to go to the advanced boot options.
Now choose the ‘Last Known Good Configuration’ option. After selecting it, boot into windows and then perform a system restore. Now go to Device Manager and perform a driver rollback to reinstall the drivers. This will resolve the configuration issues.
However, if you need an updated driver, all you need to do go on the web and download software to update the driver. It is advisable to download software from the manufacturer’s website in order to successfully update the device driver.
Cause: Poor Windows Installation
Solution: In this case, you will have to perform a Windows start-up repair. To do this: boot Windows XP from CD. Press ‘enter’ at setup Windows Screen when prompted. Then press R to repair Windows Installation.
This procedure will not delete any user data and files. In fact, it will copy only the original Windows files over the bad or existing ones.
Some of the best ways to avoid Ox0000007B blue screen errors are
To scan for viruses every time you use your PC
Never open web pages, emails, or download content that you think looks suspicious because that’s probably a virus.
In case you don’t know, the Windows Registry contains a System Hive which is a core part of Windows. The Windows operating system store various settings, options, and configurations. And if you encounter a Device Manager Error 49 for a device then it means that the system hive has exceeded its size limit. Worry not for this post will provide you with possible solutions that can help you in fixing error code 49.
You will see the following error message when you encounter error code 49:
“Windows cannot start new hardware devices because the system hive is too large (exceeds the Registry Size Limit), (Code 49)”
There are instances when it may so happen that the device or devices are no longer attached to the computer but they are still listed in the system hive of the registry. For instance, if you were removing hardware and application for years but they weren’t removed from the registry then the size of the system hive keeps on growing until it hits the maximum limit.
As you know, making changes in the registry manually, no matter how knowledgeable you are on such things is not sage since the registry is not only important but also complex. In addition, the System Hive is also a permanent part of the Registry associated with a set of files that contain information related to the configuration of the computer on which the OS is installed. To resolve this error, you must remove or uninstall any hardware devices that are no longer in the system. In fact, the Device Manager hides them by default so you need to enable hidden or non-present devices.
Follow the instructions given below to set the Devices Manager to display devices that are no longer connected to the computer.
Step 1: Tap the Win + R keys to open the Run dialog box.
Step 2: After that type in “cmd” and hit Enter to open the Command Prompt.
Step 3: Type “set devmgr_show_nonpresent_devices=1” in the Command Prompt and hit Enter to enable the hidden devices option.
Step 4: After that, exit Command Prompt and tap Win + X + M to open the Devices Manager.
Step 5: After opening the Devices Manager, click on View and then select the “Show hidden devices” option. This will show you all the devices that are not connected to the computer but are still mentioned.
Step 6: Next, select a non-present device and click Uninstall from the Driver tab.
Step 7: After that, repeat what you’ve done on step 5 for any other device that you no longer use.
Step 8: Restart your computer.
You can check the device Properties dialog box in the Device Manager after you’re done removing all the useless devices, to check if the error is now fixed or not.
Moreover, you can also try running the Hardware and Devices Troubleshooter as it can also help resolve hardware-related problems. To use it, refer to the steps below.
The first thing you need to do is click on Start and then on the gear-like icon to pull up the window for Settings.
After opening Settings, look for the Update and Security option and select it.
From there, go to the Troubleshoot option located on the left-hand side of the list.
Next, select Hardware and Devices from the list and open the Troubleshooter and run it. Once it is doing its job, wait for it to complete the process and then restart the system.
After the system restarts, check if the problem’s now fixed. If not, refer to the next option given below.
Hello and welcome to our software series review. Weel this time we could say this is more of a service review since the application we are going through today is online and you can use it freely without ever needing to install it.
When we choose software that we are going to review and recommend we really try to recommend something that is worth your time and money, Cartoonize fits in both categories in my opinion.
First of all basic plan of this graphic software is completely free and as mentioned it is working online, also as one more feature basic plan does not even require you to have an account of any kind, all you need to do is go to the website of the application and you can start using it right away. There is also paid plan for extra features if you need them billed monthly or annually.
Features
First things first, this is not Photoshop or GIMP and it does not aim nor want to be. This is something else, directed and pointed at the different types of users. This application is aimed at people that want to make some quick graphics and post them on social media and it does that very well. Even without knowledge to use graphic software this one is so well designed and straightforward that even a complete newcomer can do something right away.
So as the application that wants to be used by people that want to place some cool pictures or ads on their social media what it offers. For starters simplicity and ease of use, every option that you can use is on the left side of the screen nicely packed into the vertical toolbox. Inside the toolbox, you have access to various tools, effects, and filters that you can apply to your image.
Tools explained
Image manager
The first section on the tool panel is the image manager, here you can upload your images, delete them, search stock images, and so forth. nothing more to say about this one as it is only a basic file manager.
Edit
In this tool panel, there are a lot of basic settings for your image manipulations divided into 3 sections: Basics, Enhance, and Creative. In the basic section, you can crop, resize and rotate your image. Enhance panel will let you set exposure, color, vibrance, tint, and details (sharpen). Finally, the Creative part will let you remove the background with AI in a single click, replace colors in the image, and add a vignette and round image.
Effects
In the effects panel, you will be given 4 options to choose from Cartoonizer, Digital art, Sketcher, and painting. Each option once clicked will open another set of options tied to chosen preset where you will be able to choose a different style from chosen template. Once you click on the desired template it will be applied to your image and in the upright corner, you will have edit options to tweak it to your liking. You can play around as much as you want because only once you click on the apply button, the effect will be applied to your image.
Filters
Same as in the effects tool panel here you will also get a series of different filters that you can apply to your image. As in the previous tool once clicked on the chosen filter, you will be given options for its variations and details edits. How there is really plenty of filters options and combined with its own presets I will not focus on explaining what each one is doing since picture thumbnails are pretty accurate and just one look at them will explain to you everything you need to know.
Overlays
In the overlays panel, you can as the name says overlay different kinds of effects on your image. You can add snow, fog, sun flares rain, and many more. Presets work identically to previous effects and filters.
Masks
If you want to place your image in a certain shape or in-text this is the section for you. You will be presented with sections as custom text, shapes, brushes, floral, animals, and patterns. Each section will once again lead to plenty of variations on the chosen subject where you can pick one that you like the most and tweak its options.
Text
As the name suggests, this section is to add text to your picture or design. If you are making some cool ad for Facebook, Instagram, or other social media I believe that you will spend most of your time in this section adding text and tweaking it so it looks best. You have all the tools that you will need to make a catchy title or smaller block of text and you can add multiple texts to your picture tweaking their own visual appearance, the font used, color, and some effects like a drop shadow.
Draw
In the draw section, you will be able to freely draw whatever you like with your mouse or pen if you have one. you have basic options for a brush and eraser so you can erase stuff. Pretty basic tool but it gives a nice touch to underline something, circle it, etc.
Graphics
This panel will let you place various already made graphic assets into a picture. You have hearts, hats, glasses, etc. There really are tons of premade graphics along with thematic ones like new year, st. Patric day and more.
Frames
As the name suggests this section will place a frame of your choice around your picture. You can choose the style of frame, position, color, and many more. There are various styles and each style has its own options.
Conclusion
Cartoonize is a great online application that will let you quickly and easily do cool and nice image edits. As mentioned you can also add various effects, text, and graphics and use this app to make some quick and nice ads for social media. You have the option to publish to your social media right from the app in the save dialog but you can also of course download your image or design to your local computer.
Please note that for this review we used the pro, paid version so all of the features were unlocked. We wanted to give you a full overview of the full potential of the app. In my opinion, the small monthly fee that they charge is well worth it when you see all things that you can do with it.
Go to the cartoonize website and check it out, basic option is completely free and it does not even require making an account. Have fun, be creative and take care, I hope to see you again tomorrow.
Instaling and removing applications from your Windows can sometimes leave some traces that are unpleasant and can cause annoyances. One of these annoyances is the program in the startup section of the task manager.
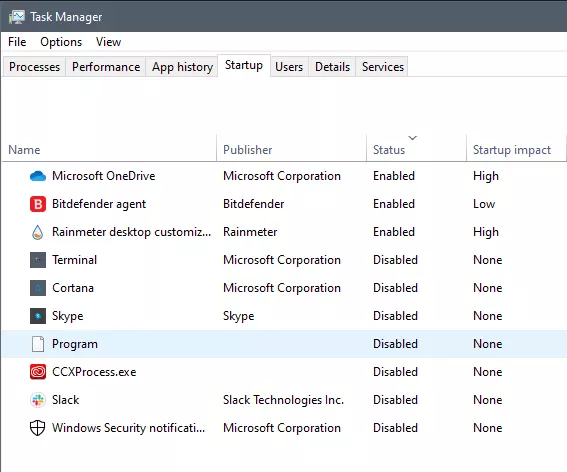
If you ever opened task manager and went into the startup section trying to disable some of the startup items on your Windows boot there might be a chance that you have experienced and seen a program without any icon or information about it just sitting there.
This is due to some applications being removed from the system but for some reason, it still shows itself in startup and it is quite annoying. So here we will show you how to get rid of this annoyance so your startup is clean again without junk in it.
Removing a program from startup
Locating the source of the issue
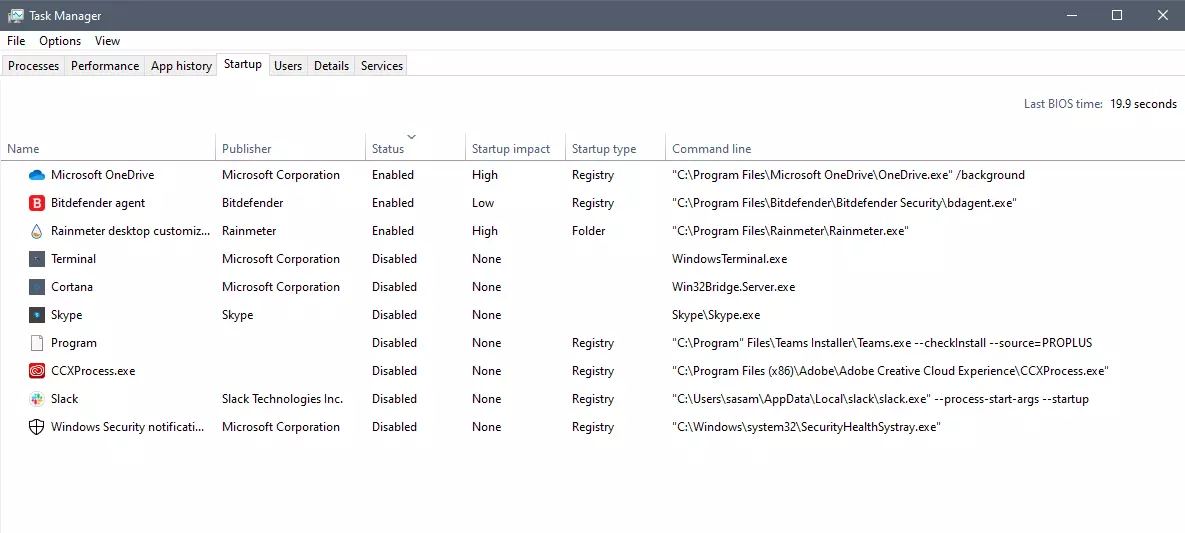
The first thing of course is to open the task manager itself and navigate to the startup tab. Inside the startup tab right-click on the column header and tick or enable Startup type and command line. Now you will see the location of the supposed file (that is missing or you could just go there by right-clicking on the item, but here it is greyed).
99% of the time startup type will be registry since the file is missing, if it was a file fix would be just to simply delete the file in the folder but since it was installed and not properly removed registry key is still present but the file cannot be found. After confirmation that the file is indeed missing and that the startup type is registry open the registry editor by typing Regedit in search and pressing enter.
Removing the key from registry
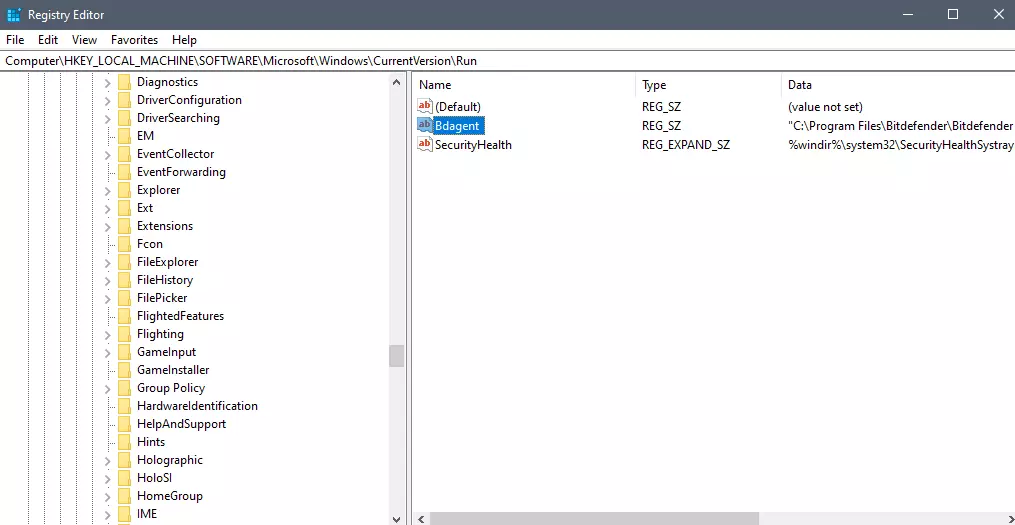
Inside Registry editor navigate to: HKEY_CURRENT_USER\SOFTWARE\Microsoft\Windows\CurrentVersion\Run. Inside on right part, you will see all auto-start entries added by installed applications.
Locate one that is causing issues by comparing its path with the path inside the task manager command line and delete the key. Once the key is deleted right-click on RUN on the left part and choose HKEY_LOCAL_MACHINE to quickly jump on that key location and repeat the process of key deletion if needed. HKEY_LOCAL_MACHINE will delete startup entry for all users and sometimes entry will not be present here since the application is not installed for all users or there are no other users on the machine.
After the procedure is finished, reboot your systems in order to apply changes.
As of the time of writing this article you no longer need or are required to have a password if you plan to log in to your Microsoft account. Microsoft explored various options for account security and came to the conclusion that passwords are obsolete.
Microsoft is letting you access your account through the Microsoft Authenticator app, Windows Hello, a security key, SMS verification, or email verification code. All of these methods are way better in terms of security than passwords.
How to turn these features on?
To get rid of your Microsoft password, the process is simple. You simply need to go to your Microsoft account, click “advanced security options,” then “enable passwordless accounts” under the Additional security section.
There are times when the WMI Repository gets corrupted which results in the Provider Load Failure. To resolve this issue, you need to repair or rebuild the WMI Repository in your Windows 10 computer. In this post, you will be guided on how exactly you can do that.
In case you don’t know, the WMI which stands for Windows Management Instrumentation is a set of specifications from Microsoft to consolidate the management of devices and applications in a network. The WMI is a database that stores meta-information and definitions for WMI classes. Using only these, the conditions of the systems can be known.
You can find the WMI Repository in %windir%System32WbemRepository. It provides end-users with the status of the local or remote computer system. Keep in mind that you must not use this on the Server 2012 Cluster machine.
Although there are command-line tools that can fix or restore the Windows Management Instrumentation repository. However, Microsoft suggests that it’s better if you verify if there is corruption. Here are a list of errors as well as permission issues you might encounter:
Unable to connect to root default or rootcimv2 namespaces. It fails with the error code “0x80041002” pointing to “WBEM_E_NOT_FOUND.”
0x80041010 WBEM_E_INVALID_CLASS
When you open Computer Management and Right Click on Computer Management (Local) and select Properties, you get the following error: “ WMI: Not Found” or it hangs trying to connect
Trying to use wbemtest , and it hangs
Schemas/Objects missing
Strange connection/operation errors (0x8007054e)
To verify if there is corruption, you can try running the following command in an elevated Command Prompt:
winmgmt /verifyrepository
After you enter the command, if there is a response saying, “repository is not consistent”, then the repository has an issue. If not, then something else is causing the problem. Since you are certain that corruption exists in the WMI repository, then here are some suggestions you need to check out to repair or rebuild the WMI repository.
Option 1 – Try to reset WMI Repository
Type “command prompt” in the Start Search and right-click on Command Prompt from the search results and then select “Run as administrator”.
After opening Command Prompt with admin privileges, type and enter this command: winmmgmt /salvagerepository
The command you entered is used when the winmmgmt command performs a consistency check. So if an inconsistency is detected, it will rebuild the repository.
Next, execute this command to see if the WMI repository now comes back as consistent: winmgmt /verifyrepository
This command will perform a consistency check on the WMI repository.
If it states that the WMI repository is not consistent, then you need to type and enter this command: winmgmt /resetrepository
This command is used to reset the repository to its initial state when the operating system was first installed.
Option 2 – Try to force recover the WMI Repository
The WMI Repository comes with a built-in self-recovery process so when the WMI service restarts or detects any corruption, it will automatically trigger the self-recovery procedure. This can happen in two ways:
AutoRestore: This will use the backup images if the Volume Shadow copy or VSS backup is turned on.
AutoRecovery: The rebuilding process will generate fresh images of the WMI repository based on the registered MOFs. The MOFs are available in the registry located at HKLMSoftwareMicrosoftWBEMCIMOM: Autorecover MOFs
Note: Autorecover MOFs is a key so double click on it to check its value.
On the other hand, if the self-recovery procedure does not work, you can try to use the force-recovery process instead. How? Refer to these steps:
First, you need to check the reg key value is empty or not under this registry path: HKLMSoftwareMicrosoftWBEMCIMOMAutorecover MOFs
If the reg key value is empty, you have to copy-paste the reg key value from another computer. Just make sure that it’s from the System which is equivalent to the computer in question.
Next, type and enter this command: Winmgmt /resetrepository
After you enter the command, if you get an error that says, “WMI repository reset failed. Error code:0x8007041B. Facility: Win32”, then you have to stop all the Dependency Services on the WMI service by running the following commands:

 Error Causes

 As of the time of writing this article you no longer need or are required to have a password if you plan to log in to your Microsoft account. Microsoft explored various options for account security and came to the conclusion that passwords are obsolete.
Microsoft is letting you access your account through the Microsoft Authenticator app, Windows Hello, a security key, SMS verification, or email verification code. All of these methods are way better in terms of security than passwords.
As of the time of writing this article you no longer need or are required to have a password if you plan to log in to your Microsoft account. Microsoft explored various options for account security and came to the conclusion that passwords are obsolete.
Microsoft is letting you access your account through the Microsoft Authenticator app, Windows Hello, a security key, SMS verification, or email verification code. All of these methods are way better in terms of security than passwords.