If you are using a multi-monitor, then you might find it quite useful. It helps many users with their work and brings more productivity. And over the past few years, Windows has managed to offer one of the excellent multi-monitor features where users can plug in an additional monitor and access their work or use their computer seamlessly on both displays. This is really handy, especially for users who are graphic designers, gamers, and other professionals who have to use a larger screen for their work.
One of the biggest inconveniences for users who use multi-monitor is that the Taskbar is switched on, on both displays, by default. This default arrangement is most likely to cause clutter on the second display. So if you are one of these users who find such a thing annoying, then you will find this post useful for you as we will walk you through how you can move the Taskbar to a second monitor. To get started, follow the instructions laid out below.
Step 1: The first thing you have to do is right-click on the Taskbar.
Step 2: Next, uncheck the “Lock the taskbar” option.
Step 3: After that, click and hold the taskbar and drag it to the second monitor.
Step 4: Once done, click the mouse button on the place where you want to place the taskbar.
Step 5: Now right-click on the “Lock the taskbar” option to lock the taskbar.
Once you’re done carrying out the steps given above, there are Advanced Options you can explore. This array of advanced options are offered by Windows 10 to fine-tune the multi-monitor experience of users. For instance, you have the option to choose to show the taskbar on an active screen only or combine the buttons on other taskbars. It would be better if you try out different variations and stick with the best one. In addition, you could also move the taskbar from one display to another.
Having a PC is a great thing, more often we are enjoying it than we have issues, but as time passes it seems that our computer is slowing more and more as new applications and games are coming which demand more powerful computers.
Before you decide to throw away your computer and buy a new one because you feel it is a bit slow, read through this guide where we will guide you to common tips & trick to make your PC run faster:
Keep your PC clean and tidy
Slowdowns and many other issues, even hardware failures can come from dirty PC. Make sure your PC is clean and tidy for maximum performance.
Optimize airflow through PC casing
Airflow is very important so your GPU and CPU and overall all hardware components can be kept in optimal working temperatures. If any device inside the casing is working in abnormal temperatures you will experience slowdowns and freezing on daily basis. Make sure that all fans are working and that your temperatures are in the optimal range to prevent overheating and make sure to have maximum performance.
Check PC for malware
Viruses, worms, and overall all malware can drastically reduce system performance. Make sure that your protection software is up to date with the latest definitions and that you have the latest Windows updates installed.
Create a Hi-Performance power plan
Windows power plans can be a very useful feature, especially if you are working on laptop but in order to boost performance and drain maximum, you will need to switch to a hi-performance power plan.
Free space on the system drive
Having little to no space on your Windows system drive can lead to extreme slowdowns, make sure that your hard drive is not on red when viewed from File explorer or you will experience even 50% poorer performance.
Choose startup applications
If you have many applications starting up with your Windows and many of them running in the background you will experience performance issues. Each application that runs in the background is taking RAM and CPU time for themselves which could be free and used for the program that you need.
Do not open too many tabs in Browser
Having too many tabs in Browser while working on a computer can also cause slowdowns, each tab is taking RAM for itself and even can cause Browser poor performance if a tab is LIVE and refreshing with new content all the time.
Remove browser extensions
Speaking of browser, having too many installed extensions which are active as soon as the browser is up and running can also lead to poor performances. Remove all which you really do not need and your computer will gain in speed.
Make hardware upgrade
Sometimes your system is just a little outdated, upgrading more RAM or switching to a new SSD with the greater speed can cause a world of difference in PC performance. Check to see how RAM is standard and upgrade accordingly, you can also upgrade the CPU and other bottlenecks in your system this way instead of completely buying a new PC.
Format and reinstall system
Drives, application traces, registry entries, etc. are piling up in your system over time, and if enough time is given it will clog your computer. From time to time it is a good idea to backup files and do a completely clean full format of HD and install a new and fresh copy of Windows with new and clean copies of applications and drivers.
That's it, 10 tips on how to make your Windows and PC perform better and speed it up. I hope that you found the read informative and helpful and I hope that I will see you soon.
Users who receive Error Code 80240020 when attempting to install and/or upgrade to Microsoft Windows 10, are receiving the error because the Windows 10 installation folder is either corrupted or unfinished. As a result of this error code, your download and the subsequent update will not process correctly.
Users who receive this code do not have to do anything specific, as it might mean that they are attempting to update before their system is ready. These users can simply wait for their computer to prompt them for the update, and then follow the on-screen instructions for the update. However, if a user is seriously wanting to update to Microsoft Windows 10 prior to the prompt, there are ways around error code 80240020.
Common symptoms include:
A dialog box appears with the Error Code 80240020
Microsoft Windows 10 upgrade is unsuccessful or freezes in the process of updating and displays the error code message.
Solution
Error Causes
This error is only caused by one type of issue, and that is unfinished or corrupted files being present in the Windows 10 installation folder.
Files that are unfinished in the Windows 10 installation folder are a result of the download not processing correctly, therefore the update is not successful because your computer does not have the files that it needs.
Files that are corrupted in the Windows 10 installation folder are a result of either a faulty download or preexisting corrupted files that need to be purged.
Until your system is ready to download the new Microsoft Windows 10 upgrade, you will be unable to install the upgrade. As stated, you have the option of waiting for your system to prompt you to download (which means that your system has made the necessary changes to its own files and is ready for the upgrade), or you can use the following steps to correct the issue yourself.
Further Information and Manual Repair
Users and Microsoft Tech Support personnel have discovered three methods to correct error code 80240020. Each of these methods should be attempted by someone who is comfortable with computer software and programs. Anyone who is not comfortable with software should either contact Microsoft Support or wait for their computer to prompt them for the Microsoft Windows 10 upgrade.
Method 1:
Back up the Registry of your operating system.
Find the Registry Key: [HKEY_LOCAL_MACHINESOFTWAREMicrosoftWindowsCurrentVersionWindowsUpdateOSUpgrade]
Note: this Registry Key should already exist, if it does not exist, create it.
Create a brand new DWORD Value that is named AllowOsUpdate
Set the Value to 0x00000001.
Close and reopen your Control Panel.
Restart the Microsoft Windows 10 upgrade.
Method 2:
Download the Microsoft Windows 10 ISO (installation device) from the following website: http://www.microsoft.com/en-us/software-download/windows10
Users must select the appropriate ISO, either 32 bit or 64 bit, depending upon their individual computer.
Extract the ISO file to a separate USB device or burn the program to a compact disc.
Run the Microsoft Windows 10 upgrade directly from the software that you have thus created.
Method 3:
Access the files on your computer via MY COMPUTER
Under the C: drive, access the WINDOWS folder
Select the SOFTWARE DISTRIBUTION folder, followed by the DOWNLOAD folder.
Delete any files within this download folder.
If you are unable to delete these files, open the command prompt (CMD) as the administrator, and type “net stop wuauserv” into the CMD prompt window. Press ENTER. This should allow you to delete the files from step 4.
Once the files are deleted, open and run the CMD as the administrator and type “wuauclt.exe /updatenow”. Press ENTER.
Access the WINDOWS UPDATE folder from your control panel, the update and download should resume without further interference from the user.
As with any other error codes, if the above methods do not rectify the issue, it may be necessary to download and install a powerful automated tool to rectify error code 80240020.
Error 1310 is a fairly common type of error encountered by Windows users.
Error 1310 usually generates while a user is attempting to install Adobe Photoshop or some Adobe product on Windows. The message displayed to the user usually states: ‘Error 1310. Error writing to file. Verify you have access to that directory’. Once the error message appears, the installation process will be terminated.
Solution
Error Causes
While there are different conditions that may trigger this error, most likely, they are generated because of the lack of privileges a user has on a Windows log-on.
When this happens, the operating system doesn’t allow the user to access the installation files. Another reason Error 1310 may occur is that often users attempt to log on to the system and choose the ‘Only for me’ option rather than the recommended ‘Anyone who uses this computer’.
Because of this reason, the data is locked for all the other users.
Since Error 1310 can easily disrupt your workflow on the system and may also lead to annoying consequences, it is best advised to treat it as quickly as possible.
Further Information and Manual Repair
There are different solutions to resolve these errors that are briefly listed below as follows.
First and foremost, restart the installation by logging onto your computer from the administrator account. This error will most likely disappear because there is often a lack of privileges that will trigger it. When you will log on from the admin account, you will have access privileges and such errors will be rectified.
Fix any corrupt system files that exist on your system. If the file resides in the Windows directory, this error will be generated. Check if any of your system files are corrupt or damaged. If yes, make sure you repair and return them back to their original position.
This error is sometimes caused because of incorrect registry entries. If the setup program shows errors, it is possible that it is because the system is having problems retrieving data stored in the system registry.
Another way, this error can be avoided is to run the setup in compatibility mode. Compatibility issues are a common occurrence. However, when an installation is performed in the compatibility mode, one can easily steer clear of such errors.
Implement any of the solutions listed above and protect your system against Error 1310.
No one knows everything about a program off hand. You need to use the program for a long time before you can even possibly know all that it is able to do and all you are able to achieve with it. However, this doesn’t mean that you don’t need help from time to time. This is also the case when Outlook errors pop up. Sometimes there are things you must or probably should do with your program that you do not understand and definitely don’t know how to do. Set up POP3 with your email account in Outlook is one of these things you will probably need help to achieve.
Steps to Set up POP3
First, you may need to know what POP3 is. POP3 is the way emails are sent from one email address to another. It may be more or less instant nowadays, but the process is still long and hard-winded. Similar to how your letters get from your mailbox to the recipients' mailbox, your emails get from you to the next person.
Letters are picked up in your mailbox and sent to your post office where they send it to the recipient’s post office who sends it to the recipient’s mailbox.
Similarly, your email is sent to your outbox, which sends it to your email service provider, that sends it to the recipient’s email service provider who sends it to their inbox.
This is one of the reasons that sending an email to someone who uses the same email service provider as you is about a millisecond faster. This process of sending emails is called POP3 and you need to set it up if you use Outlook on Microsoft.
This, on Outlook, also determines which email account you send your emails from. You see, on Outlook and many other email service providers, you can have many different email addresses, no even necessarily with the email service provider’s prefix on the end.
Now, if you want to see this for yourself, go on to your settings on Outlook and look for manage email accounts. If you have more than one email account, you will see them listed. Somewhere on the sidebar, you will see POP3 as well.
If you want to add more email accounts to this, such as a business email or a personal email, then just click ‘Add new account’ instead of 'Manage email accounts'.
When you click on an email account you have linked already, you will see on this side the details for your POP3 (incoming emails) and your SMTP (outgoing emails).
This can be changed, but since everyone’s number of accounts and type of accounts is different, there is no set way to change this.
However, you can give Microsoft a call and they will walk you through the necessary steps in order to change this.
Conclusion
So, POP3 can be incredibly easy to understand or incredibly hard; it depends on how good you are with electronics and the advice you are given.
But don’t try to change things by yourself; get a professional from Microsoft to help you with POP3 on your Microsoft Outlook account.
On September 18th, 2017, Cisco’s Talos announced that CCleaner, a popular utility with billions of worldwide users, had been compromised by hackers, and was used to unwittingly distribute hidden malware in its installer. Later in the day, Piriform, the publisher of CCleaner, confirmed the problem.
Undetected by all but 1 major antivirus including CCleaner’s own parent company, this occurred for over a month and impacted over 2.7 million users. Users of CCleaner v5.33.6162 and CCleaner Cloud v1.07.3191 for 32-bit Windows are affected. These downloads were live on CCleaner’s official site from August 15th to September 12th, 2017. Anyone who downloaded the program during this time could be affected.
The company claims that while the hackers set up the backdoor and many users were impacted, that the perpetrators have been arrested and that the malware never successfully performed its full task and compromised user’s PCs or sent out their data; in the wake of recent security breaches such as Equifax, users are understandably worried. Given the severity of the threat of hacking and data theft, users should take action immediately if they have CCleaner.
Technical Details of CCleaner Malware Injection
First reported by Talos, the malware, which was hidden in the CCleaner installer without the publisher noticing (despite them being owned by Avast, a massive Anti-virus company), modified a core program DLL file to evade detection, and creates several registry keys. Not only were these files not flagged by any major Anti-Virus, but they were also even digitally signed by Piriform via their Symantec certificate, meaning your PC and security program would likely whitelist and trust the malicious installer. The malware gathers personal information on a user’s PC, including IP address and running programs, and sends it to a remote server. In our testing, the program sent data to IP 216.126.225.148.
Restore Your PC (If Possible)
As of the publication of this article, there have been no assurances given that updating or even uninstalling CCleaner will remove the malware is installed. The only action thus far has been shutting down the remote server where user data was being sent has been shut down by authorities. For this reason, it is best to remove the underlying malware separately, as its presence represents a serious security threat. Unfortunately, as this could have been installed as far back as August 15th, 2017, your System Restore points may not go back that far, or even if they do, restoring to such an outdated point may cause unintended problems with other programs you use and potentially lost files and data. Manually backing up files and doing a full format or clean Windows installation would likely be successful in fully removing the malware, but is extremely time-consuming and can be difficult for many PC users. Unfortunately, this makes a PC Restore or format an unattainable option for many.
Update CCleaner to the Latest Version
While CCleaner has told users to update to the latest version of the program. Prior to doing so, we recommend fully uninstall CCleaner, ensuring you check its program files folders and registry keys, manually deleting any remnants, and then re-downloading the latest version from the official site and reinstalling clean.
Error Code 0x80d02002 is one of the common errors encountered by Windows users upgrading to Windows 10 or installing new Windows updates. This error results in program lock-ups, system crashes, and freezes, or slow PC performance. It can also cause possible loss of private data on your device.
Some of the common error messages involving Error Code 0x80d02002 include:
Something went wrong, Please try again later. Windows update error dt_000 – 0x80d02002
Error(s) found: Code 0x80d02002 Windows update encountered an unknown error.Windows update ran into a problem.
Windows Update Cannot Check For Updates – 0x80d02002
0x80d02002 – Windows could not search for new updates. An error occurred while checking for new updates for your computer. Some updates were not installed.
There were some problems installing updates, but we’ll try again later If you keep seeing this and want to search the web or contact support for information, this may help – 0x80d02002
While upgrading to Windows 10, depending on the state of your computer, you might encounter other error messages, including error code 0xc000021a.
Solution
Error Causes
Error Code 0x80d02002 normally occurs when a user updates their system, upgrades to Windows 10from Windows 7 or Windows 8/8.1, or installs new Windows updates. There are several reasons why this error happens which includes:
Internet connection problems
Blocked system ports
Conflict on system level
Further Information and Manual Repair
In trying to fix Error Code 0x80d02002, you can employ manual repair methods to effectively and efficiently solve the issue. However, keep in mind that one tiny error made in using the command prompt can result in data loss or put your computer in a no-boot situation. In such cases, you can seek help from a Windows professional or consider using an automated tool whenever necessary.
You can try doing the following manual repair methods in an attempt to fix Error Code 0x80d02002:
Method One: Reset Windows Update Components
In trying to fix Error Code 0x80d02002, you may try resetting manually and check the Windows update components by doing the following steps:
Right-click on the Start button then select Command Prompt (Admin) from the list to open a Command Prompt window.
Once the Command Prompt window appears, type or copy and paste the following commands all at once then hit Enter:
net stop wuauservnet stop cryptSvc
net stop bits
net stop msiserver
ren C:WindowsSoftwareDistribution SoftwareDistribution.old
ren C:WindowsSystem32catroot2 catroot2.old
net start wuauserv
net start cryptSvc
net start bits
net start msiserver
pause
Exit the Command Prompt then check if the issue is resolved.
Method Two: Check If The Region Is Correct
On the Start screen, type Region. Afterward, click on Settings then hit
Under the Format tab, choose English (United Kingdom).
Select Language Preferences then click on Add a language. Afterward, add “your language.”
After you’ve added your preferred language, choose it then click on Move Up to make it the first language. Close now the Language window.
On the Region window, select Additional Settings and see if the values are the same.
Select the Location tab then change the Home Location to “your country,” then hit
Method Three: Perform an SFC Scan
Check if there are system files that need to be repaired by running an SFC Scan. Follow the steps below:
Type CMD in the search bar then right-clicks on it. Select Run as Administrator. This will open a Command Prompt window in elevated mode.
In the next window, select
Once the Command Prompt window appears, type the command: sfc /scannow
Leave the Command Prompt window open and wait for the process to complete. This might take a while depending on how fast or slow your device is.
When everything’s fine, the message saying “Windows Resource Protection did not find any integrity violations” will appear.
Method Four: Disable Skype or Antivirus
There are times when Skype or your installed antivirus can conflict in updating your system. You can disable first your antivirus or Skype as you update your system and enable them once again when you successfully update your system.
Method Five: Download A Powerful Automated Tool
Can’t seem to put up with the long and technical manual repair process? You can still fix this error by downloading and installing a powerful automated toolthat will surely get the job done in a jiffy!
Error Code 1627 is a type of HP printer installation error. It usually occurs when you try to install an HP printer on your PC. The error code 1627 pop-up hampers your ability to install an HP printer successfully.
This error code is usually displayed in the following format:
Installation Error: Call to Driver Package Install returned error 1627 for package C:ProgramFilersHPHP deskjet 2510 seriesDriver storePipelinehpvplog.inf
Solution
Error Causes
Like every device installed on your PC, printers also need software called drivers to function on Windows Operating System.
Although Windows supports several computer devices since many drivers are already installed in Windows but there are some devices that do need additional software to get started and operate smoothly on Windows such as Hewlett-Packard HP printers.
Installing a Hewlett-Packard printer driver is slightly more time-consuming and complex than any other driver. Causes for HP printer installation usually include:
Driver issues
Bad Registry Keys
Though this is not a fatal error, it is still advisable to fix it right away to avoid inconvenience.
Further Information and Manual Repair
To resolve this error on your PC, you don’t necessarily have to hire a professional and spend hundreds of dollars in repair. The good news is that HP Installation error code 1627 is quite easy to fix. Here are some of the best and proven DIY methods to resolve error code 1627:
Method 1 - Uninstall and then Reinstall HP Printer Driver
HP printer installation errors can occur due to driver issues. If the driver is not installed properly or is outdated, you will never be able to install an HP printer on your PC successfully.
Therefore to solve this issue, first, make sure the driver used for printer installation is up to date. If it is outdated, then update it. On the other hand, if the printer driver is up to date but not installed properly then reinstall it. In both situations, first, you must uninstall the driver.
Uninstalling the previous installation will help you clean the system. Once the system is clean you can reinstall the HP drivers again.
To uninstall, go to the start menu and then the control panel. Now go to the Add/Remove program option and uninstall the driver. To activate changes, reboot your PC. Now install the updated version again.
Method 2 - Clean the Registry
If the printer software installation fails while updating, then this means the removal of the failed software was not successful. It may not show up in the Control Panel program list.
This means the entries of the failed software are still present in the registry of your PC. In this scenario, you need to clean the registry and remove the bad entries from there to successfully install the HP printer driver on your system.
Though this can be done manually this can be both time-consuming and slightly challenging if you are not technically sound. Therefore, to remove bad entries from the registry in seconds in just a few clicks download Restoro.
This is a user-friendly PC Repair Tool deployed with a powerful registry cleaner. The registry cleaner scans your entire PC, detects and removes all bad entries and files corrupting the registry right away.
Once the registry is cleaned, you can try installing the printer driver again. This is most likely to resolve the issue.
Click here to download Restoro.
Method 3: Locate and Install the Driver
As was pointed out, you might need to reinstall the printer driver again. Using DriverFIX, you'll be able to automatically update your computer system and install the drivers your computer needs to operate smoothly.
Still sitting on the fence about upgrading to Windows 11 because you don’t know what to expect? Interestingly, the new edition somehow manages to be both a total revamp and still very similar to its predecessor in many ways. It’s really something to experience for yourself.
We do want to give you a sneak peek, though. So here’s an overview of the biggest changes Windows 11 brings to the table.
What’s different in Windows 11?
1. Visual changes
The first thing anyone will notice after switching to Windows 11 is the striking visual difference. The entire interface is smoother, cleaner and more minimalistic than on Windows 10, even resembling the macOS in some instances. Perhaps the most obvious change in appearance is the Start menu and Taskbar location, which is now at the bottom center. It’s actually very neat, but if you’re someone who loves familiarity, don’t worry, you can move it back to the left.
Centralized Taskbar and Start menu
Moreover, you’ll notice that the Taskbar includes a Microsoft Teams icon by default (which you can, of course, remove) and that Live Tiles are gone. The News and Interests section has also been removed - or, shall we say, replaced. As opposed to Windows 10, news, weather forecasts and other information are now displayed as widgets.
To add to the cleanliness of the UI, Microsoft also enhanced the ‘Snap Layouts’ feature to help you better organize your windows and maximize screen real estate. It’s similar to app grouping on your smartphone. In Windows 10 this feature is slightly restricted, as it requires some manual resizing and dragging. In Windows 11, you can just hover over the minimize/maximize option on a window, select a layout and throw the windows in there.
Snap Layouts
2. New accessibility features
Microsoft has certainly paid attention to accessibility with Windows 10, but Windows 11 takes this to a whole new level.
One of the ways Windows 11 has taken things up a notch is by adding the long-awaited ‘Live Captions’ feature and advanced Narrator options.
Live Captions apply both to media played on your PC as well as your own speech when you’re using the microphone. Keep in mind that, as with almost all kinds of subtitles, you have to be prepared for a potential delay. However, it’s barely noticeable and doesn’t take away from the usefulness of this awesome new feature whatsoever.
As for the Narrator, there are three new voice packs to choose from. Microsoft has tried to put emphasis on a more natural voice than we are used to. So, now you can choose between Aria, Jenny and Guy, who will read pretty much anything off your screen out loud. Aside from this, Microsoft has also expanded the list of braille displays supported by the Narrator feature. For users with anxiety or trouble concentrating, a welcomed addition is the Focus app, which is no longer part of the Clock app. It’s now separate and called ‘Focus Sessions’, automatically triggering the Do Not Disturb mode when activated. It blocks all pop-ups and flashes and lets you work in peace until you’re ready to switch it off.
3. Android apps
Android users may rejoice! Windows 11 supports the use of your favorite applications now.
Microsoft has done this by integrating the Amazon Appstore to the Windows 11 Microsoft Store. From there, you can download your favorite Android apps and use them on your PC in a smartphone-like window.
Unfortunately not too many apps are supported at this time, but Microsoft is working on making the emulation possible for many more. Also, the option is only available in specific regions at this moment - check out if you’re one of the lucky ones.
4. Improved gaming performance
Avid gamers will be happy to hear that Microsoft has put some effort into streamlining Windows 11 for their gaming needs.
To give gamers a supreme visual experience, Windows 11 offers the ‘Auto HDR’ feature. As long as your monitor is HDR-compatible, this feature will automatically adjust the colors, brightness and contrast of games without any input from you.
Another update is DirectStorage, which we were introduced to in Windows 10 already. In Windows 11, it’s been improved to tweak loading times and overall gaming performance efficiency even better. The predisposition for it to work optimally is that your device has an NVMe SSD.
The Xbox Game Bar also helps gamers towards a smoother experience. It allows in-game screenshots, viewing processes that are running (similar to the Task Manager), monitoring the CPU and GPU performance and frame rate, integrating the Xbox App and more. There’s also a number of widgets you can now use with the Game Bar, for example the Spotify widget.
Xbox Game Bar
Another cool addition is the Xbox Game Pass, which unlocks hundreds of games to play on your Xbox App, with new additions coming in every month.
5. Smart App Control
Aside from a sleek new look and better accessibility for all users, Windows 11 also comes with a security power-up. Bear in mind that this feature is only available on clean Windows 11 installs.
Smart App Control (SAC) is an AI-powered new feature designed to protect your PC from potential threats. It blocks untrustworthy apps and adware and helps detect potentially unwanted apps, maintaining your PC’s performance and keeping your system safe.
It comes with an ‘Evaluation’ mode, which you should definitely select when running SAC for the first time. That way, the app monitors your usage and assesses whether you’re a candidate for SAC. Some users need it to be on all the time, for others it might be too distracting. Evaluation mode will turn SAC on or off based on your usage.
Don’t disable SAC again unless you’re absolutely sure you don’t need it, since reenabling it will require a fresh install. We recommend you don’t turn it off, as it is a neat feature protecting your data and files from malware at all times.
Summary
Have we piqued your interest in trying Microsoft’s latest OS? It’s a pretty exciting new iteration, but we’ll let you find out for yourself. We hope you like it!
Runtime Error r6034 is one of the most commonly occurring errors. This error usually arises in Windows Vista and Windows 7.
The message that appears to the user states ‘An application has made an attempt to load C runtime library incorrectly, please contact the support team for more information’.
As the message suggests, this problematic error occurs simply because an application attempts to load the C runtime library without a manifest.
Solution
Error Causes
Runtime Error r6034 occurs when the system compiler fails to compile the working application. While this is the primary reason, there are some other conditions that trigger Runtime Error r6034 which are outlined below.
Existence of viruses and malware in the system.
Corrupt or missing system files.
Power outages.
Hardware problems.
Hardware driver problems.
There are several other reasons that may trigger Runtime Error r6034 that are beyond the scope of this article. Regardless of what triggers this error, it is crucial to ensure that it is fixed as soon as possible.
Further Information and Manual Repair
There are several ways to deal with Runtime Error r6034. However, one of the most effective ways is listed below as follows.
When this error occurs, restart your computer. Make sure you press F8 before the windows logo is displayed.
Choose safe mode and press enter.
Go to the ‘Start’ button and type ‘msconfig’ in the search box. Press enter.
The MSConfig program will now open.
Choose ‘Start up’ in the general tab and then click on the ‘Load Start Up’ item.
Click on the ‘Services’ tab. Now click ‘Hide all Microsoft Services’ and then choose ‘Disable All’.
Close the system configuration window.
Restart the computer.
After restarting your computer, you will notice that the Runtime Error r6034 has been removed. If this approach fails to deliver the desired results, it is advised to follow the steps listed below.
Go to the start button. In the search box, type ‘System Restore’.
The system restore window will open. Make sure any process or application that’s open is now closed.
In the System Restore window, if a calendar list appears, it means the restore point is open. Now choose the point from where the error appeared and click Next.
This process may take some time. Your system will restart automatically and the Runtime Error r6034 will disappear.
DRIVER_IRQL_NOT_LESS_OR_EQUAL will cause your computer to go to the blue screen of death but do not worry there are solutions around this and we are here to instruct you on how to solve this.
Uninstall and install network drivers
DRIVER_IRQL_NOT_LESS_OR_EQUAL is most commonly tied to bad network drivers, whatever that be a corruption of the driver files or their incompatibility. So first thing is to check if this is the case.
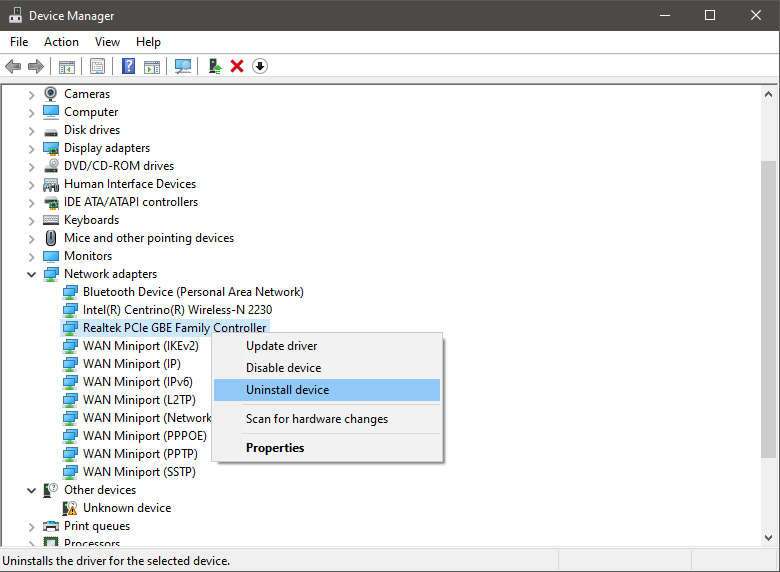
Press ⊞ WINDOWS + X to open the hidden menu in Windows and click on Device Manager.
In the Device Manager expand Network adapters, choose adapter, right-click on it and choose Uninstall.
Install latest driver or reboot so Windows will install the driver automatically
Update driver
If you do not want to reinstall the driver or you are unable to for whatever reason updating the driver might do the trick. To update driver:
Press ⊞ WINDOWS + X to open the hidden menu in Windows and click on Device Manager.
In the Device Manager expand Network adapters, choose adapter, right-click on it and choose Update Driver.
Fix via Command prompt
If both of the beforementioned solutions fail, try running the command prompt and fix the issue from there.
Press ⊞ WINDOWS + X to open the hidden menu in Windows and click on Command Prompt (administrator)
In command prompt type next line and press ENTERDEL /F /S /Q /A “C:\Windows\System32\drivers\mfewfpk.sys
Reboot the system
Scan your PC for malware
Sometimes corruption in the system is caused by malware, Scan your system for malware, viruses, etc.
Check connections or other hardware issues
If all methods fail, open your PC case and check to see if connections everywhere are properly connected and tight. Clean your PC and turn it back ON
Use system restore
If anything fails, use Windows system restore and bring back computer into a state where everything was working fine.


 In the Device Manager expand Network adapters, choose adapter, right-click on it and choose Uninstall.
 Install latest driver or reboot so Windows will install the driver automatically
 In command prompt type next line and press ENTERDEL /F /S /Q /A “C:\Windows\System32\drivers\mfewfpk.sys
Reboot the system
In command prompt type next line and press ENTERDEL /F /S /Q /A “C:\Windows\System32\drivers\mfewfpk.sys
Reboot the system