NoteHomepage (by MyWay) is a browser extension that may be bundled with other free software that you download off of the Internet, or delivered via other advertising means. When installed NoteHomepage will set the homepage and search engine for your web browser to http://search.myway.com.
While installing this extension will gather information from your browsing sessions, including website visits, clicked links, and sometimes even private information, that it later sends back to display unwanted ads into your browser.
Several anti-virus scanners have marked this extension as a Browser Hijacker and are therefore not recommended to keep on your computer. It is considered potentially unwanted, and many users wish to remove it, so it is flagged for optional deletion.
About Browser Hijackers
Browser hijacking is a form of unwanted software program, usually a web browser add-on or extension, which then causes modifications in the web browser’s settings. Browser hijacker malware is developed for many different reasons. Generally, browser hijacking is utilized for earning advertising revenue from forced advert mouse clicks and site visits. Even though it might seem harmless, these tools are designed by malicious individuals who always look to take full advantage of you, so that they can earn money from your naivety and distraction. Some browser hijackers are programmed to make certain modifications beyond the browsers, like altering entries on the system registry and letting other malware further damage your machine.
Find out how to identify a browser hijack
Below are some signs and symptoms that suggest your browser has been hijacked: the home page of your browser is changed unexpectedly; your browser is constantly being redirected to adult websites; the default search engine is changed; you are getting browser toolbars you have never noticed before; never-ending pop-up advertisements show up and/or your web browser popup blocker is disabled; your web browser gets sluggish, buggy, crashes regularly; Inability to navigate to certain websites, particularly anti-malware and also other security software websites.
So how exactly does a browser hijacker infect a computer?
Browser hijackers might use drive-by downloads or file-sharing networks or an e-mail attachment in order to reach a targeted PC. They could also come from add-on programs, also called browser helper objects (BHO), web browser plug-ins, or toolbars. Browser hijackers sneak into your computer in addition to free software application downloads also that you unknowingly install alongside the original. A good example of some infamous browser hijackers includes Babylon, Anyprotect, Conduit, SweetPage, DefaultTab, Delta Search, and RocketTab, however, the names are regularly changing.
Browser hijackers will affect the user’s web surfing experience severely, track the websites frequented by users and steal personal information, cause difficulty in connecting to the web, and eventually create stability problems, causing software programs and systems to crash.
Learn how to remove browser hijackers
Some hijackers can be removed by just uninstalling the corresponding freeware or add-ons through the Add or Remove Programs in the Windows control panel. But, many browser hijackers are difficult to get rid of manually. No matter how much you try to get rid of it, it might keep returning again and again. Additionally, manual removals demand in-depth system knowledge and thus can be a very difficult job for novices.
Industry experts always suggest users remove any malicious software including browser hijacker with an automatic malware removal tool, which is easier, safer, and quicker than the manual removal method. Employ a PC optimizer along with your anti-malware software to solve various registry issues, remove computer vulnerabilities, and boost your computer performance.
Download the software in Safe Mode with Networking
If the malware is set to run immediately when Windows starts, stepping into safe mode may block the attempt. Just minimal required applications and services are loaded whenever you start your laptop or computer in Safe Mode. To launch your Windows XP, Vista, or 7 PCs in Safe Mode with Networking, follow the instructions below.
1) At power on, hit the F8 key before the Windows splash screen begins to load. This would invoke the “Advanced Boot Options” menu.2) Select Safe Mode with Networking with arrow keys and press ENTER.3) As soon as this mode loads, you should have an internet connection. Now, get the malware removal software you want by utilizing the web browser. To install the program, follow the directions in the installation wizard.4) Immediately after installation, run a full scan and let the software remove the threats it discovers.
Switch over to an alternate browser
Some viruses may target vulnerabilities of a particular web browser that obstruct the downloading process. If you’re not able to download the anti-virus software program using Internet Explorer, this means malware is targeting IE’s vulnerabilities. Here, you need to switch to a different internet browser such as Firefox or Chrome to download the antivirus program.
Run anti-virus from a pen drive
To successfully get rid of the malware, you have to approach the problem of installing anti-malware software on the affected computer system from a different perspective. Adopt these measures to run the anti-virus on the affected computer system.
1) Download the anti-malware software on a virus-free computer.2) Plug the USB drive into the clean computer.3) Double click on the downloaded file to open the installation wizard.4) Select flash drive as the location when the wizard asks you exactly where you wish to install the application. Follow the on-screen instructions to finish the installation process.5) Remove the flash drive. Now you can utilize this portable anti-malware on the affected computer.6) Double-click the anti-malware software EXE file on the USB drive.7) Press the “Scan” button to run a full computer scan and remove viruses automatically.
Technical Details and Manual Removal (Advanced Users)
To eliminate NoteHomepage manually, navigate to the Add or Remove programs list in the Windows Control Panel and select the program you want to get rid of. For web browser plug-ins, go to your web browser’s Addon/Extension manager and choose the add-on you want to disable or remove. You might also want to reset your home page and search providers, as well as clear your web browser cache and cookies.
Finally, check your hard disk for all of the following and clean your Windows registry manually to remove leftover application entries after uninstalls. Please be aware that this is for professional users only and could be challenging, with incorrect file removal resulting in additional PC errors. In addition to that, certain malware is capable of replicating or preventing deletion. You’re advised to do this procedure in Windows Safe Mode.
The error 103 may occur either due to issues in your Google Chrome browser or system issues. If error 103 occurs when using Chrome, this means there is a conflict between Google Chrome and the antivirus program running on your PC.
It is displayed in either of the following formats:
‘Chrome error 103 connection aborted’, ‘Chrome error 103 err_connection_aborted’ or ‘Error 103 (net: ERR_CONNECTION_ABORTED): Unknown error.
However, if this is a system error code, it may be displayed in the following format ‘The semaphore cannot be set again’ or as ‘ERROR_TOO_MANY_SEM_REQUESTS’ or as the value 0x67.
Solution
Error Causes
The error 103 is triggered due to multiple reasons such as:
The conflict between Google Chrome and anti-viruses arises because when the web browser attempts to update, the anti-virus programs on your PC may view the update as a threat.
Due to this, the connection to the internet is terminated and the error 103 message is displayed on your computer screen. And besides, this keeps you from upgrading your Google Chrome browser too.
Other causes include:
Viral infection
Missing Windows component called ‘expand.exe’
Registry overlaps
Incompatible drivers
Further Information and Manual Repair
Here are some of the easy and efficient ways to resolve error 103. Choose a method according to the error 103 messages displayed on your screen.
Method 1: Check for the ‘Expand.exe’ Windows component
This method is workable if the error 103 is triggered due to browser issues. To get started, follow these steps.
First, go to the start menu, and in the search bar type ‘expand.exe’. If you are able to find it, move it to the following directory C:\Windows\system32. However, if you are unable to locate it, then copy the file from Windows installation CD. Once you copy the file to the directory, reinstall the updated version of Google Chrome.
Method 2: Change the Location of the Temporary File
If the error still persists, try method 2.
Go to the start menu and open the Run window. Now type C: and press OK. Then go to File, then New, and then Folder. Now create a temporary folder and name it ‘test’. After that go back to the start menu and open the Run window again. Now enter the following text in the text field:cmd.exe then press OK. In the command prompt type set TMP=C:\test.
After that try reinstalling Google Chrome by typing the following in the command prompt: start ChromeSetup.exe.
Method 3: Update Drivers
If the error message 103 is generated due to system issues, then try updating drivers. Sometimes the error may occur due to incompatible drivers.
Method 4: Perform an Entire PC Scan for Viruses
To resolve error 103, perform an entire PC Scan for viruses. Sometimes the error may occur due to viral infection. Removing viruses may fix the error.
Method 5: Clean and Restore the Registry
If the error is triggered due to registry issues, then it is advisable to download Restoro.
This is a multi-functional PC repair tool integrated with powerful utilities including an anti-virus, a registry cleaner, Active X controls, and class scanner, and a system optimizer. The registry cleaner feature wipes out all the unnecessary files including cookies, junk files, and bad registry keys that corrupt the registry. It cleans and restores the registry instantly.
The anti-feature removes all viruses and spyware while the system optimizer utility ensures your system works at its optimum speed.
It can be downloaded on all Windows versions. It is safe and efficient. This software is a one-stop solution for all PC-related errors.
Click here to download Restoro.
For PC users that are blind or have low vision, the Narrator accessibility feature in Windows 10, lets you use your PC without a display or mouse to complete common tasks – it reads and interacts with things on the screen, like text and buttons. The narrator can be used to read and write an email, browse the internet, and work with documents.
In Windows 10, there are a lot of options for Narrator that you can customize. You can change its keyboard shortcuts, personalize Narrator’s voice, enable Caps Lock warnings, and more. You can choose the voice for the Narrator, adjust the speaking rate, pitch, and volume.
To change the default audio output device used to play the voice of the Narrator in Windows 10:
Press the ⊞ WINDOWS + I
From the Settings menu, click Ease of Access.
Click Narrator on the left pane.
In the Narrator window, on the right pane, toggle the button to On to enable Narrator if required.
Scroll down to the Personalize Narrator’s voice section.
For the Select where you hear Narrator’s voice option, click the drop-down and select the audio output device you want from the list. Please know that you will not be able to choose if you do not have multiple audio output devices connected to your Windows 10 computer.
Exit Settings when done.
If you would like to read more helpful articles and tips about various software and hardware visit errortools.com daily.
Error code 0x801901F7, also known as “The Server Stumbled” error because it shows a message saying “The Server Stumbled. We all have bad days” is associated with Windows Store. Server Stumbled Error 0x801901F7 is an error related to the MS server. The error occurs due to damaged registry files, malware, virus, and corrupted data. You should fix this error to prevent a system crash or a BSOD error. There are some things you can do to fix it. These are not so complex. So, anyone can try these methods to fix error 0x801901F7.
Common Symptoms for error 0x801901F7:
Problems with Windows startup
System becomes very slow or the system freezes
Blue screen of death appears
Windows fails to start some process due to Stop error code 0x801901f7
Solution
Error Causes
This error is generally caused by corrupt registry files.
Virus infection can cause this problem.
Outdated driver, missing .DLL files may also cause this error.
Microsoft server overload may cause this problem as well.
Incorrect configuration may cause this problem.
Further Information and Manual Repair
To fix error 0x801901f7, there are four methods listed below. Some might work for you and some might not. Please try all of them to fix this error.
Method 1:
Basic method to fix error code 0x801901F7: Resetting Windows Store Cache
Most of the time clearing or resetting the cache helps. It doesn't always work, but you should try this first before moving on to some advanced methods which are mentioned below.
To reset the Windows Store cache please follow the simple steps below
Open RUN by searching or pressing "Windows Key + R"
Type "wsreset.exe" and press Enter or click on OK.
Windows Store will open automatically along with a command prompt.
This will reset Windows Store and you might see it loading as it should.
This method might work but if it fails to solve Error 0x801901F7 then follow the method below.
Method 2:
Advanced method of fixing error code 0x801901F7: Deleting Windows Store database file.
By using this method, you will be deleting the database file for Windows Store. This file is located on your C drive or the drive where you installed your Operating System. Follow the steps below.
Navigate to C:WindowsSoftwareDistributionDataStoreDataStore.edb.
Delete DataStore.edb file from there.
Now Open Windows Store and see if you still get error code 0x801901F7.
The Datastore.edb file that you deleted will be automatically created once you perform Step 3 which is launching Windows Store.
If you still cannot get this error away then Close Windows Store and Reboot your PC then Launch Windows Store Again.
Method 3:
Modifying Windows update properties:
Perform the steps below only if the above-mentioned methods fail. You will be tweaking a few things in the Windows update to see if it helps.
Open Task Manager by right-clicking on Taskbar, then click on Task Manager.
Go to Services Tab. Click on Open Services at the very bottom of the Window.
Now a new window will pop up. Scroll down & find "Windows Update" from the list.
Double click on Windows update to open up its Properties.
Now from the Startup Type drop-down list, select Automatic. Click on Apply, Start, and then Ok.
Now you need to perform just one more step. Reset Windows Store again (Refer to method 1 for Steps). This should fix your Windows Store error that shows The Server Stumbled with 0x801901F7 Error Code.
Method 4:
If the error is due to a problem with a driver, then follow the method below to uninstall the current driver:
Open the Run command and type “sysdm.cpl” in the text box.
Click Enter.
Open the Hardware tab on the system properties dialog box.
Then press on Device Manager.
Double press on Device type and then press on the hardware device that is reporting error code 0x801901F7.
Go to the Driver tab and press on Uninstall button to uninstall the device driver completely.
Now, install the new driver on your computer.
Restart your computer.
Run virus scan of your PC
Try using a different USB port.
If you do not possess the technical expertise required to accomplish this yourself or do not feel comfortable doing so, download and install a powerful automated tool to get the job done.
As you know, USB is now being widely used in all devices with USB A as the leading type with most devices based on it. Peripheral devices such as Pen Drives, External Hard disks, and many more also use a USB port. On the other hand, USB C is also coming up to be the next big standard in the computing world because of its high transfer speeds, wider compatibility as well as support for external Graphics Processing Units. However, just recently, USB 3.0 ports have been reported to cause the following error to pop up on Windows 10 computers every time a USB device is plugged in.
“Not enough USB controller resources. The controller does not have enough resources for this device.”
To fix this error, here are some guidelines you can check out. Make sure to follow them carefully.
Option 1 – Try to use a lower generation USB port
The first thing you can do is to try using a lower generation USB port as this issue mostly occurs when a device is connected to a USB 3,0 port. This means that you have to plug in your device to a USB 2.0 port and then see if it fixes the error or not. You can easily decipher a USB 3.0 port from a USB 2.0 port as the former is in blue.
Option 2 – Try to use a dock
You could also try to use a dock to resolve the error. Note that when too much power on laptops and notebooks are drawn from the USB ports and as a USB 3.0 port draws more power compared to a USB 2.0 port. Thus, if you plug in your USB storage device into a USB 2.0 port with the help of a dock, it should fix the problem.
Option 3 – Try disabling the xHCI Mode option in the BIOS
First, boot your computer into the BIOS.
Once your computer has booted, go to the Advanced tab.
Next, make sure that the entry for “xHCI Pre-boot mode” is set to Disabled under the USB Configuration section.
Now save the changes you’ve made and then restart your computer to Windows 10 and see if the error is now fixed.
Option 4 – Update or reinstall the Universal Serial Bus Controller driver
Since it could be a driver issue, you can try to update or reinstall the Universal Serial Bus Controller drivers using the Device Manager. Refer to the following steps:
First, click the Start button and type “device manager”.
Then click on the “Device Manager” from the search results to open it.
From there, look for the “Universal Serial Bus controllers” option and then right click on each one of the USB drivers, especially the Generic USB Hub driver, and then select the Update Driver from the menu.
Restart your PC and then click the “Search automatically for updated driver software” option.
Note: If updating the USB Controller drivers didn’t work, you can try to reinstall them instead.
Option 5 – Run the Hardware and Devices Troubleshooter
You could also run the Hardware and device Troubleshooter to try and fix the “Not enough USB controller resources” error.
The first thing you need to do is click on Start and then on the gear-like icon to pull up the window for Settings.
After opening Settings, look for the Update and Security option and select it.
From there, go to the Troubleshoot option located on the left-hand side of the list.
Next, select Hardware and Devices from the list and open the Troubleshooter and run it. Once it is doing its job, wait for it to complete the process and then restart the system.
After the system restarts, check if the problem’s now fixed. If not, refer to the next option given below.
Have you been feeling anxious in the digital space? Feeling like you have a million eyes on you each time you visit a website? It can definitely make you uneasy. Luckily there’s an easy fix, and it’s called a VPN.
In this article we’ll take you through the basics of what a VPN does and some of the biggest benefits you can reap from buying one.
VPN: definition and how it works
VPN stands for Virtual Private Network, so its name already says a lot about what it does.
A VPN is specialized software that keeps your browsing private and secure. Essentially it hides your identity, preventing possible cyberattacks and data theft. This is especially important in cases of public network use, where you’re highly exposed to potential threats.
To be more specific, this software encrypts your Internet Protocol (IP) address by filtering it through a server hosted by the VPN provider first. That way, it prevents your Internet service provider, third parties and lurking online thieves from tracking the actual you.
Credit: FLY:D on Unsplash
Some providers, such as Surfshark VPN with its IP Rotator feature, even make it a habit to frequently change your IP address to further protect your identity. With most VPN providers, you can also appear to be in a completely different country, adding to your disguise.
There are tons of advantages you can look forward to if you decide to use a VPN. Take a look at some of the crucial ones.
Benefits of using a VPN
When choosing a VPN, you can find both free and paid options. We recommend you go with the paid ones, since they have stronger security, encryption and data protection, as well as more advanced features. Free VPNs come with limitations and risk of malicious attacks on the software itself.
You can choose to buy a singular VPN service or opt for antivirus software that has a VPN built in, for example Bitdefender’s Ultimate Security plan. That depends on what you use your computer for and how much.
When you pick one, here’s what it can do for you.
1. Access region-specific content
When we said you could change your location, we meant it. Say you’re using a streaming service and a show you desperately want to watch isn’t available in your country. You can use your VPN to make it look like you’re browsing from a country where it’s unlocked.
This option is also convenient for gamers who want to access maps, skins and other in-game items unavailable in their location.
In addition, you can use this powerful feature when you’re traveling to a region where some of your favorite content may not be accessible.
Do keep in mind that you need to read the Terms and Conditions (yeah, we know - who does that?) of your games and services before doing this, since you could end up getting a penalty. It’s also important to remember that there are entire countries that have strict regulations or even bans on VPNs, for example Belarus, Russia and China. So make sure to be very cautious with your VPN use, friends.
2. Browse like no one’s watching
VPNs shield your browsing habits from prying eyes on the web. Those can be malicious hackers or just third-party cookies tracking your every move to later bombard you with targeted ads. For example, Surfshark VPN features a Cookie blocker that blocks all cookie-related pop-ups and lets you browse in peace (and secret). It works even when the VPN is turned off, which is also pretty neat.
In addition, their CleanWeb 2.0 technology makes sure ads and especially malware don’t stand a chance at all, since they’re blocked before they can even load.
The inability of sites to track your browsing means they can’t collect and analyze any of your data. So, your personal information - or your company’s information in case that’s what you’re using your computer for - is entirely hidden and secure.
3. Save money
It’s well-known that the prices of certain items and services vary based on your location, browsing time, age and many other factors. This most commonly goes for airline tickets and hotel stays.
You can use your VPN to avoid high prices and surcharges. Clear all cookies, turn on your VPN and visit an online shopping site to check out their prices. Then compare your findings with the offers you see when your VPN is off, when you spend a long time on the site or have an active account with the company.
Sometimes this can really help you find the best deals and avoid breaking the bank. But again, check the Terms and Conditions before you purchase something using a VPN.
4. Secure your smart home
The more smart devices you have connected to your network, the more exposed you are to potential cyberattacks. Phones and computers are generally designed to be decently secure even without a VPN or antivirus, but smart home devices leave a lot to be desired in that regard.
Protecting your home network with a VPN software means all devices connected to it are secure, be it an air purifier or Alexa.
Credit: Bence Boros on Unsplash
5. Prevent connection slowdown
Your ISP can intentionally slow down your internet speed based on how much data you’ve consumed (data throttling) or your activities online (bandwidth throttling).
But with a VPN, what kind of data you send and receive and how much is entirely hidden. Therefore, if your ISP can’t see you, they can’t control you and they can’t throttle down your speed.
The bottom line
You can never be too safe online. So definitely think about getting yourself a solid VPN to pump up your privacy and security as much as you can. And if you have any questions or need help choosing the perfect software for you, feel free to reach out to us.
Error Code 38 is a device driver error that users encounter on any Windows 2000 operating system and its following versions.
It occurs when the peripheral device that you connect to your PC cannot be accessed due to an inability of the Windows system to acknowledge the driver as a previous record of the driver being loaded is found in its memory.
It is a common error that users come across and appears on your PC with the following message:
“Windows cannot load the device driver for this hardware because a previous instance of the device driver is still in memory. (Code 38)”
Solution
Error Causes
Error Code 38 is prompted when incomplete program files are left in the Windows system which damage or corrupt its files. There are various factors that contribute to this, some of which are:
An incomplete program installation
An incomplete program uninstallation
Hardware is not removed properly
System recovery from viruses
An improper system shut down
The above triggers are very likely to create incomplete files within the Windows registry thereby leading to its damage and corruption.
This is especially true in the case of your PC when it has recovered from viruses when using anti-virus software. The anti-virus in its effort to remove the virus also could remove the files which contain them thereby increasing the risk of the error code.
These damaged files can severely impact the health of your PC and are imperative to fix it immediately to prevent further problems.
Further Information and Manual Repair
Although this error code may pose serious problems for your PC, thankfully, it is very similar to other PC driver errors and thus is an easy one to get rid of. Here are various methods that you can use to get your PC running smoothly again.
Method 1 – Restart your PC
The easiest method you can use to solve your PC error code is to simply restart your PC. It may be that the error prompted upon connecting the device you have connected is merely a temporary problem, and upon restart, will resume functioning smoothly.
Method 2 – Run the Troubleshooting Wizard
If restarting your PC does not help, you will have to find the exact nature of the problem by running the troubleshooting wizard for the device and then address the problem accordingly. To do this, proceed with the following steps:
Run Device Manager on your PC
Click on the program under the installed programs that is creating problems for you
Click on the ‘General’ Tab
Click ‘Troubleshoot’
Upon opening, the Troubleshooting Wizard will ask a series of questions regarding the error. Answer the questions and follow its directions for solving the error code.
After following the directions of the Troubleshooting wizard, make sure to restart your PC for the changes to take effect. Now check if your device is still causing problems.
Method 3 – Use System Restore
If the error persists, you can use system restore to eliminate the problem. Here is how to do so:
Log in using an Administrator account
Click ‘Start’ button and select All Programs > Accessories > System Tools > System Restore
Click ‘Restore my computer to an earlier time’ and click ‘Next’
Select the last Windows to restore point from the ‘On this list, click a restore point’ list, and click ‘Next’
Click ‘Next’ on the confirmation window to proceed
Restart your PC after restoration is complete
By restoring the system via a last saved system checkpoint, you can obtain undamaged Windows system files that can help resolve the error code.
Method 4 – Manually uninstall and reinstall the device driver
If using system restore does not work either, you may have to resort to manually uninstalling and then reinstalling the device driver causing the problem.
This would be necessary since the remaining incomplete files due to a partial removal or installation of programs are responsible for the error code. By uninstalling and reinstalling the device driver program, it would lead to the completion of the files.
You can do this by firstly logging in as Administrator and opening Device Manager. Select the device that is causing the problem and double click it; make sure that the peripheral is connected properly to the PC.
Upon opening, click on the ‘Driver’ tab and then select ‘Update Driver’. Make sure to refer to the system documentation that you received with your PC or computer to check for the motherboard details and driver specifics.
Method 5 – Use software to automatically download the driver
Manually uninstalling and reinstalling the driver will do the trick; however, it may be time-consuming especially when you would have to resort to your hardware user manual.
Using a program such as DriverFIX can save you a lot of time and frustration in having your device to work properly on your computer.
DriverFIX, with its user-friendly approach to help you fix your PC issues, comes with an integrated database that detects which drivers you need to reconfigure within just a few seconds and downloads it automatically.
It further ensures that your drivers are installed in their entirety leaving no room for any incomplete files to remain that create Error Code 38, or any other driver-related errors for that matter.
It also has the added advantage of being able to backup and restores your files should there be the slightest possibility of system file damage. DriverFIX is the answer to fixing your PC error codes accurately and quickly.
Click here to download DriverFIX to fix Error Code 38 quickly and effectively!
If by any chance you are working on a touchscreen PC, tablet, or any similar device and have no access to a hardware keyboard there is a way to place Touch Keyboard on your screen for easy typing, and you can enable icon on the taskbar for easy access.
Enabling the Touch Keyboard
Right-click on the Taskbar
Select Taskbar Settings
Go to Personalization > Taskbar
Click on Taskbar Corner Icons to expand it
Click on the switch next to Touch Keyboard to turn it ON
Close settings
The icon will immediately appear on the Taskbar in the lower right corner. Clicking the icon virtual keyboard will appear on the lower part of the screen.
You can use this keyboard to type in applications the same as you were typing on hardware one.
By taping on X in the upper right corner, you will hide the keyboard. Tap on the icon in Taskbar to bring it up again.
Hide the Taskbar icon
If you do not want to use Touch Keyboard anymore you can easily hide the icon:
Right-click on the Taskbar
Select Taskbar Settings
Go to Personalization > Taskbar
Click on Taskbar Corner Icons to expand it
Click on the switch next to Touch Keyboard to turn it OFF
RocketDock is one of the most popular app launchers as it has been used excessively back in several windows versions. This was modeled based on the Mac OS X launch bar and offers an animated response when you hover the mouse over the apps gathered on the Dock. This is perched at the top of your screen, and you can easily drag your favorite app icons to have them in one place. The dock keeps all your most favorite shortcuts intact for faster and easy access. Like other apps, you can easily customize the dock with skins and other add-ons.
If you would like to read more helpful articles and tips about various software and hardware visit errortools.com daily.
Code 29 is a Device Manager error commonly seen whenever a hardware device driver reports a problem. This error code indicates that the resources needed for operation are not available.
The computer hardware basically requires drivers to interface with the operating system. Drivers comprise multiple components and are supplemented with other resources provided by the BIOS (a physical chip on the motherboard).
The BIOS contains a set of basic input and output instructions for the computer system to boot, load drivers, and more.
Its firmware provides resources that drivers require to interface with other essential components. However, when the firmware fails to provide the requested resources, the device drivers stop functioning; this results in error codes like code 29.
Error code 29 is usually displayed in the following format:
“This device is disabled because the firmware of the device did not give it the required resources” Code 29
Solution
Error Causes
Error code 29 may be triggered due to several reasons. These include:
Outdated drivers
Corrupted drivers
BIOS misconfiguration
The device firmware is corrupt
Previous attempt to update the driver failed
To avoid inconvenience and to ensure your computer keeps working at its optimal pace, it is recommended that you repair error code 29 on your PC immediately. Delay may limit you from using certain hardware attached to your system properly.
Further Information and Manual Repair
To repair error code 29, you don’t have to hire a professional and spend hundreds of dollars. Here are some quick and effective DIY methods that you can try to resolve this issue in minutes even if you don’t have any technical background.
Method 1 - Reboot Your PC
Sometimes, error codes like code 29 may pop up on your computer screen due to some temporary glitch with the hardware. Rebooting can resolve the issue easily.
Therefore, before you do anything, try restarting your PC. It could be all you need to repair code 29. However, if the error code continues to persist, try the other methods given below.
Method 2 - Clear the CMOS
This may sound technical but it isn’t. To begin, with CMOS is an acronym for Complimentary Metal Oxide Semiconductor.
It is a term that is used to describe motherboard memory that contains the BIOS settings. Clearing CMOS helps reset the BIOS settings to their default manufacturer levels. It’s easy to do and is an effective troubleshooting step to resolve error code 29.
To do this, simply:
Enter the BIOS setup utility by restarting your PC
Watch for an entering setup message
Enter the BIOS access key. Usually, the key is F2 or F12. However, the key may differ from manufacturer to manufacturer. You may want to check the manufacturer’s website first to find out the BIOS access key before you restart your PC.
‘Reset BIOS settings’ to their default factory levels.
Method 3 - Enable the Device in the BIOS
Error code 29 may appear if a device is disabled. In such a scenario, simply follow the same steps as discussed in method 2, and in the advanced BIOS settings, look for disabled devices.
Enable the devices in the BIOS so that you use them easily.
This will hopefully resolve the issue. If it doesn’t, then this means the error code 29 is caused by either corrupted or outdated drivers. Try method 4 to resolve this issue successfully.
Method 4 - Identify the Problematic Device Drivers and Update them
Whether the error code 29 is caused by a misconfigured, corrupted, or outdated driver, simply update the new driver version to resolve. When doing it manually, you will first have to find and identify the problematic device drivers in the Device Manager.
You can access the Device Manager by going to the start menu and then simply typing Device Manager in the search bar.
Access the Device Manager and the properties to identify problematic drivers. Problematic drivers are normally displayed with a yellow exclamation mark.
Once you have spotted problematic drivers, simply update new drivers to resolve them. Though there is nothing technical about it but it may be time-consuming.
Method 5 - Install Driver Assist to Update Drivers Automatically and Regularly
A good alternative to manual driver update is DriverFIX. Simply download and install DriverFIX on your PC to update all problematic drivers in seconds. This is a cutting-edge program designed to resolve all kinds of device driver problems.
It is user-friendly and compatible with all Windows versions.
The intelligent programming system deployed inside this software program enables it to identify and detect all problem drivers automatically thereby sparing you from the hassle.
Furthermore, it also matches the drivers with the latest and compatible versions and updates them on a regular basis.
It takes the guesswork out of finding misconfigured and corrupted drivers and fixes driver-related problems and error codes like code 29 right away.
Click here to download DriverFIX to repair Device Manager error code 29 on your system without any hassle.
 In Windows 11 if you do not own a mouse or it has suddenly malfunctioned you can still move your arrow on-screen using the numeric pad.


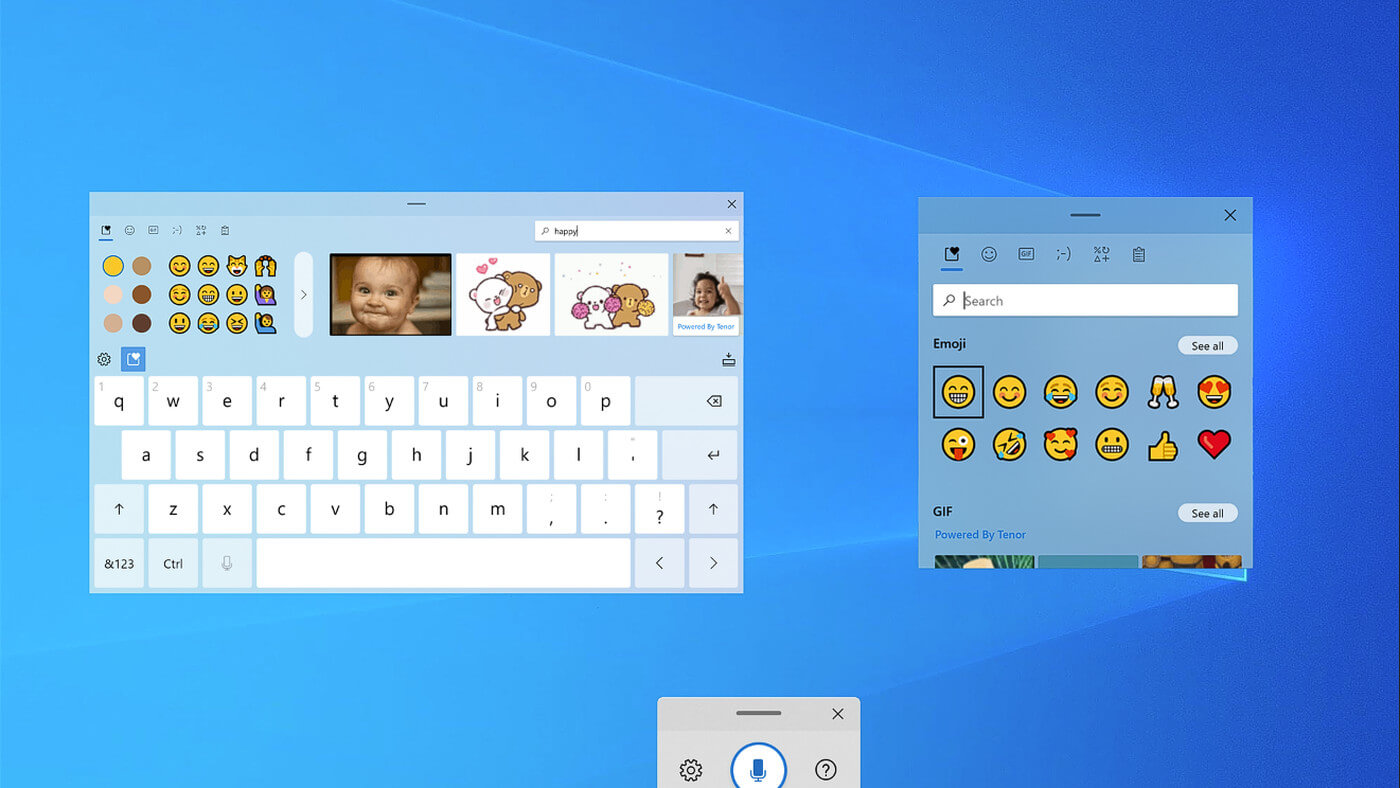 If by any chance you are working on a touchscreen PC, tablet, or any similar device and have no access to a hardware keyboard there is a way to place Touch Keyboard on your screen for easy typing, and you can enable icon on the taskbar for easy access.