How to switch to Dark mode in Windows 11

Dark modeWindows 11 is coming soon, from its typical view and color scheme, Windows 11 will natively support dark mode.
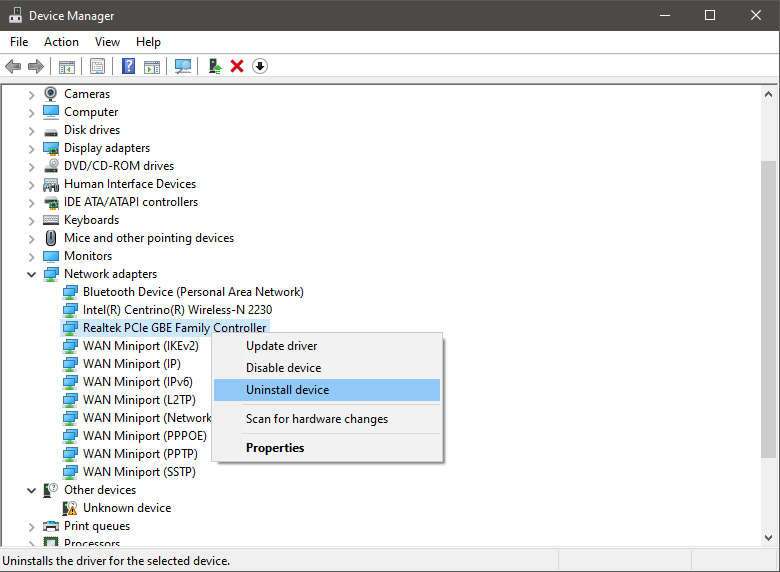
The dark mode is very popular in many applications today, some large companies like Adobe, Autodesk, and many more have already adopted a dark color scheme for their software so it is logical for others to follow and Microsoft is aboard for it.

The dark mode itself has its benefits, for people who work on computer for longer period of time dark mode inside applications will throw less white and blue light on their eyes making workhours easier and pleasant on them.

As a person who does indeed spend a lot of time in front of the screen, I would advise you to switch to dark mode regardless of the time that you spend with a computer, your eyes will be grateful.

Switching to Dark mode in Windows 11

  1. Open Windows 11 Settings by pressing ⊞ WINDOWS + I
  2. Click on Personalization on the left sidebar
  3. On the right side click on Color
  4. In color options click on the drop-down menu right next to Choose your color
  5. Select Dark

Your choice will be applied right away and you can safely close settings.

Do You Need Help with Your Device?

Our Team of Experts May Help
Troubleshoot.Tech Experts are There for You!
Replace damaged files
Restore performance
Free disk space
Remove Malware
Protects WEB browser
Remove Viruses
Stop PC freezing
GET HELP
Troubleshoot.Tech experts work with all versions of Microsoft Windows including Windows 11, with Android, Mac, and more.

Share this article:

You might also like

Windows 11 vs Windows 10: Main Differences

Still sitting on the fence about upgrading to Windows 11 because you don’t know what to expect? Interestingly, the new edition somehow manages to be both a total revamp and still very similar to its predecessor in many ways. It’s really something to experience for yourself.

We do want to give you a sneak peek, though. So here’s an overview of the biggest changes Windows 11 brings to the table.

What’s different in Windows 11?

1. Visual changes

The first thing anyone will notice after switching to Windows 11 is the striking visual difference. The entire interface is smoother, cleaner and more minimalistic than on Windows 10, even resembling the macOS in some instances.
Perhaps the most obvious change in appearance is the Start menu and Taskbar location, which is now at the bottom center. It’s actually very neat, but if you’re someone who loves familiarity, don’t worry, you can move it back to the left.

Centralized Taskbar and Start menu

Moreover, you’ll notice that the Taskbar includes a Microsoft Teams icon by default (which you can, of course, remove) and that Live Tiles are gone. The News and Interests section has also been removed - or, shall we say, replaced. As opposed to Windows 10, news, weather forecasts and other information are now displayed as widgets.

To add to the cleanliness of the UI, Microsoft also enhanced the ‘Snap Layouts’ feature to help you better organize your windows and maximize screen real estate. It’s similar to app grouping on your smartphone. In Windows 10 this feature is slightly restricted, as it requires some manual resizing and dragging. In Windows 11, you can just hover over the minimize/maximize option on a window, select a layout and throw the windows in there. 

Snap Layouts
Snap Layouts

2. New accessibility features

Microsoft has certainly paid attention to accessibility with Windows 10, but Windows 11 takes this to a whole new level.

One of the ways Windows 11 has taken things up a notch is by adding the long-awaited ‘Live Captions’ feature and advanced Narrator options.

Live Captions apply both to media played on your PC as well as your own speech when you’re using the microphone. Keep in mind that, as with almost all kinds of subtitles, you have to be prepared for a potential delay. However, it’s barely noticeable and doesn’t take away from the usefulness of this awesome new feature whatsoever.

As for the Narrator, there are three new voice packs to choose from. Microsoft has tried to put emphasis on a more natural voice than we are used to. So, now you can choose between Aria, Jenny and Guy, who will read pretty much anything off your screen out loud. Aside from this, Microsoft has also expanded the list of braille displays supported by the Narrator feature. 
For users with anxiety or trouble concentrating, a welcomed addition is the Focus app, which is no longer part of the Clock app. It’s now separate and called ‘Focus Sessions’, automatically triggering the Do Not Disturb mode when activated. It blocks all pop-ups and flashes and lets you work in peace until you’re ready to switch it off.

3. Android apps

Android users may rejoice! Windows 11 supports the use of your favorite applications now. 

Microsoft has done this by integrating the Amazon Appstore to the Windows 11 Microsoft Store. From there, you can download your favorite Android apps and use them on your PC in a smartphone-like window.

Windows Subsystem for Android™️

Unfortunately not too many apps are supported at this time, but Microsoft is working on making the emulation possible for many more. Also, the option is only available in specific regions at this moment - check out if you’re one of the lucky ones.

4. Improved gaming performance

Avid gamers will be happy to hear that Microsoft has put some effort into streamlining Windows 11 for their gaming needs.

To give gamers a supreme visual experience, Windows 11 offers the ‘Auto HDR’ feature. As long as your monitor is HDR-compatible, this feature will automatically adjust the colors, brightness and contrast of games without any input from you. 

Another update is DirectStorage, which we were introduced to in Windows 10 already. In Windows 11, it’s been improved to tweak loading times and overall gaming performance efficiency even better. The predisposition for it to work optimally is that your device has an NVMe SSD. 

The Xbox Game Bar also helps gamers towards a smoother experience. It allows in-game screenshots, viewing processes that are running (similar to the Task Manager), monitoring the CPU and GPU performance and frame rate, integrating the Xbox App and more. There’s also a number of widgets you can now use with the Game Bar, for example the Spotify widget.

Xbox Game Bar
Xbox Game Bar

Another cool addition is the Xbox Game Pass, which unlocks hundreds of games to play on your Xbox App, with new additions coming in every month.

5. Smart App Control

Aside from a sleek new look and better accessibility for all users, Windows 11 also comes with a security power-up. Bear in mind that this feature is only available on clean Windows 11 installs. 

Smart App Control (SAC) is an AI-powered new feature designed to protect your PC from potential threats. It blocks untrustworthy apps and adware and helps detect potentially unwanted apps, maintaining your PC’s performance and keeping your system safe.

It comes with an ‘Evaluation’ mode, which you should definitely select when running SAC for the first time. That way, the app monitors your usage and assesses whether you’re a candidate for SAC. Some users need it to be on all the time, for others it might be too distracting. Evaluation mode will turn SAC on or off based on your usage.

Don’t disable SAC again unless you’re absolutely sure you don’t need it, since reenabling it will require a fresh install. We recommend you don’t turn it off, as it is a neat feature protecting your data and files from malware at all times.

Summary

Have we piqued your interest in trying Microsoft’s latest OS? It’s a pretty exciting new iteration, but we’ll let you find out for yourself. We hope you like it!

Read More
How to Fix Stop Error 7B

What is Stop Error 7B?

Stop error 7B is a blue screen of death error code that occurs during Windows XP setup or after installation. The error message is displayed in either of the following formats:
  • STOP: 0x0000007B (parameter1, parameter2, parameter3, parameter4)
  • INACCESSIBLE_BOOT_DEVICE
  • ‘A problem has been detected and Windows has been shut down to prevent damages’
  • Setup has encountered a fatal error that prevents it from continuing.
  • Setup cannot continue. Power down or reboot your computer now.

Solution

Restoro box imageError Causes

There is no one particular cause for this error. The Stop error 7B may be triggered due to multiple reasons. These include:
  • Boot Sector Viruses
  • Device Driver Issues
  • Poor Windows XP installation
  • Registry Corruption
If you come across this error code on your PC, it is advisable to fix it right away particularly because it is a blue screen of death error that can cause severe damages to your system. It can lead to system failure, crash, and valuable data loss.

Further Information and Manual Repair

Here we’ve listed for you the best PC repair solutions to resolve and fix stop error 7B.

Cause: Boot Sector Viruses

Solution: Stop error 7B can occur when infected with a boot sector virus. If this is the cause, then first download a powerful antivirus on your system. After downloading it, run it to scan your PC for viral infection. Immediately delete the viruses if found. However, if the virus is too powerful, the antivirus may fail to remove it. In such an event, you will have to repartition and format your hard disk and then later reinstall Windows XP.

Cause: Device Driver Issues

Solution: If the boot controller is not properly configured or the driver is not updated, Stop error 7B can occur.  When this happens, simply restart your system and press F8 to go to the advanced boot options. Here choose the Last Known Good Configuration option. After that boot into Windows and then perform a system restore. Now go to the start menu and type Device Manager in the search box. To access the Device Manager window it may prompt you to enter an administrator password, insert it to proceed. Now go to Device Manager and perform a driver rollback to reinstall the drivers generating this stop error. By following these simple steps you can easily resolve device driver and configuration issues.

Cause: Poor Windows XP Installation

Solution:  In this case, you will have to perform a Windows start-up repair. This can be done by booting Windows XP from CD. Simply press enter at setup Windows Screen when prompted. Then press R to repair Windows XP installation. This procedure copies the original Windows files over the bad ones.

Cause: Registry Corruption

Solution: Sometimes the stop error 7B is also triggered by the registry corruption. When this happens, it is advisable to download and run Restoro software for PC scan and repair. Restoro is a powerful, advanced, and highly functional registry cleaner. It is deployed with intuitive algorithms that detect registry issues and errors like Stop error 7B on your system in seconds.  It wipes out clutter from your hard disk, repairs damaged files and the corrupted registry. It is safe, efficient, and bug-free. It is also compatible with all Windows versions. In addition to this, it is also embedded with other utilities like an antivirus, a system optimizer, and Active X controls, and a class ID scanner. Click here to download Restoro and resolve to stop error 7B on your PC immediately!
Read More
Stopping automatic redirects in Browsers
As you know, the internet has changed the world immensely. Nowadays, JavaScript is pushing the modern web ahead. One of the things that make these experiences with the internet seamless and with less clutter is redirection. It is often used on web pages and there are times when a user is prompted about them and most of the time, we barely notice them. However, there are also instances when things can go wrong with redirects as they could become a loop that could mess things up. And since the browser takes a lot of system resources, redirection can result in a poor user experience. That’s why in this post, you will be guided on how you can stop these automatic redirects on browsers such as Microsoft Edge, Google Chrome, and Mozilla Firefox, on your Windows 10 computer. To get started, refer to each one of the options provided below to stop automatic redirects in Microsoft Edge, Google Chrome, and Mozilla Firefox.

Option 1 – Configure the browsers to stop pop-ups and deceptive contents

There are a lot of browsers with built-in settings that allow users to stop pop-ups and deceptive content. To configure these settings, refer to these steps:
  • Microsoft Edge:

    • Click on the three horizontal dots icon or the menu button.
    • Next, click on Settings and select Privacy & Security from the left side navigation.
    • After that, scroll down on the right-side panel and look for Block pop-ups and Windows Defender SmartScreen and then turn their toggle buttons to On.
  • Google Chrome:

    • Open Google Chrome and click on the three vertical dots icon for the menu located in the top right corner of the browser.
    • Next, click on Settings and scroll down until you see the Advanced option. Click on it to open the Advanced Settings.
    • Now scroll down until you reach the Privacy and Security section and look for the Safe browsing option and turn its toggle button to On.
  • Mozilla Firefox

    • Open Mozilla and click on the three horizontal lines icon for the menu button located in the top right corner of the browser and click on Options.
    • Next, go to the Settings section and click the Privacy & Security tab and scroll down and then click on Permissions.
    • From there, make sure that the Block pop-up windows checkbox is checked.
    • Finally, scroll down until you reach the Security section and make sure that the checkbox for the Block dangerous and deceptive content is checked.

Option 2 – Try to reset Winsock, TCP/IP & Flush DNS

To stop redirects, you can also reset Winsock and the TCP/IP as well as flush the DNS cache. To do so, follow these steps:
  • Right-click on the Start button and click on Command Prompt (administrator) so you can pull up an elevated Command Prompt.
  • After that, execute each one of the commands listed below. And after you typed in one after the other, you have to hit Enter.
  1. netsh winsock reset – type in this command to reset Winsock
  2. netsh int ip reset resettcpip.txt – type in this command to reset TCP/IP
  3. ipconfig /flushdns – type in this command to flush the DNS cache
  • Next, restart your PC and check if the problem’s fixed.

Option 3 – Edit your Hosts File

  • Tap the Win + R keys to open then type in %WinDir% and then click OK.
  • Go to System32/drivers/etc.
  • Open the host file using Notepad.
  • Delete all the suspicious entries.
  • After that, save the changes you’ve made and close the file.
Read More
Headphone jack is not working on a laptop
In some cases, a couple of Windows 10 laptops, especially the newer ones that run the NVIDIA RTX series GPUs have been experiencing some problems, particularly with their headphone jacks which seem to be malfunctioning even though the internal speakers works just fine. And despite having all the drivers updated to their latest versions, the problem still occurs. According to security experts, this kind of problem occurs on laptop computers that are manufactured by MSI and since there is still no workaround or reliable fix released by the company, in this post you will be guided on how you can resolve the problem with the headphone jack. So if you are using a laptop made by MSI and are experiencing the same issue, then you’ve come to the right place. There are several potential fixes you can check out to resolve the problem, you can try to force reboot your computer or clean your headphone jack and then plug it back in properly. In addition, you could also try to update your Audio drivers or set your headphone as default. For more information, follow each one of the given options below.

Option 1 – Try to force reboot your computer

The first thing you can do is to force reboot your computer as this simple fix could help in fixing the problem. This option is quite simple, just make sure that before you do it, you have to save all your work.
  • First, turn on your computer and press and hold the power button for at least 30 seconds. You might notice the screen flashing or making any changes, just ignore it.
  • After that, plug out and plug in your computer and automatically turn it on.
  • Once done, check if the headphone jack is now working fine.

Option 2 – Try to clean the headphone jack and plug it properly

The next thing you can do to fix the problem is to clean your headphone jack and plug it back in properly. Make sure that you use a cotton swab in cleaning the headphone jack as there are instances where some dust might have settled in the port which results in issues like your headphone jack no working.

Option 3 – Try to update, rollback or reinstall the Audio driver

If the glitch in your audio has something to do with software, chances are it might be related to the audio driver – it could be that the newest version of your Windows 10 does not work well with the old version of the driver. This is why you have to update your audio driver to the newest available version.
  • Tap the Win + R keys to open the Run dialog box and then type in MSC and tap Enter or click OK to open the Device Manager.
  • Expand the section for the outdated device drivers.
  • And then select the outdated driver(s) and right-click on it/them.
  • From the drop-down menu, select the Update Driver option and follow the on-screen instructions to install the latest version of the driver.
  • Then also click on the option, “Search automatically for updated driver software.
  • Restart your PC after the installation.
Note: If updating or reinstalling the Audio driver didn’t work, you can go to the website of MSI and look for the support section where you can download the drivers for your computer. You just need to take note of your PC’s correct model and model number so you can find the appropriate driver.

Option 4 – Try to set the headphone as the default device manually

There are times when you plug a headphone, it does not toggle the default audio device. Thus, to fix this issue, you have to set the default audio device to the headphones manually. To do that, follow these steps:
  • First, right-click on the volume icon located on the system tray.
  • Next, select the Open sound settings option to open the Sound section in the Windows 10 Settings app.
  • From there, select the Control Panel for Sound on the rightmost column. This will open a new mini window.
  • After that, select your headphone under the Playback tab and click on the Set default button.
  • Once done, click on Apply and then OK buttons to save the changes made.

Option 5 – Try to run the Playing Audio Troubleshooter

Since the Windows 10 operating system has the Playing Audio Troubleshooter, you can use this troubleshooter to try and fix the problem with the headphones. You can access this tool in the Control Panel or in the Taskbar Search and even on the Troubleshooters page of Windows 10.
Read More
Configure Windows 10 to create Dump Files on Blue Screen of Death
If your Windows PC encounters an error, it will display a Blue Screen of Death or BSOD error which usually comes up for a fraction of second and creates some logs or Dumps Files as what other user prefers to call it and then boots your PC suddenly. This process usually takes place quickly that most users find it hard to get the error code and won’t probably be able to check what really went wrong with their PCs. This is where the dump files come in. They are stored internally in your computer and can only be accessed by an administrator. They are classified into 4 main types and in Windows 10 they are either:
  1. Complete Memory Dump
  2. Kernel Memory Dump
  3. Small Memory Dump (256 KB)
  4. Active Memory Dumps
Dump Files are useful as they could help you in resolving the problem and so you need to configure your Windows 10 PC to create them but first, you need to make a system restore point. This is essential as you are about to modify some system files as well as critical Windows 10 settings. There are two ways you can create Dump files – first is by modifying the settings in the Startup and Recovery and lastly is via the WMIC command line. Refer to the instructions prepared below to be guided on how you can create Dump files after any BSOD error using these options.

Option 1 – via Startup and Recovery

  • Type in “control panel” in the Cortana Search box and then click on Control Panel from the search results to open it.
  • After opening Control Panel, you need to make sure that you view the contents by their Category then click on the header link which is labeled “System and Security” or you could also right-click on the This PC icon and then click on Properties.
  • Next, select the Advanced system settings from the left panel. Once you do, a new and small window will pop up.
  • Under the newly opened window, look for the section called Startup and Recovery and then click on the Settings button.
  • And from the System Failure section, you can choose any option from the drop-down for Write debugging information such as:
    • None – this means that there is no dump file created by Windows
    • Small Memory Dump – this means that Windows will create a Minidump file on BSOD
    • Complete Memory Dump – this means that Windows will create a Complete Memory Dump file on BSOD
    • Automatic Memory Dump – this means that Windows will create an Automatic Memory Dump file on BSOD
    • Active Memory Dump – this means that Windows will create an Active Memory Dump file on BSOD
Note: The complete dump needs a page file that is allowed to be the size of the physical memory installed in your PC with a dedicated 1 MB of space for just the page header.
  • Now once you have selected the most suitable option for you, just click on OK/Apply and then exit.
  • Restart your PC to successfully apply the changes made.

Option 2 – via the WMIC command line

  • The first thing you need to do to create Dump files via the WMIC command line is to tap the Win + X keys combination or simply right-click on the Start button and then select the Command Prompt (Admin) option. You could also type in “cmd” in the Cortana search box and then right-click on Command Prompt from the results and select Run as administrator.
  • After that, type in any of the commands given below depending on your preferences so that your Windows 10 PC will be configured to create Dump Files:
    • No dump file: wmic RECOVEROS set DebugInfoType = 0
    • Small Memory Dump: wmic RECOVEROS set DebugInfoType = 3
    • Kernel Memory Dump: wmic RECOVEROS set DebugInfoType = 2
    • Complete Memory Dump: wmic RECOVEROS set DebugInfoType = 1
    • Automatic Memory Dump: wmic RECOVEROS set DebugInfoType = 7
    • Active Memory Dump: wmic RECOVEROS set DebugInfoType = 1
Note: A complete dump has to have a Page file which is allowed to be the size of the physical memory installed on your PC accompanied by a 1 MB space for just the page header.
  • Now type in “exit” in the Command Prompt to exit it.
  • Restart your PC to apply the changes made successfully.
Read More
A Quick Guide to Fixing Ieframe.dll Error

What is the Ieframe dll Error?

Ieframe.dll is a Dynamic Link Library, a collection of small programs. It is stored in C:\WINDOWS\SYSTEM32. The function of this dll file is to convert Html code into web pages on IE (Internet Explorer). When this file gets corrupt, you start experiencing ieframe.dll errors on your system. Ieframe.dll error is displayed in either of the following formats:
  • "Res://ieframe.dll/dnserror.htm#"
  • "Cannot find the file ieframe.dll"
  • "File Not Found C:WINDOWSSYSTEM32IEFRAME.DLL"

Solution

Restoro box imageError Causes

The Ieframe dll error code may occur due to multiple reasons. These include:
  • Incorrect Firewall settings
  • Ieframe.dll corruption and damage
  • Missing Ieframe.dll file
  • Internet Explorer issues
  • Viruses and malware attack
  • Outdated security software applications
If you wish to continue browsing on Internet Explorer, then it is important for you to resolve this error right away.

Further Information and Manual Repair

Here are some of the best solutions to resolve the Ieframe dll error on your PC:

Cause: Missing Ieframe.dll file

Solution: If Ieframe dll error file is missing, this means you have either accidentally deleted it while uninstalling a certain program that also shared this file. Therefore the best way to resolve the issue is to restore the missing Ieframe.dll file. To do this check the recycle bin. If you find the file, simply restore it in the following path C:\Windows\System32. However, if you are unable to find it, then download it from a reliable website.

Cause: Incorrect Firewall Settings

Solution:  In case the error is generated due to incorrect Firewall settings, then try disabling this software.  See if this works and resolves the error.

Cause: Internet Explorer Issues

Solution: Sometimes the Ieframe dll error can occur due to Internet Explorer issues. Here it is recommended to reinstall and update the latest version of IE on your system. This can be done by removing the program from the system. Go to the Control Panel, click Add/remove programs, and uninstall the program. After uninstalling the old version, install a new and updated version of IE on your system and try running it again. If it works, great the error is resolved. However, if it persists, then this means the problem is deeper and bigger than you think. The reason can be severe viral infection and malware attack not just damaging Ieframe.dll file but also exposing your system to privacy errors and threats.

Cause: Damaged and Corrupt Ieframe.dll files

Solution: The files can get corrupt when the registry overloads with data. It stores important and unnecessary files like junk files, cookies, internet history, temporary files, and invalid registry entries. Such files take up a lot of disk space and damages dll files. To resolve this issue it is advisable to download Restoro. This is a powerful registry cleaner, that detects and resolves all registry issues in seconds. It wipes out unnecessary and obsolete files cluttering the registry and restores the damaged Ieframe.dll files. It is efficient, safe, and compatible with all Windows versions. It has an intuitive interface and easy navigation which makes it simple and easy to use.

Cause: Viral Infection

Solution: If the underlying cause is a viral infection, Restoro takes care of that too. It is more than a registry cleaner. It is embedded with a powerful antivirus that removes all malicious software from your PC including viruses, Trojans, spyware, malware, and adware. And unlike a typical antivirus, it does not reduce the speed of your system. Its system optimizer utility boosts your PC speed dramatically. Click here to download Restoro on your PC today and resolve Ieframe dll error today!
Read More
Infographic: How To Speed Up PC Startup

A slow PC startup can be pretty annoying. This usually results from various computer issues. If your computer is acting sluggishly, here are four ways to speed up your PC startup.

How-to-Sped-Up-PC-Startup
Read More
Troubleshoot Error 651 on Your PC

Error 651 - What is it?

Are you a Windows 7 PC user? Are you experiencing error 651? If yes, then read on. We will discuss what is this error, the causes, and easy DIY solutions to help you resolve this issue immediately. Error 651 is a common Windows 7 error. This error occurs when you try to connect using your PPPoE connections. The error message is displayed in the following format:
“Error 651: The Modem (or other connecting device) has reported an error.”

Solution

Restoro box imageError Causes

The error code 651 occurs due to multiple reasons. However, some of the most common error causes include:
  • The raspppoe.sys file saved in the wrong location
  • IP setting  issues
  • Registry issues

Further Information and Manual Repair

Here are some of the best and easiest solutions to resolve the error code 651 on your system immediately. These solutions are so easy to perform that you don’t need any technical expertise or knowledge to get started. So here we go!

Solution 1: Reset TCP/IP Settings

To reset TCP/IP settings on your PC, here’s what you need to do. Simply replace the RAS PPPoE driver. First open a command prompt, then write the following command in the command prompt:  TAKEOWN /F"C:Windowssystem32driversraspppoe.sys" ICACLS "C:Windowssystem32driversraspppoe.sys" /grant administrators:F. After that, press enter to continue. Now close the command prompt and go to the folder C:\Windows\system32\drivers, here rename the raspppoe.sys file to raspppoe2.sys. Now right click on save the link as Vista RAS PPPoE Driver and save it in the C:\Windows\system32\drivers folder. Once this process is complete, to activate changes made, restart your PC. This is most likely to resolve the error code 651 on your system.

Solution 2: Try Power Cycling your Modem and your Router

This is another way to resolve error 651. However, before you try this solution, it is recommended that you save all your work on your system, close all your open applications, and then shut down your PC. After that first turn your router off and wait for about 2 minutes. Then turn off your modem too. Now disconnect all the Ethernet cables that are connected to your modem, router and your system. Reconnect them again and make sure that the connections are not loose. After reconnecting the cables, reboot your PC and switch on the modem first. After your modem gets initialized, turn on the router. See if this procedure works. If it does, then that’s great the issue is resolved. However, if the error persists, then this indicates deeper problems. The error message is triggered due to registry issues.

Solution 3: Clean and Repair the Registry

Sometimes the underlying cause of error 651 is a corrupt and damaged registry. Registry is the database where operating system stores all the information associated with installed programs and activities performed on your PC. Registry issues typically result due to poor PC maintenance. When you don’t clean the registry the unnecessary and obsolete files accumulate and acquire a lot space. It damages the registry and DLL files. This often leads to disk fragmentation and files are then saved in segments in different locations. This also slows down your PC performance. This could also be the reason for why the raspppoe.sys file is saved in the wrong location. Though you can repair the registry manually but it may be complex for you especially if you are not technically sound. And besides, it is also slightly time-consuming.

Restoro - Premier Registry Cleaner

Therefore, to resolve errors like 651 triggered by the registry issues on your system in seconds, it is advisable to download Restoro. Restoro is a cutting-edge and multi-functional PC Fixer. It is deployed with a powerful intuitive algorithm and multiple highly functional utilities designed to resolve practically all types of PC errors. It includes utilities like a registry cleaner, an antivirus, and a system optimizer. The registry cleaning feature scans for all types of registry issues and errors and resolves them instantly. It wipes out unnecessary and redundant files like cookies, internet history, junk files, and bad/ invalid registry entries. It cleans the registry freeing up space. Furthermore, it also repairs the damaged files and restores the registry back to normal.

Restoro Special Features

Other features include an antivirus that removes all types of malicious software hiding in your PC including viruses, Trojans, spyware, malware, and adware. The system optimizer feature ensures that your computer performs at its optimal level at all times. Restoro is safe and bug-free. Its user-friendly interface and simple navigations makes it quite easy for users to operate it without any difficulty. Furthermore, compatibility is not an issue with this software. You can download it on any Windows version. Click here to download Restoro and fix error 651 on your PC today!
Read More
Fix Msvcr120.dll_clr0400.dll Missing Error
DLL files have certain functions that help the programs in the computer run properly. One of these DLL files is the Msvcr120.dll_clr0400.dll. This particular DLL file is responsible for the extraction of the required resources during the installation of a program and is used when the program is launched or when games are launched in the C++ language. However, a number of users recently reported that they’ve encountered an error that says, “Msvcr120.dll_clr0400.dll is missing” when they tried to install an application or when they tried opening an application. This kind of error could be due to several factors. It is possible that the DLL file is corrupted or there are some programs that interfere with the DLL file. On the other hand, it is also possible that it has been infected by a virus. To resolve this error, here are some potential fixes you need to check out:

Option 1 – Run System File Checker scan

The first thing you can do to fix the error is to try running the System File Checker or SFC scan. System File Checker is a command utility built into your computer that helps restore corrupted files and missing files. Refer to the following steps to run it:
  • Hit the Win + R keys to launch Run.
  • Type in cmd in the field and tap Enter.
  • After opening Command Prompt, type in sfc /scannow
The command will start a system scan which will take a few whiles before it finishes. Once it’s done, you could get the following results:
  1. Windows Resource Protection did not find any integrity violations.
  2. Windows Resource Protection found corrupt files and successfully repaired them.
  3. Windows Resource Protection found corrupt files but was unable to fix some of them.
  • Reboot your computer.

Option 2 – Troubleshoot the missing Msvcr120.dll_clr0400.dll error in a Clean Boot State

You can also troubleshoot the isDone.dll error in a Clean Boot state. It could be that there are some third-party applications in your computer that are preventing the application from getting installed and to isolate this possibility, you need to boot your computer in a Clean Boot State and then try installing the program again. Putting your computer in this state can help you identify which program is the culprit and thus isolates the problem. In a Clean Boot state, your computer will start using only the pre-selected minimal set of drivers and startup programs. Note that you have to disable and enable one process at a time.
  • Log onto your PC as an administrator.
  • Type in MSConfig in the Start Search to open the System Configuration utility.
  • From there, go to the General tab and click “Selective startup”.
  • Clear the “Load Startup items” check box and make sure that the “Load System Services” and “Use Original boot configuration” options are checked.
  • Next, click the Services tab and select the “Hide All Microsoft Services” check box.
  • Click Disable all.
  • Click on Apply/OK and restart your PC. (This will put your PC into a Clean Boot State. And configure Windows to use the usual startup, just simply undo the changes.)
  • After you’ve set your computer into a Clean Boot State, make sure that you’re signed in as administrator and then try to install the application again.

Option 3 – Try to re-register the problematic DLL file

You can also try to re-register the DLL to resolve the problem. The Regsvr32 tool is a command-line utility that can be used to register and unregister OLE controls like DLL and ActiveX (OCX) controls in the Windows operating system. Follow the steps below to use it.
  • Open Command Prompt as admin from the WinX menu.
  • Next, type the following commands in the elevated Command Prompt and hit Enter to execute the command. This will re-register the affected DLL file using the Windows operating system tool, regsvr32.exe.
    • exe /[DLL file]
    • exe [DLL file]
Note: Replace “[DLL file]” with the name of the DLL file that was pointed out in the error.
  • After you execute the given commands, you should see a message saying, “DllRegisterServer in vbscript.dll succeeded” if the Regsvr32 tool was able to run successfully. After that, try to install the program again and see if it now works.

Option 4 – Try to replace the DLL file with a trusted source

  • First, you need to get the new DLL file from another computer with preferably the same file version number.
  • After that, you need to boot your PC into Safe Mode and navigate to the paths listed below and then replace the file using a USB drive or other external storage devices.
    • x86: This PC > C:WindowsSystem32
    • x64: This PC > C:WindowsSysWOW64
  • Next, type “cmd” in the Cortana search box and right-click on Command Prompt, and select “Run as administrator” to open it with administrator privileges.
  • Now type the “regsvr32 ntdll.dll” command and hit Enter.
  • Restart your PC and check if the error is now fixed.

Option 5 – Scan your computer using Windows Defender

The DLL file might also be infected with malware or virus and to eliminate it which could explain why you’re getting the “Msvcr120.dll_clr0400.dll is missing” error. Thus, you have to scan your computer using security programs like Windows Defender.
  • Tap the Win + I keys to open Update & Security.
  • Then click on the Windows Security option and open Windows Defender Security Center.
  • Next, click on Virus & threat protection > Run a new advanced scan.
  • Now make sure that Full Scan is selected from the menu and then click the Scan Now button to get started.
Read More
Copy and Paste feature is not working
One of the most basic and commonly used features in the Windows operating system is the copy and paste feature that helps users accomplish tasks in a faster and easier way. However, if you notice that it’s not working properly for some reason, then this post might be of help as it will provide you with options you can check out to resolve the problem. You can encounter this kind of problem with the copy and paste feature if some system files are corrupted or if there’s some third-party application or process that interferes with this function. Worry not though for there are some options you can check out to fix this. You can try to restart the rdpclip.exe process or the explorer.exe process. You could also try to reinstall the program where you encountered the issue with the Copy and Paste function. In addition, you could try clearing the clipboard history or run the built-in tools like the DISM tool and SFC scan. You could also troubleshoot the problem in a Clean Boot State or use the Refresh Windows tool. For more information, refer to each one of the options below.

Option 1 – Try to restart the rdpclip.exe and the explorer.exe processes

The first thing you can do to resolve the problem is to restart certain processes namely, the rdpclip.exe process and the explorer.exe process via Task Manager.
  • First, right-click on your Taskbar and select the Task Manager.
  • Next, look for the rdpclip.exe process and right-click on it, and select the End process option.
  • After that, click on the File tab > Run new task and then type “rdpclip.exe” and tap Enter.
  • This should help fix the problem. If not, you could also try to restart the explorer.exe process – just look for the explorer.exe process in the Task Manager and right-click on it, and then select the Restart option.

Option 2 – Try reinstalling the concerned program

If you only experience this issue on a particular program, you might want to uninstall this program and install it back again, and then see if it fixed the problem or not.

Option 3 – Try to clear the clipboard history

You could also try clearing the clipboard history as it has been known to help in fixing this kind of issue. You can clear the clipboard history using the command line.
  • Tap the Win + R keys to launch the Run dialog box and type “cmd” in the field and hit Enter to open Command Prompt.
  • Next, execute this command: echo off | clip
  • After that, check if the Copy and Paste function is now working properly or not.

Option 4 – Try running the DISM tool

You can run the DISM tool as well to help fix the “Tile Database is corrupt” error. Using this built-in tool, you have various options such as the “/ScanHealth”, “/CheckHealth”, and “/RestoreHealth”.
  • Open the Command Prompt with admin privileges.
  • Then type in the following commands and make sure to hit Enter right after you type each one of them:
    • Dism /Online /Cleanup-Image /CheckHealth
    • Dism /Online /Cleanup-Image /ScanHealth
    • DISM.exe /Online /Cleanup-image /Restorehealth
  • Do not close the window if the process takes a while as it will probably take a few minutes to finish.
  • Once it’s done, check if it was able to fix the corrupted Start Menu or not.

Option 5 – Try to run System File Checker or SFC scan

  • Tap Win + R to launch Run.
  • Type in cmd in the field and tap Enter.
  • After opening Command Prompt, type in sfc /scannow and hit Enter.
  • Once done, restart your computer.

Option 6 – Restart your computer in a Clean Boot State

If a third party program like antivirus is the one that’s causing the problem, you can try to put your computer in a Clean Boot State to isolate the issue by following these steps:
  • Log onto your PC as an administrator.
  • Type in msconfig in the Start Search to open the System Configuration utility.
  • From there, go to the General tab and click “Selective startup”.
  • Clear the “Load Startup items” check box and make sure that the “Load System Services” and “Use Original boot configuration” options are checked.
  • Next, click the Services tab and select the “Hide All Microsoft Services” check box.
  • Click Disable all.
  • Click on Apply/OK and restart your PC. (This will put your PC into a Clean Boot State. And configure Windows to use the usual startup, just simply undo the changes.)
  • Now try to connect your device or copy the files to your external device again and check if the problem with the Copy and Paste function is fixed.
Read More
1 2 3 171
Logo
Copyright © 2023, ErrorTools. All Rights Reserved
Trademark: Microsoft Windows logos are registered trademarks of Microsoft. Disclaimer: ErrorTools.com is not affiliated with Microsoft, nor claims direct affiliation.
The information on this page is provided for information purposes only.
DMCA.com Protection Status