If you got an error code of 0x80072EE2 while trying to download a Windows 10 update then it could be that something is blocking the Windows Update service on your Windows 10 PC and is preventing it from connecting to the Microsoft server. In addition, the error code 0x80072EE2 also indicates “ERROR_INTERNET_TIMEOUT” and together with this message, you might also see a message as Windows Update encountered an unknown error or you might also find it hard to search for new updates. So in this post, you will be guided on how you can fix the Windows Update error code 0x80072EE2. Make sure to follow the steps below carefully.
Option 1 – Restart your computer and try installing the Updates again
You can restart your computer and then try installing the updates once again. There are instances when a simple restart resolves Windows Update errors. Aside from that, it would also be better if you make sure that your internet connection is working and that it’s stable. And so after you restart your computer, check for updates once again and see if you’re still getting the error or not.
Option 2 – Run the Windows Update Troubleshooter
Running the built-in Windows Update troubleshooter is one of the things you can first check out as it is known to automatically resolve any Windows Update errors like error code 0x80072EE2. To run it, go to Settings and then select Troubleshoot from the options. From there, click on Windows Update and then click the “Run the troubleshooter” button. After that, follow the next on-screen instructions and you should be good to go.
Option 3 – Try to disable your antivirus program
Disabling the antivirus program or any security software installed in your computer is always a good idea you can try when the Windows Update process does not go smoothly. So before you try updating your computer again, make sure to disable the antivirus or security program and once the Windows Update is done, don’t forget to enable the antivirus program back again.
Option 4 – Try to restart the Background Intelligent Transfer Service
The Background Intelligent Transfer Service or BITS is a part of the Windows Update service and is the one that manages the background download of Windows Update, as well as scans for new updates and so on. And if Windows Update is experiencing some problems, you can try restarting BITS but make sure that you have admin privileges to do so.
Tap the Win + R keys to open the Run dialog box.
Next, type “services.msc” in the field and hit Enter to open Windows Services.
From the list of Services, look for the Background Intelligent Transfer Service and double-click on it to open Properties.
After that, you need to set the Startup type to “Automatic (Delayed Start) and click on Apply.
Now click the Stop button to stop BITS and then click the Start button to restart the service.
Click OK to save the changes made and then restart your PC.
Option 5 – Try installing the updates in a Clean Boot State
It could be that some third-party application is the one that’s causing the problem so it’s best if you put your computer in a Clean Boot state. During this state, you can start the system with a minimum number of drivers and startup programs that will surely help you in isolating the root cause of the issue.
Log onto your PC as an administrator.
Type in MSConfig in the Start Search to open the System Configuration utility.
From there, go to the General tab and click “Selective startup”.
Clear the “Load Startup items” check box and make sure that the “Load System Services” and “Use Original boot configuration” options are checked.
Next, click the Services tab and select the “Hide All Microsoft Services” check box.
Click Disable all.
Click on Apply/OK and restart your PC. (This will put your PC into a Clean Boot State. And configure Windows to use the usual startup, just simply undo the changes.)
After that, try to install the Windows app again.
Note: If you are able to install the app without any trouble at all then it means that the error is caused by some third-party application on your computer. You need to look for the culprit and uninstall it once you found it.
Option 6 – Run Microsoft’s online troubleshooter
Running Microsoft’s online troubleshooter might also help you fix the Windows update error code 0x80072EE2. This online troubleshooter is known to help in fixing Windows Update errors, it scans your computer for issues that might be causing the problem and then fixes them automatically.
Updating your Windows 10 computer does not always go smoothly as there are some errors you can encounter along the way. One of these Windows Update errors is the error code of 0x80246008. This kind of error can occur during different phases of an update that’s being downloaded or installed and even when an update is being initialized.
If you narrow down the cause of this Windows Update error, you’ll most likely see that it is related to the deliverability of a file to a computer from the servers of Microsoft. In other words, the error might be due to conflicts from programs like Firewall as well as third party programs like Antivirus or it could also be due to corrupted disk image or system files or it could be that any of the supporting Windows Update components and services are not working properly. Whatever the cause may be, the potential fixes provided in this post can be applicable to Windows Updates as well as the Microsoft Store.
Refer to the suggestions provided below to resolve the Windows Update Error 0x80246008 but before you proceed, make sure that you create a System Restore point first.
Option 1 – Apply some tweak in the Windows Registry from Command Prompt
Tap the Win + X keys and select Command Prompt (Admin) to open Command Prompt with admin privileges.
Next, navigate to the root location of the bootable device inside the Command Prompt command line.
Once you’re in the root location, type the following command and tap Enter to execute it:
After that, close the Command Prompt command line and then tap the Win + R keys to open Run utility.
In the field, type “services.msc” and click OK or tap Enter to open the Windows Services Manager.
From there, look for the following services:
Windows Update – Manual (Triggered)
Background Intelligent Transfer Service – Manual
Now open their Properties and make sure that their Startup type is as mentioned above and that they are running. If they are not running, just click on the Start button.
Option 2 – Run the System File Checker Scan
If the registry tweak didn’t work, you can run a System File Checker scan instead. It is a built-in command-line utility that replaces bad and corrupted system files to good system files that might be the cause why you’re getting the error when you try updating your computer. To run the SFC command, follow the steps given below.
Tap Win + R to launch Run.
Type in cmd in the field and tap Enter.
After opening Command Prompt, type in sfc /scannow
The command will start a system scan which will take a few whiles before it finishes. Once it’s done, you could get the following results:
Windows Resource Protection did not find any integrity violations.
Windows Resource Protection found corrupt files and successfully repaired them.
Windows Resource Protection found corrupt files but was unable to fix some of them.
Restart your computer.
Option 3 – Run the Windows Update Troubleshooter
If the System File Checker wasn’t able to resolve the Windows Update error, you could also try running the Windows Update Troubleshooter as it could also help in fixing any issues related to Windows Update including this one. To run it, go to Settings and then select Troubleshoot from the options. From there, click on Windows Update and then click the “Run the troubleshooter” button. After that, follow the next on-screen instructions and you should be good to go.
Option 4 – Try to disable your antivirus program
Disabling the antivirus program or any security software installed in your computer is always a good idea you can try when the Windows Update process does not go smoothly. So before you try updating your computer again, make sure to disable the antivirus or security program and once the Windows Update is done, don’t forget to enable the antivirus program back again.
Option 5 – Try deleting the files from the SoftwareDistribution folder and resetting the Catroot2 folder
The downloaded Windows Updates are placed in a folder called “SoftwareDistribution”. The files downloaded in this folder are automatically deleted once the installation is completed. However, if the files are not clean up or if the installation is still pending, you can delete all the files in this folder after you pause the Windows Update service. For complete instructions, refer to the steps below.
Open the WinX Menu.
From there, open Command Prompt as admin.
Then type in the following command – don’t forget to hit Enter right after typing each one of them.
net stop wuauservnet start cryptSvcnet start bitsnet start msiserver
After entering these commands, it will stop the Windows Update Service, Background Intelligent Transfer Service (BITS), Cryptographic, and the MSI Installer
Next, go to the C:/Windows/SoftwareDistribution folder and get rid of all the folders and files thereby tapping the Ctrl + A keys to select them all and then click on Delete. Note that if the files are in use, you won’t be able to delete them.
After resetting the SoftwareDistribution folder, you need to reset the Catroot2 folder to restart the services you just stopped. To do that, follow these steps:
Type each one of the following commands.
net start wuauservnet start cryptSvcnet start bitsnet start msiserver
After that, exit Command Prompt and restart your computer.
DuckDuckGo has risen in the public eye as a private search engine offering searches without tracking. A less known fact about DuckDuckGo is that they have their own browser, well they have it for the Android platform and it was stated that it is coming for desktops soon.
People were excited for this new browser for a few reasons, one of them being privacy and another that it is built from scratch, not using existing chromium runtime that assured users that privacy is the main focus. Still, lately, things got a little out of control. Duckduckgo is under fire from users since a security researcher has discovered that there is an exception for Microsoft trackers inside Browser.
The main feature of their browser is that it blocks tracking scripts and most online advertising with the goal of preventing servers from collecting data about your online behavior. Of course, tracking protection is never 100% effective since it requires a lot of manual labor from people to add sites and links to blocklists but it was discovered that DuckDuckGo has a defined exception in the browser for Microsoft owned ad networks and tracking scripts giving them free pass even when they are related to privacy compromisation.
Zach Edwards first pointed out the exception in a series of tweets, after noticing DuckDuckGo on iPhone and Android wasn’t blocking LinkedIn and Bing advertisements on Facebook’s Workplace site.
You can capture data within the DuckDuckGo so-called private browser on a website like Facebook's https://t.co/u8W44qvsqF and you'll see that DDG does NOT stop data flows to Microsoft's Linkedin domains or their Bing advertising domains.
DuckDuckGo’s CEO and founder, Gabriel Weinberg, replied with his own series of tweets.
Most of our other protections also apply to MSFT-owned properties as well. This is just about non-DuckDuckGo and non-Microsoft sites, where our search syndication agreement prevents us from stopping Microsoft-owned scripts from loading, though we can still apply protections post-load (like 3rd party cookie blocking). We are also working to change that.
DuckDuckGo says it uses over 400 sources for search engine results, including the company’s own web crawler, but typical link results are sourced most commonly from Bing. According to Weinberg, DuckDuckGo’s ability to use Bing search results depends on a carved-out exception for Microsoft’s ads in the mobile browser. A representative from DuckDuckGo told that third-party cookies from Microsoft services are still blocked.
Of course, the main aim and campaign of DUckDuckGo's rise was private search and private browsing so this kind of news did not go well among long supporters. The latest statement from them is as follows:
We have always been extremely careful to never promise anonymity when browsing, because that frankly isn’t possible given how quickly trackers change how they work to evade protections and the tools we currently offer. When most other browsers on the market talk about tracking protection, they are usually referring to 3rd-party cookie protection and fingerprinting protection, and our browsers for iOS, Android, and our new Mac beta, impose these restrictions on third-party tracking scripts, including those from Microsoft.
What we’re talking about here is an above-and-beyond protection that most browsers don’t even attempt to do — that is, blocking third-party tracking scripts before they load on 3rd party websites. Because we’re doing this where we can, users are still getting significantly more privacy protection with DuckDuckGo than they would using Safari, Firefox and other browsers. This blog post we published gets into the real benefits users enjoy from this approach, like faster load times (46% average decrease) and less data transferred (34% average decrease). Our goal has always been to provide the most privacy we can in one download, by default without any complicated settings.
There are a lot of online services and a lot of ways to get your public IP address. One of them being typing whats my IP in Google search and you will get immediate results. But there is a way to get the same information inside Windows 10 which could be very useful if for any reason you can not connect to mentioned services. By checking public IP directly inside your windows you can make sure that the issue for not being able to open some websites is not due to your public IP.
In order to use this Windows feature, we will be checking our public IP using Windows PowerShell.
To open Power Shell in Windows first press ⊞ WINDOWS + R to open the run dialog
Inside run dialog type Powershell and press ENTER
In the Powershell type in the following command and press ENTER
If you were trying to install a program on your Windows 10 computer but encounter an error instead that says, “Error 1310, Error writing to file: <PATH>, Verify that you have access to that directory” then read on as this post will guide you on how you can fix it. This kind is a fairly common type of error encountered by many Windows users.
You can get this error when you try to install certain programs like Excel, AutoCAD, Adobe Photoshop, and some other Adobe products on Windows. One of the most likely causes for this error is that the required files or location is already used by some other software which means that Windows finds that you are trying to overwrite a software that is already installed. Aside from that, it could also occur if the program installer does not have access to write to that directory.
To fix Error 1310, here are some potential fixes that could help.
Option 1 – Clear up temporary or junk files
The error could be caused by some temporary or junk files in your computer and so you need to clear them up to fix the problem. You can achieve that using the Storage Sense feature.
Open Setting > System > Storage from the WinX Menu.
From there, you will see a list of all the local and connected storage devices along with the details on the free space. Make sure that Storage Sense is on.
Next, find a link that says “Free Up Space” and click it to open.
After that, a screen which is the built-in program in Windows 10 will appear and will scan your computer for the following junk files so you can free up disk space:
Windows Upgrade Log Files
The system created Windows Error Reporting Files
Thumbnails
Temporary Internet Files
Previous Windows Installation Files
Delivery Optimisation Files
DirectX Shader Cache
Choose the files you want to get rid of and then click on the remove files option. Note that you’ll have an idea of the total size as you select any of the junk files listed above.
Now go to the “Free Up Space Now” section and click the Clean Now button. This will get rid of all the temporary or junk files in your computer and should hopefully fix Error 1310.
Option 2 – Reinstall the program in a Clean Boot State
You can also troubleshoot Error 1310 in a Clean Boot state. It could be that there are some third-party applications in your computer that's preventing the program from getting installed and to isolate this possibility, you need to boot your computer in a Clean Boot State and then try installing the program again. Putting your computer in this state can help you identify which program is the culprit and thus isolates the problem. In a Clean Boot state, your computer will start using only the pre-selected minimal set of drivers and startup programs. Note that you have to disable and enable one process at a time.
Log onto your PC as an administrator.
Type in MSConfig in the Start Search to open the System Configuration utility.
From there, go to the General tab and click “Selective startup”.
Clear the “Load Startup items” check box and make sure that the “Load System Services” and “Use Original boot configuration” options are checked.
Next, click the Services tab and select the “Hide All Microsoft Services” check box.
Click Disable all.
Click on Apply/OK and restart your PC. (This will put your PC into a Clean Boot State. And configure Windows to use the usual startup, just simply undo the changes.)
After you’ve set your computer into a Clean Boot State, make sure that you’re signed in as administrator and then try to install the program again.
Option 3 – Try to unregister and re-register the Windows Installer Module
Tap the Win + R keys to open the Run dialog box.
Then type the “msiexec /unregister” command and hit Enter to unregister the Windows Installer Module.
Next, type the “msiexec /regserver” command and hit Enter to re-register the Windows Installer Module.
Now restart your computer and see if un-registering and re-registering the Windows Installer Module fixed the problem or not.
Option 4 – Take ownership of the location where you want to install the app
The next thing you can try to do is to take ownership of the particular folder as this worked for some users who experienced the same problem. But before you do that, you have to create a System Restore Point first, once that’s done, proceed to the given steps below.
First, locate the concerned folder and right-click on it then select Properties.
Next, click on the Edit button in the Properties window and click OK to confirm if you got a User Account Control elevation request.
After that, select user/group from the permission windows or click on the Add button to add another user or group. It would be best if you add “Everyone” to give permission.
Then check “Full Control” under the “Allow” column to assign full access rights control permissions.
Now edit the permission to Full Control for “Everyone”.
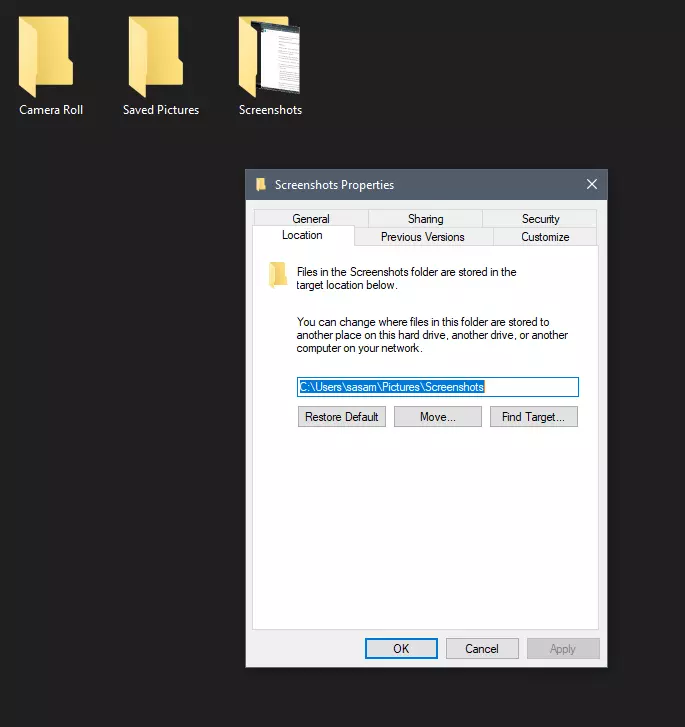
Each time when you press WINDOWS + PrtScn key on your keyboard a screenshot is taken and saved on your Hard drive, to be more precise, it is saved in a specific folder which is in c:\Users\Your user name\Pictures\Screenshots. Now, this specific location is not anything that's bad but it is a little deep and not so user-friendly for quick access.
Luckily this default location can be changed into any folder that you like.
Changing location
First thing is to open File Explorer and then navigate to your PC. Once you go to your PC, go to Pictures, and inside right-click on the Screenshots folder. If there is no screenshots folder inside, this means that since Windows was installed no screenshots were taken with WINDOWS + PrtScn key combination. Please note that just by pressing PrtScn you will create a screenshot but you will place it inside the clipboard ready to be pasted somewhere, with WINDOWS + PrtScn you are saving the screenshot directly in a file on your hard drive.
So once you clicked on the Screenshots folder, go to the bottom and click on properties. Inside properties go to the Location tab. In the location, tab clicks on MOVE and browse to your new location where you would like screenshots to be saved. Once you select the folder for screenshots, click on the Select Folder button and confirm with OK. After this, Windows will ask you would you like to move existing screenshots into the chosen folder. Click YES or NO, depending on your preference.
After this easy setup, all of your new screenshots will be placed now inside the chosen folder.
Thank you for reading and I hope to see you tomorrow. Take care.
In Windows 11 by default inside the Start menu, there is recommended section that contains recently opened folders, documents, and files. If you do not wish this section and do not want recent items in your Start menu there is an easy way to turn it off.
Press ⊞ WINDOWS + I to open settings
Click on Personalization
On the right side scroll down and click on Start
Click on the switch beside Show recently opened items in Start, Jump lists, and File Explorer
Close settings
Settings will be automatically applied and there will be no more recommended items inside your Start menu to create clutter, it will be nice and clean.
Receiving a screen of death is not a pleasant experience at all and most users would agree that they would very much like not to face one during their work with the computer. Sadly PC is not a perfect machine and it is not working in a perfect environment so errors happen.
The most famous and well-known death screen is blue which is also the most common one, my bet would be that there is not a user which has not been faced with this blue error screen. There is no simple explanation why these stop errors occur as several factors can be involved. However, it is known that the malfunctioning of hardware drivers or drivers that are installed by third-party software drive this unwanted change.
But did you know that there is more colors for infamous death screens and not just blue one?
Microsoft has coded different errors to different colors in the goal for the technical team to be aware right away of what type and kind of error they are dealing with.
Color for screen errors are: Blue, Black, Pink, Brown, Yellow, Red, Orange, Green and White
If you are interested in what color represents what keep reading.
BLUE
A stop error or exception error commonly called the blue screen of death (BSoD) or blue screen, is an error screen displayed on Windows computers following a fatal system error. It indicates a system crash, in which the operating system has reached a condition where it can no longer operate safely. This is caused by many different problems, such as a general hardware failure or a crucial process terminating unexpectedly.
BLACK
On Windows 10 systems, a Black Screen of Death can be caused by an unfinished Windows Update.To resolve this problem, simply hold the power button down on your PC or laptop to switch off the computer. A cold start should result in the system booting properly.
PINK
It is a diagnostic screen with a white type on a pink background. Pink Screen is mainly seen when the VMkernel of an ESX/ESXi host experiences a critical error, becomes inoperative, and terminates any virtual machines that are running. It is not fatal and generally considered more of a developer testing issue. When encountered, it can be fixed quickly by following the simple action of pressing and holding your computer’s power button to shut down the device.
BROWN
The Microsoft Windows 10 Operating System Brown Screen of Death is an on-screen fatal error notification with bug check codes which is seen when a computer crashes due to graphics hardware or software-related problems (failing graphics drivers).
YELLOW
It affects the functioning of a browser, particularly Mozilla Firefox. The Yellow Screen of Death makes the appearance with a weird buzzing sound in the background when the XML parser refuses to process an XML document causing a parsing error and a weird buzzing sound. The issue persists unless the computer is manually rebooted.
RED
Commonly the Windows 10 red screen is caused due to the hardware error, particularly if you overclock your Windows PC/laptop. Despite this, sometimes the red screen of death is also caused by outdated or incompatible drivers or due to BIOS issues.
ORANGE
The Orange Screen of Death on Windows occurs due to fatal hardware errors. Multiple reasons have been reported for the Orange Screen of Death. Some had this issue when watching a YouTube video, some were not able to boot into Windows. It can even occur when waking up from Sleep.
GREEN
The green screen of death only appears when you're running an Insider Preview version of Windows 10. It's the same as the blue screen of death, and it will show the same error messages. ... If you see a green screen of death (GSOD) on your PC, that's a sign you're using an Insider Preview build of Windows 10.
WHITE
The White Screen on Windows is also an error where the screen of the computer just turns white and freezes. There can be several things that can cause the white screen to appear on the Windows laptop monitor. But the main issue could be because of malfunctioning of the graphics hardware.
As you know, storage devices are an important part of the computer system for porting, saving, and extracting data files. And for you to differentiate between storage devices on your computer system, each one of the storage devices is labeled with a unique number referred to as Disk Signature for identification.
The unique disk identifier is stored as a part of the MBR or Master Boot Record. Disk signature is used by operating systems in order to identify and set apart different data storage devices and hard disk drives in the computer for data access.
These days, Disk cloning has become a regular practice in upgrading to larger hard disk drives. Drives are cloned in order to produce a similar copy to use both the original drive and cloned copy together. Moreover, lots of virtualization tools are being used to virtualize the physical hard disk drives to create virtual hard disk drives and several virtual machine clones that are created with the existing virtual hard disk drives. And since these are identical copies, chances these copies may have identical disk signatures. As a result, when you use both disks that have identical signatures at the same time you run into the Disk Signature Collision problem. This kind of problem does not often occur as the Windows system does not really allow two disks to function simultaneously when they have the same disk signature.
When you encounter a Disk Collision problem in your Windows 10 computer, you may see the following error messages:
The boot selection failed because a required device is inaccessible
The disk is offline because it has a signature collision
This disk is offline because it has a signature collision with another disk that is online
You can fix the disk collision problem by changing the disk signature which you can achieve using the command line utility diskpart in Windows PowerShell or Command Prompt or using Windows Disk Management utility.
To fix the disk collision problem, you can make use of the command-line utility called diskpart in Windows PowerShell or Command Prompt to view and change the signature, or can make use of Master Boot record in the Windows Registry. You can also make use of Windows Disk Management Utility to change the signature. Simply follow the given options below to change the disk signature either way.
Option 1 – Change Disk Signature via Diskpart
Type “command prompt” in the Windows Search bar and then right-click on the related search result and select the “Run as administrator” option.
After that, type the “diskpart” command and hit Enter to open Diskpart.
Next, type the “list disk” command to display all the disks available in the system.
Next, take note of the problematic disk number with the status Offline from the list and then type the “Select disk x” command where x is the offline disk to select the offline disk. For instance, if you type “select disk 1”, it will display the “Disk 1 is now the selected disk” message.
Now type the “Uniqueid disk” command to display the disk signature and to change the disk’s signature and set the disk online, type the “unique disk ID= (New signature)” where (New signature) is the new ID in hexadecimal. For instance, you can set the new id as “unique disk ID= 1456ACBD”.
Note: If you have given the wrong format ID, the command prompt will display the following error:
“The specified identifier is not in the correct format. Type the identifier in the correct format: in hexadecimal form for an MBR disk or as a GUID for a GPT disk.”
After you’re done, the disk will be online, and then restart your computer.
Option 2 – Change Disk Signature via Disk Management Utility
Tap the Win + R keys to open the Run dialog box and then type “diskmgmt.msc” and hit Enter or click OK to open Disk Management.
Next, right-click on the disk that is marked as Missing or Offline.
After that, select the Online command from the drop-down menu.
Then from the selecting option Online, Windows will generate a new disk signature.
Having the latest applications is often preferred for most users but sometimes we have some old applications which have not been updated or simply we just want to run oldie on our computer because it does everything we need and we do not want to upgrade in order to save some money.
The issue is presented sometimes when we try to run an old application in Windows 10 and some components are missing in Windows itself or the application is simply coded in a way to work on older Windows versions. If by any chance you have this issue then this guide is for you since we are going to show you how to run old applications in Windows 10.
This guide is made in a way to takes into account that the application itself is completely installed on your Windows 10 machine if you can not even install the application you will need to search solution for that particular application since that can not really be generalized and pinpointed issue, every application is different.
Running old applications using the compatibility option
All of that being said, let's start that old app you have. First thing is to locate an executable file or shortcut of the desired application. Once it is located, right-click on it to bring up the menu, and all the way to the bottom you will find properties. Left-click on properties.
The application settings screen will open, in upper tabs locate Compatibility and left-click on it.
After the click, you will find yourself in application compatibility settings.
In this window, you will face different options to run the chosen application in various modes in order to make it run. How settings are self-explanatory and different applications will need different settings sadly we can not cover them all but your safest bet is to run them in an environment where they have worked.
For example, if the application was working fine in Windows XP and required administrator privileges, check Run this program as an administrator and Run this program in compatibility mode for Windows XP.
In case you don’t know, Microsoft hooks up every machine that is running Windows 10 with an Advertising ID which helps them in providing Windows 10 users with relevant ads. These ads are delivered to users in the Action Center, Start Menu as well as the ads inside the UWP Applications.
What makes these advertisements relevant is that they keep track of your browsing trends, likes and dislikes, with the help of the Advertising ID. However, if you are not fond of advertisements and you do not want this feature of Microsoft to track your usage, worry not for you actually have the option to disable targeted ads on your Windows 10 computer by turning off the Advertising ID. And you can do that during Windows 10 Setup or using the Group Policy Editor. For more details, refer to the instructions provided below for each one of the methods.
Option 1 – Turn off Advertising ID during Windows 10 setup
If you are about to install Windows 10, then during the installation process, your computer boots into the Install and Configure Windows 10 screen with Cortana that assist you during the setup. Once you reach the last page which is “Choose privacy settings for your device”, you will see the Advertising ID of your computer. Under the Advertising ID, you have to disable or toggle off the “Apps can use advertising ID to provide more personalized advertising in accordance with the privacy policy of the app provider” option. After you disable it, click on the Accept button to proceed with the installation. After that, the copy of your Windows 10 you are using will have the Advertising ID disabled by default.
Option 2 – Turn off Advertising ID via Group Policy Editor
First, tap the Win + R keys to launch the Run utility.
Then, type “gpedit.msc” in the field and click OK or tap Enter to open the Group Policy Editor.
Next, navigate to this group policy setting: Computer Configuration > Administrative Templates > System > User Profiles
Now double click on the “Turn off the advertising ID” option and set the radio button to Enabled. Once you do, you will see the following description on your screen:
“This policy setting turns off the advertising ID, preventing apps from using the ID for experiences across apps. If you enable this policy setting, the advertising ID is turned off. Apps can’t use the ID for experiences across apps. If you disable or do not configure this policy setting, users can control whether apps can use the advertising ID for experiences across apps.”
Note that setting the radio button to Enabled or Not Configured will turn off the data collection of the Advertising ID.
Finally, exit the Group Policy Editor and then restart your computer to apply the changes made successfully.


 Inside run dialog type Powershell and press ENTER
In the Powershell type in the following command and press ENTER
Inside run dialog type Powershell and press ENTER
In the Powershell type in the following command and press ENTER
 In Windows 11 by default inside the Start menu, there is recommended section that contains recently opened folders, documents, and files. If you do not wish this section and do not want recent items in your Start menu there is an easy way to turn it off.
 A stop error or exception error commonly called the blue screen of death (BSoD) or blue screen, is an error screen displayed on Windows computers following a fatal system error. It indicates a system crash, in which the operating system has reached a condition where it can no longer operate safely. This is caused by many different problems, such as a general hardware failure or a crucial process terminating unexpectedly.
 On Windows 10 systems, a Black Screen of Death can be caused by an unfinished Windows Update.
 It is a diagnostic screen with a white type on a pink background. Pink Screen is mainly seen when the VMkernel of an ESX/ESXi host experiences a critical error, becomes inoperative, and terminates any virtual machines that are running. It is not fatal and generally considered more of a developer testing issue. When encountered, it can be fixed quickly by following the simple action of pressing and holding your computer’s power button to shut down the device.
 The Microsoft Windows 10 Operating System Brown Screen of Death is an on-screen fatal error notification with bug check codes which is seen when a computer crashes due to graphics hardware or software-related problems (failing graphics drivers).
 It affects the functioning of a browser, particularly Mozilla Firefox. The Yellow Screen of Death makes the appearance with a weird buzzing sound in the background when the XML parser refuses to process an XML document causing a parsing error and a weird buzzing sound. The issue persists unless the computer is manually rebooted.
 Commonly the Windows 10 red screen is caused due to the hardware error, particularly if you overclock your Windows PC/laptop. Despite this, sometimes the red screen of death is also caused by outdated or incompatible drivers or due to BIOS issues.
 The Orange Screen of Death on Windows occurs due to fatal hardware errors. Multiple reasons have been reported for the Orange Screen of Death. Some had this issue when watching a YouTube video, some were not able to boot into Windows. It can even occur when waking up from Sleep.
 The green screen of death only appears when you're running an Insider Preview version of Windows 10. It's the same as the blue screen of death, and it will show the same error messages. ... If you see a green screen of death (GSOD) on your PC, that's a sign you're using an Insider Preview build of Windows 10.
 The White Screen on Windows is also an error where the screen of the computer just turns white and freezes. There can be several things that can cause the white screen to appear on the Windows laptop monitor. But the main issue could be because of malfunctioning of the graphics hardware.
  The application settings screen will open, in upper tabs locate Compatibility and left-click on it.
 After the click, you will find yourself in application compatibility settings.
 In this window, you will face different options to run the chosen application in various modes in order to make it run. How settings are self-explanatory and different applications will need different settings sadly we can not cover them all but your safest bet is to run them in an environment where they have worked.
For example, if the application was working fine in Windows XP and required administrator privileges, check Run this program as an administrator and Run this program in compatibility mode for Windows XP.
In this window, you will face different options to run the chosen application in various modes in order to make it run. How settings are self-explanatory and different applications will need different settings sadly we can not cover them all but your safest bet is to run them in an environment where they have worked.
For example, if the application was working fine in Windows XP and required administrator privileges, check Run this program as an administrator and Run this program in compatibility mode for Windows XP.  If you are about to install Windows 10, then during the installation process, your computer boots into the Install and Configure Windows 10 screen with Cortana that assist you during the setup. Once you reach the last page which is “Choose privacy settings for your device”, you will see the Advertising ID of your computer. Under the Advertising ID, you have to disable or toggle off the “Apps can use advertising ID to provide more personalized advertising in accordance with the privacy policy of the app provider” option. After you disable it, click on the Accept button to proceed with the installation. After that, the copy of your Windows 10 you are using will have the Advertising ID disabled by default.