USB devices are one of the commonly used devices every day – from plugging mobile devices for charging using pen drives, you are making use of USB drives. However, there are times when you might encounter an error message saying, “Unknown USB Device” as you plug your USB device on your Windows 10 computer. So if you encounter this kind of error message followed by either of the following explanations, read on as this post will give you a couple of suggestions you can check out to resolve the issue.
Device Descriptor Request Failed
Port reset failed
The device failed enumeration
Set address failed
Error code 43
You can fix this error using several ways. You can try changing the Power Options, update or roll back the USB drivers, turn off Fast Startup, or run the USB troubleshooter. Follow the options given below for more details.
Option 1 – Try to change the Power Options
Tap the Win + R keys to open the Run utility.
Then type “powercfg.cpl” and tap Enter to open the Power Options window.
Next, go to your selected power plan and click the “Change plan settings” option to open a new page.
From there, click on the “Change advanced power settings” option. This will open a new window where you can see various power consumption options.
Now look for the USB Settings option and expand it.
Then set the USB selective suspend setting to “Disabled” for both scenarios: On Battery and Plugged in.
After that, click on OK and restart your computer to apply the changes made.
Option 2 – Update or reinstall the Universal Serial Bus Controller driver
Since it could be a driver issue, you can try to update or reinstall the Universal Serial Bus Controller drivers using the Device Manager. Refer to the following steps:
First, click the Start button and type “device manager”.
Then click on the “Device Manager” from the search results to open it.
From there, look for the “Universal Serial Bus controllers” option and then right-click on each one of the USB drivers and select the Update Driver from the menu.
Note: If it is a regular USB drive, then it will be listed as a USB Mass Storage Device but if you have a USB 3.0 device, then look for a USB 3.0 Extensible Host Controller.
Restart your PC and then click the “Search automatically for updated driver software” option.
Note: If updating the USB Controller drivers didn’t work, you can try to reinstall them instead.
Option 3 – Try turning off Fast Startup
Tap the Win + R keys to open the Run dialog box and type in “control” to open the Control Panel.
Next, click on the Hardware and Sound section and click on Power Options.
Afterwards, select the “Choose what the power buttons do” option from the left side menu pane.
Now click on Change settings that are currently unavailable and uncheck the entry that says, “Turn on fast startup (Recommended).
Then click on Save Changes and restart your computer and see if it has fixed the problem or not.
Option 4 – Run the Hardware and Devices Troubleshooters
The first thing you need to do is click on Start and then on the gear-like icon to pull up the window for Settings.
After opening Settings, look for the Update and Security option and select it.
From there, go to the Troubleshoot option located on the left-hand side of the list.
Next, select Hardware and Devices from the list and open the Troubleshooter and run it. Once it is doing its job, wait for it to complete the process and then restart the system.
After the system restarts, check if the problem’s now fixed. If not, refer to the next option given below.
As you know, Airplane mode is the one that gets devices in such a state where all the wireless connections are turned off. However, recently, there are some reports from users claiming that the Airplane Mode turns on by itself in their Windows 10 computers. This kind of problem could be due to an error with the Network driver, third-party applications, and many other factors. Other users also reported that the Airplane Mode automatically flickers, while some stated that they aren’t able to toggle the option for Airplane mode.
There are several options you can try to resolve this problem. You can try to configure the Power Management settings for the driver or run the Network troubleshooter. You could also roll back, reinstall or update the Network driver, as well as troubleshoot the problem in a Clean Boot State. For more details, follow each one of the given options below.
Option 1 – Try configuring the Power Management settings for the driver
The first thing you can do to fix the problem is to try configuring the Power Management settings for the driver. How? Refer to these steps:
Tap the Win + X keys to open the WinX menu and from there, select the Device Manager to open it.
Next, expand the Network adapters and select the entry for your Wi-Fi hardware.
After that, right-click on it and select Properties.
From there, go to the Power Management tab and uncheck the “Allow the computer to turn off this device to save power” option.
Once done, restart your computer and see if it has fixed the problem.
Option 2 – Try to run the Network troubleshooter
To run the Network Troubleshooter, refer to these steps:
Open the Search bar on your computer and type in “troubleshoot” to open the Troubleshoot settings.
Next, scroll down and select the “Network Adapter” option from the right pane.
Then click on the Run Troubleshooter” button.
After that, your computer will check for any possible errors and will pinpoint the root cause of the problem if possible.
Restart your computer.
Option 3 – Try to update, rollback or reinstall the Network adapter drivers
The next thing you can do to resolve the problem is to update the Network Adapter drivers by following these steps:
Tap the Win + R keys to launch the Run window and then type in the “devmgmt.msc” command and hit Enter to open the Device Manager window.
Under the Device Manager, you will see a list of drivers. From there, look for the Network Adapters and expand them.
Look for the Broadcom Network Adapter and right-click on it, as well as other network adapters that have an exclamation icon, and update them all.
Restart your PC and see if it helped in fixing the problem.
Note: If updating the network drivers didn’t help in fixing the problem, you can also try to roll back the very same drivers from their previous versions and restart your Windows 10 PC. After that, the system itself will reinstall the drivers you just uninstalled. Alternatively, you can also download and install the drivers from the manufacturer’s website directly.
To reinstall the network adapter drivers, refer to these steps:
Open the Devices Manager from the Win X Menu.
Then locate the device drivers and right-click on them to open the Properties.
After that, switch to the Driver tab and click on the Uninstall Device button.
Follow the screen option to completely uninstall it.
Finally, restart your computer. It will just reinstall the device drivers automatically.
Option 4 – Try to reset the Network Adapter
You can also try to perform a Network Reset to resolve the problem. This will reset the entire network configuration including your IP address. To perform Network Reset, follow these steps:
Tap the Win + I keys to open Settings.
From there, go to the Network and Internet section.
Next, scroll down and look for “Network Reset” under the status pane.
After that, click on Network Reset and then on Reset now to start resetting the network configuration. Once done, check if it is able to fix the error or not.
Option 5 – Try putting your computer in a Clean Boot State
You can also troubleshoot the problem in a Clean Boot state. It could be that there are some third-party applications in your computer that are causing the Airplane Mode to behave in a strange way. So, to isolate this possibility, you need to boot your computer in a Clean Boot State be using these steps:
Log onto your PC as an administrator.
Type in MSConfig in the Start Search to open the System Configuration utility.
From there, go to the General tab and click “Selective startup”.
Clear the “Load Startup items” check box and make sure that the “Load System Services” and “Use Original boot configuration” options are checked.
Next, click the Services tab and select the “Hide All Microsoft Services” check box.
Click Disable all.
Click on Apply/OK and restart your PC. (This will put your PC into a Clean Boot State. And configure Windows to use the usual startup, just simply undo the changes.)
After you’ve set your computer into a Clean Boot State, try to observe if the Airplane mode is now back to normal or not.
Blackouts are one of the most annoying things that can happen in the modern age. We have all learned to depend on electricity, maybe too much, so having a backup plan in these unpleasant situations is necessary. Here are some good gadgets for these kinds of situations.
Power Bank
The fully charged power bank is a great item that could fill up your phone or tablet. If it is a larger power bank it could fill them up all the way to the top several times and having charged phone or tablet can help greatly with some fun during dark times. The power bank can also be used to fill up other gadgets on this list so if the power outage is expected to last longer perhaps it would be wiser not to waste it on phone/tablet games.
Portable Generator
If the power bank is too short-lived for your needs, a portable generator is always a good option since it can provide power for longer time periods. The solar generator is what we recommend because it is much cheaper to produce electricity but it is limited if a power surge comes at night, one on gasoline is more stable and practical but it costs more to produce electricity.
Portable Solar Charger
One more electric-producing device on the list, this one however is aimed at charging your phone, tablet, or laptop by harvesting Sun's energy and turning it into valuable electricity for your devices. Fully silent and easy to operate this is a great tool for power outrage. It will not be able to produce electricity for smaller house appliances but for basic phone/tablet/laptop needs it will suffice.
Panic light
Self-sustained with its own battery, panic lights are great assets for lightning when power is not present. They can turn automatically when the circuit detects that power is missing but can be also manually switched on or off. There are many versions of panic lights ranging from the light they produce to how long can they work so picking the right one will depend entirely on your home size and needs.
USB Headlamp
If you lack panic lights USB headlamp is a great choice to light your way and it works even better than a flashlight, although a flashlight is also a great tool, a headlight will provide you with free arms to do various things that you would not be able to by holding a flashlight. Modern headlights come with LED lights so they provide a good amount of light with small power consumption and they can be recharged in a power bank, solar charger, or generator.
LED lantern
LED Lantern is a gadget sitting somewhere between a headlight and a panic light, it offers around the same light amount as a panic light but you can carry it around with you. Of course, it will drain its battery faster than a panic light and it will still need to carry around but it can offer some good options when you need it, like taking it with you to the toilet.
Electric Lighter
An electric lighter is also one of the things that you will need, it can ignite candles, paper, stoves, etc. Its battery is usually enough for extensive use and there are small chances that it will need to be recharged. Having matches is also smart, just in case.
Solar Oven
Great gadget when outbreaks last long or when you get hungry. Not all households have gas ovens so a Solar oven is a great tool to keep you full of food. Granted it will not be on par in speed and quality with a regular oven but when it is the only option it will suffice.
Windows comes with a built-in backup solution. However, if it failed because of an internal error, you will encounter an error message saying, “The backup application could not start due to an internal error, Server execution failed (0x80080005)”. When you get this kind of error, it means that it did not start and the process failed with a Server execution error. If you got this kind of error worries not for this post will guide you in fixing the problem in your Windows 10 computer.
The Windows Backup service is an excellent feature in Windows that only works on the NTFS file system and if you want to use this make sure that you have formatted your files system to NTFS. It is performed by the Volume Shadow Copy, all you have to do is right-click on any folder and if you see the “Previous versions” option, this means that a backup process runs from time to time and can bring back old files when needed.
To resolve the “The backup application could not start due to an internal error”, here are two suggestions you can check out.
Option 1 – Check if the Volume Shadow Copy service is running and restart it
The first thing you need to do is check if the Volume Shadow Copy service. To do that, refer to the following steps:
Click on Start and type “cmd” and right-click on Command Prompt from the search results.
Then select the “Run as administrator” option to open Command Prompt with admin privileges.
After that, type “net stop sdrsvc” and hit Enter to execute the command in stopping the Volume Shadow Copy service.
Next, type the “net start sdrsvc” command and hit Enter to start the service again.
Note: You can also restart the service using the Windows Services Manager.
In the Cortana search box, type “services” and click on the Services icon to open the Services Manager. Alternatively, you can also tap the Win + R keys to launch the Run prompt and then type “services.msc” in the field and hit Enter to open the Services Manager.
From there, look for the Volume Shadow Service (sdrsv) from the list of services. Its Startup type should be set to Manual by default.
Restart the service and if you don’t encounter any error while you turn it on, re-run the backup service and see if the backup process runs successfully.
Option 2 – Try to run the Volume Shadow Copy Service in a Clean Boot State
If the first option didn’t work and the service still keeps on failing even though the service is running, you can try putting your computer in a Clean Boot State and then try to run Windows Backup again.
Log onto your PC as an administrator.
Type in MSConfig in the Start Search to open the System Configuration utility.
From there, go to the General tab and click “Selective startup”.
Clear the “Load Startup items” check box and make sure that the “Load System Services” and “Use Original boot configuration” options are checked.
Next, click the Services tab and select the “Hide All Microsoft Services” check box.
Click Disable all.
Click on Apply/OK and restart your PC. (This will put your PC into a Clean Boot State. And configure Windows to use the usual startup, just simply undo the changes.)
Now try to run the Volume Shadow Copy service again and see if the process goes smoothly.
Note: You might also want to delete all the files in the backup solution if you want to start fresh with the backup solution. Just go to C:/System/Volume/Information/Windows Backup and take ownership of the folder. After that, make sure to stop the Volume Shadow Copy service and then delete all the files inside it.
Recently, a number of users reported that they were not able to run PLEX and other similar streaming services ever since a Windows Update was automatically installed in the system. The error in these streaming services has something to do with a missing Mfplat.dll DLL file from the Windows Media Feature Pack. On the other hand, some users also reported that the mfplat.dll error occurred on several games as well which used the Media Feature Pack.
Usually, the mfplat.dll error is caused by the missing Media Feature Pack in Windows 10. Although most of the time the Media Feature Pack is installed by the application that needs it or through Windows Update automatically, there are just certain installers that do not have it. It could be that the Media Playback service was disabled by a particular Windows Update. Aside from that, the error might be because your computer is using Windows 10 N – a Windows 10 version that does not include the Media Feature Pack by default. Whatever the cause may be, you can troubleshoot the problem with the help of the options given below. But before you go on, keep in mind that downloading the missing DLL file and copying it to the folder of the program where you encounter the error won’t really help and will only make things even more complicated.
Option 1 – Install the Media Feature Pack for Windows 10 N version
As mentioned, the Windows 10 N version does not come with Windows Media Player. Meaning to say, the Media Feature Pack is also not installed by default or won’t be updated by the Windows Update component. So if you are not quite sure what Windows 10 version you currently have installed, refer to these steps:
Tap the Windows key + S and then type “about” in the search box.
From the search results, click on the “About your PC” to open the About tab of the Settings app.
Afterward, scroll down to the Windows specifications and check your Windows version under Edition.
Note: If you’ve determined that your computer is using the Windows 10 N version, you need to install the appropriate Media Feature Pack for your computer. How? Refer to the steps below:
Click this link to download and install the Media Feature Pack from Microsoft’s official website.
Upon installation, select the edition you want to install using the drop-down menu and then click on Confirm. Take note that there are few reasons why you’d want to install the older version since most streaming services like PLEX and most games usually require version 1803.
After that, wait until the request is validated. The download should begin in a few minutes automatically.
Once the download is completed, open the installation executable file and follow the next on-screen instructions to install the Media Feature Pack on your computer.
Restart your computer. After your computer has rebooted, open the application where you’re getting the mfplat.dll missing error and then check if the problem is now fixed.
Option 2 – Enable Media Playback via Command Prompt
If you encounter the mfplat.dll missing error when you attempt to run PLEX or other similar streaming service and you’ve already verified that the Media Feature Pack is indeed installed, you might want to try enabling it using an elevated Command Prompt. There are cases when a particular Windows Update ends up disabling the feature and creates the grounds which results in the mfplat.dll missing error. Thus, you can have to enable the feature via Command Prompt.
Tap the Win + R keys to open the Run dialog box.
Then type “cmd” in the field and hit Enter to open an elevated Command Prompt.
Next, click on Yes if a User Account Control prompt pops up.
After opening Command Prompt, copy and paste the following command and hit Enter to execute it:
Close Command Prompt and then open the app once again to check if the problem is now fixed.
Option 3 – Try extracting a copy of the mfplat.dll file from the windows.old directory
If you encounter the error shortly after you just upgraded to Windows 10 from an older version, the best thing you can do to resolve the problem is to use windows.old directory to fetch an old copy of the mfplat.dll file. To do so, follow the steps below.
Go to the Windows drive and then look for the windows.old directory where it preserves a copy of your old operating system as well as associated files in case something goes out of hand during the upgrade process.
After that, open the windows.old folder and then go to the syswow64 folder.
Next, from the syswow64 folder, copy the mfplat.dll file and paste it to C: windows syswow64.
Restart your computer and check if the error is now resolved or not.
There is various Blue Screen of Death errors that you can encounter as you use your Windows 10 computer and some of these Stop errors have something to do with the win32kbase.sys file. This post will guide you in fixing the BSOD errors related to the win32kbase.sys file.
A problem has been detected and Windows has been shut down to prevent damage to your computer. The problem seems to be caused by the following file: Win32kbase.sys.
Your PC ran into a problem and needs to restart. If you would like to know more, you can search online later for this error: win32kbase.sys.
The win32kbase.sys file is a Windows operating system Base Win32 Kernel Driver file located in the System32 folder so if it ends up getting corrupted or if it went missing, your computer will throw up Blue Screen error. To fix BSOD errors that have something to do with the win32kbase.sys file, here are some possible fixes that could help. Worry not for these possible fixes are not complicated.
Option 1 – Run the Check Disk or CHDSK utility
One of the first things you can try to resolve the win32kbase.sys Blue Screen error is running the CHKDSK utility. If your hard drive has issues with integrity, the update will really fail as the system will think that it’s not healthy and that’s where the CHKDSK utility comes in. The CHKDSK utility repairs hard drive errors that might be causing the problem.
Open Command Prompt with admin privileges.
After opening Command Prompt, execute the following command and hit Enter:
chkdsk /f C:
Wait for the process to be completed and then restart your computer.
Option 2 – Run SFC or System File Checker scan
System File Checker or SFC is a built-in command utility that helps in restoring corrupted files as well as missing files. It replaces bad and corrupted system files to good system files. To run the SFC command, follow the steps given below.
Tap Win + R to launch Run.
Type in cmd in the field and tap Enter.
After opening Command Prompt, type in sfc /scannow
The command will start a system scan which will take a few whiles before it finishes. Once it’s done, you could get the following results:
Windows Resource Protection did not find any integrity violations.
Windows Resource Protection found corrupt files and successfully repaired them.
Windows Resource Protection found corrupt files but was unable to fix some of them.
Restart your PC.
Option 3 – Try to run the DISM commands
You might want to repair potentially corrupted files in your system as having them could also trigger the win32kbase.sys Blue Screen error. To repair these corrupted system files, you can run the DISM commands:
Tap the Win + X keys and click on the “Command Prompt (Admin)” option.
After that, input each one of the commands listed below sequentially to execute them:
Dism /Online /Cleanup-Image /CheckHealth
Dism /Online /Cleanup-Image /ScanHealth
Dism /Online /Cleanup-Image /RestoreHealth
Once you’ve executed the commands given above, restart your computer and check if the dxgkrnl.sys Blue Screen error is now fixed.
Option 4 – Try to run the Blue Screen Troubleshooter
As you know, the Blue Screen troubleshooter is a built-in tool in Windows 10 that helps users in fixing Blue Screen errors related to the win32kbase.sys file. It can be found in the Settings Troubleshooters page. To use it, refer to these steps:
Tap the Win + I keys to open the Settings panel.
Then go to Update & Security > Troubleshoot.
From there, look for the option called “Blue Screen” on your right-hand side and then click the “Run the troubleshooter” button to run the Blue Screen Troubleshooter and then follow the next on-screen options. Note that you might have to boot your PC into Safe Mode.
Encountering errors is never a pleasant experience and fixing errors can sometimes take a large amount of time. Also depending on your expertise and knowledge about computers and the operating systems themselves could be determining factor would you try to wrestle with error.
We will explore and analyze the advantages of both methods so you can choose and know when to apply one and when to reach for the other.
Advantages of manual method
Full control is the main advantage of manually solving errors, when you go deep dive into manually fixing problematic issues you are one that has control. Complete freedom is also another, sometimes fixing things can be done in several different ways and when you are the man behind the wheel, you are the one that can choose how to approach and what solution to apply in order to solve the issue.
Disadvantages of using manual method
The main disadvantage that some users might encounter is that they will need to know ins and outs of computer and operating systems' workings. Of course, the more complicated errors, the more knowledge it will require in order to apply the proper fix. There is also a risk to break something else if the person that is doing the fixing is not fully competent so this is also something to think about.
Another thing that goes against manual fixing is the time it will require in order to actually fix it, some more complex stuff will probably depend on searching for some external resources like searching for compatible drivers for example, or navigating complex registry keys inside Windows.
Advantages of automatic solutions
If you are a user that has no knowledge about how the operating system works, if you do not know what is a registry or how to properly navigate through the Windows folder then the automated solution is for you. The main advantage of automated systems is that you can easily fix errors without any kind of technical knowledge and usually with just one click of a button.
Saving time is also one of the advantages of fully automated solutions because they will work much faster than manually locating the problem and then fixing it. Also, most of these systems will have in place active monitoring that will check always if your system is in top form and alert you when something is not right.
Disadvantages of one-click solutions
Automated solutions are great, they can solve various issues and errors without any knowledge from the user, but they are not perfect. Like security suites sometimes an automated system can misinterpret something as an error when in fact it is not and fixing it could mean some apps not working anymore, luckily you can choose would you like to apply the suggested solution. So if you are using one do not just click fix without looking at what it is trying to fix and maintain.
Another problem with this is the price it is carrying, manually solving your computer error will cost you your time and knowledge but good automated software will come with a price tag. Some people might not be too happy to pay for this kind of application but at the end of the day, it will still be cheaper than a professional technician. The last thing that you should be aware of is that in order for the app to do its work properly it will need to be active all the time, now for modern computers, this is not the issue but for some older ones with a small amount of memory might lead to some slowing them down. This is a price to be paid in order to have your system always errors free.
Should you use an automated solution at all?
This depends on your knowledge and time available, professional IT technicians will not need this type of solution nor will power users but for most common people this will offer computers free of errors for an affordable price.
Getting a few errors here and there when updating your Windows 10 computer is not uncommon. Some of these errors won’t allow the Windows Update service to initiate while the other ones will halt the process while it’s running. So in this post, we’ll show you what you can do to fix the Windows Update error 0x80070020.
The Windows Update error 0x80070020 is most likely caused by some programs installed in the system which interferes with the Windows Update process. It might be an antivirus program, an incompatible program, a potentially unwanted program, or worse, malware. In addition, corrupted or missing files might also be the culprit. Whichever the cause may be, here are some suggestions you need to check out to resolve the problem.
Option 1 – Try to reset the Windows Update components manually
To manually reset the Windows Update components, first, you need to stop the Background Intelligent Transfer Service, Windows Update, and the Cryptographic Services. To do so, run the following command in Command Prompt and make sure to press Enter after you enter each one of them:
net stop bits
net stop wuauserv
net stop cryptsvc
Next, delete the “qmgr*.dat” file in order to reset the Windows Update components. To do delete this file, run the following command in Command Prompt:
Del “%ALLUSERSPROFILE%Application DataMicrosoftNetworkDownloaderqmgr*.dat
Now you have to rename both the SoftwareDistribution and Catroot2 folders by entering the following command in Command Prompt:
RE-register BITS and other Windows Update related files by typing each one of the following commands:
regsvr32.exe atl.dll
regsvr32.exe urlmon.dll
regsvr32.exe mshtml.dll
regsvr32.exe shdocvw.dll
regsvr32.exe browseui.dll
regsvr32.exe jscript.dll
regsvr32.exe vbscript.dll
regsvr32.exe scrrun.dll
regsvr32.exe msxml.dll
regsvr32.exe msxml3.dll
regsvr32.exe msxml6.dll
regsvr32.exe actxprxy.dll
regsvr32.exe softpub.dll
regsvr32.exe wintrust.dll
regsvr32.exe dssenh.dll
regsvr32.exe rsaenh.dll
regsvr32.exe gpkcsp.dll
regsvr32.exe sccbase.dll
regsvr32.exe slbcsp.dll
regsvr32.exe cryptdlg.dll
regsvr32.exe oleaut32.dll
regsvr32.exe ole32.dll
regsvr32.exe shell32.dll
regsvr32.exe initpki.dll
regsvr32.exe wuapi.dll
regsvr32.exe wuaueng.dll
regsvr32.exe wuaueng1.dll
regsvr32.exe wucltui.dll
regsvr32.exe wups.dll
regsvr32.exe wups2.dll
regsvr32.exe wuweb.dll
regsvr32.exe qmgr.dll
regsvr32.exe qmgrprxy.dll
regsvr32.exe wucltux.dll
regsvr32.exe muweb.dll
regsvr32.exe wuwebv.dll
Now type each one of those commands below.
net start bits
net start wuauserv
net start cryptsvc
Option 2 – Install the updates in a Clean Boot State
You might want to try putting your computer in a Clean Boot state and then install Windows Updates again without any trouble. During this state, you can start the system with a minimum number of drivers and startup programs that will surely help you in isolating the root cause of the issue.
Log onto your PC as an administrator.
Type in msconfig in the Start Search to open the System Configuration utility.
From there, go to the General tab and click “Selective startup”.
Clear the “Load Startup items” check box and make sure that the “Load System Services” and “Use Original boot configuration” options are checked.
Next, click the Services tab and select the “Hide All Microsoft Services” check box.
Click Disable all.
Click on Apply/OK and restart your PC. (This will put your PC into a Clean Boot State. And configure Windows to use the usual startup, just simply undo the changes.)
After that, try to install the Windows Updates or upgrade again.
Option 3 – Clear the contents of both the SoftwareDistribution and Catroot2 folders
Open the WinX Menu.
From there, open Command Prompt as admin.
Then type in the following command – don’t forget to hit Enter right after typing each one of them.
net stop wuauservnet stop bits
After entering these commands, it will stop the Windows Update Service and the Background Intelligent Transfer Service.
Next, go to the C:/Windows/SoftwareDistribution folder and get rid of all the folders and files thereby tapping the Ctrl + A keys to select them all and then click on Delete. Note that if the files are in use, you won’t be able to delete them.
Once all the contents in the Software Distribution folder are deleted, restart your PC and then go back to Command Prompt and input the following commands again.
net start wuauservnet start bits
Since the folder has already been flushed, it will be populated afresh the instant your restart your computer and open Windows Update.
Option 4 – Try to run the Windows Update Troubleshooter
Running the built-in Windows Update troubleshooter could also help you resolve the Windows Update error 0x80070020. To run it, go to Settings and then select Troubleshoot from the options. From there, click on Windows Update and then click the “Run the troubleshooter” button. After that, follow the next on-screen instructions and you should be good to go.
Option 5 – Try restarting the Windows Update Services
Open the Services Manager.
From there, make sure that you set the following services and Startup types:
Fix Microsoft Visual C++ Runtime Library Error, Microsoft Windows operating system supports a form of shared libraries that are known as DLL (Dynamic-link libraries). These are also known as code libraries that are used by multiple processes while one copy is loaded into memory.
Runtimes are also code libraries that are loaded by applications when the application is called to run on the system. The most common runtime libraries that are used today are Visual C++ Runtime Library and Java Runtime Environment.
These libraries are practically used for nearly every single application you run on your system. Therefore it is very important that these libraries are in good working order.
Microsoft Visual C++ Runtime Library Error occurs when this runtime library becomes corrupted.
When Microsoft Visual C++ Runtime Library Error occurs, the applications powered by this runtime library fail to run smoothly, resulting in locking you out of those applications and hampering your ability to work on them.
Generally speaking, this error indicates system instability and poor PC maintenance. If this error is not fixed timely it can expose your system to serious PC damages like system freeze, crashes, and data loss.
Solution
Error Causes
Microsoft Visual C++ Runtime Library Error is triggered for numerous reasons. These include:
Poor program installation
Disk fragmentation
Missing and damaged .dll files
Registry corruption
Malware invasion
In a nutshell, it can be said that the deep-rooted cause of the Microsoft Visual C++ Runtime Library Error is the registry. All the causes listed above are associated with the registry.
For simplification, the registry is the main database of your system that stores all the activities executed on the computer in the RAM, the hard disk.
This includes both the important data and junk files such as temporary files, internet history, bad registry keys, invalid registry entries, and also the files from the uninstalled programs.
If these files are not removed from the registry frequently, it overloads the hard disk and leads to obscure error message displays on your system like the Microsoft Visual C++ Runtime Library Error as warning signs.
Sometimes, rebooting the system may fix the Microsoft Visual C++ Runtime Library Error. However, this is temporary. Error message pops again after some time. So, instead of seeking out a temporary solution, it is advisable to look for a solution that can repair this error for the longest time.
Further Information and Manual Repair
There are two ways to fix the Microsoft Visual C++ Runtime Library Error code. One is to reinstall the Visual C++ runtime libraries. This can be a complex task if you are not a computer programmer or technically sound.
However, the second way, or let’s just say the best and easiest way to resolve this problem is to download Restoro.
This is truly an easy way as it requires no technical expertise or programming knowledge to repair the Microsoft Visual C++ Runtime Library Error.
Restoro is an advanced, user-friendly, and multi-functional repair tool integrated with profound powerful utilities like an intuitive registry cleaner, system stability scanner, and anti-virus.
It has a smooth interface, easy navigation, and a simple layout making it easy for users and even novices to operate it to resolve the Microsoft Visual C++ Error in seconds.
The registry cleaner scans your entire PC for registry issues. It wipes out all the invalid, unnecessary, and obsolete files clearing up your disk space. In addition to this, it repairs fragmented disks, damaged .dll files (runtime code library), and repairs the registry.
Along with these benefits, Restoro also functions as a system optimizer thus boosting the performance of your system. It can be downloaded by all PC Windows users as it is compatible with all Windows versions.
Click here to download Restoro on your PC to resolve the Microsoft Visual C++ Runtime Library Error code and to ensure optimum PC performance and health.
Instaling and removing applications from your Windows can sometimes leave some traces that are unpleasant and can cause annoyances. One of these annoyances is the program in the startup section of the task manager.
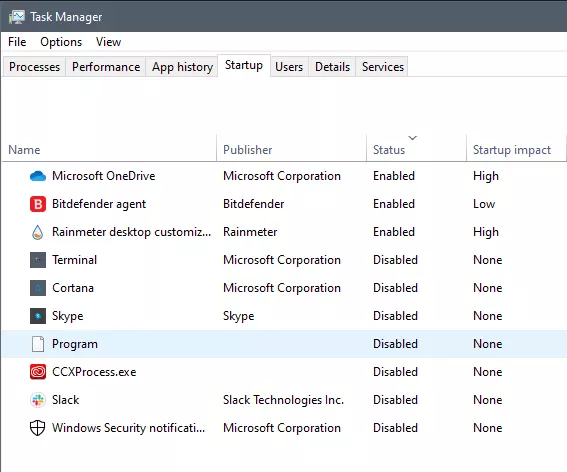
If you ever opened task manager and went into the startup section trying to disable some of the startup items on your Windows boot there might be a chance that you have experienced and seen a program without any icon or information about it just sitting there.
This is due to some applications being removed from the system but for some reason, it still shows itself in startup and it is quite annoying. So here we will show you how to get rid of this annoyance so your startup is clean again without junk in it.
Removing a program from startup
Locating the source of the issue
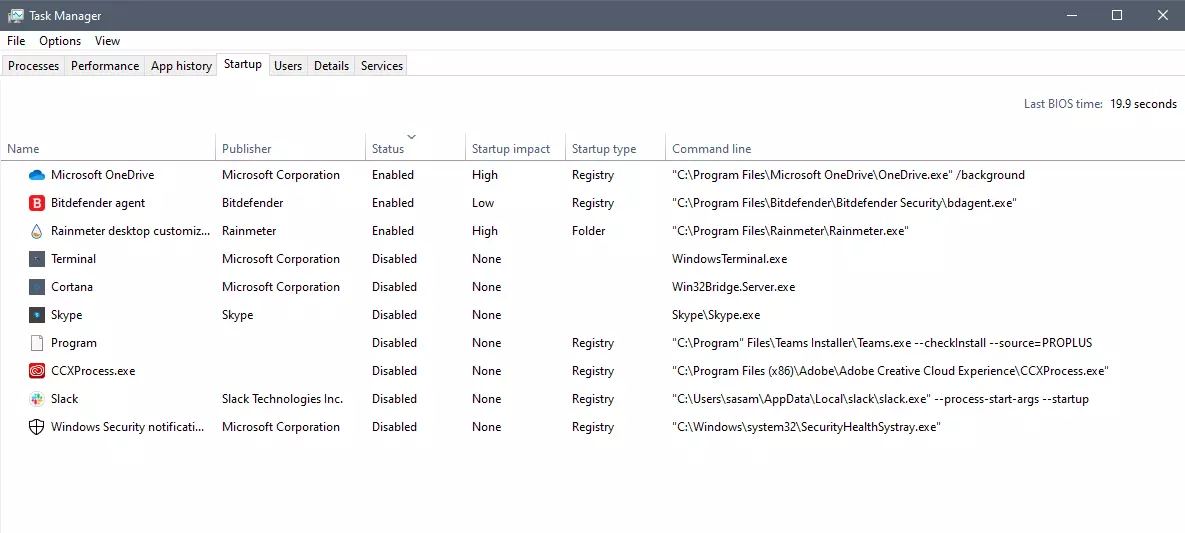
The first thing of course is to open the task manager itself and navigate to the startup tab. Inside the startup tab right-click on the column header and tick or enable Startup type and command line. Now you will see the location of the supposed file (that is missing or you could just go there by right-clicking on the item, but here it is greyed).
99% of the time startup type will be registry since the file is missing, if it was a file fix would be just to simply delete the file in the folder but since it was installed and not properly removed registry key is still present but the file cannot be found. After confirmation that the file is indeed missing and that the startup type is registry open the registry editor by typing Regedit in search and pressing enter.
Removing the key from registry
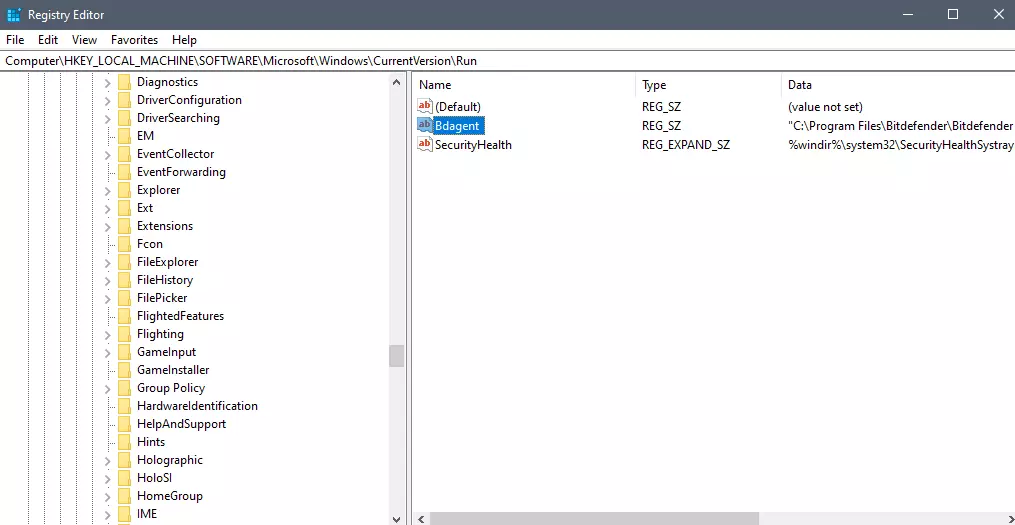
Inside Registry editor navigate to: HKEY_CURRENT_USER\SOFTWARE\Microsoft\Windows\CurrentVersion\Run. Inside on right part, you will see all auto-start entries added by installed applications.
Locate one that is causing issues by comparing its path with the path inside the task manager command line and delete the key. Once the key is deleted right-click on RUN on the left part and choose HKEY_LOCAL_MACHINE to quickly jump on that key location and repeat the process of key deletion if needed. HKEY_LOCAL_MACHINE will delete startup entry for all users and sometimes entry will not be present here since the application is not installed for all users or there are no other users on the machine.
After the procedure is finished, reboot your systems in order to apply changes.
Spying via some malicious app on the target phone is not a new thing but it can be very uncomfortable and even against the law in some countries.
Infecting the target phone can be done in various ways, another person can intentionally download and install applications on it, and you can install them via some phishing attacks or by an online scam. Once installed this piece of software presents a very serious invasion of privacy since it can track text messages, track phone location in real-time, record calls in real-time, eavesdrop on calls, take control of the camera and microphone, and many other applications.
Here are some common symptoms of mobile phones infected with spyware.
Symptoms of spyware
Random reboots Slow performance Strange text messages Overheating Unusual high data usage Non-familiar apps in the app list The fast drain of the battery Long shutdown time Strange interference and sounds during calls Signs of activity during standby mode
If your phone exhibits any of these symptoms you might have a spyware app installed and running on it.
Common spy apps
There are many apps that have been designed to spy on people that can be downloaded in the app store or on Google Play today. Most of these spyware apps are aimed at parents wanting to keep an eye on and protect their children. However, these can be used by anyone in order to spy on a target person via their phone.
Below is a list of common apps that can be used to spy on you. Many spyware apps require a phone to be ‘jailbroken’ or ‘rooted’ before being installed, this is when the phone’s operating system is changed to allow the phone to become unlocked and customizable.
mSpy : An undetectable spying app for iOS devices. It can be used to read your chats, see your location, view your email, check your call history, record your keystrokes, and more.
Spyera : This app requires rooted and jail-broken iPhones to work. It can go undetected and monitors phone calls and your call history. It even allows call recording and eavesdropping on live calls.
Flexispy : Flexispy prides itself as the #1 phone monitor for parents and can monitor everything from calls to social texts.
Umobix : This powerful spyware app has a dashboard that allows users to easily monitor someone’s location, calls, texts, keystrokes, all major social media, and more. You can detect Umobix because it heats up the infected phone and greatly affects the battery life of the infected device.
Ikey Monitor : Although it requires the device to be rooted for Android or jailbroken for iPhones, this spy app captures keystrokes, passwords, and screenshots, allows for call recording and supports multiple languages.
Clevguard : Available for both iOS and Android, Clevguard allows users to track GPS and Wi-Fi locations, capture screenshots remotely, and more. Due to a recent update, the spy app drains the target phone’s battery significantly.
Remove spyware from your phone
If any of the beforementioned apps are present on your phone you need to remove them right away.
Go to your phone settings and remove the malicious applications, then download some protection suite and scan the whole phone for any other trace of software remains or other malware apps.