
Error Code 0x80072EE2 – What is it?
Windows 10 error code 0x80072EE2 usually occurs as a result of a disruption during the upgrade process when users attempt to upgrade their operating system using Windows Update. The disruption may be caused by a loss of Internet connection. Error code 0x80072EE2 may also occur due to problems related to one’s firewall. Common symptoms of this error code include the following:
- Upgrade process fails to complete
- A message box pops up highlighting the presence of error code 0x80072EE2
Solution
 Error Causes
Upgrade error codes like error code 0x80072EE2 usually occur when disruptions or problems related to system files, or third-party apps prevent Windows Update from completing an upgrade. In the case of error code 0x80072EE2, the most likely cause is a bad Internet connection.
Further Information and Manual Repair
Windows 10 error codes are numerous and so are the solutions to fixing these problems. In most cases, Windows users have access to several manual repair solutions depending on the error code present on their device. These manual repair methods are usually easy to implement, with the exception of a few solutions that require technical knowledge and skills. In such cases, you may need to consider using an effective automated tool or you may contact a Windows repair technician to assist you.
In terms of error code 0x80072EE2, however, no technical skills are required. Manual repair solutions for this error code involve checking and troubleshoot network problems if your connection was disrupted. Also, you may need to check your firewall settings and disable it temporarily to verify whether or not your firewall is preventing you from accessing the upgrade. Further details are provided below.
Method One: Verify Internet Connection
If for whatever reason you lost Internet connection while attempting to upgrade your operating system via Windows Update, your upgrade will time out and error code 0x80072EE2 in Windows 10 may occur. For this reason, it is important for you to check your connection once you notice the presence of error code 0x80072EE2 on your device.
There are many ways you can verify your Internet connection but one of the simplest ways is to first open your preferred Internet browser and type the web address of a site you normally visit. Once you are able to access the website, you will know for sure that your connection is not an issue. Simply restart your PC and reattempt the upgrade.
If you are unable to complete the upgrade process, however, this simply means that there is another issue causing error code 0x80072EE2 to occur. Proceed to the next manual repair method. This method may also apply if you were unable to connect to the Internet.
Method Two: Troubleshoot Network Problems
Though you may be able to access a website or open your Internet browser, there may be other issues affecting your network that are causing the error code to occur. To verify for certain whether or not the issue causing error code 0x80072EE2 in Windows 10 is related to your network, troubleshoot your network using the Network Troubleshooter tool found on your PC.
- Step one: Type Network Troubleshooter in the search box near the Start button
- Step two: Select Identify and repair network problems
- Step three: Wait until the troubleshooter has verified and fixed problems related to the network
- Step four: Restart PC
Once the issue has been resolved, it is time to verify if the error code is fixed. Open Windows Update then select the option which enables you to access the latest upgrades to your machine. Wait to see if the error code reoccurs or if you can now access the upgrade to your operating system. If the error code reoccurs, move to the next manual repair method.
Method Three: Disable Firewall Settings
Another issue that may be causing an error code to occur is your firewall. To verify if your firewall is preventing you from accessing the upgrade, disable your firewall. If you are using third-party security software, simply open the security app and check its firewall settings. Select disable or turn off the firewall.
Restart your computer, then open Windows Update to reattempt to upgrade your device. If this proves successful, you will be able to access the upgrade. Error code 0x80072EE2 in Windows 10 will no longer be present.
Method Four: Download an Automated Tool
If you wish to always have at your disposal a utility tool to fix these Windows 10 and other related issues when they do arise, download and install a powerful automated tool.

 In the menu choose device manager and click on it.
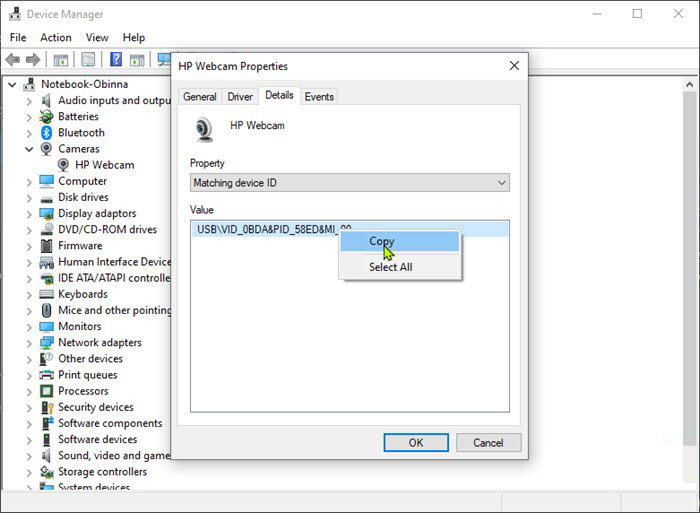
 When the device manager opens, expand the Imaging devices or Cameras section.
Right-click Integrated Camera or the primary webcam, and click Properties.
Go to the Details tab.
Under the Property section, click to select Matching device ID from the drop-down.
Right-click the value and select Copy
When the device manager opens, expand the Imaging devices or Cameras section.
Right-click Integrated Camera or the primary webcam, and click Properties.
Go to the Details tab.
Under the Property section, click to select Matching device ID from the drop-down.
Right-click the value and select Copy
 The next step is to download and install
  Despite popular belief, there are a lot of users running Linux OS. Linux offers great security and working environment and 96.3% of the world's top 1 million servers run on Linux. 90% of all cloud infrastructure operates on Linux and practically all the best cloud hosts use it. But gaming on Linux is limited, enter Steam proton a Valve’s gaming solution.
 Skinning of applications is not new to PC users, but did you knew you could skin Steam?
With skin, you can customize the UI and style of the client to what you want making it more personal and to your liking. First thing is to find the skin that you would like to install. There are a lot of sites where you could find custom made Steam skins but we would recommend
Skinning of applications is not new to PC users, but did you knew you could skin Steam?
With skin, you can customize the UI and style of the client to what you want making it more personal and to your liking. First thing is to find the skin that you would like to install. There are a lot of sites where you could find custom made Steam skins but we would recommend  The 2021 CLUVENS BRAND newly issued model UNICORN has fully electrical tilting capabilities to 160 degrees, Reading light-two LED & RGB illumination lighting, manual open/close keyboard tray, and armrests. This model is suitable for home and office, and also gaming computer work environments.
It offers functions that enable the user to experience unprecedented comfort and quasi total immersion through strategically positioned 1-3 monitors, audio systems, and accessories. The result is a complete computer office, ergonomically optimized, with a minimal footprint that improves overall performance and productivity and health and comfort.
Sitting on a chair can help a lot for relieving health problems like lower back pain, herniated discs, sciatica, and neck pain and also enhance performance and viewing effects.
The 2021 CLUVENS BRAND newly issued model UNICORN has fully electrical tilting capabilities to 160 degrees, Reading light-two LED & RGB illumination lighting, manual open/close keyboard tray, and armrests. This model is suitable for home and office, and also gaming computer work environments.
It offers functions that enable the user to experience unprecedented comfort and quasi total immersion through strategically positioned 1-3 monitors, audio systems, and accessories. The result is a complete computer office, ergonomically optimized, with a minimal footprint that improves overall performance and productivity and health and comfort.
Sitting on a chair can help a lot for relieving health problems like lower back pain, herniated discs, sciatica, and neck pain and also enhance performance and viewing effects.
 Scorpion is basically a premium version of Unicorn with being able to hold more weight, having cup holders on the armrest, etc.
The look is also similar with Scorpion being more sinister-looking but overall Steel frame and chair are the same.
Scorpion is basically a premium version of Unicorn with being able to hold more weight, having cup holders on the armrest, etc.
The look is also similar with Scorpion being more sinister-looking but overall Steel frame and chair are the same.