 Like in Windows 10, Windows 11 will also support God mode to be enabled and used. For those readers that do know what God mode is, let me explain it in simple terms. God mode is the icon on the desktop that once clicked will open and let you adjust every option in the control panel and some hidden features for Windows inside one application.
There are a lot of advantages to having this one-click fast access to features, especially if you are a power user. Luckily creating such an awesome icon and enabling God mode is very easy to accomplish, all you have to do is:
As you can see creating and accessing all settings at your fingertips is much easier than most people think. Enjoy your ultimate access to Windows 11 features and if you wish you can drag and drop sections from it into the desktop or anywhere for easy access to that specific topic.

In 2014 Proton mail started as an end-to-end encrypted email service offering secure and private email services. Proton mail is still live and going with the same dedication to privacy and security but the company has expanded its offering into cloud storage drive services.
Starting as a public beta at the end of 2020, Proton Drive is keeping its privacy and security policy philosophy with the new service. Proton Drive is the newest service besides Proton Calendar, Proton VPN, and Proton Mail.
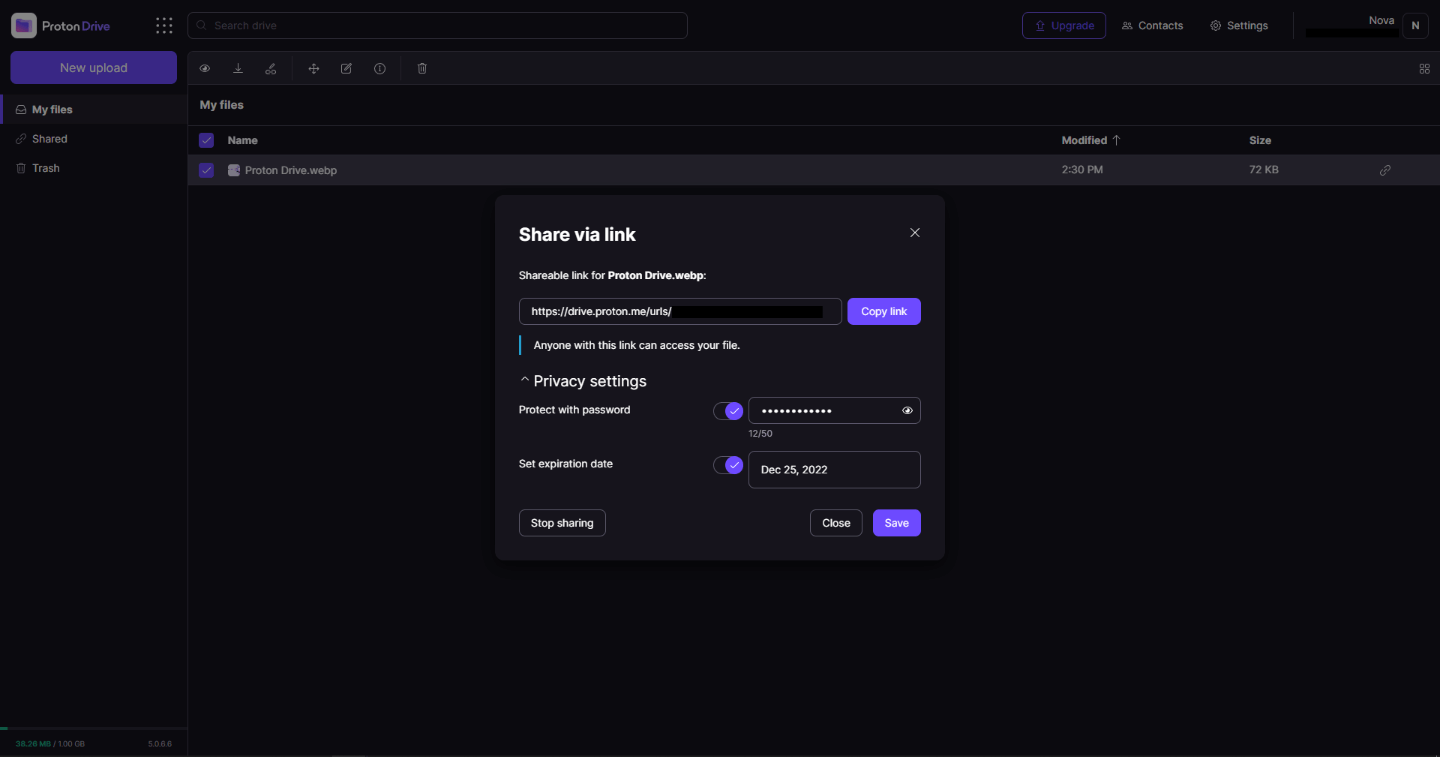
Drive has end-to-end encryption for everything on it including files themselves, filenames, folder structure, folder names, extensions, and file sizes. This means that you and only you can access your files. Servers are located in Geneva, Switzerland and they are under Swiss privacy laws making sure that your files are protected. Proton services in general are all open source so anyone can take a look at them to be sure that nothing is lurking under the hood. For now, sync is done either via the android app or web interface but the desktop client will come soon since currently, it is under development.
Sadly free plan of Proton Drive will give you only 1GB of storage which is much less than other services and sadly payments plans are also not so jaw-dropping going for $4 USD per month for a 200GB plan or with Proton ultimate subscription that will set you $10 behind but you will get 500GB of drive storage. Of course, if you value privacy for your files these options are good but if you do not mind that part other services have much better options.
All in all Proton Drive is a great cloud storage solution if you need privacy and well worth the investment. With the ultimate subscription, you will get enough space for most people and company needs with other services and guaranteed privacy and security, on the other hand, if you just need a large amount of cloud storage not caring too much about privacy other options are better.
 When File Explorer opens go to VIEW > OPTIONS. Inside options select “Show hidden files, folders, and drives”, uncheck “Hide protected operating system files (Recommended)”, and click APPLY > OK
Go to the recycle bin and check to see if files have managed to show up.
When File Explorer opens go to VIEW > OPTIONS. Inside options select “Show hidden files, folders, and drives”, uncheck “Hide protected operating system files (Recommended)”, and click APPLY > OK
Go to the recycle bin and check to see if files have managed to show up. In the command prompt type in the following: rd /s /q C:\$Recycle.bin
Reboot your system
In the command prompt type in the following: rd /s /q C:\$Recycle.bin
Reboot your system Further Information and Manual Repair
“This policy setting turns off the Windows Location Provider feature for this computer. If you enable this policy setting, the Windows Location Provider feature will be turned off, and all programs on this computer will not be able to use the Windows Location Provider feature. If you disable or do not configure this policy setting, all programs on this computer can use the Windows Location Provider feature.”
“\server is not accessible. You might not have permission to use this network resource. Contact the administrator of this server to find out if you have access permissions. Logon Failure: The target account name is incorrect.”If you are among the users who experience the same issue, read on as this post will help you resolve this error when accessing your server. But before you start troubleshooting the problem, you might want to perform System Restore, especially if tend to create one. To use System Restore, here’s what you have to do:
Error code 10 is a type of Window Device Manager error code. This error code is generated when the Device Manager can’t start the hardware device or is experiencing device driver issues. It is displayed in the following format:
"This device cannot start. (Code 10)"
You can access complete details about error codes related to Device Manager such as code 10 through the Device Status area in the Device Properties.
By accessing Device Status, you can easily view the status of each device and learn about the specific device that could be causing the problem.
 Error Causes
Error code 10 can be triggered due to several reasons. These include:
Device driver corruption can cause you great inconvenience and PC performance issues. The computer’s operating system relies heavily on device drivers to communicate with the hardware.
For example, the printer driver facilitates functioning of the printer. Similarly, the graphic card driver ensures proper video output on the monitor screen.
However, your PC hardware, such as printer or keyboard, may stop functioning properly if their device drivers become outdated or corrupt. Therefore to avoid inconvenience and to ensure your PC works properly, it is important to resolve the problem immediately without any delay.
To repair error code 10, you don’t have to be a technical whiz or hire a professional computer programmer. Here are some of the best and easy to perform DIY methods that can help you fix this device error in no time.
Sometimes temporary problems in Device Manager can also generate code 10 error. Therefore it is advisable to restart your PC. Rebooting your system might fix the error. Try it! If it does, great, however, if the error still persists, then try other methods listed below.
Go through the Device Status in the Device Properties to view the driver causing the problem. If any driver is tagged with a yellow exclamation point, it means that driver is the one causing problems. Once identified, uninstall that driver and then reinstall it. This will hopefully resolve the problem.
Whether the error code 10 is generated due to incompatible, corrupted, or outdated device drivers, simply update the device driver to resolve. To update the driver, go to the Device Manager, then click the driver tab in the device properties dialog box.
After that, click update driver. This will start the hardware update wizard. Then follow the instructions to update the driver on your PC. During this process, you may be prompted to provide the driver path.
If you don’t have it, then you will have to download the latest driver from the hardware vendor’s official website. This can be time-consuming and stressful.
Another alternative is to install DriverFIX. It is a user-friendly device driver management software with an intuitive interface.
Its intelligent algorithm is designed to detect all the problematic drivers in seconds. It automatically updates and accurately installs appropriate drivers and ensures your PC runs at its optimum level in no time.
Click here to download DriverFIX on your system to resolve error code 10.
Error Causes“Script: <PATH of the VBS Script> Line: x Char: x Error: The description of the error. Code: xxxxxxxx Source: (Source of the error)”At the time of writing, it isn’t clear yet what the root cause of the error really is but there are several potential fixes you can check out to fix it. You can try to run the System File Checker or set the default value for the .vbs key, or troubleshoot the problem in a Clean Boot State. You could also try to repair Install Windows 10 or scan your computer for malware. For more detailed instructions refer to the following options.