Logo

Fix Wi-Fi doesn't have a valid IP configuration

In today's time, Wi-Fi is a common occurrence, each household has it, on town squares, there are free Wi-Fi hotspots, etc. But sometimes when relaxing at home WI-Fi can fail on us and stop working. If this happens to you do not lose your mind because we have several troubleshooting help tips and ways to get it back quickly so you can continue with your browsing and using your internet.

wi-fi router

Restart the Router and Computer

Yes, we will start with this typical cliche in IT and tech in general. Surprisingly this method still proves over and over again to be true and effective. Over time some electric components simply start working a little bit differently, electrostatic electricity can accumulate on some parts and they can cause issues. By turning off the device and leaving it for some time you are discharging accumulated electrostatics and placing it again into normal working mode.

Unplug your router and leave it for at least 30s like that, a full 1 min is recommended, and then plug it back. Turn it on and restart your computer in order to reboot addresses.

Reset DHCP

If simple have you tried unplugging it and plugging it back in did not work let us reset DHCP. Click on the start button and type in PowerShell, then click on Run as administrator. Once inside the PowerShell type in the following command followed by ENTER: ipconfig /release and after the command finishes, type in: ipconfig /renew also followed by ENTER key. Try the connection again.

Reset TCP/IP stack

The next thing that we will try if the previous one failed is to reset the TCP/IP stack to eliminate corruption of settings files. Like in the previous step, press Start and type in PowerShell and click on run as administrator. inside type in: netsh int IP reset and press ENTER key. Wait for the process to finish and reboot your PC.

Reset WinSock

WinSock is yet another part of Windows OS that is responsible for network communication and resetting it could solve the issue. Again go to PowerShell as described in previous steps and type in this time: winsock reset and press ENTER. Wait for the process to finish and restart your computer.

Other things you can try

Change TCP IP setting back to automatic if you have set manual Ip address on your computer.

Update your network driver via the manufacturer's website of your network adapter. There is a chance that somewhat updates are available to address some issues discovered.

Factory reset your router on the back by locating the reset button on it and pressing and holding it for around 10s.

Turn off your firewall and antivirus protection in order to eliminate it from blocking your internet access.

Do You Need Help with Your Device?

Our Team of Experts May Help
Troubleshoot.Tech Experts are There for You!
Replace damaged files
Restore performance
Free disk space
Remove Malware
Protects WEB browser
Remove Viruses
Stop PC freezing
GET HELP
Troubleshoot.Tech experts work with all versions of Microsoft Windows including Windows 11, with Android, Mac, and more.

Share this article:

You might also like

Lock folder with password in Windows 10
Hello and welcome everyone. In today's article, you will learn how to lock folder and content in it. Please be aware of few things:
  1. The method is shown here works, but you need to be careful and follow step by step or you will damage your files permanently,
  2. If you forget your password, you can not access your files anymore
  3. Your files altho protected can still show up in recent files of some applications
All of that being said, let us start with locking the local folder on the computer with the password. Go to the folder where you have files that you would like to hide and lock with a password. Enter the folder and create the new text file inside it. Skip the name for now and go inside it. Copy and paste the following code inside the file:
cls @ECHO OFF title Folder Locker if EXIST "Control Panel.{21EC2020-3AEA-1069-A2DD-08002B30309D}" goto UNLOCK if NOT EXIST Locker goto MDLOCKER :CONFIRM echo Are you sure u want to Lock the folder(Y/N) set/p "cho=>" if %cho%==Y goto LOCK if %cho%==y goto LOCK if %cho%==n goto END if %cho%==N goto END echo Invalid choice. goto CONFIRM :LOCK ren Locker "Control Panel.{21EC2020-3AEA-1069-A2DD-08002B30309D}" attrib +h +s "Control Panel.{21EC2020-3AEA-1069-A2DD-08002B30309D}" echo Folder locked goto End :UNLOCK echo Enter password to Unlock folder set/p "pass=>" if NOT %pass%==Your-Password-Here goto FAIL attrib -h -s "Control Panel.{21EC2020-3AEA-1069-A2DD-08002B30309D}" ren "Control Panel.{21EC2020-3AEA-1069-A2DD-08002B30309D}" Locker echo Folder Unlocked successfully goto End :FAIL echo Invalid password goto end :MDLOCKER md Locker echo Locker created successfully goto End :End
Now locate this line of code in the document: if NOT %pass%==Your-Password-Here goto FAIL and replace Your-Password-Here with your password. !!! Write down somewhere your password, if you lose it you will lock the folder even for you !!! Save the file as FolderLocker.bat and double-click on it to execute it. If everything was done correctly, a new folder with the name: Locker Move files that you want to hide and protect inside that folder. Double click again on FolderLocker.bat The command prompt will appear with the question do you want to lock the folder, press Y, and press ENTER. The command prompt will close and the Locker folder will disappear. In order to unhide and access the folder, you will need to double click on FolderLocker.bat again but this time command prompt with ENTER your password will appear. Type in your chosen password and the folder is back. If you wish to hide and lock it again just double click on FolderLocker.bat again, confirm with Y and it is hidden again.
Read More
Moving Start Menu to the Second Monitor
One of the most important User Interface elements in a Windows 10 operating system is the Start Menu. Not too long ago, Microsoft has added some new features and redesigned the Start Menu a couple of times as well. Thus, it is not uncommon for Windows 10 users to use several monitors. That’s why in this post, you will be guided on how you can move the Start Menu to your second monitor in Windows 10. There are a lot of advantages in using more than one monitor like a better and widescreen as well as help in improving and increasing productivity. Usually, the Start Menu and the taskbar is present in the original monitor only. In most cases, it helps users in moving the Start Menu to the second monitor and helps users in segregating tasks, and uses separate monitors for each kind of task. There are two simple steps to move the Start Menu to the second monitor. You have the option to unlock and drag the taskbar, as well as make adjustments in the settings. To get started, refer to each one of the following options to move the Start Menu to the second monitor.

Option 1 – Move the second monitor by unlocking and dragging the taskbar

The first option you can try to move the Start Menu to the second display is to simply unlock and then drag the taskbar. To do so, follow these steps:
  • First, click on the Taskbar and unlock it.
  • Next, uncheck the Lock the taskbar feature in the menu of the Taskbar Settings. This will free the taskbar so you can move or drag it around.
  • After that, push the Start Menu to the furthermost corner of the screen and then transfer it to the second monitor.

Option 2 – Move the second monitor using the keyboard

  • The first thing you have to do is to tap the Windows key to open the Start Menu.
  • Next, close the Start Menu by tapping the Esc key.
  • After that, the controls will shift back to the taskbar.
  • Now open the context menu of the taskbar by tapping the Alt + space bar together. This will move the Start Menu to the second monitor.

Option 3 – Move the Start Menu to the second monitor via Settings

If you find that the Taskbar is moving to the wrong monitor automatically or if the program does not start on the same monitor as the taskbar, then you can try this option.
  • Click on Start first and click Run.
  • Then type “desk.cpl” in the field and click OK.
  • Alternatively, you could also right-click on the desktop and select the Screen Resolution option from the drop-down menu.
  • After that, click on the monitor that you want to use as the primary monitor and select the checkbox labeled “Make this my main display”.
  • Once done, you have to choose the “Show desktop” on only 1 from the drop-down menu of Multiple displays.
  • Now click the Keep Changes option and select the Extend these displays from the Multiple displays drop-down menu and then click on the Apply button to save the changes made.
  • Afterward, click the Keep changes option once the dialog box pops up.
Read More
Automatically Adjust Active Hours in Windows
In case you didn’t know, the new Windows 10 v1903 has brought tons of new features around Windows 10 Updates. One of these features is the ability to automatically adjust the Active Hours based on your computer activity. This feature is really useful as it tells the operating system when to install the Windows Updates. A lot of users use the Active Hours feature to ensure that the Windows Update won’t force them to restart their PCs to install the update. So if your computer is turned on, it won’t apply the update during the active hours you’ve specified. In addition, the active hours change for many users and they are not that strict. For instance, if you set the active hours between 10 am to 5 pm, Windows Update won’t be forcing you to restart your computer to install the updates at those times. Note that Windows Update allows enabling an option using where it can monitor the active hours in your computer and change it. To configure this setting, here’s what you have to do:
  • Frist, go to Settings > Update & security > Windows Update.
  • Next, take note of your current active hours and click on the “Change active hours” link.
  • Then toggle the option that says, “Automatically adjust active hours for this device based on activity”. This will change the active hours and if you match it with the previous one, it should be different.
As you can see on the image given above, the earlier active hours were between 8:00 to 17:00 and were changed to 11:00 to 19:00. If you have been using this feature for a while you’ll find how useful and handy it is especially when you’re using your computer and don’t want any notifications like the prompts for Windows Updates to bother you while working.
Read More
MS Mariner, new OS for servers based on Linux
mariner installerWell if anyone told me just a few years ago that I will see the day when Microsoft releases a new OS based on Linux I would be very amused, but that day has come. Mariner is the newest OS out of nowhere. Microsoft’s new Linux Distro, dubbed Common Base Linux (CBL)-Mariner, isn’t the type of distro you’d want to install directly on any old machine. It’s primarily meant for cloud infrastructure and edge products. Specifically Microsoft’s Cloud and Edge products. But if you are curious, it’s possible to run. Juan Manuel Rey, a Microsoft Senior Program Manager for Azure VMware, recently published a guide to ISO CBL-Mariner image. With that, you can easily get it up and running. And you can build CBL-Mariner on an Ubuntu 18.04 desktop. So you can try it out since it is free. You can get it from here: https://github.com/microsoft/CBL-Mariner It is obvious that Microsoft aims to set itself as a leader in enterprise server environments with this move and it is very likely that it may succeed or at least give a good shake to its competitors, mainly red hat and Suse which are two dominant distros in that field. Many believe that they can win over by providing regular updates and package delivery via their already established system and that feature could be a turning point for some. In any case, time will tell and we shall see.
Read More
Resize icons on desktop quickly in Windows 10
Resize icons on desktop in Windows 10 in a matter of seconds! Hello everyone and welcome to today's quick tip. If you have ever been dissatisfied with icon size on your desktop and any of the default sizes like small, medium large, etc have not been appropriate know that there is a quick way to resize icons on your desktop in between sizes. All that you have to do in order to use this built-in feature is: Press and hold CTRL and scroll with the mouse. That's it! Find your appropriate size for icons and enjoy. icons on desktop
Read More
Fix “We couldn’t find any drives” Error
If you encountered an error message saying, “We couldn’t find any drives, To get a storage driver, click Load driver” when you try to install Windows in a VirtualBox machine, then you’ve come to the right place as this post will guide you in fixing this error. This error message is displayed on the screen where you have to choose a partition to install the guest operating system. This error is most likely due to the lack of correct settings as well as a corrupted virtual disk. To fix this error, you have to remove existing storage devices, create a new storage device and select the correct ISO file.

For complete instructions, follow the given steps below.

Step_1: The first thing you have to do is remove all the existing Storage devices and since this option is already available in VirtualBox by default, there is no need for you to install any third-party software. Step_2: After that, open VirtualBox and select the virtual machine and then click the Settings button. Step_3: Next, switch to the Storage section and on your right-hand side, you will see “Controller: SATA” and two other sub-labels. From there, select Controller: SATA and then click on the red cross button that says, “Remove selected storage controller”. Step_4: Now click on the Add new storage controller icon and select the “Add SATA Controller” option from the given list. Step_5: Afterwards, click the “Add hard disk” button and select the “Create new disk” option, and then you have to create a new virtual disk for your virtual machine. Step_6: Verify if you have selected Dynamically allocated while you create the virtual hard disk. Once the process is completed, you will get a “.vdi” file in the list. Step_7: Next, click on the “Add optical drive” button and select the “Choose disk” option. Here, you have to select the ISO file and if you can find an ISO file in the given list, select it from there, else, you have to click the Add button and navigate to the folder where the ISO file is located. Step_8: Once you’re done, click the OK button and boot your virtual machine. You should see options instead of the “We couldn’t find any drives, To get a storage driver, click Load driver” error message. If you see the options, you can now create a new partition and start the installation process of the Windows operating system in the VirtualBox machine without any problem.
Read More
New Chrome update brings surveillance debate
Google Chrome 94 is here and it has introduced a controversial idle detection API. For those people that do not know what idle detection API is, well basically Chrome can be asked by a website to report when a user of the site has a site open and is idle on the device. The issue that people have with this is that this particular feature can be used to report when the user is not using a computer at all. chrome idle detection feature
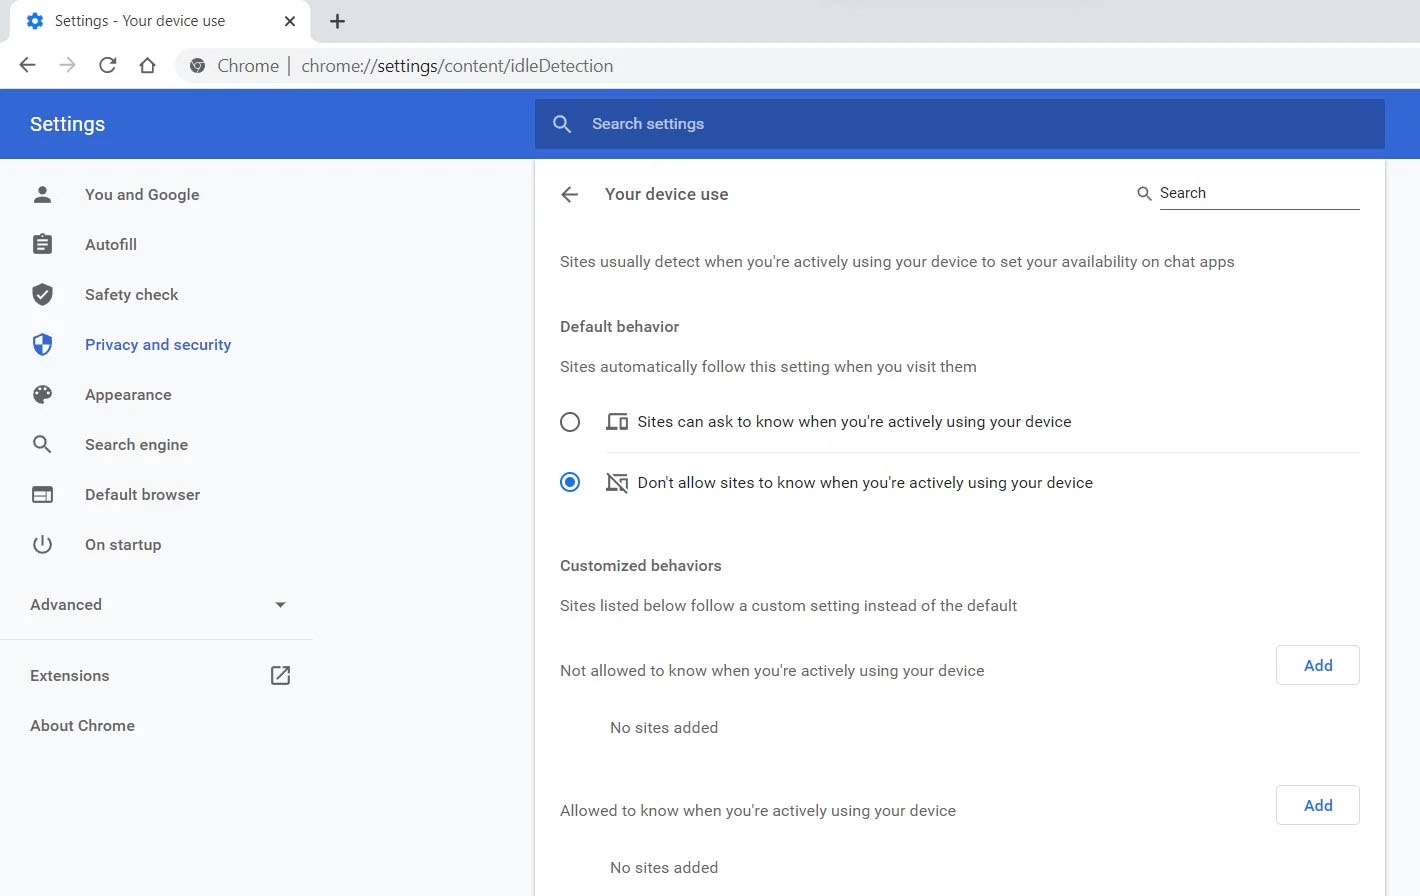
Good thing is that website or web application will prompt you to allow it to use this feature like when a site/application wants to use your microphone or web camera. Developers are on board with this feature since it can provide them with more telemetric data on how users are interacting with their website/application but there are some that are strongly voicing against this. Tantek Çelik, Mozilla Standards Lead, commented on GitHub, saying:
As it is currently specified, I consider the Idle Detection API too tempting of an opportunity for surveillance capitalism motivated websites to invade an aspect of the user’s physical privacy, keep long-term records of physical user behaviors, discerning daily rhythms (e.g. lunchtime), and using that for proactive psychological manipulation (e.g. hunger, emotion, choice)… Thus I propose labeling this API harmful and encourage further incubation, perhaps reconsidering simpler, less-invasive alternative approaches to solve the motivating use-cases.
Others who have spoken against this feature are people from the WebKit development team inside Apple. Ryosuke Niwa, an Apple software engineer who works on WebKit said:
That doesn’t seem like a strong enough use case for this API. For starters, there is no guarantee that the user won’t immediately come back to the device. Also, who is such a service supposed to know what another device user might be using at any given point? We’re definitely not going to let a website know all the devices a given user might be using at any given point. That’s a very serious breach of the said user’s privacy. It seems to me that such a suppression/distribution mechanism is best left for the underlying operating systems/web browsers to handle.
Of course, technology itself as always can be used for good or for bad and time will tell if this feature has brought good stuff or it has paved another brick in surveillance and privacy manipulation. As said for now option will prompt for agreement and let's hope that it will be used for good causes from this day into the future.
Read More
Windows Upgrade/Activation error 0xc03f6506
There are a lot of home users that often get a computer that comes installed with the Windows 10 Home. And since Windows 10 Pro offers more features and utilities compared to Windows 10 Home, a lot of users also prefer to upgrade their Windows 10 Home computers to Windows 10 Pro. However, while doing so, a number of users reported that they encountered error 0xc03f6506 and they were not able to proceed with the upgrade. If you are one of these users, when you encounter error 0xc03f6506, you will see the following error message on your screen:
“The last product key you entered can’t be used on this copy of Windows (0xc03f6506).”
This particular error tends to occur when you go on to activate Windows 10 although it can also appear during the upgrade process. In such cases, you will see the following error message:
“Unable to upgrade your edition, We can’t upgrade your edition of Windows. Try upgrading your edition of Windows again. (0xc03f6506).”
To fix the Activation Error Code 0xc03f6506 in Windows 10, use the options provided below as references but before you proceed, make sure that you create a System Restore point first.

Option 1 – Try to use the Registry Editor

If you have already upgraded from Windows 10 Home to Windows 10 Pro and you’re having trouble with its Activation, then you might want to apply some registry tweaks to fix the problem. How? Refer to these steps:
  • Tap the Win + R key combination to open the Run dialog box.
  • Then type “Regedit” in the field and click OK or tap Enter to open the Registry Editor.
  • Next, navigate to this registry key: ComputerHKEY_LOCAL_MACHINESOFTWAREMicrosoftWindows NTCurrentVersion
  • From there, look for a DWORD named “EditionID” and once you found it, double click on it and change its Value data to Windows 10 Professional.
  • After that, look for another DWORD named “ProductName” and double click on it to change its Value data to Windows 10 Professional.
  • Once you’re done, restart your computer to apply the changes made successfully.

Option 2 – Try to use Command Prompt

If the registry tweaks you applied didn’t fix the Activation error, then you can try using Command Prompt instead. Note that you can use this option in both scenarios pointed out above.
  • First, you have to insert a bootable drive of the Windows10 installer.
  • Next, tap the Win + X keys and select Command Prompt (Admin) from the menu.
  • After opening Command Prompt as admin, navigate to the root location of the bootable drive inside the Command Prompt command line.
  • Once you’re already there, type the following command and tap Enter:
setup.exe /auto upgrade /pkey <YOUR WINDOWS 10 PRO EDITION PRODUCT KEY>
After entering the command, check if it was able to fix the Windows Upgrade or Activation error 0xc03f6506. If not, refer to the next given option below.

Option 3 – Try to disable the Network Adapter

Just like the second option, you can also use this option for both the given scenarios above.
  • Tap the Win + X keys and select Network Connections from the menu.
  • This will open the settings for your network and on the left side panel, click on the “Change adapter settings” link. This will open Control Panel.
  • From there, click on the network your computer is connected to, and then right-click on the Network Adapter that you are using and select Disable.
  • After disabling the Network Adapter, try to switch to the edition of your copy of Windows 10 again and see if the problem is now fixed and don’t forget to double click on the disabled Network Adapter to get back on the Network.
Read More
Fix user account is not authorized
If you encounter an error message saying, “The connection was denied because the user account is not authorized for remote login” when you try to establish a remote connection, read on as this post will help you resolve the problem. This kind of error occurs when the targeted host does not allow you to access that system remotely. Based on the error, you are not authorized to log in remotely which means that you need to obtain the correct permission. There are several potential fixes you can try for this error. You can try to check the Remote Desktop Users group or add users to the Security group or check the Remote Desktop Service itself. Refer to the options provided below for more detailed instructions to fix the “The connection was denied because the user account is not authorized for remote login” error.

Option 1 – Try checking the Remote Desktop Users group

You can encounter this error when the Remote Desktop Users group does not have any permission for your user account that you are using to establish a remote connection. Thus, you need to make sure that your user account is a member of the Remote Desktop Users group. How? Refer to these steps:
  • Tap the Win + R keys on your keyboard and then type “cmd” in the field and tap Enter or click OK to open Command Prompt.
  • After opening Command Prompt, type the “lusrmgr.msc” command and tap Enter to execute it.
  • Alternatively, you can also search for “lusrmgr.msc” in the Start Search and once you’ve opened it, select Users and then double click on your user name to open its Properties.
  • From there, switch from the “General” tab to the “Member Of” tab.
  • Next, if you can’t see any Remote Desktop Users group under the Administrator, you have to add it. To do that, just click on the Add button.
  • After that, on the newly opened window, click on the Advanced and Find Now buttons, respectively.
  • And in the Search results box, double click on Remote Desktop Users.
  • Now click on the OK button to save the changes made and check if you can now connect to a remote host or not.

Option 2 – Try to add a user to the Security group

You can actually block or allow a user from logging on through the Remote Desktop Services. However, if you do not have the right setting, you won’t be able to use this functionality. Thus, you need to confirm this setting. To do that, follow the steps below.
  • In the Start Search, type “secpol.msc” in the field and tap Enter to open the Local Security Policy panel.
  • From there, go to User Rights Assignment.
  • Next, look for a policy named “Allow log on through Remote Desktop Services” located on your right-hand side and then double click on it to open its Properties.
  • If you were not able to find the Remote Desktop Users under Administrator, then you have to add it by simply clicking on the Add User or Group button.
  • After that, enter “Remote Desktop Users” in the blank field and click the OK button to save the changes made.
  • Now restart your computer and try connecting again to the remote host.

Option 3 – Try checking the Remote Desktop Users group

There is a service that’s supposed to be running and needs to be set up correctly for you to connect to the remote host. And so you need to ensure that this service is up and running. To do so, follow these steps:
  • Tap the Win + R keys to launch the Run utility.
  • Then type “services.msc” in the field and hit Enter or click OK to open the Services Manager.
  • Next, look for the Remote Desktop Services and double click on it to open its Properties.
  • After that, go to the “Log On” tab and select the “This account” option and then click on the Browse button.
  • On the next screen that appears, look for the Advanced button and click on it and use the Find Now button to search.
  • You will see “NETWORK SERVICE”. Double click on it and then save the changes you’ve made to the settings.
  • Finally, restart your PC and see if the problem is now fixed.
Read More
How to Fix Low Wi-Fi signal strength on Windows 10
If you are experiencing a Low Wi-Fi signal strength on your Windows 10 PC after you’ve updated or reinstalled it, read on as this post will guide you on what you can do to fix the problem. The way devices connect these days has evolved with our cognitive revolution. Various devices use some or other wireless technology to connect with other devices. However, all wireless technology has some kind of limitation when it comes to range and signal strength. From time to time, you might have faced several Wi-Fi issues. Low Wi-Fi signal strength usually happens after you update or reinstall your Windows 10 system. This issue can be identified easily by looking at the signal bars in the Wi-Fi icon or by measuring its strength. Since this problem is wide scope, there are tons of possibilities which is why this post covers the most generic situations that could help most users. Refer to the options given below to fix the low Wi-Fi signal strength of your Windows 10 PC.

Option 1 – Try running the Network Adapter Troubleshooter

If a few days ago the range and signal of the Wi-Fi was perfectly fine before you did an update or reinstall, it is possible that there were some changes made in the configuration as well. In most cases, the latest configuration that came with the update has not aligned the config in your computer or laptop. The easiest and simplest way to fix this is by using the Network Adapter Troubleshooter. How? Follow the steps below.
  • Right-click on the Wi-Fi icon from the system tray to start troubleshooting.
  • After that, select Troubleshoot problems. Note that it might take a while to run it but once it’s finished, it will show you all the problems with the network adapter.
Note: The Network Adapter Troubleshooter will also fix the issues in the background but there might be some issues that will require manual action. And if the troubleshooter wasn’t able to identify and fix the problem for you, proceed to the next given option below.

Option 2 – Try using the Device Manager

If the problem is related to hardware, you need to seek out the help of the Device Manager. To do so, follow the steps below.
  • Pull up the Device Manager.
  • Next, look for your Wi-Fi adapter under the Network Adapters.
  • Once you found it, right-click on it and open Properties.
  • After that, you will see all the actions related to drivers under the driver tab.
  • You can either update or roll back the selected driver or you could also disable and re-enable it to see if the problem’s fixed.
Note: If updating the driver didn’t help, you might have to dig into the advanced settings. From this post on, it can get a bit complicated as there are terms that you might not understand as well as some configuration. To make it easier for you, you can search for your Wi-Fi adapter online and try following the instructions from there. And before you make any further changes to your computer’s settings, make sure that you create a system restore point first.

Option 3 – Try changing the Wi-Fi Roaming Sensitivity

If you want to enhance the Wi-Fi reception as well as the performance on your Windows 10 PC, you might want to change the Wi-Fi Roaming Sensitivity or Aggressiveness. Roaming Sensitivity is the rate at which your computer chooses and switches to the nearest available point of access which offers a better signal. It is based on the strength and quality of the Wi-Fi and not on the distance to the Wi-Fi point.

Option 4 – Try adjusting the Wi-Fi range

The issue could also be caused by the position of your computer with respect to the Wi-Fi router instead of your hardware or drivers. It could be that your physical location might be a factor for the low signal strength of your Wi-Fi so you might want to adjust the Wi-Fi range to fix the problem.
Read More
1 2 3 171
Logo
Copyright © 2023, ErrorTools. All Rights Reserved
Trademark: Microsoft Windows logos are registered trademarks of Microsoft. Disclaimer: ErrorTools.com is not affiliated with Microsoft, nor claims direct affiliation.
The information on this page is provided for information purposes only.
DMCA.com Protection Status