 in system dialog click on the clipboard and on the right screen turn ON CLipboard history.

Check your connection. Microsoft Store needs to be online. It looks like you’re not.
Check connection
Code: 0x80072F7D
This is the error that you get if trying to open the Microsoft store on Windows 10 and it fails. If you experienced this error and are unable to access the store do not despair we are here to help you. This particular error is usually due to some internet issues, follow the presented guide step by step in order to solve it and be able to access the Windows store again.
Since this error is closely tied to internet connection it is advisable to first eliminate the obvious and check if your computer is connected to the internet.
Built-in Windows troubleshooter is a great tool and we will be using it in the next few segments in order to locate the issue and fix it.
Open Windows 10 Settings app using the WINDOWS + I
Click on Network & Internet
Click on Network troubleshooter
Select network adapter to diagnose
Press the Next button.
Press WINDOWS + I to open the Settings app
Click on the Update & Security
Click on the Troubleshoot
Select Additional troubleshooters option
Click on Internet Connections option
Hit Run the troubleshooter button.
Press WINDOWS + I to open the Settings app
Select Update & Security
Click on the Troubleshoot
Use the Additional troubleshooters option
Click on the Windows Store Apps option
Press Run the troubleshooter button
Your antivirus or firewall might be interfering with the application, sometimes, in some cases store is detected as a false positive in some security applications, and its access to the internet is cut. Disable your security suite to see if this is the case.
 in system dialog click on the clipboard and on the right screen turn ON CLipboard history.
New Tab Aid is an extension for Google Chrome. It is published by Spigot Inc. It is classified as a potentially unwanted browser hijacker as it injects Yahoo search into your new tab windows. This extension also adds recently viewed tabs under the search bar. It also redirects all your searches to Yahoo instead of your default browser search engine. It is often found bundled with other software found on the internet and not installed directly by the user. For these reasons, numerous anti-malware utilities flag New Tab Aid as potentially unwanted or malicious.
“Your PIN is no longer available due to a change in the security setting on this device on this device.”
C:\Windows\Service\Profiles\Local\Service\AppData\Local\MicrosoftNote: From there, you should see a folder named “Ngc”. This folder might be the one that’s causing the problem so you are going to fix it by making some changes. This folder contains all the files responsible for any PIN-related settings. So if you are not able to access the Ngc folder, or it has gotten corrupted for some reason during an update here’s how to fix it.
 Bad or good news, depending on your view comes from RIOT for their game Valorant. It seems that Riot has decided to enforce Windows 11 TPM 2.0 feature into Valorant running on Windows 11 and there is a rumor that it will be de facto standard and that it will move to Valorant in general no matter on which system it runs.
Furthermore, there is a rumor circling around that other developers are also talking about implementing TPM 2.0 requirements so they can harvest advanced security features of Windows 11 in order to prevent hacks and other cheats in their games.
This is an interesting point to stand on, on one side, sure, advanced features that will prevent cheating and hacking is a great thing. On other hand denying access to many computers that do not support TPM 2.0 and removing them from the game can be a permanent loss of customers and therefore loss of money. It is a risk to be sure and I am not really sure that alienating gamers is a good choice for long-term income, especially when you will be able to install Windows 11 on an unsupported PC as stated by Microsoft.
We will all see how this Riot decision will reflect on their business, as not a big Valorant player myself I am not impacted too much with this decision, but it will be interesting to see if others will indeed go with this trend or they will decide to wait a while until much more PC’s are upgraded.
Bad or good news, depending on your view comes from RIOT for their game Valorant. It seems that Riot has decided to enforce Windows 11 TPM 2.0 feature into Valorant running on Windows 11 and there is a rumor that it will be de facto standard and that it will move to Valorant in general no matter on which system it runs.
Furthermore, there is a rumor circling around that other developers are also talking about implementing TPM 2.0 requirements so they can harvest advanced security features of Windows 11 in order to prevent hacks and other cheats in their games.
This is an interesting point to stand on, on one side, sure, advanced features that will prevent cheating and hacking is a great thing. On other hand denying access to many computers that do not support TPM 2.0 and removing them from the game can be a permanent loss of customers and therefore loss of money. It is a risk to be sure and I am not really sure that alienating gamers is a good choice for long-term income, especially when you will be able to install Windows 11 on an unsupported PC as stated by Microsoft.
We will all see how this Riot decision will reflect on their business, as not a big Valorant player myself I am not impacted too much with this decision, but it will be interesting to see if others will indeed go with this trend or they will decide to wait a while until much more PC’s are upgraded. 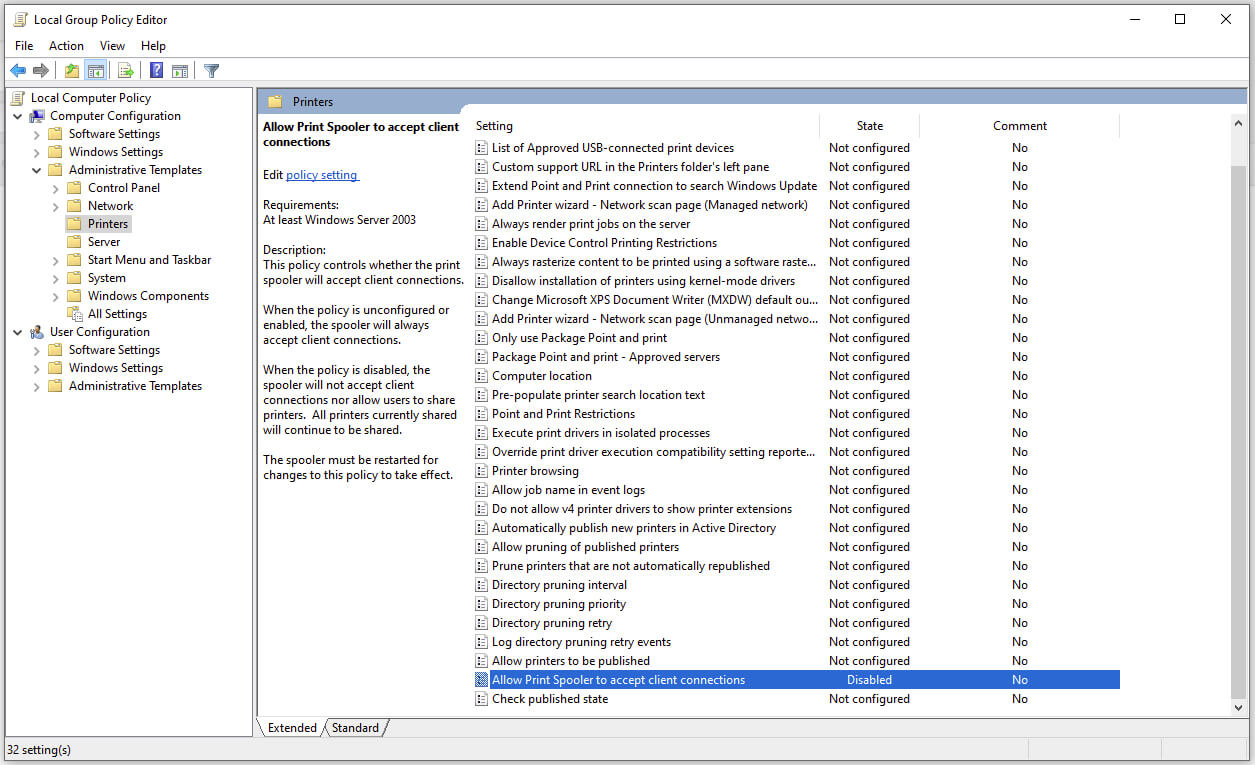 Microsoft is once again advising its customers to disable Windows print spooler after a new vulnerability that allows hackers to execute malicious code on machines has emerged. While a patch fixing the flaw will be released in due course, the most effective workaround currently on the table is to stop and disable the print spooler service entirely.
"An elevation of privilege vulnerability exists when the Windows Print Spooler service improperly performs privileged file operations. An attacker who successfully exploited this vulnerability could run arbitrary code with SYSTEM privileges. An attacker could then install programs; view, change, or delete data; or create new accounts with full user rights."
In its most basic essence, Error Code 0xc00000fd appears when a program can not be initiated. It can occur when a file or program is corrupted, incompatible with the current version of the operating system, or out of date.
This error code occurs primarily in Windows but is also present in previous editions of the operating system. The symptoms of this error and the resolution methods for each of these systems are essentially resolved in the same way.
Common symptoms include:
There are several different things that Windows 10 users can do to try to fix the appearance of Error Code 0xc00000fd on their machine. Some of these methods are fairly simple for the average user, while others may require advanced knowledge and comfort with diving into the deeper tools and settings of the Windows operating system. If you have difficulty in implementing the methods below, contact a qualified Windows repair technician to assist you in the resolution of the error code.
 Error Causes
Error Code 0xc00000fd can arise when program files are not recognized properly by the operating system, when the operating system is no longer compatible with the program being run, when files are missing or corrupted, or when the program has been changed in a substantial way. Each of these causes requires a different method of resolution.
 Windows and Devices chief Panos Panay has revealed new focus sessions feature that will be in Windows 11 on his Twitter account today. He himself is referring to it as a game-changer especially with Spotify integration.
Error Causes
Windows and Devices chief Panos Panay has revealed new focus sessions feature that will be in Windows 11 on his Twitter account today. He himself is referring to it as a game-changer especially with Spotify integration.
Error Causes