Power Calibration Error or Medium Speed Error when burning CD/DVD

If you are one of the few users who is still burning CDs and DVDs, you might have come across an error that says, “Medium Speed Error” or “Power Calibration Error”. There are several factors that could cause this error but it’s most likely that the CD/DVD burner wasn’t able to determine the Optimum Power Calibration rate properly.

So what is Optimum Power Calibration rate? It is a test that runs before the burning process to regulate the optimal laser power needed to complete the job. And if this process malfunctions, obviously, you won’t be able to burn the content on your CD or DVD. There are also cases when the Power Calibration error pops up for some small issues that have nothing to do with the regulation of laser power.

Here are some quick fixes you can try to resolve the Power Calibration error when burning a CD or DVD.

Option 1 – Make sure you’re using good quality CD or DVD

A lot of burning issues stem down to the purchase of low CDs or DVDs to make sure that what you are using has good quality for it is not always a good idea to purchase cheap products as cheap products could also mean cheap quality.

Option 2 – Try burning at lower speeds

If you’re certain the problem is not with the CD or DVD you are using then you can try burning again, this time at lower speeds. There are instances when doing things quickly can end in a disaster such as the “Medium Speed Error” or “Power Calibration Error” you’re getting.  To fix the problem, you have to burn at a slower speed and just take the time to wait until the burning process is done.

Option 3 – Try updating your burning software

It’s always a good idea to check if the burning software you’re using requires an update especially if it’s throwing up “Medium Speed Error” or “Power Calibration Error”. Thus, you need to update your burning software right away and then try to burn your CD or DVD once the update has been completed.

Option 4 – Try cleaning the disk drive

You might want to consider cleaning the disk drive using several tools in the market that is designed to clean the disk drive. These tools work on removing dust particles from the lens which helps a lot in the burning quality. Aside from that, it also helps in reducing errors like “Medium Speed Error” or “Power Calibration Error”. So give this option a try as it might time for a disk drive cleanup.

Option 5 – Try to disable the IMAPI

If none of the options given above worked, you might want to disable the IMAPI or Image Mastering Applications Programming Interface. How? Refer to the steps below.

  • Open Control Panel by simply clicking the Start button and then typing “control panel” in the field.
  • Control Panel should pop up in the search results. Once you found it, click it to open it.
  • Next, select System Security > Administrative Tools and then click Services.
  • After that, you’ll have to search for the “IMAPI CD-Burning COM Service” option.
  • Then right-click on it and select Properties.
  • From there, switch the Startup Type from “Enabled” to “Disabled”.
  • Now click on Apply and then restart your PC.

Do You Need Help with Your Device?

Our Team of Experts May Help
Troubleshoot.Tech Experts are There for You!
Replace damaged files
Restore performance
Free disk space
Remove Malware
Protects WEB browser
Remove Viruses
Stop PC freezing
GET HELP
Troubleshoot.Tech experts work with all versions of Microsoft Windows including Windows 11, with Android, Mac, and more.

Share this article:

You might also like

DRIVER_UNLOADED_WITHOUT_CANCELLING_PENDING_OPERATION
If you encounter the DRIVER_UNLOADED_WITHOUT_CANCELLING_PENDING_OPERATION Blue Screen error with an error code of 0x000000CE then it means that a driver failed to cancel the pending operations before unloading. Some of the driver files that might be the culprit include the intelppm.sys, intcdaud.sys, tmxpflt.sys, mrxsmb.sys and asusptpfilter.sys. This kind of Blue Screen error occurs when the driver failed to cancel lookaside lists, worker threads, DPCs, and other items before unloading. You can usually identify which driver file is triggering the BSOD error in the BSOD error itself since its name would be printed on the blue screen and stored in memory at the location (PUNICODE_STRING) KiBugCheckDriver. Refer to the possible solutions given below to fix the DRIVER_UNLOADED_WITHOUT_CANCELLING_PENDING_OPERATIONS error.

Option 1 – Perform a System Restore

Performing System Restore might help you in fixing the SYNTP.SYS Blue Screen error. You can do this option either by booting into Safe Mode or in System Restore. If you are already in the Advanced Startup Options, just directly select System Restore and proceed with the next steps. And if you have just booted your PC into Safe Mode, refer to the steps below.
  • Tap the Win + R keys to open the Run dialog box.
  • After that, type in “sysdm.cpl” in the field and tap Enter.
  • Next, go to the System Protection tab then click the System Restore button. This will open a new window where you have to select your preferred System Restore point.
  • After that, follow the on-screen instructions to finish the process and then restart your computer and check if the problem is fixed or not.

Option 2 – Disable the BIOS Memory options

Disabling the BIOS Memory options such as Caching and Shadowing can help you in fixing the DRIVER_UNLOADED_WITHOUT_CANCELLING_PENDING_OPERATIONS Blue Screen error. All you have to do is enter the BIOS first and then use the Arrow and Enter keys to select your choices. And if you can’t seem to find it, look for specific instructions from your OEM or you could also look out for instructions from the manufacturer of your motherboard.

Option 3 – Update or rollback your device drivers

If the first option didn’t work for you, then it’s time to either update or roll back the device drivers. It is most likely that after you updated your Windows computer that your driver also needs a refresh. On the other hand, if you have just updated your device drivers then you need to roll back the drivers to their previous versions. Whichever applies to you, refer to the steps below.
  • Open the Devices Manager from the Win X Menu.
  • Then locate the device drivers and right-click on them to open the Properties.
  • After that, switch to the Driver tab and click on the Uninstall Device button.
  • Follow the screen option to completely uninstall it.
  • Finally, restart your computer. It will just reinstall the device drivers automatically.
Note: You can install a dedicated driver on your computer in case you have it or you could also look for it directly from the website of the manufacturer.

Option 4 – Try to run the CHKDSK utility

Running the CHKDSK utility might also help you resolve the DRIVER_UNLOADED_WITHOUT_CANCELLING_PENDING_OPERATIONS Blue Screen error. If your hard drive has issues with integrity, the update will really fail as the system will think that it’s not healthy and that’s where the CHKDSK utility comes in. The CHKDSK utility repairs hard drive errors that might be causing the problem.
  • Open Command Prompt with admin privileges.
  • After opening Command Prompt, execute the following command and hit Enter:
chkdsk /f /r
  • Wait for the process to be completed and then restart your computer.

Option 5 – Run the Memory Diagnostic Tool to check for Memory leaks

  • Tap the Win + R keys to open Run and type exe and hit Enter to open the Windows Memory Diagnostic Tool.
  • After that, it will give two options such as:
    • Restart now and check for problems (Recommended)
    • Check for problems the next time I start my computer
  • Once your computer has restarted, perform a basic scan or you could also go for the “Advanced” options such as “Test mix” or “Pass count”. Simply tap the F10 key to start the test.
Note: After you select the option, your PC will restart and check for memory-based issues. If it finds any issues, it will automatically fix them and if there’s no issue found, then it’s most likely not a memory-based issue so you should try the other options given below.

Option 6 – Try analyzing the Memory Dump Files

You can also try to analyze the Memory Dump files as it can help you identify the root cause of the DRIVER_UNLOADED_WITHOUT_CANCELLING_PENDING_OPERATIONS error.

Option 7 – Try checking the Registry settings

You might also want to try disabling the concerned driver file if it is mentioned in the Stop error. For example, if the stop error mentioned the “intelppm.sys” driver file then you have to disable this driver file since it is most likely the culprit. To do that, follow the steps below.
  • Tap the Win + R keys to open the Run dialog box.
  • Next, type “Regedit” in the field and hit Enter to open the Registry Editor.
  • After that, go to the this registry path: HKEY_LOCAL_MACHINE > SYSTEM > CurrentControlSet > Services > Processor
  • From there, double click on Start and change its value to “4”.
  • Now go to this path: HKEY_LOCAL_MACHINE > SYSTEM > CurrentControlSet > Services > Intelppm.
  • Set its value to “4” and then restart your computer to apply the changes made.

Option 8 – Run the Blue Screen Troubleshooter

The Blue Screen troubleshooter is a built-in tool in Windows 10 that helps users in fixing BSOD errors like DRIVER_UNLOADED_WITHOUT_CANCELLING_PENDING_OPERATIONS. It can be found on the Settings Troubleshooters page. To use it, refer to these steps:
  • Tap the Win + I keys to open the Settings panel.
  • Then go to Update & Security > Troubleshoot.
  • From there, look for the option called “Blue Screen” on your right-hand side and then click the “Run the troubleshooter” button to run the Blue Screen Troubleshooter and then follow the next on-screen options. Note that you might have to boot your PC into Safe Mode.
Read More
Fix Windows Sandbox failed to start 0x80070015
As of late, many users reported getting an error in Windows Sandbox that has an error code of 0x80070015. According to users, they encountered this error when they tried to start Windows Sandbox. Based on the error code, it seems that there are some problems with the supporting services of Windows Sandbox that trigger the error. It is possible that these services are misconfigured or that they are outdated and have to be updated. Here’s the complete message of the error:
“Windows Sandbox failed to start. Error 0x80070015. The device is not ready. Would you like to submit feedback about this issue?”
If you are one of the users who encountered this kind of error in Windows Sandbox, then you’ve come to the right place as this post will help you sort this problem out. All you have to do is follow each one of the options provided below.

Option 1 – Make sure that all the supporting processes and services of Windows Sandbox are running properly

If running Windows Sandbox as an administrator didn’t fix the error, you have to ensure that all related processes for Windows Sandbox are running properly. To do that, follow these steps:
  • Tap the Win + R keys to launch the Run utility and type “services.msc” in the field and hit Enter to open the Windows Services Manager.
  • Next, from the list of services, look for the following services in the given order:
    • Network Virtualization Service: (Startup type: Manual)
    • Virtual Disk: (Startup type: Manual)
    • Hyper – V Virtual Machine: (Startup type: Manual)
    • Hyper – V Host Compute Service: (Startup type: Manual)
    • Container Manager Services: (Startup type: Automatic)
  • After you find the aforementioned services, restart each one of them.
  • Once done, try to open the Windows Sandbox again and see if the error is fixed or not.

Option 2 – Try to install any pending Windows Updates

If the second option still didn’t work, then you might want to check Windows Updates on your computer and see if there are any pending Windows Updates you have to install. All you have to do is go to the Windows 10 Settings app and then go to the Windows Updates section and click on the “Check for updates” button to check if there are any pending updates that are needed to be installed. This could fix the Windows Sandbox Error 0x80070015.

Option 3 – Try to run Windows Sandbox as an admin

  • In the Start Menu, scroll down until you see the entry for the Windows Sandbox.
  • Then right-click on it and select More and then select the “Run as administrator” option to open it with admin privileges.
  • Next, if a User Account Control or UAC prompt pops up, just click on Yes to proceed.
  • You should now be able to open the Windows Sandbox without the error. However, if the error persists, proceed to the next given option below.
Read More
Screen of death colors in Windows 10
Receiving a screen of death is not a pleasant experience at all and most users would agree that they would very much like not to face one during their work with the computer. Sadly PC is not a perfect machine and it is not working in a perfect environment so errors happen. The most famous and well-known death screen is blue which is also the most common one, my bet would be that there is not a user which has not been faced with this blue error screen. There is no simple explanation why these stop errors occur as several factors can be involved. However, it is known that the malfunctioning of hardware drivers or drivers that are installed by third-party software drive this unwanted change. But did you know that there is more colors for infamous death screens and not just blue one? Microsoft has coded different errors to different colors in the goal for the technical team to be aware right away of what type and kind of error they are dealing with. Color for screen errors are: Blue, Black, Pink, Brown, Yellow, Red, Orange, Green and White If you are interested in what color represents what keep reading.

BLUE

blue screen of deathA stop error or exception error commonly called the blue screen of death (BSoD) or blue screen, is an error screen displayed on Windows computers following a fatal system error. It indicates a system crash, in which the operating system has reached a condition where it can no longer operate safely. This is caused by many different problems, such as a general hardware failure or a crucial process terminating unexpectedly.

BLACK

black screen of deathOn Windows 10 systems, a Black Screen of Death can be caused by an unfinished Windows Update. To resolve this problem, simply hold the power button down on your PC or laptop to switch off the computer. A cold start should result in the system booting properly.

PINK

pink screen of deathIt is a diagnostic screen with a white type on a pink background. Pink Screen is mainly seen when the VMkernel of an ESX/ESXi host experiences a critical error, becomes inoperative, and terminates any virtual machines that are running. It is not fatal and generally considered more of a developer testing issue. When encountered, it can be fixed quickly by following the simple action of pressing and holding your computer’s power button to shut down the device.

BROWN

brown screen of deathThe Microsoft Windows 10 Operating System Brown Screen of Death is an on-screen fatal error notification with bug check codes which is seen when a computer crashes due to graphics hardware or software-related problems (failing graphics drivers).

YELLOW

yellow screen of deathIt affects the functioning of a browser, particularly Mozilla Firefox. The Yellow Screen of Death makes the appearance with a weird buzzing sound in the background when the XML parser refuses to process an XML document causing a parsing error and a weird buzzing sound. The issue persists unless the computer is manually rebooted.

RED

red screen of deathCommonly the Windows 10 red screen is caused due to the hardware error, particularly if you overclock your Windows PC/laptop. Despite this, sometimes the red screen of death is also caused by outdated or incompatible drivers or due to BIOS issues.

ORANGE

orange screen of deathThe Orange Screen of Death on Windows occurs due to fatal hardware errors. Multiple reasons have been reported for the Orange Screen of Death. Some had this issue when watching a YouTube video, some were not able to boot into Windows. It can even occur when waking up from Sleep.

GREEN

green screen of deathThe green screen of death only appears when you're running an Insider Preview version of Windows 10. It's the same as the blue screen of death, and it will show the same error messages. ... If you see a green screen of death (GSOD) on your PC, that's a sign you're using an Insider Preview build of Windows 10.

WHITE

white screen of deathThe White Screen on Windows is also an error where the screen of the computer just turns white and freezes. There can be several things that can cause the white screen to appear on the Windows laptop monitor. But the main issue could be because of malfunctioning of the graphics hardware.
Read More
How To Fix Error Code 652 On Windows PC

What is the Error Code 652?

Error code 652 is a runtime error. It hampers you from accessing and running your program on your system. If not resolved, it can also lead to program corruption.

Solution

Restoro box imageError Causes

Runtime Error 652 can occur due to several causes. These include:
  • Conflict of color depth within icons, the desktop, or a particular application in the Visual Basic environment.  This happens when the Image
  • List control consists of more colors than the depth of what Windows can support.
Other causes include:
  • Malicious software and malware attack
  • Conflict with Terminate
  • Invalid or corrupt registry

Further Information and Manual Repair

If you are not a computer programmer and don’t have any sound technical expertise, then you might think of hiring a professional to resolve the error on your PC. But this can be costly as you may have to pay hundreds of dollars to the technician. However, an alternative way to resolve the error code 652 is to download the Total System Care. This PC repair tool is integrated with an intuitive registry cleaner and a powerful anti-virus. It is safe, efficient, user-friendly, and available for free. Restoro is a multi-functional error tool and a one-stop solution to resolve practically all kinds of PC-related problems. By running this repair tool, you can fix runtime error code 652 on your system in seconds.

Restoro

What makes Restoro a hot favorite among PC users is that it is simple and easy to use. To operate this PC fixer, you don’t need to have the sound technical knowledge or be adept at computer programming. It can be used by all levels of PC users including beginners and intermediates. It has a neat and clean layout with simple instructions and navigation making it easy for users to resolve even the mightiest errors in just a few clicks.

Restoro features

Whether the underlying reason for the error code 652 is malicious software or registry corruption, Restoro takes care of all. Registry corruption occurs due to unnecessary files and data overload in the hard disk. This includes junk files, internet history, invalid registry entries, and bad registry keys. The registry cleaner embedded in Restoro intuitively detects and scans all registry issues. It wipes and clears the hard disk from all the unnecessary and obsolete files and thus cleans up your disk space. It repairs the corrupt registry and also boosts your PC’s performance. Thus it not only repairs the error code 652 but also resolves system slowdown issues by optimizing your system’s speed. With the help of its in-built anti-virus, it removes all the malicious software on your system that could be triggering the error code 652. Data security threats such as malicious software are detected and scanned and listed under the privacy error utility. It is compatible with all Windows versions including both the latest and old versions. You can run it to scan error code 652 on any Windows version you have installed on your computer.

Restoro for error Code 652

Furthermore, as mentioned above Error Code 652 is safe to use. It is bug-free and besides, it offers users outstanding data safety. It has a backup file feature that helps you save and create backup copies of all the data you have on your system. This is carried for safety purposes. It enables users to retrieve and recover data in case the data and files are lost during the repair thus sparing you from a big loss. The error code 652 may be critical but it can be resolved in seconds with Restoro. Here’s how:
  1. To get started click here to download and install Restoro on your system
  2. Once installed, run it to scan for errors. It will take only a few seconds to scan your entire PC.
  3. Then simply create a backup and click on repair to resolve and resume your desired program.
For best results, it is advised to run Restoro on the computer often. This will help you detect PC errors and repair them timely. It will help you ensure proper PC maintenance, health, and performance.
Read More
GoDaddy data breach compromised 1.2M accounts
A very serious data breach has happened to the unfortunate GoDaddy hosting service placing a little over 1.2 million accounts affected. Security breaches sadly are not a rare occurrence but this time it is a little different. GoDaddy breachEach time when the company is breached data is stolen and that places the company in a bad light usually because its user database has been compromised and people are concerned about their data being misused. This is very rational fear and concern but this time things are a little bit different than usual, why is that, you might ask? Well, as before mentioned GoDaddy is a hosting company and the vector of attack was aimed at the part where it is hosting WordPress. Attackers were able to get their hands on the sFTP credentials of customers on that server meaning that all of the websites are also been relieved of their user base as well. This potentially means that there is a high chance that all of the hosted web site's content is also compromised, meaning that your data could also be compromised even if you were not a GoDaddy customer, all you needed to do is to be a member of any site hosted on their platform. GoDaddy has reset WordPress passwords and private keys, so it’s already taken the steps required to stock the attacker from exploiting anything with the passwords obtained. The company is in the process of generating new SSL certificates for customers. Bad thing is that the attack used a compromised password to get into systems all the way back around September 6th, 2021, the breach was discovered on November 17th, 2021, which is more than a 2-month active time where the attacker could harvest tons of data. The outcome of this attack will be seen in the upcoming time, until then be safe, and Just in case change your passwords.
Read More
Microsoft bans Windows from Russia

Microsoft has cut out Russia from downloading ISO files for Windows 10 and Windows 11 as well as installation tools without any explanation or reason behind this.

microsoft

If you connect via VPN to a Russian server and try to download either ISO files or installation tools you will be greeted with the error 404 and an explanation of File or Directory not found or There was a problem with your request.

At this time you can still download Windows 11 Media creation tool but once you run it will throw a 0x80072F8F-0x20000 error with text: For some unknown reason, this tool failed to run on your computer.

People in Russia can still download files if they connect via VPN and go to a server located outside Russia.

Microsoft has not published any explanation why is this happening, it might be technical difficulty or it could be on purpose.

Other histories of Microsoft vs Russia

Since the beginning of the Russian military operation in Ukraine Microsoft has been putting restrictions on Russia starting with a suspension of all sales in March, next month in April Microsoft started suspending developer's accounts on GitHub linked to sanctioned companies and the suspension was even if the developer is not working for a given company or left it.

At the beginning of this month, Microsft laid off 400 employees inside Russia as they began scaling back operations in the country but has also stated that they would continue to provide services to all contractors and customers inside Russia so this sudden blocking of downloads is unexpected and it goes against their statement.

Read More
Fix Invalid file handle Error during ...
If you encounter an error saying, “Invalid file handle” when you try to rename, copy, delete a file or other operations in your Windows 10 computer, then read on as this post will guide you in what you can do to fix it. This kind of error pops up when the operating system tries to carry out an operation on a folder or file using the following words:
CON, PRN, AUX, NUL, COM1, COM2, COM3, COM4, COM5, COM6, COM7, COM8, COM9, LPT1, LPT2, LPT3, LPT4, LPT5, LPT6, LPT7, LPT8, and LPT9
When you rename or create a folder or file using the reserved words given above, you could encounter an error that says, “The specified device name is invalid”. This occurs since these words are Windows system reserved words that you can’t use, unlike any other words. Thus, if you have a folder or file which contains any of the reserved words on another computer that runs a non-Windows operating system and you try to copy or rename it Windows, then it’s no wonder why you’re getting this error message. In such cases, you can always click on the Skip button to stop the operation. However, if there are various folders or files, you can just use the Command Prompt to carry out the task. All it takes is a simple command that will get rid of the folder as well as the files in it. How? Refer to the instructions given below. Step 1: Tap the Win + R keys to open the Run utility. Step 2: Next, type “cmd” in the field and then tap Enter to open Command Prompt. Step 3: After opening Command Prompt, execute the following command:
rd \.file-folder-path /S /Q
Note: The “rd” command will remove the directory or the folder while the “\.” command will select the current computer. The “/S” command, on the other hand, helps you in removing all the sub-directories and the files that are in the CON folder. The “/Q” command is not really mandatory since it helps you remove everything silently without any confirmation message. For example, if you have a folder named “CON” located on your Desktop, the path will be like this “C:/Users/<username>/Desktop/CON”. In this case, the command should be like this:
rd \.C:Users<username>DesktopCON /S /Q
However, if the error pops up for a whole different reason, you could use the following command instead to remove the reparse point extended functionality. Once you’ve entered the given command below, you should now be able to delete the file.
FSUTIL reparsepoint delete C:Users<username>DesktopFileName DEL C:Users<username>DesktopFileName
Read More
Troubleshoot Error 651 on Your PC

Error 651 - What is it?

Are you a Windows 7 PC user? Are you experiencing error 651? If yes, then read on. We will discuss what is this error, the causes, and easy DIY solutions to help you resolve this issue immediately. Error 651 is a common Windows 7 error. This error occurs when you try to connect using your PPPoE connections. The error message is displayed in the following format:
“Error 651: The Modem (or other connecting device) has reported an error.”

Solution

Restoro box imageError Causes

The error code 651 occurs due to multiple reasons. However, some of the most common error causes include:
  • The raspppoe.sys file saved in the wrong location
  • IP setting  issues
  • Registry issues

Further Information and Manual Repair

Here are some of the best and easiest solutions to resolve the error code 651 on your system immediately. These solutions are so easy to perform that you don’t need any technical expertise or knowledge to get started. So here we go!

Solution 1: Reset TCP/IP Settings

To reset TCP/IP settings on your PC, here’s what you need to do. Simply replace the RAS PPPoE driver. First open a command prompt, then write the following command in the command prompt:  TAKEOWN /F"C:Windowssystem32driversraspppoe.sys" ICACLS "C:Windowssystem32driversraspppoe.sys" /grant administrators:F. After that, press enter to continue. Now close the command prompt and go to the folder C:\Windows\system32\drivers, here rename the raspppoe.sys file to raspppoe2.sys. Now right click on save the link as Vista RAS PPPoE Driver and save it in the C:\Windows\system32\drivers folder. Once this process is complete, to activate changes made, restart your PC. This is most likely to resolve the error code 651 on your system.

Solution 2: Try Power Cycling your Modem and your Router

This is another way to resolve error 651. However, before you try this solution, it is recommended that you save all your work on your system, close all your open applications, and then shut down your PC. After that first turn your router off and wait for about 2 minutes. Then turn off your modem too. Now disconnect all the Ethernet cables that are connected to your modem, router and your system. Reconnect them again and make sure that the connections are not loose. After reconnecting the cables, reboot your PC and switch on the modem first. After your modem gets initialized, turn on the router. See if this procedure works. If it does, then that’s great the issue is resolved. However, if the error persists, then this indicates deeper problems. The error message is triggered due to registry issues.

Solution 3: Clean and Repair the Registry

Sometimes the underlying cause of error 651 is a corrupt and damaged registry. Registry is the database where operating system stores all the information associated with installed programs and activities performed on your PC. Registry issues typically result due to poor PC maintenance. When you don’t clean the registry the unnecessary and obsolete files accumulate and acquire a lot space. It damages the registry and DLL files. This often leads to disk fragmentation and files are then saved in segments in different locations. This also slows down your PC performance. This could also be the reason for why the raspppoe.sys file is saved in the wrong location. Though you can repair the registry manually but it may be complex for you especially if you are not technically sound. And besides, it is also slightly time-consuming.

Restoro - Premier Registry Cleaner

Therefore, to resolve errors like 651 triggered by the registry issues on your system in seconds, it is advisable to download Restoro. Restoro is a cutting-edge and multi-functional PC Fixer. It is deployed with a powerful intuitive algorithm and multiple highly functional utilities designed to resolve practically all types of PC errors. It includes utilities like a registry cleaner, an antivirus, and a system optimizer. The registry cleaning feature scans for all types of registry issues and errors and resolves them instantly. It wipes out unnecessary and redundant files like cookies, internet history, junk files, and bad/ invalid registry entries. It cleans the registry freeing up space. Furthermore, it also repairs the damaged files and restores the registry back to normal.

Restoro Special Features

Other features include an antivirus that removes all types of malicious software hiding in your PC including viruses, Trojans, spyware, malware, and adware. The system optimizer feature ensures that your computer performs at its optimal level at all times. Restoro is safe and bug-free. Its user-friendly interface and simple navigations makes it quite easy for users to operate it without any difficulty. Furthermore, compatibility is not an issue with this software. You can download it on any Windows version. Click here to download Restoro and fix error 651 on your PC today!
Read More
Dangerous GriftHorse Trojan found on Android
There has been recently discovered in the field of malware targeting Android devices. Affecting more than 10 million users of Android phones, the malware GriftHorse is doing its attacks via phishing and premium services scams. A lot of applications have been discovered that are hosts for this malware and many of them are inside the Google store and available for download. GriftHorse
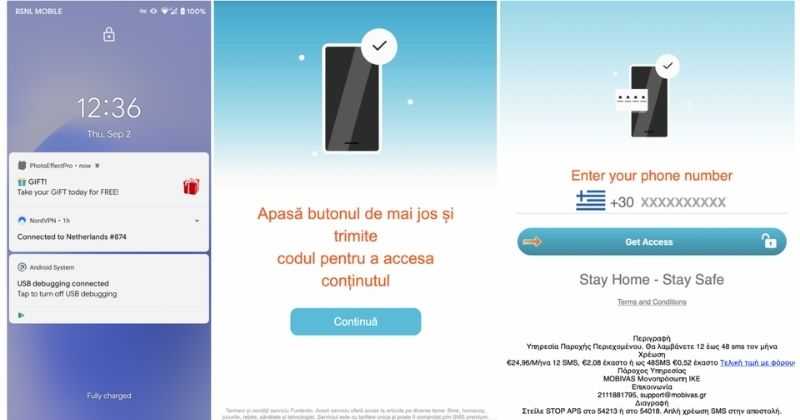
According to Zimperium zLabs, this malware that was recently detected has been doing its scams and attacks even in November of 2020 and has thus far accumulated hundreds of thousands of dollars in its scam. On the surface it looks very harmless, asking for typical permissions like internet access, calls, and other related needed functions, and then it waits. After few months the real attack happens when users get charged with premium service they never subscribed to in the first place.

List of Infected Applications that Carry GriftHorse Trojan

Zimperium zLabs listed out some of the apps with this malware. Users are advised to avoid installing them.
  •     Amazing Video Editor
  •     Bag X-Ray 100% Scanner
  •     Bus – Metrolis 2021
  •     Call Recoder Pro
  •     Call Blocker-Spam Call Blocker
  •     Cinema Hall: Free HD Movies
  •     Coupons & Gifts: InstaShop
  •     GPS Phone Tracker – Family Locator
  •     Fingerprint Changer
  •     Fitness Point
  •     Free Calls WorldWide
  •     Geospot: GPS Location Tracker
  •     GPS Phone Tracker – Family Locator
  •     Handy Translator Pro
  •     Horoscope : Fortune
  •     iCare – Find Location
  •     iConnected Tracker
  •     Instant Speech Translation
  •     Lifeel – scan and test
  •     My Chat Translator
  •     My Locator Plus
  •     Plant Camera Identifier
  •     Racers Car Driver
  •     Safe Lock
  •     Screen Mirroring TV Cast
  •     Slime Simulator
  •     Smart Spot Locator
These are only some of the many infected apps available on the internet. Zimperium zLabs also warned that GriftHorse Trojan exists in over 70 countries worldwide. The infected app quickly changes the language and displays content depending on the user’s IP address.
Read More
Microsoft Windows 11 limitations surfacing
windows 11As more and more people get into insider preview of upcoming Windows 11 we will see more and more different takes and opinions on it. Generally speaking, the first wave was quite positive when it was previewed but how time is passing more and more limitations and frustration comes to the surface. Some of the limitation that is inside it, which have been confirmed by Microsoft itself includes features missing that we had in Windows 10 like moving the application to the taskbar in order to pin it, moving the file in the taskbar to open it in default application and some big annoyances like Windows opening widgets always in Edge no matter what is your default browser. Not being able to move the taskbar from the bottom is also one of many illogical things. There is not really a point in these missing features since they were working fine in Windows 10 and many users liked them since they could customize Windows more to their liking, now with this new look at limitations it reminds me personally much of apple macOS and I will be honest, I am not a big fan of that kind of thinking. If I wanted that kind of OS I would have gotten myself a MAC, not custom build PC, but hey, Linux is always a free alternative, and how Microsoft itself is pushing limitations and in my opinion bad design choices along with awful system requirements that might just be a case for a lot of users. I am really not sure what is logic behind these moves and I am sure they have their reasons but this time it seems that their take on the new OS is not resonating well with the overall user population, well at least what I have heard so far. Things of course can still be changed and made for the better and I would rather see release postponed and issues addressed than getting more system hogging and limited new OS that at its current state looks like reskinned Windows 10 with limitations.
Read More
1 2 3 171
Logo
Copyright © 2023, ErrorTools. All Rights Reserved
Trademark: Microsoft Windows logos are registered trademarks of Microsoft. Disclaimer: ErrorTools.com is not affiliated with Microsoft, nor claims direct affiliation.
The information on this page is provided for information purposes only.
DMCA.com Protection Status