Error 0x80070003 is a type of Windows file backup and restore error code. This error occurs when you copy files or try to create backup and restore files and folders by using Windows Backup and Restore.
This error stops you from using browse for files or folders. It hampers your ability to browse and restore files in the File Restore Wizard on your PC.
Solution
Error Causes
Error 0x80070003 may occur due to numerous reasons such as:
Registry files are corrupted and damaged
Missing directories
Boot sector corrupted
Outdated drivers
Faulty software installation
Malware infection
Improper maintenance and incomplete installation
Further Information and Manual Repair
Here are some manual and easy do-it-yourself methods that you can try at home and resolve the issue on your own and save hundreds of dollars that you would be otherwise spending to hire a professional for the job.
Method 1 - Use Search Functionality in the File Restore Wizard to restore files
To work out and resolve error 0x80070003 on your system simply use the search functionality in the File Restore Wizard to locate and restore the files. This can be done by going to the start menu and then click on search.
Now enter the keywords in the search for box and then click search again. Click to select the files that you want to restore from the list and then click OK. This will help you restore the files and resolve the issue.
Method 2 - Recreate the Missing Directory
If the re-parse point is deleted, then you will have to recreate the missing directory.
The deletion of the re-parse point can be identified if the error code is displayed in this format ‘Filename: C:\Myfolder\11111.txt, Error: the system cannot find the path specified (0x80070003)’.
To resolve, simply follow the path that is pointed out in the error and create the corresponding folder. Create the folder Myfolder in Drive C.
Then try the restore operation again. Now click to clear the Restore the files to their original subfolders check box and then run the File Restore Wizard. This is most likely going to resolve the issue.
Method 3 - Scan for Viruses
Sometimes error 0x80070003 may occur due to malware. This stops you from creating file backup and restore files. If this is the cause then simply download and run an antivirus to remove malware programs on your PC.
Method 4 - Clean and Repair the Corrupted Registry
Error 0x80070003 can be triggered due to registry corruption. If this is the cause then simply download Restoro. This is a user-friendly and powerful multi-functional PC Fixer integrated with a registry cleaner.
The registry cleaner scans for all registry-related errors, wipe out all unnecessary and junk files, and also cleans and repairs the damaged registry in seconds.
Click here to download Restoro and resolve error 0x80070003 today!
If you are trying to restore your computer using a System Image that has been created by the Windows Backup and Restore tool but encountered an error message instead that says, “Windows cannot find a system image on this computer”, you’ve come to the right place as this post will walk you through in fixing this error. Here’s the complete context of the error message:
“Windows cannot find a system image on this computer, Attach the backup hard disk or insert the final DVD from a backup set and click Retry. Alternatively, close this dialog for more options.”
In the error message, you are offered two choices – to either Retry or Cancel the operation. You can try to select Retry to try again but you will most likely get the same error if you do so. This kind of error can occur if the name of the WindowsImageBackup folder or any of its sub-folders has been modified. On the other hand, this error can also pop up if this folder or any of its sub-folders have gone missing or have become corrupted. To resolve the error, you can try to move the WindowsImageBackup folder or check its sub-folders. You can also try to isolate the System Image file or rename the System Image folder or remove all the unwanted sub-folders as well as use Command Prompt in Repair mode.
Option 1 – Try to move the WindowsImageBackup folder
The WindowsImageBackup folder must be stored in the root of the volume where it is stored, in line with the functioning of the System Restore utility. For example, if the WindowsImageBackup folder is stored in the “C:/Backups/System Restore Backups/New” location, then you have to move it to the C: drive as well.
Option 2 – Try to check the subfolders of the WindowsImageBackup folder
The classification of folders and files plays an important part to restore in restoring a computer from a System Restore point. Thus, if have modified the names of any files or folders inside the WindowsImageBackup folder, then you need to set the defaults. After that, run System Restore again and check if it fixes the error.
Option 3 – Try to isolate the System Image file
If the System Image file is stored in a USB storage device along with various System Restore images, then it’s no wonder why you’re getting this error. To set things right, you have to make sure that the System Restore image you wish to restore your computer from, is the only one that’s present at the root of the USB storage device.
Option 4 – Try renaming the System Image folder
If you have renamed the System Image folder prior to running System Restore, then it is most likely the reason why you’re getting the “Windows cannot find a system image on this computer” error. This error pops up because the System Restore utility in Windows 10 looks out for the WindowsImageBackup folder so if you have renamed it, you need to change its name back to what it originally was to fix the error.
Option 5 – Try to remove all the sub-folders of the WindowsImageBackup folder
If you have stored some foreign files inside the WindowsImageBackup folder, you need to get rid of them right away and return the folder to its default state as this folder must be left alone and should not be meddled with if you want to run System Restore smoothly.
Option 6 – Try to use Command Prompt in Repair Mode
Open Command Prompt while your computer is in the Repair Mode.
Next, type and enter this command where you need to replace “<Partition Letter>” with your drive’s letter: dir <Partition Letter>
After you’ve found the WindowsImageBackup folder in any of the partitions, type and enter this command: dir <Parition Letter>WindowsImageBackup /s
The command you entered will display all the contents of the folder exceeding 10 GB in total size. You can check and confirm the integrity of the folder and if you find that the integrity is violated, then it is the reason why you’re getting the error.
Running the Windows Setup does not always go smoothly as you could encounter some errors along the way. One of these errors is the “Something happened, Setup has failed to determine supported install choices” error. The only given option in such cases is to click the Close button and exit the setup.
This kind of error in Windows setup can occur when you try to downgrade to the previous version of Windows using the built-in mechanism. This error could be caused by a corrupted image or it is also possible that the set of files are incomplete. Aside from that, it could also be due to compatibility issues or that the module used to downgrade the Windows operating system is not configured properly. To fix this error, you have to run the Windows Setup program in compatibility mode so that you can downgrade Windows. You could also use the image for the lower version of Windows that’s available on the official site of Microsoft. But before you do any of these, make sure that you’re logged in as an administrator.
To fix the “Something happened, Setup has failed to determine supported install choices” error, follow the given options below sequentially.
Option 1 – Try to run the Installer of the downgraded version in Compatibility Mode
This is the first thing you can try to resolve the issue instead of going right ahead on making a bootable device. So if you are downgrading Windows, you can try to run the installer in the compatibility mode for that specific Windows version.
Look for the setup file.
Once you find it, right-click on it and select Properties from the context menu.
After that, go to the Compatibility tab and mark the checkbox for “Run this program in compatibility mode for:” and from the drop-down list, select either Windows 7 or Windows 8.
You also have to check the “Run as administrator” option.
Now click the Apply button and then click OK to save the changes made and check if it has resolved the issue or not.
Option 2 – Try to troubleshoot compatibility
This option is almost the same as the first one except it is an alternative way of fixing the “Setup has failed to determine supported install choices” error in case the first one didn’t work. In this option, you will troubleshoot the compatibility issue.
Look for the setup file.
Then right-click on it and select the “Troubleshoot compatibility” from the context menu.
After that, click on the “Try recommended setting” option. Once the process is done, the error message should be gone.
Option 3 – Run the DISM tool
You can run the DISM tool as well to help fix the error code 0x80244022 during Windows Update. Using this built-in tool, you have various options such as the “/ScanHealth”, “/CheckHealth”, and “/RestoreHealth”.
Open the Command Prompt with admin privileges.
Then type in the following commands and make sure to hit Enter right after you type each one of them:
Dism /Online /Cleanup-Image /CheckHealth
Dism /Online /Cleanup-Image /ScanHealth
exe /Online /Cleanup-image /Restorehealth
Do not close the window if the process takes a while as it will probably take a few minutes to finish.
Option 4 – Try using the image from the official site of Microsoft
If none of the options given above worked, you can try to use the image from Microsoft’s official site. This would help, especially if the error is caused by a corrupted image or image folder with incomplete files.
World of Warcraft had been released on November 23, 2004, and even today it is the most successful MMORPG ever made. Some say that it was the right timing, others say it was Blizzard's history and its fans, it is even spoken that marketing team has responsibility for WOW's success. Whatever the reason may be, the fact remains that WOW is a really fun game to play. In this article we will cover the annoying issue of World of Warcraft's lost connection to the game server and how can you fix it. Please be aware that before you try any fixes go to the official World of Warcraft website and check to see if the server maintenance is not underway. If this is the case, you will have to wait for servers to come back online after the maintenance.
Keep reading and try provided solutions as they are presented to fix this issue and continue gaming.
If you encounter a Blue Screen error that points out to the CMUDA.sys, read on as this post will guide you in fixing it. The CMUDA.sys file is a Windows operating system driver file that is related to the USB Device Audio capabilities of a computer. There are times when this file causes Blue Screen error due to some conflicts in RAM or some incompatible firmware or hard disk issues, corrupted drivers or malware infection, and so on.
There are various Blue Screen errors that are related to the CMUDA.sys file such as:
KMODE EXCEPTION NOT HANDLED
PAGE FAULT IN A NONPAGED AREA
IRQL NOT LESS OR EQUAL
SYSTEM THREAD EXCEPTION NOT HANDLED (CMUSBDAC.sys)
In most cases, the CMUDA.sys file usually triggers the SYSTEM_THREAD_EXCEPTION_NOT_HANDLED Blue Screen error. Although this Blue Screen error may seem complicated, its workarounds are straightforward so you won’t have any problems in following them.
Option 1 – Try to update or rollback your device drivers
If the first option didn’t work for you, then it’s time to either update or roll back the device drivers. It is most likely that after you updated your Windows computer that your driver also needs a refresh. On the other hand, if you have just updated your device drivers then you need to roll back the drivers to their previous versions. Whichever applies to you, refer to the steps below.
Open the Devices Manager from the Win X Menu.
After opening the Device Manager, locate the device drivers that are marked with a small yellow exclamation mark icon and right-click on each one to open their Properties. On the other hand, you can also look for sub-entries under Sound, video, and game controllers like the C-Media USB Audio Class
After that, switch to the Driver tab and click on the Uninstall Device button.
Follow the screen option to completely uninstall it.
Finally, restart your computer. It will just reinstall the device drivers automatically.
Note: You can install a dedicated driver on your computer in case you have it or you could also look for it directly from the website of the manufacturer. You can download the as C-Media USB Audio Class driver from the cmedia.com website.
Option 2 – Try to recreate the CMUDA.sys file
The first thing you can try is to recreate the CMUDA.sys file. Every time your Windows 10 PC boots up, it looks for all the system drivers in place and if it is unable to find them, it tries to create them. Which is why if you remove your corrupt driver file, chances are, you might get a fixed file recreated just for you. How? Refer to the steps below.
Boot your Windows 10 PC in Safe Mode.
Then open File Explorer and navigate to this location: C:/Windows/System32/drivers
From there, look for the file named sys and rename it to CMUDA.old.
Note: As you can see, the file’s extension has changed from .sys to .old.
Now restart your computer and check if the CMUDA.sys Blue Screen error is now fixed.
Option 3 – Run the Blue Screen Troubleshooter
The Blue Screen troubleshooter is a built-in tool in Windows 10 that helps users in fixing BSOD errors. It can be found on the Settings Troubleshooters page. To use it, refer to these steps:
Tap the Win + I keys to open the Settings panel.
Then go to Update & Security > Troubleshoot.
After that, look for the option called “Blue Screen” on your right-hand side and then click the “Run the troubleshooter” button to run the Blue Screen Troubleshooter and then follow the next on-screen options. Note that you might have to boot your PC into Safe Mode.
On the other hand, you can also try running the online Windows 10 Blue Screen troubleshooter from Microsoft. It is a wizard that could help you fix any Stop errors related to the CMUDA.sys file and will offer you helpful links as you use it.
Option 4 – Try running the DISM tool
You can try running the Deployment Imaging and Servicing Management or DISM tool to fix the Wdf01000.sys Blue Screen error. Using this built-in tool, you have various options such as the “/ScanHealth”, “/CheckHealth”, and “/RestoreHealth”.
Open the Command Prompt with admin privileges.
Then type in the following commands and make sure to hit Enter right after you type each one of them:
Dism /Online /Cleanup-Image /CheckHealth
Dism /Online /Cleanup-Image /ScanHealth
exe /Online /Cleanup-image /Restorehealth
Do not close the window if the process takes a while as it will probably take a few minutes to finish.
Option 5 – Run System Restore
Running System Restore might also help in fixing Blue Screen errors related to the CMUDA.sys file.
Tap the Win + R keys to open the Run dialog box.
After that, type in “sysdm.cpl” in the field and tap Enter.
Next, go to the System Protection tab then click the System Restore button. This will open a new window where you have to select your preferred System Restore point.
After that, follow the on-screen instructions to finish the process and then restart your computer and check if the problem is fixed or not.
Installing Windows Updates in your Windows 10 computer does not always go smoothly as there are instances when you could encounter some errors along the way. One of these errors is error code 0x80244022 –WU_E_PT_HTTP_STATUS_SERVICE_UNAVAIL HTTP 503. This kind of error can be encountered when you check, download or install any updates. At the time of writing, it isn’t known yet what the exact cause of this error is. However, there are some potential fixes you can check out to fix it.
When this error occurs, you will see the following error message on your screen:
“There were some problems installing updates, but we’ll try again later. If you keep seeing this and want to search the web or contact support for information, this may help: (0x80244022).”
To fix error code 0x80244022, refer to the potential fixes provided below.
Option 1 – Disable the Proxy server
The first thing you can do is to try disabling the Proxy server as it might be the reason why you’re getting error 0x80244022 for Windows Updates. To disable the proxy server, refer to the steps below.
Tap the Win + R keys to open the Run dialog box.
Then type “inetcpl.cpl” in the field and hit Enter to pull up the Internet Properties.
After that, go to the Connections tab and select the LAN settings.
From there. Uncheck the “Use a Proxy Server” option for your LAN and then make sure that the “Automatically detect settings” option is checked.
Now click the OK and the Apply buttons.
Restart your PC.
Note: If you are using a third-party proxy service, you have to disable it. In addition, if you are also using a VPN, you can try to disable it as well.
Option 2 – Run the DISM tool
You can run the DISM tool as well to help fix the error code 0x80244022 during Windows Update. Using this built-in tool, you have various options such as the “/ScanHealth”, “/CheckHealth”, and “/RestoreHealth”.
Open the Command Prompt with admin privileges.
Then type in the following commands and make sure to hit Enter right after you type each one of them:
Dism /Online /Cleanup-Image /CheckHealth
Dism /Online /Cleanup-Image /ScanHealth
exe /Online /Cleanup-image /Restorehealth
Do not close the window if the process takes a while as it will probably take a few minutes to finish.
Option 3 – Perform a System File Checker scan
The SFC or System File Checker scan could detect and automatically repair damaged system files that could be causing error code 0x80244022 to appear when you try to update your Windows 10 computer. SFC is a built-in command utility that helps in restoring corrupted files as well as missing files. It replaces bad and corrupted system files with good system files. To run the SFC command, follow the steps given below.
Tap Win + R to launch Run.
Type in cmd in the field and tap Enter.
After opening Command Prompt, type in sfc /scannow and hit Enter.
The command will start a system scan which will take a few whiles before it finishes. Once it’s done, you could get the following results:
Windows Resource Protection did not find any integrity violations.
Windows Resource Protection found corrupt files and successfully repaired them.
Windows Resource Protection found corrupt files but was unable to fix some of them.
Once done, restart your computer.
Option 4 – Try disabling the Firewall or antivirus program
Disabling the antivirus program or Firewall or any other security software installed in your computer is always a good idea you can try when the Windows Update process does not go smoothly. So before you try updating your computer again, make sure to disable the antivirus or security program and once the Windows Update is done, don’t forget to enable the antivirus program back again.
Option 5 – Try resetting the Windows Update components
Open Command Prompt with admin privileges.
After that, type each one of the following commands and hit Enter after you key in one after the other.
net stop wuauserv
net stop cryptsvc
net stop bits
net stop msiserver
Note: The commands you entered will stop the Windows Update components such as Windows Update service, Cryptographic services, BITS, and MSI Installer.
After disabling WU components, you need to rename both the SoftwareDistribution and Catroot2 folders. To do that, type each one of the following commands below, and don’t forget to hit Enter after you type one command after the other.
Next, restart the services you’ve stopped by entering another series of commands. Don’t forget to hit Enter after you key in one command after the other.
net start wuauserv
net start cryptsvc
net start bits
net start msiserver
Close Command Prompt and reboot your PC.
Option 6 – Run the Windows Update Troubleshooter
You might also want to run the Windows Update Troubleshooter as it could also help in fixing Windows Update Error. To run it, go to Settings and then select Troubleshoot from the options. From there, click on Windows Update and then click the “Run the troubleshooter” button. After that, follow the next on-screen instructions and you should be good to go.
Hello and welcome to our software series review. Weel this time we could say this is more of a service review since the application we are going through today is online and you can use it freely without ever needing to install it.
When we choose software that we are going to review and recommend we really try to recommend something that is worth your time and money, Cartoonize fits in both categories in my opinion.
First of all basic plan of this graphic software is completely free and as mentioned it is working online, also as one more feature basic plan does not even require you to have an account of any kind, all you need to do is go to the website of the application and you can start using it right away. There is also paid plan for extra features if you need them billed monthly or annually.
Features
First things first, this is not Photoshop or GIMP and it does not aim nor want to be. This is something else, directed and pointed at the different types of users. This application is aimed at people that want to make some quick graphics and post them on social media and it does that very well. Even without knowledge to use graphic software this one is so well designed and straightforward that even a complete newcomer can do something right away.
So as the application that wants to be used by people that want to place some cool pictures or ads on their social media what it offers. For starters simplicity and ease of use, every option that you can use is on the left side of the screen nicely packed into the vertical toolbox. Inside the toolbox, you have access to various tools, effects, and filters that you can apply to your image.
Tools explained
Image manager
The first section on the tool panel is the image manager, here you can upload your images, delete them, search stock images, and so forth. nothing more to say about this one as it is only a basic file manager.
Edit
In this tool panel, there are a lot of basic settings for your image manipulations divided into 3 sections: Basics, Enhance, and Creative. In the basic section, you can crop, resize and rotate your image. Enhance panel will let you set exposure, color, vibrance, tint, and details (sharpen). Finally, the Creative part will let you remove the background with AI in a single click, replace colors in the image, and add a vignette and round image.
Effects
In the effects panel, you will be given 4 options to choose from Cartoonizer, Digital art, Sketcher, and painting. Each option once clicked will open another set of options tied to chosen preset where you will be able to choose a different style from chosen template. Once you click on the desired template it will be applied to your image and in the upright corner, you will have edit options to tweak it to your liking. You can play around as much as you want because only once you click on the apply button, the effect will be applied to your image.
Filters
Same as in the effects tool panel here you will also get a series of different filters that you can apply to your image. As in the previous tool once clicked on the chosen filter, you will be given options for its variations and details edits. How there is really plenty of filters options and combined with its own presets I will not focus on explaining what each one is doing since picture thumbnails are pretty accurate and just one look at them will explain to you everything you need to know.
Overlays
In the overlays panel, you can as the name says overlay different kinds of effects on your image. You can add snow, fog, sun flares rain, and many more. Presets work identically to previous effects and filters.
Masks
If you want to place your image in a certain shape or in-text this is the section for you. You will be presented with sections as custom text, shapes, brushes, floral, animals, and patterns. Each section will once again lead to plenty of variations on the chosen subject where you can pick one that you like the most and tweak its options.
Text
As the name suggests, this section is to add text to your picture or design. If you are making some cool ad for Facebook, Instagram, or other social media I believe that you will spend most of your time in this section adding text and tweaking it so it looks best. You have all the tools that you will need to make a catchy title or smaller block of text and you can add multiple texts to your picture tweaking their own visual appearance, the font used, color, and some effects like a drop shadow.
Draw
In the draw section, you will be able to freely draw whatever you like with your mouse or pen if you have one. you have basic options for a brush and eraser so you can erase stuff. Pretty basic tool but it gives a nice touch to underline something, circle it, etc.
Graphics
This panel will let you place various already made graphic assets into a picture. You have hearts, hats, glasses, etc. There really are tons of premade graphics along with thematic ones like new year, st. Patric day and more.
Frames
As the name suggests this section will place a frame of your choice around your picture. You can choose the style of frame, position, color, and many more. There are various styles and each style has its own options.
Conclusion
Cartoonize is a great online application that will let you quickly and easily do cool and nice image edits. As mentioned you can also add various effects, text, and graphics and use this app to make some quick and nice ads for social media. You have the option to publish to your social media right from the app in the save dialog but you can also of course download your image or design to your local computer.
Please note that for this review we used the pro, paid version so all of the features were unlocked. We wanted to give you a full overview of the full potential of the app. In my opinion, the small monthly fee that they charge is well worth it when you see all things that you can do with it.
Go to the cartoonize website and check it out, basic option is completely free and it does not even require making an account. Have fun, be creative and take care, I hope to see you again tomorrow.
Libcurl.dll is a Dynamic Link Library file; a component of Google Earth. Google Earth is a 3D software tool.
Libcurl.dll file is visible within a 3D application with the help of which software users can see satellite images, maps, and other geography-related information from their computers.
The Libcurl.dll file enables users to map the earth using superimposing images received via satellite imagery and also aerial photography. However, Libcurl.dll error messages may occur while using or installing this program.
The libcurl.dll error message is displayed in either of the following formats:
"Cannot find [PATH]libcurl.dll"
"The file libcurl.dll is missing."
"Libcurl.dll Not Found"
"This application failed to start because libcurl.dll was not found. Re-installing the application may fix this problem."
Solution
Error Causes
Libcurl.dll may occur due to several reasons. These include:
Bugged program
Viral infection may add malicious codes to Libcurl.dll file and generate error messages
Registry issues
Missing libcurl.dll file
Hard disk failure
Misconfigured system files
If you experience difficulty in using Google Earth and come across libcurl.dll error message, it is advisable to resolve the error immediately typically because this error has severe consequences.
If not fixed timely, it can lead to the blue screen of death errors, system hang-ups and freezes, sluggish PC performance, PC crashes and browser crashes, slow internet speed, and other system errors.
Further Information and Manual Repair
This error is crucial but the good news is that it is easy to fix. To resolve it, you don’t have to hire a technical expert and pay hundreds of dollars.
You can repair the issue with ease by yourself regardless of whether or not you are technically sound. Continue reading to find out the best solutions to fix libcurl.dll error code on your system without any hassle.
Here are some of the easiest and the best methods to resolve libcurl.dll error:
1. Check your recycle bin
Since .dll files are shared by multiple programs, there is a possibility that you might have accidentally deleted libcurl.dll file when uninstalling a certain program on your system which was also sharing this file.
And because of this, you may experience the missing libcurl.dll error message. To resolve it, all you have to do is to check your recycle bin. If you find the file here, restore it. Once restored, try running the program again! If the error code does not appear, then this means it is resolved.
However, if it continues to persist, then try other solutions given below.
2. Scan for Malicious Software on your System
While downloading files and checking unknown emails malicious software like viruses, malware and spyware can also enter your PC.
Such software can damage and corrupt dll files. This could be the underlying cause of libcurl.dll error on your PC too. So, to resolve the issue, scan and remove malicious viruses and spyware from your system by using a powerful anti-virus.
However, please note, anti-viruses are notorious for slowing PC performance and also sometimes you may also have to stop all other activities on your PC.
3. Clean the Cluttered Disk, Repair dll files and Restore the Registry
Libcurl.dll file error may also occur due to hard disk failure. This triggers registry issues. If you don’t clean the registry every now and then, it overloads the hard disk with files.
These include both important and unnecessary files like internet history, temporary files, cookies, junk files, invalid registry entries, and bad keys. These clutter the disk, damaged dll files, and the registry.
Therefore first you need to clean the cluttered disk, repair libcurl.dll files and restore the registry. Executing it manually can take a lot of time as you may find it complex if you are not a computer programmer. However, the best, easiest, and quickest way to clean, repair, and restore the registry is to download Restoro
Why Restoro?
Restoro is an innovative, advanced, and multi-functional PC repair tool loaded with powerful and PC performance boosting utilities including an intuitive registry cleaner, an antivirus, Active X controls, and class module, and a system optimizer.
So, whether the libcurl.dll error message is triggered by a viral infection, hard disk failure, or registry issues, this tool takes care of all!
The registry cleaning feature scans all registry issues, cleans the hard disk by removing unnecessary and obsolete files, repairs damaged and corrupt dll files, and restores the registry thereby resolving libcurl.dll error in seconds.
Simultaneously, the antivirus utility removes viruses and malware if found. And the system optimizer feature ensures optimum PC performance.
Restoro is easy to navigate and operate. It is user-friendly, safe, bug-free, and efficient. Furthermore, it is compatible with all Windows versions.
Click here to download Restoro and repair your PC and resolve libcurl.dll error today!
Instagram posting has been reserved for mobile phones for a very long time but in October 2021 that privilege has come to an end. Instagram added the long-awaited ability to post to Instagram from the website. You get nearly all of the same filters and editing tools that you can find in the iPhone and Android app, too.
In order to post via computer on your Instagram account all you need is a browser. The first step, of course, is to go to instagram.com and login into your account, if you do not have an account, you can make one for free. Next, click on the + icon in the upper right corner.
Create a new post screen will open, in this screen click on the Select from computer blue button on the bottom. The file manager will open, choose your desired photo and confirm. After that, you will be presented will an adjustment screen for a photo, here you can crop the photo, zoom in, adjust the aspect ratio, or if you wish add more photos to create a slide show.
Once you are done will all of these adjustments, click on Next in the upper right. From there you will be taken into a filter screen where you can apply one of many filters or if you want, you can adjust brightness, contrast, saturation, temperature, etc. just like in the application on your phone. Once you have the desired result, again click on Next in the upper right part of the screen.
Lastly, you will be given an option to write a caption for the photo if you wish and add a location. Once this step is finished you can post the feed by clicking on share in the upper right part.
That is all to it, just like in a mobile application you can now use your computer for Instagram posting.
What is 0x3D55? As you know, Windows 10 is loaded with various Universal Windows Platform or UWP apps such as the Microsoft News, Weather, Calculator, Windows Mail, and many other applications that are based on the modern UWP platform of Microsoft that was introduced in Windows 10.
Each one of these apps has a shared piece of code in the kernel for them to be able to get executed across any device that runs the Windows 10 OS which includes laptops, PCs, 2-in-1 devices, mobile phones, mixed reality headsets, and many more. However, there are times when the runtime information for these apps ends up getting corrupted which causes them not to function as expected and throws errors like the error 0x3D55.
This kind of error can be pinned down when the UWP app malfunctions and you can also find an error message in the Event Log that reads, “0x3D55: Package family <App name with ID> runtime information is corrupted”. So if you encounter this error, read on for this post will walk you through fixing it. There are three suggestions you need to check out to fix this error – first, you can try to reset the Microsoft Store cache, second, you can try to re-register or reinstall the problematic app and lastly, run the Windows Store App troubleshooter.
Option 1 – Try to reset the Microsoft Store cache
Just like browsers, Microsoft Store also caches as you view apps and games so it is most likely that the cache is no longer valid and must be removed. To do so, follow the steps below.
Right-click on the start button and click on Command Prompt (administrator).
Next, type in the command, “wsreset.exe” and tap Enter. Once you do, the command will clear the cache for the Windows Store app.
Now restart your PC and afterward, try opening Microsoft Store again and then try to install your app or update your computer again.
Option 2 – Run the Microsoft Store Apps troubleshooter
The Microsoft Store Apps Troubleshooter will help you in fixing the error 0x3D55. This is a great built-in tool from Microsoft that helps users fix any app installation issues. So this is worth a try to solve the problem. This built-in tool also helps you fix the Windows 10 Store if it isn’t working.
To use the Windows Store Troubleshooter, follow the steps below.
Tap Win + I keys again to open the Windows Settings panel.
Go to Update & Security and then go to Troubleshoot.
On your right-hand side, scroll down to find the Windows Store Apps and then click on the Run the troubleshooter option and see if it fixes the problem.
Option 3 – Try to re-register the UWP app via PowerShell
First, type “command prompt” in the Start Search and right-click on Command Prompt and then select the “Run as administrator” option.
Next, navigate to this location in the command line utility: C:/Users/<Insert Username>/AppData/Local/Packages
After that, execute the “DIR” command to view the list of all the directories in the given location.
Once the list appears, look for the ID of the problematic app and take note of it.
Now tap the Win + X key combination or right-click on the Start button and click on the Windows PowerShell (Admin) option.
If a User Account Control or UAC prompt appears, just click on Yes to proceed and open the Windows PowerShell window.
Next, type in or copy-paste the following command to re-register the Microsoft Store app and tap Enter:
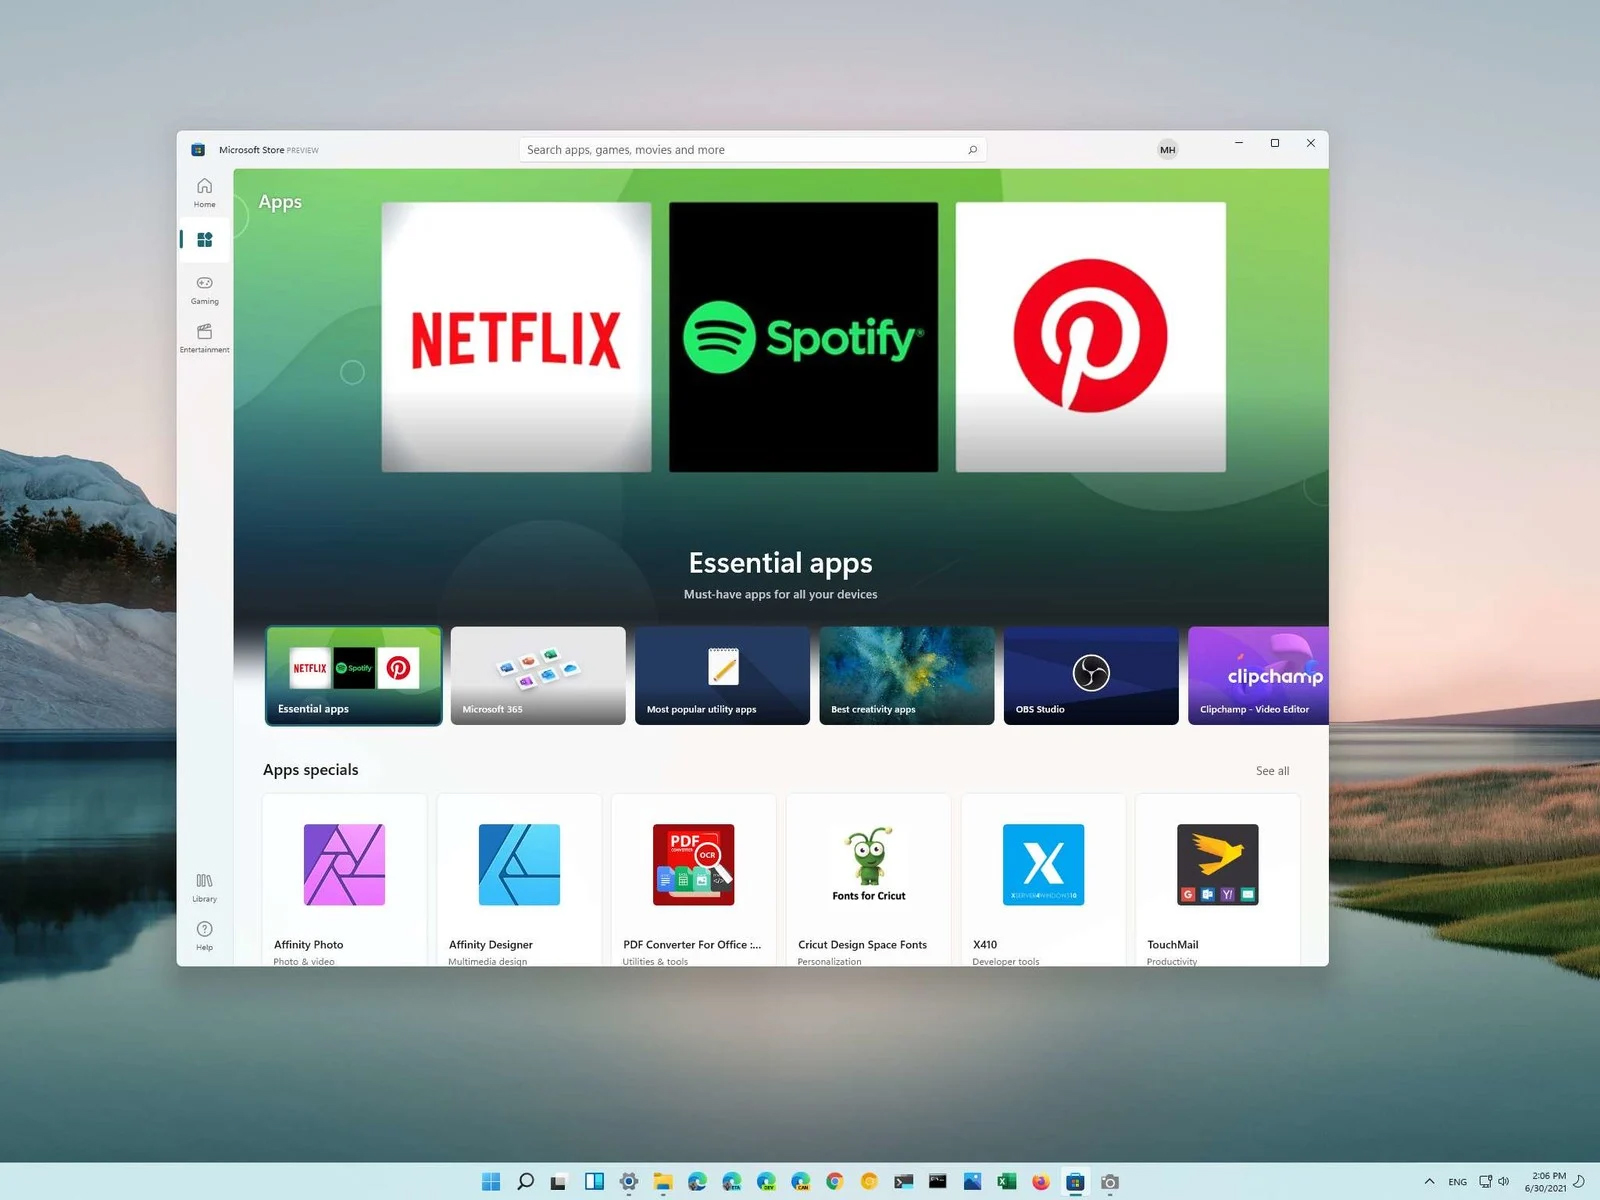
You can prevent starting of app installations files if they have not come from the MS store inside Windows 11.
This can make your PC more secure because all apps in the store will have to be digitally signed and overall it can provide you with more control over what will be installed.
Follow the guide below to find out how can you easily turn this feature ON.
Press ⊞ WINDOWS + I to open Windows settings
Select Apps and then choose Apps & Features
Click on Choose where to get apps to bring a drop-down menu
Select The Microsoft Store only (Recommended)
Close settings
Settings will apply changes immediately and you continue using Windows right away.
With these settings turned ON if you want to install a downloaded application or run the installer you will not be able to, and message The app you’re trying to install isn’t a Microsoft-verified app will show on your screen.
You can always reverse this setting by choosing Anywhere in settings instead of Microsoft store only.


 You can prevent starting of app installations files if they have not come from the MS store inside Windows 11.
This can make your PC more secure because all apps in the store will have to be digitally signed and overall it can provide you with more control over what will be installed.
Follow the guide below to find out how can you easily turn this feature ON.
You can prevent starting of app installations files if they have not come from the MS store inside Windows 11.
This can make your PC more secure because all apps in the store will have to be digitally signed and overall it can provide you with more control over what will be installed.
Follow the guide below to find out how can you easily turn this feature ON.