Can’t connect to this network Internet connectivity issues present a complex problem with simple solutions for PC and laptop users. First, it is usually recommended that users rule out problems with the internet connection, router, and Wi-Fi settings before proceeding to troubleshoot settings on your PC/laptop. Once the rest are ruled out, we can then proceed with the following troubleshooting steps and guidelines to fix your wifi connection issue:
The first step is to update your windows network adapter driver. Connectivity problems may arise if your network driver is not updated or if it is incompatible with the network adapter. To do so, you may resort to any third-party driver scanning and installing programs found online. This solution should have resorted if users don’t want the hassle of perusing through windows settings that users may not be familiar with.
However, this solution requires a pre-existing internet connection other than wifi, so it is recommended you have a backup internet connection via ethernet.
The second step is to uninstall the driver for your network adapter. This solution is to be reported if there is an issue with the driver as restarting the PC after the following steps let windows reinstall the driver again:
Open the quick access menu on your keyboard by pressing the Windows key and X key at the same time and select “Device Manager” from the menu list.
From the list of devices, select “Network Adapters”
Usually on the top of the list is the Wireless Network Adapter
Right-click the Wireless Network Adapter and select the option to “Uninstall device”
You will be given a confirmation in a new separate window to proceed. Click “Uninstall” to proceed.
After completing the previous steps, try rebooting your Windows PC and reconnecting to see if it works.
A third step is to disable the 802.1 1n modes of your network adapter by following the next steps:
First press the Windows logo key and the X key at the same time to bring up the quick-access menu. And like the previous step, select “Device Manager”
From the list of devices, select “Network Adapters”
Right-click the Wireless Network Adapter from the drop-down menu and select properties
Under properties, select the “Advanced” tab then select the 802.1 1n Mode. To the right drop-down menu change the option to “Disabled” and click “Ok”
After, try to re-establish the connection to see if the steps have worked.
In the event that any of the preceding did not fix your problem, it helps to take a second look at the router and network settings using the interface provided by your ISP. A simple reset to the back of your router often fixes the issue. Also, try to check if you have any other administrative capabilities over the network to determine whether your device, in particular, has been MAC filtered or if the frequency of your wireless adapter is not compatible with the broadcast frequency of your router.
A couple of Windows 10 users have reported an error on domain-connected systems when they tried accessing their computer systems remotely. This occurs when the network level authentication or NLA is enabled on the computer. If you are one of these users, you better keep reading as this post will guide you on how you can fix this error. To resolve this issue, there are several workarounds you can try. You can either disable this option directly via properties or you can also modify some registry entries or sub-keys and restart the system.
When you encounter this problem, an error message pops up that states:
“The remote computer that you are trying to connect to requires network level authentication (NLA), but your windows domain controller cannot be contacted to perform NLA. If you are an administrator on the remote computer, you can disable NLA by using the options on the Remote tab of the System Properties dialog box.”
Or you could also see this error message instead:
“The remote computer requires Network Level Authentication, which your computer does not support. For assistance, contact your system administrator or technical support.”
Before you proceed in troubleshooting the problem using the options provided below, you need to create a backup for your data or system restore point as well as make a copy of any registry entries you are going to modify.
Option 1 – Disable Network Level Authentication via Properties
The NLA is a useful tool that provides your computer with extra security and helps network administrators in controlling who can log into the system with just a click of a single box. However, there are times when it can become a disadvantage and could prevent you from accessing your system remotely. Thus, you need to disable it using Properties.
Tap the Win + R keys to open the Run dialog box.
After that, type in “sysdm.cpl” and tap Enter to open System Properties.
Next, go to the remote tab and uncheck the checkbox for the “Allow connections only from computers running Remote Desktop with Network Level Authentication (recommended)” option.
Now click the Apply button to save the changes made and exit System Properties and then try logging into the remote computer again and see if the problem is fixed or not.
Option 2 – Disable NLA via Registry Editor
Note that you can only use this option if the first one didn’t work for you. Take note that this option will require you to restart your PC completely which could mean some downtime if your computer is running a production server. So make sure to save all your work.
Tap the Win + R keys to open the Run dialog box and then type in “Regedit” in the field and tap Enter to open the Registry Editor.
From there, click on File > Connect Network Registry and input the details of the remote computer and then try to connect.
Navigate to the path below after you’re connected:
HKLM >SYSTEM > CurrentControlSet > Control >Terminal Server > WinStations > RDP-Tcp
After that, change the values given below to “0”
SecurityLayer
UserAuthentication
The navigate to PowerShell and execute this command – restart-computer
Option 3 – Disable NLA via PowerShell
PowerShell allows you to tap into the remote computer and once you’ve targeted the machine, you can execute the commands given below to disable NLA.
Tap the Win + S to open Search and then type in “PowerShell” in the field. Right-click on the related result and select the “Run as administrator” option.
After opening PowerShell, execute the command below:
Once in the PowerShell, execute the following command:
$TargetMachine = “Target-Machine-Name”(Get-WmiObject -class “Win32_TSGeneralSetting” -Namespace rootcimv2terminalservices -ComputerName $TargetMachine -Filter “TerminalName=’RDP-tcp'”).SetUserAuthenticationRequired(0)
Note: In the command given, the “Target-Machine-Name” is the name of the machine you are targeting.
Option 4 – Use the Group Policy Editor to disable NLA
Another option you can use to disable NLA is via the Group Policy Editor. This is ideal for you if you are blanket disabling. Just take note that the Group Policy Editor is a powerful tool and that if you make some mistakes by changing values you have no clue about, you can render your computer useless so make sure that you create a backup for all the values before you proceed.
Tap the Win + R keys to open the Run dialog box.
Then type in “gpedit.msc” and tap Enter to open the Group Policy Editor.
From there, go to this path – Computer Configuration > Administrative Templates > Windows Components > Remote Desktop Services > Remote Desktop Session Host > Security
After that, search for “Require user authentication for remote connections by using Network Level Authentication” and set it to disabled.
Disk partitioning is a concept that’s been around for so long, but is still only familiar to few. If done right, it can help get your computer in perfect order.
Today we bring you a simple definition of disk partitioning, its pros and cons, and a quick tip on how to do it properly to reap its full benefit!
Definition and purpose
The simplest way to define disk partitioning would be: it’s exactly what it sounds like. It means taking a hard disk drive and separating it into different segments. These segments are called partitions. You can visualize it as cutting a cake into smaller pieces - not necessarily of the same size, though.
So what is the purpose of these pieces?
Well, when you first get a hard drive, it’s basically just a bunch of unallocated storage space. Until there’s at least one partition, this space is unusable to your operating system. Once you create a partition, your OS will recognize it as usable storage space.
You can choose to create a single partition and use it for all your files, from program files to personal data. A lot of off-the-shelf computers come with one primary partition like this and a small secondary one reserved for recovery purposes.
Whether or not you want to split your disk into more than one segment is up to you. We would generally recommend it, though. The whole point of partitioning is for each segment to have its own purpose.
So treating all your storage space as a single unit containing different file types would be like constructing an office building with only one massive room for everything - day-to-day work, conferences, interviews, etc. And all of this for different departments of the company. You can see how this might get a little messy.
Creating multiple partitions eliminates the task of running several different types of files from the same place. This takes a heavy load off the entire process of accessing data.
Disk partitioning also brings a ton of other benefits to the table. An important disclaimer, though: there are disadvantages too. We will walk you through both sides to help you get an objective idea and make an informed decision.
Source: Kina on Unsplash
What are the benefits of disk partitioning?
1. Better file organization
This is the most obvious and perhaps the biggest advantage of partitioning your hard drive.
As we already mentioned, partitioning allows you to create separate segments for different file and data types. You wouldn’t want to use the same partition for your system files and for games, would you?
If organization and time management are important to you, then multiple partitions are the right solution. Searching for specific files will be much easier overall. Say you have one hard drive, but three partitions: C for the system files alone, D for multimedia files and documents, and E for games and apps. Your computer loads the system from C without interference from the other two, and you know exactly where to look when searching for a file.
2. Easy reinstallation
File management isn’t the only thing made faster and simpler thanks to partitioning. If you opt for creating multiple segments on your drive, reinstalling Windows will be easy peasy.
That’s because all you need to do is format the partition your system is on. Then you reinstall the OS on it, and there you go. Now you have a clean installation, with all your files saved on other partitions intact. You can even make a copy of your system partition, so you can revisit the exact same installation in the future if you want. And the whole time your pictures, music, documents stay exactly where you left them.
Source: Andrew M on Unsplash
3. Possibility of using multiple file systems
By now you’ve understood that partitions function completely separately. This means that, if for some reason you need multiple file system capabilities, partitioning will allow that.
One segment could be used for, say, an NTFS file system, while another could run ext or APFS.
4. Running different OSes
You’re an avid Windows user but need to use Linux on the side? No problem. You don’t need to buy a separate computer or anything. The possibility of running different file systems also means you can use partitioning to run multiple operating systems.
Doesn’t that sound enticing? One machine for multiple totally different uses!
5. Backup and recovery made simple
Data loss can happen on any disk, partitioned or not. However, it’s much easier to get it back on a partitioned one. You know where you stored what, and each partition can be backed up exactly as it is. It’s also a lot faster to back up single partitions than entire hard drives.
Ultimately this also means a faster path to recovery. If you lose or accidentally delete important files and data, you might want to use a recovery tool like Recuva to scan for them and get them back. Recuva is even powerful enough to recover data from damaged hard drives. But no matter how powerful, scanning a whole drive is strenuous for any recovery tool. Scanning independent partitions is a lot more convenient than that, and will get you to your goal more efficiently.
6. Optimized performance
Now, let’s keep in mind that computer performance is influenced by a number of factors. Partitioning alone isn’t what makes it better or worse. However, it can contribute to optimization. It’s easier for your computer to scan, say, a 40 GB partition to fetch the system file it needs than scanning the entire capacity of your drive.
7. Improved security (possibly*)
Separate partitions can help make your system more secure. Firstly, they minimize file corruption. If one partition gets corrupted, the others should remain unaffected. And keeping in mind the previous point about backup and recovery, ‘fixing’ the damaged partition would be much easier than fixing the entire hard drive.
Partitioning also improves security in terms of malware protection. A malicious attack on one partition is easier to deal with than malware on the whole drive. If your system partition gets infected, you can simply reinstall your OS and that should do the trick.
*Do keep in mind that partitioning can’t defend you against more advanced attacks. So make sure not to give in to a false sense of security.
What are the disadvantages of partitioning?
1. Data is still vulnerable
Yes, it’s easier to back up and recover data from independent partitions. And yes, partitioning may help protect separated files and data to a higher degree. But remember: everything is still on a single physical drive. So while digital errors and issues may be easier to deal with on partitioned drives, physical damage obviously won’t be.
If your hard drive is destroyed in some way, all data on it will be gone. That’s why, if you have crucial files on your PC, it’s important to give them the proper backup treatment before it’s too late.
2. Disbalance of space
Allocating storage space on separate partitions may be a little more tricky than you think. You may fill up one partition a lot faster than another. So on one side you’re struggling with space, and on another you have too much of it to spare. Imagine nearly filling up your system partition and then it turns out you need a lot more space for its updates than you thought.
That’s why you really have to be sure you actually have enough files of different types that you need help managing efficiently. Otherwise you’ll just create a struggle and disbalance in terms of storage.
3. Increased risk of error
If done incorrectly, partitioning can lead to more harm than good. Aside from space disbalance, there is an increased risk of incorrect partition sizes and formatting. Plus, human error is also a factor: in a moment of distraction, you may erase one partition when you meant another. Undoing such mistakes will definitely be tedious and time-consuming.
4. SSDs eliminate the need of partitioning
SSDs (solid-state drives) don’t function in the same way that HDDs do. They have faster read times and can organize files on their own. This quite literally eliminates the need for organization on your part.
Partitioning: yes or no?
The bottom line is that multiple partitions might not be necessary for the average user. But if you’re planning on storing many file types or different file and operating systems on the same PC, then you should give it a shot. It’s also an excellent solution for businesses, of course.
And if our pros and cons list isn’t enough to help you decide, you can always send us a message and we’ll help you make the right choice.
Decided to partition your hard drive?
If you’ve decided to give it a go, you definitely should make sure to do it right.
The two most effective and reliable ways to partition are using the built-in options on Windows or investing in a dedicated partitioning tool, like the EaseUS Partition Master. Which one you'll opt for depends on your specific needs.
Option 1 may be more suitable for users with at least some level of experience. In this case, you’d have to know exactly which steps to take without making errors. This is done in Disk Management on Windows 10/11. From there, you can select the partitions you’d like to split into different volumes of selected sizes.
If this is your first time partitioning, we highly suggest you either consult professionals for this or move on to option 2. The EaseUS partitioning software is specifically designed for beginners, with an intuitive interface helping you succeed in the process. All you need to do is pick the Partition Master package tailored to your needs and follow their guide.
Each package offers technical support as well, and even free upgrades (to varying degrees based on your subscription). Plus, all of this is valid for not one, but two PCs.
It’s the perfect solution for a smooth and error-free partitioning process. If you want to organize your hard drives efficiently and make the most of all your space without doing irreparable damage, it’s definitely worth the investment.
If you have set a static IP address manually in your Windows 10 computer and you encounter an error saying, “This operation failed as no adapter is in the state permissible for this operation”, then you won’t be able to connect to any network.
Many users have reported that they were unable to connect to any network after they set their IP addresses manually and all they see is a red cross symbol on the network icon located at the left-hand side of the taskbar. And upon trying to release the IP configuration and renew the address using Command Prompt or Windows PowerShell, they are getting the error instead. Users also noted that their internet connection is fine since they were able to connect to their Wi-Fi connection on their mobile devices. However, they find it hard to connect to the internet using their PCs. To fix this issue, here are some possible fixes you can check out. Make sure to follow each one of the instructions carefully.
Option 1 – Try to run the Internet Connections troubleshooter
As you were not able to connect to your internet connection using your PC, you can try to run the Internet Connections troubleshooter as it might resolve the problem. Refer to the following steps to run this troubleshooter:
Tap the Win + I keys to open Settings.
After opening Settings, go to Update and Security.
Next, navigate to the Troubleshoot pane and select the Internet Connections section and click the Run Troubleshooter button to get started.
Wait until the troubleshooter is finished doing its job and then try connecting to your network again.
Option 2 – Try to perform Network Reset
As pointed out, the “This operation failed as no adapter is in the state permissible for this operation” error occurs due to the static IP you’ve set. Thus, to fix it, you can try to perform a Network Reset. This will reset the entire network configuration including your IP address. To perform Network Reset, follow these steps:
Tap the Win + I keys to open Settings.
From there, go to the Network and Internet section.
Next, scroll down and look for “Network Reset” under the status pane.
After that, click on Network Reset and then on Reset now to start resetting the network configuration. Once done, check if it is able to fix the error or not.
Option 3 – Try to update or rollback or uninstall the Network drivers
You might also want to update, roll back, or disable your Network drivers to fix the “This operation failed as no adapter is in the state permissible for this operation” error.
Tap the Win + R keys to launch the Run window and then type in the “MSC” command and hit Enter to open the Device Manager window.
Under the Device Manager, you will see a list of drivers. From there, look for the Network Adapters and expand it.
Then right-click on each one of the Network drivers and depending on your preference, you can either select “Update driver”, “Disable device” or “Uninstall device”.
After that, restart your PC and see if it helped in fixing the netio.sys Blue Screen error.
Option 4 – Try to reset Winsock, TCP/IP & Flush DNS
You might also want to try resetting Winsock, TCP/IP, and flushing DNS might help you resolve errors. To do so, follow these steps:
Right-click on the Start button and click on Command Prompt (administrator) so you can pull up an elevated Command Prompt.
After that, execute each one of the commands listed below. And after you typed in one after the other, you have to hit Enter.
netsh winsock reset – type in this command to reset Winsock
netsh int ip reset resettcpip.txt – type in this command to reset TCP/IP
ipconfig /flushdns – type in this command to flush the DNS cache
Next, restart your PC and check if the problem’s fixed.
Option 5 – Temporarily disable Firewall and third-party antivirus
Firewall and antivirus programs are known to block files the instant it detects a threat to the system. However, there are some cases when it can also block a file even when it’s a safe one. Thus, your antivirus or firewall programs might be the reason why you can’t download anything on your Windows 10 computer. To isolate the issue, you need to temporarily disable both the Firewall and antivirus programs and then check if you can now download anything from the internet. Do not forget to enable them again as disabling them can leave your computer vulnerable to cyber threats.
REevil is one of the most active and successful hacking groups connected to Russia and operating all over the world. The group recently demanded a huge bitcoin ransom for an attack targeting IT firm Kaseya in the USA.
Since Tuesday blog and payment site run by REvil group cannot be longer reached without any kind of explanation or why.
The reason behind the disappearance is unknown but has sparked speculation that the group may have been targeted deliberately by authorities.
US President Joe Biden said he raised the issue with Vladimir Putin during a phone call on Friday, after discussing the subject during a summit with the Russian president in Geneva last month.
Mr. Biden told reporters that he had "made it very clear to him...we expect them to act" on information and also hinted the US could take direct digital retaliation on servers used for intrusions.
The timing of Tuesday's outage has sparked speculation that either the US or Russian officials may have taken action against REvil - though officials have so far declined to comment and cyber experts say sudden disappearances of groups are not necessarily uncommon.
The development comes after a series of high-profile ransomware attacks which have hit major US businesses this year.
The FBI accused REvil - also known as Sodinokibi - of being behind a ransomware attack on the world's largest meat processing company JBS last month.
MapsGalaxy is a Browser Extension developed by MindSpark Inc. witch usually comes bundled with other software. This extension claims it allows users to search the web, open maps, and check out fasters routes to a destination.
While active, it monitors your browser activity. The links you visit, the searches you make, the websites you use, and even personal information is sent back to MindSpark Inc. to later be sold/used to deliver ads to your browser.
While this extension is active you may see additional unwanted ads, sponsored links, and pop-up ads displayed in your search results and browser. It also changes your default search engine to MyWay, ensuring its ads are displayed. Several anti-virus scanners have marked this extension as a Browser Hijacker and are therefore not recommended to keep on your PC.
About Browser Hijackers
Browser hijacking is actually a form of unwanted software program, usually a web browser add-on or extension, which causes modifications in browser settings. Practically all browser hijackers are made for marketing or advertising purposes. Typically, it will drive users to predetermined websites that are looking to increase their advertising campaign revenue. Many people believe that such websites are legitimate and harmless but that is not true. Almost every browser hijacker poses an actual threat to your online safety and it is vital to classify them under privacy risks. They do not just screw up your internet browsers, but browser hijackers can also modify the computer registry to make your computer or laptop vulnerable to various other malware attacks.
How to know if your internet browser has been hijacked
Below are some symptoms that indicate you have been hijacked:
1. your web browser’s homepage is suddenly different2. you observe new unwanted bookmarks or favorites added, usually directed to ad-filled or pornography websites3. The default search page of your web browser is modified4. discover new toolbars that you didn’t add5. you’ll notice random pop-ups start occurring frequently6. websites load very slowly and sometimes incomplete7. Inability to navigate to certain websites, especially anti-malware and other security software sites.
Exactly how they infect computer systems
There are many ways your PC can get infected by a browser hijacker. They typically arrive by way of spam email, via file-sharing networks, or by a drive-by download. They could also be deployed via the installation of a web browser toolbar, extension, or add-on. A browser hijacker could also be installed as a part of freeware, shareware, demoware, and pirated programs. Well-known examples of browser hijackers include Conduit, CoolWebSearch, RocketTab, OneWebSearch, Coupon Server, Searchult.com, Snap.do, and Delta Search.
Browser hijackers might record user keystrokes to collect potentially invaluable information leading to privacy concerns, cause instability on computers, significantly disrupt the user experience, and eventually slow down the PC to a point where it will become unusable.
How to fix a browser hijack
The one thing you can try to get rid of a browser hijacker is to locate the malicious software in the “Add or Remove Programs” list in the Windows Control Panel. It may or may not be there. When it is, try to uninstall it. Having said that, most hijackers are quite tenacious and need specialized tools to remove them. Inexperienced PC users should not attempt the manual form of removal methods, since it requires in-depth computer knowledge to do fixes on the system registry and HOSTS file.
Find Out How To Install Safebytes Anti-Malware On An Infected Computer system
Practically all malware is inherently unsafe, but certain kinds of malicious software do more damage to your PC than others. Some malware variants alter web browser settings by adding a proxy server or change the PC’s DNS configurations. In these cases, you’ll be unable to visit certain or all internet sites, and therefore unable to download or install the required security software to eliminate the infection. If you’re reading this article now, you have perhaps recognized that virus infection is the cause of your blocked web connectivity. So how to proceed when you want to download and install an antivirus application such as Safebytes? There are some options you could try to get around with this problem.
Get rid of viruses in Safe Mode
Safe Mode is a special, basic version of Microsoft Windows in which just a bare minimum of services are loaded to prevent viruses as well as other problematic applications from loading. In the event, the malicious software is set to load immediately when the computer boots, switching into this particular mode could prevent it from doing so. In order to get into Safe Mode or Safe Mode with Networking, press F8 while the computer is booting up or run MSCONFIG and look for the “Safe Boot” options under the “Boot” tab. Once you’re in Safe Mode, you can attempt to download and install your anti-malware program without the hindrance of the malware. At this point, you are able to run the anti-virus scan to remove computer viruses and malware without hindrance from another malicious application.
Utilize an alternate web browser to download the anti-malware application
Malicious code could exploit vulnerabilities in a specific browser and block access to all anti-virus software sites. If you seem to have a trojan attached to Internet Explorer, then switch to a different browser with built-in safety features, such as Chrome or Firefox, to download your favorite antivirus program – Safebytes.
Install and run anti-virus from your flash drive
Here’s another solution which is utilizing a portable USB anti-malware software package that can scan your computer for malicious software without the need for installation. Adopt these measures to run the anti-virus on the infected computer.
1) Download Safebytes Anti-Malware or Microsoft Windows Defender Offline onto a clean computer.2) Plug the pen drive into the uninfected computer.3) Double-click on the downloaded file to open the installation wizard.4) Select the drive letter of the pen drive as the place when the wizard asks you exactly where you would like to install the antivirus. Do as instructed on the screen to finish up the installation process.5) Unplug the USB drive. You may now utilize this portable anti-malware on the infected computer.6) Double-click the Safebytes Anti-malware icon on the flash drive to run the software.7) Run Full System Scan to detect and clean-up up all types of malware.
Features and Benefits of SafeBytes Anti-Malware
If you are looking to download an anti-malware application for your computer, there are plenty of tools in the market to consider nonetheless, you should not trust blindly anyone, regardless of whether it is a paid or free program. Some are worth your money, but many aren’t. You need to pick one that is trustworthy, practical, and has a strong reputation for its malware source protection. On the list of the recommended tools by industry leaders is SafeBytes Anti-Malware, the most dependable program for Windows computers.
SafeBytes anti-malware is really a powerful, very effective protection tool created to assist users of all levels of computer literacy in detecting and removing harmful threats from their personal computers. This software program can easily identify, eliminate, and protect your PC from the most advanced malware threats such as spyware, adware, trojan horses, ransomware, worms, PUPs, along with other possibly damaging software programs.
SafeBytes carries a plethora of amazing features which can help you protect your laptop or computer from malware attack and damage. Let’s look into some of them below:
Live Protection: SafeBytes provides real-time active checking and protection from all known computer viruses and malware. It will regularly monitor your pc for hacker activity and also provides end-users with sophisticated firewall protection.
Optimum AntiMalware Protection: With its advanced and sophisticated algorithm, this malware elimination tool can detect and remove the malware threats hiding in your computer system effectively.
Safe Web Browsing: SafeBytes inspects the hyperlinks present on a web page for possible threats and notifies you if the website is safe to check out or not, through its unique safety rating system.
Fast Multi-threaded Scanning: SafeBytes’s virus scan engine is among the quickest and most efficient within the industry. It's targeted scanning drastically increases the catch rate for viruses that are embedded in various PC files.
Lightweight: The program is lightweight and can run silently in the background, and will not impact your PC efficiency.
24/7 On-line Tech Support: Support service is available for 24 x 7 x 365 days via email and chats to answer your queries.
Technical Details and Manual Removal (Advanced Users)
If you want to manually get rid of MapsGalaxy without the use of an automated tool, it might be actually possible to do so by removing the program from the Windows Add/Remove Programs menu, or in cases of browser extensions, going to the browsers AddOn/Extension manager and removing it. You’ll likely also want to reset your internet browser.
If you choose to manually delete the system files and registry entries, make use of the following list to make sure you know exactly what files to remove before undertaking any actions. But bear in mind, this can be a difficult task and only computer experts could accomplish it safely. Additionally, certain malicious programs have the capability to defend against its deletion. It is highly recommended that you carry out the removal process in Safe Mode.
In case you don’t know, when you visit a website that uses HTTPS, it also offers an SSL certificate to the browser in order to verify the website’s identity. Although it may contain lots of things inside it, one of them is the URL of the website. So if the certificate does not match the URL to what you entered, you will most likely get the “Server’s certificate does not match, ERR CERT COMMON NAME INVALID” error which indicates that the connection is not private and the site may try to steal your data but worry not, as this post will guide you in resolving this issue.
To fix the ERR_CERT_COMMON_NAME_INVALID error, here are some suggestions that might help.
Option 1 – Check the website’s certificate
If you own the website where you’re getting the error, then you might have to check if the website’s certificate is installed properly and configured on the server as it could be the reason why you’re suddenly getting the error.
Option 2 – Check the Windows Host file
You can also try to cross-check the Windows Hosts file to find out if the website you are trying to open has been blocked, because if it is, then it’s no wonder why you’re getting the ERR_CERT_COMMON_NAME_INVALID error. There are instances when some third-party application modifies the file and adds some websites to the blocklists. So if the website is indeed blocked, you need to remove it from the list.
Option 3 – Use the Google Public DNS
You might want to change your DNS to Google Public DNS as it could also help you in fixing the ERR_CERT_COMMON_NAME_INVALID error in Chrome. To do so, follow the steps below.
The first thing you have to do is right-click on the network icon in the Taskbar and select Network and Sharing Center.
Next, click on the “Change Adapter Settings” option.
After that, search for the network connection that you are using to connect to the internet. Note that the option might be “Wireless Connection” or “Local Area Connection”.
Right-click on your network connection and click on Properties.
Then select the new window to choose the “Internet Protocol 4 (TCP/IPv4)” option.
After that, click on the Properties button and click the checkbox in the new window for the option “Use the following DNS server addresses”.
Type in “8.8.8.8” and “8.8.4.4” and click OK and exit.
Option 4 – Run the built-in Malware Scanner and Cleanup Tool in Chrome
In case you don’t know, there is actually a built-in malware scanner and cleanup tool in Chrome that helps you get rid of any unwanted ads, pop-ups, and even malware, as well as unusual startup pages, toolbars, and other things that could affect the performance of the browser. In addition, this built-in tool in Chrome might also help in fixing the ERR_CERT_COMMON_NAME_INVALID error.
Option 5 – Reset Chrome
Resetting Chrome can also help you get rid of the error. Resetting Chrome means restoring its default settings, disabling all the extensions, add-ons, and themes. Aside from that, the content settings will be reset as well and the cookies, cache, and site data will also be deleted. To reset Chrome, here’s what you have to do:
Open Google Chrome, then tap the Alt + F keys.
After that, click on Settings.
Next, scroll down until you see the Advanced option, once you see it, click on it.
After clicking the Advanced option, go to the “Restore and clean up option and click on the “Restore settings to their original defaults” option to reset Google Chrome.
Recently, a number of users reported that they were not able to run PLEX and other similar streaming services ever since a Windows Update was automatically installed in the system. The error in these streaming services has something to do with a missing Mfplat.dll DLL file from the Windows Media Feature Pack. On the other hand, some users also reported that the mfplat.dll error occurred on several games as well which used the Media Feature Pack.
Usually, the mfplat.dll error is caused by the missing Media Feature Pack in Windows 10. Although most of the time the Media Feature Pack is installed by the application that needs it or through Windows Update automatically, there are just certain installers that do not have it. It could be that the Media Playback service was disabled by a particular Windows Update. Aside from that, the error might be because your computer is using Windows 10 N – a Windows 10 version that does not include the Media Feature Pack by default. Whatever the cause may be, you can troubleshoot the problem with the help of the options given below. But before you go on, keep in mind that downloading the missing DLL file and copying it to the folder of the program where you encounter the error won’t really help and will only make things even more complicated.
Option 1 – Install the Media Feature Pack for Windows 10 N version
As mentioned, the Windows 10 N version does not come with Windows Media Player. Meaning to say, the Media Feature Pack is also not installed by default or won’t be updated by the Windows Update component. So if you are not quite sure what Windows 10 version you currently have installed, refer to these steps:
Tap the Windows key + S and then type “about” in the search box.
From the search results, click on the “About your PC” to open the About tab of the Settings app.
Afterward, scroll down to the Windows specifications and check your Windows version under Edition.
Note: If you’ve determined that your computer is using the Windows 10 N version, you need to install the appropriate Media Feature Pack for your computer. How? Refer to the steps below:
Click this link to download and install the Media Feature Pack from Microsoft’s official website.
Upon installation, select the edition you want to install using the drop-down menu and then click on Confirm. Take note that there are few reasons why you’d want to install the older version since most streaming services like PLEX and most games usually require version 1803.
After that, wait until the request is validated. The download should begin in a few minutes automatically.
Once the download is completed, open the installation executable file and follow the next on-screen instructions to install the Media Feature Pack on your computer.
Restart your computer. After your computer has rebooted, open the application where you’re getting the mfplat.dll missing error and then check if the problem is now fixed.
Option 2 – Enable Media Playback via Command Prompt
If you encounter the mfplat.dll missing error when you attempt to run PLEX or other similar streaming service and you’ve already verified that the Media Feature Pack is indeed installed, you might want to try enabling it using an elevated Command Prompt. There are cases when a particular Windows Update ends up disabling the feature and creates the grounds which results in the mfplat.dll missing error. Thus, you can have to enable the feature via Command Prompt.
Tap the Win + R keys to open the Run dialog box.
Then type “cmd” in the field and hit Enter to open an elevated Command Prompt.
Next, click on Yes if a User Account Control prompt pops up.
After opening Command Prompt, copy and paste the following command and hit Enter to execute it:
Close Command Prompt and then open the app once again to check if the problem is now fixed.
Option 3 – Try extracting a copy of the mfplat.dll file from the windows.old directory
If you encounter the error shortly after you just upgraded to Windows 10 from an older version, the best thing you can do to resolve the problem is to use windows.old directory to fetch an old copy of the mfplat.dll file. To do so, follow the steps below.
Go to the Windows drive and then look for the windows.old directory where it preserves a copy of your old operating system as well as associated files in case something goes out of hand during the upgrade process.
After that, open the windows.old folder and then go to the syswow64 folder.
Next, from the syswow64 folder, copy the mfplat.dll file and paste it to C: windows syswow64.
Restart your computer and check if the error is now resolved or not.
One of the most common ways cybercriminals use to inject suspicious code into devices is by tricking users into installing a malicious program on a targeted device. Oblivious users are vulnerable to such tricks, which is why Microsoft has been working hard in the background to address this issue. Recently, Microsoft announced the availability of a sandboxed version of Windows 10 that runs inside Windows 10 in order to isolate suspected software to run inside it and protect the system from potential threats.
This Windows Sandbox feature is a new feature that keeps your computer secure. It is a virtual disposable environment that you can enable. So if suspect any software of being malicious, you can run this software in an environment and ensure that it won’t interfere with any normal processes and would not jeopardize files on your computer. To simply put it, “Windows Sandbox is a new lightweight desktop environment tailored for safely running applications in isolation”. So if the Sandbox is closed, all the residual files, software, and other data are deleted permanently. To enable Windows Sandbox, refer to the instructions provided below.
Step 1: You have to make sure that you are running either Windows 10 Enterprise Editions or Windows 10 Pro and that your computer is running build 18305 or newer.
Step 2: After that, you have to enable Virtualization to let another instance of Windows 10 running in Sandbox mode.
Step 3: Next, search for Windows Features on and off in the search box and then select the appropriate entry.
Step 4: From the list, go to the mini window and check the Windows Sandbox and then click on OK.
Step 5: Afterwards, in the Cortana Search box, search for “Windows Sandbox” and select the related entry to run it in an elevated window.
Step 6: Then from your main computer (host), copy the executable file and paste it inside the Windows Sandbox environment.
Step 7: Now run the executable file in the Sandbox environment and use it as you normally do.
Step 8: Once you’re done, close the Windows Sandbox application and as mentioned, every data regarding the executable file and the temporary environment will be deleted.
Step 9: And for the sake of safety, ensure that there are no modifications made to the host because of the executions in the Sandbox environment.
You have the option to contact Microsoft for feedback related to Windows Sandbox. You can use the traditional Feedback Hub if you have any suggestions or any issues. Just fill in the appropriate details and select Windows Sandbox for the feature category under the Security and Privacy section. And if you have any issues related to the execution of and within Windows Sandbox, simply choose “Recreate my problem” then select Start capture to reproduce the issue, and once you’re done, select Stop capture.
The feature that was originally planned for now scrapped Windows 10X is included in Windows 11. You will be able to customize your Virtual desktop with different wallpapers for each screen.
In order to fully customize your virtual desktops with different wallpapers follow this easy step-by-step guide.
Click on the Task View button in the taskbar
When the Task View opens, select the desktop on which you want to set wallpaper
The view will switch to the selected desktop. Right-click anywhere on the desktop and select personalize
In personalization settings, click on the background
Select wallpaper which you would like to have on the desktop by clicking on browse and navigating to the desired one
Close the settings
Repeat for each virtual desktop you would like to customize
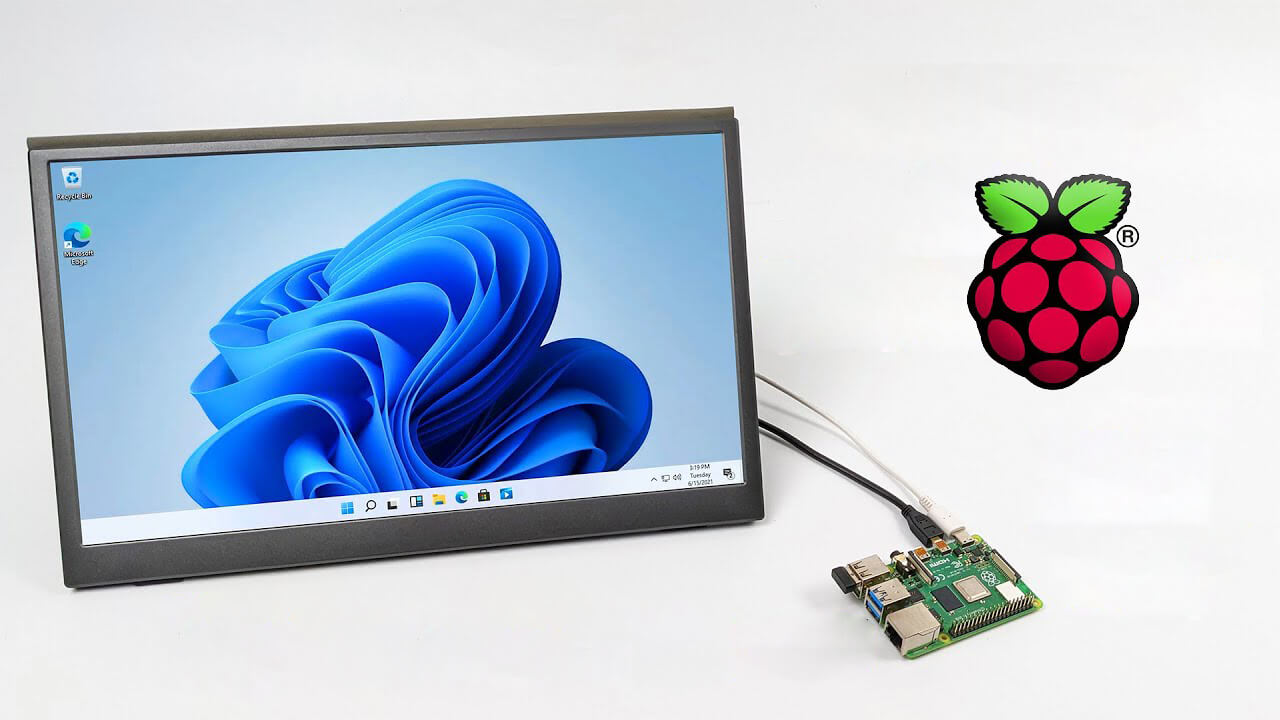
A lot of controversies and mixed emotions have come from statements about Windows 11 minimum system requirements, especially ones linked to TPM.
Naturally, each time some software company giant announces how things are must have there are people who go out and prove them wrong.
This time Raspberry Pi community was one which demonstrated that not only Raspberry Pi does not have a TPM module, it can run the full desktop version of Windows 11
Raspberry Pi 4 and things you need for Windows 11 installation
In order to actually install Windows 11 on your Pi, there are certain things that you will need. Check out the below list and prepare everything.
Raspberry Pi 4 4GB or 8GB
A 32GB or larger SSD via a USB 3 caddy. Best for performance or 16GB or larger microSD card
USB boot enabled, see below.
A micro SD card with the latest Raspberry Pi OS
Windows 10 PC
USB to Ethernet or WiFi dongle
Bluetooth dongle (if you want Bluetooth)
Keyboard, mouse, HDMI, and power for your Raspberry Pi
Configuring Pi to boot from SSD
In order to boot from SSD be sure that firmware and bootloader are up to date on the latest version and upgrade if needed. Be aware that this firmware update can only be performed using the official Raspberry Pi OS.
Also if you are eager and want to use a standard microSSD card instead of an SSD to run Windows 11 feel free to skip this entire section.
Boot from microSSD with the latest Raspberry Pi OS on it.
Update firmware and OS using the terminal by typing
sudo apt updatesudo apt full-upgradesudo rpi-update
Reboot your Pi
Install the latest version of bootloader again using the terminal with the command
sudo rpi-eeprom-update -d – a
Reboot Pi
Launch raspi-config on your Pi via terminal with
sudo raspi-config
Select option 3 (Boot options – Configure options for start-up) from boot options
Select Boot ROM version and press ENTER
Select latest and then OK
Select NO when prompted to reset boot ROM to defaults on the latest version boot ROM selected screen. Press OK
Select Boot order and press ENTER
Select USB Boot and click on OK and remove microSD card from Pi
Select Finish and click on NO when prompted to reboot
Creating Windows 11 installation image for Pi 4
In order to install Windows 11 on our Pi, we must create an installation image, follow the steps below explaining the process.
Download Windows on Raspberry imager and extract it into the win11 folder
Open Imager and allow it to make changes to your computer, set your language, and click on next
Select storage drive where you would like to install Windows
Set device type and click on next
Select our Windows 11 ISO image we created and click on next
On the drivers screen select Use the latest driver package available on the server
On UEFI firmware select screen choose Use the latest firmware available on the server
On configuration screen click on next
Check your setting on the installation overview and if everything is ok click on install
Wait for the whole process to be finished
Once the process is completed, close Windows on Raspberry imager, take out SSD or microSSD card from PC and connect it on your Pi along with Pi peripherals.
Setting Windows 11 on Pi
In order to actually use Windows 11 on our Raspberry Pi we now have to set up the Windows 11 install using the standard post-installation setup sequence.
Power up Pi and press ESC when prompted
Go to Device manager and press ENTER
Select Raspberry Pi Configuration
Select Advanced configuration
Set Limit RAM to 3GB to a disabled state, press F10 to save, and ESC to exit.
Select Display configuration
Set the resolution to desired option and press ENTER, F10 to save, and ESC to exit
Go to CPU configuration
Check if the CPU clock is set to default, if not set it
Press ESC to go back all the way to the main menu
Select Continue to exit BIOS and boot your Raspberry Pi with Windows 11 on it
And there you have it, fully working Windows 11 OS on Raspberry Pi despite what Microsoft says
Note that due to lack of some drivers performance can be less than optimal, for example, full HD videos will not work since there are no compatible graphic drivers for Pi and some other stuff like Wi-Fi will also cause some issues but overall Windows 11 is working pretty well.


 REevil is one of the most active and successful hacking groups connected to Russia and operating all over the world. The group recently demanded a huge bitcoin ransom for an attack targeting IT firm Kaseya in the USA.
Since Tuesday blog and payment site run by REvil group cannot be longer reached without any kind of explanation or why.
The reason behind the disappearance is unknown but has sparked speculation that the group may have been targeted deliberately by authorities.
US President Joe Biden said he raised the issue with Vladimir Putin during a phone call on Friday, after discussing the subject during a summit with the Russian president in Geneva last month.
Mr. Biden told reporters that he had "made it very clear to him...we expect them to act" on information and also hinted the US could take direct digital retaliation on servers used for intrusions.
The timing of Tuesday's outage has sparked speculation that either the US or Russian officials may have taken action against REvil - though officials have so far declined to comment and cyber experts say sudden disappearances of groups are not necessarily uncommon.
The development comes after a series of high-profile ransomware attacks which have hit major US businesses this year.
The FBI accused REvil - also known as Sodinokibi - of being behind a ransomware attack on the world's largest meat processing company JBS last month.
REevil is one of the most active and successful hacking groups connected to Russia and operating all over the world. The group recently demanded a huge bitcoin ransom for an attack targeting IT firm Kaseya in the USA.
Since Tuesday blog and payment site run by REvil group cannot be longer reached without any kind of explanation or why.
The reason behind the disappearance is unknown but has sparked speculation that the group may have been targeted deliberately by authorities.
US President Joe Biden said he raised the issue with Vladimir Putin during a phone call on Friday, after discussing the subject during a summit with the Russian president in Geneva last month.
Mr. Biden told reporters that he had "made it very clear to him...we expect them to act" on information and also hinted the US could take direct digital retaliation on servers used for intrusions.
The timing of Tuesday's outage has sparked speculation that either the US or Russian officials may have taken action against REvil - though officials have so far declined to comment and cyber experts say sudden disappearances of groups are not necessarily uncommon.
The development comes after a series of high-profile ransomware attacks which have hit major US businesses this year.
The FBI accused REvil - also known as Sodinokibi - of being behind a ransomware attack on the world's largest meat processing company JBS last month. 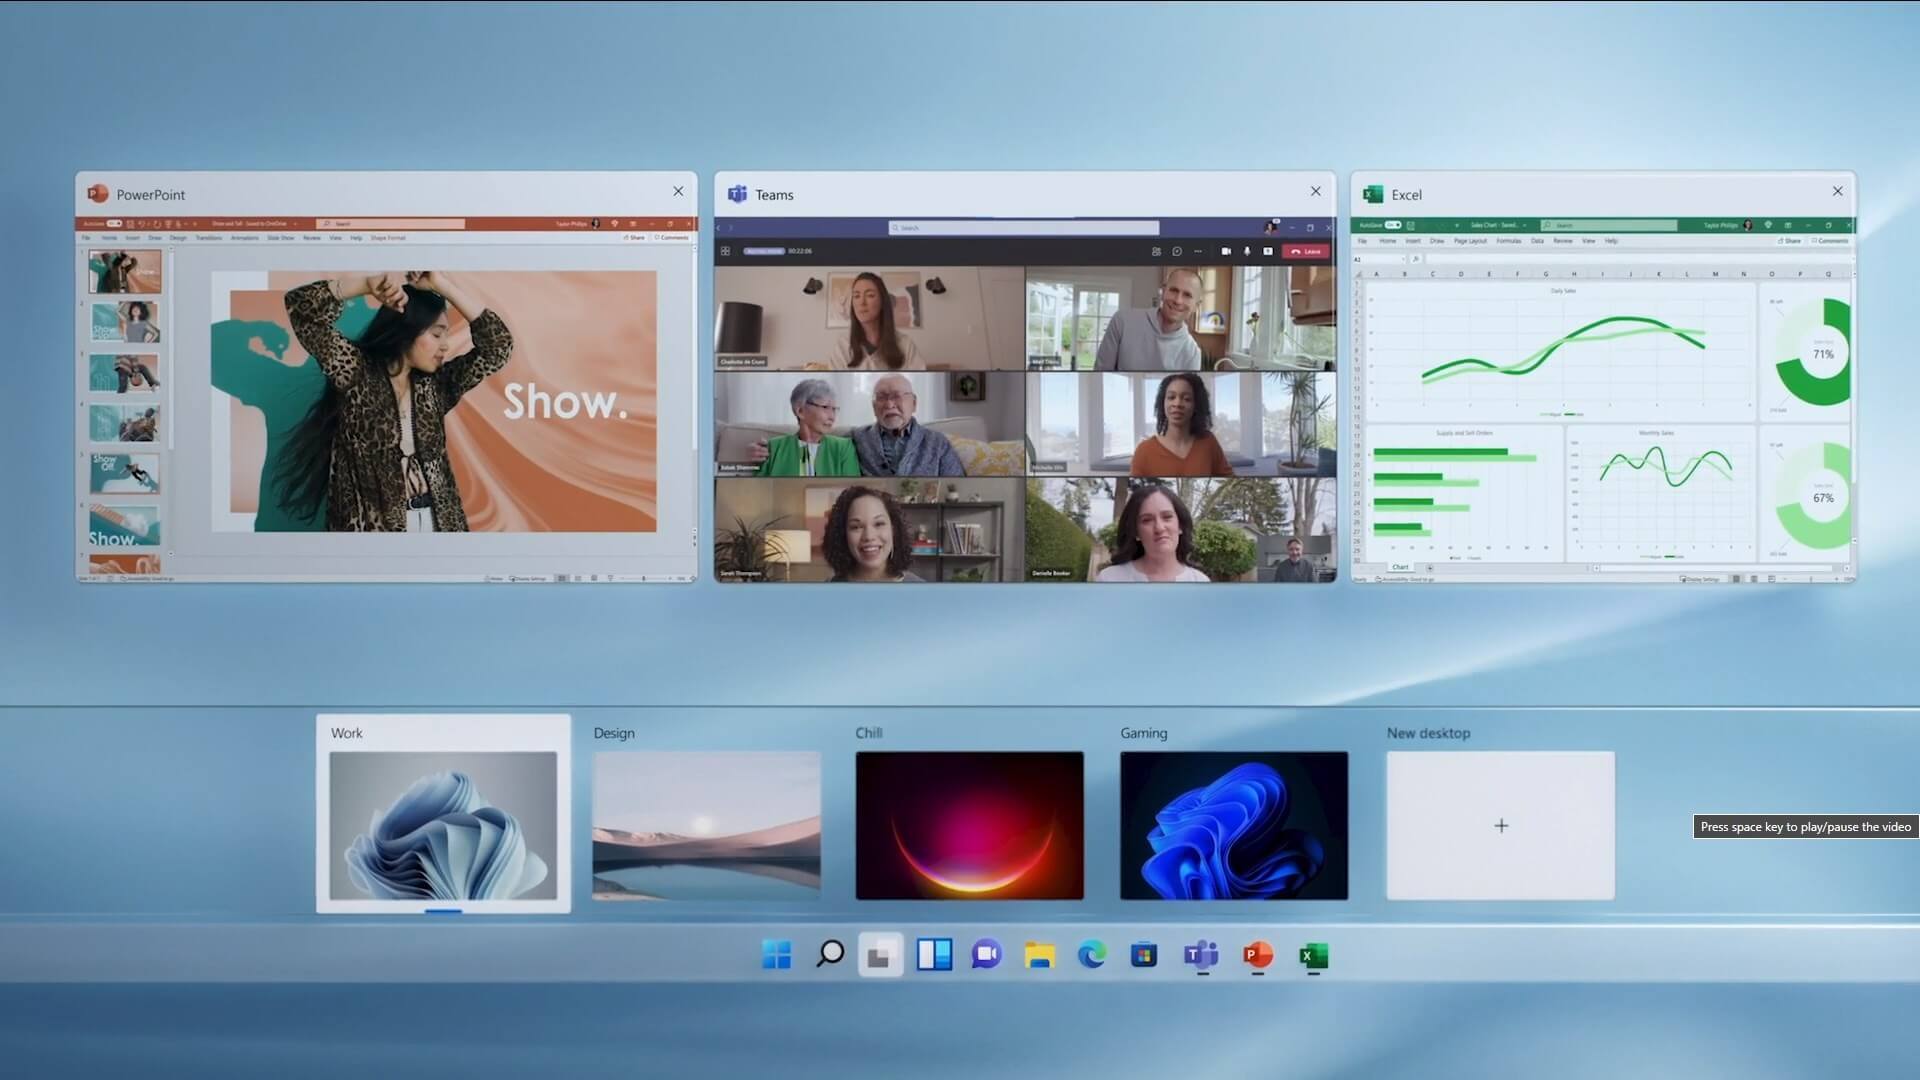 The feature that was originally planned for now scrapped Windows 10X is included in Windows 11. You will be able to customize your Virtual desktop with different wallpapers for each screen.
In order to fully customize your virtual desktops with different wallpapers follow this easy step-by-step guide.
The feature that was originally planned for now scrapped Windows 10X is included in Windows 11. You will be able to customize your Virtual desktop with different wallpapers for each screen.
In order to fully customize your virtual desktops with different wallpapers follow this easy step-by-step guide.
 Raspberry Pi 4 and things you need for Windows 11 installation