Error code 10 is a type of Window Device Manager error code. This error code is generated when the Device Manager can’t start the hardware device or is experiencing device driver issues. It is displayed in the following format:
"This device cannot start. (Code 10)"
You can access complete details about error codes related to Device Manager such as code 10 through the Device Status area in the Device Properties.
By accessing Device Status, you can easily view the status of each device and learn about the specific device that could be causing the problem.
 Error Causes
Error code 10 can be triggered due to several reasons. These include:
Device driver corruption can cause you great inconvenience and PC performance issues. The computer’s operating system relies heavily on device drivers to communicate with the hardware.
For example, the printer driver facilitates functioning of the printer. Similarly, the graphic card driver ensures proper video output on the monitor screen.
However, your PC hardware, such as printer or keyboard, may stop functioning properly if their device drivers become outdated or corrupt. Therefore to avoid inconvenience and to ensure your PC works properly, it is important to resolve the problem immediately without any delay.
To repair error code 10, you don’t have to be a technical whiz or hire a professional computer programmer. Here are some of the best and easy to perform DIY methods that can help you fix this device error in no time.
Sometimes temporary problems in Device Manager can also generate code 10 error. Therefore it is advisable to restart your PC. Rebooting your system might fix the error. Try it! If it does, great, however, if the error still persists, then try other methods listed below.
Go through the Device Status in the Device Properties to view the driver causing the problem. If any driver is tagged with a yellow exclamation point, it means that driver is the one causing problems. Once identified, uninstall that driver and then reinstall it. This will hopefully resolve the problem.
Whether the error code 10 is generated due to incompatible, corrupted, or outdated device drivers, simply update the device driver to resolve. To update the driver, go to the Device Manager, then click the driver tab in the device properties dialog box.
After that, click update driver. This will start the hardware update wizard. Then follow the instructions to update the driver on your PC. During this process, you may be prompted to provide the driver path.
If you don’t have it, then you will have to download the latest driver from the hardware vendor’s official website. This can be time-consuming and stressful.
Another alternative is to install DriverFIX. It is a user-friendly device driver management software with an intuitive interface.
Its intelligent algorithm is designed to detect all the problematic drivers in seconds. It automatically updates and accurately installs appropriate drivers and ensures your PC runs at its optimum level in no time.
Click here to download DriverFIX on your system to resolve error code 10.

 Restart graphic driver
 Error Causes
“There were some problems installing updates, but we’ll try again later. If you keep seeing this and want to search the web or contact support for information, this may help: (0x80244022).”To fix error code 0x80244022, refer to the potential fixes provided below.
YourTemplateFinder is a browser extension developed by Mindspark for Google Chrome. This extension allows users to browse and download various templates that can be used for all kinds of occasions.
When installed, it changes your default search engine and home page to MyWay.com. During your browsing sessions, YourTemplateFinder will monitor user activity, recording website visits, user information, product purchases, etc. This data is later used to target better ads to users.
While browsing the internet with this extension active you will see additional ads displayed throughout your browsing sessions. Sponsored content such as links, banners, and pop-up ads will appear on websites sometimes even covering the website content.
This extension has been marked for removal by several anti-virus applications and has been classified as a Browser Hijacker due to its aggressive behavior and ad injections. It is flagged for optional removal.
CHKDSK [volume [[path] filename]] [/F] [/V] [/R] [/X] [/C] [: size]]Note: In the command given above, “[/F]” will try to fix the system errors while “[/R]” will be the one to fix the bad sectors.
One of the selling points of Windows 11 was the ability to run Android apps natively in it without the need for any third-party software. It is not a big surprise that even after its release Microsoft is evolving and expanding Windows 11 and its features.
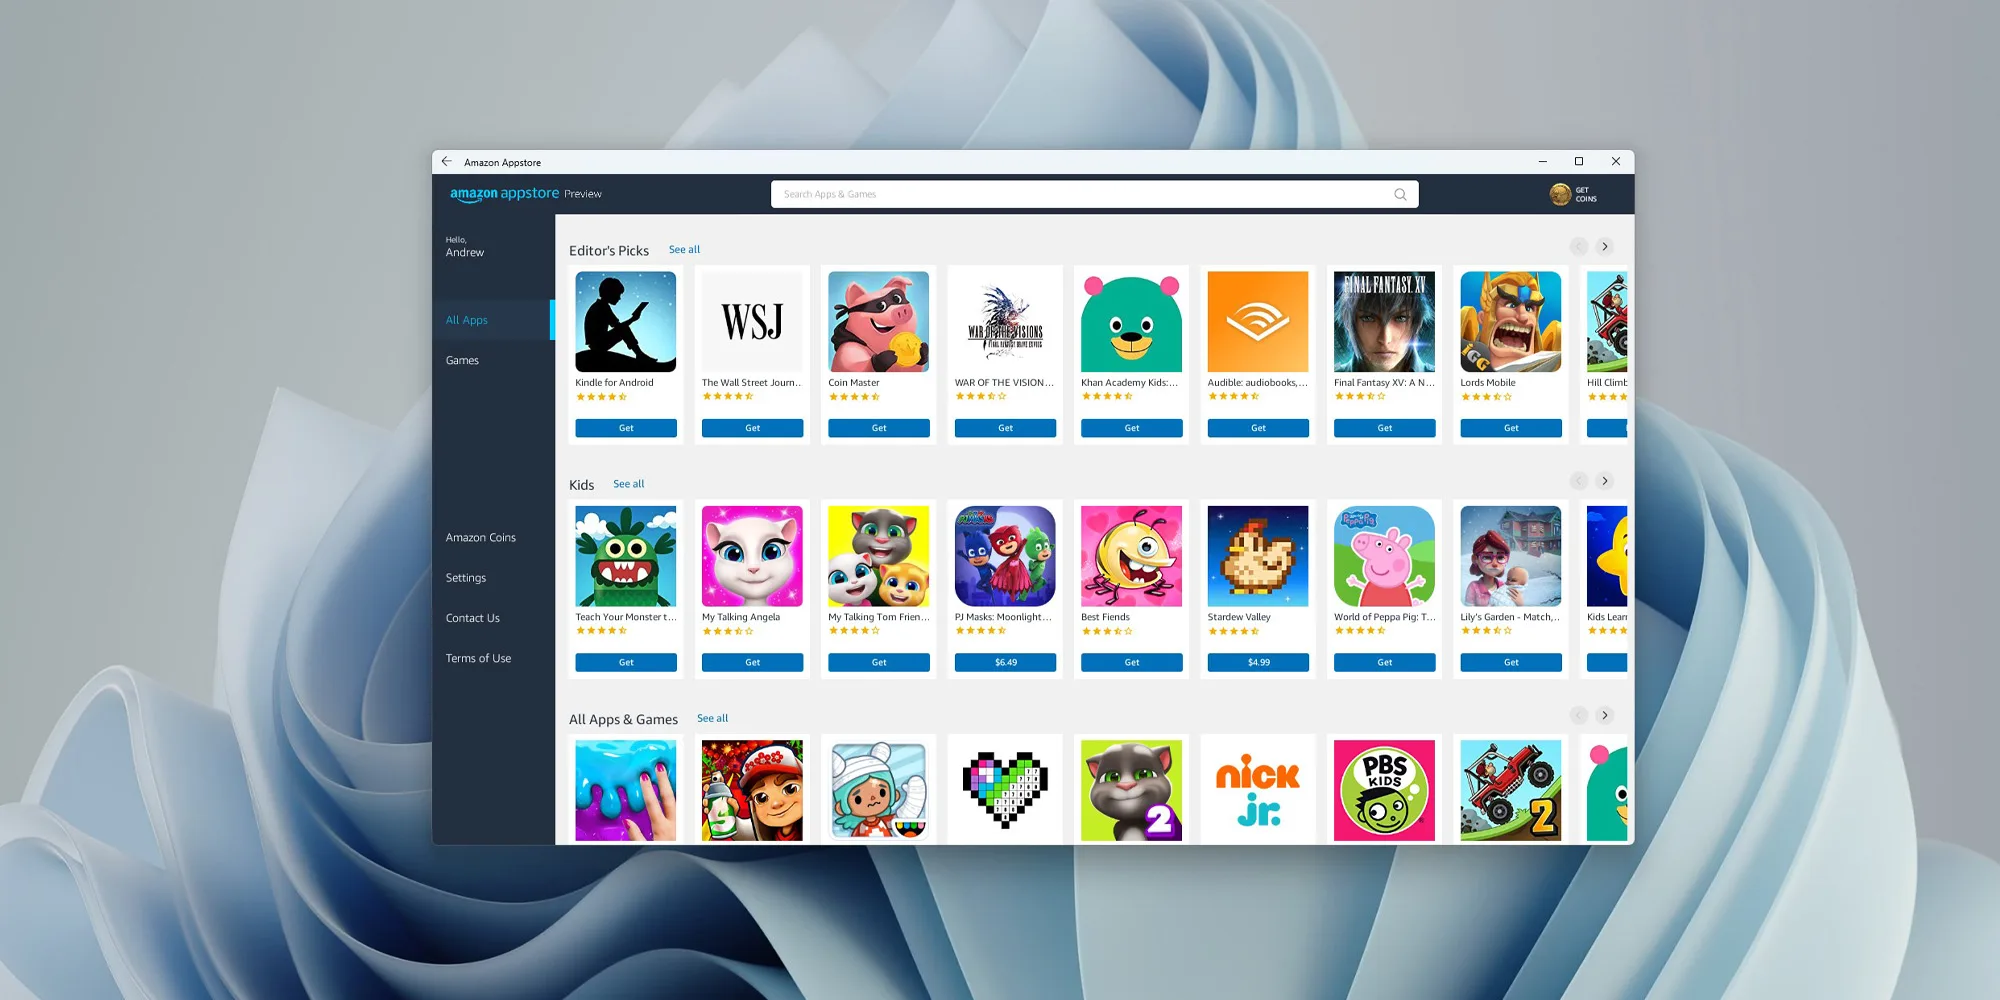
Microsoft is now rolling out an update for the Windows Subsystem for Android on the Dev Channel of the Windows Insiders program. The new version upgrades the core operating system from Android 11 to Android 12.1 (also known as Android 12L), which means the new system and app features in Android 12 and 12.1 are now available on Windows for the first time. However, not the new features in those updates apply to the modified version that runs on top of Windows. For example, one of the main improvements in 12.1 was a dual-pane notification panel for larger screens, but Android app notifications on Windows just show up in the Windows notification panel.
The upgrade also improves how Android apps integrate into Windows. The Windows taskbar will now show which Android apps are currently using the microphone, location, and other system services — similar to many native Windows applications. Toasts messages (the small popups that some apps use for temporary messages) are now displayed as Windows notifications, and the titlebar on Android apps will use the current activity name for the title.
Full changelog
The new update is limited to Windows Insiders for now, but once Microsoft fixes all the bugs, it should start rolling out to everyone on Windows 11 that has the Android Subsystem enabled.
Installation Error: Call to Driver Package Install returned error 1627 for package C:ProgramFilersHPHP deskjet 2510 seriesDriver storePipelinehpvplog.inf
Error Causes