Logo

Software review series: Tor Browser

Back in the mid-'90s, when the US Navy was looking into ways to securely communicate sensitive intelligence information, a mathematician and two computer scientists emerged from the Naval Research Lab with something called "onion routing." It was a new kind of technology that would protect your internet traffic with layers of privacy. By 2003, The Onion Routing project, acronym Tor, was in the hands of the public, where its vast network of users the engine enabling Tor has since continued to grow.

Today, thousands of volunteers all over the world are connecting their computers to the internet to create the Tor network by becoming "nodes" or "relays" for your internet traffic.

What is Tor?

At a basic level, Tor is a type of internet-connected network with its own internet browser. Once you connect to the internet with the Tor browser, your internet traffic is stripped of its first layer of identifying information as it enters the Tor network and is then sent bouncing through those relay nodes, which serve to encrypt and privatize your data, layer by layer like an onion. Finally, your traffic hits an exit node and leaves the Tor network for the open web.

Once you're in the Tor network, it's nearly impossible for others to track your traffic's manic pinballing path across the globe. And once you leave the Tor network via an exit node, the website you view (assuming it has HTTPS in front of its address) isn't sure which part of the world you're hailing from, offering you more privacy and protection.

Because Tor is a volunteer-run network, speed can often be an issue. As your traffic moves from node to node, you're likely to notice more speed loss than you would, for instance, with most commercial virtual private networks. This becomes particularly noticeable if you try to watch streaming Netflix content over Tor or make voice-over-IP phone calls or video calls with an app like Zoom. Tor technology isn't necessarily built to provide seamless audio-video experiences.

Tor and plugins

Speaking of videos, there are also limits to the amount of privacy Tor can offer you if you enable certain browser media plugins like Flash. Likewise, your browser's JavaScript plug-in which enables you to view a lot of websites' embedded media can still leak your IP address information. Torrenting files with Tor also exposes you to privacy risks. Because of these risks, Tor's privacy settings have these kinds of plug-ins disabled by default.

If you're just looking to do general, daily internet perusal using a browser that will better hide your traffic from spying eyes, Tor probably isn't the best choice due to its slow speeds and incompatibility with most embedded media. But if you're concerned enough about privacy around a particular topic of internet research (and you don't have a VPN), Tor is probably the best choice for you.

If you would like to read more helpful articles and tips about various software and hardware visit errortools.com daily.

Do You Need Help with Your Device?

Our Team of Experts May Help
Troubleshoot.Tech Experts are There for You!
Replace damaged files
Restore performance
Free disk space
Remove Malware
Protects WEB browser
Remove Viruses
Stop PC freezing
GET HELP
Troubleshoot.Tech experts work with all versions of Microsoft Windows including Windows 11, with Android, Mac, and more.

Share this article:

You might also like

Fix “We couldn’t find any drives” Error
If you encountered an error message saying, “We couldn’t find any drives, To get a storage driver, click Load driver” when you try to install Windows in a VirtualBox machine, then you’ve come to the right place as this post will guide you in fixing this error. This error message is displayed on the screen where you have to choose a partition to install the guest operating system. This error is most likely due to the lack of correct settings as well as a corrupted virtual disk. To fix this error, you have to remove existing storage devices, create a new storage device and select the correct ISO file.

For complete instructions, follow the given steps below.

Step_1: The first thing you have to do is remove all the existing Storage devices and since this option is already available in VirtualBox by default, there is no need for you to install any third-party software. Step_2: After that, open VirtualBox and select the virtual machine and then click the Settings button. Step_3: Next, switch to the Storage section and on your right-hand side, you will see “Controller: SATA” and two other sub-labels. From there, select Controller: SATA and then click on the red cross button that says, “Remove selected storage controller”. Step_4: Now click on the Add new storage controller icon and select the “Add SATA Controller” option from the given list. Step_5: Afterwards, click the “Add hard disk” button and select the “Create new disk” option, and then you have to create a new virtual disk for your virtual machine. Step_6: Verify if you have selected Dynamically allocated while you create the virtual hard disk. Once the process is completed, you will get a “.vdi” file in the list. Step_7: Next, click on the “Add optical drive” button and select the “Choose disk” option. Here, you have to select the ISO file and if you can find an ISO file in the given list, select it from there, else, you have to click the Add button and navigate to the folder where the ISO file is located. Step_8: Once you’re done, click the OK button and boot your virtual machine. You should see options instead of the “We couldn’t find any drives, To get a storage driver, click Load driver” error message. If you see the options, you can now create a new partition and start the installation process of the Windows operating system in the VirtualBox machine without any problem.
Read More
Download and Install Google Fonts on Windows
Google fonts are a free open-source font library made to enrich web content and present end-user with a smooth web experience while surfing. Fonts are completely free for both commercial and personal use and they are not limited to use in WEB only, you can use them also in other projects like business cards, flyers, etc. In order to use google fonts first thing of course you will need to download them. In this guide, we will show you how to download and install google fonts.
  • Go to the Google Fonts page.
  • Select the font family that you wish to use. You can preview each font style to make double-sure it is the right one.
  • When you are ready, click on the Download family button.
Roboto Font
  • A File Explorer window will pop up, asking you where to save the font family.
  • The downloaded file will be compressed in .zip format to save bandwidth, so you will first need to uncompress/unzip it. Right-click on the file and select Extract all.
Extract All
  • You will then be asked where to unzip/extract the file. File Explorer will automatically create a new subfolder, named as the file name, so all you need to do is confirm it by clicking Extract.
Extract Files
  • Click on the Windows icon in the bottom-left corner of your desktop
Settings
  • Select the Personalization category and Fonts.
Available Fonts
  • Split the screen between File Explorer and Settings by dragging the windows to either the left or right edge of the screen. Select all the font files by pressing CTRL + A and drag them into the Add fonts box.
Add Fonts New
Read More
Run Windows Updates from Command Line
As you know, one of the most highlighted features of Windows 10 is Windows Updates. It was offered to the customers as a service rather than a product with the release of Windows 10 under the scenario of Software as a Service which led to Windows Updates being set by default on Windows 10 and without an option for any users to disable it. Although not all users are happy with what Microsoft did, this is an ultimate step towards the greater good of all its customers since Windows Updates helps users in keeping their computers secured against all kinds of threats as well as provide them with the greatest and latest updates from Microsoft. So if you are one of those users who approved of the Windows Updates service, then read on as this post will guide you in running Windows Updates from Command Line either via Command Prompt or Windows PowerShell. For the complete set of instructions, refer to the options given below.

Option 1 – Run Windows Update via Command Prompt

Command Prompt in the Windows operating system exists for a very long time now compared to the comparatively new Windows PowerShell. That’s why it has similar capabilities to run Windows Updates. However, the highlighting point here is that you don’t have to download any module for Windows Updates. To get started running Windows Updates using Command Prompt, refer to the steps below.
  • First, type “cmd” in the Cortana search box, and from the search results, right-click on Command Prompt and select the Run as Administrator option to open it with Administrator privileges.
  • If a User Account or UAC prompt appears, just click on Yes to proceed.
  • Next, type in the commands listed below, and don’t forget to tap Enter right after you type each one of them.
    • UsoClient StartScan – use this command to start checking for updates.
    • UsoClient StartDownload – use this command to start downloading updates.
    • UsoClient StartInstall – use this command to start installing the downloaded updates.
    • UsoClient RestartDevice – use this command to restart your computer after you install.
    • UsoClient ScanInstallWait – use this command to check, download and install updates.
Note: Keep in mind that the commands in Command Prompt listed above are only meant for Windows 10. On the other hand, if you are using an older Windows version, you can try using the following commands instead:
  • wuauclt /detectnow – use this command to start checking for updates.
  • wuauclt /updatenow – use this command to start installing the updates detected.
  • wuauclt /detectnow /updatenow – use this command to check, download and install updates.

Option 2 – Run Windows Updates via Windows PowerShell

If you run Windows Updates in the Windows PowerShell, it will require you to install the Windows Update module manually. Hence, you have to get the Windows Updates downloaded and install Windows Updates.
  • Search for PowerShell in the Cortana search box and then run it with administrator privileges.
  • Once you’ve opened the Windows PowerShell, type the following command and hit Enter.
    • Install-Module PSWindowsUpdate – use this command to install the Windows Update module for Windows PowerShell.
    • Get-WindowsUpdate – use this command to connect to the servers of Windows Update and download the updates if found.
    • Install-WindowsUpdate – use this command to install the Windows Updates you’ve downloaded to your computer.
Read More
Fix Windows Update Error 0x80240020
There are instances when the Windows 10 installation needs interaction before it reaches the file process. And so if you suddenly encounter the Windows Update Installation Failure 0x80240020 error under the Windows Update History, then you need to get it fixed. When you encounter this kind of Windows Update Error, you will see an error message that says, “The operation did not complete because there is no logged-on interactive user”. This error also indicates the “WU_E_NO_INTERACTIVE_USER” code. To resolve this issue, in this post we’ll walk you through a couple of steps but before you get started, know that you don’t have to run any troubleshooter or delete any file just to fix this error since all you have to do is enable one option that can automatically login with your account and complete the installation for you. With that said, just make sure to only try running Windows Update once you’re told to do so. There are two ways you can enable the option that could resolve the Windows Update Installation Failure 0x80240020 error. One is via Settings while the second one is via Registry Editor.

Option 1 – via Settings

Step 1: Go to Settings > Accounts > Sign-in Options. Step 2: From there, toggle on the “Use my sign-in info to automatically finish setting up my device and reopen my apps after an update or restart” option. Step 3: After that, it will make sure that the interaction part is removed from the Windows Update process. Note: If your device is joined in a domain or if some work or email policies are applied to your device by your company or organization, then you wouldn’t be able to see this option in Settings and that’s where the Registry Editor comes in. Just make sure that you’re logged in as an administrator and that you create a System Restore Point first since registry hacks are sensitive and could highly impact how your computer behaves or functions. Once you have that covered, follow the steps below.

Option 2 – via Registry Editor

Step 1: In the Start search, type “Regedit” and hit Enter to open the Registry Editor. Step 2: Navigate to the following registry key:
HKEY_LOCAL_MACHINESOFTWAREMicrosoftWindowsCurrentVersionWindowsUpdateOSUpgrade
Note: If the above-given registry key does not exist, you can simply create it. All you have to do is right-click on the WindowsUpdate key and then select the New Key option and type “OSUpgrade” as its name. Afterward, create a new DWORD (32-bit) Value and name it “AllowOSUpgrade” and set its value to 0x00000001. Step 3: Restart your computer and check if the error is now fixed. And then try to update your Windows 10 computer again and while you’re at it, make sure that you’re around your computer to interact with the prompts needed to complete the installation process.
Read More
Valorant will enforce Windows 11 TPM 2.0
Valorant ingameBad or good news, depending on your view comes from RIOT for their game Valorant. It seems that Riot has decided to enforce Windows 11 TPM 2.0 feature into Valorant running on Windows 11 and there is a rumor that it will be de facto standard and that it will move to Valorant in general no matter on which system it runs. Furthermore, there is a rumor circling around that other developers are also talking about implementing TPM 2.0 requirements so they can harvest advanced security features of Windows 11 in order to prevent hacks and other cheats in their games. This is an interesting point to stand on, on one side, sure, advanced features that will prevent cheating and hacking is a great thing. On other hand denying access to many computers that do not support TPM 2.0 and removing them from the game can be a permanent loss of customers and therefore loss of money. It is a risk to be sure and I am not really sure that alienating gamers is a good choice for long-term income, especially when you will be able to install Windows 11 on an unsupported PC as stated by Microsoft. We will all see how this Riot decision will reflect on their business, as not a big Valorant player myself I am not impacted too much with this decision, but it will be interesting to see if others will indeed go with this trend or they will decide to wait a while until much more PC’s are upgraded.
Read More
How to Fix ntdll.dll crash Error on Windows
DLL files, also known as Dynamic Link Libraries are external parts of applications that run on Windows as well as other operating systems. Almost all applications are not complete in themselves and store code in different files. In this post, we will be discussing one DLL file called ntdll.dll. It is described as “NT Layer DLL” which means that it contains some Kernel functions that help in the normal functioning of the Windows operating system. It is created by Windows in the System32 folder when the OS gets installed. This file can serve different programs simultaneously by providing them with different Kernel functions which support the programs’ performance. However, if you encounter the ntdll.dll file error on your Windows 10 computer, read on as this post will guide you in fixing the problem.

Option 1 – Try to re-register the ntdll.dll file

You may have to re-register the ntdll.dll file using the regsvr32.exe before you can successfully install the program and fix ntdll.dll file crash error. The Regsvr32 tool is a command-line utility that can be used to register and un-register the OLE controls like DLL and ActiveX (OCX) control in the Windows operating system. Follow the steps below to use it.
  • Open Command Prompt as admin from the WinX menu.
  • Next, type the following commands in the elevated Command Prompt and hit Enter to execute the command. This will re-register the affected DLL file using the Windows operating system tool, regsvr32.exe.
    • exe /u ntdll.dll
    • exe ntdll.dll
  • You should see a message saying, “DllRegisterServer in vbscript.dll succeeded” if the Regsvr32 tool was able to run successfully. After that, try to install the program again and see if it now works.

Option 2 – Disable problematic Internet Explorer add-ons

There are instances when some add-ons in the Internet Explorer browser can cause the ntdll.dll file crash error. Thus, you need to disable some add-ons in Internet Explorer and then check if it fixes the problem.

Option 3 – Try running the DISM tool

You might want to repair potentially corrupted files in your system as having them could also trigger the ntdll.dll file crash error. To repair these corrupted system files, you can run the DISM commands:
  • Tap the Win + X keys and click on the “Command Prompt (Admin)” option.
  • After that, input each one of the commands listed below sequentially to execute them:
    • Dism /Online /Cleanup-Image /CheckHealth
    • Dism /Online /Cleanup-Image /ScanHealth
    • Dism /Online /Cleanup-Image /RestoreHealth
  • Once you’ve executed the commands given above, restart your computer and check if the DCOM error is now fixed.

Option 4 – Try to run the Program Compatibility Troubleshooter

You might also want to run the Program Compatibility Troubleshooter. This built-in troubleshooter is available in the Windows Update & Security section. From there, select Troubleshoot. This will find a list of programs for you and since you have already downloaded the driver files, just click on Not Listed located at the top of the program list. After that, browse and select the driver files and then let the program do its job.

Option 5 – Try to replace the DLL file with a trusted source

  • First, you need to get the new DLL file from another computer with preferably the same file version number.
  • After that, you need to boot your PC into Safe Mode and navigate to the paths listed below and then replace the file using a USB drive or other external storage devices.
    • x86: This PC > C:WindowsSystem32
    • x64: This PC > C:WindowsSysWOW64
  • Next, type “cmd” in the Cortana search box and right-click on Command Prompt, and select “Run as administrator” to open it with administrator privileges.
  • Now type the “regsvr32 ntdll.dll” command and hit Enter.
  • Restart your PC and check if the error is now fixed.

Option 6 – Try scanning your computer using Windows Defender

The ntdll.dll file crash error might also be infected with malware or virus and to eliminate it, you have to scan your computer using security programs like Windows Defender.
  • Tap the Win + I keys to open Update & Security.
  • Then click on the Windows Security option and open Windows Defender Security Center.
  • Next, click on Virus & threat protection > Run a new advanced scan.
  • Now make sure that Full Scan is selected from the menu and then click the Scan Now button to get started.
Read More
Microsoft project Volterra

Microsoft will soon offer 4 CPU computer specifically aimed at developers and its name is Volterra. The machine as stated will come with 4 processors but the strange thing is that they will be ARM-based instead of x86.

CEO of Microsoft, mister Satya Nadella has introduced the product and Microsoft has released a youtube video promoting it.

https://youtu.be/yICVNta8jMU

The computer system will have Qualcomm's NPU or built-in neural processing unit to use AI's power to help developers write and produce better and faster code. The sad news is that besides processors used there is no other information on other components that will go into this system.

As seen in the video, the computer reminds me a lot of the apple MAC mini with its size and design, and as stated it is made from recycled plastic which in our opinion will bring the price under $1000.

Microsoft has not provided an official price tag for Volterra, but our hope is that it will be more affordable than building your own development PC. Also, there was nothing said about computer availability, we suspect that the selling model will be typical Microsoft one with first models available only in the USA and moving forward slowly opening it to other markets.

Volterra specifications

As previously said nothing except the number of CPUs and their type has been officially said but we managed to get some information about some other specific things not including its inside components.

microsoft volterra

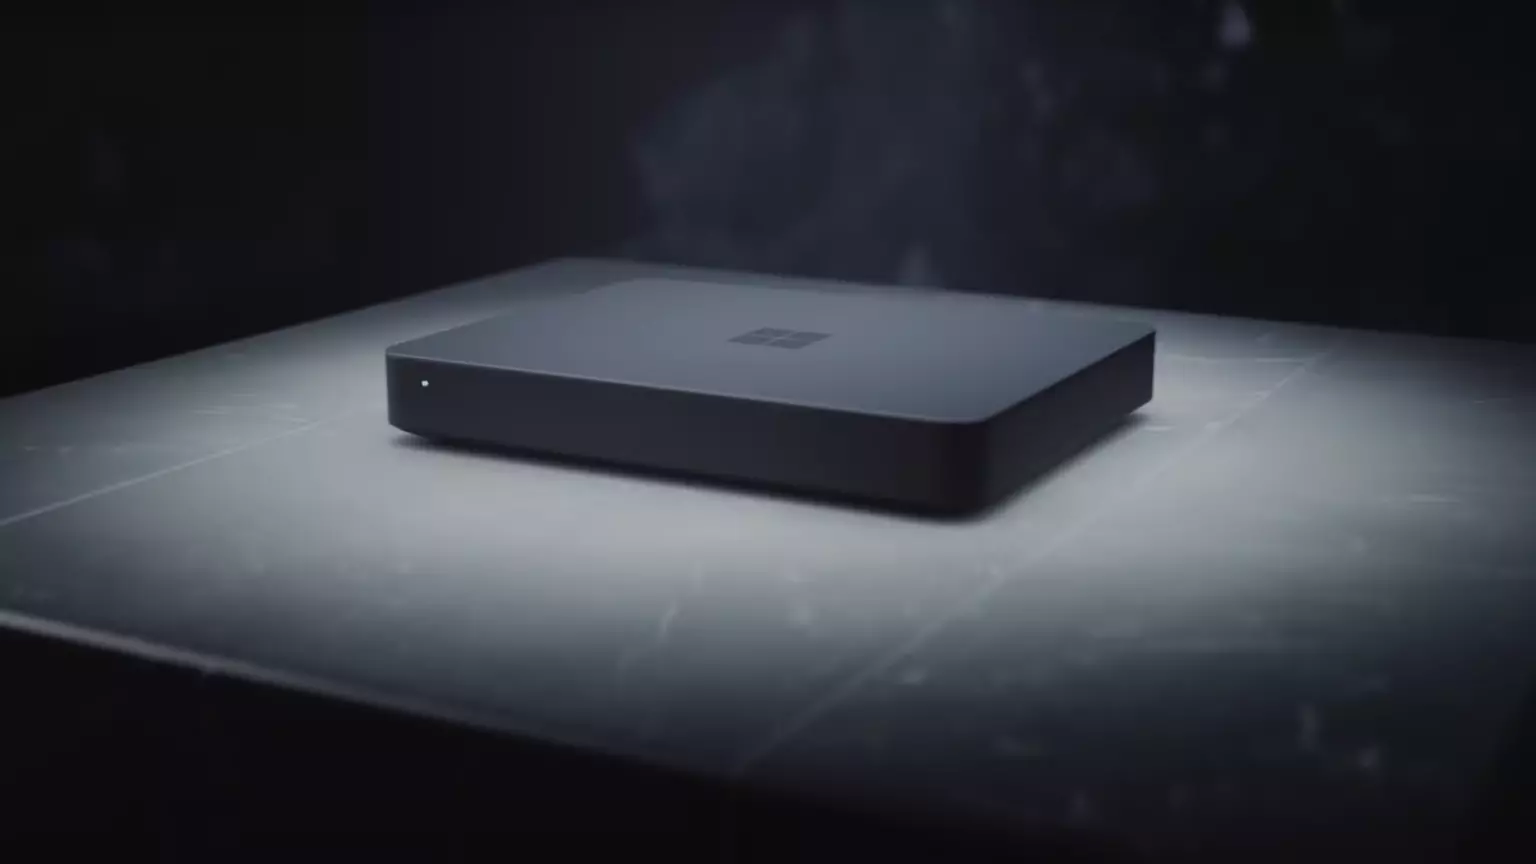
The unit will have a fan inside of it for cooling purposes and better performance and that is what was officially stated by Microsoft. On the outside, it is known that the computer will have three USB-A ports, a mini DisplayPort, and an ethernet input. All of these will be positioned on the back of the device, on its left side there will be two USB-C ports.

The unit itself will be running on Windows 11 but it was not disclosed anything about the version, we presume since this is a model aimed for professional use that it will come with Windows 11 PRO version.

Currently available tools for ARM

Since this product is aimed at developers logically support for developing software is a must-have and at the time of this writing software that will come and that will run on Volterra is:

  • Visual Studio 2022
  • Visual Studio Code
  • Visual C++
  • Modern .NET 6 & JAVA
  • Classic .NET
  • Windows Terminal
  • Windows Subsystem for Android
  • Windows Subsystem for Linux

Conclusion

Once MAC studio has been released it showed that specific builds have their audience and can be sold for less of a price than full-fledged custom-made workstations. There is no doubt that Microsoft Volterra will find its audience but will that be enough to have more versions of this compact computer only time will tell.

Read More
VirtualBox FATAL:No bootable medium found!
If you continuously encountered the “VirtualBox FATAL: No bootable medium found, System halted” error when you try to install Windows 10 in VirtualBox, read on as this post will give you some potential fixes to resolve the problem – you will be guided on how to choose the ISO image to fix this error in VirtualBox. This kind of error is a very common one especially if you have a corrupted ISO file or if you have not selected an ISO file for your virtual machine. Like pointed out, this error pops up when you have a corrupted ISO file or if the ISO file is not attached to the virtual machine. You have to select the ISO file while you create the virtual hard disk, else, you will most likely face this problem, and to fix it, you need to download fresh Windows ISO, create a new IDE Controller, assign Windows ISO to the IDE Controller and then boot your virtual machine. For detailed steps, follow the instructions below but before you start, make sure that you have a valid and uncorrupted Windows ISO. Step 1: First, you need to open the VirtualBox program on your computer and select the virtual machine. Step 2: Next, click on the Settings button or you can also right-click on the virtual machine and select Settings from the context menu. Step 3: Once you’re in the Settings panel, go to the Storage section and from there, create a Controller: IDE. Step 4: To create a Controller: IDE, click the Add new storage controller icon and select the “Add IDE Controller” option. Step 5: After that, click the Add optical drive icon and click on the Choose disk button. You will then see all the attached and non-attached ISO files. However, you have to add the new ISO file that you just downloaded. Step 6: To add the new ISO file, click the Add button and select the ISO file and then select the .iso file from the Non Attached section. Step 7: Now click the Choose button and afterward, make a checkmark in the Live CD/DVD checkbox and then select the IDE Primary Master from the drop-down menu of the Optical Drive. Step 8: Once you’re done, save the changes made and try booting into your virtual machine again.
Read More
MS Edge, autoplay video blocking coming
Microsoft Edge may be about to win a lot of fans by introducing a new feature that it says could prevent one of the most annoying things about being online. A new update to the browser suggests it is looking at a way to block auto-playing videos by default when a user navigates to a website. People spotted a new entry to the Microsoft Edge Canary browser where the company tries out its in-progress updates, that suggests auto-playing videos may have had their day at last. The new addition, for Mac, Windows, and Linux systems, is called “Autoplay Limit Default Setting”, with the description suggesting that Microsoft Edge would set the media autoplay setting to "Limit" as a default - stopping videos from starting up when a user lands on a website. Currently, Edge offers two options for users to control media autoplay - "Allow" (the current default setting), where all videos on a website will play automatically with sound, and "Limit", where media won’t be autoplayed on sites that a user has previously visited. It appears that Microsoft is looking to test the feature in Canary before rolling it out to a wider user base - as blocking autoplaying videos can cause issues for some websites. The same Canary entry also hints at a future "Block" option, which would presumably stop any videos or media from playing when a user lands on a website. However, this feature, which is also listed as being available for Mac, Windows, and Linux systems, doesn't appear to be enabled as yet. If you would like to read more helpful articles and tips about various software and hardware visit errortools.com daily.
Read More
How to remove weather widget from W11
The latest Windows 11 update has brought with it not so popular widget from Windows 10, the weather widget that will reside into the taskbar and constantly show stuff like temperature, weather conditions, etc. The weather widget is not a bad thing but most users found it a little annoying and turned it off in Windows 10. If you wonder how can you do the same but this time inside Windows 11 please keep reading. weather widgetThe first step is to right-click  anywhere on the taskbar (in empty space) and choose Taskbar settings Once the taskbar settings are opened, find Widgets and click on the switch on the far right to turn it off, immediately no more information will be shown on the taskbar and it will be free again. And that is all there is to it.
Read More
1 2 3 171
Logo
Copyright © 2023, ErrorTools. All Rights Reserved
Trademark: Microsoft Windows logos are registered trademarks of Microsoft. Disclaimer: ErrorTools.com is not affiliated with Microsoft, nor claims direct affiliation.
The information on this page is provided for information purposes only.
DMCA.com Protection Status