Signs that someone is spying on you via your phone
Spying via some malicious app on the target phone is not a new thing but it can be very uncomfortable and even against the law in some countries.
Infecting the target phone can be done in various ways, another person can intentionally download and install applications on it, and you can install them via some phishing attacks or by an online scam. Once installed this piece of software presents a very serious invasion of privacy since it can track text messages, track phone location in real-time, record calls in real-time, eavesdrop on calls, take control of the camera and microphone, and many other applications.
Here are some common symptoms of mobile phones infected with spyware.
Symptoms of spyware
Random reboots Slow performance Strange text messages Overheating Unusual high data usage Non-familiar apps in the app list The fast drain of the battery Long shutdown time Strange interference and sounds during calls Signs of activity during standby mode
If your phone exhibits any of these symptoms you might have a spyware app installed and running on it.
Common spy apps
There are many apps that have been designed to spy on people that can be downloaded in the app store or on Google Play today. Most of these spyware apps are aimed at parents wanting to keep an eye on and protect their children. However, these can be used by anyone in order to spy on a target person via their phone.
Below is a list of common apps that can be used to spy on you. Many spyware apps require a phone to be ‘jailbroken’ or ‘rooted’ before being installed, this is when the phone’s operating system is changed to allow the phone to become unlocked and customizable.
mSpy : An undetectable spying app for iOS devices. It can be used to read your chats, see your location, view your email, check your call history, record your keystrokes, and more.
Spyera : This app requires rooted and jail-broken iPhones to work. It can go undetected and monitors phone calls and your call history. It even allows call recording and eavesdropping on live calls.
Flexispy : Flexispy prides itself as the #1 phone monitor for parents and can monitor everything from calls to social texts.
Umobix : This powerful spyware app has a dashboard that allows users to easily monitor someone’s location, calls, texts, keystrokes, all major social media, and more. You can detect Umobix because it heats up the infected phone and greatly affects the battery life of the infected device.
Ikey Monitor : Although it requires the device to be rooted for Android or jailbroken for iPhones, this spy app captures keystrokes, passwords, and screenshots, allows for call recording and supports multiple languages.
Clevguard : Available for both iOS and Android, Clevguard allows users to track GPS and Wi-Fi locations, capture screenshots remotely, and more. Due to a recent update, the spy app drains the target phone’s battery significantly.
Remove spyware from your phone
If any of the beforementioned apps are present on your phone you need to remove them right away.
Go to your phone settings and remove the malicious applications, then download some protection suite and scan the whole phone for any other trace of software remains or other malware apps.
In this post, you will be guided on how you can turn on or turn off the Tailored Experiences feature in Windows 10 using three methods – via Settings, Registry Editor, and Group Policy Editor.
The Tailored Experiences feature in Windows 10 helps Microsoft in delivering recommendations about Microsoft Products. The diagnostic data that comes with it allows Microsoft to know about its consumers’ experiences as well as collect feedback. To simply put it, tailored experiences are personalized tips, ads, and recommendations that enhance Microsoft products and services for consumer needs. And when you enable this feature, Windows will collect information from your browser, apps, features, and many more.
After collecting information, it will offer contents that are tailored based on the data gathered on the lock screen of your computer, Windows tips, and other related functions. On the other hand, the diagnostic data is the one that allows Microsoft to get feedback from the customer. So if you’ve noticed some prompts when you use Windows that ask you about the experience, that’s actually a part of the diagnostic data.
A lot of users find this feature useful. However, there are also skeptical ones that don’t share the same sentiments. If you are one of the skeptical ones, you actually have the option to turn this feature off if you do not want Microsoft to show ads, recommendations, and so on. It is also recommended that you enable the Diagnostic Data collection as you can choose to delete any collected data, as well as control the feedback frequency from Automatic to Once a day, or once a week, or to never.
As mentioned, there are three methods you can choose from to either turn on or turn off Tailored Experiences. You can do it via Settings, Registry Editor, and the Group Policy Editor. To get started, follow the options provided below.
Option 1 – via Settings
To turn on or off Tailored Experiences using Settings, refer to these steps:
Go to Settings and here, click on Privacy.
Next, go to Diagnostic and Feedback.
From there, toggle off the control under the Tailored experiences option to turn it off or toggle it on, if you want to turn it on.
Option 2 – via Registry Editor
To turn on or off Tailored Experiences via Registry Editor, follow the steps below.
Tap the Win + R keys to open the Run dialog box and type “Regedit” in the field and then tap Enter to open the Registry Editor.
Next, navigate to this registry path: HKEY_CURRENT_USERSoftwareMicrosoftWindowsCurrentVersionPrivacy
After that, look for the DWORD named “TailoredExperiencesWithDiagnosticDataEnabled” and change its value to 0 if you want to turn it off or 1 if you want to turn it on.
Option 3 – via Group Policy Editor
To turn on or off Tailored Experiences using the Group Policy Editor, here’s what you have to do:
Tap the Win + R keys to open the Run prompt and type “gpedit.msc” in the field and hit Enter to open the Group Policy Editor.
Next, navigate to this policy setting: User ConfigurationAdminstrative TemplatesWindows ComponentsCloud Content
Here, double click on the “Do not use diagnostic data for tailored experiences” option and select Enabled. Once you do that, you will see the following description:
“This policy setting lets you prevent Windows from using diagnostic data to provide tailored experiences to the user. If you enable this policy setting, Windows will not use diagnostic data from this device (this data may include browser, app, and feature usage, depending on the “diagnostic data” setting value) to customize the content shown on the lock screen, Windows tips, Microsoft consumer features, and other related features. If these features are enabled, users will still see recommendations, tips, and offers, but they may be less relevant. If you disable or do not configure this policy setting, Microsoft will use diagnostic data to provide personalized recommendations, tips, and offers to tailor Windows for the user’s needs and make it work better for them. This setting does not control Cortana tailored experiences, since there are separate policies to configure it.”
Blackouts are one of the most annoying things that can happen in the modern age. We have all learned to depend on electricity, maybe too much, so having a backup plan in these unpleasant situations is necessary. Here are some good gadgets for these kinds of situations.
Power Bank
The fully charged power bank is a great item that could fill up your phone or tablet. If it is a larger power bank it could fill them up all the way to the top several times and having charged phone or tablet can help greatly with some fun during dark times. The power bank can also be used to fill up other gadgets on this list so if the power outage is expected to last longer perhaps it would be wiser not to waste it on phone/tablet games.
Portable Generator
If the power bank is too short-lived for your needs, a portable generator is always a good option since it can provide power for longer time periods. The solar generator is what we recommend because it is much cheaper to produce electricity but it is limited if a power surge comes at night, one on gasoline is more stable and practical but it costs more to produce electricity.
Portable Solar Charger
One more electric-producing device on the list, this one however is aimed at charging your phone, tablet, or laptop by harvesting Sun's energy and turning it into valuable electricity for your devices. Fully silent and easy to operate this is a great tool for power outrage. It will not be able to produce electricity for smaller house appliances but for basic phone/tablet/laptop needs it will suffice.
Panic light
Self-sustained with its own battery, panic lights are great assets for lightning when power is not present. They can turn automatically when the circuit detects that power is missing but can be also manually switched on or off. There are many versions of panic lights ranging from the light they produce to how long can they work so picking the right one will depend entirely on your home size and needs.
USB Headlamp
If you lack panic lights USB headlamp is a great choice to light your way and it works even better than a flashlight, although a flashlight is also a great tool, a headlight will provide you with free arms to do various things that you would not be able to by holding a flashlight. Modern headlights come with LED lights so they provide a good amount of light with small power consumption and they can be recharged in a power bank, solar charger, or generator.
LED lantern
LED Lantern is a gadget sitting somewhere between a headlight and a panic light, it offers around the same light amount as a panic light but you can carry it around with you. Of course, it will drain its battery faster than a panic light and it will still need to carry around but it can offer some good options when you need it, like taking it with you to the toilet.
Electric Lighter
An electric lighter is also one of the things that you will need, it can ignite candles, paper, stoves, etc. Its battery is usually enough for extensive use and there are small chances that it will need to be recharged. Having matches is also smart, just in case.
Solar Oven
Great gadget when outbreaks last long or when you get hungry. Not all households have gas ovens so a Solar oven is a great tool to keep you full of food. Granted it will not be on par in speed and quality with a regular oven but when it is the only option it will suffice.
If your browser of choice is Google Chrome then sit back and enjoy the ride as we are going through some great productivity tips for it.
So without further talking let's dive right into them.
Browsing using tabs groups in Chrome
If you have plenty of tabs opened during your browsing session clogging your screen then you will be happy to know that it is possible to group tabs under, well tabs groups. The good part is that you can name groups however you wish and even code them with color if you wish so.
Right-click a tab for a website you want to put into a group. Select Add tab to the new group, then type in a name for the group and choose a color. Create as many groups as you want in this way.
To put a tab into an existing group, right-click the tab, select Add tab to group, and select the group to which you want to add the tab. To remove a tab from a group, right-click it and select remove from group.
Send a highlighted text to another Chrome user
If you want to send some text or article you stumbled upon while surfing the internet, there is an easy way to do it providing that the target user is also on Google chrome.
Highlight the text you want to share, then right-click it and select Copy link to highlight. That creates the link and puts it into your clipboard. Copy the link from your clipboard and send it to someone. When they click on it, they’ll be sent to the section of the web page with the text you want to share, and the text will be highlighted in yellow.
Sync Google Chrome via the account on multiple devices
If you use multiple devices there is an option to sync Chrome through all of these devices and get all of your bookmarks, history, etc. All you have to do is click on three dots in the upper right corner and click on synchronize.
Take note that you will need a Google account in order to sync accounts and you will need to be logged in on all devices you are syncing.
Use multiple search engines
If you need or want to use multiple search engines inside Chrome like BING, DuckDuckGo, etc. now you can and you can do it very easily.
Click the three-dot menu icon at the top right of Chrome and select Settings, Search engine, Manage search engines. Under the Default search engines section toward the top of the page, you’ll see a list of search engines you can search through without having to navigate to their sites.
To perform a search using any of these engines, such as Bing.com, type bing.com into the address bar and press the Tab key. The leftmost part of the address bar changes, it will read Search Bing or whatever search engine you’ve typed in. Now just type in your search term and press Enter, and you’ll do a search with that search engine.
Search similar websites in content
When you are searching for content on google there is a very easy and quick way to find similar content on the internet. For example, if you want to find more sites similar to the searched site just type in the address bar in front of address related:
For example, if you want sites similar to Microsoft, you would type related:www.microsoft.com
Open specific set of websites on Chrome startup
If you need and want to open a specific set of pages each time Chrome is booted know that you can.
Click the three, dot icon at the top right of Chrome and select Settings, You and Google, then scroll to the On startup section at the bottom of the screen. Select Open a specific page or set of pages, then click Add a new page, type or paste in the page’s URL and click Add. Add as many pages as you want this way.
That’s it for now on Google Chrome tips for better productivity, tune-up again to errortools.com for more articles.
If you are trying to run or starting a program on your Windows 10 computer and you suddenly get an error message saying, “Error 1061 The service cannot accept control messages at this time”, read on as this post will show you what you can do to fix the problem.
This kind of error pops up since the Application Information Service does not respond to the requests to raise applications to Administrator in Windows 10 like the Task Manager, Service updates, and so on. Thus, you won’t be able to run or open apps and will only get stuck with this error.
The “Error 1061 The service cannot accept control messages at this time” message is a type of network error that typically occurs when there is a temporary mismatch between the requested control and the state of the service to be controlled. It’s most likely that the service is in a state of start-pending, stop-pending, stopped or it may already be used by another user which explains why this error message suddenly appears.
You can encounter this error message on any Windows operation. Here are some of the most common occurrences:
Debugging a Windows service
Starting Task Manager
Starting Registry Editor
Starting Firewall
Starting services.msc
Starting dsm.exe
Updating services
Asking for file permissions, etc.
According to Microsoft MSDN, the error occurs because:
“There is a temporary mismatch between the requested control and the state of the service to be controlled. The service may be in a state of start-pending, stop-pending, or stopped. Wait a few minutes, then retry your operation.”
If after a few minutes, the error still appears, then you may have to follow the options prepared below.
Option 1 – Try to restart the Credential Manager Service
Go to the Start menu.
Then type in “services” in the search box.
From the search results, right-click on “Services” and select the “Run as Administrator” option.
Next, look for the Credential Manager Service in the Services window.
Once you found it, double-click on it to open its Properties. From there, you need to click on the Stop button.
After that, set the Credential Manager Service to “Automatic” and click on the Start button to restart it.
Option 2 – Try to start the Application Information Service
You can also try starting the Application Information Service to fix the “Error 1061 The service cannot accept control messages at this time”. Just open the Windows Services Manager and make sure that Application Information Service is Started. And if you find that it’s already started, you need to restart it.
Option 3 – Try killing the IIS Worker Process via Task Manager
Tap the Ctrl + Alt + Del keys and select the Task Manager.
Next, click on More details to expand the Task Manager and then look for the IIS Worker Process entry which should be displayed in the list under the Processes tab. From there, you can see it in the Background processes. Once you find it, kill its process.
You can also try to look for the “w3wp.exe” entries and end its process. if you find many entries, right-click on some of them and select the End task option from the context menu.
The errors that are caused by the BIOS of your computer can get annoying as they can be hard to fix for they are really dangerous and won’t be resolved by simple fixes. This is because of the fact that these kinds of errors do not even allow you to load your operating system as it throws the error even before you can access your computer. One of these errors is the “Error 0199: System Security – Security password retry count exceeded”. Fixing this error can be quite tricky but you need not worry for you will be guided in doing so. Simply follow the given instructions below.
Option 1 – Try to update the BIOS
Updating the BIOS can help you fix the “Error 0199, Security password retry count exceeded” error but as you know, BIOS is a sensitive part of a computer. Even though it is a software component, the functioning of the hardware depends on it largely. Thus, you must be careful when modifying something in the BIOS. So if you don’t know much about it, it’s best if you skip on this option and try the other ones instead. However, if you are well-versed in navigating the BIOS, then follow the steps below.
Tap the Win + R keys to open the Run dialog box.
Next, type “msinfo32” in the field and press Enter to open System Information.
From there, you should find a search field on the bottom where you have to search for the BIOS version and then press Enter.
After that, you should see the developer and version of the BIOS installed on your PC.
Go to your manufacturer’s website and then download the latest version of BIOS on your computer.
If you are using a laptop, make sure that you keep it plugged in until you have updated the BIOS.
Now double click on the downloaded file and install the new BIOS version on your computer.
Now restart your computer to apply the changes made.
Option 2 – Try resetting the BIOS
If updating the BIOS didn’t help in fixing Error 0199, you can try to reset the BIOS instead.
Start your computer and tap the F10 key during the booting process to enter the BIOS. If it does not work, you can try tapping the F1 or F2 key as well as the Del key.
Once you’re already in the BIOS, tap the F9 key to get the prompt to RestoreLoad default configuration now for the BIOS.
Next, click on Yes and then follow the next on-screen instructions that appear to set the BIOS back to its default settings.
Once you’re done restoring the default settings of the BIOS, restart your computer and then check if it now boots properly.
It is no secret that Microsoft is trying to keep Windows relevant and that it is trying to make it as good as possible. A new Windows update will bring some interesting stuff in it which well some like it, some not so much.
Among various technical and security updates Microsoft will bring some directly visible to each user.
First
of these features will be File explorer compact mode. This feature is a sort of spacing content in file explorer giving it easier access if you are using a touch screen device. Now, this feature is somewhat strange, and altho I can understand and get behind the logic of this move I am not sure I like it. Lucky for me and others who feel the same this option can be turned off for now.
Second
feature is something I can get behind, improvements for virtual desktops. There is an article on errortools about virtual desktops feature and I really hope you are using it since it is a great feature. Anyway, new update will bring us separate desktop wallpapers for each desktop and we will be able to arrange them in order we like.
Third
thing that I would like to address is animation features. We will have windows slowly fade and resize when opened, minimized, maximized, etc. So far we are unable to tell how this can and will it affect overall system performance. I am sure it will have some impact but hopes are that it will be kept to a minimum.
If you would like to read more helpful articles and tips about various software and hardware visit errortools.com daily.
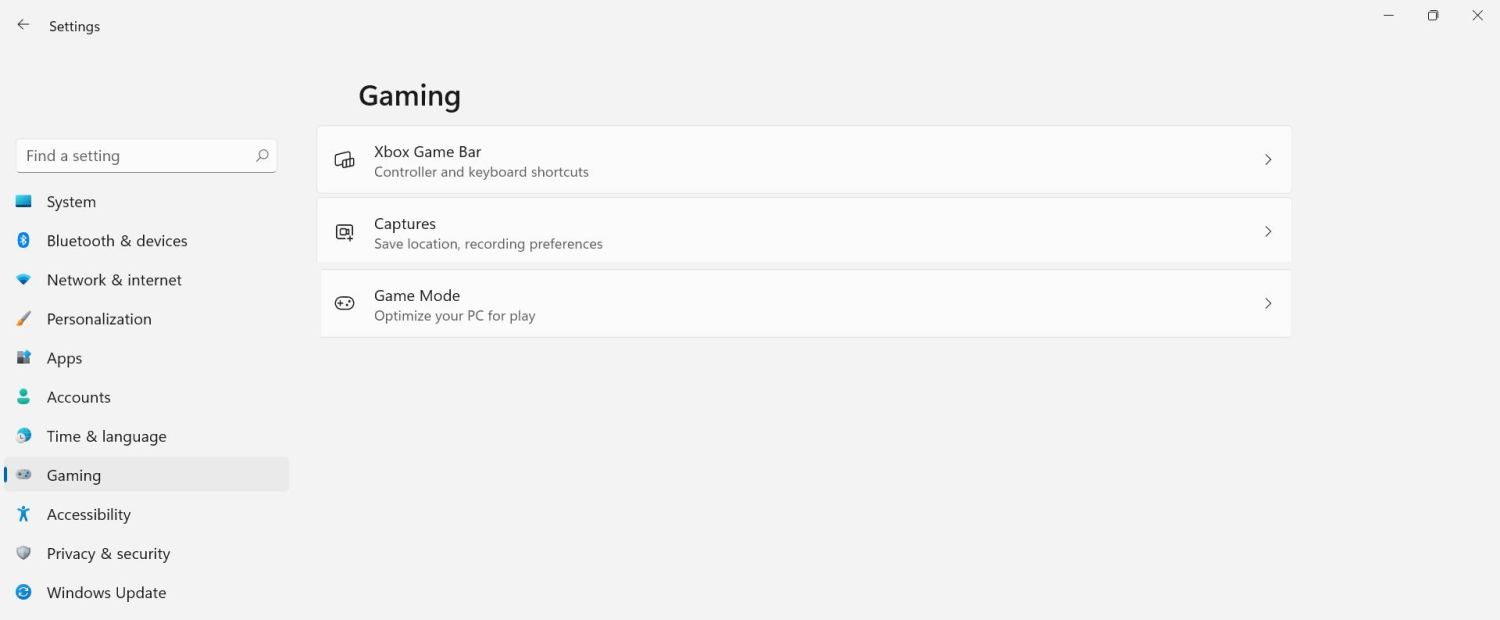
Among other things and innovations, Windows 11 brings to the table is the game mode. The game mode is a system designed to release some resources and optimize your system when Windows 11 detects that you are playing games. It also turns off automatic updates while the game is active.
The game mode is active at all times and usually, everything works great but in some instances, it can sadly cause some performance issues. If you are one of these unlucky people where game mode is not working as supposed to do, don’t panic, we have a quick guide for you on how to turn it off.
Press ⊞ WINDOWS + I to open settings
Inside click on Gaming
Select Game mode
Click switch beside Game mode to turn it off
Close settings
Everything will be automatically saved and applied and you should not have any issues from now on. If for any reason you wish to turn game mode back ON, just follow the same steps and turn the switch to ON.
Having a PC is a great thing, more often we are enjoying it than we have issues, but as time passes it seems that our computer is slowing more and more as new applications and games are coming which demand more powerful computers.
Before you decide to throw away your computer and buy a new one because you feel it is a bit slow, read through this guide where we will guide you to common tips & trick to make your PC run faster:
Keep your PC clean and tidy
Slowdowns and many other issues, even hardware failures can come from dirty PC. Make sure your PC is clean and tidy for maximum performance.
Optimize airflow through PC casing
Airflow is very important so your GPU and CPU and overall all hardware components can be kept in optimal working temperatures. If any device inside the casing is working in abnormal temperatures you will experience slowdowns and freezing on daily basis. Make sure that all fans are working and that your temperatures are in the optimal range to prevent overheating and make sure to have maximum performance.
Check PC for malware
Viruses, worms, and overall all malware can drastically reduce system performance. Make sure that your protection software is up to date with the latest definitions and that you have the latest Windows updates installed.
Create a Hi-Performance power plan
Windows power plans can be a very useful feature, especially if you are working on laptop but in order to boost performance and drain maximum, you will need to switch to a hi-performance power plan.
Free space on the system drive
Having little to no space on your Windows system drive can lead to extreme slowdowns, make sure that your hard drive is not on red when viewed from File explorer or you will experience even 50% poorer performance.
Choose startup applications
If you have many applications starting up with your Windows and many of them running in the background you will experience performance issues. Each application that runs in the background is taking RAM and CPU time for themselves which could be free and used for the program that you need.
Do not open too many tabs in Browser
Having too many tabs in Browser while working on a computer can also cause slowdowns, each tab is taking RAM for itself and even can cause Browser poor performance if a tab is LIVE and refreshing with new content all the time.
Remove browser extensions
Speaking of browser, having too many installed extensions which are active as soon as the browser is up and running can also lead to poor performances. Remove all which you really do not need and your computer will gain in speed.
Make hardware upgrade
Sometimes your system is just a little outdated, upgrading more RAM or switching to a new SSD with the greater speed can cause a world of difference in PC performance. Check to see how RAM is standard and upgrade accordingly, you can also upgrade the CPU and other bottlenecks in your system this way instead of completely buying a new PC.
Format and reinstall system
Drives, application traces, registry entries, etc. are piling up in your system over time, and if enough time is given it will clog your computer. From time to time it is a good idea to backup files and do a completely clean full format of HD and install a new and fresh copy of Windows with new and clean copies of applications and drivers.
That's it, 10 tips on how to make your Windows and PC perform better and speed it up. I hope that you found the read informative and helpful and I hope that I will see you soon.
Afraid of the growing threats online? As you should be. But we’re here to show you what kinds of malware are out there and what you can do to keep them at bay.
Malware definition
Malware comes from the term malicious software. It’s software designed to attack and exploit devices and networks to the advantage of the hacker who made it.
Malware can be transmitted in different ways. Most commonly this happens via infected USB drives, downloadable files or malicious websites. Depending on the type and ultimate goal, the consequences of a malware attack can range from negligible to catastrophic.
Credit: Ed Hardie on Unsplash
What kinds of malware are there?
1. Virus
A virus is typically spread via infected files, websites or links. It’s one of the oldest malware types and one of the most difficult to get rid of. That’s because, once activated, it replicates itself - hence the name.
It can perform different kinds of attacks, depending on what the creator wants to achieve. The main characteristic of a virus is that it really doesn’t show itself until you activate the host. So that’s a scary thought for sure.
2. Adware
Sometimes an ad blocker isn’t enough to fight off unwanted ads. And some of them can, unfortunately, be malicious. They may redirect you to infected sites or prompt downloads of risky files. Even just opening a malicious site can lead to data theft.
So, definitely be careful when clicking around. Even if an ad seems completely legitimate, you can never be too sure.
3. Ransomware
Through ransomware, cybercriminals gain access to a user’s data and use it to extort them for money. Basically, the user is threatened with data deletion or even exposure if a ransom isn’t paid by a specific deadline.
This is a particularly nerve-wracking type of malware. If it targets an individual, it preys upon their sense of anxiety, fear, guilt and even shame. If it targets a business (which is a lot more common), it preys upon not only that business’s profit but also every single one of their customers and their data.
4. Trojans
This type of malware disguises itself very well as a legitimate-looking program. Once you download it, hackers can get full access and control of your device, data and network. They can even be hidden in games, apps and attachments. They cannot self-replicate, though, so we guess that’s… good news?
5. Worms
Worms can replicate, just like viruses, but you don’t need to actually activate the infected program for them to get going. They can be used for various purposes, ranging from data deletion to file encryption to support a ransomware attack.
Credit: Growtika on Unsplash
6. Spyware
Spyware refers to malicious software that stays hidden on your computer and monitors your activity. The best-known type is keyloggers. This can be used to steal sensitive data like passwords and banking information.
7. Rootkits
Rootkits are among the most dangerous types of malware. They allow administrative access and full control of a device, which lets hackers continue hijacking all your data and monitoring your activity without your knowledge.
8. Botnets
Botnets are networks made up of bots - computers that cybercriminals have infected with malicious software. Bots and botnets give hackers remote access to users’ devices and allow them to spy on your camera, take screenshots, memorize passwords and launch Distributed Denial of Service attacks. This one truly makes your hair stand on end.
What can you do about it?
You know the old adage - better safe than sorry. And trust us, malware attacks are such a pain in the you-know-what that you really don’t want to be sorry.
Luckily, there are simple solutions that can shield you from most digital threats these days. What you want to be looking at is a solid antivirus program. Well, technically, you need an antimalware program, but since the latter evolved from the former, we still mostly refer to them as antivirus software. The majority of antimalware programs these days don’t just shield you from potential risks online, but include additional features as well. For example, some Bitdefender antivirus packages also include parental control and a VPN. And Bitdefender is not just for PCs either - it offers protection for your beloved iPhone or Android as well. You can throw in a password manager in there too, for an additional layer of security.
Credit: Dan Nelson on Unsplash
If you aren’t too concerned about all these various threats or feel like you don’t need extra security, you can at least take a step to protect your information from being exposed to lurking cybercriminals as you’re browsing. This can be done through a good VPN like Surfshark, which hides your identity in the digital space and prevents your data from being tracked.
Choosing the right protective software is especially important if you have children with access to the Internet, since they’re unfortunately even more vulnerable to malicious attacks. If you aren’t sure what the right kind of antimalware program is right for you, you can reach out to us and we’ll be happy to help keep your entire household or office digitally secure.
The bottom line
The truth is that there’s no way to be 100% protected in the online world. Hackers are constantly coming up with new ways to infiltrate our devices. But malware-battling software evolves along with them and there’s still plenty you can do to keep risks away. Stay safe!
Error Code 100?? Whenever a Setup error contains error codes in the message, this indicates what the setup was operating on, let’s say copying files.
The text in the error message will determine whether that it is fatal or not. An error code 100 is a system error that is displayed as ‘ERROR_TOO_MANY_SEMAPHORES’ or as a value 0x64.
This error means that the system ‘cannot create another system semaphore.’ A semaphore is used in controlling access to parallel programming or a multi-user platform through multiple processes.
This error can prevent certain features of your Windows to perform properly, like trying to get a print, copying files, deleting files, or any other routine computer activities.
Solution
Error Causes
Error code 100 can affect a wide range of activities that you normally perform on your PC. This error can occur for a number of reasons, of which some of the common ones include:
When the account used for starting AOS does not match the database in SQL Server
When the AOS licenses have exceeded their limit
When the SQL Server database is incorrectly case sensitive
Though these are the common causes for error code 100, there can be other ways through which this error can occur. To find out the specific cause for error code 100, follow these steps:
Go to Start and select All Programs. Go to Administrative Tools and click Even Viewer
Click Application in Even Viewer
Locate the error message in the right pane by scrolling down
Click on the error message and see if the message applies to the error code.
Further Information and Manual Repair
In order to manually repair this error, you will have to work with your Network Administrator as they will have security privileges to take the steps. However, there are more than one ways to resolve this issue, for instance:
Starting SQL Server Service
A likely cause of an error code 100 can be that your SQL Server service is not started. To activate it, follow these steps:
Got to Start and Click on All Programs, go to Administrative Tools and click on Services
Find SQL/MSSQLServer service
Right Click on it and click Start to activate the service
Network Resolve
If you are connected to a network, then you can work with your network administrator to fix error code 100. Follow these steps to resolve this error:
Got to Start and then Run. Type dcomcnfg and press Enter
Locate Default Security and click it
Find Default Access Permissions and click Edit Default
You should locate System and Interactive, listed in the Allow Access. If they’re not listing, you can add them by clicking Add
Find the local computer in the list and click on Allow Access


 The game mode is active at all times and usually, everything works great but in some instances, it can sadly cause some performance issues. If you are one of these unlucky people where game mode is not working as supposed to do, don’t panic, we have a quick guide for you on how to turn it off.


