How to personalize STEAM with custom skin

steam skinSkinning of applications is not new to PC users, but did you knew you could skin Steam?

With skin, you can customize the UI and style of the client to what you want making it more personal and to your liking. First thing is to find the skin that you would like to install. There are a lot of sites where you could find custom made Steam skins but we would recommend steamskins.org

The site itself is organized in tabs with different sections, once you click on the tab you will get a list of skins available for chosen section. If you click on the skin you will be taken to skin page detail where you can find what skin is aiming for, its legibility, a record of how the skin has been altered over time, or some mix of these aspects.

Note that some skins might have issues like some buttons might be missing from big picture mode but so far none of the skins has any kind of client breaking feature, only functionality one.

Downloading skin

Once you have chosen desired skin and while on the skin details page, scroll to the middle of the page just above the Related Skins sections with two options: Direct Download and External Download. Now usually I would recommend Direct download but in this case, I would advise going with External Download for the simple reason that the External link will send you to the developer's website where there is a higher chance to get the latest updated skin.

Installing it in Steam

Once the skin is downloaded you will first need to create a skin folder inside your Steam installation location. Navigate to your Steam installation folder (default: C:\Program Files (x86)\Steam) and create a new folder inside it. Give new folder name Skins and confirm.

Extract the skin zip file in the newly made folder. Once the file is extracted you can delete the ZIP file if you wish.

Go to your Steam client and go to Steam>Settings. In settings select Interface on the left bar and on the right part then click the Select the skin you wish Steam to use the drop-down menu and select the skin that you wish to use. Confirm and restart your Steam client

Reverting to old skin

If you found skin unappealing or, unfortunately, has some functions missing you can always choose another skin or revert back to default Steam skin.

Default Steam skin is named in the drop-down menu as < default skin >.

Do You Need Help with Your Device?

Our Team of Experts May Help
Troubleshoot.Tech Experts are There for You!
Replace damaged files
Restore performance
Free disk space
Remove Malware
Protects WEB browser
Remove Viruses
Stop PC freezing
GET HELP
Troubleshoot.Tech experts work with all versions of Microsoft Windows including Windows 11, with Android, Mac, and more.

Share this article:

You might also like

KFConsole enters the console competition
Yes, you read that right, KFC is making a console partnered with Cooler Master. Bizzare at it sounds, it is even more bizarre that the console is designed to keep your food warm!!! You can pull out the drawer from the console out on its top and place some food there in order to keep it warm. kfconsole drawerThe console itself is coming in cylindrical shape powered by Intel CPU and ASUS GPU of the unknown chipset. It has Seagate Baraccuda 1TB SSD and it is VR-ready. The console will have raytracing and will be 4K ready.

My thoughts

Well, my thoughts are somewhat strange, on one side I am not really sold on food heating gimmicks and without specific hardware specifications, it is difficult to say how much power the console will have. Price is also not leaked so that is also a stumbling stone for making an informed opinion. I am a little puzzled and concerned about this whole heating food thing because personally, I can see 2 issues: Console overheating and fat dripping on inside hardware, I am sure they have somehow eliminated this but I would be very interested to see how.
Read More
Fix DRIVER_IRQL_NOT_LESS_OR_EQUAL in Windows
DRIVER_IRQL_NOT_LESS_OR_EQUAL will cause your computer to go to the blue screen of death but do not worry there are solutions around this and we are here to instruct you on how to solve this.
  1.  Uninstall and install network drivers

    DRIVER_IRQL_NOT_LESS_OR_EQUAL is most commonly tied to bad network drivers, whatever that be a corruption of the driver files or their incompatibility. So first thing is to check if this is the case. Press ⊞ WINDOWS + X to open the hidden menu in Windows and click on Device Manager. keyboard with windows and x marked Windows menu device manager 
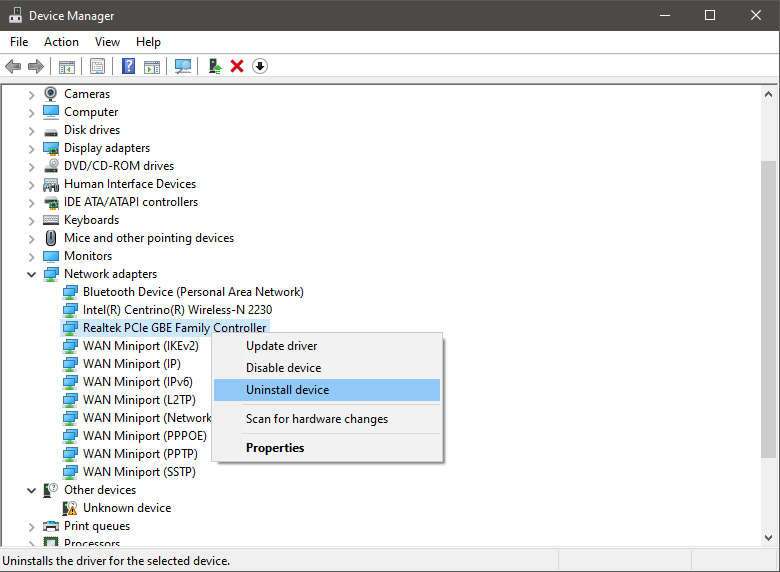
In the Device Manager expand Network adapters, choose adapter, right-click on it and choose Uninstall. network device manager Install latest driver or reboot so Windows will install the driver automatically
  2. Update driver

    If you do not want to reinstall the driver or you are unable to for whatever reason updating the driver might do the trick. To update driver: Press ⊞ WINDOWS + X to open the hidden menu in Windows and click on Device Manager. keyboard with windows and x markedWindows menu device manager In the Device Manager expand Network adapters, choose adapter, right-click on it and choose Update Driver. network device manager update
  3. Fix via Command prompt

    If both of the beforementioned solutions fail, try running the command prompt and fix the issue from there. Press ⊞ WINDOWS + X to open the hidden menu in Windows and click on Command Prompt (administrator) keyboard with windows and x markedWindows menu command prompt admin In command prompt type next line and press ENTERDEL /F /S /Q /A “C:\Windows\System32\drivers\mfewfpk.sys Reboot the system
  4. Scan your PC for malware

    Sometimes corruption in the system is caused by malware, Scan your system for malware, viruses, etc.
  5. Check connections or other hardware issues

    If all methods fail, open your PC case and check to see if connections everywhere are properly connected and tight. Clean your PC and turn it back ON
  6. Use system restore

    If anything fails, use Windows system restore and bring back computer into a state where everything was working fine.
Read More
Instagram posts available now on computer
Instagram posting has been reserved for mobile phones for a very long time but in October 2021 that privilege has come to an end. Instagram added the long-awaited ability to post to Instagram from the website. You get nearly all of the same filters and editing tools that you can find in the iPhone and Android app, too. Instagram logoIn order to post via computer on your Instagram account all you need is a browser. The first step, of course, is to go to instagram.com and login into your account, if you do not have an account, you can make one for free. Next, click on the + icon in the upper right corner. Create a new post screen will open, in this screen click on the Select from computer blue button on the bottom. The file manager will open, choose your desired photo and confirm. After that, you will be presented will an adjustment screen for a photo, here you can crop the photo, zoom in, adjust the aspect ratio, or if you wish add more photos to create a slide show. Once you are done will all of these adjustments, click on Next in the upper right. From there you will be taken into a filter screen where you can apply one of many filters or if you want, you can adjust brightness, contrast, saturation, temperature, etc. just like in the application on your phone. Once you have the desired result, again click on Next in the upper right part of the screen. Lastly, you will be given an option to write a caption for the photo if you wish and add a location. Once this step is finished you can post the feed by clicking on share in the upper right part. That is all to it, just like in a mobile application you can now use your computer for Instagram posting.
Read More
Fix Windows Upgrade Error 0x800F081E – 0x20003
If you are trying to run Windows Upgrade on your Windows 10 computer but suddenly interrupted by the error 0x800F081E – 0x20003, worry not for this post will guide you on how you can fix this Windows Upgrade error. This particular Windows Upgrade error is a Windows status code for CBS_E_NOT_APPLICABLE which indicates that some of the update requirements are missing or the files that are installed are already of a higher version compared to the ones that are still pending. In most cases, this error occurs when you try to upgrade to earlier versions of the Windows 10 N edition to a later version. Here’s the full content of the error message:
“0x800f081E-0x20003, The installation failed in the SECOND_BOOT phase with an error during BOOT operation”
In case you don’t know, Microsoft distributes special “N” editions of Windows in Europe and the “KN” editions in Korea. These editions are the same as the standard editions of Windows except that they do not have the Windows Media Player as well as the multimedia playback features. Thus, when the Windows Upgrade fails with the error code and error message and it doesn’t provide much information as to why the update couldn’t be installed, there is something you can do about it to fix the error. Since Windows uses generic error codes and so if you see the error code 0x800f081e, you have to check the error log first. For more details, follow the instructions laid out below. Step_1: You need to navigate to C:$WINDOWS.~BTSourcesPanther and from there look for the text file named “setuperr.log” and open it with a text viewer/editor program like Notepad. Step_2: After opening the setuperr.log file, you should see content that’s similar to this:
C:WINDOWSSoftwareDistributionDownload80b2677d6e15a2a206625bb25a7124feamd64_Microsoft-Windows-MediaPlayer-Package~~AMD64~~10.0.17134.1. Error: 0x800F081E 2019-09-10 20:26:57, Error SP Operation failed: Add [1] package C:WINDOWSSoftwareDistributionDownload80b2677d6e15a2a206625bb25a7124feamd64_Microsoft-Windows-MediaPlayer-Package~~AMD64~~10.0.17134.1. Error: 0x800F081E[gle=0x000000b7]
Note: From the content above, it is clear that the Windows Upgrade failed due to complete due to the Windows Media Player. It could be that the log file may contain other error messages and other error codes and if you see the error code 0x800f081e from the list, then you need to uninstall the Media Feature Pack. Step_3: You have to uninstall the Media Feature Pack.
  • Tap the Win + R keys to launch the Run dialog box and type “optionalfeatures.exe” in the field and hit Enter to open the Windows Features wizard.
  • Next, you need to wait until the list of Windows Features populates and then click on the + sign to collapse the folder of the Media Features.
  • After that, uncheck the “Windows Media Player” option from the Media Features folder.
  • Now click on the Yes and OK buttons to save the changes made and then close the Windows Features dialog box.
  • Restart your computer and boot, try to run the Windows Upgrade process again, and check if the error is fixed or not.
Note: If the installation has been successfully completed, you have to go back to the Windows Features and enable the Windows Media Player again. And if you are using the Windows 10 N Edition, then you can just download and install the latest version of the Media Feature Pack for your Windows 10 N edition. On the other hand, running the built-in Windows Update troubleshooter could also help you resolve any Windows Update-related problems, including the error 0x800F081E – 0x20003. To run it, go to Settings and then select Troubleshoot from the options. From there, click on Windows Update and then click the “Run the troubleshooter” button.
Read More
WebShield Malware Removal Tutorial

Web Shield is a free application that allows you to view insightful analyses about the websites that you visit and specifically how they’re tracking you online. Web Shield cannot determine exactly who is tracking your computer usage. Instead, Web Shield allows a user to see which websites have placed tracking code onto their computer.

This software is ad-supported and displays advertisements in the form of injected banner ads, popups, and context hyperlinks in the user’s web browser. It adds Windows Background services, displays unwanted advertisements, and can modify the browser’s home page.

About Browser Hijackers

Browser hijackers (also called hijackware) are a type of malicious software that modifies web browser settings without the user’s knowledge or permission. These hijacks appear to be increasing at a worrying rate across the world, and it could be really nefarious and sometimes dangerous too. There are lots of reasons why you may experience a browser hijack; but commercial, marketing, and advertising are the main reasons for their creation. The idea is to force users to visit specific sites that are looking to increase their site visitor traffic and generate higher ad income. Nevertheless, it is not that harmless. Your web safety is jeopardized and it is also very irritating. Furthermore, hijackers will make the entire infected system fragile – other destructive malware and viruses would seize these opportunities to intrude into your system very easily.

Browser hijacking signs

Here are some symptoms that indicate you have been hijacked: home-page is modified; you see new unwanted favorites or bookmarks added, typically directed to ad-filled or pornography sites; the default search engine has been changed and the web browser security settings have been cut down without your knowledge; you notice many toolbars on the internet browser; you see lots of pop-up ads on your computer screen; your internet browser has become unstable or starts running slowly; you can’t visit certain websites like home pages of anti-malware software.

How does a PC get infected with a browser hijacker?

Browser hijackers might use drive-by downloads or file-sharing networks or even an email attachment to reach a targeted computer system. They may also originate from any BHO, browser extension, add-on, toolbar, or plug-in with the malicious objectives. Some browser hijackers spread in user’s PC by using a deceptive software distribution strategy called “bundling” (usually through shareware and freeware). A good example of a popular browser hijacker is the most recent Chinese malware named “Fireball”, which has attacked 250 million computers across the world. It acts as a hijacker but could be changed into a fully functioning malware downloader later on. Browser hijackers will affect the user’s web surfing experience severely, record the websites frequented by users and steal personal information, cause problems in connecting to the net, and eventually create stability issues, causing applications and systems to crash.

Browser hijacker removal

Some browser hijacking could be quite easily reversed by finding and removing the corresponding malware software from your control panel. But, most browser hijackers are difficult to get rid of manually. No matter how much you try to remove it, it can come back over and over. Moreover, manual removal requires you to carry out several time-consuming and intricate actions that are hard to do for novice computer users.

Malware Blocking Access To Safebytes Website And Anti-Malware Downloads - What To Do?

Every malware is bad and the effects of the damage can vary based on the specific type of malicious software. Some malware types alter browser settings by including a proxy server or change the computer’s DNS settings. In these cases, you’ll be unable to visit some or all internet sites, and therefore unable to download or install the required security software to get rid of the malware. If you’re reading this, chances are you’re stuck with a malware infection that is preventing you to download and/or install Safebytes Anti-Malware software on your PC. Even though this type of problem can be tougher to circumvent, there are some steps you can take.

Start your system in Safe Mode

If the malware is set to load at Windows start-up, then booting in Safe Mode should avoid it. Since just the bare minimum programs and services start-up in Safe Mode, there are rarely any reasons for issues to occur. The following are the steps you need to follow to start your computer into the Safe Mode of your Windows XP, Vista, or 7 computers (go to Microsoft website for directions on Windows 8 and 10 computers). 1) Tap the F8 key continuously as soon as your computer boots, but before the large Windows logo or black screen with white texts appears. This would conjure up the “Advanced Boot Options” menu. 2) Make use of the arrow keys to choose Safe Mode with Networking and press ENTER. 3) Once this mode loads, you should have internet access. Now, get the malware removal program you need by using the browser. To install the program, follow the guidelines within the setup wizard. 4) Right after installation, run a complete scan and allow the program to delete the threats it detects.

Switch over to an alternate browser

Some malware only targets particular browsers. If this is your situation, make use of another internet browser as it might circumvent the malware. If you appear to have a trojan attached to Internet Explorer, then switch to a different web browser with built-in safety features, such as Firefox or Chrome, to download your favorite antivirus program – Safebytes.

Install and run anti-virus from your Thumb drive

Here’s yet another solution which is utilizing a portable USB antivirus software that can scan your system for malware without the need for installation. Follow these steps to use a thumb drive to clean your infected computer system. 1) Make use of another virus-free PC to download Safebytes Anti-Malware. 2) Plug in the USB flash drive to a USB port on the uninfected computer. 3) Run the setup program by double-clicking the executable file of the downloaded software, which has a .exe file extension. 4) When asked, choose the location of the pen drive as the place where you want to put the software files. Follow the directions to complete the installation process. 5) Now, transfer the pen drive to the infected PC. 6) Double-click the anti-malware software EXE file on the USB flash drive. 7) Click on “Scan Now” to run a scan on the affected computer for malware.

Review of SafeBytes Anti-Malware

Do you want to download the very best anti-malware software program for your desktop? You can find many applications available that come in free and paid versions for Windows systems. A few of them are great, some are ok types, and some will harm your computer themselves! You need to pick one that is reliable, practical, and has a good reputation for its malware protection. When considering the reliable software programs, Safebytes Anti-Malware is undoubtedly the highly recommended one. SafeBytes anti-malware is a trusted software that not only secures your PC completely but is also quite user-friendly for people of all ability levels. Through its cutting-edge technology, this software protects your computer against infections caused by different types of malware and other threats, including spyware, adware, trojans horses, worms, computer viruses, keyloggers, ransomware, and potentially unwanted program (PUPs). SafeBytes anti-malware comes with a plethora of enhanced features that sets it apart from all others. Here are a few popular features present in this program: World-class AntiMalware Protection: This deep-cleaning anti-malware software program goes much deeper than most antivirus tools to clean out your personal computer. Its critically acclaimed virus engine locates and disables hard to remove malware that hides deep within your PC. Real-time Active Protection: SafeBytes offers complete and real-time security for your computer system. It’ll regularly monitor your laptop or computer for hacker activity and also provides users with advanced firewall protection. Web protection: SafeBytes checks and provides a unique safety rating to every website you visit and block access to web pages considered to be phishing sites, thus protecting you from identity theft, or known to contain malware. Low CPU Usage: SafeBytes is a lightweight and simple-to-use anti-virus and anti-malware solution. Since it uses very little computer resources, this software leaves the computer power exactly where it belongs to: with you actually. 24/7 Guidance: You could get high levels of support 24/7 if you’re using their paid version.

Technical Details and Manual Removal (Advanced Users)

If you’d like to manually get rid of WebShield without the use of an automated tool, it may be actually possible to do so by deleting the program from the Microsoft Windows Add/Remove Programs menu, or in cases of web browser extensions, going to the browsers AddOn/Extension manager and removing it. You’ll probably also want to totally reset your browser to its default settings. If you choose to manually delete the system files and registry entries, make use of the following list to make sure you know precisely what files to remove before undertaking any actions. Please keep in mind that this is for advanced users only and might be challenging, with incorrect file removal leading to additional system errors. In addition to that, certain malware is capable of replicating or preventing deletion. It is recommended that you do the removal procedure in Safe Mode.
Files: %ProgramData%webshield %ALLUSERSPROFILE%Application DataWebShield %ALLUSERSPROFILE%WebShield Registry: [HKEY_LOCAL_MACHINESOFTWAREMicrosoftWindowsCurrentVersionUninstallmweshield] [HKEY_LOCAL_MACHINESOFTWAREmweshield] [HKEY_LOCAL_MACHINESYSTEMCurrentControlSetservicesmwescontroller]
Read More
Display driver nvlddmkm stopped responding
Users are reporting that randomly their screen will just go black for a second and come back. When this happens, it usually distorts any video currently on the screen; sometimes, they can resume working on the PC normally. However, when they view the event logs, they see the error message Display driver nvlddmkm stopped responding and has successfully recovered. In this article, we will address solutions to this issue and how to not have it again.
  1. Remove Aura iCUE plugin (applies to only ASUS motherboards)

    Some PC users discovered that iCue adds an Aura plugin for ASUS MOBOs. That, combined with EVGA Precision X1, was causing the error it seems – this was determined when the screen would turn off and on when opening EVGA x1 software. In this case, the issue was resolved by removing the Aura iCUE plugins.
  2. Change Power Management mode

    Right-click the battery icon on the notification area on the right of the Taskbar. Select Power Options. In the Power Options window, locate your current Power Plan. Select High performance, if that’s not your current power plan. Now, click on Change plan settings next to it. Now click on Change advanced power settings. Expand PCI Express section. Expand Link State Power Management. Now set power saving to Off for both On battery and Plugged in state. This would fix any issues caused by the low power of the video card. Click Apply > OK to save changes.
  3. Update graphics driver

    Go into device manager Expand display adapter section Right-click on adapter Click on update driver Reboot
  4. Rollback graphics driver

    Go into device manager Expand display adapter section Right-click on adapter Click on Roll back driver Reboot
  5. Uninstall and reinstall graphics card driver

    Go into device manager Expand display adapter section Right-click on adapter Click on Uninstall device Reboot
  6. Replace the graphics card

    If everything else failed, replace the graphic card
Read More
Fix 0x80070079: The semaphore timeout ...
This post will guide you on how you can fix the Error 0x80070079. This kind of error mostly occurs during the transfer of files across the networks. It could be caused by several factors which include the incorrect configuration of drivers or the network, as well as deadlock state or the server is loaded with a lot of tasks and if any location is not available. This error could also appear when you try to create a System Image or copy or move files on your computer. Here’s the full context of the error message:
“Error 0x80070079: The semaphore timeout period has expired.”
To fix this error, you can try to run the three built-in Network-related troubleshooters or update or reinstall the network adapter drivers or perform a network reset. For more details, follow the options laid out below.

Option 1 – Try to run the three built-in Network-related troubleshooters

The first thing you could do to fix the problem is to run any of the three built-in troubleshooters related to Networks such as Incoming Connections, Network Adapter, and Shared Folders troubleshooters. To access them, just open the Windows Settings app, and go to Update & security > Troubleshoot. From there, run any or each one of the aforementioned troubleshooters.

Option 2 – Update the Network Adapter drivers

You might also want to update the Network Adapter drivers by following these steps:
  • Tap the Win + R keys to launch the Run window and then type in the “MSC” command and hit Enter to open the Device Manager window.
  • Under the Device Manager, you will see a list of drivers. From there, look for the Network Adapters and expand them.
  • Then right-click on each one of the Network drivers and update them all.
  • Restart your PC and see if it helped in fixing the BSOD error.
Note: If updating the network drivers didn’t help in fixing the “Windows could not find a driver for your network adapter” error, you can also try to uninstall the very same drivers and restart your Windows 10 PC. After that, the system itself will reinstall the drivers you just uninstalled. Alternatively, you can also download and install the drivers from the manufacturer’s website directly. To reinstall the network adapter driver, refer to these steps:
  • Open the Devices Manager from the Win X Menu.
  • Then locate the device drivers and right-click on them to open the Properties.
  • After that, switch to the Driver tab and click on the Uninstall Device button.
  • Follow the screen option to completely uninstall it.
  • Finally, restart your computer. It will just reinstall the device drivers automatically.

Option 3 – Perform a Network Reset

Network Reset is a feature in Windows 10 that will help you reinstall the Network adapters as well as reset the Networking Components back to their original settings.
  • Open the Start Menu and click on the Settings icon.
  • Next, click on the Status link on the left side where you should see the status of your Network. Aside from that, you should also see a link that will let you open the Network Troubleshooter – click on that link to expand Network Troubleshooter.
  • Under Network Troubleshooter, select the link for “Network reset”.
  • After you click on Network reset, it should redirect you to the following page. From there, click on the Reset now button.
Read More
Troubleshooting Epic Games Launcher issues
If you are having trouble using the Epic Games Launcher, here are some troubleshooting steps that usually fix common problems.

Check the Epic Games server status

Check the Epic Games Server Status page to make sure all systems are operational. If the Epic Games Launcher is affected by an outage or system-wide issue, your issue may be fixed when the outage is resolved.

Clear your launcher’s webcache

Clearing the webcache often resolves display issues that may prevent you from using the launcher. Follow these steps to clear your webcache:

Windows

  1. Exit the Epic Games Launcher by right-clicking the system tray icon in the bottom-right corner, and then clicking Exit.
  2. Press Windows key + R, type “%localappdata%”, and then press Enter to open a File Explorer window.
  3. Open the Epic Games Launcher folder.
  4. Open the Saved folder.
  5. Click the webcache folder, and then delete it.
  6. Restart your computer, and then relaunch the Epic Games Launcher.

Mac

  1. Exit the Epic Games Launcher.
  2. Open Finder.
  3. Click on Go then Go to Folder...
  4. Type ~/Library/Caches/com.epicgames.EpicGamesLauncher and press Enter.
  5. Drag the webcache folder to the Trash.
  6. Press control and click on Trash.
  7. Click on Empty Trash.
  8. Relaunch the Epic Games Launcher.

Run the launcher as an administrator

Running the launcher as an administrator elevates its permissions so it can avoid problems with downloading games, for example. Follow these steps to run the launcher as an administrator:
  1. Right-click your Epic Games Launcher shortcut.
  2. Click Run as Administrator.

Update graphics card drivers

Making sure the player is using the latest graphics card drivers may resolve the launcher crashing. Review this article for steps on how to do update their graphics drivers.

Reinstall the Epic Games Launcher

Note: The following process will remove all of your installed games.

On Windows: 

Run system file checker then reinstall the Epic Games Launcher.
  1. Close the Epic Games launcher by right-clicking the system tray icon in the bottom right corner and then clicking Exit.
  2. Click Start.
  3. Type "cmd", right-click Command Prompt, and then click Run as administrator.
  4. In the window that opens, type "sfc /scannow", and then press Enter.  This may take a little while.
  5. Restart your computer.
  6. Click Start.
  7. Type "Add or Remove Programs", and then press Enter.
  8. Select Epic Games Launcher from the list of programs.
  9. Click Uninstall.
  10. Go to www.epicgames.com and click Get Epic Games in the top right corner to download the latest installer.

On Mac:

  1. Close the Epic Games Launcher.
  2. Verify there are no processes associated with the Epic Games Launcher by checking Activity Monitor.
  3. Open the Applications folder.
  4. Click and drag the Epic Games Launcher application to the Trash.
  5. Verify all the following directories no longer have any Epic Games Launcher folders or files:
    • ~/Library/Application Support
    • ~/Library/Caches
    • ~/Library/Preferences
    • ~/Library/Logs
    • ~/Library/Cookies
  6. Go to www.epicgames.com and click Get Epic Games in the top right corner to download the latest installer.

Launcher freezing on macOS 10.15.1 or earlier

If your launcher is freezing on macOS 10.15.1 or earlier, follow the steps above to reinstall the Epic Games Launcher on your Mac.

Verify system requirements

Make sure your computer meets the system requirements to run the Epic Games Launcher using this article here. The system requirements for the Epic Games Launcher are here.

Blinking Epic Games Launcher icon on the taskbar

If you can't start the Epic Games Launcher and see a blinking icon on your taskbar, use these steps to try and fix this:
  1. Right-click your Epic Games Launcher shortcut.
  2. Click Properties.
  3. Select Normal Window from the drop-down menu next to Run.
  4. Click the Compatibility tab.
  5. Uncheck any boxes, and then click Apply then OK.
  6. Click Start, then type "Graphics Settings" and press Enter.
  7. Select Classic app from the drop-down under Graphics performance preference.
  8. Click Browse.
  9. Navigate to the Epic Games Launcher installation directory. By default, this is C:/Program Files (x86)/Epic Games/Launcher/Portal/Binaries/Win64.
  10. Click the EpicGamesLauncher.exe file, and then click Add.
  11. Click Options.
  12. Select Power Saving.
  13. Click Save.
  14. Relaunch the Epic Games Launcher.
Read More
Moving mouse pointer via the keypad in W11
windows 11 mouse pointerIn Windows 11 if you do not own a mouse or it has suddenly malfunctioned you can still move your arrow on-screen using the numeric pad. In this guide, we will guide you on how to turn this option ON, follow this easy guide step by step.
  1. Press ⊞ WINDOWS + I to open Windows settings
  2. Click on Accessibility on left
  3. Scroll down to reach the interaction section on the right and click on Mouse
  4. Click on Switch beside Mouse keys under accessibility options
  5. Set your preferences
  6. Close settings
Settings will be as always automatically applied.
Read More
Windows 11 slows down some SSD drives
In the latest Windows 11 fiasco, it is reported that the operating system is slowing down some SSD drives. Good thing is that it does not affect all of SSD on the market but the ones which it is affecting can see even a 45% of speed drop. ssd driveMicrosoft has not published a solution to this issue, but users point out two potential problems. The first is a security mechanism based on disk virtualization, which is supposed to slow down the performance of SSDs. The second, in turn, is related to the place of installation of Windows 11 – users indicate that if the performance test is performed on a medium with no files associated with the system, its performance results are similar to the parameters given by the manufacturer. Transfer speeds were to be slightly improved with the latest Windows 11 update 22000.348. However, users are still waiting for a solution to the problem that significantly reduces the efficiency of SSD media.

More information

The details described leading to speculation that the problem could be related to drivers that Microsoft is providing. On further tests, all Nvme drives that use the Microsoft driver have this problem, but Intel 905P, which has its own driver provided by Intel, is working at full power,”.
Read More
1 2 3 171
Logo
Copyright © 2023, ErrorTools. All Rights Reserved
Trademark: Microsoft Windows logos are registered trademarks of Microsoft. Disclaimer: ErrorTools.com is not affiliated with Microsoft, nor claims direct affiliation.
The information on this page is provided for information purposes only.
DMCA.com Protection Status