The Recycle Bin is undeniably an important place to make files ready for deletion. To put it simply, it assumes some importance but there are times when it displays an unpredictable behavior. For instance, it just suddenly goes missing and even Cortana is unable to find it. A lot of users have experienced the missing Recycle Bin issue in their Windows 10 computers. If you are one of these users, you might have wondered where the Recycle Bin icon has gone and how you can get it back. Worry not, as this post will provide you a couple of options you can try to bring back Recycle Bin in your Windows 10 computer.
Follow the given options below to get started.
It could be that you have disabled the Recycle Bin by accident which is why Windows was not able to show it on your desktop. To restore Recycle Bin, follow these steps:
If the first option didn’t work, then it could be that Recycle Bin might have been deleted which is why you fail to restore it. And to resolve this problem, you need to recreate Recycle Bin. Refer to the following steps to do so:
Note: Even though this icon is quite similar to the original one, it actually differs from it. The difference is that you won’t see if fill up when you delete files and you can’t simply empty it by right-clicking on the shortcut. On the other hand, you can still drag items into it just like with the original one. So when you want to empty the content of the newly restored Recycle Bin, you just have to double-click on the shortcut and right-click on the recycle bin in the window that appears, and select the “Empty Recycle Bin” option. In addition, now that you’ve set up the Recycle Bin shortcut, you have to re-activate the “Hide protected operating system files” to keep the important files and folders in your computer hidden.
If both the first two options failed to restore the missing Recycle Bin, then you can try repairing it instead. There are times when the Recycle Bin is removed from the Desktop screen due to some corrupted Windows system files. To fix these corrupted system files, you can run the DISM tool. This tool is known to repair potentially corrupted files in your system as having them could also system issues like the missing Recycle Bin. To repair these corrupted system files, you can run the DISM commands:
Since Windows 10 is designed to work on both desktop and mobile devices, it could be that your computer has slipped into Tablet Mode which explains why you’re not seeing the Recycle Bin. To check if your computer is really in Tablet Mode, follow these steps:

HPQTRA08.exe (Hewlett Packard Tray 08) is the Hewlett Packard Digital Imaging Monitor task. It is installed with the drivers of HP imaging products like PhotoSmart Printers.
It incessantly monitors and indicates the connectivity status with any recognizable HP product.
Simply put, HPQTRA08.exe is an exe (executable) file that contains step-by-step instructions that a computer follows to carry out a function.
HPQTRA08.exe error code is displayed in any of the following formats:
 Error Causes
Error code HPQTRA08.exe can be triggered for several reasons. However, some of the most common causes include:
It is advisable to repair the error code HPQTRA08.exe on your PC immediately. Delays can lead to serious problems especially if the underlying cause of the error is related to registry corruption.
To resolve this error on your PC, you don’t need to hire a professional and pay hundreds of dollars for the repair. Simply try the DIY methods listed below to fix the problem right away.
If the error cause is related to deleted, corrupted, or damaged HPQTRA08.exe file, then the best way to fix the problem is to install the HPQTRA08.exe file on your PC.
However, first, make sure the site you select to download the file from is reliable and trusted.
By downloading from an unreliable website you can expose your PC to potential malicious programs and risk your data security.
Sometimes viruses and malware tend to disguise in the form of exe files such as the HPQTRA08.exe file.
In such a situation scan your entire PC for viruses and malware using a powerful antivirus. Remove all the malicious programs found to fix the issue.
The registry saves all PC-related activities and information including both important and obsolete files such as cookies, bad registry entries, invalid keys, internet history, and junk files.
If these files are not removed from the registry frequently, these accumulate in the registry and corrupt thereby triggering error codes. Error code HPQTRA08.exe is generated when the corrupt Windows registry keys are associated with the HPQTRA08.exe file.
To resolve, clean the registry and repair it. Although this can be done manually it can be time-consuming and tricky especially if you are not technically sound, therefore it is advisable to download Restoro.
Click here to download Restoro and resolve error HPQTRA08.exe.‘Update server not available (error: 3)’
Error Causes| Shortcut Keys | Description |
| Windows Key | Opens/closes the Start menu. |
| Windows Key + Up Arrow | Maximizes the selected window. |
| Windows Key + Down Arrow | Reduces the window size. (Restore down.) |
| Windows Key + M | Minimizes all open windows. |
| Windows Key + Shift + M | Opens minimized windows. |
| Windows Key + Tab | Shows Task View. |
| Windows Key + L | Locks the screen. |
| Windows Key + A | Opens the Action Center. |
| Windows Key + V | Opens Clipboard History. |
| Windows Key + I | Opens the Settings menu. |
| Windows Key + F | Opens the Feedback hub. |
| Windows Key + H | Opens the dictation toolbar. |
| Windows Key + P | Opens the projection settings. |
| Windows Key + . (Windows Key + ;) | Opens the emoji panel. |
| Windows Key + C | Opens Cortana in listening mode. |
| Windows Key + C (Windows Key + Q) | Opens Windows Search. |
| Windows Key + G | Opens the Xbox game bar. |
| Windows Key + X | Opens the secondary start menu. |
| Windows Key + <number> | Opens the app in the taskbar relative to the number input. For example, if Chrome is the fourth app on the taskbar, using Windows Key + 4 will open Chrome. |
| Windows Key + Alt + <number> | Opens the right-click menu for the app in the taskbar relative to the number input. For example, if Chrome is the fourth app on the taskbar, using Windows Key + Alt + 4 will open Chrome’s right-click menu. |
| Windows Key + D | Shows/hides open apps on the desktop. |
| Windows Key + E | Opens File Explorer. |
| Windows Key + U | Opens Ease of Access in the Settings menu. |
| Windows Key + Print Screen | Takes a screenshot of the desktop. |
| Windows Key + Control + F | Opens the Find Computers window. |
| Windows Key + Control + D | Creates a virtual desktop. |
| Windows Key + Control + Left Arrow | Switches to the virtual desktop on the left. |
| Windows Key + Control + Right Arrow | Switches to the virtual desktop on the right. |
| Windows Key + Control + F4 | Closes the active virtual desktop. |
| Windows Key + Space | Switches between installed languages (for writing text). |
Taking information from the internet or from other sources usually involves selecting the text, copying it into the clipboard, and then pasting it into your file. In today's modern applications pasting text will most of the time take its formating with it.

By formatting what I am talking about are parameters like font size, line breaks, hyperlinks, font styles, etc. and sometimes you do not want any of these in your file, you would like and prefer to have just plain text so you can format it as you wish.
In order to paste just plain text instead of using the CTRL + V keyboard shortcut, press CTRL + SHIFT + V instead. This shortcut will paste the only text into your file.
Leave it to Microsoft to make its shortcut not work in their application. In Microsoft Word, you can only use the standard CTRL + V shortcut, if you press CTRL + SHIFT + V nothing will happen. So in order to paste the only text into a word document, choose to paste special > text only
I have tried CTRL + SHIFT + V in various applications like photoshop, illustrator, InDesign, visual studio code, slack, discord, WordPress installations, etc and only one that has not worked for me was Word and office in general so you are safe to use this trick and have desired results.
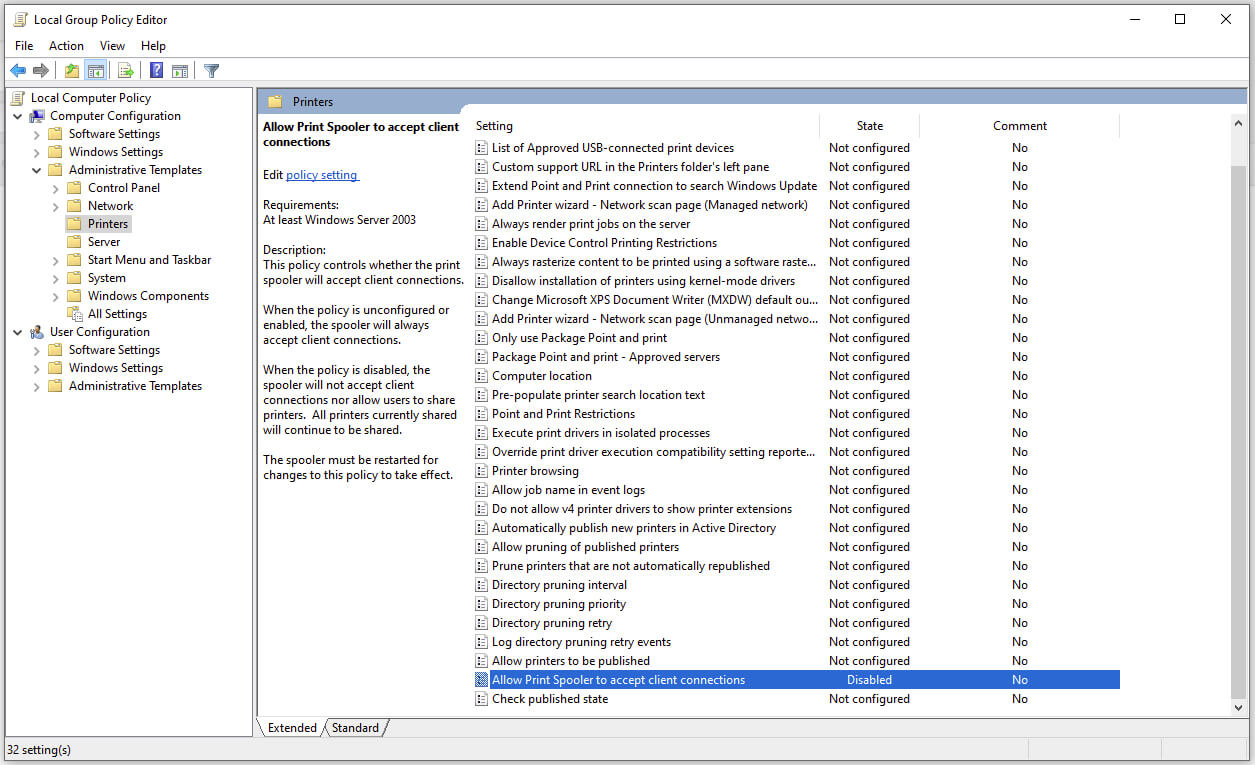 Microsoft is once again advising its customers to disable Windows print spooler after a new vulnerability that allows hackers to execute malicious code on machines has emerged. While a patch fixing the flaw will be released in due course, the most effective workaround currently on the table is to stop and disable the print spooler service entirely.
"An elevation of privilege vulnerability exists when the Windows Print Spooler service improperly performs privileged file operations. An attacker who successfully exploited this vulnerability could run arbitrary code with SYSTEM privileges. An attacker could then install programs; view, change, or delete data; or create new accounts with full user rights."