Microsoft has started building a unified store with Windows 8 and later with Windows 10 in order to make it easier for users to get safer and more modern applications for their Windows 10 devices. This unified store is called the Microsoft Store which is tied up with the Windows Update. The delivery for them both are quite similar which is why they also have some common errors as well as fixes for them. So in this post, you will be guided on how you can fix error 0x80246019 for both Microsoft Store and Windows Update in your Windows 10 computer.
The error 0x80246019 might be caused by corrupted system files or missing ones or be due to some glitch in the component services and other possible causes but whatever the cause is, you can fix it with the help of the following fixes, make sure to follow each one of them carefully.
Option 1 – Reset Windows Update components
Open Command Prompt with admin privileges.
After that, type each one of the following commands and hit Enter after you key in one after the other.
net stop wuauserv
net stop cryptsvc
net stop bits
net stop msiserver
Note: The commands you entered will stop the Windows Update components such as Windows Update service, Cryptographic services, BITS, and MSI Installer.
After disabling WU components, you need to rename both the SoftwareDistribution and Catroot2 folders. To do that, type each one of the following commands below, and don’t forget to hit Enter after you type one command after the other.
Next, restart the services you’ve stopped by entering another series of commands. Don’t forget to hit Enter after you key in one command after the other.
net start wuauserv
net start cryptsvc
net start bits
net start msiserver
Close Command Prompt and reboot your PC.
Option 2 – Toggle the Windows Insider Program settings
This option is only applicable to you if you are a part of the Windows Insider Program. If you are, then follow the steps below.
First, you have to open Settings and go to the Update & Security section.
From there select the Windows Insider Program.
After that, select the “Stop Insider Preview builds” option and then restart your computer.
Now open the Windows Insider Program again and check if it fixes error 0x80246019 or not.
Option 3 – Run the System File Checker Scan
System File Checker or SFC is a built-in command utility that helps in restoring corrupted files as well as missing files. It replaces bad and corrupted system files with good system files that might be the cause why you’re getting error 0x80246019. To run the SFC command, follow the steps given below.
Tap Win + R to launch Run.
Type in cmd in the field and tap Enter.
After opening Command Prompt, type in sfc /scannow
The command will start a system scan which will take a few whiles before it finishes. Once it’s done, you could get the following results:
Windows Resource Protection did not find any integrity violations.
Windows Resource Protection found corrupt files and successfully repaired them.
Windows Resource Protection found corrupt files but was unable to fix some of them.
Reboot your computer.
Option 4 – Run the DISM tool
You can also run the DISM Tool as it helps in repairing the Windows System Image as well as the Windows Component Store in Windows 10. Using this built-in tool, you have various options such as the “/ScanHealth”, “/CheckHealth”, and “/RestoreHealth” which could help in fixing error 0x80246019.
Open the Command Prompt with admin privileges.
Then type in the following commands and make sure to hit Enter right after you type each one of them:
Dism /Online /Cleanup-Image /CheckHealth
Dism /Online /Cleanup-Image /ScanHealth
exe /Online /Cleanup-image /Restorehealth
Do not close the window if the process takes a while as it will probably take a few minutes to finish.
Option 5 – Try to reset the Microsoft Store cache
Just like browsers, Microsoft Store also caches as you view apps and games so it is most likely that the cache is no longer valid and must be removed. To do so, follow the steps below.
Right-click on the start button and click on Command Prompt (administrator).
Next, type in the command, “wsreset.exe” and tap Enter. Once you do, the command will clear the cache for the Windows Store app.
Now restart your PC and afterward, try opening Microsoft Store again and then try to install your app or update your computer again.
Option 6 – Run the Windows Update Troubleshooter
You might also want to run the Windows Update Troubleshooter as it could also help in fixing error 0x80246019. To run it, go to Settings and then select Troubleshoot from the options. From there, click on Windows Update and then click the “Run the troubleshooter” button. After that, follow the next on-screen instructions and you should be good to go.
To make the Windows 10 operating system a lot more user-friendly, Microsoft introduced the Tablet Mode for Windows 10 devices, especially the 2-in-1 devices like Surface Pro and Surface Book. Despite the Tablet Mode’s efficiency, it also encounters some errors from time to time. One of the issues users reported about tablet mode is that they can’t turn off or exit tablet mode. If you are one of these users, read on as this post will guide you in what you can do to fix the issue.
To fix the problem with Tablet Mode, there are several suggestions you can check out. You can try to check the full-screen setting, or perform a full shutdown or perform two buttons to restart the Surface devices. You could also disable Tablet Mode via Registry Editor or perform System Restore or change the settings in the System tab or the Action Center.
Option 1 – Try to check the full-screen setting
Tap the Win + I keys to open the Windows Settings app.
Then navigate to this path, Personalization > Start.
Next, scroll down to toggle off the “Use Start Full Screen” option.
After that, restart your computer and see if the problem is fixed.
Option 2 – Perform a full shutdown
Open Command Prompt with admin privileges first.
Next, execute this command to perform a full shutdown: shutdown /s /f /t 0
The command you entered will shut down your computer and once it’s turned off, wait for a couple of minutes and then turn it back on.
Option 3 – Try to perform a two-button restart on your Surface device
Tap and hold the power button for about 30 seconds.
Then release them after 30 seconds.
After that, tap and hold the volume up + the power button for 20 seconds. This will cause the display to flash a few times but you have to keep those buttons pressed until your Surface device is turned off.
Wait for a couple of minutes and your Surface will turn back on. This should resolve the problem.
Option 4 – Try to disable the Tablet Mode via Registry Editor
In the Start Search, type “registry editor” and right-click on the Registry Editor from the results, and then select the Run as administrator option. This will open the Registry Editor with admin privileges.
Next, navigate to this registry key: ComputerHKEY_CURRENT_USERSoftwareMicrosoftWindowsCurrentVersionImmersiveShell
From there, look for the DWORD named “SignInMode” and double click on it.
Set its value to “1” and its base as hexadecimal.
After that, click on OK to save the changes made. This will make sure that you are signed in to the desktop mode when you log into your account.
Now look for the DWORD named “TabletMode” and double click on it and set its value data to “0” and it's base as hexadecimal.
Click on OK to save the changes made and then restart your computer.
Option 5 – Run System Restore
Tap the Win + R keys to open the Run dialog box.
After that, type in “sysdm.cpl” in the field and tap Enter.
Next, go to the System Protection tab then click the System Restore button. This will open a new window where you have to select your preferred System Restore point.
After that, follow the on-screen instructions to finish the process and then restart your computer and check if the problem is fixed or not.
Option 6 – Try changing the settings in the System tab or the Action Center
Go to Settings and navigate to System > Tablet Mode.
After that, scroll down to set the “Use desktop mode” from the drop-down menu under the “When I sign in” section.
Now restart your computer and see if the issue is fixed.
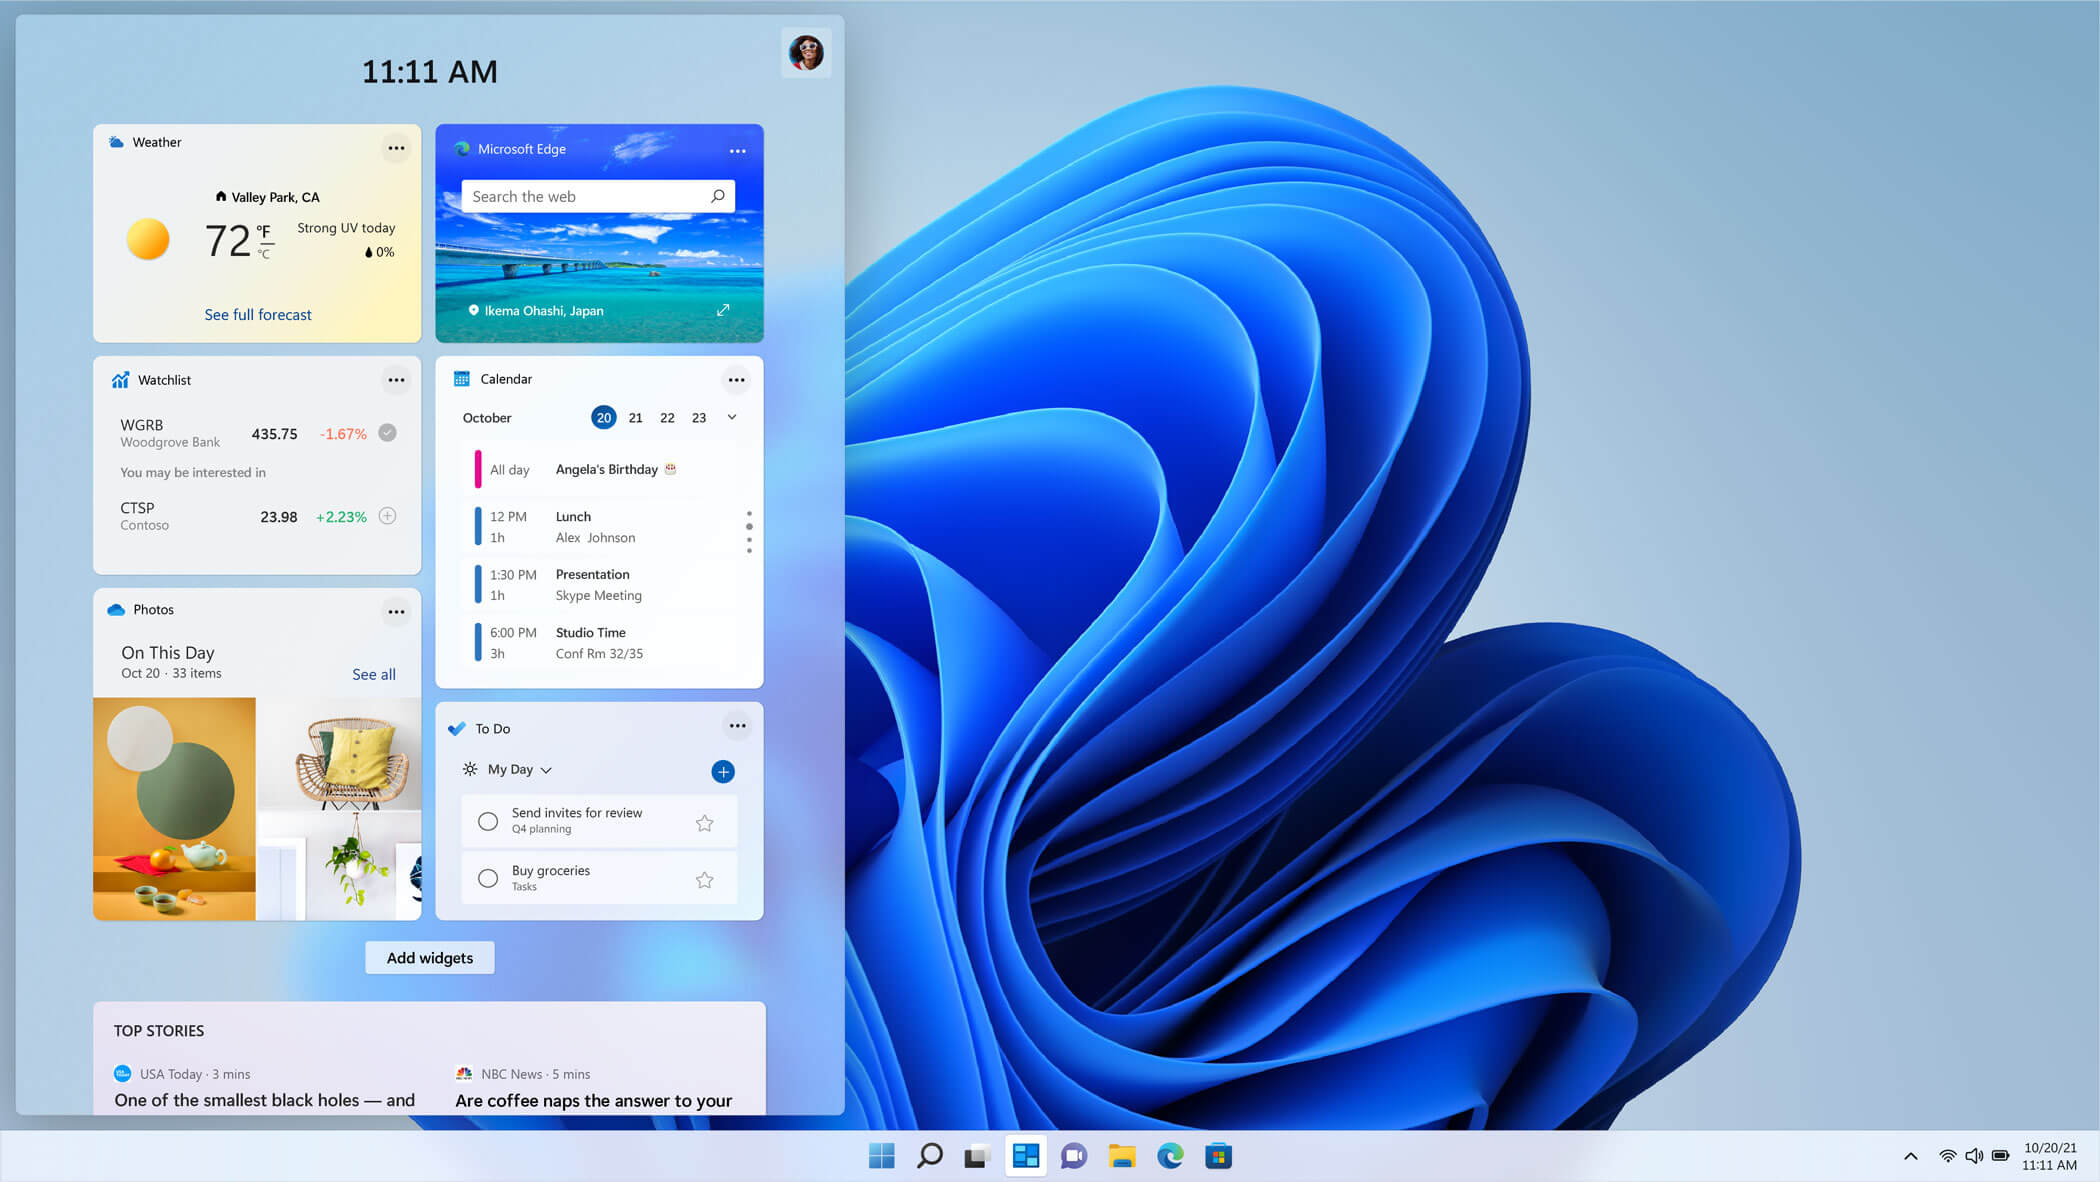
The new widget's menu inside Windows 11 is generally met with a positive attitude but there are still users which prefer not to have it. Luckily for them, Microsoft included a very easy way to turn the widgets menu on or off. Follow this easy guide to see how.
Right-click on the widget button in the taskbar and click on Hide from Taskbar and that’s it
Alternatively, you can also turn it off via the setting app.
Go to the settings app and navigate to Personalization > Taskbar > Taskbar Items and flipping the switch beside Widgets to Off.
Please note that both methods will only hide the button to toggle widgets menu, at the current state there is no really a way to actually turn it off, only hide it and make it not available to bring it up.
Have you been feeling anxious in the digital space? Feeling like you have a million eyes on you each time you visit a website? It can definitely make you uneasy. Luckily there’s an easy fix, and it’s called a VPN.
In this article we’ll take you through the basics of what a VPN does and some of the biggest benefits you can reap from buying one.
VPN: definition and how it works
VPN stands for Virtual Private Network, so its name already says a lot about what it does.
A VPN is specialized software that keeps your browsing private and secure. Essentially it hides your identity, preventing possible cyberattacks and data theft. This is especially important in cases of public network use, where you’re highly exposed to potential threats.
To be more specific, this software encrypts your Internet Protocol (IP) address by filtering it through a server hosted by the VPN provider first. That way, it prevents your Internet service provider, third parties and lurking online thieves from tracking the actual you.
Credit: FLY:D on Unsplash
Some providers, such as Surfshark VPN with its IP Rotator feature, even make it a habit to frequently change your IP address to further protect your identity. With most VPN providers, you can also appear to be in a completely different country, adding to your disguise.
There are tons of advantages you can look forward to if you decide to use a VPN. Take a look at some of the crucial ones.
Benefits of using a VPN
When choosing a VPN, you can find both free and paid options. We recommend you go with the paid ones, since they have stronger security, encryption and data protection, as well as more advanced features. Free VPNs come with limitations and risk of malicious attacks on the software itself.
You can choose to buy a singular VPN service or opt for antivirus software that has a VPN built in, for example Bitdefender’s Ultimate Security plan. That depends on what you use your computer for and how much.
When you pick one, here’s what it can do for you.
1. Access region-specific content
When we said you could change your location, we meant it. Say you’re using a streaming service and a show you desperately want to watch isn’t available in your country. You can use your VPN to make it look like you’re browsing from a country where it’s unlocked.
This option is also convenient for gamers who want to access maps, skins and other in-game items unavailable in their location.
In addition, you can use this powerful feature when you’re traveling to a region where some of your favorite content may not be accessible.
Do keep in mind that you need to read the Terms and Conditions (yeah, we know - who does that?) of your games and services before doing this, since you could end up getting a penalty. It’s also important to remember that there are entire countries that have strict regulations or even bans on VPNs, for example Belarus, Russia and China. So make sure to be very cautious with your VPN use, friends.
2. Browse like no one’s watching
VPNs shield your browsing habits from prying eyes on the web. Those can be malicious hackers or just third-party cookies tracking your every move to later bombard you with targeted ads. For example, Surfshark VPN features a Cookie blocker that blocks all cookie-related pop-ups and lets you browse in peace (and secret). It works even when the VPN is turned off, which is also pretty neat.
In addition, their CleanWeb 2.0 technology makes sure ads and especially malware don’t stand a chance at all, since they’re blocked before they can even load.
The inability of sites to track your browsing means they can’t collect and analyze any of your data. So, your personal information - or your company’s information in case that’s what you’re using your computer for - is entirely hidden and secure.
3. Save money
It’s well-known that the prices of certain items and services vary based on your location, browsing time, age and many other factors. This most commonly goes for airline tickets and hotel stays.
You can use your VPN to avoid high prices and surcharges. Clear all cookies, turn on your VPN and visit an online shopping site to check out their prices. Then compare your findings with the offers you see when your VPN is off, when you spend a long time on the site or have an active account with the company.
Sometimes this can really help you find the best deals and avoid breaking the bank. But again, check the Terms and Conditions before you purchase something using a VPN.
4. Secure your smart home
The more smart devices you have connected to your network, the more exposed you are to potential cyberattacks. Phones and computers are generally designed to be decently secure even without a VPN or antivirus, but smart home devices leave a lot to be desired in that regard.
Protecting your home network with a VPN software means all devices connected to it are secure, be it an air purifier or Alexa.
Credit: Bence Boros on Unsplash
5. Prevent connection slowdown
Your ISP can intentionally slow down your internet speed based on how much data you’ve consumed (data throttling) or your activities online (bandwidth throttling).
But with a VPN, what kind of data you send and receive and how much is entirely hidden. Therefore, if your ISP can’t see you, they can’t control you and they can’t throttle down your speed.
The bottom line
You can never be too safe online. So definitely think about getting yourself a solid VPN to pump up your privacy and security as much as you can. And if you have any questions or need help choosing the perfect software for you, feel free to reach out to us.
In some cases, a couple of Windows 10 laptops, especially the newer ones that run the NVIDIA RTX series GPUs have been experiencing some problems, particularly with their headphone jacks which seem to be malfunctioning even though the internal speakers works just fine. And despite having all the drivers updated to their latest versions, the problem still occurs.
According to security experts, this kind of problem occurs on laptop computers that are manufactured by MSI and since there is still no workaround or reliable fix released by the company, in this post you will be guided on how you can resolve the problem with the headphone jack. So if you are using a laptop made by MSI and are experiencing the same issue, then you’ve come to the right place.
There are several potential fixes you can check out to resolve the problem, you can try to force reboot your computer or clean your headphone jack and then plug it back in properly. In addition, you could also try to update your Audio drivers or set your headphone as default. For more information, follow each one of the given options below.
Option 1 – Try to force reboot your computer
The first thing you can do is to force reboot your computer as this simple fix could help in fixing the problem. This option is quite simple, just make sure that before you do it, you have to save all your work.
First, turn on your computer and press and hold the power button for at least 30 seconds. You might notice the screen flashing or making any changes, just ignore it.
After that, plug out and plug in your computer and automatically turn it on.
Once done, check if the headphone jack is now working fine.
Option 2 – Try to clean the headphone jack and plug it properly
The next thing you can do to fix the problem is to clean your headphone jack and plug it back in properly. Make sure that you use a cotton swab in cleaning the headphone jack as there are instances where some dust might have settled in the port which results in issues like your headphone jack no working.
Option 3 – Try to update, rollback or reinstall the Audio driver
If the glitch in your audio has something to do with software, chances are it might be related to the audio driver – it could be that the newest version of your Windows 10 does not work well with the old version of the driver. This is why you have to update your audio driver to the newest available version.
Tap the Win + R keys to open the Run dialog box and then type in MSC and tap Enter or click OK to open the Device Manager.
Expand the section for the outdated device drivers.
And then select the outdated driver(s) and right-click on it/them.
From the drop-down menu, select the Update Driver option and follow the on-screen instructions to install the latest version of the driver.
Then also click on the option, “Search automatically for updated driver software.
Restart your PC after the installation.
Note: If updating or reinstalling the Audio driver didn’t work, you can go to the website of MSI and look for the support section where you can download the drivers for your computer. You just need to take note of your PC’s correct model and model number so you can find the appropriate driver.
Option 4 – Try to set the headphone as the default device manually
There are times when you plug a headphone, it does not toggle the default audio device. Thus, to fix this issue, you have to set the default audio device to the headphones manually. To do that, follow these steps:
First, right-click on the volume icon located on the system tray.
Next, select the Open sound settings option to open the Sound section in the Windows 10 Settings app.
From there, select the Control Panel for Sound on the rightmost column. This will open a new mini window.
After that, select your headphone under the Playback tab and click on the Set default button.
Once done, click on Apply and then OK buttons to save the changes made.
Option 5 – Try to run the Playing Audio Troubleshooter
Since the Windows 10 operating system has the Playing Audio Troubleshooter, you can use this troubleshooter to try and fix the problem with the headphones. You can access this tool in the Control Panel or in the Taskbar Search and even on the Troubleshooters page of Windows 10.
Mingwm10.dll is a dynamic link library file. This file is associated with the gaming program called the Adventures of Tintin developed for Windows OS by Ubisoft.
Like all other DLL files, Mingwm10.dll file also contains small programs that are used to load and run this gaming program on your PC and several other programs developed by Ubisoft.
Mingwm10.dll error code may occur when this file fails to run and load the Adventures of Tintin, the game on your PC. This error may appear on your PC in different formats such as:
"Mingwm10.dll not found."
"The file mingwm10.dll is missing."
"Cannot register mingwm10.dll."
"Cannot find C:\Windows\System32\mingwm10.dll."
"Mingwm10.dll Access Violation."
"Cannot start The Adventures of Tintin The Game. A required component is missing: mingwm10.dll.Please install The Adventures of Tintin The Game again."
"This application failed to start because mingwm10.dll was not found. Re-installing the application may fix this problem."
Solution
Error Causes
Mingwm10.dll error code is triggered due to a plethora of reasons. These include causes like:
Registry damage or corruption
Viral infection
Hardware failure
Corrupt or missing Mingwm10.dll file
Though this error is not fatal nonetheless it is advisable to fix it promptly to ensure you are able to access your desired program successfully without any restriction.
Please note, this error can become a major PC threat as the underlying causes are registry corruption or viral infection.
Further Information and Manual Repair
Listed below are some of the best, proven, and easy DIY methods to help you resolve the Mingwm10.dll error code on your system. These are simple methods and require no technical expertise or know-how.
Method 1 - Restore the Missing File
As mentioned above DLL are shared files, there is a possibility that you accidentally deleted the Mingwm10.dll file on your system while uninstalling a program developed by Ubisoft.
In such an event, the best and the easiest way to fix the error is to check your recycle bin and restore the deleted Mingwm10.dll file on your system.
Method 2 - Download Mingwm10.dll File from a Reliable Website
If you are unable to locate the missing Mingwm10.dll file in the recycle bin, then another method to fix the issue can be to download the Mingwm10.dll file from a trusted website.
The reason why we say trusted is that viruses often enter computer systems when users download files from unreliable websites.
So, to avoid bigger problems first make sure the site you select to download the Mingwm10.dll file is authorized and trusted.
Method 3 - Update Outdated Drivers
Hardware failure is related to outdated drivers. If the cause of the Mingwm10.dll error code is hardware failure, simply update the outdated drivers to resolve.
Since the Mingwm10.dll file is used to run and load Adventures of Tintin, a gaming software program, then most probably the error is caused because of the outdated video card driver.
Therefore update it to fix the issue. For this, go to the start menu, type Device Manager in the search bar. Once it opens use the driver update wizard to make updates. The wizard will walk you through the entire process, making the driver update task easy.
Method 4 - Repair the Corrupt Registry
The registry is the part that stores all the information and activities performed on your system. From important files to obsolete files it saves everything.
If the obsolete files like the junk files, bad entries, invalid registry keys, and cookies are not removed from the registry frequently, these files accumulate in the registry and corrupt important system files like DLL files, popping error codes like Mingwm10.dll error.
To resolve, download Restoro. It is a PC Fixer embedded with a registry cleaner. The registry cleaner scans and removes all the obsolete files. It cleans the registry and the corrupted system files in just a few clicks, thereby fixing the problem.
Click here to download Restoro to resolve the Mingwm10.dll error code on your PC
Windows 11 comes with glass and transparency effects by default once it is installed. The transparency effect looks really good but if in any case, you do not like them, you can easily turn them off very easily
Open settings inside Windows 11
Inside settings click on Accessibility in the sidebar
Click on Visual Effects on far-right
Inside Visual effects, settings click on the switch beside Transparency effects to OFF
Windows will automatically save settings and apply changes right away. Just close your settings application and continue with work. You can always turn it back ON if you change your mind.
if you were following our articles you are aware that Windows 10 has a build-in-game mode that you can summon
by pressing ⊞ WINDOWS + G. But did you know that you can use this to capture and record your screen?
Hello and welcome to another great tutorial about how to get the maximum out of your Windows 10, today our topic will be recording your screen using Windows 10 game mode.
In order to start recording first, we need to bring game mode by pressing ⊞ WINDOWS + G
In the Game Bar overlay screen, look for the “Capture” window.
If you don’t see it, click the Widget menu icon on the left. It looks like several lines with bullet points to their left.
A drop-down list will appear; click “Capture.” The “Capture” shortcut may also be in the Game Bar toolbar.
Look for the “Capture” widget window in the overlay. There are four buttons on the Capture widget (from left to right):
Screenshot: Takes a screenshot of the active window.
Record last 30 seconds: Creates a recording of the previous 30 seconds.
Start recording: Starts recording your active window.
Turn on the mic while recording: If this option is enabled, Windows 10 will capture audio from your computer’s microphone and include it in the recording.
You’ll notice text underneath the buttons. This is how you’ll know what the active window is, aka what will be recorded. For example, if you’re browsing the web, it will show the title of the open tab.
To start recording your screen, you must first decide whether you want to use your mic, which is useful if you’re trying to explain something on the screen.
Next, simply click the Start Recording button.
The screen recording will begin, and you’ll see a little toolbar appear in the corner of the screen. It will show the running time of the recording, and it also has buttons to stop recording and toggle the microphone.
When you’re finished, click the Stop icon to end the recording.
From the Capture widget, click “Show All Captures” to see your recording.
Your recording will be at the top of the list. Click the folder icon to see all recordings and screenshots in File Explorer.
These recordings are stored under your Windows user folder at C:\Users\NAME\Videos\Captures by default.
There is various Blue Screen of Death errors that you can encounter as you use your Windows 10 computer and some of these Stop errors have something to do with the win32kbase.sys file. This post will guide you in fixing the BSOD errors related to the win32kbase.sys file.
A problem has been detected and Windows has been shut down to prevent damage to your computer. The problem seems to be caused by the following file: Win32kbase.sys.
Your PC ran into a problem and needs to restart. If you would like to know more, you can search online later for this error: win32kbase.sys.
The win32kbase.sys file is a Windows operating system Base Win32 Kernel Driver file located in the System32 folder so if it ends up getting corrupted or if it went missing, your computer will throw up Blue Screen error. To fix BSOD errors that have something to do with the win32kbase.sys file, here are some possible fixes that could help. Worry not for these possible fixes are not complicated.
Option 1 – Run the Check Disk or CHDSK utility
One of the first things you can try to resolve the win32kbase.sys Blue Screen error is running the CHKDSK utility. If your hard drive has issues with integrity, the update will really fail as the system will think that it’s not healthy and that’s where the CHKDSK utility comes in. The CHKDSK utility repairs hard drive errors that might be causing the problem.
Open Command Prompt with admin privileges.
After opening Command Prompt, execute the following command and hit Enter:
chkdsk /f C:
Wait for the process to be completed and then restart your computer.
Option 2 – Run SFC or System File Checker scan
System File Checker or SFC is a built-in command utility that helps in restoring corrupted files as well as missing files. It replaces bad and corrupted system files to good system files. To run the SFC command, follow the steps given below.
Tap Win + R to launch Run.
Type in cmd in the field and tap Enter.
After opening Command Prompt, type in sfc /scannow
The command will start a system scan which will take a few whiles before it finishes. Once it’s done, you could get the following results:
Windows Resource Protection did not find any integrity violations.
Windows Resource Protection found corrupt files and successfully repaired them.
Windows Resource Protection found corrupt files but was unable to fix some of them.
Restart your PC.
Option 3 – Try to run the DISM commands
You might want to repair potentially corrupted files in your system as having them could also trigger the win32kbase.sys Blue Screen error. To repair these corrupted system files, you can run the DISM commands:
Tap the Win + X keys and click on the “Command Prompt (Admin)” option.
After that, input each one of the commands listed below sequentially to execute them:
Dism /Online /Cleanup-Image /CheckHealth
Dism /Online /Cleanup-Image /ScanHealth
Dism /Online /Cleanup-Image /RestoreHealth
Once you’ve executed the commands given above, restart your computer and check if the dxgkrnl.sys Blue Screen error is now fixed.
Option 4 – Try to run the Blue Screen Troubleshooter
As you know, the Blue Screen troubleshooter is a built-in tool in Windows 10 that helps users in fixing Blue Screen errors related to the win32kbase.sys file. It can be found in the Settings Troubleshooters page. To use it, refer to these steps:
Tap the Win + I keys to open the Settings panel.
Then go to Update & Security > Troubleshoot.
From there, look for the option called “Blue Screen” on your right-hand side and then click the “Run the troubleshooter” button to run the Blue Screen Troubleshooter and then follow the next on-screen options. Note that you might have to boot your PC into Safe Mode.
22H2 update for Windows 11 will arrive later this year and although Microsoft is not releasing anything big there will be some interesting improvements and fixes. We take a look at some that caught our attention.
Phishing protection
One of the most interesting upcoming features is enhanced phishing protection. Microsoft Defender SmartScreen will be upgraded to alert users when they try to store passwords in plain text files and also if they accidentally type in a Microsoft account password on phishing sites.
"These enhancements will make Windows the world's first operating system with phishing safeguards built directly into the platform and shipped out of the box to help users stay productive and secure without having to learn to be their own IT department,"
Microsoft
File Explorer gets tabs, a modern sidebar, and contextual suggestions
Finally, Windows File explorer is getting tabs that will allow much easier management of folders and files inside it.
It is confirmed that Microsoft is also working on a new 'HOME' sidebar that should be modern in design and in features including OneDrive so you can find everything in one place.
Pinning of favorite files was also mentioned so you can easily pin favorites for quick access.
Full-screen widgets
Windows 11 has brought back widgets in a new way and from all the feedback users are loving them. Currently, you have a widget sidebar on the left part of the screen where you have your chosen store widgets but from the Microsoft teaser, we will have soon the option to have them in full screen.
If you are using a widget for reading news, blogs, etc. this feature will be very good since you will be able to use your whole screen for information and not just a part of it.
Suggested actions
Another new feature is 'suggested actions' which is going to be particularly useful in apps like Microsoft Teams. With this new feature, you can highlight a date in a Teams message and Windows will suggest actions.
For example, if you highlight a date, you'll see a recommendation to create an event in Microsoft Calendar for that day.
Activation errors in Windows 10 can interfere with your ability to fully use the system. When Error Code 0xC004C4AE appears on your computer, you may see a message that shows that the validation process has been stalled due to binaries that appear to have been tampered with.
While the text of this message may sound intimidating to people who are not familiar with the inner workings of the Windows 10 system, the basic meaning of the error message is that something has been introduced to the system that is not natively supported in Windows 10. During the Activation process, Windows checks to ensure that all of the Windows elements that are currently on the computer are valid and authentic to the Windows system. Usually, this particular error code refers to a language package that has been downloaded into the system using an outside application, which the Windows 10 operating system does not support.
Common symptoms include:
An error message when the activation is attempted
Inability to complete the Windows 10 Activation process
Inability to fully use apps in Windows 10 until the issue is resolved
This particular error can easily be resolved with a few simple steps. However, if you are not confident in your ability to use the methods below or they do not fully remove the issue on your computer, you may want to seek the assistance of a qualified repair technician who is well versed in the Windows 10 Activation process.
Solution
Error Causes
The most basic cause of Error Code 0xC004C4AE is that an unsupported language package has been enabled in the computer. This most often occurs when third-party applications have been used to introduce additional display languages to your system. While third-party applications that provide language packs are acceptable in some versions of the Windows operating system, the Windows 10 Activation process will not be able to complete if the system detects that one of these unofficial language packs exists on your machine.
Further Information and Manual Repair
There are several methods that may be helpful in resolving the basic issue in the display languages that causes Error Code 0xC004C4AE to appear:
Method 1:Restore Your System to an Earlier Point to Revert Changes
Use a backup copy to restore your computer to an earlier date, in effect undoing the changes that caused the error. When your system has been restored, you will be able to go through any language packs that are not native to the Windows operating system and remove them before re-attempting the installation and activation of the Windows 10 system.
This method is most useful if you keep a regular backup of your system and files. If you do not regularly back up the information on your computer, attempt one of the other methods instead. If you are unsure of how to use a backup to revert your changes or are not comfortable completing this step on your own, contact a certified Windows technician to assist you in the process.
Method 2: Revert to an Earlier System to Remove the Language Pack
If you are unable to restore your system using a backup, the other option to resolve Error Code 0xC004C4AE is to halt your installation of Windows 10 and go back to Windows 7 or Windows 8.1, from which you will be able to remove the language pack in question. Once the offending language pack has been completely removed from your computer, the Windows 10 Activation process should be able to proceed normally.
Several versions of windows don’t support language packages, so the best way to prevent this error from occurring is to avoid using any kind of third-party tool to install additional languages onto your Windows system. Activities Language You may be able to use third-party tools to instead complete alternative language actions without installing these languages as language packs.
If the above solutions do not help you to resolve Error Code 0xC004C4AE on your machine, get in touch with a qualified Windows repair technician, who may be able to perform the operations needed to remove the problematic language pack from your computer and allow the Windows 10 Activation process to continue to completion.

 The new widget's menu inside Windows 11 is generally met with a positive attitude but there are still users which prefer not to have it. Luckily for them, Microsoft included a very easy way to turn the widgets menu on or off. Follow this easy guide to see how.
Right-click on the widget button in the taskbar and click on Hide from Taskbar and that’s it
Alternatively, you can also turn it off via the setting app.
Go to the settings app and navigate to Personalization > Taskbar > Taskbar Items and flipping the switch beside Widgets to Off.
Please note that both methods will only hide the button to toggle widgets menu, at the current state there is no really a way to actually turn it off, only hide it and make it not available to bring it up.
The new widget's menu inside Windows 11 is generally met with a positive attitude but there are still users which prefer not to have it. Luckily for them, Microsoft included a very easy way to turn the widgets menu on or off. Follow this easy guide to see how.
Right-click on the widget button in the taskbar and click on Hide from Taskbar and that’s it
Alternatively, you can also turn it off via the setting app.
Go to the settings app and navigate to Personalization > Taskbar > Taskbar Items and flipping the switch beside Widgets to Off.
Please note that both methods will only hide the button to toggle widgets menu, at the current state there is no really a way to actually turn it off, only hide it and make it not available to bring it up. 


 Windows 11 comes with glass and transparency effects by default once it is installed. The transparency effect looks really good but if in any case, you do not like them, you can easily turn them off very easily
