Code 21 is a Device Manager error code that appears when you try to use a hardware device attached to your computer and the Windows prohibits you from using it.
This is due to the Windows experiences problems loading the device driver. This error message is displayed in the following format:
“Windows is removing this device. (Code 21)”
 Error Causes
Error code 21 means that Windows is in the device removal process and the device has not been completely removed. It occurs when you set a device to be removed and then select the same device to run on your system.
Upon your instructions, Windows start to remove that device and when you on the other hand try to use/access the same device that you selected for removal, it kicks up Code 21.
If you are experiencing error code 21 on your PC, it is advisable to resolve it immediately.
Though this error will not damage your system, but will significantly lower the performance of your PC which is definitely something you don’t want especially if you work on your computer daily and use it to perform important time-sensitive errands.
To repair and resolve, try the methods given below:
This is one of the best and easiest ways to resolve code 15 on your system. Wait for a few seconds, and then press the F5 key. This will update the Device Manager view and the error will most probably go away.
Sometimes error codes may pop up due to temporary glitches. To resolve such errors, a simple reboot of your PC is enough. Shut down Windows and then restart your system.
This is most likely to resolve Code 21. However, if the error still persists then this means the underlying problem for code 21 is deeper than you think. Try method 3 to resolve.
As mentioned earlier, the error code 21 may occur if you have selected a device to remove and then you try to reuse it.
To resolve, you may have to install the device again and the driver for that the reinstalled device. To reinstall the driver without any hassle, simply download DriverFIX.
It is a smart, user-friendly, and intuitive software program designed to resolve driver problems. The program is embedded with intelligent device identification technology which:
Furthermore, it enables accurate installation and ensures that your system is running at its optimal speed.
Other features that this program boasts are full backup and restoration, safe USB management, and ejection.
If nothing works, you can try the full backup and restoration feature and restore your PC to its previous state when it was functioning properly before the error occurred.
DriverFIX creates a backup of all your files and data hedging keeps you from disasters like data loss. It restores the system to the time when it was working properly.
Click here to download DriverFIX on your system and resolve error code 21 today.

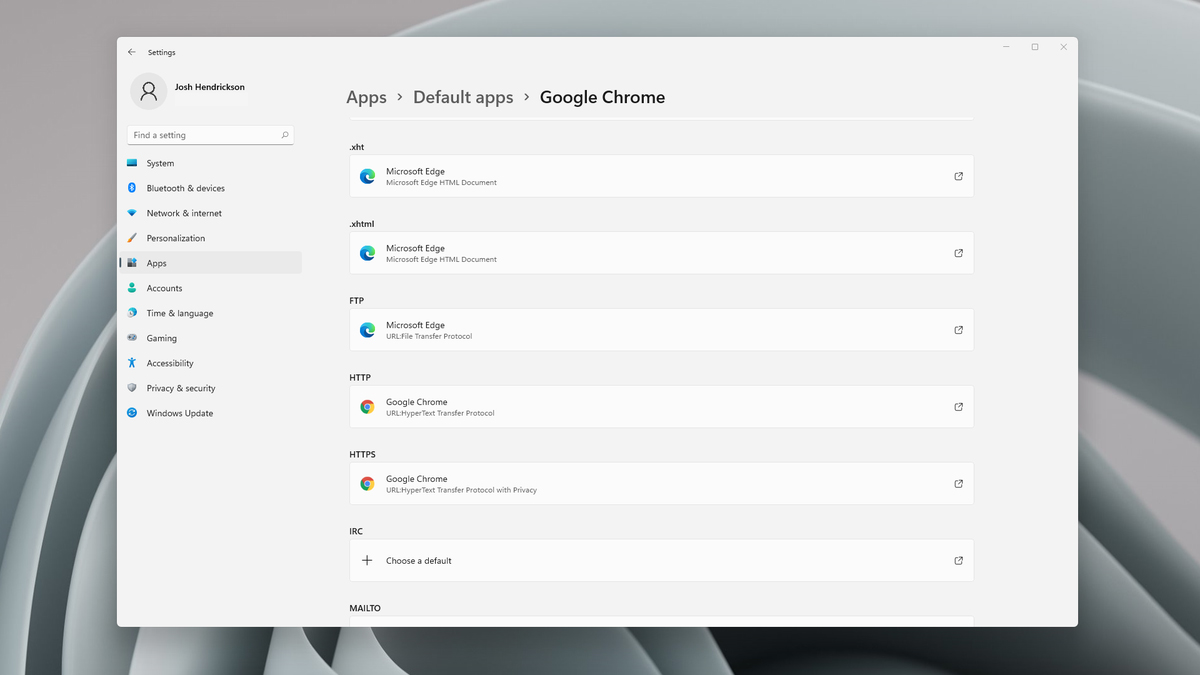 Choosing default browser in settings
 Windows 11 provides several different ways to make your cursor stand out and be easier to spot inside it. You can make the mouse pointer larger, invert it, or change its color.
 From the menu choose Command Prompt (administrator)
 When the command prompt is active type the next command in it:
DISM /online /export-driver /destination:C:\DriverBackup
where: C:\DriverBackup is the folder and the hard drive where you want to store your backed-up drivers.
Press ENTER
That's it, you have now successfully backed-up all of your installed Windows drivers.
Now, save all of your drivers on USB and reinstall Windows.
but this time choose Device manager
When the command prompt is active type the next command in it:
DISM /online /export-driver /destination:C:\DriverBackup
where: C:\DriverBackup is the folder and the hard drive where you want to store your backed-up drivers.
Press ENTER
That's it, you have now successfully backed-up all of your installed Windows drivers.
Now, save all of your drivers on USB and reinstall Windows.
but this time choose Device manager
 From decide, manager right-click on any device Windows has not been able to install appropriate driver and choose update driver
Get-ExecutionPolicy –ListStep 3: After you execute the command, it will give you a list of the User Groups as well as their Execution Policy status, and under the Scope column, look for “LocalMachine”. Once you find its Execution Policy you will notice that it’s either set to Undefined or Restricted. Step 4: Now that you’ve determined the Execution Policy, you need to set it to Unrestricted if it is set to Restricted. To do that, you have to enter the following command in the very same PowerShell window.
Set-ExecutionPolicy UnrestrictedStep 5: After you execute the command, you will see a message that asks for various permissions for which you either have to tap Y to say Yes to each one of the messages individually or tap the A key to say Yes to all the messages to once. However, if the command throws another error, you can just force the Execution Policy to change by executing the following command.
Set-ExecutionPolicy Unrestricted -ForceStep 6: Once you’re done, it will finally set the Execution Policy for the Windows PowerShell scripts as well as cmdlets to be Unrestricted and fix the “File cannot be loaded because running scripts is disabled on this system” error.
"Cannot find the file sqlite3.dll (or one of its components)"
Followed by:
"Error starting program.. A required .DLL file sqlite3.dll was not found."
 Error Causes
“C:WINDOWSsystem32>chkdsk /f g: Cannot open volume for direct access. C:WINDOWSsystem32>chkdsk /f f: The type of the file system is NTFS. Volume label is 0529357401.”To fix the “Cannot open volume for direct user access” error, here are some suggestions that might help. Follow them carefully.
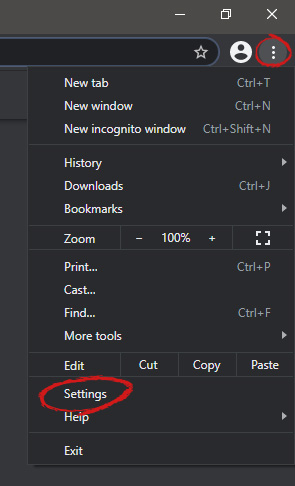 When you are in settings, on the left side move toward the bottom until you run into a tab that says On Startup and click on it. On right, a new section will open, click on Open a specific page or set of pages.
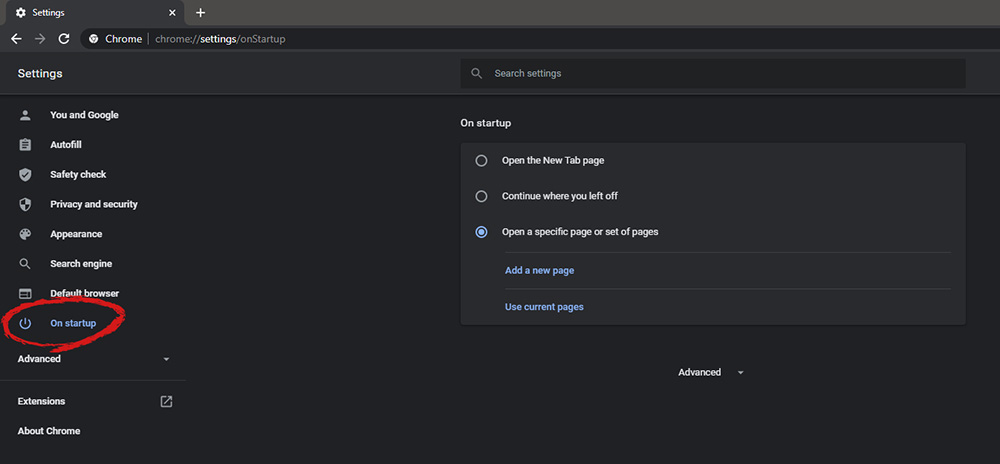 You will be presented with the option to add a new page by typing its URL or getting it from bookmarks or using a specific opened one. You can repeat this process until you have added all pages that you wish to be automatically opened once Chrome is opened for the first time.
Windows 10 and Windows 11 have automatic dynamic screen brightness depending on the surrounding light inside the room. Please take note that this option is available only on devices with build-in screens like laptops, tablets, and all in one desktop PC. If you are connected with your PC via an external monitor you will not have these settings available and probably feature is not even working.

Some computers will also allow automatic brightness changes also on what is displayed on the screen. This option is meant to save battery life on devices. Microsoft calls this automatic brightness feature Content adaptive brightness control. In order to change this setting, we will go to settings inside Windows.
Open Settings inside Windows, in Windows 11 press WINDOWS + I to open settings, then click on the system in the sidebar and then go to Display. Click on the small arrow beside the Brightness slider in order to expand a small menu and then uncheck Help improve battery by optimizing the content show and brightness. If you see Change brightness automatically when lighting changes, uncheck that as well. Close the settings and you are good to go, now brightness will always be as set in settings.
Inside Windows 10, go to Settings and then go to System and then in Display under the Brightness and Color section look below and locate the box that says Automatically adjust contrast based on the displayed content to help improve battery and uncheck it, if the box below with text Change brightness automatically when lighting changes exists, uncheck it as well. Close settings and you are done.