A black screen error inside Windows 11 is a typical screen turning to solid black without any error message. This can be very annoying since it can randomly appear out of nowhere and it will appear while you are using the computer. Worry not, this is not a serious error and we have several solutions for it, so please keep reading and try them as presented in order.
Restart graphic driver
This is the first thing to check if the issue is due to software or driver malfunctioning, there is a shortcut for rebooting graphic driver inside Windows 11. Press WINDOWS + CTRL + SHIFT + B to reboot the graphic driver and see if this fixes the issue. A beep sound should be heard during this process and the screen should turn back to normal.
Check connections
Sometimes the screen can go black due to a faulty connection or cable. If you have it at your hand try a different cable or slightly and gently nudge the existing one to see will screen flicker. If you are on a laptop try gently moving the lid from back to front and pay attention to the screen. If screen flickers or picture returns with this method, cable or connector needs to be replaced.
Clean your computer
The black screen can be because the computer is overheating. If this is the case either fan inside is not working properly or there is a lot of dirt and dust that needs to be removed so airflow can be established again for proper cooling. We have an article on errortools.com on how to properly clean your PC but if you are not technical enough maybe the best solution would be to call someone who is or to take the PC to service for cleaning.
Change The Projection Settings
Press WINDOWS + P to open projection settings, check to see if PC is set to PC screen only. If any other option is selected change it to PC screen only since this can cause random black screen issues.
Uninstall latest updates
If this problem has started to manifest itself during the latest update, go to setting and roll back from the latest update to fix this issue.
Scan system for malware
The black screen can also be caused by various viruses and malware. IF you have anti-virus software, run a full system scan to check it for malware. If you do not have one, download a free one and run a system scan, we recommend Bitdefender.
GoodShopLanding is a browser extension for Google Chrome, Mozilla Firefox, and Safari. This extension offers the latest coupons from a range of variety stores. While this may seem useful, this extension only offers coupons from sponsored stores, not all coupons available, so the only coupons that you will get are from the Extensions Ad network. You may see additional new tabs opening randomly while browsing the internet, these tabs are opened by GoodShopLanding and usually contain last-minute store deals.
As it is often distributed via potentially unwanted advertising, and impacts browser performance in a way that many users do not want, it is classified as a Browser Hijacker and thus flagged for optional removal.
From the Author:
Shop online? Here’s your free automatic coupon finder, Gumdrop.
Never miss a coupon again
Gumdrop automatically applies the best coupons for you at checkout.
Get the best deals anywhere
With over 500,000 coupons, Gumdrop finds deals for thousands of stores, including Amazon, Expedia, and Papa John’s.
About Browser Hijackers
Browser hijackers (sometimes called hijackware) are a kind of malicious software that alters internet browser configurations without the computer owner’s knowledge or consent. These hijacks appear to be increasing at an astonishing rate around the globe, and it could be truly nefarious and sometimes harmful too. There are numerous reasons why you may have a browser hijack; but commercial, marketing, and advertising are definitely the primary purposes for their creation. Often, hijackers will force hits to sites of their choice either to increase traffic generating higher advertisement revenue, or to gain a commission for every user visiting there. However, it isn’t that harmless. Your web safety is jeopardized and it is extremely irritating. They not only mess up your web browsers, but browser hijackers can also modify the system registry, leaving your computer vulnerable to various other attacks.
Indications of browser hijack
There are many symptoms that indicate the browser is highjacked: your homepage is reset to some mysterious site; bookmark and the new tab are likewise changed; The default search page of web browser is changed; unwanted new toolbars are added to your web browser; you may see never-ending pop-up ads on your computer screen; web pages load very slowly and sometimes incomplete; you’re disallowed access to certain webpages, such as the site of an antimalware software developer like SafeBytes.
How they get into the computer
A browser hijacker can be installed on your computer if you go to an infected website, click an e-mail attachment, or download something from a file-sharing website. They can also be deployed via the installation of an internet browser toolbar, add-on, or extension. Browser hijackers sneak into your pc along with free software application downloads that you unknowingly install along with the original. A good example of some well-known browser hijackers includes Babylon, Anyprotect, Conduit, DefaultTab, SweetPage, RocketTab, and Delta Search, but the names are often changing.
Browser hijackers may record user keystrokes to collect potentially invaluable information that leads to privacy issues, cause instability on computers, significantly disrupt user’s browsing experience, and finally slow down the computer to a stage where it will become unusable.
How you can get rid of browser hijackers
Certain browser hijacking can be simply corrected by identifying and removing the corresponding malware program from your control panel. Unfortunately, most of the software programs utilized to hijack a web browser are intentionally designed to be hard to remove or detect. Moreover, manual removal requires you to carry out many time-consuming and intricate steps which are tough to conduct for new computer users.
Installing and running anti-malware software on the affected computer can automatically delete browser hijackers as well as other malicious applications. If you want to remove persistent browser hijackers quickly and effectively, install the top-rated Anti-Malware program Safebytes Anti-Malware. Along with anti-virus software, a system optimizer program can help you fix registry errors, get rid of unwanted toolbars, secure internet privacy, and enhance overall computer performance.
What you can do if Malware Stops You From Downloading Anti-virus?
Malware could cause all kinds of damage when they invade your system, from stealing your private information to deleting data files on your computer. Some malware sits in between the computer and the internet connection and blocks some or all sites that you really want to visit. It could also block you from adding anything to your machine, especially antivirus applications. If you are reading this, you may have got infected by malware that stops you from installing a computer security application like Safebytes Anti-Malware. Do as instructed below to get rid of the malware in alternate ways.
Download the application in Safe Mode with Networking
If the malware is set to load immediately when Microsoft Windows starts, entering Safe Mode could very well block the attempt. Since only the bare minimum applications and services start-up in safe mode, there are seldom any reasons for issues to take place. Here are the steps you should follow to boot into the Safe Mode of your Windows XP, Vista, or 7 computers (go to Microsoft site for instructions on Windows 8 and 10 computers).
1) At power-on/startup, press the F8 key in 1-second intervals. This will conjure up the “Advanced Boot Options” menu.2) Use the arrow keys to select Safe Mode with Networking and hit ENTER.3) When this mode loads, you should have internet access. Now, use your internet browser normally and navigate to https://safebytes.com/products/anti-malware/ to download Safebytes Anti-Malware.4) Immediately after installation, do a full scan and allow the program to delete the threats it discovers.
Switch over to an alternate browser
Malicious program code could exploit vulnerabilities in a particular internet browser and block access to all anti-virus software sites. If you seem to have a virus attached to Internet Explorer, then switch over to an alternate web browser with built-in safety features, such as Firefox or Chrome, to download your favorite antivirus program – Safebytes.
Create a portable antivirus for removing malware
Another solution is to make a portable antivirus program on your USB stick. Adopt these measures to use a USB flash drive to fix your corrupted computer system.
1) Download Safebytes Anti-Malware or MS Windows Defender Offline onto a virus-free computer system.2) Plug the USB drive into the clean PC.3) Double-click the Setup icon of the antivirus software package to run the Installation Wizard.4) Pick a USB flash drive as the location when the wizard asks you where you intend to install the software. Follow the directions to complete the installation process.5) Remove the USB drive. You may now utilize this portable antivirus on the infected computer system.6) Double click the Safebytes Anti-malware icon on the thumb drive to run the program.7) Click the “Scan Now” button to begin the virus scan.
Let's Talk About SafeBytes Anti-Malware!
If you’re looking to download anti-malware software for your PC, there are numerous tools in the market to consider nonetheless, you cannot trust blindly anyone, regardless of whether it is paid or free program. Some of them are good but there are several scamware applications that pretend as legit anti-malware programs waiting to wreak havoc on your personal computer. When looking for antimalware software, pick one that provides solid, efficient, and total protection against all known computer viruses and malware. When thinking about reliable software programs, Safebytes AntiMalware is undoubtedly the highly recommended one.
SafeBytes anti-malware is a powerful, highly effective protection tool made to help users of all levels of IT literacy in identifying and eliminating harmful threats from their personal computers. Once you’ve got installed this tool, SafeBytes superior protection system will ensure that no viruses or malicious software can seep through your PC.
SafeBytes carries a variety of amazing features which can help you protect your PC from malware attack and damage. Listed below are some of the good ones:
Real-time Threat Response: SafeBytes delivers complete and real-time security for your PC. It’ll monitor your personal computer for suspicious activity at all times and safeguards your PC from unauthorized access.
Robust, Anti-malware Protection: With a critically acclaimed malware engine, SafeBytes gives multilayered protection which is made to catch and eliminate viruses and malware that are hidden deep inside your computer’s operating system.
Fast Scan: Safebytes Anti-Malware, using its enhanced scanning engine, offers extremely fast scanning which can promptly target any active online threat.
Safe Browsing: SafeBytes inspects the links present on a webpage for possible threats and alerts you if the site is safe to visit or not, through its unique safety rating system.
Light-weight Tool: This software program is not “heavy” on the computer’s resources, so you’ll not see any performance troubles when SafeBytes is working in the background.
24/7 Online Technical Support: For any technical issues or product guidance, you could get 24/7 professional assistance through chat and email.
To sum it up, SafeBytes Anti-Malware provides excellent protection combined with very low system resource usage with both great malware detection and prevention. You can be sure that your computer system will be protected in real-time once you put this software program to use. So if you’re searching for the absolute best malware removal application out there, and when you don’t mind shelling out some money for it, go for SafeBytes Anti-Malware.
Technical Details and Manual Removal (Advanced Users)
If you wish to do the removal of GoodShop Landing manually instead of employing an automated tool, you can follow these measures: Navigate to the Windows Control Panel, click the “Add or Remove Programs” and there, select the offending program to remove. In cases of suspicious versions of browser extensions, you can actually get rid of it through your browser’s extension manager. You will likely also want to reset your browser.
To be certain of complete removal, find the following registry entries on your computer and remove them or reset the values appropriately. Please note that this is for professional users only and might be difficult, with wrong file removal leading to additional system errors. Additionally, certain malicious programs are capable to defend against its deletion. Doing this malware-removal process in Safe Mode is suggested.
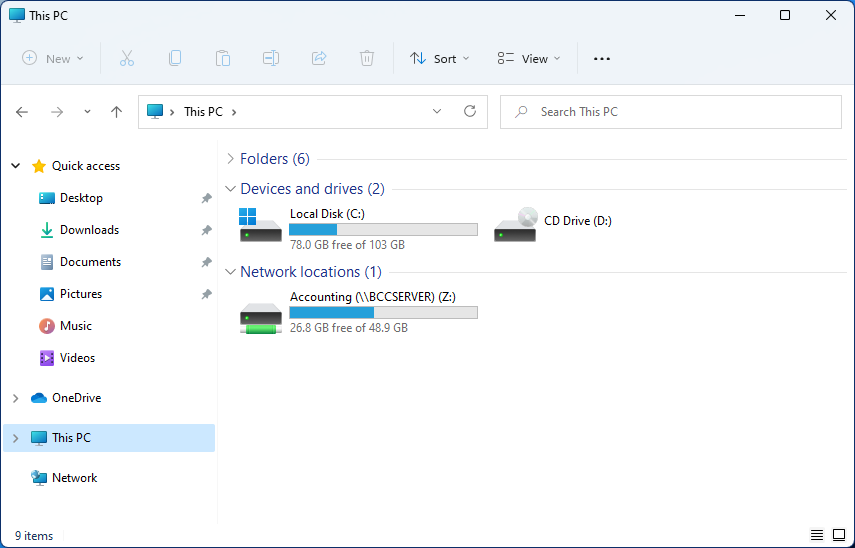
Mapping network drive has many benefits in terms of speed and ease of access of files via network. It lets you access the hard drive over the whole network like it was the hard drive inside your PC case. In order to easily and quickly map a folder as a network drive follow the guide below.
Open File Explorer
Click on the three dots icon in the Toolbar
Select Map Network Drive
Click the Drive drop-down menu
Select a driver letter that you wish to assign as a network drive
In the folder field enter network device and share name (click on browse to see all devices on local network)
Check the box beside Reconnect at sign-in if you wish to automatically connect to a network drive on Windows startup
Check Connect Using Different Credentials if you wish to connect to a network drive using different credentials that one used to login into Windows.
Click Finish
After finishing setting Windows 11 will try to connect to the network drive and if successful drive icon will appear inside File Explorer and the drive will open up to see its content.
If for any reason it cannot connect try checking user credentials, cables, network adapters, etc.
One of the problems encountered by Windows users when upgrading to Windows 10 from Windows 7 or Windows 8/8.1 is the Error Code 0x80070020. This error code normally occurs when users try to download updates from the Windows Update Website or simply by upgrading to Windows 10. Error Code 0x80070020 also occurs when the device already has a Windows 10 installed.
Once this error is encountered, it will cause malfunction of update installs and display the following message:
An error (-5006 : 0x80070020) has occurred while running the setup. Or The process cannot access the file because it is being used by another process”
Solution
Error Causes
In an attempt to fix Error Code 0x80070020, it is important to pinpoint what the cause is. The most probable cause of this error is due to interference. This error code most likely occurs when there is another automatic update running, for instance, an Antivirus scanning in real-time. If you’re scheduled to have an automatic update during real-time scanning, the Windows 10 update might malfunction.
Further Information and Manual Repair
In trying to fix Error Code 0x80070020, you can perform manual repair methods to resolve the issue effectively and efficiently. Most Windows users can easily employ these manual repair methods, even those who do not have technical abilities. However, there are certain instances where a Windows professional’s help is needed. If you don’t want to face any risk in resolving the issue, it would be best to consult a professional Windows technician or you can also make use of a powerful automated tool.
Since Error Code 0x80070020 is most likely encountered due to interference during your update, the easiest method you can do is to close all opened programs and restart your device. After restarting, try to start the update process again.
Method Two: Disable Antivirus Temporarily
Another quick and safe way to fix Error Code 0x80070020 is to disable your antivirus. You must take note though that in doing so, your computer will be susceptible to virus attacks. If you want to proceed with this method, follow these steps:
Locate all programs in process in the notifications area, found in the lower right-hand section of your screen. If in case the antivirus icon is not visible on the taskbar, you may have to click an arrow pointing up to show what programs are currently running.
Right-click on the antivirus icon then select the disable option.
Method Three: Run the Update Troubleshooter for Windows
The Windows Update Troubleshooter may resolve many of the errors encountered by Windows users when installing updates from Windows Update. To execute the troubleshooter, follow the steps below:
Access a menu by holding the Windows key and X. Wait for the menu to appear on the bottom left corner of the screen.
Open the Control Panel.
Change the appearance of files by selecting large or small icons in the View by option located on the upper right section of your screen.
Once you change the appearance of the files, choose the troubleshooting
Run the Windows Update Troubleshooter.
Restart your device then check if this resolves the problem.
Method Four: Execute A Clean Boot
Executing a clean boot means starting Windows using only a few resources, including startup programs and drivers. This safeguards minimizing conflicts and prevent software clash when an update is received. In performing a clean boot, you will be able to pinpoint what caused the manifestation of error code 0x80070020. Check Microsoft’s Support website to know how to execute a clean boot.
Method Five: Reset Windows Update Components
Performing this method is a bit risky and should be your last option if all methods were unsuccessful. This process will alter your device’s registry so you must ensure to perform accurately the steps. A single mistake can lead to modifying your registry erroneously, which might result in the occurrence of other error messages. Carefully follow the steps found on Microsoft’s Support website to successfully reset Windows Update components.
Resetting Windows Update components can also be done by implementing the following steps:
Open the Command Prompt by pressing Windows Key + X. Select Command Prompt (Admin) from the menu.
Stop the BITS, MSI Installer, Cryptographic, and the Windows Update Services.
Rename both the SoftwareDistribution and Catroot2 folders to <name of folder> old.
Start now the BITS, MSI Installer, Cryptographic, and the Windows Update Services.
Exit the Command Prompt then restart your device. After restarting, try installing the updates again.
Method Six: Disable Third-Party Antivirus
A third-party antivirus such as BitDefender may recognize the Windows Update as a threat since the new update of Windows 10 is probably not yet registered with this third-party antivirus vendor. To solve this, you must disable temporarily the antivirus before performing the update. Once the third-party antivirus is disabled, you can now proceed with the updating process. Update as well your third-party antivirus.
Method Seven: Use the DISM Tool for Windows 10
The Deployment Image Servicing and Management (DISM) is a command-line utility that is installed by default in Windows 10 system. This program is used to fix images in Windows. In the case of Error Code 0x80070020, the DISM can repair the recovery image in Windows 10 and can perform as a virtual hard disk as well.
Scan and check files for errors.
Open the Command Prompt by pressing Windows Key + X. Select Command Prompt (Admin) from the menu.
Type sfc /scannow
You can also use the following commands to check for corrupted files:
/CheckHealth – to check for corrupted files or components
/ScanHealth – to check for corrupted Windows image. This may take up to 10 minutes to finish
/RestoreHealth – to check for corrupted Windows image and do an automatic repair. This may take up to 20 to 30 minutes to finish
NOTE: In an instance where you cannot locate the good files in your computer, the system image files may be corrupted. If this happens, you need to have a copy of install.wim from a computer with good Windows 10 OS or the Windows 10 ISO file. Make sure that the source of the good files has the same language, version, and edition of your OS.
Cleaning corrupted files using DISM utility:
Enter the following commands one by one to perform the /RestoreHealth switch using the source path location of good files you copied:
Error Code 52 is a device driver problem that users experience on any Windows 2000 operating system and later Windows systems.
The error occurs when the operating system prevents the peripheral device connected to the computer from functioning properly and is usually displayed by the following message:
“Windows cannot verify the digital signature for the drivers required for this device. A recent hardware or software change might have installed a file that is signed incorrectly or damaged, or that might be malicious software from an unknown source. (Code 52)”
Solution
Error Causes
Error Code 52 is triggered by the following factors:
An incomplete program uninstallation
An incomplete program installation
Hardware is not removed properly
System recovery from viruses
An improper system shut down
Further Information and Manual Repair
Error Code 52 can pose severe risks to the overall health of your PC and any negligence in fixing it can be disastrous for your computer.
However, since the error code is like other device driver errors, resolving the error is relatively straightforward. Here are a few methods to resolve the error code.
Method 1 – Use System Restore
You can use system restore to roll back the system to a time when there was no error to eliminate the problem. Here is how you can use it:
Log in using an Administrator account
Click ‘Start’ button and select All Programs > Accessories > System Tools > System Restore
Click ‘Restore my computer to an earlier time’ and click ‘Next’
Select the last Windows restore point from the ‘On this list, click a restore point’ list, and click ‘Next’
Click ‘Next’ on the confirmation window to proceed
Restart your PC after restoration is complete
By restoring the system via a last saved system checkpoint, you can obtain undamaged Windows system registry files that can help avert the error code.
Method 2 – Run the Troubleshooting Wizard
If restarting your PC does not help, you will have to find the exact nature of the problem by running the troubleshooting wizard for the device and address the problem accordingly. To do this, proceed with the following steps:
Run Device Manager on your PC
Click on the program under the installed programs that are creating problems for you
Click on the ‘General’ Tab
Click ‘Troubleshoot’
Upon opening, the Troubleshooting Wizard will ask a series of questions regarding the error. Answer the questions and follow its directions for solving the error code.
After following the directions of the Troubleshooting wizard, make sure to restart your PC for the changes to take effect. Then check if your device is still causing problems.
Method 3 – Manually uninstall and reinstall the device driver
Uninstalling and then reinstalling the device driver can help solve the error.
You can do this by firstly logging in as Administrator and open Device Manager. Select the device that is causing the problem and double click it and make sure that the peripheral is connected properly to the PC.
Upon opening, click on the ‘Driver’ tab and then select ‘Update Driver’. Make sure to refer to the system documentation that you received with your PC or computer to check for the motherboard details and driver specifics.
Method 4 – Use software to automatically download the driver
Manually uninstalling and reinstalling the driver will do the trick, however, it may be time-consuming especially when you would have to resort to your hardware user manual.
Therefore, using a program such as DriverFIX can save you a lot of time and frustration in having your device work properly on your computer.
DriverFIX, with its user-friendly approach to help you fix your PC issues, comes with an integrated database that detects which drivers you need to reconfigure within just a few seconds and downloads it automatically.
It further ensures that your drivers are installed in their entirety leaving no room for any incomplete files to remain that create Error Code 52.
It also has the added advantage of being able to backup and restores your files should there be the slightest possibility of system file damage. DriverFIX is the answer to fixing your PC error codes accurately and quickly.
Click here to download DriverFIX to fix Error Code 52 quickly and effectively!
Error Code 0x8007000d is a common error code that can be found on the Windows 10 Operating system, although it can also appear in previous versions of the operating system, as well.
Common symptoms include:
Inability to download new updates.
Inability to run the Update tool through to completion.
There are four basic ways to try to resolve Error Code 0x8007000d on your Windows machine. Three of these are pretty simple for even the most basic users, while the final method requires some familiarity with running commands in the Command Prompt. If you don’t feel that you have the skill or confidence to complete the steps listed below, it is generally recommended that you get in touch with a qualified computer repair technician that can assist you in error resolution.
Error Causes
The main cause for the appearance of Error Code 0x8007000d on a Windows machine is that one of the files that the Update tool uses to run one or more updates cannot be found or has experienced damage. Fortunately, there are a few things that you can try on your machine that can be used to attempt to resolve the issues at hand.
Further Information and Manual Repair
Three primary methods exist for the resolution of Error Code 0x8007000d on a Windows machine. As mentioned above, two of these methods can usually be accomplished by basic users, while the third requires some degree of familiarity with the tools associated with the Command Prompt. If you don’t feel that you have the knowledge or skill necessary to follow these steps, contact a computer repair technician to aid you.
Here are the best ways to try to resolve Error Code 0x8007000d on your device:
Method One: Use the Troubleshooting Tool from Windows Update
From the Windows Update tool, you can attempt to run a scan using the Windows Update Troubleshooter, which can try to identify the specific issue that is occurring and to fix it automatically.
Not only will this tool often fix the problem at hand, but it can also help you to avoid other errors that you may have encountered later on in the Update process. This tool should always be your starting point when you encounter an error as you attempt to download or install updates for your Windows machine.
After the tool has been run, restart your computer to apply any changes and then reopen the Update tool to reattempt installation.
Method Two: Reset Your Computer
In some cases, the missing or corrupted files may be extensive enough that you need to restore your computer to an earlier point. If you create regular backups of your information or have a past version of the software that you can install, this can help you to resolve the issue. Otherwise, you may need to restore your device to its factory settings to resolve the error.
Always make sure to backup your important files and information before you perform a reset of your device, in order to ensure that you are able to return the computer to its original state when you have finished.
Method Three: Use Command Line Tools to Resolve the Issue
One of the ways that you can try to resolve this particular error code is the use a DISM tool. This is accessed through the Command Prompt. In order to use this method, follow the steps below:
Step One: Open up the search bar in the Start Menu and type in the words “Command Prompt,” selecting it and choosing to run it as an administrator.
Step Two: Enter each of the commands below, hitting the “Enter” key when you finish each one:
exe /Online /Cleanup-image /Scanhealth
exe /Online /Clean-upimage /Restorehealth
Exit
Step Three: Attempt to run the Update program again. In some cases, you may want to restart your computer before you attempt to run the Update tool again.
If you have not been able to resolve the error code using the steps above or if you are unsure of your ability to follow these steps on your own, get in touch with a trusted computer repair professional that is familiar with the Update process and the errors associated with it.
One of the most useful tools in the Windows 10 operating system is the Windows Media Creation tool. This tool is used to download and install the latest version of Windows 10. However, there are times when you might encounter some issues while using this tool. One of these issues is the Error code 0x80072F76 – 0x20016. If you encounter this error, you will see the following error message during setup:
“We’re not sure what happened, but we’re unable to run this tool on your PC. If you continue experiencing problems, reference the error code when contacting customer support – Error code: 0x80072F76 – 0x20016.”
This kind of error in the Media Creation tool could be due to an interrupted download or unstable internet connection, and many more. To fix it, you can run the Windows Update troubleshooter or try using another browser to download the tool to another location. You can also try changing the DNS or the ISP connection or use the Windows 10 Update Assistant as well as delete the $Windows.~BT & $Windows.~WS folders.
Check out the given suggestions below to fix the Media Creation Tool Error code 0x80072F76 – 0x20016 in your Windows 10 computer.
Option 1 – Try to run the Windows Update troubleshooter
Windows 10 have various troubleshooters that can help you resolve many system issues. So if you’re dealing with Windows Update errors like Error Code 0x80072f76 – 0x20016, you can run the Windows Update troubleshooter to resolve it.
To run the Windows Update troubleshooter, go to Settings and then select Troubleshoot from the options. From there, click on Windows Update and then click the “Run the troubleshooter” button. After that, follow the next on-screen instructions and you should be good to go.
Option 2 – Try using a different browser to download the tool to another location
You could also use another browser in downloading the tool and place it in a different location on your computer but if you do not have another browser, you can just install one and then download the same tool to another location like the Desktop.
Option 3 – Try to change the DNS
Tap the Win + R keys to open the Run dialog box.
Then type “inetcpl.cpl” in the field and hit Enter to pull up the Internet Properties.
After that, go to the Connections tab and select the LAN settings.
From there. Uncheck the “Use a Proxy Server” option for your LAN and then make sure that the “Automatically detect settings” option is checked.
Now click the OK and the Apply buttons.
Restart your PC and then check if the Media Creation tool error is fixed.
Note: If you are using a third-party proxy service, you have to disable it.
Option 4 – Try to change the ISP connection
There are times when the connection to the Microsoft servers is interrupted due to some glitch or it could also be blocked by your Internet Service Provider or ISP. To rule out this possibility, you can try to change your computer’s internet connection and then see if it fixes the problem.
Option 5 – Try to use the Windows 10 Update Assistant
There’s another tool you can use as an alternative to the Media Creation tool. It is called the Windows 10 Update Assistant. This tool can also help you download and install Windows updates seamlessly.
Option 6 – Try to delete the $Windows.~BT and $Windows.~WS folders
From time to time, the Windows Update files also get corrupted which can cause some problems and conflicts when downloading and installing a Windows Update. To fix this, you need to delete the $Windows.~BT & $Windows.~WS folders in your computer.
If you are trying to save a file in a PDF format on your Windows 10 computer but then the PDF text content in an Adobe file suddenly disappears, then read on. This post will give you more insight into this issue. This kind of issue is rare and mostly occurs in forms that you can fill upon. In such a case, the text you enter in the form vanishes right after you click the Save button.
One of the benefits of working with PDF files is that it has the ability to compress high-quality files to relatively small file sizes. This is really useful especially when you are saving hard drive space and you’re working with limited storage resources. However, these files can contain layered content if they are created from layered documents using applications like Adobe InDesign. Consequently, a single page of the PDF file can contain different layers with different content. So if you try to save or print a PDF file that contains layered content, the elements will disappear from the PDF. To resolve this issue, you can try to merge or flatten the file since it will help keep the changes in the PDF file. On the other hand, you can no longer make any alterations or form data once you flatten the file. Another thing to keep in mind is that merging or flattening the file can’t be undone so you might want to save another copy of the file before you proceed.
Option 1 – Print to PDF
First, you have to open the desired PDF file and tap the Ctrl + P keys to open the Print dialog box.
After that, select the “Microsoft Print to PDF” option as the printer.
Once the action is confirmed, it will regenerate another version of the PDF file with the default settings and merge all the existing layers into a single layer.
On the other hand, you can also click on the “File” menu of the PDF file and select Print.
From there, click on the Print button and select “PostScript (*.ps)” as the “Save as” type to save a PostScript copy of the original PDF file.
Once you’re done, double click on the .ps file to open the file in the Adobe Distiller which will flatten the file automatically and convert it to a PDF file with only one visible layer.
Option 2 – Save the PDF file as an Optimized PDF file
If you are using the Acrobat Reader Pro version such as the Acrobat Pro, Foxit, and so on, you can try to flatten the layers by saving the PDF file as an Optimized PDF file. Refer to these steps to do so:
Select File > Save as > Optimized PDF.
Next, select the Transparency checkbox from the Settings window that opens.
Then click on the Save button to apply and save the changes made. After that, the PDF text content should not disappear when you try to save a file on your Windows 10 computer.
This toolbar/web browser extension is ad/search-supported that is typically installed as an optional offer, users generally have this bundled with 3rd party software. During setup, this toolbar will modify the home page and new tab pages to the affiliate search portal MyWay.com using a primary search engine to collect shared search revenue. It will also modify the default search provider as well.
While this extension is installed users will experience a display of additional ads and sponsored content throughout their browsing sessions, as well as the possibility of pop-up ads.
Several anti-virus scanners have marked this extension as a Browser Hijacker and it is recommended to remove it from your computer.
About Browser Hijackers
Browser hijacking means that a malicious code has taken control over and altered the settings of your internet browser, without your consent. They are designed to interfere with browser programs for a variety of purposes. Usually, it’ll drive users to predetermined websites that are looking to increase their advertising campaign income. Though it may seem naive, all browser hijackers are damaging and thus always regarded as security risks. In a worst-case scenario, your internet browser can be hijacked to download malicious software that can do a great deal of damage to your laptop or computer.
How to know if your internet browser has been hijacked
The common symptoms that indicate having this malicious software on your PC are:
1. home page is modified2. bookmark and the new tab are likewise modified3. default online search engine is changed4. you’re getting new toolbars you have never found before5. your internet browser displays endless pop-up ads6. your web browser has become unstable or starts running slowly7. you can’t visit certain websites like homepages of anti-malware software.
Exactly how browser hijacker finds its way onto your computer system
Browser hijackers can enter a computer by some means or other, including via downloads, file sharing, and e-mail also. They may also come from any BHO, extension, add-on, toolbar, or plug-in with malicious intent. Browser hijackers sneak into your pc in addition to free software application downloads that you unintentionally install alongside the original. Some of the most popular hijackers are MyImageConverter, Conduit Search, Babylon Toolbar, Sweet Page, OneWebSearch, and CoolWebSearch.
Learn how to get rid of browser hijackers
Certain hijackers could be removed by just uninstalling the related freeware or add-ons through the Add or Remove Programs in the Windows control panel. In some cases, it could be a difficult job to find and remove the malicious piece because the associated file could be running as part of the operating system process. Besides, browser hijackers can modify the Windows registry so it can be quite tough to restore all the values manually, especially when you are not a very tech-savvy person.
You can choose automatic browser hijacker removal by just installing and running an efficient anti-malware program. SafeBytes Anti-Malware detects all types of hijackers – including MyImageConverter – and eliminates every trace quickly and efficiently. In addition to anti-virus software, a PC optimizer program, like Total System Care, can help you fix Windows registry errors, remove unwanted toolbars, secure your internet privacy, and boost overall computer performance.
What to Do if Virus Stops You From Downloading Or Installing Antivirus?
Practically all malware is bad, but certain types of malware do much more damage to your PC than others. Some malware variants alter web browser settings by adding a proxy server or change the PC’s DNS configuration settings. In such cases, you’ll be unable to visit some or all of the websites, and therefore not able to download or install the required security software to clear out the computer virus. If you are reading this now, you might have perhaps realized that virus infection is a reason behind your blocked net connectivity. So how to proceed if you need to install an anti-virus software like Safebytes? Follow the instructions below to remove malware by alternate methods.
Download the software in Safe Mode with Networking
The Windows operating system comes with a special mode referred to as “Safe Mode” in which only the minimum required programs and services are loaded. In the event the malware is blocking internet connection and affecting your computer, running it in Safe Mode enables you to download anti-virus and run a diagnostic scan whilst limiting potential damage. To get into Safe Mode or Safe Mode with Networking, press F8 while the system is booting up or run MSCONFIG and locate the “Safe Boot” options in the “Boot” tab. Once you are in safe mode, you can try to install your anti-malware application without the hindrance of the malware. Now, you can run the antivirus scan to get rid of viruses and malware without hindrance from another malicious application.
Download the security software using an alternate internet browser
Some malware only targets particular web browsers. If this sounds like your situation, utilize another web browser as it might circumvent the virus. If you seem to have a trojan attached to Internet Explorer, then switch to an alternate web browser with built-in safety features, such as Firefox or Chrome, to download your preferred anti-malware program – Safebytes.
Install anti-malware on a USB drive
Another option would be to make a portable antivirus program on your USB flash drive. To run anti-malware from a USB pen drive, follow these simple measures:
1) On a virus-free computer, download and install Safebytes Anti-Malware.2) Plug the USB drive into the clean computer.3) Double-click on the downloaded file to open the installation wizard.4) Select the drive letter of the flash drive as the location when the wizard asks you exactly where you want to install the antivirus. Follow the on-screen instructions to finish the installation process.5) Transfer the flash drive from the uninfected computer to the infected computer.6) Double-click the Safebytes Anti-malware icon on the USB drive to run the software.7) Hit the “Scan” button to run a full computer scan and remove viruses automatically.
Protect Your PC and Privacy With SafeBytes Anti-Malware
Are you looking to install the best anti-malware software program for your PC? You can find many applications on the market which come in free and paid versions for Windows systems. A few of them do a great job in eradicating malware threats while some will affect your PC themselves. You should look for a product that has obtained a good reputation and detects not only viruses but other types of malware as well. While considering the highly regarded applications, Safebytes AntiMalware is certainly the highly recommended one.
SafeBytes anti-malware is trustworthy software that not only secures your PC completely but is also quite user-friendly for people of all ability levels. Through its cutting-edge technology, this software will help you protect your computer against infections caused by various kinds of malware and similar internet threats, including adware, spyware, viruses, worms, trojans, keyloggers, ransomware, and potentially unwanted program (PUPs).
SafeBytes anti-malware offers an array of advanced features which sets it aside from all others. Let’s take a look at a few of them below:
Real-time Threat Response: SafeBytes provides real-time active supervision and protection from all known computer viruses and malware. It’ll inspect your personal computer for suspicious activity regularly and its unrivaled firewall protects your computer from illegal access by the outside world.
World-class AntiMalware Protection: Using a critically acclaimed anti-malware engine, SafeBytes offers multilayered protection which is designed to catch and get rid of viruses and malware that are hidden deep inside your computer’s operating system.
Web protection: SafeBytes inspects the hyperlinks present on a webpage for possible threats and notifies you if the site is safe to visit or not, through its unique safety ranking system.
Light-weight: This application is not “heavy” on the computer’s resources, so you’ll not see any performance troubles when SafeBytes is working in the background.
24/7 Customer Support: Support service is readily available 24 x 7 x 365 days through email and chats to answer your concerns.
SafeBytes has developed a great anti-malware solution to help you conquer the latest malware threats and virus attacks. You can be sure that your computer will be protected in real-time once you put this tool to use. So if you’re looking for the absolute best malware removal application out there, and if you don’t mind paying out a few bucks for it, opt for SafeBytes Anti-Malware.
Technical Details and Manual Removal (Advanced Users)
To get rid of MyImageConverter manually, navigate to the Add or Remove programs list in the Control Panel and choose the program you want to get rid of. For web browser extensions, go to your browser’s Addon/Extension manager and choose the plug-in you intend to disable or remove. You may also want to reset your home page and search engine providers, and also delete temporary files, browsing history, and cookies.
If you opt to manually delete the system files and Windows registry entries, utilize the following checklist to make sure you know precisely what files to remove before performing any actions. But bear in mind, editing the Windows registry is usually a difficult task that only advanced users and professionals should attempt to fix the problem. In addition, some malware is capable of replicating or preventing removal. It is highly recommended that you carry out the removal procedure in Windows Safe Mode.
It really sucks when you can’t fully enjoy the newest version of your favorite OS.
Windows 11 is still relatively fresh and consequently has some annoying little bugs that really ruin our experience. The good news is that you’re not alone and most of them are easy to fix.
Here are 5 commonly reported Windows 11 issues and what you can do to get rid of them.
1. Windows 11 audio problems
One of the absolute most irritating things in the world is struggling with the sound on your computer. Windows 11 users have reported facing the issue of low or no sound. If you’re currently experiencing the same frustration, you can be relieved. Chances are fixing it will only take a few minutes.
The first thing to check would be whether you accidentally muted your device by pressing the mute button on your keyboard. Yes, we know it sounds a lot like the old “have you tried turning it off and on again?” But it’s important to leave no stone unturned, and the most obvious things are usually the ones we easily overlook.
Moreover, if you have several audio output sources, check whether the right one is selected. You can do this via the Action Center or through Settings. If you want to use the same source every time, we also recommend you set it as the default one.
It’s also important to have a good, up-to-date audio driver. More often than not, this will be the true cause of your audio struggles. Make sure to update your driver, and if that doesn’t work out, you can always un- and reinstall it or install a different one.
Lastly, if all attempts remain unsuccessful, run the audio troubleshooter to figure out what’s actually going wrong.
2. Unable to find files
Such a powerful new operating system, yet it can’t seem to do the simplest thing imaginable? The File Explorer not responding on Windows 11 is one of the most frustrating and most common problems with Microsoft’s newest iteration of its awesome OS.
However, 9/10 times it can be fixed by simply restarting your PC. You could also try killing the Windows Explorer process in the Task Manager and then rerunning it.
If these don’t help, check whether there are any pending Windows 11 updates. A single missing update can compromise your PC’s functionality, so always make sure to install them all on time.
Should none of that work, then there are other ways to solve the File Explorer problem. However, then the issue is probably a bit deeper and it’s no longer in the ‘easy fix’ territory.
3. Start menu not working
Just like the File Explorer, the Start menu is a fundamental element of your OS. So, it’s only natural that its malfunction grinds your gears. It may be more customizable than on previous Windows versions, but it doesn’t always work smoothly.
If you’re facing the so-called Start menu critical error, there are a few things this could be caused by. Usually it means you turned off your system while an important update was still being installed, there is a corrupt file on your PC, or Windows forcefully stopped a program.
Whatever the reason, the solution should be pretty simple. Try the basic steps: restarting your File Explorer (like we explained above) and signing out and back into your account. If that doesn’t do anything, you may want to try uninstalling third-party start menu apps (if you have any), since they can interfere with your default programs’ functionality.
Now, those are the easy fixes. If you get nowhere with them, you might need to identify the root cause and search for more complex solutions than that.
4. Snipping tool not working
Our beloved screenshot tool was introduced with Windows 10 and Microsoft decided to keep it. However, you were probably just as disappointed as us when you tried to run it and failed.
Normally, this can be fixed by installing the latest Out-of-band (OOB) update, or even pending updates in general. Even if your system appears to be up-to-date, run the checker just in case.
Another cool thing Windows 11 lets you do is ‘Repair’ and ‘Reset’, which is the easiest way to troubleshoot your Snipping tool. If this fails, you can also try the good old un- and reinstall method. Simply uninstall the tool through the Control Panel and reinstall it from the Microsoft Store.
Furthermore, in the case of an upgrade from Windows 10 to 11, it may be that the old Snipping tool version is interfering with the launch of the new one. If you don’t care that much about the additional options available with the enhanced screenshot tool, you can use the old version instead.
Simply go to your C Drive, find the Windows.old folder, search for the tool and open it from there. Make sure to pin it to your taskbar as well, if you know you’re going to use it often.
5. Can’t install the latest update
The latest Windows 11 version, 22H2, has brought tons of enhancements to our dearest operating system. Unfortunately, a lot of users still haven’t had the opportunity to experience it. A mere update of your OS version should be the one thing that goes smoothly, but sometimes that’s not the case.
Failure to install 22H2 can be caused by a few things. Most commonly, the issue is caused by lack of storage space or corrupted files, but there could be other culprits.
There are a couple of things you could try. For example, it’s crucial that your drivers be up-to-date and some important services be enabled. These are: Windows Modules Installer, Background Intelligent Transfer Service, Cryptographic Service, Windows Update services.
To enable them, search ‘Services’, find the service you need and right-click on it. Open ‘Properties’ and select the startup type ‘Automatic’.
It may also be necessary to unplug all peripherals that aren’t crucial and disable third-party antivirus tools until after the update is finished.
Ultimately, you can run the Windows Update troubleshooter to detect and fix other possible issues.
Summary
Tiny bugs like these are nothing out of the ordinary. That said, we still all hate when they happen.
Hopefully some of our solutions have helped you to a smoother Windows 11 experience. But if you’re still struggling, feel free to reach out to us. We’d be happy to help!
Chkdsk (Check Disk) is a built-in Microsoft Windows O/S utility tool.
This tool is designed to verify the integrity of data stored on the hard drive. In addition to this, it resolves and finds errors that may corrupt and damage stored data on your system and affect your PC’s performance.
This tool is intended to keep your PC’s Windows database clean.
However, this tool has certain limitations. It prevents the hard disk from getting damaged but if it gets damaged and corrupt then this tool is no good. It fails to disk check and repair. As a result, you may come across Chkdsk error pop-ups.
In such an event, it is not advisable to run the malfunctioned Chkdsk utility on your PC as it may damage your system beyond repair making you lose all your valuable data saved on your system.
Solution
Error Causes
Chkdsk errors are triggered by multiple reasons:
Viruses
Hard Drive failure
Registry Corruption Due to Data Overload
Poor PC Maintenance
Chkdsk errors may cause PC to freeze and lag and also result in data loss as we discussed above.
Further Information and Manual Repair
To avoid serious damages that the Chkdsk error code can cause to your system, it is advisable to fix it. You can either hire a professional or install Restoro. The latter is not just the best way but also a time and money-saving option. It is fast, user-friendly and you can download it for free thus saving hundreds of dollars that you would be paying for professional services.
Why Use Restoro?
Restoro is an advanced PC repair tool embedded with multiple features such as a registry cleaner, anti-virus, system optimizer, and Active X and Class error scanner. It helps resolve practically all types and kinds of PC-related errors including the most notorious ones like the Chkdsk errors.
It has an automated and intuitive interface smoothly integrated with the latest technology that enables this software to scan your entire PC and detect errors in seconds.
With the help of its super functional registry cleaner, Restoro detects errors registry issues triggering Chkdsk errors on your system.
It cleans all the unnecessary files like junk files, bad and invalid registry entries, and internet files that are stored in your hard disk and taking a lot of space. It removes the clutter and frees up your disk space and repairs the damaged registry.
It boosts the speed of your systemand ensures that programs run smoothly on your PC and there are no hang-ups or system freezes.
The privacy error detector functions as a powerful anti-virus. With the help of this feature, Restoro identifies and scans for viruses and malware infecting your system. These are removed right away.
Restoro is 100% safe and efficient. It has a backup feature that enables users to create backup copies. This is carried for safety purposes. In case you lose your data during the repair of the Chkdsk error, you can always recover and restore the lost files without any hassle.
With some registry cleaners and repair tools you may often have to struggle with compatibility issues but not with this PC Fixer.
Restoro is compatible with all Windows versions.
It is simple and very easy to use. From beginners, intermediate to experienced, all levels of users can use it with ease.
Once the installation is complete, run the fixer for a scan. You have the option to either scan some portions of the PC or the entire PC.
Scanning will take a few seconds
Once the scanning is complete, Restoro will display the scan results. This is presented in a comprehensive report showing you errors found including the Chkdsk error and errors related to it.
After that, all you need to do is press the repair button to resolve the error(s) promptly.
Once the error is resolved, try running the Chkdsk utility again.
 Restart graphic driver
 Mapping network drive has many benefits in terms of speed and ease of access of files via network. It lets you access the hard drive over the whole network like it was the hard drive inside your PC case. In order to easily and quickly map a folder as a network drive follow the guide below.


