If you are trying to connect your mobile or external device to your Windows 10 computer but suddenly encountered an error saying, “A device attached to the system is not functioning”, read on as this post will guide you on how you can resolve this error using a couple of potential fixes. In this case, it is possible that the connected device is not working for some reason and this error pops up when you connect your device or when you try to move or copy files from your computer to your external device and vice versa.
As you can see, the error message is pretty straightforward, and it mostly occurs when you connect plug and play devices such as USB drives, printers, external storage devices, and many more. And when you open the Device Manager to check the device, you will most likely see a yellow exclamation mark on the device which indicates that the device is currently having problems. To fix this problem, there are several options you can check out. You need to check the status of the device or check the compatibility between the external device and the drive types. You also have to make sure that the device is connected properly or check if the device has been formatted properly. For more details, follow the given suggestions below.
Option 1 – Try to check the status of the device
The first thing you can do to get rid of the error is to check the status of the external device, especially if it’s a plug-and-play device. So when your computer boots, check if it is able to detect the device or not.
Option 2 – Try to check the compatibility between the external devices and drivers
As you know, when you connect an external device to your computer, Windows installs drivers to communicate with the device, the same way as any hardware you connect to the motherboard and if the driver ends up getting corrupted or is incompatible, then you need to update the device driver. To do that, follow the steps below.
- First, click the Start button and type “device manager”.
- Then click on the “Device Manager” from the search results to open it.
- From there, look for the driver the external device related to and then right-click on each one of the Device drivers and select the Update Driver from the menu.
- Restart your PC and then click the “Search automatically for updated driver software” option.
Note: If updating the device drivers didn’t work, you can try to reinstall them instead.
Option 3 – Try checking the hardware connections
The first thing you have to do before you further troubleshoot the problem is to check the hardware connections of your computer and see if there are damaged ones, just like with USB ports, it would also affect the overall connectivity of the device with the computer. So if you notice some irregularities in the connecting cable physically, you might have to buy another one and replace it and then see if it fixes the problem or not.
Option 4 – Check if the device is formatted properly
You might also want to check if the external device is properly formatted especially if you’ve recently formatted it. If a device wasn’t formatted properly, then it’s no wonder why you’re getting the “A device attached to the system is not functioning” error. To fix this, you need to use Disk Management. From there, you can find the devices connected but are not visible. If you are using an admin account, then to fix this error, you have the option to format the drive or create new partitions using the interface. Once you do this, it should resolve the problem.
Option 5 – Try to run System File Checker or SFC scan
- Tap Win + R to launch Run.
- Type in cmd in the field and tap Enter.
- After opening Command Prompt, type in sfc /scannow and hit Enter.
- Once done, restart your computer.
Option 6 – Restart your computer in a Clean Boot State
If a third party program like antivirus is the one that’s causing the problem, you can try to put your computer in a Clean Boot State to isolate the issue by following these steps:
- Log onto your PC as an administrator.
- Type in MSConfig in the Start Search to open the System Configuration utility.
- From there, go to the General tab and click “Selective startup”.
- Clear the “Load Startup items” check box and make sure that the “Load System Services” and “Use Original boot configuration” options are checked.
- Next, click the Services tab and select the “Hide All Microsoft Services” check box.
- Click Disable all.
- Click on Apply/OK and restart your PC. (This will put your PC into a Clean Boot State. And configure Windows to use the usual startup, just simply undo the changes.)
- Now try to connect your device or copy the files to your external device again and check if the error is now gone.

 Error Causes
 As in most usual online scams, everything starts with a strange email containing threats and other poorly written and composed speech. At the end of the given email, there would be a link claiming that you, of course, need to read it and follow instructions about the threat, if you click the link it will open a web page where you will have an innocent-looking PDF file with more information about the threat itself.
If you click on a seemingly innocent PDF file it will summon Windows 10's AppInstaller.exe tool, kickstarting a download-and-run process that'll put you in a bad place very quickly. From there, you'll have to deal with the dangers of malware BazarBackdoor, including data and credential theft.
This kind of scam is nothing new but the interesting thing here is that it uses App installer and by clicking on a link you are opening and giving permission for a malicious crook to use it. So, stay safe and do not click on any links from unknown emails no matter what.
As in most usual online scams, everything starts with a strange email containing threats and other poorly written and composed speech. At the end of the given email, there would be a link claiming that you, of course, need to read it and follow instructions about the threat, if you click the link it will open a web page where you will have an innocent-looking PDF file with more information about the threat itself.
If you click on a seemingly innocent PDF file it will summon Windows 10's AppInstaller.exe tool, kickstarting a download-and-run process that'll put you in a bad place very quickly. From there, you'll have to deal with the dangers of malware BazarBackdoor, including data and credential theft.
This kind of scam is nothing new but the interesting thing here is that it uses App installer and by clicking on a link you are opening and giving permission for a malicious crook to use it. So, stay safe and do not click on any links from unknown emails no matter what. 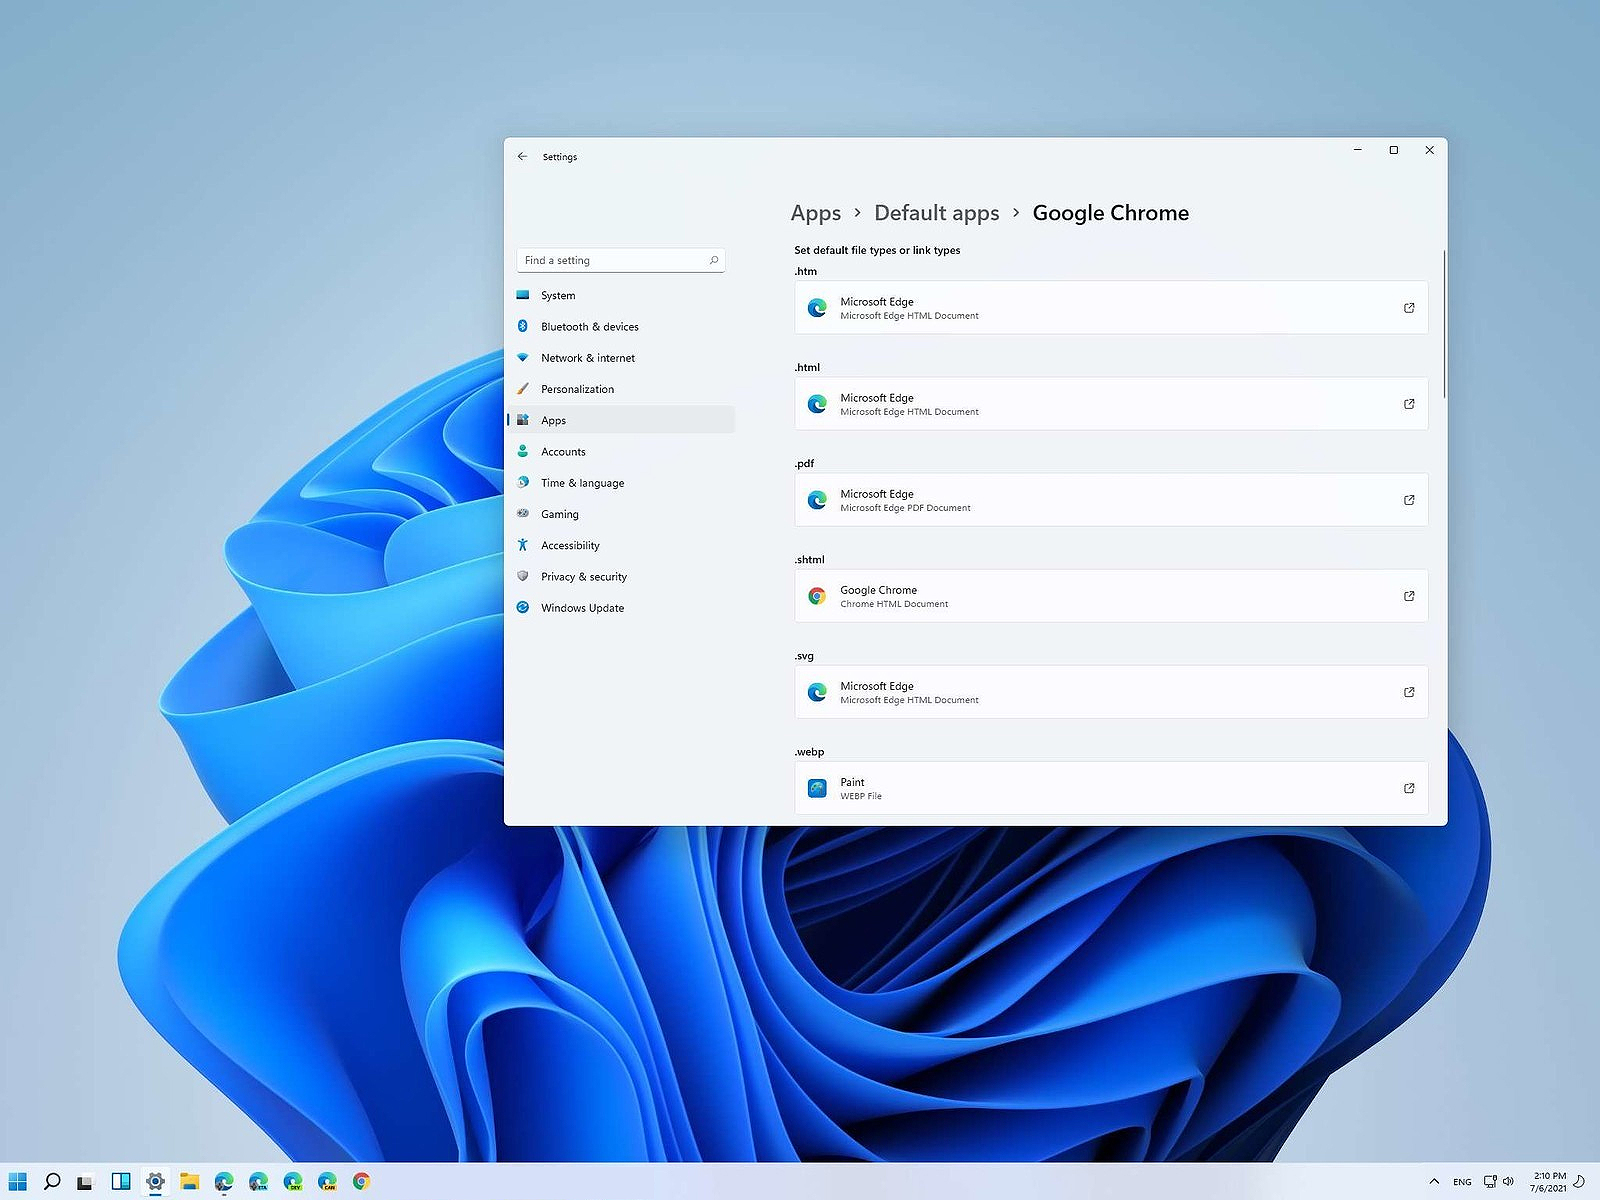 Same as in previous Windows versions, Windows 11 will also use certain applications as default ones for opening certain file types and file extensions. And yes, same as in previous versions it will come preconfigured for certain file types and associated applications like for example photos for pictures.
Of course, users usually have their own favorite applications for certain file types and much more prefer to open them inside the application of their choice instead of the default one.
We can change the default application like in previous Windows versions but this time there are two ways and overall more control of this process. Windows 11 has settings for choosing default file type applications and default file extension applications giving you more control of this process.
Same as in previous Windows versions, Windows 11 will also use certain applications as default ones for opening certain file types and file extensions. And yes, same as in previous versions it will come preconfigured for certain file types and associated applications like for example photos for pictures.
Of course, users usually have their own favorite applications for certain file types and much more prefer to open them inside the application of their choice instead of the default one.
We can change the default application like in previous Windows versions but this time there are two ways and overall more control of this process. Windows 11 has settings for choosing default file type applications and default file extension applications giving you more control of this process.
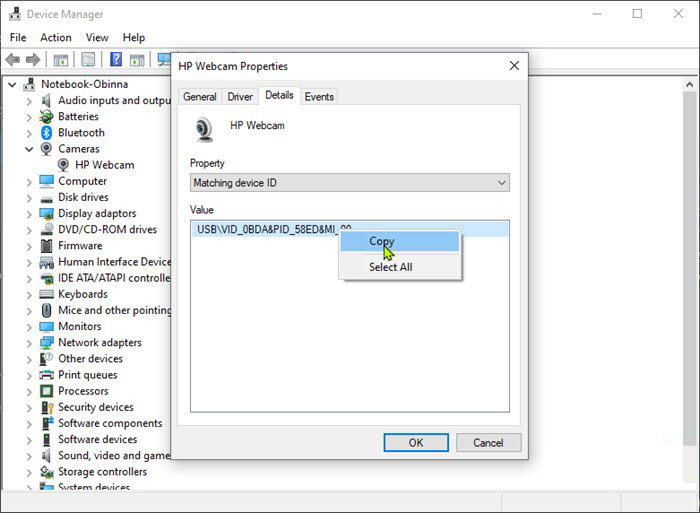
 In the menu choose device manager and click on it.
 When the device manager opens, expand the Imaging devices or Cameras section.
Right-click Integrated Camera or the primary webcam, and click Properties.
Go to the Details tab.
Under the Property section, click to select Matching device ID from the drop-down.
Right-click the value and select Copy
When the device manager opens, expand the Imaging devices or Cameras section.
Right-click Integrated Camera or the primary webcam, and click Properties.
Go to the Details tab.
Under the Property section, click to select Matching device ID from the drop-down.
Right-click the value and select Copy
 The next step is to download and install