Logo

Fix Windows Update Error 0x8007025D-0x2000C

Recently, a number of users reported getting an error code 0x8007025D-0x2000C while updating their Windows 10 computers using an ISO or the Media Creation tool. You will also see a detailed error message saying, “The installation failed in the SAFE_OS phase with an error during APPLY_IMAGE operation” together with the error code 0x8007025D-0x2000C.

This kind of issue usually occurs when there is some problem with the installation files and when Windows Update fails to apply upgrade using the Media Creation Tool or ISO. To resolve this issue, you can use the troubleshooting options given below as a reference.

Option 1 – Try recreating the Windows 10 installation USB

Recreating the Windows 10 installation USB might help in fixing the problem. You can use a USB drive to do so but make sure that it has a great read-write speed. Follow the steps below to recreate Windows 10 installation USB”

  • Click this link and then click the Download Tool Now button.
  • Next, click the “Use the tool to create installation media (USB flash drive, DVD, or ISO file)…” option and follow the next given instructions on the screen.
  • Now select the ISO file option in step 5.
  • After that, you should now have an ISO file.
  • Next, go to the location where you’ve downloaded the ISO file.
  • Then right-click on the Windows 10 ISO file and select the Open with option and then select File Explorer.
  • Now click on “setup.exe” and follow the next instructions that appear on the screen. When asked, you have to select either Nothing (clean install) or Keep personal files only option. Take note that you must not select the “Keep personal files, apps, and Windows settings since it doesn’t really work.

Option 2 – Try running the Windows Update troubleshooter

You might also want to run the Windows Update Troubleshooter as it could also help in fixing Windows Update error code 0x8007025D-0x2000C. To run it, go to Settings and then select Troubleshoot from the options. From there, click on Windows Update and then click the “Run the troubleshooter” button. After that, follow the next on-screen instructions and you should be good to go.

Option 3 – Update the BIOS

Take note that you have to be careful when modifying something in the BIOS. So if you don’t know much about it, it’s best if you skip on this option and try the other ones instead. However, if you are well-versed in navigating the BIOS, then follow the steps below.

  • Tap the Win + R keys to open the Run dialog box.
  • Next, type “msinfo32” in the field and press Enter to open System Information.
  • From there, you should find a search field on the bottom where you have to search for the BIOS version and then press Enter.
  • After that, you should see the developer and version of the BIOS installed on your PC.
  • Go to your manufacturer’s website and then download the latest version of BIOS on your computer.
  • If you are using a laptop, make sure that you keep it plugged in until you have updated the BIOS.
  • Now double click on the downloaded file and install the new BIOS version on your computer.
  • Now restart your computer to apply the changes made.

Option 4 – Try restarting the Background Intelligent Transfer Service

The Background Intelligent Transfer Service or BITS is a part of the Windows Update service and is the one that manages the background download of Windows Update, as well as scans for new updates and so on. And if Windows Update is experiencing some problems, you can try restarting BITS but make sure that you have admin privileges to do so.

  • Tap the Win + R keys to open the Run dialog box.
  • Next, type “services.msc” in the field and hit Enter to open Windows Services.
  • From the list of Services, look for the Background Intelligent Transfer Service and double-click on it to open Properties.
  • After that, you need to set the Startup type to “Automatic (Delayed Start) and click on Apply.
  • Now click the Stop button to stop BITS and then click the Start button to restart the service.
  • Click OK to save the changes made and then restart your PC.

Option 5 – Try to update Windows after a couple of minutes or an hour

There are times when the issue is from Microsoft’s end. It could be that there’s some issue with Microsoft’s server so it would be better if you give it a couple of minutes or an hour or so before trying to run Windows Update again.

Do You Need Help with Your Device?

Our Team of Experts May Help
Troubleshoot.Tech Experts are There for You!
Replace damaged files
Restore performance
Free disk space
Remove Malware
Protects WEB browser
Remove Viruses
Stop PC freezing
GET HELP
Troubleshoot.Tech experts work with all versions of Microsoft Windows including Windows 11, with Android, Mac, and more.

Share this article:

You might also like

How to share games on Steam with someone
Sharing is caring, an old saying says. I completely agree and that is reason enough for this article filled with sharing goodness. Holidays are coming and I hope that the holiday spirit is strong with you, that you will spend them in peace and with loved ones. All that being said wouldn’t it be great if you can spend some joy with close ones and share some of your games on their account so they can enjoy them as well? steam libraryWell, you can and it is not complicated as well. Follow this easy guide to see how can you get someone’s account up and running with some of your games.

The steam Family sharing feature

The family Sharing feature inside Steam will let you share your games to another account so owners of that account can play games that you have purchased without the need to buy themselves. You can allow up to 5 accounts and 10 devices to play your library games, and owners of these accounts will have their own achievements. Be aware that enabling this option will place your entire library on the share, you will not be able to choose which games you would like to share and therefore any kind of parental controls are not applying here. Also know that once the game is running on one device, others will have to wait for one playing to finish before they can get a spin on it. Only the owner of the game can play whenever he wants as a priority but others will have to wait for the game to be not run by someone else.

How to Share Your Game Library

In order to share your game library have a person, you wish to share games with at his device on ready to go and enable steam guard on your account. To enable steam guard login into your account and on the top left corner click on Steam and then on Settings. Inside settings click on the Manage Steam Guard Account Security button. Choose the way of authentication either by mail or steam guard mobile app. Check Get Steam guard codes by email radio button and re-login into account.

Sharing Games on another Steam account

Now that Steam Guard is enabled on the primary account let’s share some games!!! Inside client again, in the top left click on Steam and again on settings. In the left panel choose and click on Family. Inside Family section check box beside Authorize Library Sharing on This Computer. Log out of your account and login into the client user account credentials you wish to share your library with (this is your friend or cousin account, they need to log in to Steam client on your computer but with their credentials). After they have successfully logged in, log them out and re-log with your account again. Now go again into Steam > Family and now you should see an account in the box at the bottom with the user name or your friend or relative. Confirm that this is an account that you wish to share the library with by clicking on the checkbox next to the name. Now let users login into the desired device with their credentials and they will have access to your entire library. Happy gaming!
Read More
CD/DVD icon is not showing in File Explorer
In the past, CDs, DVDs, and floppy drivers used to be the primary sources of external storage for many users – that is until the USB storage devices took over. These days, a lot of devices no longer have a built-in CD or DVD writer or reader as it contributes to the thickness of the device. On the other hand, there are still various devices that still come with a built-in CD or DVD writer or reader. However, recently, users who still use CD or DVD on their devices reported a problem where the CD or DVD icon is not visible in the File Explorer as well as in “This PC” or the My Computer page. The cause of this issue is still unknown at the time of writing, but there are still some potential fixes you can try to fix it. You can try to update or roll back the device drivers or apply some tweaks in the Registry Editor. For more details, refer to the given options below.

Option 1 – Try to update or rollback device drivers

The first thing you can try to fix the missing CD or DVD icon is to either update or roll back the device drivers. It is most likely that after you updated your Windows computer that your driver also needs a refresh. On the other hand, if you have just updated your device drivers then you need to roll back the drivers to their previous versions. Whichever applies to you, refer to the steps below.
  • Open the Devices Manager from the Win X Menu.
  • Then locate the device drivers and right-click on them to open the Properties. Note that the concerned drivers will be listed under the DVD/CD-ROM drives section as well as the IDE/ATAPI Controllers section.
  • From there, look for the following drivers:
    • ATA Channel 0.
    • ATA Channel 1.
    • Standard Dual Channel PCI IDE Controller.
  • Now, right-click on each one of the listed drivers and update them all. You could also try to roll them back to their previous versions.
Note: You can also directly download the relevant drivers of your computer from the manufacturers’ website. So if you have an SSD, the issue might be due to an old storage driver.

Option 2 – Try to use the Registry Editor

  • Tap the Win + R keys to open the Run dialog box and type “Regedit” in the field and then tap Enter to open the Registry Editor.
  • Next, navigate to this registry key: HKEY_LOCAL_MACHINESYSTEMCurrentControlSetControlClass{4D36E965-E325-11CE-BFC1-08002BE10318}
  • After that, look for the DWORD values named “UpperFilters” and “LowerFilters”.
  • Right-click on each one of these DWORD values and select Delete.
  • Now restart your computer and see if it fixes the problem.

Option 3 – Try creating a new Registry entry

There is another option you can try in the Windows Registry to fix the missing icon of the CD/DVD. You can try adding a new entry. How? Refer to these steps:
  • Tap the Win ­+ R keys to open the Run dialog box and type “Regedit” in the field and hit Enter to open the Registry Editor.
  • After that, navigate to this registry path: HKEY_LOCAL_MACHINESYSTEMCurrentControlSetServicesatapi
  • From there, right-click on “ATAPI” and select New > Key.
  • After that, name it is “Controller0” and right-click on the sub-key and then select New > DWORD (32-bit) Value.
  • Now name it as “EnumDevice1” and double click on it and then set its value data to “1”.
  • Click OK and restart your computer to apply the changes made successfully.
Read More
Drive letter missing in Windows File Explorer
There are times when you might notice that the Drive letter from the File Explorer is missing, right after you install an update in your Windows 10 computer. So if you are facing this issue right now, then you’ve come to the right place as this post will guide you on what to do to fix it. In case you don’t know, a drive letter represents a single alphabetic character which is through A-Z typically. This could be assigned to a physical disk partition, floppy disk drive or the removal device/ CD-ROM/ mapping network drive in your PC. In most cases, the drive letter “C:” is assigned to the first disk partition where the running Windows is installed. Thus, if the assigned letter is missing from either the Disk Management or the Windows File Explorer, it could result in inconveniences or will leave the partition inaccessible. To fix this problem, you can try to show the missing drive letters manually or make sure that the drive has a drive letter assigned in the Disk Management as well as assign the letter using a tweak in the Windows Registry. For more details, refer to the options provided below.

Option 1 – Try to show the missing drive letters manually

  • Open the Folder Options from the Start Search and go to the View tab,
  • Next, scroll down on the list of given options until you see the “Show drive letters” option and then check the box that’s marked against this option.
  • After that, click on the Apply and OK buttons and then go back to the “This PC” window. You should now see the drive letters

Option 2 – Make sure that the drive has a drive letter assigned in Disk Management

As you know, every drive is assigned a drive letter in Disk Management. However, if it goes missing, you can still get it back through Disk Management. To do so, follow the steps below.
  • Open Disk Management and from there, right-click on the menu of a partition or volume and you should see a function named “Change Drive Letter and Paths”.
Note: This function allows you to add the drive letter, remove the drive letter and change the drive letter. If the last option, namely, “Remove”, is selected and applied, the letter of the drive will be removed and won’t appear in Disk Management. Thus, this could be one of the reasons why a drive letter is missing.
  • You need to click on “Add” to assign a letter to the selected drive in order to reverse the change. Note that you must assign the drive with the original letter because if not, the programs that rely on the original letter might not work as expected.
  • If the original letter is already taken by a new drive, you need to change the letter of that new drive to another available letter.
  • Then allocate the released letter of the targeted drive.

Option 3 – Try assigning the letter using a Registry tweak

The next thing you can do to fix the problem is to assign the letter using a tweak in the Windows Registry but before you do that, make sure that you create a System Restore point first, after that, follow these steps:
  • Tap the Win + R keys to open Run and type “Regedit” in the field and then tap Enter to open the Registry Editor.
  • Next, navigate to this registry path: HKEY_LOCAL_MACHINESYSTEMMountedDevices
  • From there, check if a device is shown as being mounted at the specific drive letter and then right-click on that drive letter.
  • Select the “Rename” option from the right-click menu to change the letter to any other available letter.
  • Exit the Registry Editor and restart your computer.

Option 4 – Try to format the destination drive

Formatting the drive can also help you resolve the error. To format it, follow these steps:
  • To get started formatting your drive, tap the Win + E keys and then go to the access page of the drive.
  • Next, right-click on the drive and select Format.
  • After that, uncheck the “Quick Format” option and then format your drive properly.
  • Now once the formatting process is finished, unplug the drive and plug it back in afterward.
  • Check if the error is already fixed. If the drive is not initialized, tap the Win + R keys and hit Enter.
  • After opening the Run dialog box, type “diskmgmt.msc” and hit Enter to open Disk Management.
  • From there, right-click on the drive volume and select initialize disk.
  • Next, select the correct partition type and proceed.
Read More
Surefire Methods of Fixing Error Code 47

Error Code 47 – What is it?

It is a device driver error that users encounter when they use Windows 2000 operating system and its later versions.

The error occurs when the connected peripheral device, upon removal using the ‘Safe Removal Hardware’ program, hangs up a problem within the process. The error prompt you then see is referred to within the operating system as error code 47.

It usually pops up on your computer screen with the following message:

Windows cannot use this hardware device because it has been prepared for "safe removal", but it has not been removed from the computer. (Code 47)

Solution

driverfix boxError Causes

There are many factors responsible for the Error Code, the primary ones are listed below:

  • An incomplete program installation
  • An incomplete program uninstallation
  • System recovery from viruses
  • Corrupted Windows system registry entries

Further Information and Manual Repair

Error Code 47, like other device driver error codes, is relatively easy to solve. You can fix the error code in the following ways:

Method 1 – Reconnect the device to your computer

Unplugging and plugging the USB cable of the device into the computer is the easiest way to resolve the error.

Doing this will help refresh the system and increase the likelihood of the device driver files loading and function properly.

Method 2 – Restart your PC

Another simple method you can use to solve your PC error code is to simply restart your Windows system.

It may be that the error prompted upon connecting the device you have connected is merely a temporary problem, and upon restart, will resume functioning smoothly.

Method 3 – Manually uninstall then reinstall the device driver

If both of the above-listed methods fail to resolve the problem, you may have to resort to manually uninstalling and then reinstalling the device driver causing the problem.

This would be necessary since the remaining incomplete files due to a partial removal or installation of programs is what contributes to the error code. By uninstall and reinstalling the device driver program, it would lead to the completion of the files.

You can do this by firstly logging in as Administrator and open Device Manager. Select the device that is causing the problem and double click it and make sure that the peripheral is connected properly to the PC.

Upon opening, click on the ‘Driver’ tab and then select ‘Update Driver’. Make sure to refer to the system documentation that you received with your PC or computer to check for the motherboard details and driver specifics.

Method 4 – Use software to automatically download the driver

Manually uninstalling and reinstalling the driver will usually do the trick; however, it may be time-consuming especially when you would have to resort to your hardware user manual.

Therefore, using a program such as DriverFIX can save you a lot of time and frustration in having your device work properly on your computer.

DriverFIX, with its user-friendly approach to help you fix your PC issues, comes with an integrated database that detects which drivers you need to reconfigure within just a few seconds and downloads it automatically. It further ensures that your drivers are installed in their entirety leaving no room for any incomplete files to remain that create Error Code 47. It also has the added advantage of being able to backup and restores your files should there be the slightest possibility of system file damage. Thus, registry damage can be averted by letting the software roll back the system files to an earlier healthy checkpoint. DriverFIX is the answer to fixing your PC error codes accurately and quickly. Click here to download DriverFIX to fix Error Code 47 quickly and effectively!
Read More
Fix terminated lsass.exe in Windows
The Local Security Authority Subsystem Service or LSASS.exe is a process in the Windows operating system that is valuable as it enforces the security policy on the computer. Every time you log in to the Windows Server, the LSASS.exe is the one that handles the password changes and creates the access tokens while updating the security log. However, it is also frequently targeted by malware and is often imitated. The original location of this file is at “C:/Windows/System32” so if you open the Task Manager and notice that a process with a similar name has a different location then it is definitely a threat and is exploiting the security of your computer. To resolve issues related to LSASS.exe, here are some fixes that could help.

Option 1 – Use the Performance Monitor’s Active Directory Data Collector

Note that this option will only work on the recent Windows server versions. Refer to the steps below to use the Performance Monitor’s Active Directory Data Collector set on your computer.
  • Tap the WINKEY + R button to open the Run dialog box.
  • Then type “Perfmon.msc” in the field and hit Enter to open the Performance Monitor and from there open the Server Manager.
  • Next, navigate to Diagnostics > Reliability and Performance > Data Collector Sets > System from the left side of the navigation bar.
  • Then right-click on “Active Directory Diagnostics” and select Start from the context menu. This will take about 5 minutes or 300 seconds depending on the performance capabilities of your hardware to gather the data required and then take some more time to compile a report from the gathered data. Note that these timings are dependent on one another.
  • After the report is compiled, you can find it under Diagnostics > Reliability and Performance > Reports > System > Active Directory Diagnostics. The report will contain all the information as well as conclusions. However, it does not mean that it will also contain the exact cause of the problem with LSASS.exe. Nevertheless, it should help you in fixing the problem.

Option 2 – Try to run the System File Checker

System File Checker or SFC is a built-in command utility that helps in restoring corrupted files as well as missing files. It replaces bad and corrupted system files to good system files that might be the cause why the LSASS.exe file is having some issues. To run the SFC command, follow the steps given below.
  • Type “cmd” in the Start search and then right-click on the appropriate search result.
  • Next, select “Run as administrator” to open Command Prompt with admin privileges.
  • After opening Command Prompt, type in sfc /scannow
The command will start a system scan which will take a few whiles before it finishes. Once it’s done, you could get the following results:
  1. Windows Resource Protection did not find any integrity violations.
  2. Windows Resource Protection found corrupt files and successfully repaired them.
  3. Windows Resource Protection found corrupt files but was unable to fix some of them.
 Now restart your computer and see if the problem is fixed or not.

Option 3 – Put your computer in a Clean Boot State

If none of the options given above helped, you can try putting your computer in a Clean Boot State as this can help you in finding any incompatible programs that’s causing the problem.
  • Log onto your PC as an administrator.
  • Type in MSConfig in the Start Search to open the System Configuration utility.
  • From there, go to the General tab and click “Selective startup”.
  • Clear the “Load Startup items” check box and make sure that the “Load System Services” and “Use Original boot configuration” options are checked.
  • Next, click the Services tab and select the “Hide All Microsoft Services” check box.
  • Click Disable all.
  • Click on Apply/OK and restart your PC. (This will put your PC into a Clean Boot State. And configure Windows to use the usual startup, just simply undo the changes.)
  • From there, start to isolate the problem by checking which one of the programs you installed recently is the root cause of the problem.
Once you’ve found any incompatible programs, you need to uninstall them. Refer to the steps below to do so.
  • In the search box, type in “control” and then click on Control Panel (desktop app) among the search results.
  • After that, select Programs and Features from the list which will give you a list of all the programs installed on your computer.
  • From there, look for the concerned program and select it and then uninstall it.
Note: If you have downloaded the app from the Windows Store, you can simply right-click on it from the application list and then uninstall it.
Read More
Corsair Voyager laptop review

Corsair is well known for RAM memory modules for PC but then it has expanded to PC peripherals and even selling some pre-build computers as well in past few years. New Corsair expansion now includes a laptop line, starting with their new gaming laptop Voyager.

Corsair Voyager laptop

Voyager laptop is packed with a mechanical keyboard and MacBook-like touch bar for your typing and pointing needs. It is built with a 16-inch QHD+ screen packing 240Hz that is run by Radeon 6800M GPU. Also inside lurks AMD 16 thread Ryzen 9 6900HS CPU, Wi-Fi 6E support, Dolby Atmos audio, and full HD 1080p WEB camera.

The keyboard has low-profile mechanical Cherry MX switches with per-key RGB lightning and above is what Corsair calls a macro bar, with 10 shortcut buttons and a small LCD in the center.

Corsair is also including a few features that tie in with its other products. Many of the company’s keyboards, mice, and other accessories use the ‘Slipstream’ USB wireless adapter, which is built into the Voyager laptop. The macro bar is also configured using the same software used for the Elgato Stream Deck, a popular product sold by Corsair.

Read More
KFConsole enters the console competition
Yes, you read that right, KFC is making a console partnered with Cooler Master. Bizzare at it sounds, it is even more bizarre that the console is designed to keep your food warm!!! You can pull out the drawer from the console out on its top and place some food there in order to keep it warm. kfconsole drawerThe console itself is coming in cylindrical shape powered by Intel CPU and ASUS GPU of the unknown chipset. It has Seagate Baraccuda 1TB SSD and it is VR-ready. The console will have raytracing and will be 4K ready.

My thoughts

Well, my thoughts are somewhat strange, on one side I am not really sold on food heating gimmicks and without specific hardware specifications, it is difficult to say how much power the console will have. Price is also not leaked so that is also a stumbling stone for making an informed opinion. I am a little puzzled and concerned about this whole heating food thing because personally, I can see 2 issues: Console overheating and fat dripping on inside hardware, I am sure they have somehow eliminated this but I would be very interested to see how.
Read More
Command prompt tips and tricks
Hello and welcome to errortools articles. Today we will talk about some great and awesome tips and tricks for the command prompt. Commands which can make your life easier and your workday more pleasant. That being said let's dive in right into muddy waters and swim out with new knowledge.

Tip 1: Read Motherboard information

There are a lot of reasons why you would like to read information from your motherboard, maybe you would like to upgrade your BIOS, perhaps you would like to know the serial number, maybe even the version number. Well, you can, type the following code into the command prompt and you will receive all information about your motherboard.
wmic baseboard get product,version,serialnumber,product

Tip 2: Copy command output to clipboard

Getting information from the command prompt to a word processor, into an email or any other medium can be somewhat troublesome, usually, people tend to screenshot or write from a command prompt into another destination, which could induce errors, and let's be honest, it is not practical. You can copy command output directly into the clipboard ready for pasting it anywhere with | clip. So for example if you would like to paste the directory structure of your c drive command would look like: dir c: | clip, now output would be placed into the clipboard ready to be pasted anywhere needed.

Tip 3: Erase data permanently

When you delete data on your hard drive, what really happens is that files are marked with a marker which marks that space for new data writing, but the data itself is still present and can be brought back. This sometimes could impose problems but if you would type: cipher /w:c Windows will write random data over each marked file deleting it forever without means to be brought back.

Tip 4: Manage your IP address

If you would like to play with your IP address and do fancy stuff with it do the following: ipconfig /release to release your IP address ipconfig /renew to renew your IP address ipconfig /flushdns to flush down DNS information and enjoy a new browsing start.

Tip 5: Check to see are packets reaching the desired location

You installed a new LAN printer, or a new switch, maybe you want to check if your new site is up and running. Use ping destination in order to see if TCP packets are reaching desired information, you can use it with a specific address like ping 192.168.1.1 or you can type a web address, for example, ping google.com and see if a connection can be established.

Tip 6: Get information about a specific command

So you learned some command prompt commands, but you do not know all of their configuration or switches? No worries, just type command/? to get a list of available switches for it. For example ipconfig/? will write you a list of available switches for ipconfig command.

Tip 7: Link and execute multiple commands one after another.

Let us say that for example, you would like to copy files into a different folder, then rename some and delete others and you need to do a couple of times. Instead of writing command after command once each one is finished link them with && and they will execute one after another.

Tip 8: Scan and repair files.

In order to scan files and repair broke or corrupted ones write in the command prompt: sfc /scannow. Please know that this command can take a long time since it is solely dependant on the number of files, their size, and the power of the computer.

Tip 9: Manage and configure your computer energy

Command powercfg will let you manage and see the power configuration of your computer. Just write powercfg/? and see what you need and want to change or get information about.

Tip 10: Associate files with applications

Windows already has some file associations defined, and some applications take over some type of files but if you want to take control into your own hand use assoc command. For example assoc.txt= "APPLICATION NAME" will associate txt files with the provided application.

Tip 11: Hide files and folder.

Do you have some folder or file with information that you do not want to be seen when someone opens file explorer? Use attrib +h <name of file> and hide file or attrib +h /D <folder name> to hide folder.

Tip 12: Get a list of installed computer drivers

Want to know which drivers are installed in your system? Use driverquery and take a look.

Tip 13: Find and locate shared folders

have you shared a folder but forgot which one and where? Do not bang your head on the wall, we have a simple solution for you. just type in command prompt net share and see everything.

Tip 14: Run commands as an administrator

You do not have administrator privileges? Do you want to bypass common blockades?
runas /user:yourdomainadministrator command
That is all that we have for you today, I certainly hope you have found something useful here and that we have managed to teach you some valuable things.
Read More
Fix Cannot load Management Console
TPM, also known as Trusted Platform Module, is a specialized chip used for security as well as encryption of users’ private data like Fingerprint, Facial data, and many more. TPM also comes with a Management Console and if you are not able to load the Management Console and you got the “Cannot load Management Console” error instead, read on as this post will guide you in fixing the problem. This type of issue usually happens when you clear or disable the TPM using the settings in the BIOS and so when you run the Trusted Platform Module Management console, you encounter the error. To fix the “Cannot load Management Console” error in your Windows 10 computer, here are some options you should check out.

Option 1 – If TPM is cleared in the BIOS:

If the Trusted Platform Module is cleared in the settings of the BIOS, you have to close and restart the TPM Management console or TPM.msc once again. It could be that the TPM Management has to reload the changes again after you’ve made them which is why you encounter the “Cannot load management console” error.

Option 2 – If TPM is disabled in the BIOS:

If you opted to disable TPM using the BIOS settings or you have turned it off by accident, then you have to enable it back and you have two options to do that – you can either enable TPM from the BIOS or using the Windows PowerShell. For more details, refer to the instructions below.

Enabling TPM from the BIOS:

  • You need to first reboot your PC and then go to the BIOS.
  • From there, look for TPM under the security options and in case the TPM management option has been disabled or greyed out, refer to the sub-steps given below to make it active again
    • Enable the Admin password in the BIOS.
    • Then go back to the TPM settings and check if the TPM management is already available.
  • After that, you should now be able to enable TPM. Remember that it’s always a good idea to have an ADMIN password for your BIOS as it makes sure that no one can change the settings in your computer BIOS and Security level options.

Enable TPM via Windows PowerShell:

  • This second option is a lot easier compared to the first one if you have admin privileges. So once you’ve opened the Windows PowerShell with admin privileges, you need to run the following command:
    • $tpm = gwmi -n rootcimv2securitymicrosofttpm win32_tpm
    • $tpm.SetPhysicalPresenceRequest(6)
  • After you execute the commands given above, you need to restart your computer.
  • Now, once your computer has restarted, you need to accept any BIOS prompts and then check if the “Cannot load management console” error is now fixed.
Read More
Schedule restart update on Windows 11
windows 11 schedule update
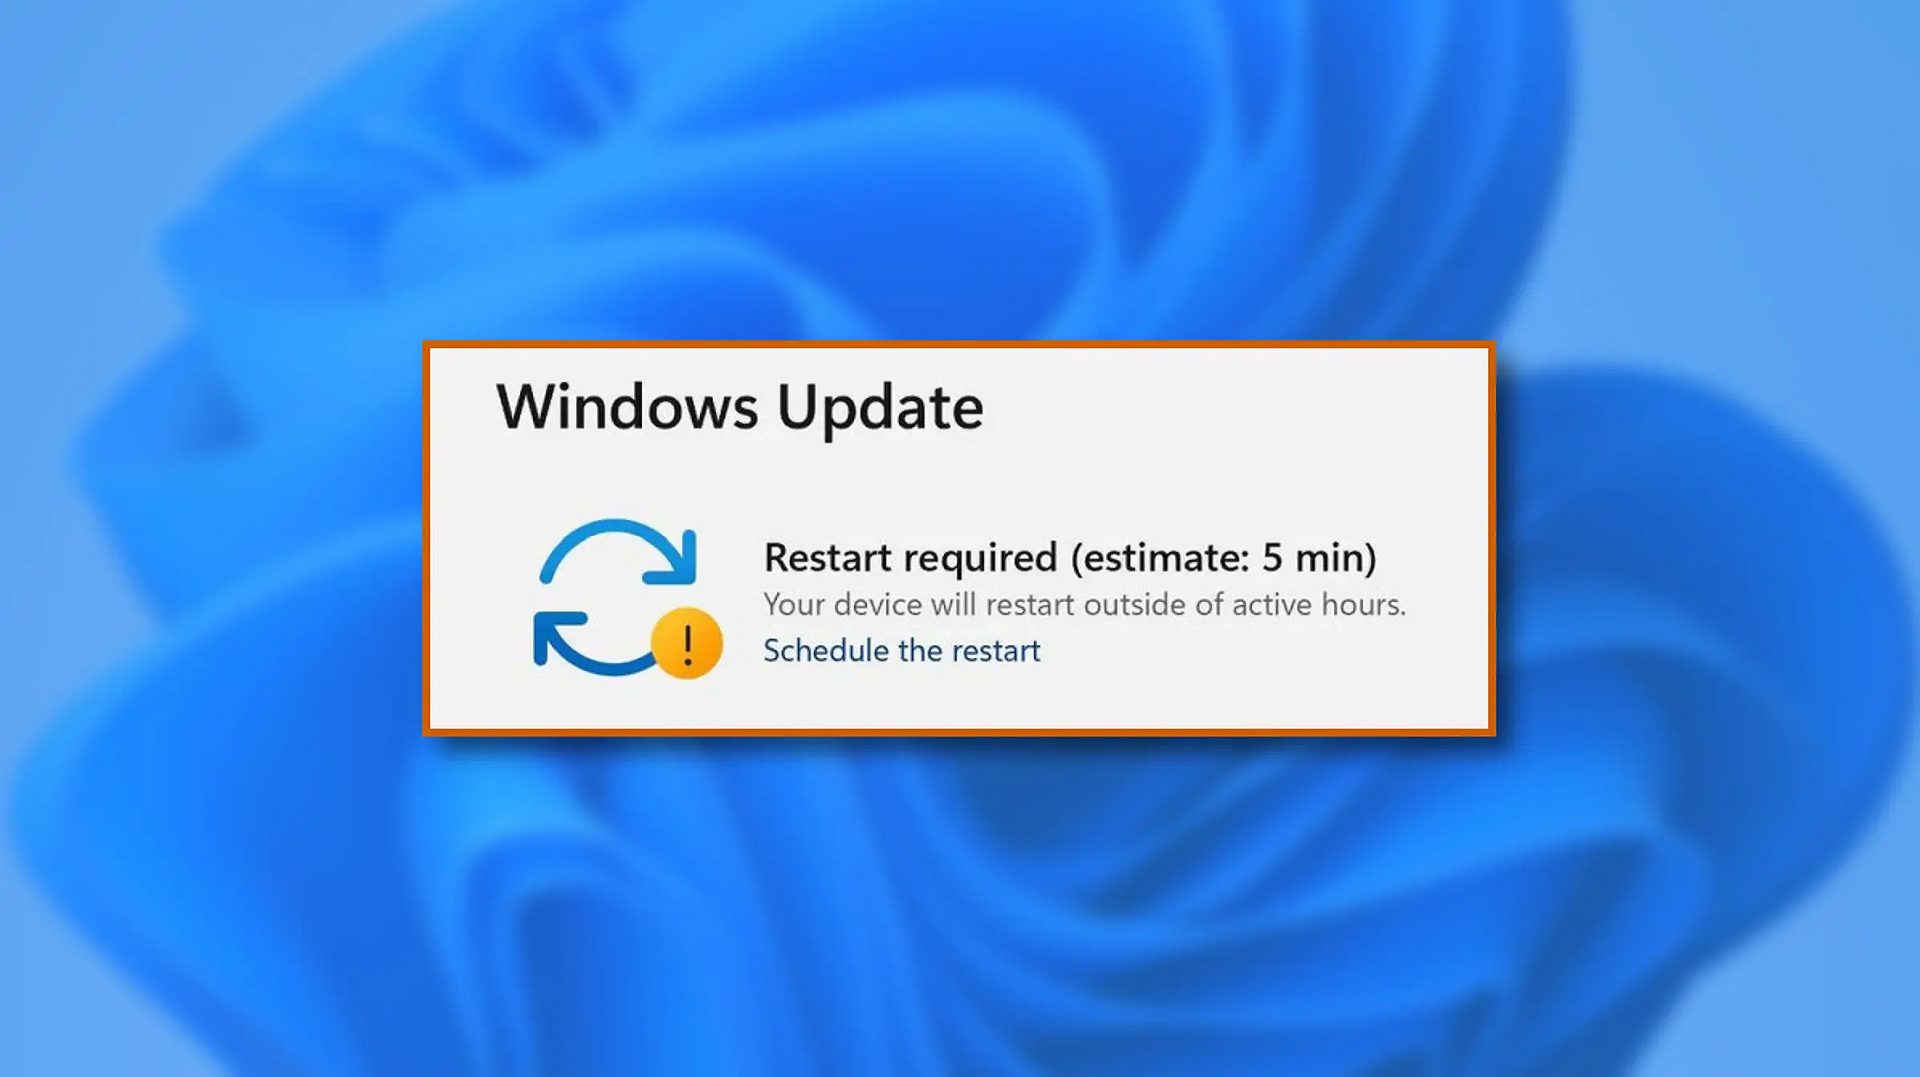
When Windows 11 update is available but you do not wish to restart right away because you are in the middle of using a computer, you can schedule a restart for up to 7 days. It is very easy and we will show you how to do it.
  1. Press ⊞ WINDOWS + I to open settings
  2. Click on Windows Update
  3. At the top, under the Restart required to click on Schedule the Restart
  4. Click the switch under Schedule a Time to turn it ON
  5. Use the Pick a Time and Pick a Day menu to set time and day when you want to update
  6. Go back to one screen and visually confirm that the date is set
  7. Close the settings
The scheduled restart will be confirmed in a message on the Windows Update page.
Read More
1 2 3 171
Logo
Copyright © 2023, ErrorTools. All Rights Reserved
Trademark: Microsoft Windows logos are registered trademarks of Microsoft. Disclaimer: ErrorTools.com is not affiliated with Microsoft, nor claims direct affiliation.
The information on this page is provided for information purposes only.
DMCA.com Protection Status