There are times when you encounter some issues while your Windows 10 computer. One of the errors you can encounter in the update process is the “Something went wrong, error code 0x8007042B”. This kind of error might be caused by several reasons and it could also pop up in lots of cases like upgrading to a new feature update or a new build using the Media Creation tool or Windows Update Assistant.
There are times when the Windows Update error code 0x8007042B is followed by another error code like 0x2000d. Whatever the extra error code that follows, the core issue still remains the same. To resolve the problem, here are some options that could help. And while going over these troubleshooting tips, you have to keep clicking the Update button right after you carry out a troubleshooting option.
Option 1 – Try to restart the Background Intelligent Transfer Service
The Background Intelligent Transfer Service or BITS is a part of the Windows Update service and is the one that manages the background download of Windows Update, as well as scans for new updates and so on. And if Windows Update is experiencing some problems, you can try restarting BITS but make sure that you have admin privileges to do so.
Tap the Win + R keys to open the Run dialog box.
Next, type “services.msc” in the field and hit Enter to open Windows Services.
From the list of Services, look for the Background Intelligent Transfer Service and double-click on it to open Properties.
After that, you need to set the Startup type to “Automatic (Delayed Start) and click on Apply.
Now click the Stop button to stop BITS and then click the Start button to restart the service.
Click OK to save the changes made and then restart your PC.
Option 2 – Try creating Windows 10 ISO media
In this option, you will have to create a Windows 10 bootable media and use it to install the latest Windows 10 version. The most user reported that this option works and the reason why it does have something to do with the Windows Update client since the Windows Updates downloaded from the regular Windows Update client seems to create issues such as the Windows Update error code 0x8007042B. However, issues like this one don’t occur when the very same Windows Updates are downloaded and installed via an ISO file. Take note that when using a Windows ISO file, you will be asked to choose what you want to do with the previous settings and apps. A lot of users opted for the “Not to keep the old Windows settings” option which has resolved the issue. So if you want to keep the previous settings then you must try to update Windows first while keeping the old settings. However, if it doesn’t work, you have to try installing the latest version of Windows without keeping the previous settings.
Click this link and then click the Download Tool Now button.
Next, click the “Use the tool to create installation media (USB flash drive, DVD, or ISO file)…” option and follow the next given instructions on the screen.
Now select the ISO file option in step 5.
After that, you should now have an ISO file.
Next, go to the location where you’ve downloaded the ISO file.
Then right-click on the Windows 10 ISO file and select the Open with option and then select File Explorer.
Now click on “setup.exe” and follow the next instructions that appear on the screen. When asked, you have to select either the Nothing (clean install) or the Keep personal files only option. Take note that you must not select the “Keep personal files, apps, and Windows settings since it doesn’t really work.
Option 3 – Run the DISM tool
You can run the DISM tool as well to help fix the error code 0x8007042B during Windows Update. Using this built-in tool, you have various options such as the “/ScanHealth”, “/CheckHealth”, and “/RestoreHealth”.
Open the Command Prompt with admin privileges.
Then type in the following commands and make sure to hit Enter right after you type each one of them:
Dism /Online /Cleanup-Image /CheckHealth
Dism /Online /Cleanup-Image /ScanHealth
exe /Online /Cleanup-image /Restorehealth
Do not close the window if the process takes a while as it will probably take a few minutes to finish.
Option 4 – Perform a System File Checker scan
The SFC or System File Checker scan could detect and automatically repair damaged system files that could be causing the Windows Update Error 0x8007042B to appear. SFC is a built-in command utility that helps in restoring corrupted files as well as missing files. It replaces bad and corrupted system files with good system files. To run the SFC command, follow the steps given below.
Tap Win + R to launch Run.
Type in cmd in the field and tap Enter.
After opening Command Prompt, type in sfc /scannow and hit Enter.
The command will start a system scan which will take a few whiles before it finishes. Once it’s done, you could get the following results:
Windows Resource Protection did not find any integrity violations.
Windows Resource Protection found corrupt files and successfully repaired them.
Windows Resource Protection found corrupt files but was unable to fix some of them.
Option 5 – Run the Windows Update Troubleshooter
You might also want to run the Windows Update Troubleshooter as it could also help in fixing Windows Update Error 0x8007042B. To run it, go to Settings and then select Troubleshoot from the options. From there, click on Windows Update and then click the “Run the troubleshooter” button. After that, follow the next on-screen instructions and you should be good to go.
Option 6 – Contact Microsoft Support for assistance
If you’re at your wits’ end in trying to update your Windows 10 computer, you should consider contacting Microsoft Support for help as they can offer you various options that would make fixing Windows Update Error 0x8007042B a lot easier and faster.
Strangely enough, Windows 11 does not feature any typical icon on its desktop when installed. No My PC, no Recycle Bin, nothing, just plain and clean wallpaper. Personally, I like this clean look and feel but of course, there are a lot of users that are used to have some system-related icons on their desktop for easy access.
Do not sweat, we will turn them back on with ease. The best part is that you can choose which one would you like. So let’s dive right into it and get the icons back for the old Windows feel and look.
Showing selected Icons desktop
Right-click on Desktop and select Personalize
Select Themes from the list of personalization items
Inside themes scroll down and click on Desktop Icon Settings
Desktop Icon Settings will open and inside it, place checkmarks beside icons that you would like to appear on the desktop and click OK
Close settings
As always settings and choices will be automatically applied and icons will appear right away on the desktop.
Windows Update Error 0x80071a91, what it is? As you know, Windows Updates are very essential to the operating system since they push with them the important security updates that are crucial to the system. And if a Windows Update is delayed, it can the system vulnerable to potential threats. Thus, this kind of issue must be resolved right away.
One of the errors that you can encounter while updating your computer is the Windows Update Error 0x80071a91. The error code 0x80071a91 occurs when the “Transaction support within the specified file system resource manager is not started or was shut down due to an error”. This happens when a service called “File System Resource Manager” or FSRM does not function due to some reason. To fix the Windows Update Error 0x80071a91, here are some suggestions that could help.
Option 1 – Run the Windows Update Troubleshooter
Running the built-in Windows Update troubleshooter could also help you resolve the Windows Update Error 0x80071a91. To run it, go to Settings and then select Troubleshoot from the options. From there, click on Windows Update and then click the “Run the troubleshooter” button. After that, follow the next on-screen instructions and you should be good to go.
Option 2 – Disable the antivirus program temporarily
There are times when the antivirus program installed in your computer blocks file access and even disk access. Thus, disabling the antivirus program or any security software installed in your computer is always a good idea you can try when the Windows Update process does not go smoothly. So before you try updating your computer again, make sure to disable the antivirus or security program and once the Windows Update is done, don’t forget to enable the antivirus program back again.
Option 3 – Try resetting the File System Resource Manager
As pointed out earlier, the error 0x80071a91 pops up when the FSRM service suddenly stops working and so resetting this service via Command Prompt might resolve the problem. To do so, follow the steps below.
In the Windows Search box, type “command prompt” and hit Enter.
Then right-click on Command Prompt from the related search results and click the “Run as administrator” option.
After opening Command Prompt as admin, type the following command and hit Enter:
resource setautoreset true C:
After that, exit Command Prompt and restart your computer and then check if the problem’s fixed by running Windows Update again.
Option 4 – Flush the contents of the SoftwareDistribution folder
You have to stop a couple of services such as BITS, Cryptographic, MSI Installer, and Windows Update Services. And to do that, you need to flush the contents in the SoftwareDistribution folder. The Software Distribution folder in the Windows operating system is a folder that can be found in the Windows directory and is used to store files temporarily which might be required to install the Windows Update on your PC. Thus, it is required by the Windows Update and maintained by WUAgent. Aside from that, it also contains all the Windows Update History files and once you delete them, you will most likely lose the Update history. As a result, the next time you run the Windows Update, it may result in a longer detection time.
Open the WinX Menu.
From there, open Command Prompt as admin.
Then type in the following command – don’t forget to hit Enter right after typing each one of them.
net stop wuauservnet start cryptSvcnet start bitsnet start msiserver
After entering these commands, it will stop the Windows Update Service, Background Intelligent Transfer Service (BITS), Cryptographic, and the MSI Installer
Next, go to the C:/Windows/SoftwareDistribution folder and get rid of all the folders and files thereby tapping the Ctrl + A keys to select them all and then click on Delete. Note that if the files are in use, you won’t be able to delete them.
Once all the contents in the Software Distribution folder are deleted, restart your PC and then go back to Command Prompt and input the following commands again.
net start wuauservnet start bits
Option 5 – Delete the Common Log File System transaction logs
You might also want to delete the Common Log File System or CLFS transaction logs to fix the Windows Update Error 0x80071a91.
Open an elevated Command Prompt.
Then type each of the commands listed below and press Enter after you type each one of them.
cd /d %SystemRoot%System32SMIStoreMachine
attrib -s -h *
del *.blf
del *.regtrans-ms
After you’ve executed the commands given above, restart your computer and try to update Windows 10 again.
Error code 0xc0000142 is an error code that affects Windows 10 users. It often occurs when users attempt to run Windows applications. The message in the application error box allows users to recognize the error as it states that “the application was unable to start correctly (0xc0000142).” Common symptoms of this error code include the following:
Inability to start applications
Inability to completely run Windows applications
The appearance of error code 0xc0000142 message box
Error Causes
Error code 0xc0000142 in Windows 10 is often caused by issues related to startup programs, corrupted files or other applications. To address this issue, the source of the issue needs to be located. But how will users be able to do this while the error code is present?
Further Information and Manual Repair
To fix error code 0xc0000142 users will need to employ at least one manual repair procedure. This may include checking your system for corrupt files through tools like Microsoft’s System File Checker (SFC). If you are uncertain of your skills or prefer to get professional support, contact a Windows repair technician to assist you.
The top three methods to resolve error code 0xc0000142 include the following:
Method One: Perform a Clean Boot
A clean boot is one of the most basic procedures you can run to solve a Windows-based error code of this nature. It works by identifying whether or not conflict among startup programs is preventing Windows applications from running properly. This occurs through a clean boot process involving Windows using a minimal set of drivers and startup programs when you reboot.
Here is what you’ll need to do:
Step one: Go to Start and type msconfig
Step two: Right-click and select System Configuration
Step three: Select Service tab and click Hide all Microsoft Services then click Disable all.
Step four: Click Startup tab within the System Configuration dialog box.
Step five: Select Open Task Manager
Step six: Within the Startup tab of Task Manager, select Disable for each Startup item, then close Task Manager.
Step seven: Click OK on the Startup tab of System Configuration.
Step eight: Restart your computer.
This method resolves software conflict arising when you attempt to update, run a program or simply use your operating system. However, if error code 0xc0000142 remains unresolved after you restart your machine, follow the next step below.
Method Two: Run a System File Checker Scan
System File Checker (SFC) is a utility tool built into the Windows 10 operating system, as well as other versions of Windows, to detect and repair corrupted system files. Since corrupted system files can result in error code 0xc0000142, run this tool by following the steps below:
Step one: Go to Start and type Command Prompt or CMD.
Step two: Right-click and select Administrator
Step three: Check for and repair corrupted system files. Simply type sfc /scannow. (Be sure to place a space between “sfc” and “/scannow”).
Once these procedures are followed, the System File Checker tool will automatically scan your machine, and find and repair corrupted files. If this is the source or underlying cause of error code 0xc0000142 on your system, the error code will be resolved. However, if the source of the issue is not due to corruption in our system or is simply a more complicated issue try the next method highlighted below.
Google fonts are a free open-source font library made to enrich web content and present end-user with a smooth web experience while surfing. Fonts are completely free for both commercial and personal use and they are not limited to use in WEB only, you can use them also in other projects like business cards, flyers, etc.
In order to use google fonts first thing of course you will need to download them. In this guide, we will show you how to download and install google fonts.
Select the font family that you wish to use. You can preview each font style to make double-sure it is the right one.
When you are ready, click on the Download family button.
A File Explorer window will pop up, asking you where to save the font family.
The downloaded file will be compressed in .zip format to save bandwidth, so you will first need to uncompress/unzip it. Right-click on the file and select Extract all.
You will then be asked where to unzip/extract the file. File Explorer will automatically create a new subfolder, named as the file name, so all you need to do is confirm it by clicking Extract.
Click on the Windows icon in the bottom-left corner of your desktop
Select the Personalization category and Fonts.
Split the screen between File Explorer and Settings by dragging the windows to either the left or right edge of the screen. Select all the font files by pressing CTRL + A and drag them into the Add fonts box.
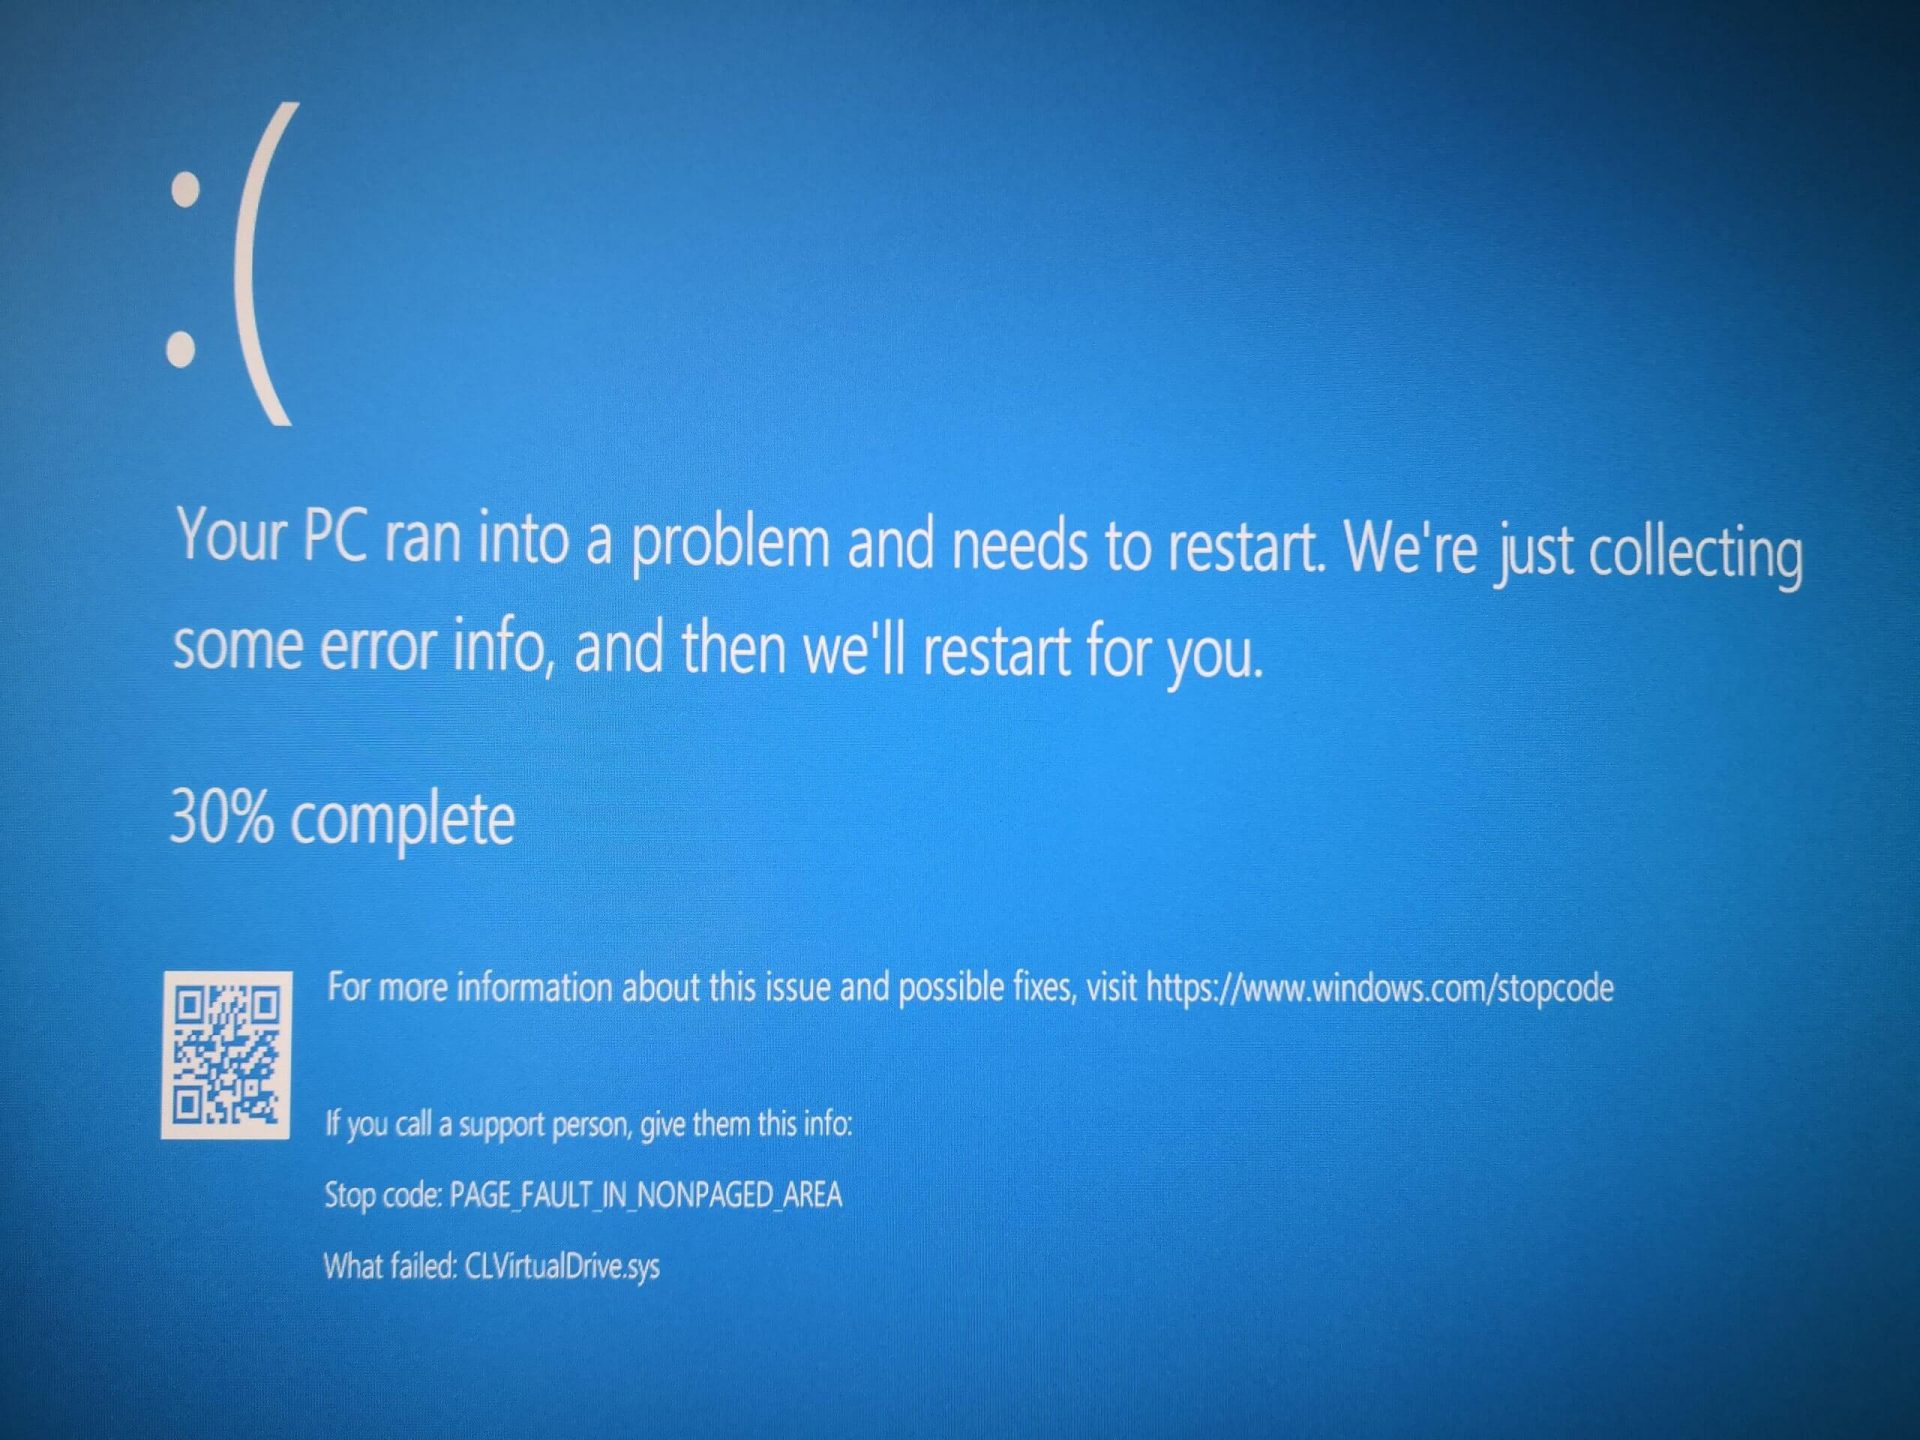
Page Fault in Non-Paged Area is a blue screen error usually happening with faulty drivers but it can come from different issues like faulty RAM.
In this short article, we will cover usual ways on how to approach and solve this error.
Solving Page fault in Non-Paged Area
Rollback using system restore
Simple and easy solution, roll back to the previous system restore point where Windows was stable and working.
Fix Page Fault in Non-Paged Area using device manager
Press ⊞ WINDOWS + X to open the hidden menu
Click on device manager
Find a device with a question mark and right-click on it
Click on the rollback driver button
Fix via command prompt
Press ⊞ WINDOWS + X to open the hidden menu
Click on command prompt (admin)
Inside command prompt type in SFC / scannow and press ENTER
Wait for the process to be finished and then reboot the PC
Fix via DISM tool
Press ⊞ WINDOWS + X to open the hidden menu
Click on command prompt (admin)
Inside command prompt type in DISM /Online /Cleanup-image /Restorehealth and press ENTER
Wait for the process to be finished and then reboot the PC
Page fault in Non-Paged Area via a dedicated tool
Sometimes manual and provided solutions just simply cannot cut it because the issue is triggered also with something else and not just a single issue.
Use DRIVERFIX to fix this specific issue with a single click.
Microsoft’s initial Windows 11 hardware requirements were not really well received by users and they were not really clearly represented from the start making a lot of potential customers slowly drift away from the hype.
It seems that Microsoft has acknowledged this since they have changed their tune about system hardware requirements for the upcoming Windows 11.
It seems that Windows 11 will be able to be officially installed on unsupported computers but with a little inconvenience.
What is a catch?
Windows 11 will still have the same hardware requirements and if the PC meets them, that computer will be officially supported, other ones (any that can run Windows 10) that do not meet system requirements can still run Windows 11 but the system will have to be clean installed. So no upgrade option for old computer users, just a clean install.
This means of course that you will need to download the ISO image and make a bootable USB in order to install it. Also since you will be doing a clean install do a backup of the hard drive since it will need to be formatted.
Also, Microsoft has stated that with unofficially supported PC some driver updates might not be delivered leaving you with either older driver versions or relying on your hardware manufacturer on them. This is still not confirmed by Microsoft, just stated as an option. We will see how it goes.
Conclusion
It is very good that Microsoft has reconsidered its system requirements and will not stubbornly push its initiatives over the top requirements allowing even older computers to install new OS.
I am sure over time lot of users will upgrade their hardware and drive into officially supported waters, but it is good that they will be able to use new OS on their current hardware.
Virtual Reality or VR for short has come a long way from its infant stage and as 2022 is in half period we are looking at the VR market and reflecting on what has changed in one year. For starters, games have increased in quality and quantity while the hardware price has decreased making the whole VR experience a little closer to a wider audience.
Many companies have tried to get on the VR bandwagon but also many have failed. What remained are staples in VR hardware from large companies that have started with VR early and kept improving their headsets.
So with great pleasure, we are presenting the remaining best 3 virtual headsets so far of 2022 brought to you from Sony, Valve, and Meta.
SONY PLAYSTATION VR
If you want VR on consoles then there is really one option, and that is SONY VR. Premium Virtual Reality solution from SONY, sadly you can do this only on Playstation 4 and Playstation 5. Sony managed to pull off great quality hardware and packed with its exclusives on playstore at a very affordable price that is still cheaper than other products.
While waiting for the Sony PlayStation VR2 headset this one is still a great option and quality is still among the top of the game. From the time of its release until today, many AAA titles have been released for it as exclusives that you can not play any other way and some of them are really worth it.
VALVE Index
Altho there are headsets like HTC Vive Cosmos Elite that have some features that place it as a better solution than Valve Index, Index is still an overall better VR headset as a whole product but its price is something that is keeping it still way out of reach of your standard user. The price, however, is really an illusion since it applies only when buying the system first time, you see Valve has created this headset as a modular design system making it upgradable meaning that you can, for example, buy newer controllers only and they will work perfectly with rest of hardware.
The modular design will save you money when you want to upgrade your VR system but as said entry price is steep. Besides its somewhat higher price than competitors, it is also notable that Index is a positional tracking VR set which means that it relies on a base station in order to locate the user. This means that once set, it is not so easy to change its location of use.
However, its quality and steam use are unmatched, high-quality games and compatibility that no other headset with steam will even pull off probably make Index one of the 3 best headsets out there. Half-life Alyx, arguably and currently one of the best VR games ever made so far was specifically designed for Valve Index and other games are behaving also incredibly nice with this headset, so if you want a great powerhouse for PC VR gaming, you will no go wrong in purchasing Valve Index.
META QUEST 2
Cheapest of the three and coming in various iterations, Meta has established itself from the beginning as a leading player in VR technology with its oculus line of products. Quest 2 is the next product in their line and it comes with 128GB and 256GB versions.
Meta has removed the need for the Facebook account for its VR systems and now you can use them without the need to send any kind of data to meta. Priced fairly for its entry 128 models this standalone VR set improves in any way possible from its previous iteration and sets the bar for what will come in VR's future.
Offering both wired and wi-fi connection with its standalone battery Quest 2 also is packed with a large library of games and it is user friendly as your typical game console but still allows some under-the-hood tinkering if you wish so.
Also, Meta's Vr solution since it uses inside-out tracking makes it incredibly easy to just pick it up and carry it with you wherever you go.
The Error Code 0xC1900208 – 0x4000C is an error that is caused by an installed application or program on your computer that is not compatible with Microsoft Windows 10. The incompatible application prevents you from being able to complete the upgrade to Microsoft Windows 10 and will continue to do so until the issue is resolved.
Common symptoms include:
You receive a dialog box displaying Error Code 0xC1900208 – 0x4000C
You are unable to successfully complete the Microsoft Windows 10 upgrade process.
Solution
Error Causes
Error Code 0xC1900208 – 0x4000C is caused by a non-compatible application or program that is currently installed on your computer, and is not allowing the Microsoft Windows 10 upgrade to finish the installation and update process.
The upgrade is stopped due to an incompatible app or program.
Out of date or no longer supported software can cause this error to occur.
Device drivers that are not up to date or no longer compatible.
The computer might pick up malware along the way and might be preventing the upgrade. If error code 0xC1900208 – 0x4000C is not rectified, you’ll not be able to proceed with your Windows 10 upgrade.
Further Information and Manual Repair
The good news is, error code 0xC1900208 – 0x4000C is a relatively common problem that is usually easily fixed by the user at home, though it can be a little time-consuming. To elude this time-consuming process, use a powerful tool to rectify the issue in no time (TSC). Before making any attempts to repair this error, ensure to perform a compatibility test.
Check the compatibility of applications and programs installed on your computer to locate and remove, or fix the one that is incompatible. (Don't stop at the first one you find, there could be multiple incompatibility issues.)
Check to ensure all programs and software are not outdated or no longer supported, and remove or fix any outdated or unused, unnecessary programs or software. (This is also a great way to free up space and clean your computer up a bit.)
Check to ensure that all of your device drivers are current, up to date, and compatible with Microsoft Windows 10, and replace or update where necessary.
Method 1:
Use the get Microsoft Windows 10 application on your computer to check its compatibility, follow the steps below to run the check.
Look at the taskbar, to the right; you will see an icon for Microsoft Windows 10, right-click the icon. Locate the option in the menu to check the status of your upgrade. This will open an app for getting Microsoft Windows 10.
Next, you will see 3 lines on top of one another on the upper left side, this will open a drop-down menu, once you have this menu open, locate the option to check the compatibility of your computer.
Microsoft Windows will then run a check of your entire computer to check for compatibility with Microsoft Windows 10. Once it has finished its check, a pop-up window will display whether or not your computer will work with Microsoft Windows 10, and will also display a list of any hardware and software that are not compatible with the upgrade.
This may not catch everything and there may still be incompatible programs so the previous steps, though time-consuming may still be necessary.
Method 2:
Once the incompatible applications are discovered, use the control panel to remove/uninstall them. The steps are below:
Locate your computer’s Control Panel.
Choose the option that says “Programs”
From the options available, select the ‘Programs and Features’ link.
Locate the app in the queue or menu.
Right-click and choose the uninstall option.
… another option
You can also locate the app on the ‘app homepage’, right-click and choose the ‘uninstall’ option. If after following these steps the problem is still not corrected, download and install an automated tool for a quick fix.
Error code 707 is a typical Gmail error. Gmail is an email service provided by the largest internet giant Google Inc. It is an email service that is most widely used by web-based email providers with more than 425 million active users worldwide.
The error code 707 is usually displayed in any one of the following formats:
“Oops... the system encountered a problem (#707)”“Server error occurred and your email was not sent (error 707)”
Solution
Error Causes
The error code 707 may be triggered due to many reasons. These include:
Enabled Lab ‘Background Send’ feature on Gmail
Web browser history and cache is full of junk content
Outdated browser
Though this error code is not fatal it is advisable to fix it right away to avoid inconvenience and to ensure your email is sent right away without any delays.
Further Information and Manual Repair
Here are some of the easy DIY methods to repair and fix the error code 707 on your PC. These methods are simple and do not require any kind of technical expertise. So, even if you are not technically sound, you can repair the error code 707 on your system in no time.
Method 1
Sometimes you may experience error code 707 while sending email via Gmail because of the enabled Background send labs feature. To fix this error here’s what you must do: Log in to your Gmail account, click on the Gear Box, and select settings.
Now simply switch to the lab tab under the settings. Here search for Background Send. If you can’t locate it, then scroll down and insert background Send in the find box. Once you find this lab feature, disable it. After disabling this feature, try resending the email.
Hopefully, this will resolve the issue. Nonetheless, if the error 707 still persists, then try method 2 given below.
Method 2
The error 707 may also be triggered if your web browser becomes outdated. If so, then it is advisable to update the browser to resolve the issue. Simply download the latest browser version from a reliable website.
After the installation is complete, log on to your Gmail account and then try to send an email. If the email is sent successfully, then the issue is fixed.
Method 3
Try clearing cache and web browser history. When the web browser history and cache are full of junk files, then you might experience this error on your system. Sometimes this can also lead to registry issues. To remove the error and repair the registry immediately, download Restoro.
This is a multi-functional and user-friendly PC Fixer compatible with all Windows versions and embedded with multiple powerful scanners including a registry cleaner.
It scans your entire PC for such errors. It clears the registry, removes all obsolete and unnecessary files including cookies, web browser history, junk files, and invalid entries, and cleans it right away thereby fixing the error immediately.
Click here to download Restoro and resolve error code 707.
Hello and welcome to our software series review. Weel this time we could say this is more of a service review since the application we are going through today is online and you can use it freely without ever needing to install it.
When we choose software that we are going to review and recommend we really try to recommend something that is worth your time and money, Cartoonize fits in both categories in my opinion.
First of all basic plan of this graphic software is completely free and as mentioned it is working online, also as one more feature basic plan does not even require you to have an account of any kind, all you need to do is go to the website of the application and you can start using it right away. There is also paid plan for extra features if you need them billed monthly or annually.
Features
First things first, this is not Photoshop or GIMP and it does not aim nor want to be. This is something else, directed and pointed at the different types of users. This application is aimed at people that want to make some quick graphics and post them on social media and it does that very well. Even without knowledge to use graphic software this one is so well designed and straightforward that even a complete newcomer can do something right away.
So as the application that wants to be used by people that want to place some cool pictures or ads on their social media what it offers. For starters simplicity and ease of use, every option that you can use is on the left side of the screen nicely packed into the vertical toolbox. Inside the toolbox, you have access to various tools, effects, and filters that you can apply to your image.
Tools explained
Image manager
The first section on the tool panel is the image manager, here you can upload your images, delete them, search stock images, and so forth. nothing more to say about this one as it is only a basic file manager.
Edit
In this tool panel, there are a lot of basic settings for your image manipulations divided into 3 sections: Basics, Enhance, and Creative. In the basic section, you can crop, resize and rotate your image. Enhance panel will let you set exposure, color, vibrance, tint, and details (sharpen). Finally, the Creative part will let you remove the background with AI in a single click, replace colors in the image, and add a vignette and round image.
Effects
In the effects panel, you will be given 4 options to choose from Cartoonizer, Digital art, Sketcher, and painting. Each option once clicked will open another set of options tied to chosen preset where you will be able to choose a different style from chosen template. Once you click on the desired template it will be applied to your image and in the upright corner, you will have edit options to tweak it to your liking. You can play around as much as you want because only once you click on the apply button, the effect will be applied to your image.
Filters
Same as in the effects tool panel here you will also get a series of different filters that you can apply to your image. As in the previous tool once clicked on the chosen filter, you will be given options for its variations and details edits. How there is really plenty of filters options and combined with its own presets I will not focus on explaining what each one is doing since picture thumbnails are pretty accurate and just one look at them will explain to you everything you need to know.
Overlays
In the overlays panel, you can as the name says overlay different kinds of effects on your image. You can add snow, fog, sun flares rain, and many more. Presets work identically to previous effects and filters.
Masks
If you want to place your image in a certain shape or in-text this is the section for you. You will be presented with sections as custom text, shapes, brushes, floral, animals, and patterns. Each section will once again lead to plenty of variations on the chosen subject where you can pick one that you like the most and tweak its options.
Text
As the name suggests, this section is to add text to your picture or design. If you are making some cool ad for Facebook, Instagram, or other social media I believe that you will spend most of your time in this section adding text and tweaking it so it looks best. You have all the tools that you will need to make a catchy title or smaller block of text and you can add multiple texts to your picture tweaking their own visual appearance, the font used, color, and some effects like a drop shadow.
Draw
In the draw section, you will be able to freely draw whatever you like with your mouse or pen if you have one. you have basic options for a brush and eraser so you can erase stuff. Pretty basic tool but it gives a nice touch to underline something, circle it, etc.
Graphics
This panel will let you place various already made graphic assets into a picture. You have hearts, hats, glasses, etc. There really are tons of premade graphics along with thematic ones like new year, st. Patric day and more.
Frames
As the name suggests this section will place a frame of your choice around your picture. You can choose the style of frame, position, color, and many more. There are various styles and each style has its own options.
Conclusion
Cartoonize is a great online application that will let you quickly and easily do cool and nice image edits. As mentioned you can also add various effects, text, and graphics and use this app to make some quick and nice ads for social media. You have the option to publish to your social media right from the app in the save dialog but you can also of course download your image or design to your local computer.
Please note that for this review we used the pro, paid version so all of the features were unlocked. We wanted to give you a full overview of the full potential of the app. In my opinion, the small monthly fee that they charge is well worth it when you see all things that you can do with it.
Go to the cartoonize website and check it out, basic option is completely free and it does not even require making an account. Have fun, be creative and take care, I hope to see you again tomorrow.


 Rollback using system restore
 Microsoft’s initial Windows 11 hardware requirements were not really well received by users and they were not really clearly represented from the start making a lot of potential customers slowly drift away from the hype.
It seems that Microsoft has acknowledged this since they have changed their tune about system hardware requirements for the upcoming Windows 11.
It seems that Windows 11 will be able to be officially installed on unsupported computers but with a little inconvenience.
Microsoft’s initial Windows 11 hardware requirements were not really well received by users and they were not really clearly represented from the start making a lot of potential customers slowly drift away from the hype.
It seems that Microsoft has acknowledged this since they have changed their tune about system hardware requirements for the upcoming Windows 11.
It seems that Windows 11 will be able to be officially installed on unsupported computers but with a little inconvenience.


