Windows defender error 0x800700AA, service can not be started comes when the user is trying to run Windows defender scan on their system.
This kind of behavior happens for two reasons mostly, third-party application conflict or corrupted system files.
In this article, we will tackle both scenarios and provide you with solutions in both cases.
Third-party application conflict
In this rare scenario when Windows defender can not start scan due to conflict with installed service or application in the system solution is quite simple. Restart your PC into safe mode and run the scan from there. In a safe mode environment, minimum drivers and services are only loaded eliminating any conflicts that might occur when everything is booted. If Windows defender can not run the scan in safe mode and you get the same 0x800700AA error then you can eliminate application conflict as a reason and move to the next solution which will tackle corrupted system files. If you, however, managed to run a scan then you have a rare third-party application conflict, you can boot normally into windows and try to eliminate one by one to see which one is causing the issue. The safest bet would be to start with security software because most of the time that is what causes conflicts in running services and applications.
Corrupted system files
If the previous solution has not provided you with results then you have system file corruption that needs to be fixed. Move from one solution to another as presented below:
Run SFC scan
SFC scan is a built-in Windows tool for solving corrupted system files issues, it is fully automated and does not require from the user any kind of knowledge or information. To run it and scan the system do the following:
Press ⊞ WINDOWS + X to open the secret menu
Left-click on the command prompt (admin)
In command prompt type SFC /SCANNOW and press ENTER
Wait for the process to finish, do not interrupt it and once it is done, restart your computer
Run DISM scan
DISM scan is similar to SFC scan but it tackles different types of system file corruption and it is recommended to run it also after SFC has been completed. Please note that for DISM scan to be successful you will need a stable internet connection since DISM will replace corrupted files with new ones downloaded from Microsoft. To run it do the following:
Press ⊞ WINDOWS + X to open the secret menu
Left-click on the command prompt (admin)
inside command prompt type: exe /online /cleanup-image /scanhealth followed by ENTER, then type: Dism.exe /online /cleanup-image /restorehealth also followed with ENTER.
Leave scan to finish and reboot your PC
Error 1512 is a type of runtime error code. This error may hamper your ability to run and load your desired programs on Windows PC. There are increased chances of runtime error 1512 occurring when system files go missing or get corrupt.
Symptoms of this error code include:
Slow PC speed
Window System freeze
Solution
Error Causes
There are several for the occurrence of runtime error 1512. These include:
Faulty or outdated drivers
Poor Program installation
Damaged Windows Registry
Viruses tampering the system settings/memory
Broken or incorrect Registry entries
Damaged Windows registry
Further Information and Manual Repair
To resolve this issue you don’t have to hire a professional and spend hundreds of dollars to get it fixed. Here are some of the best and easy do-it-yourself methods to repair error 1512 on your system in a few minutes.
These methods are very easy to work around and do not require any kind of technical expertise.
Method 1 - Uninstall and then reinstall the Same Program
Sometimes this runtime error may pop up due to poor program installation. In such an event, it is advisable to uninstall the program and then reinstall it again properly. To do so, go to the start menu, and click on control panel.
Now select the program & features option. Here you will find the option Add/Remove Program. Remove the program causing error 1512. Once the program is removed, reinstall it again.
Method 2 - Run an Antivirus Program
Computer viruses are capable of tampering with system settings. Due to this reason you might experience runtime errors like 1512 on your PC. These malicious programs usually enter the system through phishing emails or website downloads.
To resolve the issue, you need to run a powerful antivirus program. An antivirus removes all sorts of malicious programs hiding in your PC like malware, spyware, and malware that are responsible for generating runtime errors.
Method 3 - Update the Outdated Drivers on your PC
If the error still persists, then it is suggested to update outdated drivers. Faulty and outdated drivers can also trigger runtime error 1512. To do this, go to the Device Manager. Here use the Driver update wizard to make updates.
Method 4 - Remove the Invalid Registry Entries and Repair the Damaged Registry
The best way to perform both tasks is to download Restoro. It is embedded with a registry cleaner that is quite easy to use.
The registry cleaner removes all invalid entries in seconds, cleans the cluttered registry by wiping out all the redundant and unnecessary files. The damaged registry is then repaired and resumes its normal function.
Click here to download Restoro and resolve runtime error 1512.
OEM Partition, also known as System Reserved Partition, is placed by the OEM to help users recover their computers or bring back the original state of the computer when it was bought. If you’ve observed that a part of your hard drive says “Healthy (OEM partition)” in the Disk Management and it occupies space in GBs, then this means that it’s normal and there’s nothing to worry about except that part of the storage space is not available and even when you right-click on it, the only thing it displays is the Help menu. Thus, in this guide, you will be guided on how you can merge as well as delete an OEM partition in your Windows 10 computer.
Since the Disk Management tool in Windows won’t let you merge or delete the OEM partition, you can just use the built-in command-line tool known as Diskpart. Note that you have to be extra careful when you run the commands as it could mess your computer up and before you proceed with the instructions provided below, make sure that you create a System Restore point first. Once you have that covered, follow the instructions below.
Step 1: Tap the Win + R keys to open the Run dialog box and type “cmd” in the field and tap Enter to open the Command Prompt.
Step 2: Next, execute this command to launch the Diskpart tool: diskpartStep 3: Execute this second command to view the list of the disks in your computer: list diskStep 4: Now select the disk you want to manage by executing this command: select disk xNote: In the command above, replace “x” with the letter of your disk.
Step 5: After that, execute this command to display all the volumes or partitions: list partitionStep 6: Now execute this command to select the partition you want to delete: select partition xNote: You have to replace “x” with the partition you want to delete.
Step 7: Once done, execute this command to delete the selected partition: delete partition overrideStep 8: Afterwards, execute this command to merge the OEM partition with the adjoining value: ExtendNote: if you only want to merge part of the partition, you need to use this command “extend [size=<size>]”. For instance, you want to extend its size by 5GB, then you need to type “Extend size=5000”. The size you set is the size you select from the OEM partition. This will extend the selected volume by size in MB or megabytes.
Following a two-year investigation by the California Department of Fair Employment and Housing, the state has filed a lawsuit against Activision Blizzard for fostering a "frat boy" culture in which female employees are allegedly subjected to unequal pay and sexual harassment.
As reported by Bloomberg, Activision Blizzard is being accused by the state of California of discriminating against female employees at nearly all levels of employment, including in regards to compensation, promotion, assignments, and termination. The state alleges Activision Blizzard’s leadership has failed to address any of these outstanding issues or prevent them from occurring within the workplace. You can read the full details of the lawsuit here.
The suit, filed Tuesday in the Los Angeles Superior Court, says Activision Blizzard, which is made up of about 20 percent women, assigns women, and women of color, to "lower paid and lower opportunity levels" with lower starting pay for similar work as their male counterparts.
The documents also accuse Activision Blizzard of fostering a "pervasive 'frat boy' workplace culture in the office. Male employees are said to drink "copious amounts of alcohol" as they make their way through cubicles and "often engage in inappropriate behavior toward female employees."
Male employees are said to come to work hungover, play video games during work "while delegating their responsibilities to female employees, engage in banter about their sexual encounters, talk openly about female bodies, and joke about rape."
The lawsuit also cites one particular incident where a female employee, who was already subjected to intense sexual harassment at the company, committed suicide during a work trip with a male supervisor who allegedly brought inappropriate, sexual items with him on the trip.
The lawsuit is asking for an injunction that will force Activision Blizzard to comply with workplace protections, as well as deliver unpaid wages, pay adjustments, back pay, and lost wages and benefits for female employees.
An Activision Blizzard spokesperson sent the following statement in response to the allegations:
We value diversity and strive to foster a workplace that offers inclusivity for everyone. There is no place in our company or industry, or any industry, for sexual misconduct or harassment of any kind. We take every allegation seriously and investigate all claims. In cases related to misconduct, the action was taken to address the issue.The DFEH includes distorted, and in many cases false, descriptions of Blizzard’s past. We have been extremely cooperative with the DFEH throughout their investigation, including providing them with extensive data and ample documentation, but they refused to inform us what issues they perceived. They were required by law to adequately investigate and to have good faith discussions with us to better understand and to resolve any claims or concerns before going to litigation, but they failed to do so.Instead, they rushed to file an inaccurate complaint, as we will demonstrate in court. We are sickened by the reprehensible conduct of the DFEH to drag into the complaint the tragic suicide of an employee whose passing has no bearing whatsoever on this case and with no regard for her grieving family. While we find this behavior to be disgraceful and unprofessional, it is, unfortunately, an example of how they have conducted themselves throughout the course of their investigation. It is this type of irresponsible behavior from unaccountable State bureaucrats that are driving many of the State’s best businesses out of California.The picture the DFEH paints is not the Blizzard workplace of today. Over the past several years and continuing since the initial investigation started, we’ve made significant changes to address company culture and reflect more diversity within our leadership teams. We’ve updated our Code of Conduct to emphasize a strict non-retaliation focus, amplified internal programs and channels for employees to report violations, including the “ASK List” with a confidential integrity hotline, and introduced an Employee Relations team dedicated to investigating employee concerns.We have strengthened our commitment to diversity, equity, and inclusion and combined our Employee Networks at a global level, to provide additional support. Employees must also undergo regular anti-harassment training and have done so for many years.We put tremendous effort into creating fair and rewarding compensation packages and policies that reflect our culture and business, and we strive to pay all employees fairly for equal or substantially similar work. We take a variety of proactive steps to ensure that pay is driven by non-discriminatory factors. For example, we reward and compensate employees based on their performance, and we conduct extensive anti-discrimination training including for those who are part of the compensation process.We are confident in our ability to demonstrate our practices as an equal opportunity employer that fosters a supportive, diverse, and inclusive workplace for our people, and we are committed to continuing this effort in the years to come. It is a shame that the DFEH did not want to engage with us on what they thought they were seeing in their investigation.
Conclusion
We will see how things work out, but I am not too optimistic for Activision Blizzard, truth to be told these reports are really bringing up some disturbing news on the sunlight. I just hope that all responsible will be brought to justice.
As you know, Windows 10 has a complicated mechanism for Activation which helps in the verification of a genuine copy of Windows 10. However, there are times when you might encounter some errors during the activation process. One of these errors is the error code 0xc000f074. This kind of error could be due to the Key Management Service or KMS which is unreachable by the client computer or if the key used in the SLSetAuthenticationData function call is incorrect.
This kind of error mostly affects surfaces on computers that are upgraded from either Windows 7 or Windows 8.1 to Windows 10. In such cases, you may encounter any of the following error messages:
“Windows is unable to reach your company’s activation service. Please connect to your corporate network. If you are connected and continue to see the error, contact your system administrator. You can also click on the error detail to find the exact error. Error code: 0xC004F074.”“Activating Windows(R),(Key hash)…Error: 0xC004F074 The Software Licensing Service reported that the computer could not be activated. No Key Management Service (KMS) could be contacted.Please see the Application Event Log for additional information.”“Error 0xC004F074, SL_E_AUTHN_MISMATCHED_KEY, The Software Licensing Service reported that the key is mismatched.”
To fix the Windows 10 Activation error 0xC004F078, you have to use the correct key for your type of Windows copy or use Command Prompt to reinstall the key or you could also try running the Activation troubleshooter.
Option 1 – Try running the Windows 10 Activation Troubleshooter
The first thing you can do to resolve the Activation error code 0xc000f074 is to run the Windows 10 Activation Troubleshooter. To do so, follow these steps:
Go to Settings and then select Activation.
After that, click on the Windows Activation and then troubleshoot. This will help you address most of the commonly found activation issues in Windows devices.
The Windows 10 Activation Troubleshooter will determine if your license key is a valid Windows 10 digital license for an edition that is not currently installed. If it turns out that it’s not, then the troubleshooter will show you how to install the correct edition.
Option 2 – Try to use the correct key for the type of Windows version you have
If the Windows Activation troubleshooter wasn’t able to resolve the error, then you can try using the correct key for your type of Windows version. All you have to do so is check the type of your Windows copy if it’s OEM, retail, or volume. And make sure that you have the correct, valid product key for your operating system.
Option 3 – Try to use Command Prompt to reinstall the key
In the Start Search, type “command prompt” and right-click on Command Prompt from the search results, and then select “Run as administrator”.
After that, execute this command to uninstall the existing key: vbs /upk
Next, you need to install the KMS product key by executing this command: vbs /ipk <The KMS Product Key>
Once you’re done, you will see a prompt that’ll tell you whether the operation was either successful or not.
To active, the KMS product key online, use this command: vbs /ato
Use this command to activate the key using the telephone: exe 4
After you’ve activated the KMS product key, restart the Software Protection Service. You can also verify the Activation Status to check if your fix was successful or not.
Option 4 – Contact Microsoft Support for assistance
If you’re at your wits’ end in trying to upgrade your computer, you should consider contacting Microsoft Support for help as they can offer you various options that would make fixing Windows Activation error code 0xc000f074 a lot easier and faster.
If the Diagnostic Data level in your Windows 10 computer is configured manually to the non-default security setting of zero and you’ve encountered an error code of 0xc0000005, read on as this post will guide you in fixing the problem with the Remote Access Connection Manager Service. In relation to error 0xc0000005, you might also encounter an error in the Application section of Windows Logs in the Event Viewer, along with the Event ID 1000 which would most likely have a reference of “svchost.exe_RasMan” and “rasman.dll”.
Before you troubleshoot the problem, keep in mind that the Remote Access Connection Manager or RasMan service is the one that manages dial-up and VPN connections from the computer to the internet as well as other remote networks. Each time you connect, the Services dials the connection or sends out a request for a VPN connection. However, the error 0xc0000005, only occurs when a VPN profile is configured as “Always On VPN or “AOVPN” connection with or without a device tunnel.
There are several options you can check out to resolve this error, you can try to install the KB Update 4505903 or fix it via Group Policy. You could also try to enable Telemetry from the Settings app or enable it via Registry Editor. For more information, make sure to check out the provided options below.
Option 1 – Try installing the KB Update 4505903
The first thing you can do to fix the problem is to make sure that you’ve already installed the KB Update 4505903 in your computer. If not, then you have to go to Settings > Update & Security > Windows Update and from there select the Check for updates link. You need to get the standalone package if you are using the Microsoft Update Catalog to update your computer and for that, you have to the website of the Microsoft Update Catalog. On the other hand, if you are using the Windows Server Update Services or WSUS, then you can just manually import the KB Update 4505903 into WSUS.
Option 2 – Try to enable Telemetry in the Group Policy and run the RASMAN service
The next thing you can do to fix the problem is to enable Telemetry via Group Policy and then run the RASMAN service. To do that, follow these steps:
Tap the Win + R keys to open the Run dialog box and type “gpedit.msc” in the field and hit Enter to open the Group Policy Editor.
Next, navigate to Computer Configuration > Administrative Templates > Windows Components > Data Collection and Preview Builds > Allow Telemetry.
After that, open the policy and select one of the security levels like Basic, Enhanced, and Full.
Then click on the Apply and OK buttons to save the changes made and close the Group Policy Editor.
Once one, open the Run dialog box again and type “services.msc” in the field, and hit Enter to open the Windows Services Manager.
From there, look for the Remote Access Connection Manager Service and restart it. And then check if it resolved the problem or not...
Option 3 – Try enabling Telemetry via Settings
Tap the Win + I keys to open the Settings app.
Next, go to Privacy > Diagnostics and Feedback and select Basic or Enhanced under the Diagnostic data.
After that, tap the Win + R keys to launch Run and type “services.msc” in the field, and hit Enter to open the Services Manager.
From there, look for the Remote Access Connection Manager Service and restart it.
Option 4 – Try to enable Telemetry via Registry Editor
Launch the Run utility and type “regedit” in the field and tap Enter to open the Registry Editor.
Then navigate to this path: HKEY_LOCAL_MACHINESOFTWAREPoliciesMicrosoftWindowsDataCollection
From this path, look for “AllowTelemetry” and double click on it.
Now enter the values, 1, 2, 3 for Basic, Enhanced, Full, respectively.
If you can’t find AllowTelemetry, then just create a DWORD (32-bit) and name it “AllowTelemetry” and edit its value.
Once done, exit the Registry Editor and restart the Remote Access Connection Manager Service from the Services Manager.
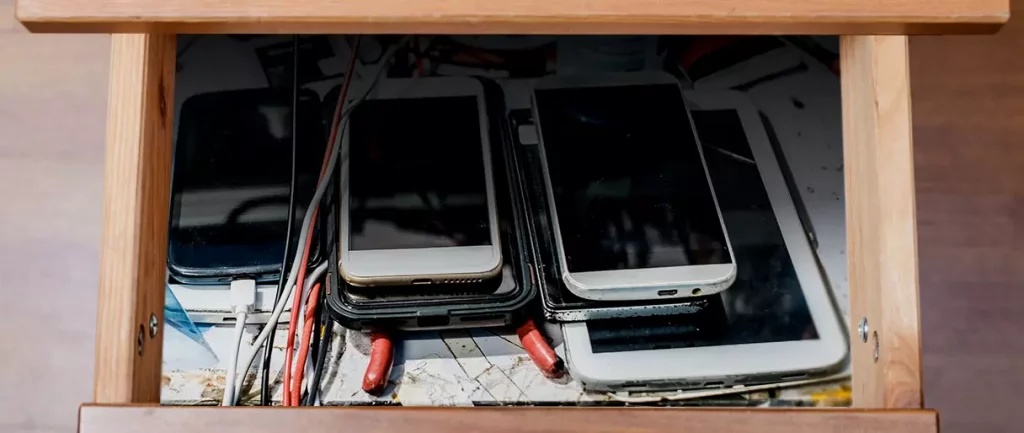
Hello all the wonderful people and welcome to our new article where we take a little different turn than usual and discuss why keeping old electronics around the house is not such a good idea. We all have some drawer or in some bag around the house and in the end of the day if that electronic has battery inside it is probably not the smart thing to keep it.
So naturally, the question comes why it is a bad idea to have old electronics with batteries in them? Well unlike a battery failure with, say, some AA batteries jammed in the back of an old toy, the risk with a lithium-ion battery failing isn’t just some leaking and corrosion in the battery compartment, it’s a potential fire as the battery swells up and the gases (combined with the stored energy) turn the battery into a potential fire hazard.
Good thing is that the battery will not explode just like that, it will swallow over time and get bigger and bigger until the breaking point is reached and all the fire breaks lose. So if by any chance you have some old gadgets lying around you can check up on them and see if has swelling process started, if yes, dispose properly of that piece of the old device immediately.
How to keep old electronics
If you’re not ready to get rid of the gadget then it’s best to charge it properly for storage. Proper charging keeps the battery cells and circuits in optimum health.
While recommendations vary by manufacturer and application, the general consensus is that lithium-ion batteries should be charged to approximately 40%. (Some manufacturers recommend charging 50% or 60% instead.)
Really, the important part here isn’t the exact percentage. What’s important is ensuring that the battery is charged to roughly half capacity and not stored with a completely discharged or completely full battery.
Discharge rates on lithium-ion batteries in completely powered-off devices are very slow, but you should still plan to top off the charge every 12-18 months or so to keep it around 50%.
If you wanted to go above and beyond, a metal storage container with a snug lid on a basement shelf with a desiccant pack inside to control the moisture would offer optimum conditions.
Installing or updating Google Chrome does not always go smoothly as there are times when it also encounters some errors like the error code 0x80072EE7. This kind of error in Chrome is most likely caused by the Windows Firewall or third-party Firewall (if you’re using one) that blocks the installation or update process. Aside from this known culprit, there are also other factors to consider such as corrupted or incompatible installation files or it could also be caused by some issue with your internet connection.
If you face this kind of problem when installing or updating Chrome, you will see the following error message on your screen:
“An error occurred while checking for updates: Unable to connect to the Internet. If you use a firewall, please whitelist GoogleUpdate.exe. (error code 7: 0x80072EE7 — system level).”
Whatever the cause of this error is, you need to use the options prepared below to fix it.
Option 1 – Whitelist the “googleupdate.exe” in Firewall
If the issue is really caused by the Firewall, you need to whitelist the googleupdate.exe program to fix the error. To do that, follow these steps:
Tap the Win + E keys to open the File Explorer.
Next, copy and paste the following location in the address bar and tap Enter to go there.
Control Panel/All Control Panel Items/Windows Defender Firewall/Allowed apps
After that, click on the Change Settings button, and from the given list, look for Google Chrome.
Now check both Private and Public connections for it and then click on OK and see if it fixes the error or not.
Option 2 – Disable the proxy server for LAN
If the problem has something to do with your internet connection, then you can try disabling the proxy server for LAN and see if that helps.
Tap the Win + R keys to open the Run dialog box.
Then type “inetcpl.cpl” in the field and hit Enter to pull up the Internet Properties.
After that, go to the Connections tab and select the LAN settings.
From there. Uncheck the “Use a Proxy Server” option for your LAN and then make sure that the “Automatically detect settings” option is checked.
Now click the OK and the Apply buttons.
Restart your PC.
Note: If you are using a third-party proxy service, you have to disable it.
Option 3 – Check your VPN
If you are using a VPN application, then this option should apply to you, if not, skip this option and proceed to the next one. There are times when VPN software causes some issues like this error. If that’s the case, you can try to disable your VPN temporarily and see if the error is resolved or not and if turns out that your VPN is the culprit, you have to uninstall it and install a new one or its latest version. To uninstall it, follow the steps below.
Tap the Win + R keys to open the Run dialog box
Then type “appwiz.cpl” in the field and hit Enter to open the Programs and Features in Control Panel.
From there, look for the VPN service you are using, select it and then click on Uninstall to remove it.
After that, restart your computer and try to install the latest version of the program again. It should work now. If not, proceed to the next available option below.
Option 4 – Try to run the Chrome Cleanup tool
You might want to run Google Chrome’s built-in Malware Scanner & Cleanup tool as it could also help in getting rid of any unwanted ads, pop-ups, and even malware, as well as unusual startup pages, toolbars, and anything else that might overtake the network and could affect the performance of the browser.
Option 5 – Reset Google Chrome
Before you proceed, make sure that the Chrome browser is not running anywhere in the background via Task Manager. Once you’ve made sure that it’s no longer running, refer to these steps:
Tap the Win + R keys to open the Run dialog box.
Then type “%USERPROFILE%AppDataLocalGoogleChromeUser Data” in the field and tap Enter to open this location.
From there, look for the Default folder and then tap the Shift + Delete button and if a confirmation prompt appears, click on Yes.
After deleting the Default folder, open Google Chrome and click on the three vertical dots icon located in the top-right corner to open the menu.
Next, click on Settings and scroll down and then click on Advanced to open the Advanced Settings.
Then scroll down until you see the “Reset and clean up” section and click the “Restore Settings to their original defaults” option.
After that, you will see a confirmation box and from there, click on the Reset settings button to reset your Google Chrome browser.
Stop 0x00000000 error code is a type of a Stop error popularly known as a blue screen of death error code. This is a critical error.
It can pop up while loading or using the Windows program on your PC. When this error occurs, the computer screen turns blue and you, the user, get locked out of the program. Furthermore, it can also result in sudden system shut down or system freeze.
If not fixed timely, the error may start to pop up more and more frequently which then may lead to complete system corruption and system crash.
Solution
Error Causes
The two most common causes for the STOP 0x00000000 error code are:
Malware infection
Registry corruption
This is a fatal system error and must be resolved immediately. Delay may lead to system crashes and data loss. And recovering lost data is not easy.
Further Information and Manual Repair
Though this is a fatal error the good news is that it is easy to resolve. To repair the STOP 0x00000000 error on your system, here are some methods that you can try:
Method 1 - Use System Restore to Bring Your Computer Back to its Previous State
To resolve this error on your system, try using the System Restore tool. Use this tool to bring your computer back to its previous state. The Windows System Restore utility is one of the most valuable recovery tools.
To use it, simply type System Restore in the search box. Once you find it, click on it and select a restore point to bring your PC back to its normal state. To activate changes, reboot the PC.
Method 2 - Scan for Viruses
If the underlying cause of the Stop 0x00000000 error code is related to malware infection, then you must download a powerful antivirus to resolve it. Run it to scan your entire PC.
Make sure you remove all types of malware including adware, spyware, viruses, and Trojan. Once your PC is malware-free, the error will be fixed in no time.
Method 3 - Clean and Repair the Registry
The registry is an important part of the PC. It stores practically all the activities you perform on your system.
It saves all the files including both important and unnecessary files such as junk files, cookies, internet history, bad and invalid entries. If these obsolete and unnecessary files are not deleted frequently and keep on accumulating it takes up all the registry space and corrupts it.
This results in registry errors like runtime and BSoD errors and sometimes may also lead to disk fragmentation.
To resolve it is advisable to repair the registry. This can be done manually but that will take too much time and also require technical expertise. However, another way to resolve it is to download Restoro.
This is a user-friendly PC Fixer with a powerful registry cleaner. It removes all obsolete and unnecessary files, cleans the registry and repairs the damaged files, thereby removing the error right away.
Click here to download Restoro and resolve Stop 0x00000000 today!
Error 0x0000001e is when you start the Windows XP Setup and you see a message which says something like:
STOP: 0x0000001E (0x80000003, 0xBFC0304, 0x0000000, 0x0000001)
Solution
Error Causes
You are most likely to face this error if you restart your PC while the Windows Setup is still under process and yet to complete.
Other causes of this error include any of the following conditions:
The drive on which you are installing Windows has insufficient disk space to accommodate the installation.
An incompatible or outdated third-party driver (or more) is installed on your PC which is conflicting with the installation. For instance, this could be a problematic video driver.
The system BIOS has incompatibilities with the installation.
Further Information and Manual Repair
This error is also called the “Bug check code”.
The STOP 0x1E signifies that there was an unknown or illegal processor instruction detected by the Windows XP kernel. You will see the exception address which shows up to indicate the root of the problem which is usually a driver or faulty hardware.
You should note this address down as well as the link date of the faulty driver or image which includes it.
If at any point it becomes impossible for you to handle and you end up contacting the Windows support center to help you out with the process then this information will help you out in making things a lot easier while the support team tries to troubleshoot the problem.
The parameters included in the STOP 0x1E error message are the following:
is the exception code which couldn’t be handled.
shows the module’s address where the exception took place.
signifies the exception’s parameter 0.
represents the exception’s parameter 1.
You can use this information which usually is provided in error 0x0000001e message to pinpoint the root cause of the problem and troubleshoot it.
In order to fix this error, you need to follow either one of the following procedures as needed according to your situation.
Clean Up Your Disk
If your disk doesn’t have ample space to accommodate the installation then you should free up some of the space on your disk to make sure the Windows can be installed on it.
You can also reinstall the Windows on another disk that has sufficient space.
Get Rid of the Third Party Driver
If the error 0x0000001e message gives you the name of the driver due to which the installation process is being halted, then get rid of that driver by disabling it or removing it.
If the problem is resolved by this then you should contact the manufacturer of the third-party driver and ask them about any newer versions of the driver that wouldn’t conflict with the installation of Windows.
Upgrade System BIOS
Upgrading your system BIOS is something that you can’t do on your own. You will need to find out more about how you can upgrade. For this, you should contact either your PC’s manufacturer or your motherboard’s manufacturer.
If nothing else works, you can always make use of the Microsoft Debugging Tools which will provide you ample information about the error message.
You will find the Debugging Tools and further information about them including the downloading and installation process on Microsoft’s website.
Hello and welcome to our software series review. Weel this time we could say this is more of a service review since the application we are going through today is online and you can use it freely without ever needing to install it.
When we choose software that we are going to review and recommend we really try to recommend something that is worth your time and money, Cartoonize fits in both categories in my opinion.
First of all basic plan of this graphic software is completely free and as mentioned it is working online, also as one more feature basic plan does not even require you to have an account of any kind, all you need to do is go to the website of the application and you can start using it right away. There is also paid plan for extra features if you need them billed monthly or annually.
Features
First things first, this is not Photoshop or GIMP and it does not aim nor want to be. This is something else, directed and pointed at the different types of users. This application is aimed at people that want to make some quick graphics and post them on social media and it does that very well. Even without knowledge to use graphic software this one is so well designed and straightforward that even a complete newcomer can do something right away.
So as the application that wants to be used by people that want to place some cool pictures or ads on their social media what it offers. For starters simplicity and ease of use, every option that you can use is on the left side of the screen nicely packed into the vertical toolbox. Inside the toolbox, you have access to various tools, effects, and filters that you can apply to your image.
Tools explained
Image manager
The first section on the tool panel is the image manager, here you can upload your images, delete them, search stock images, and so forth. nothing more to say about this one as it is only a basic file manager.
Edit
In this tool panel, there are a lot of basic settings for your image manipulations divided into 3 sections: Basics, Enhance, and Creative. In the basic section, you can crop, resize and rotate your image. Enhance panel will let you set exposure, color, vibrance, tint, and details (sharpen). Finally, the Creative part will let you remove the background with AI in a single click, replace colors in the image, and add a vignette and round image.
Effects
In the effects panel, you will be given 4 options to choose from Cartoonizer, Digital art, Sketcher, and painting. Each option once clicked will open another set of options tied to chosen preset where you will be able to choose a different style from chosen template. Once you click on the desired template it will be applied to your image and in the upright corner, you will have edit options to tweak it to your liking. You can play around as much as you want because only once you click on the apply button, the effect will be applied to your image.
Filters
Same as in the effects tool panel here you will also get a series of different filters that you can apply to your image. As in the previous tool once clicked on the chosen filter, you will be given options for its variations and details edits. How there is really plenty of filters options and combined with its own presets I will not focus on explaining what each one is doing since picture thumbnails are pretty accurate and just one look at them will explain to you everything you need to know.
Overlays
In the overlays panel, you can as the name says overlay different kinds of effects on your image. You can add snow, fog, sun flares rain, and many more. Presets work identically to previous effects and filters.
Masks
If you want to place your image in a certain shape or in-text this is the section for you. You will be presented with sections as custom text, shapes, brushes, floral, animals, and patterns. Each section will once again lead to plenty of variations on the chosen subject where you can pick one that you like the most and tweak its options.
Text
As the name suggests, this section is to add text to your picture or design. If you are making some cool ad for Facebook, Instagram, or other social media I believe that you will spend most of your time in this section adding text and tweaking it so it looks best. You have all the tools that you will need to make a catchy title or smaller block of text and you can add multiple texts to your picture tweaking their own visual appearance, the font used, color, and some effects like a drop shadow.
Draw
In the draw section, you will be able to freely draw whatever you like with your mouse or pen if you have one. you have basic options for a brush and eraser so you can erase stuff. Pretty basic tool but it gives a nice touch to underline something, circle it, etc.
Graphics
This panel will let you place various already made graphic assets into a picture. You have hearts, hats, glasses, etc. There really are tons of premade graphics along with thematic ones like new year, st. Patric day and more.
Frames
As the name suggests this section will place a frame of your choice around your picture. You can choose the style of frame, position, color, and many more. There are various styles and each style has its own options.
Conclusion
Cartoonize is a great online application that will let you quickly and easily do cool and nice image edits. As mentioned you can also add various effects, text, and graphics and use this app to make some quick and nice ads for social media. You have the option to publish to your social media right from the app in the save dialog but you can also of course download your image or design to your local computer.
Please note that for this review we used the pro, paid version so all of the features were unlocked. We wanted to give you a full overview of the full potential of the app. In my opinion, the small monthly fee that they charge is well worth it when you see all things that you can do with it.
Go to the cartoonize website and check it out, basic option is completely free and it does not even require making an account. Have fun, be creative and take care, I hope to see you again tomorrow.

 Error Causes
 Following a two-year investigation by the California Department of Fair Employment and Housing, the state has filed a lawsuit against Activision Blizzard for fostering a "frat boy" culture in which female employees are allegedly subjected to unequal pay and sexual harassment.
As reported by Bloomberg, Activision Blizzard is being accused by the state of California of discriminating against female employees at nearly all levels of employment, including in regards to compensation, promotion, assignments, and termination. The state alleges Activision Blizzard’s leadership has failed to address any of these outstanding issues or prevent them from occurring within the workplace. You can read the full details of the lawsuit here.
The suit, filed Tuesday in the Los Angeles Superior Court, says Activision Blizzard, which is made up of about 20 percent women, assigns women, and women of color, to "lower paid and lower opportunity levels" with lower starting pay for similar work as their male counterparts.
The documents also accuse Activision Blizzard of fostering a "pervasive 'frat boy' workplace culture in the office. Male employees are said to drink "copious amounts of alcohol" as they make their way through cubicles and "often engage in inappropriate behavior toward female employees."
Male employees are said to come to work hungover, play video games during work "while delegating their responsibilities to female employees, engage in banter about their sexual encounters, talk openly about female bodies, and joke about rape."
The lawsuit also cites one particular incident where a female employee, who was already subjected to intense sexual harassment at the company, committed suicide during a work trip with a male supervisor who allegedly brought inappropriate, sexual items with him on the trip.
The lawsuit is asking for an injunction that will force Activision Blizzard to comply with workplace protections, as well as deliver unpaid wages, pay adjustments, back pay, and lost wages and benefits for female employees.
Following a two-year investigation by the California Department of Fair Employment and Housing, the state has filed a lawsuit against Activision Blizzard for fostering a "frat boy" culture in which female employees are allegedly subjected to unequal pay and sexual harassment.
As reported by Bloomberg, Activision Blizzard is being accused by the state of California of discriminating against female employees at nearly all levels of employment, including in regards to compensation, promotion, assignments, and termination. The state alleges Activision Blizzard’s leadership has failed to address any of these outstanding issues or prevent them from occurring within the workplace. You can read the full details of the lawsuit here.
The suit, filed Tuesday in the Los Angeles Superior Court, says Activision Blizzard, which is made up of about 20 percent women, assigns women, and women of color, to "lower paid and lower opportunity levels" with lower starting pay for similar work as their male counterparts.
The documents also accuse Activision Blizzard of fostering a "pervasive 'frat boy' workplace culture in the office. Male employees are said to drink "copious amounts of alcohol" as they make their way through cubicles and "often engage in inappropriate behavior toward female employees."
Male employees are said to come to work hungover, play video games during work "while delegating their responsibilities to female employees, engage in banter about their sexual encounters, talk openly about female bodies, and joke about rape."
The lawsuit also cites one particular incident where a female employee, who was already subjected to intense sexual harassment at the company, committed suicide during a work trip with a male supervisor who allegedly brought inappropriate, sexual items with him on the trip.
The lawsuit is asking for an injunction that will force Activision Blizzard to comply with workplace protections, as well as deliver unpaid wages, pay adjustments, back pay, and lost wages and benefits for female employees.
 If your disk doesn’t have ample space to accommodate the installation then you should free up some of the space on your disk to make sure the Windows can be installed on it.
You can also reinstall the Windows on another disk that has sufficient space.
If your disk doesn’t have ample space to accommodate the installation then you should free up some of the space on your disk to make sure the Windows can be installed on it.
You can also reinstall the Windows on another disk that has sufficient space.
