Can’t connect to this network Internet connectivity issues present a complex problem with simple solutions for PC and laptop users. First, it is usually recommended that users rule out problems with the internet connection, router, and Wi-Fi settings before proceeding to troubleshoot settings on your PC/laptop. Once the rest are ruled out, we can then proceed with the following troubleshooting steps and guidelines to fix your wifi connection issue:
The first step is to update your windows network adapter driver. Connectivity problems may arise if your network driver is not updated or if it is incompatible with the network adapter. To do so, you may resort to any third-party driver scanning and installing programs found online. This solution should have resorted if users don’t want the hassle of perusing through windows settings that users may not be familiar with.
However, this solution requires a pre-existing internet connection other than wifi, so it is recommended you have a backup internet connection via ethernet.
The second step is to uninstall the driver for your network adapter. This solution is to be reported if there is an issue with the driver as restarting the PC after the following steps let windows reinstall the driver again:
Open the quick access menu on your keyboard by pressing the Windows key and X key at the same time and select “Device Manager” from the menu list.
From the list of devices, select “Network Adapters”
Usually on the top of the list is the Wireless Network Adapter
Right-click the Wireless Network Adapter and select the option to “Uninstall device”
You will be given a confirmation in a new separate window to proceed. Click “Uninstall” to proceed.
After completing the previous steps, try rebooting your Windows PC and reconnecting to see if it works.
A third step is to disable the 802.1 1n modes of your network adapter by following the next steps:
First press the Windows logo key and the X key at the same time to bring up the quick-access menu. And like the previous step, select “Device Manager”
From the list of devices, select “Network Adapters”
Right-click the Wireless Network Adapter from the drop-down menu and select properties
Under properties, select the “Advanced” tab then select the 802.1 1n Mode. To the right drop-down menu change the option to “Disabled” and click “Ok”
After, try to re-establish the connection to see if the steps have worked.
In the event that any of the preceding did not fix your problem, it helps to take a second look at the router and network settings using the interface provided by your ISP. A simple reset to the back of your router often fixes the issue. Also, try to check if you have any other administrative capabilities over the network to determine whether your device, in particular, has been MAC filtered or if the frequency of your wireless adapter is not compatible with the broadcast frequency of your router.
If you suddenly encounter a PNP_DETECTED_FATAL_ERROR Blue Screen error, then this post can help you out. The PNP_DETECTED_FATAL_ERROR BSOD usually occurs when any new hardware that is mostly the Plug and Play type is attached. In such cases, when the device is plugged, and the driver for that device crashes or isn’t found or is not compatible, you will most likely encounter this particular BSOD error.
There are several error codes that come under this category, some of them are 0x000000CA (0x01681690, 0xEA96A7BE, 0x938A81AD, 0xF8362881. This BSOD error can also occur at any time. However, the only constant thing here is when you plug a PNP device like earphones, microphones, USB drives, and many more.
The PNP_DETECTED_FATAL_ERROR bug check has a value of 0x000000CA which indicates that the Plug and Play Manager encountered some severe error which is most likely have something to do with a problematic Plug and Play driver. To fix this error, here are some possible solutions that could help.
Option 1 – Run the Blue Screen Troubleshooter
The Blue Screen troubleshooter is a built-in tool in Windows 10 that helps users in fixing BSOD errors like PNP_DETECTED_FATAL_ERROR Blue Screen error. It can be found on the Settings Troubleshooters page. To use it, refer to these steps:
Tap the Win + I keys to open the Settings panel.
Then go to Update & Security > Troubleshoot.
From there, look for the option called “Blue Screen” on your right-hand side and then click the “Run the troubleshooter” button to run the Blue Screen Troubleshooter and then follow the next on-screen options. Note that you might have to boot your PC into Safe Mode.
Option 2 – Try disabling or removing newly installed hardware
In this option, you will have to disable or remove the hardware you’ve just installed recently since external devices could be the one that’s causing the Blue Screen of Death error to appear. To do that, just disconnect any external device that’s connected to your computer physically and then check if it fixes the PNP_DETECTED_FATAL_ERROR Blue Screen error.
Disabling the BIOS Memory options such as Caching and Shadowing can help you in fixing the PNP_DETECTED_FATAL_ERROR Blue Screen error. All you have to do is enter the BIOS first and then use the Arrow and Enter keys to select your choices. And if you can’t seem to find it, look for specific instructions from your OEM or you could also look out for instructions from the manufacturer of your motherboard.
Option 4 – Try to run the CHKDSK utility
Running the CHKDSK utility might also help you resolve the PNP_DETECTED_FATAL_ERROR Blue Screen error. If your hard drive has issues with integrity, the update will really fail as the system will think that it’s not healthy and that’s where the CHKDSK utility comes in. The CHKDSK utility repairs hard drive errors that might be causing the problem.
Open Command Prompt with admin privileges.
After opening Command Prompt, execute the following command and hit Enter:
chkdsk /f /r
Wait for the process to be completed and then restart your computer.
Option 5 – Try to uninstall programs you’ve installed recently
Chances are, some programs that you just installed might be the one that’s causing the BSOD error. Thus, you need to uninstall the program to resolve the problem.
In the search box, type in “control” and then click on Control Panel (desktop app) among the search results.
After that, select Programs and Features from the list which will give you a list of all the programs installed on your computer.
From there, look for the concerned program and select it and then uninstall it.
Option 6 – Update the Device drivers
Tap the Win + R keys to launch Run.
Type in devmgmt.msc into the box and tap Enter or click OK to open the Device Manager.
After that, a list of device drivers will be displayed. Look for the device driver you and then select either “Update driver” or “Uninstall device”. And if you find any “Unknown device”, you need to update it as well.
Select the “Search automatically for updated driver software” option and then follow the instructions to complete the process.
If you have chosen to uninstall the driver, follow the screen options to complete the process and then restart your PC.
Connect the device and Scan for hardware changes – you can see this option under Device Manager > Action.
Option 7 – Perform a System Restore
Performing System Restore might help you in fixing the PNP_DETECTED_FATAL_ERROR Blue Screen error. You can do this option either by booting into Safe Mode or in System Restore. If you are already in the Advanced Startup Options, just directly select System Restore and proceed with the next steps. And if you have just booted your PC into Safe Mode, refer to the steps below.
Tap the Win + R keys to open the Run dialog box.
After that, type in “sysdm.cpl” in the field and tap Enter.
Next, go to the System Protection tab then click the System Restore button. This will open a new window where you have to select your preferred System Restore point.
After that, follow the on-screen instructions to finish the process and then restart your computer and check if the problem is fixed or not.
Same as in previous Windows versions, Windows 11 will also use certain applications as default ones for opening certain file types and file extensions. And yes, same as in previous versions it will come preconfigured for certain file types and associated applications like for example photos for pictures.
Of course, users usually have their own favorite applications for certain file types and much more prefer to open them inside the application of their choice instead of the default one.
We can change the default application like in previous Windows versions but this time there are two ways and overall more control of this process. Windows 11 has settings for choosing default file type applications and default file extension applications giving you more control of this process.
The opening setting for apps
Whatever you wish to change default application or default extension application you will need to open settings for default application. Follow steps to quickly go into it.
Press ⊞ WINDOWS + I to open settings
Select Apps on left
On the right part select Default Apps
Now you are in settings for choosing default applications
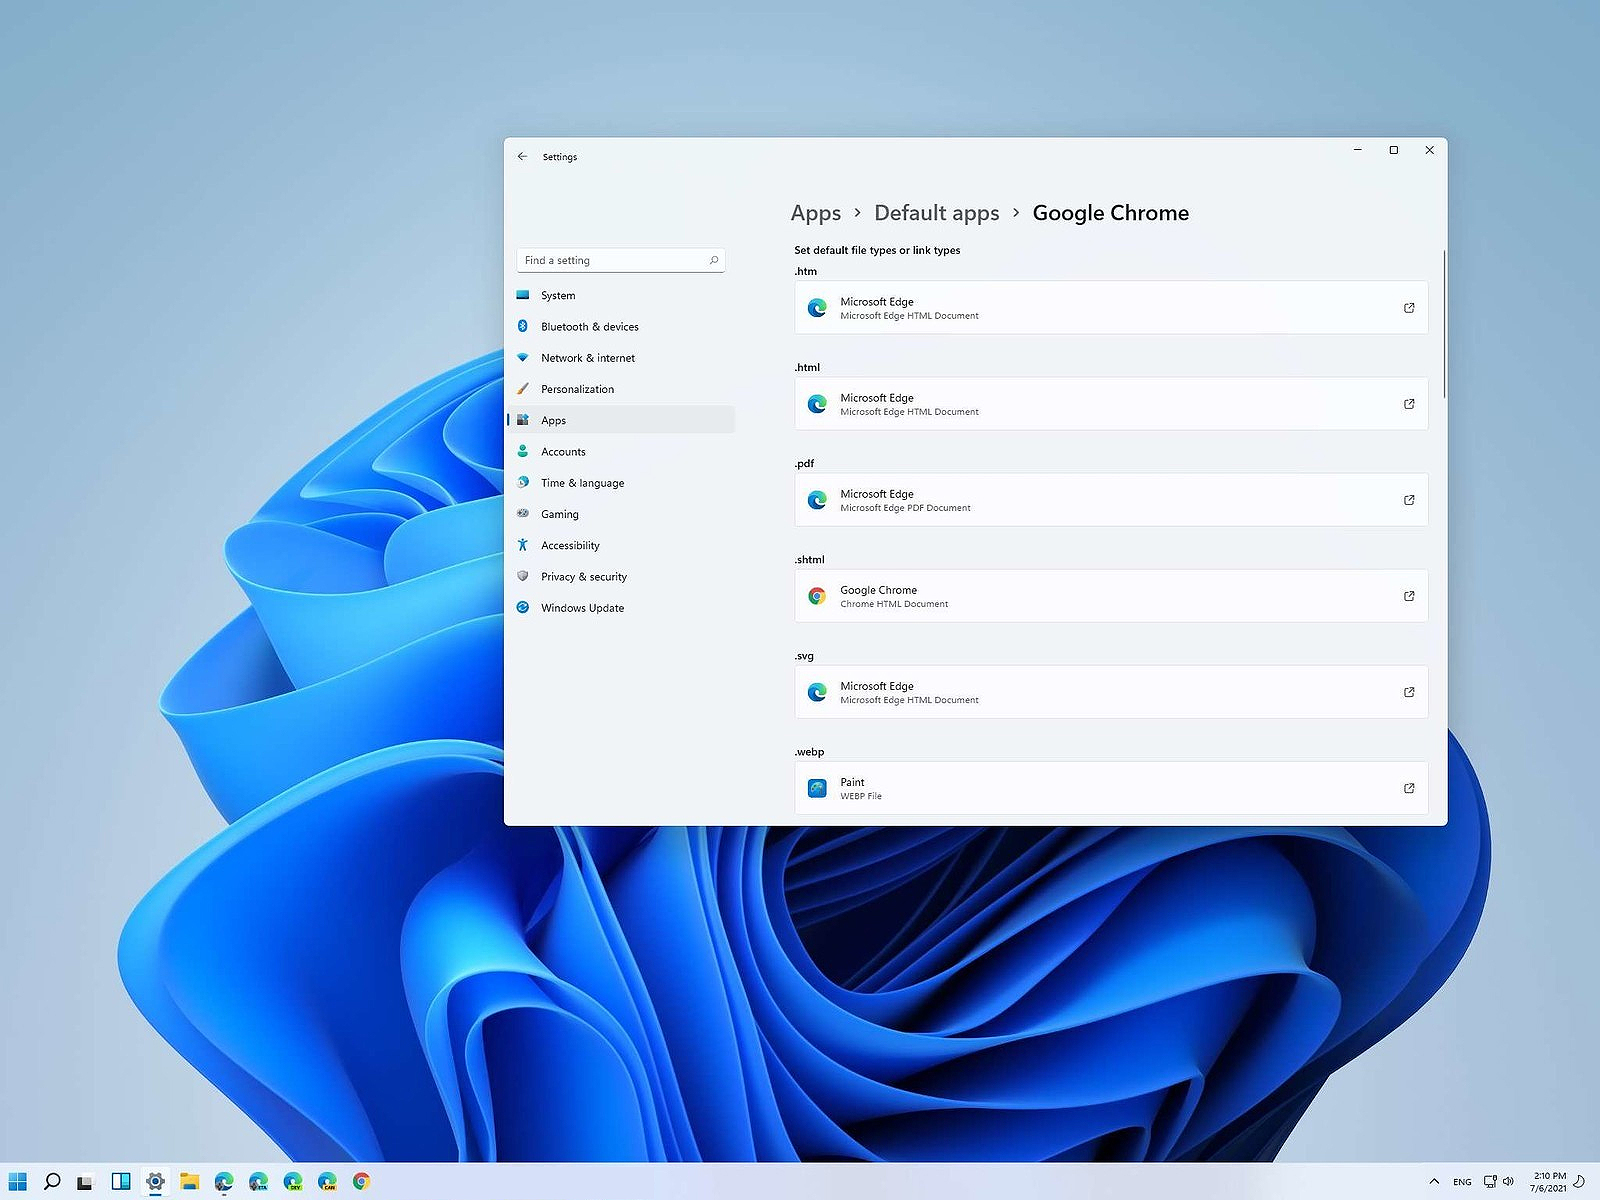
Choosing default application by file type extension
This is considering by Microsoft as a typical way to set default applications inside Windows 11. Once you are inside the settings app there is a box labeled Enter a file type or link type. Inside the search box, type in file extension that you wish to associate the application with like .JPG, .TXT, or other.
If the file extension is not associated with any application you will be presented with a Choose a Default button, if however, the file extension is already associated with the app, you will need to click on the app box itself.
In any case, a pop-up will appear and ask How do you want to open YOUR FILE EXTENSION files from now on? Choose Application from the list of presented ones and click on OK.
Choosing default file type
Another method is to select the default application by file type selecting application for it. In the settings screen, under the search box, you will have a list of installed applications. Choose the application that you would like to associate a file type with and click on it. On the next details screen scroll down and select the file type that you want to associate with the selected application and click on OK.
Other/third method
There is also the third method for choosing the default application for file type but it includes some surfing on your hard drive and it can be more time-consuming for first-time settings. But it is fairly quick when you need to only use it once on some new file type (for example you have a new application installed and want to switch just one file type extension to that application).
Locate the file that you want to associate with the application and right-click on it. Select Open With from the menu and then Choose Another App. Pop up will appear, select the application that you would like to use, and check the box beside Always use this app to open CHOOSEN EXTENSION files followed by clicking on the OK button.
Windows 10X is a new version of Windows that has been built from the ground up for new PCs and will begin shipping on hardware in 2021. It's built on top of a new modern version of Windows called 'Windows Core OS' that guts legacy components and features in favor of contemporary user experiences and enhanced security. This means everything from the Windows Shell to the underlying OS has been rebuilt with modern technologies.
As a result, Windows 10X does not support legacy Win32 applications at launch. Windows 10X PCs in 2021 will be able to run Microsoft Edge, UWP, and web apps. Legacy Win32 application support will arrive at a later date, however. When it does, Win32 applications will run in a secure container by default, meaning those legacy applications cannot affect system performance and battery life when closed. Windows 10X is a much more secure and stable OS as a result of this, as there's no opportunity for legacy apps to cause bitrot.
Windows 10X features a new shell of the user interface that has been built with modern technologies. It's an adaptive user experience that can adjust depending on the "posture" of your device. For example, with a foldable PC, the user might want to use it in several different ways; as a laptop, or tablet, or in tent mode for movies. Because of this, the user interface must adapt to provide the best experience no matter which way your device is being used.
This also means that legacy shell elements, such as the Control Panel, File Explorer, and error dialogs and icons are gone on Windows 10X. As Microsoft has rebuilt the entire shell, it doesn't include any of the legacy things that make Windows 10 so inconsistent when it comes to UI. The Windows Shell on Windows 10X should be much more consistent. At launch, Windows 10X will only be available on traditional clamshell PCs aimed primarily at the education and enterprise markets. The platform will eventually ship on the new devices from factors such as foldable PCs, but that won't be happening in 2021.
Start menu
Microsoft is redesigning the Start menu experience on Windows 10X with a focus on productivity. It features a system-wide search bar along the top that can also search the web and a grid of installed apps below that in place of live tiles. It also has a "recent activities" area that dynamically updates with things the user might want to jump straight into, such as recent Office documents and visited websites. The apps list can be customized, with the ability for users to rearrange which apps show up in the first few rows.
Taskbar
Windows 10X also has a new adaptive Taskbar that features a centered design. The Start and Task View buttons appear in the center, with running and pinned apps appearing between the two. When you open an app, the Start and Task View buttons gently spread apart, giving the Taskbar a much more fluid appearance. There are some new animations; the Start and Task View buttons have their own animations when clicked on, and there's a subtle bounce to app icons when you minimize running apps to the Taskbar.
In addition to the new design, there are also up to three different Taskbar sizes: Small, medium, and large. Large is great for tablets, while medium and small mimic the usual sizes we already have today on Windows 10. On tablets, users can now swipe up anywhere on the Taskbar to access the Start menu, making it easier for touch users to access their apps list. You no longer have to hit the specific Start button to access your Start menu.
Action center
In addition to the new Start and Taskbar experiences, there's also a new Action Center to compliment them. This new Action Center puts more emphasis on quick actions, with the ability to jump into specific quick actions for further control without leaving the Action Center at all. It's also designed in such a way that mimics a control center, with notifications housed above it in a separate box. This new Action Center includes things like volume controls, power options, and battery percentage. There's also a new music control UI that appears in the Action Center when music is playing from a supported app.
State separation feature
Unlike Windows 10, Windows 10X features something called "state separation" which is how the OS lays itself out on a drive. Windows 10 today installs everything into a single partition, which means the user can access system files, as can apps and potential attackers. On Windows 10X, everything goes into its own read-only partition. So OS files are locked away, as are app files, as are drivers, and the registry. The only thing the user and applications can access is the user partition.
This means that malware or viruses can't get in and affect the system because those programs are only able to operate in a single partition, and that assumes they're able to get outside of the app container system Microsoft has built. All apps on Windows 10X run in a container and need explicit permissions to access things that are outside that container. This is already how UWP apps work on Windows 10, and Microsoft will be extending that to Win32 apps on Windows 10X when support for Win32 apps arrives.
Launch date and info
Windows 10X will launch this spring first for commercial markets. Commercial markets include education and enterprise industries looking for sub-$600 PCs for students in the classroom or first-line workers. Windows 10X won't be launching on consumer PCs in 2021, meaning you won't find it on a flagship Dell or HP device. It's also only for clamshell PCs, with foldable, tablets, and other form factor support coming in 2022 and beyond.
Windows 10X will launch without an in-box Mail and Calendar app. It's been removed from the first version of Windows 10X because the platform is aimed at commercial markets that will likely use Outlook Web or stream Outlook via Windows Virtual Desktop. Users can opt to reinstall the Mail and Calendar apps from the Microsoft Store if they wish.
Windows 10X for mainstream markets won't happen until 2022 when Win32 app support among other features comes to the OS as part of the Windows 10 "Nickel" release scheduled for the first half of 2022.
Because Windows 10X is a new operating system, it will not be released as an update for existing Windows 10 PCs. Users won't be able to install Windows 10X on a device that didn't come with Windows 10X, to begin with. There won't be any official ISO media and you won't be able to buy Windows 10X on its own to install on your existing device. It's for new PCs only.
If you would like to read more helpful articles and tips about various software and hardware visit errortools.com daily.
BSOD or Blue Screen of Death errors are one of the most common errors you can encounter on your Windows PC. One of these BSOD errors is the “ACPI_BIOS_ERROR”. If you suddenly get this error, it means that there is some problem in booting the operating system from your hard drive or Windows was not properly installed on your PC. In addition, this error could also mean that there is something wrong with the CMOS battery located in the motherboard.
Unlike other BSOD errors, the workaround for this error is a bit different as these workarounds require a bit more expertise in updating the BIOS as well as setting the correct boot configuration. If you know are capable enough in troubleshooting the problem, refer to the instructions laid out below to fix the BSOD “ACPI_BIOS_ERROR”.
Option 1 – Try to remove the SSD and update the BIOS
The first thing you have to do is to check the primary storage devices on your PC. If you have just installed a new hard drive or SSD recently on your computer, then it’s most likely the cause of the BSOD error. Moreover, you should also ensure that your BIOS is up-to-date to the latest available build.
Remove the SSD/HDD and inject a different HDD that was already preinstalled in your Windows PC.
After that, update the BIOS to the latest available build. After updating it, insert the old SSD/HDD and then try to boot your PC again. The problem should be fixed now. If not, refer to the next given option.
Option 2 – Try to check the CMOS battery and reset the CMOS module
As mentioned earlier, the CMOS battery might also be the one that’s causing the problem. It is a physical component of the motherboard and is a memory chip that contains all the settings configuration on your computer and is also powered by a battery. So if your battery loses power, the CMOS will be reset and as a result, all the configurations will be gone as well. It is also possible that the CMOS module is not properly working and every time things are saved, they are properly written due to the battery. That’s why you have to consider changing the CMOS battery and see if it fixes the problem. In addition, you also have to make sure that you completely reset the CMOS module and then try booting your PC again.
Option 3 – Try to check the BIOS settings
If the BIOS settings are incorrect, chances are that’s the reason why you’re getting the “ACPI_BIOS_ERROR” BSOD error. Every BIOS has different settings which you can make use of to enhance your computer experience. So make sure that your BIOS is up-to-date and that the settings are in accordance with your requirement.
Another thing you can try is to disable the Legacy USB and the Legacy BIOS in the BIOS settings if you are trying to install a 64 bit Windows version. Make sure that you also enable AHCI before plugging in the installation drive on your PC. Moreover, ensure that your PC is using IDE or Integrated Drive Electronics mode instead of SATA or Serial Advanced Technology Attachment. Aside from that, try to check the extracted setup if it is in NTFS format, if it is, you should extract the ISO in FAT32 and use it to install Windows.
Option 4 – Try to reset the ACPI Compliant Control Method
ACPI or Advanced Configuration and Power Interface provide an open standard that operating systems can use to detect hardware, perform power management, as well as monitor the status of your device and provide information for other processes. Chances are, there are some misconfigurations with this module on your PC that lead to believing that there is no battery present. That’s why you need to reset it and see if it fixes the BSOD error or not.
Boot your PC into Safe Mode.
Tap the Win + R keys to open the Run dialog box.
Type in “devmgmt.msc” in the field and tap Enter to open the Device Manager.
After opening the Device Manager, go to the “Batteries” section and click it to expand it and then right-click on the “Microsoft ACPI-Complaint Control Method Battery” option and click on Uninstall.
After you disable the module, click on any empty space and then click the “Scan for hardware changes” option.
Then check if you can now boot your PC normally and without the BSOD error.
Security on your PC and on your accounts is the important thing. Security on your phone device is also very very important. That is why we are bringing you a list of 8 applications that are marked by the cybersecurity team as ones that could be used to steal data from you. If you have by any chance any of these applications installed, uninstall them immediately.
List is as follows:
Cake VPN (com.lazycoder.cakevpns)
Pacific VPN (com.protectvpn.freeapp)
eVPN (com.abcd.evpnfree)
BeatPlayer (com.crrl.beatplayers)
QR/Barcode Scanner MAX (com.bezrukd.qrcodebarcode)
Having any kind of hardware malfunction is not a pleasant place to be. Even a minor malfunction like a broken key on a keyword can introduce certain bad feelings, frustration, and difficulty in working.
So, what are your options when the dreaded key on the keyboard breaks? From my point of view, there are three options that could be accomplished in order to continue working.
Replace broken keyboard with the new one
Yes, the best and most expensive solution, just bite the bullet and buy a new working one.
Replace key with another key
So you broke some key, if you can replace it with another key which you do not use, this option will work only tho if the broken key is not Space bar, enter or similar with specific shape and size.
Remap key
use Windows power tools to remap key function to another working key
There you go, three options to continue working with a broken key on the keyboard.
Error Code 0x80060100 is an error that relates to the Windows Update process. It most commonly occurs when the Update process runs and cannot be completed, as the system appears to have necessary files corrupted or absent.
Common symptoms include:
Inability to begin the Windows Update process
Inability to complete the Windows Update process
While it can be frustrating when users are not able to complete their necessary updates for Windows 10, there are several solutions that are available to fix the problem at hand. Some of the methods that can be used are simple and accessible, even for beginners, while advanced methods of resolution are also available for users who are more confident in their abilities.
Error Code 0x80060100 appears on Windows 10 and earlier versions of the Windows operating systems. In most cases, the steps to resolve the problem remain the same, regardless of the system on which the error appears. This error code is also related to Error Code 0x800b0100, which appears in similar circumstances.
If the solutions below are not successful in resolving Error Code 0x80060100 on your machine, you may need to get in touch with a qualified repair technician who can assist you in the resolution of the issue at hand. Any repair technician used should be familiar with the needs of the Windows 10 update process.
Solution
Error Causes
The primary cause for the appearance of Error Code 0x80060100 on a Windows machine is that the Update files have had damage to them or are found to have elements missing that are necessary for the completion of the Update process.
Further Information and Manual Repair
If Error Code 0x80060100 has appeared on your Windows operating system as you are attempting to download, install, or run Windows Update, there are several steps that you can take to attempt to resolve the error. Some of these methods require advanced knowledge or skills, so if you are not confident in your ability to undertake the steps below, contact a qualified Windows repair technician to assist you in the process.
Here are the best ways to resolve Error Code 0x80060100:
Method One: Run the Troubleshooter for Windows Update
As you attempt to run the Windows Update process and experience difficulty, there is a tool that will usually appear on the screen called the Windows Update Troubleshooter. This process can scan the files being used for the update process and attempt to fix the errors on its own, retrieving or repairing any damaged files as it comes across them.
In most cases, this step on its own will resolve Error Code 0x80060100 on a computer. However, if you are still unable to run Windows Update after using the Troubleshooter, you may need to run a disk repair tool before proceeding.
Method Two: Restart Your Computer
In some cases, Error Code 0x80060100 can be resolved simply by restarting the computer that is affected by the error. Even if this step is not successful on its own, restarting after each of the other methods can allow necessary changes to take place and refresh the progress of the Windows Update process.
Method Three: Use the DISM Tool
This method requires some skill and knowledge of your operating system. To use this tool, follow the steps below:
Step One: From the right side of the screen, use your mouse to swipe inward and select the “Search” option.
Step Two: When the search box appears, enter in the words “command prompt".
Step Three: From the results that appear, right-click on the “Command Prompt” option, then choose the option to “Run as Administrator.” An administrator password may be required at this point.
Step Four: In the window that comes up, enter in the following words, hitting the “Enter” key after each:
Dism.exe /online /cleanup-image /scanhealth
Dism.exe /online /cleanup-image /restorehealth
Step Five: Type in “exit” to close the prompt window and hit the Enter key.
Step Six: Attempt to run the Windows 10 Update process again, restarting your computer as needed beforehand.
If the methods above are not successful in the resolution of Error Code 0x80060100, a qualified Windows repair technician may be able to assist you.
If you wish to always have at your disposal a utility tool to fix these Windows 10 and other related issues when they do arise, download and install a powerful automated tool.
This is a Windows Vista printer error. It occurs when you try to use the plug-and-play service to install a WSD printer on your PC.
WSD is the abbreviation for Web Services for Devices.
It is a Microsoft API to simply programming connections to web service enabled devices such as printers, file shares and scanners. The error 0x00000643 code is displayed in the following format:
“Operation could not be completed (error 0x00000643)”
Solution
Error Causes
The error 0x00000643 may occur due to multiple reasons, including:
No suitable driver installed for your printer
A firewall or other security program is too restrictive
Registry file has invalid entries
Virus and Trojan
Outdated system drivers
Further Information and Manual Repair
To resolve this error code on your PC, you don’t have to hire a professional technician and spend hundreds of dollars to perform system repair. You can resolve it all by yourself, even if you are not a computer programmer or lack technical expertise.
Here are some of the easiest and proven methods to fix the error 0x00000643 on your PC:
1. Update Outdated Drivers
This can be done by accessing the ‘Device Manager’. All you have to do is, go to the start menu and type Device Manager in the start search box. Then click on the Device Manager in the list. On the action menu, click the scan for hardware changes or update the driver.
2. Delete the WSD Port to Resolve Error
Go to the start menu and type printers in the search box. Click printers in the given program list and then click the option add a new printer.
After that, select the existing WSD port and any printer driver. Now delete the printer. The WSD will be deleted automatically. Once this is done, connect the printer to your computer. You will see the plug-and-play service will begin to install the printer again. This process is most likely to resolve the issue and reinstall your printer.
3. Disable Firewall
Sometimes the error may occur if the security programs are too restrictive such as the Firewall. To fix the problem simply disable Firewall.
4. Viral Infection
If the underlying cause of the error is a viral infection, then download a powerful antivirus and run it on your PC. Scan for viruses and delete them.
5. Registry Invalid Entries
If you don’t clean the registry regularly, this overloads with unnecessary, redundant and obsolete files like cookies, internet history, junk files, bad registry keys and invalid entries. This damages the registry and generates such error codes. Although you can resolve and repair the registry manually, but that method is slight tricky and time consuming. It may require technical expertise.
However, another quick and easy way to clean and restore the registry and resolve error 0x00000643 on your system is to download Restoro. This is a next-generation, advanced, and highly functional PC Repair Tool. It is deployed with an intuitive algorithm and multiple utilities such as a smart registry cleaner, a powerful antivirus, and a system optimizer.
The registry cleaning utility detects all registry issues on your PC, removes invalid entries cluttering the registry, and repairs it right away thereby resolving error 0x00000643.
The antivirus simultaneously detects malware on your PC and removes them while the system optimizer boosts the speed of your computer significantly.
Restoro is bug-free, safe, and efficient. It has simple navigations and a user-friendly interface. This software is compatible with all Windows versions including Vista.
To fix error 0x00000643 on your system in seconds, click here to download Restoro now!
Started as an internal network and has slowly expanded since 1960 internet has taken over the world. In the beginning, it was a means of information change but in the modern age you can run applications and virtual machines over the internet, you can stream video and audio, and you can communicate in real-time with someone on the other side of Earth.
With the internet growing so fast in such a small amount of time it is only logical and wise to take a step back and take a good look at what it offers now, what are great things about it and what are some of the worst.
Good sides of the internet
Information
There are a lot of advantages of the internet, first and foremost is information. Internet was made as an information exchange service and even today you can find a lot of various information about various topics that interest you. A site like Wikipedia is a completely free online encyclopedia and a lot of news companies have their own internet sites where you can find free information and news.
On the other hand, there are also websites like udemy, edx, Coursera, and many others that will offer you the education, some for free, some for money but you can get a glimpse and part of university quality education for just a fraction of price.
Online shopping
Sites like Amazon have used the internet and launched themselves as today's multi-billion companies. In today's world, there is not a single thing you can not buy online. Many sites today are going from the large online marketplace where you can find everything to small niche specialized ones. Also every major brand in the world today has its own online store.
Other shops will offer you music, movies, games, etc. Services like steam, xbox pass, sony pass etc, will let you buy games online, other music, movies, and many more.
Streaming services
Days, when you had to buy movies in order to watch them at home, are gone, thanks to the internet we have plenty of streaming services for movies and tv shows as well as ones for music. If you do not want to spend money on actually purchasing things then a good idea is to have a streaming plan set up when you want it.
Email and messaging
Communication is a great thing and since the dawn of mankind people have been talking and sharing with each other, the internet has made it possible to send mail electronically and instantly and modern chat communication is everywhere. We can not just talk with our friends and family that can be on the other side of the world, we can also talk in real-time with the sales representative, with technical service, or attend online classes with a group of people.
Cloud storage services
Saving your pictures in this digital media age on the hard drive can be risky but thanks to modern technologies you can save most of your precious files on cloud servers for safekeeping. From pictures to documents and even other files that you need and want to save. There are some of them that will offer you a free amount and some basic free plans as well.
Bad sides of the internet
Malware, viruses, and phishing
We could not talk about the bad side of the internet if we do not mention its greatest threat. Bad sites, infected software, phishing emails, and many more malicious threats. Problem is that these kinds of tricks and attacks have become more and more sophisticated and harder to detect and avoid.
Pornography
Pornography is bad, having it freely available to children is even worse. Sadly the only way to regulate this is on a computer-by-computer basis by turning on parent control on each one. There are many studies that go into detail about why this is bad, sadly currently there are no effective ways to isolate this content.
No privacy
When we say there is no privacy we do not mean by using social media and not setting your privacy settings altho that also fits in this point, what we are talking about is data mining of your habits and things you do. It is well known that today lot of websites are using some form of AI recommender system in order to tailor your internet experience to suit your needs better. Most of these AI systems are trained by mining your data and analyzing your habits.
If you have 2 google accounts there is a high probability chance that for the same query you will get different results, depending on your so far browsing habits. The same goes for other services as well.
Dark webshops
There are some great things in dark and deep WEB-like sites with true news and information. Even some legit libraries where you can find and download rare books. Sadly as goes with the internet dark and deep WEB also has its well, dark sides, from disturbing content to shops that sell stolen items to straight stealing your money by parading as legit shops but only to steal your money.
Dating sites
We all try to find someone that is perfectly matched with us but using the online dating site has many proven bad effects on psychology. It also devaluates interaction between people and can lower self-esteem.
Bad habits
Since the internet has become wildly available and popular on various devices like tablets and mobile phones more and more people are spending an unhealthy amount of time on it. Harvesting the benefits of the internet is great but find some time for other people as well.
BIOS is software that is running in a chip located on your motherboard, you can enter BIOS usually by hitting DEL once the computer is turned ON but this sometimes varies and it depends solely on the motherboard manufacturer. Inside BIOS you can configure your computer components and set up some other important things including passwords for BIOS itself or for the entire system.
Password itself is meant to protect access to BIOS from other non-technical users or to prevent access to the system from other people if for example computer is in one household and you would like to be the only one having access to it. However, passwords can be forgotten, and sometimes you can even purchase a second-hand computer with a password on it.
In this guide, we will lead you through ways on how to remove your BIOS password so you can regain access to your BIOS settings.
Use Manufacturers master password
Most motherboard manufacturers have built-in a couple of master passwords for BIOS access. If your motherboard has one you can easily find it on the manufacturer's website. Use the master password and remove other passwords inside BIOS, save and exit.
Remove CMOS battery
If you could not find the manufacturer's master password or your motherboard model does not have one remove the CMOS battery to reset BIOS. Note that this method will reset the whole BIOS not only the password. Open on side of your computer casing and locate the round battery on it, do not worry, there is only one battery so you can not make mistake. Remove the battery and leave it outside for around 20 to 30 minutes then place it back as it was, CMOS is reset now and you can access BIOS.
Reset BIOS via jumper
If you want to remove only the password and do not touch other BIOS setting you can locate the BIOS password reset jumper. How the location of this jumper and position is different from the motherboard to motherboard we can not cover them all here and it is advisable to read the manual or find information on the official manufacturer's website.
If you would like to read more helpful articles and tips about various software and hardware visit errortools.com daily.

 Same as in previous Windows versions, Windows 11 will also use certain applications as default ones for opening certain file types and file extensions. And yes, same as in previous versions it will come preconfigured for certain file types and associated applications like for example photos for pictures.
Of course, users usually have their own favorite applications for certain file types and much more prefer to open them inside the application of their choice instead of the default one.
We can change the default application like in previous Windows versions but this time there are two ways and overall more control of this process. Windows 11 has settings for choosing default file type applications and default file extension applications giving you more control of this process.
Same as in previous Windows versions, Windows 11 will also use certain applications as default ones for opening certain file types and file extensions. And yes, same as in previous versions it will come preconfigured for certain file types and associated applications like for example photos for pictures.
Of course, users usually have their own favorite applications for certain file types and much more prefer to open them inside the application of their choice instead of the default one.
We can change the default application like in previous Windows versions but this time there are two ways and overall more control of this process. Windows 11 has settings for choosing default file type applications and default file extension applications giving you more control of this process.

