
Activating photo viewer
How technically photo viewer is still in the system but not used we will have to make it available again and this we will do by adding some lines in the Windows registry, that being said, open a notepad and paste the following code as it is in it.Windows Registry Editor Version 5.00 [HKEY_CLASSES_ROOT\jpegfile\shell\open\DropTarget] "Clsid"="{FFE2A43C-56B9-4bf5-9A79-CC6D4285608A}" [HKEY_CLASSES_ROOT\pngfile\shell\open\DropTarget] "Clsid"="{FFE2A43C-56B9-4bf5-9A79-CC6D4285608A}" [HKEY_CLASSES_ROOT\Applications\photoviewer.dll\shell\open] "MuiVerb"="@photoviewer.dll,-3043" [HKEY_CLASSES_ROOT\Applications\photoviewer.dll\shell\open\command] @=hex(2):25,00,53,00,79,00,73,00,74,00,65,00,6d,00,52,00,6f,00,6f,00,74,00,25,\ 00,5c,00,53,00,79,00,73,00,74,00,65,00,6d,00,33,00,32,00,5c,00,72,00,75,00,\ 6e,00,64,00,6c,00,6c,00,33,00,32,00,2e,00,65,00,78,00,65,00,20,00,22,00,25,\ 00,50,00,72,00,6f,00,67,00,72,00,61,00,6d,00,46,00,69,00,6c,00,65,00,73,00,\ 25,00,5c,00,57,00,69,00,6e,00,64,00,6f,00,77,00,73,00,20,00,50,00,68,00,6f,\ 00,74,00,6f,00,20,00,56,00,69,00,65,00,77,00,65,00,72,00,5c,00,50,00,68,00,\ 6f,00,74,00,6f,00,56,00,69,00,65,00,77,00,65,00,72,00,2e,00,64,00,6c,00,6c,\ 00,22,00,2c,00,20,00,49,00,6d,00,61,00,67,00,65,00,56,00,69,00,65,00,77,00,\ 5f,00,46,00,75,00,6c,00,6c,00,73,00,63,00,72,00,65,00,65,00,6e,00,20,00,25,\ 00,31,00,00,00 [HKEY_CLASSES_ROOT\Applications\photoviewer.dll\shell\open\DropTarget] "Clsid"="{FFE2A43C-56B9-4bf5-9A79-CC6D4285608A}" [HKEY_CLASSES_ROOT\PhotoViewer.FileAssoc.Bitmap] "ImageOptionFlags"=dword:00000001 "FriendlyTypeName"=hex(2):40,00,25,00,50,00,72,00,6f,00,67,00,72,00,61,00,6d,\ 00,46,00,69,00,6c,00,65,00,73,00,25,00,5c,00,57,00,69,00,6e,00,64,00,6f,00,\ 77,00,73,00,20,00,50,00,68,00,6f,00,74,00,6f,00,20,00,56,00,69,00,65,00,77,\ 00,65,00,72,00,5c,00,50,00,68,00,6f,00,74,00,6f,00,56,00,69,00,65,00,77,00,\ 65,00,72,00,2e,00,64,00,6c,00,6c,00,2c,00,2d,00,33,00,30,00,35,00,36,00,00,\ 00 [HKEY_CLASSES_ROOT\PhotoViewer.FileAssoc.Bitmap\DefaultIcon] @="%SystemRoot%\\System32\\imageres.dll,-70" [HKEY_CLASSES_ROOT\PhotoViewer.FileAssoc.Bitmap\shell\open\command] @=hex(2):25,00,53,00,79,00,73,00,74,00,65,00,6d,00,52,00,6f,00,6f,00,74,00,25,\ 00,5c,00,53,00,79,00,73,00,74,00,65,00,6d,00,33,00,32,00,5c,00,72,00,75,00,\ 6e,00,64,00,6c,00,6c,00,33,00,32,00,2e,00,65,00,78,00,65,00,20,00,22,00,25,\ 00,50,00,72,00,6f,00,67,00,72,00,61,00,6d,00,46,00,69,00,6c,00,65,00,73,00,\ 25,00,5c,00,57,00,69,00,6e,00,64,00,6f,00,77,00,73,00,20,00,50,00,68,00,6f,\ 00,74,00,6f,00,20,00,56,00,69,00,65,00,77,00,65,00,72,00,5c,00,50,00,68,00,\ 6f,00,74,00,6f,00,56,00,69,00,65,00,77,00,65,00,72,00,2e,00,64,00,6c,00,6c,\ 00,22,00,2c,00,20,00,49,00,6d,00,61,00,67,00,65,00,56,00,69,00,65,00,77,00,\ 5f,00,46,00,75,00,6c,00,6c,00,73,00,63,00,72,00,65,00,65,00,6e,00,20,00,25,\ 00,31,00,00,00 [HKEY_CLASSES_ROOT\PhotoViewer.FileAssoc.Bitmap\shell\open\DropTarget] "Clsid"="{FFE2A43C-56B9-4bf5-9A79-CC6D4285608A}" [HKEY_CLASSES_ROOT\Applications\photoviewer.dll\shell\print] "NeverDefault"="" [HKEY_CLASSES_ROOT\Applications\photoviewer.dll\shell\print\command] @=hex(2):25,00,53,00,79,00,73,00,74,00,65,00,6d,00,52,00,6f,00,6f,00,74,00,25,\ 00,5c,00,53,00,79,00,73,00,74,00,65,00,6d,00,33,00,32,00,5c,00,72,00,75,00,\ 6e,00,64,00,6c,00,6c,00,33,00,32,00,2e,00,65,00,78,00,65,00,20,00,22,00,25,\ 00,50,00,72,00,6f,00,67,00,72,00,61,00,6d,00,46,00,69,00,6c,00,65,00,73,00,\ 25,00,5c,00,57,00,69,00,6e,00,64,00,6f,00,77,00,73,00,20,00,50,00,68,00,6f,\ 00,74,00,6f,00,20,00,56,00,69,00,65,00,77,00,65,00,72,00,5c,00,50,00,68,00,\ 6f,00,74,00,6f,00,56,00,69,00,65,00,77,00,65,00,72,00,2e,00,64,00,6c,00,6c,\ 00,22,00,2c,00,20,00,49,00,6d,00,61,00,67,00,65,00,56,00,69,00,65,00,77,00,\ 5f,00,46,00,75,00,6c,00,6c,00,73,00,63,00,72,00,65,00,65,00,6e,00,20,00,25,\ 00,31,00,00,00 [HKEY_CLASSES_ROOT\Applications\photoviewer.dll\shell\print\DropTarget] "Clsid"="{60fd46de-f830-4894-a628-6fa81bc0190d}" [HKEY_CLASSES_ROOT\PhotoViewer.FileAssoc.JFIF] "EditFlags"=dword:00010000 "ImageOptionFlags"=dword:00000001 "FriendlyTypeName"=hex(2):40,00,25,00,50,00,72,00,6f,00,67,00,72,00,61,00,6d,\ 00,46,00,69,00,6c,00,65,00,73,00,25,00,5c,00,57,00,69,00,6e,00,64,00,6f,00,\ 77,00,73,00,20,00,50,00,68,00,6f,00,74,00,6f,00,20,00,56,00,69,00,65,00,77,\ 00,65,00,72,00,5c,00,50,00,68,00,6f,00,74,00,6f,00,56,00,69,00,65,00,77,00,\ 65,00,72,00,2e,00,64,00,6c,00,6c,00,2c,00,2d,00,33,00,30,00,35,00,35,00,00,\ 00 [HKEY_CLASSES_ROOT\PhotoViewer.FileAssoc.JFIF\DefaultIcon] @="%SystemRoot%\\System32\\imageres.dll,-72" [HKEY_CLASSES_ROOT\PhotoViewer.FileAssoc.JFIF\shell\open] "MuiVerb"=hex(2):40,00,25,00,50,00,72,00,6f,00,67,00,72,00,61,00,6d,00,46,00,\ 69,00,6c,00,65,00,73,00,25,00,5c,00,57,00,69,00,6e,00,64,00,6f,00,77,00,73,\ 00,20,00,50,00,68,00,6f,00,74,00,6f,00,20,00,56,00,69,00,65,00,77,00,65,00,\ 72,00,5c,00,70,00,68,00,6f,00,74,00,6f,00,76,00,69,00,65,00,77,00,65,00,72,\ 00,2e,00,64,00,6c,00,6c,00,2c,00,2d,00,33,00,30,00,34,00,33,00,00,00 [HKEY_CLASSES_ROOT\PhotoViewer.FileAssoc.JFIF\shell\open\command] @=hex(2):25,00,53,00,79,00,73,00,74,00,65,00,6d,00,52,00,6f,00,6f,00,74,00,25,\ 00,5c,00,53,00,79,00,73,00,74,00,65,00,6d,00,33,00,32,00,5c,00,72,00,75,00,\ 6e,00,64,00,6c,00,6c,00,33,00,32,00,2e,00,65,00,78,00,65,00,20,00,22,00,25,\ 00,50,00,72,00,6f,00,67,00,72,00,61,00,6d,00,46,00,69,00,6c,00,65,00,73,00,\ 25,00,5c,00,57,00,69,00,6e,00,64,00,6f,00,77,00,73,00,20,00,50,00,68,00,6f,\ 00,74,00,6f,00,20,00,56,00,69,00,65,00,77,00,65,00,72,00,5c,00,50,00,68,00,\ 6f,00,74,00,6f,00,56,00,69,00,65,00,77,00,65,00,72,00,2e,00,64,00,6c,00,6c,\ 00,22,00,2c,00,20,00,49,00,6d,00,61,00,67,00,65,00,56,00,69,00,65,00,77,00,\ 5f,00,46,00,75,00,6c,00,6c,00,73,00,63,00,72,00,65,00,65,00,6e,00,20,00,25,\ 00,31,00,00,00 [HKEY_CLASSES_ROOT\PhotoViewer.FileAssoc.JFIF\shell\open\DropTarget] "Clsid"="{FFE2A43C-56B9-4bf5-9A79-CC6D4285608A}" [HKEY_CLASSES_ROOT\PhotoViewer.FileAssoc.Jpeg] "EditFlags"=dword:00010000 "ImageOptionFlags"=dword:00000001 "FriendlyTypeName"=hex(2):40,00,25,00,50,00,72,00,6f,00,67,00,72,00,61,00,6d,\ 00,46,00,69,00,6c,00,65,00,73,00,25,00,5c,00,57,00,69,00,6e,00,64,00,6f,00,\ 77,00,73,00,20,00,50,00,68,00,6f,00,74,00,6f,00,20,00,56,00,69,00,65,00,77,\ 00,65,00,72,00,5c,00,50,00,68,00,6f,00,74,00,6f,00,56,00,69,00,65,00,77,00,\ 65,00,72,00,2e,00,64,00,6c,00,6c,00,2c,00,2d,00,33,00,30,00,35,00,35,00,00,\ 00 [HKEY_CLASSES_ROOT\PhotoViewer.FileAssoc.Jpeg\DefaultIcon] @="%SystemRoot%\\System32\\imageres.dll,-72" [HKEY_CLASSES_ROOT\PhotoViewer.FileAssoc.Jpeg\shell\open] "MuiVerb"=hex(2):40,00,25,00,50,00,72,00,6f,00,67,00,72,00,61,00,6d,00,46,00,\ 69,00,6c,00,65,00,73,00,25,00,5c,00,57,00,69,00,6e,00,64,00,6f,00,77,00,73,\ 00,20,00,50,00,68,00,6f,00,74,00,6f,00,20,00,56,00,69,00,65,00,77,00,65,00,\ 72,00,5c,00,70,00,68,00,6f,00,74,00,6f,00,76,00,69,00,65,00,77,00,65,00,72,\ 00,2e,00,64,00,6c,00,6c,00,2c,00,2d,00,33,00,30,00,34,00,33,00,00,00 [HKEY_CLASSES_ROOT\PhotoViewer.FileAssoc.Jpeg\shell\open\command] @=hex(2):25,00,53,00,79,00,73,00,74,00,65,00,6d,00,52,00,6f,00,6f,00,74,00,25,\ 00,5c,00,53,00,79,00,73,00,74,00,65,00,6d,00,33,00,32,00,5c,00,72,00,75,00,\ 6e,00,64,00,6c,00,6c,00,33,00,32,00,2e,00,65,00,78,00,65,00,20,00,22,00,25,\ 00,50,00,72,00,6f,00,67,00,72,00,61,00,6d,00,46,00,69,00,6c,00,65,00,73,00,\ 25,00,5c,00,57,00,69,00,6e,00,64,00,6f,00,77,00,73,00,20,00,50,00,68,00,6f,\ 00,74,00,6f,00,20,00,56,00,69,00,65,00,77,00,65,00,72,00,5c,00,50,00,68,00,\ 6f,00,74,00,6f,00,56,00,69,00,65,00,77,00,65,00,72,00,2e,00,64,00,6c,00,6c,\ 00,22,00,2c,00,20,00,49,00,6d,00,61,00,67,00,65,00,56,00,69,00,65,00,77,00,\ 5f,00,46,00,75,00,6c,00,6c,00,73,00,63,00,72,00,65,00,65,00,6e,00,20,00,25,\ 00,31,00,00,00 [HKEY_CLASSES_ROOT\PhotoViewer.FileAssoc.Jpeg\shell\open\DropTarget] "Clsid"="{FFE2A43C-56B9-4bf5-9A79-CC6D4285608A}" [HKEY_CLASSES_ROOT\PhotoViewer.FileAssoc.Gif] "ImageOptionFlags"=dword:00000001 "FriendlyTypeName"=hex(2):40,00,25,00,50,00,72,00,6f,00,67,00,72,00,61,00,6d,\ 00,46,00,69,00,6c,00,65,00,73,00,25,00,5c,00,57,00,69,00,6e,00,64,00,6f,00,\ 77,00,73,00,20,00,50,00,68,00,6f,00,74,00,6f,00,20,00,56,00,69,00,65,00,77,\ 00,65,00,72,00,5c,00,50,00,68,00,6f,00,74,00,6f,00,56,00,69,00,65,00,77,00,\ 65,00,72,00,2e,00,64,00,6c,00,6c,00,2c,00,2d,00,33,00,30,00,35,00,37,00,00,\ 00 [HKEY_CLASSES_ROOT\PhotoViewer.FileAssoc.Gif\DefaultIcon] @="%SystemRoot%\\System32\\imageres.dll,-83" [HKEY_CLASSES_ROOT\PhotoViewer.FileAssoc.Gif\shell\open\command] @=hex(2):25,00,53,00,79,00,73,00,74,00,65,00,6d,00,52,00,6f,00,6f,00,74,00,25,\ 00,5c,00,53,00,79,00,73,00,74,00,65,00,6d,00,33,00,32,00,5c,00,72,00,75,00,\ 6e,00,64,00,6c,00,6c,00,33,00,32,00,2e,00,65,00,78,00,65,00,20,00,22,00,25,\ 00,50,00,72,00,6f,00,67,00,72,00,61,00,6d,00,46,00,69,00,6c,00,65,00,73,00,\ 25,00,5c,00,57,00,69,00,6e,00,64,00,6f,00,77,00,73,00,20,00,50,00,68,00,6f,\ 00,74,00,6f,00,20,00,56,00,69,00,65,00,77,00,65,00,72,00,5c,00,50,00,68,00,\ 6f,00,74,00,6f,00,56,00,69,00,65,00,77,00,65,00,72,00,2e,00,64,00,6c,00,6c,\ 00,22,00,2c,00,20,00,49,00,6d,00,61,00,67,00,65,00,56,00,69,00,65,00,77,00,\ 5f,00,46,00,75,00,6c,00,6c,00,73,00,63,00,72,00,65,00,65,00,6e,00,20,00,25,\ 00,31,00,00,00 [HKEY_CLASSES_ROOT\PhotoViewer.FileAssoc.Gif\shell\open\DropTarget] "Clsid"="{FFE2A43C-56B9-4bf5-9A79-CC6D4285608A}" [HKEY_CLASSES_ROOT\PhotoViewer.FileAssoc.Png] "ImageOptionFlags"=dword:00000001 "FriendlyTypeName"=hex(2):40,00,25,00,50,00,72,00,6f,00,67,00,72,00,61,00,6d,\ 00,46,00,69,00,6c,00,65,00,73,00,25,00,5c,00,57,00,69,00,6e,00,64,00,6f,00,\ 77,00,73,00,20,00,50,00,68,00,6f,00,74,00,6f,00,20,00,56,00,69,00,65,00,77,\ 00,65,00,72,00,5c,00,50,00,68,00,6f,00,74,00,6f,00,56,00,69,00,65,00,77,00,\ 65,00,72,00,2e,00,64,00,6c,00,6c,00,2c,00,2d,00,33,00,30,00,35,00,37,00,00,\ 00 [HKEY_CLASSES_ROOT\PhotoViewer.FileAssoc.Png\DefaultIcon] @="%SystemRoot%\\System32\\imageres.dll,-71" [HKEY_CLASSES_ROOT\PhotoViewer.FileAssoc.Png\shell\open\command] @=hex(2):25,00,53,00,79,00,73,00,74,00,65,00,6d,00,52,00,6f,00,6f,00,74,00,25,\ 00,5c,00,53,00,79,00,73,00,74,00,65,00,6d,00,33,00,32,00,5c,00,72,00,75,00,\ 6e,00,64,00,6c,00,6c,00,33,00,32,00,2e,00,65,00,78,00,65,00,20,00,22,00,25,\ 00,50,00,72,00,6f,00,67,00,72,00,61,00,6d,00,46,00,69,00,6c,00,65,00,73,00,\ 25,00,5c,00,57,00,69,00,6e,00,64,00,6f,00,77,00,73,00,20,00,50,00,68,00,6f,\ 00,74,00,6f,00,20,00,56,00,69,00,65,00,77,00,65,00,72,00,5c,00,50,00,68,00,\ 6f,00,74,00,6f,00,56,00,69,00,65,00,77,00,65,00,72,00,2e,00,64,00,6c,00,6c,\ 00,22,00,2c,00,20,00,49,00,6d,00,61,00,67,00,65,00,56,00,69,00,65,00,77,00,\ 5f,00,46,00,75,00,6c,00,6c,00,73,00,63,00,72,00,65,00,65,00,6e,00,20,00,25,\ 00,31,00,00,00 [HKEY_CLASSES_ROOT\PhotoViewer.FileAssoc.Png\shell\open\DropTarget] "Clsid"="{FFE2A43C-56B9-4bf5-9A79-CC6D4285608A}" [HKEY_CLASSES_ROOT\PhotoViewer.FileAssoc.Wdp] "EditFlags"=dword:00010000 "ImageOptionFlags"=dword:00000001 [HKEY_CLASSES_ROOT\PhotoViewer.FileAssoc.Wdp\DefaultIcon] @="%SystemRoot%\\System32\\wmphoto.dll,-400" [HKEY_CLASSES_ROOT\PhotoViewer.FileAssoc.Wdp\shell\open] "MuiVerb"=hex(2):40,00,25,00,50,00,72,00,6f,00,67,00,72,00,61,00,6d,00,46,00,\ 69,00,6c,00,65,00,73,00,25,00,5c,00,57,00,69,00,6e,00,64,00,6f,00,77,00,73,\ 00,20,00,50,00,68,00,6f,00,74,00,6f,00,20,00,56,00,69,00,65,00,77,00,65,00,\ 72,00,5c,00,70,00,68,00,6f,00,74,00,6f,00,76,00,69,00,65,00,77,00,65,00,72,\ 00,2e,00,64,00,6c,00,6c,00,2c,00,2d,00,33,00,30,00,34,00,33,00,00,00 [HKEY_CLASSES_ROOT\PhotoViewer.FileAssoc.Wdp\shell\open\command] @=hex(2):25,00,53,00,79,00,73,00,74,00,65,00,6d,00,52,00,6f,00,6f,00,74,00,25,\ 00,5c,00,53,00,79,00,73,00,74,00,65,00,6d,00,33,00,32,00,5c,00,72,00,75,00,\ 6e,00,64,00,6c,00,6c,00,33,00,32,00,2e,00,65,00,78,00,65,00,20,00,22,00,25,\ 00,50,00,72,00,6f,00,67,00,72,00,61,00,6d,00,46,00,69,00,6c,00,65,00,73,00,\ 25,00,5c,00,57,00,69,00,6e,00,64,00,6f,00,77,00,73,00,20,00,50,00,68,00,6f,\ 00,74,00,6f,00,20,00,56,00,69,00,65,00,77,00,65,00,72,00,5c,00,50,00,68,00,\ 6f,00,74,00,6f,00,56,00,69,00,65,00,77,00,65,00,72,00,2e,00,64,00,6c,00,6c,\ 00,22,00,2c,00,20,00,49,00,6d,00,61,00,67,00,65,00,56,00,69,00,65,00,77,00,\ 5f,00,46,00,75,00,6c,00,6c,00,73,00,63,00,72,00,65,00,65,00,6e,00,20,00,25,\ 00,31,00,00,00 [HKEY_CLASSES_ROOT\PhotoViewer.FileAssoc.Wdp\shell\open\DropTarget] "Clsid"="{FFE2A43C-56B9-4bf5-9A79-CC6D4285608A}" [HKEY_CLASSES_ROOT\SystemFileAssociations\image\shell\Image Preview\command] @=hex(2):25,00,53,00,79,00,73,00,74,00,65,00,6d,00,52,00,6f,00,6f,00,74,00,25,\ 00,5c,00,53,00,79,00,73,00,74,00,65,00,6d,00,33,00,32,00,5c,00,72,00,75,00,\ 6e,00,64,00,6c,00,6c,00,33,00,32,00,2e,00,65,00,78,00,65,00,20,00,22,00,25,\ 00,50,00,72,00,6f,00,67,00,72,00,61,00,6d,00,46,00,69,00,6c,00,65,00,73,00,\ 25,00,5c,00,57,00,69,00,6e,00,64,00,6f,00,77,00,73,00,20,00,50,00,68,00,6f,\ 00,74,00,6f,00,20,00,56,00,69,00,65,00,77,00,65,00,72,00,5c,00,50,00,68,00,\ 6f,00,74,00,6f,00,56,00,69,00,65,00,77,00,65,00,72,00,2e,00,64,00,6c,00,6c,\ 00,22,00,2c,00,20,00,49,00,6d,00,61,00,67,00,65,00,56,00,69,00,65,00,77,00,\ 5f,00,46,00,75,00,6c,00,6c,00,73,00,63,00,72,00,65,00,65,00,6e,00,20,00,25,\ 00,31,00,00,00 [HKEY_CLASSES_ROOT\SystemFileAssociations\image\shell\Image Preview\DropTarget] "{FFE2A43C-56B9-4bf5-9A79-CC6D4285608A}"="" [HKEY_LOCAL_MACHINE\SOFTWARE\Microsoft\Windows Photo Viewer\Capabilities] "ApplicationDescription"="@%ProgramFiles%\\Windows Photo Viewer\\photoviewer.dll,-3069" "ApplicationName"="@%ProgramFiles%\\Windows Photo Viewer\\photoviewer.dll,-3009" [HKEY_LOCAL_MACHINE\SOFTWARE\Microsoft\Windows Photo Viewer\Capabilities\FileAssociations] ".cr2"="PhotoViewer.FileAssoc.Tiff" ".jpg"="PhotoViewer.FileAssoc.Jpeg" ".wdp"="PhotoViewer.FileAssoc.Wdp" ".jfif"="PhotoViewer.FileAssoc.JFIF" ".dib"="PhotoViewer.FileAssoc.Bitmap" ".png"="PhotoViewer.FileAssoc.Png" ".jxr"="PhotoViewer.FileAssoc.Wdp" ".bmp"="PhotoViewer.FileAssoc.Bitmap" ".jpe"="PhotoViewer.FileAssoc.Jpeg" ".jpeg"="PhotoViewer.FileAssoc.Jpeg" ".gif"="PhotoViewer.FileAssoc.Gif" ".tif"="PhotoViewer.FileAssoc.Tiff" ".tiff"="PhotoViewer.FileAssoc.Tiff"
Yup, that is a lot of keys and settings but you are almost done. Once you have pasted text into your new notepad document save it but as .REG, you can name it however you want but it has to be .REG extension. Once the file is saved double click on it to merge it into the Windows registry. You might need to turn off UAC for this operation (check our tutorial on this topic) and accept warning messages but once it is done you should now have an old photo viewer as a choice for your default viewing application. All you have to do now is to go to settings and go to default apps, under photo viewer you should see your current default viewing application, probably photos, click on it to see options and choose photo viewer and exit the Settings menu, and you're done.
 Once it opens, click on Device Manager to open it,
If you have a driver device error inside Windows, you should see it immediately when entering the Device Manager, it will have a yellow exclamation mark beside it. Right-click on it and choose update driver.
Once it opens, click on Device Manager to open it,
If you have a driver device error inside Windows, you should see it immediately when entering the Device Manager, it will have a yellow exclamation mark beside it. Right-click on it and choose update driver.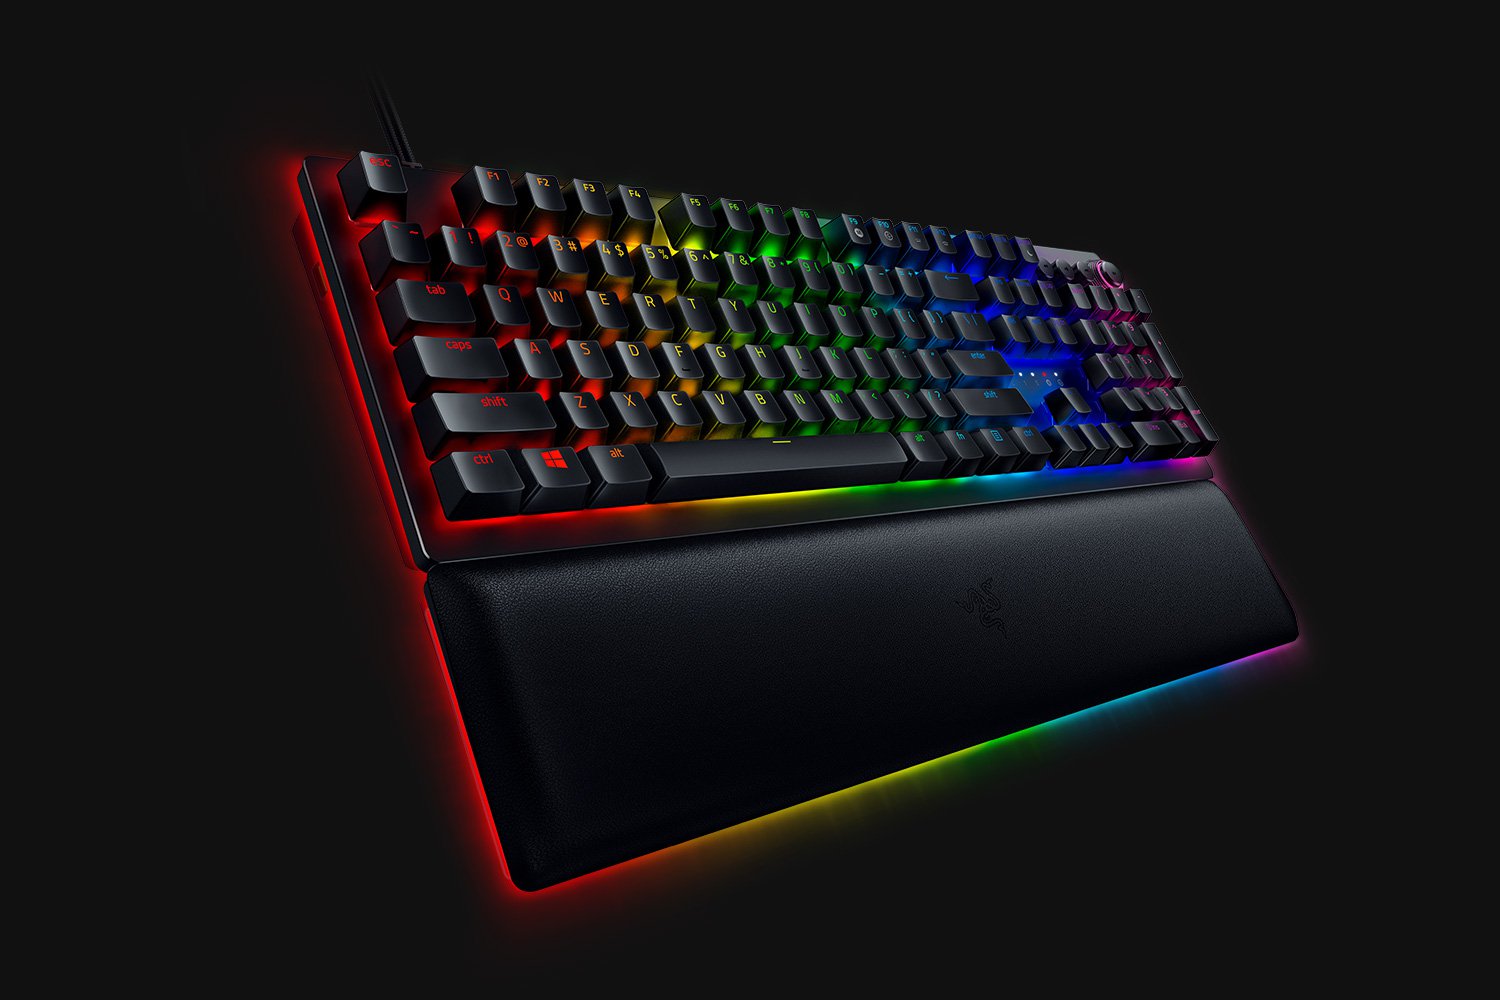 When it comes to computer peripherals first thing that comes to people's minds is probably Mouse and Keyboard. Also when discussing peripherals brands, Razer is not a stranger and over the years it has built its name and cult following.
Razer’s mechanical keyboards have been always in the upper field of quality and trust from users and Huntsman is no different.
When it comes to computer peripherals first thing that comes to people's minds is probably Mouse and Keyboard. Also when discussing peripherals brands, Razer is not a stranger and over the years it has built its name and cult following.
Razer’s mechanical keyboards have been always in the upper field of quality and trust from users and Huntsman is no different.
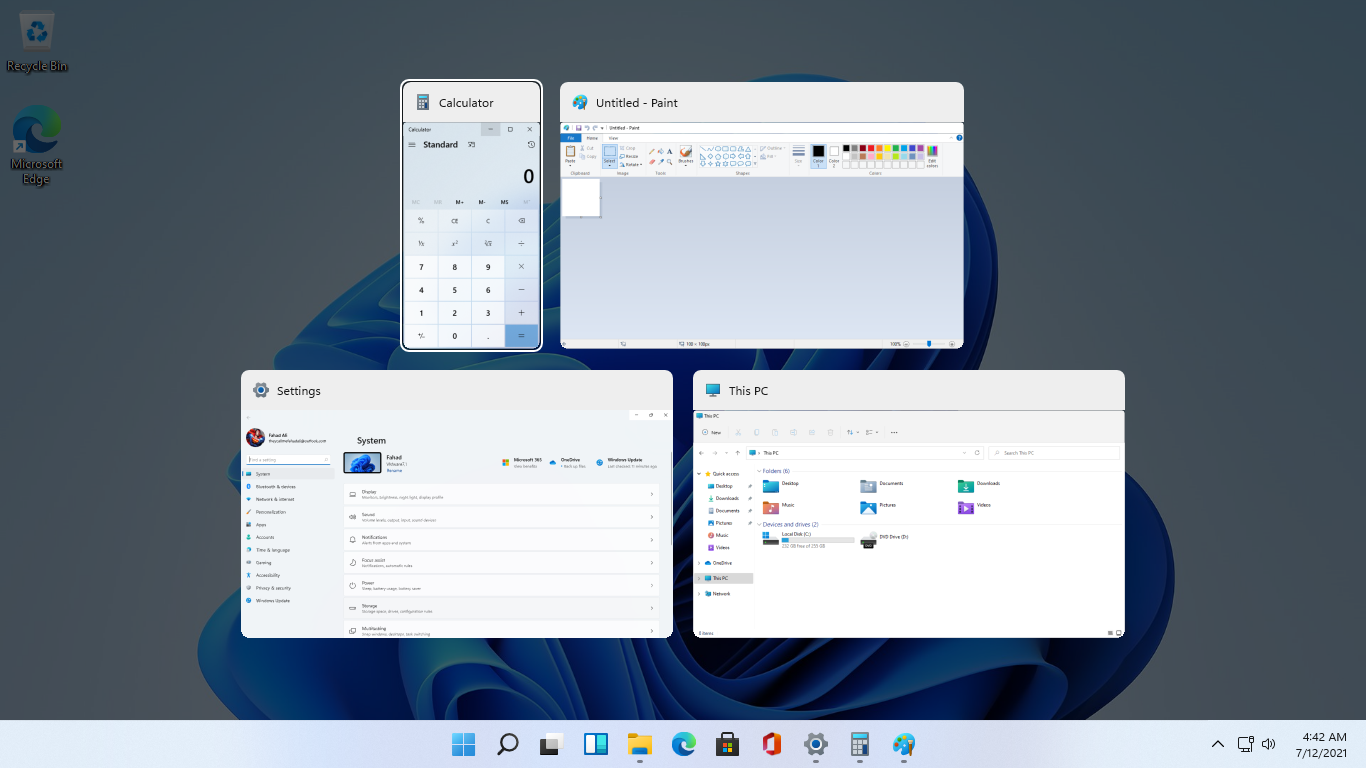 As in previous Windows 10, inside Windows 11 also when you press the ALT + TAB key combination you will get a preview of all running applications along with all Browser tabs so you can go through them and pick the one you want to switch to.
Alto, I personally am a big fan of alt-tabbing, I must admit that I am not a big fan of having multiple browsers tabs on screen when I do press key combo. Luckily there is a very easy way to turn this feature off.
Turning browsers tabs thumbnails off
As in previous Windows 10, inside Windows 11 also when you press the ALT + TAB key combination you will get a preview of all running applications along with all Browser tabs so you can go through them and pick the one you want to switch to.
Alto, I personally am a big fan of alt-tabbing, I must admit that I am not a big fan of having multiple browsers tabs on screen when I do press key combo. Luckily there is a very easy way to turn this feature off.
Turning browsers tabs thumbnails off
