CinematicFanatic (by MyWay) is a browser extension for Google Chrome that may come bundled with other free software that you download off of the Internet. When installed CinematicFanatic will set the homepage and search engine for your web browser to http://search.myway.com
While browsing the internet with this extension installed, you will see additional ads, sponsored content, and even pop-up ads throughout your browsing sessions.
While CinematicFanatic is active, it will log user information, visited websites, product categories. This information is later used/sold to better display targeted ads through your web pages as sponsored content and banner ads.
CinematicFanatic has been marked as a Browser Extension by several popular anti-malware scanners, and due to its information-gathering behavior, it is recommended to remove it from your computer.
Browser hijack is a very common type of internet fraud where your web browser configurations are modified to allow it to do things you never intend. Browser hijacker malware is developed for many different reasons. These are typically used to force visitors to predetermined sites, manipulating web traffic to generate ad revenue. Even though it may seem naive, all browser hijackers are dangerous and thus always regarded as security risks. They not only screw up your web browsers, but browser hijackers can even modify the computer registry to make your PC susceptible to other forms of hacking.
There are several symptoms of browser hijacking. Here are a few of them:
1. home-page is modified
2. bookmark and the new tab are likewise changed
3. The default search page of your browser is altered
4. you’ll see multiple toolbars in your internet browser
5. you will find random pop-ups start showing regularly
6. websites load slowly and often incomplete
7. You simply can’t access particular sites, particularly anti-malware websites.
Browser hijackers could use drive-by downloads or file-sharing websites or perhaps an e-mail attachment in order to reach a targeted computer. Many web browser hijackings originate from add-on programs, i.e., browser helper objects (BHO), toolbars, or plug-ins added to browsers to provide them additional functionality. A browser hijacker could also come bundled up with some freeware which you unintentionally download to your PC, compromising your internet security. Some of the well-known hijackers are CinematicFanatic, Babylon Toolbar, Conduit Search, Sweet Page, OneWebSearch, and CoolWebSearch.
Browser hijackers could disrupt the user’s web surfing experience greatly, keep track of the websites visited by users and steal financial information, cause difficulty in connecting to the net, and ultimately create stability issues, making applications and systems crash.
Certain browser hijacking could be easily reversed by discovering and removing the corresponding malware software through your control panel. Having said that, many hijackers are really tenacious and need specialized tools to eliminate them. Additionally, manual removals demand deep system understanding and thus can be a very difficult job for inexperienced computer users.
You might opt for automatic browser hijacker removal by simply installing and running an efficient anti-malware program. One of the top tools for fixing browser hijacker infections is SafeBytes Anti-Malware. It assists you to get rid of any pre-existing malware on your system and gives you real-time monitoring and protection from new threats. Together with the antivirus tool, a system optimizer, such as SafeBytes’s Total System Care, will help you in removing all related files and modifications in the computer registry automatically.
Viruses could cause a lot of damage to your PC. Some malware is designed to interfere with or block things that you’d like to do on your personal computer. It may not allow you to download anything from the net or it will stop you from accessing a few or all of the sites, especially the antivirus sites. If you’re reading this, chances are you’re stuck with a malware infection that is preventing you to download and/or install the Safebytes Anti-Malware program on your PC. Refer to the instructions below to remove malware in alternate ways.
In Safe Mode, you can change Windows settings, uninstall or install some applications, and get rid of hard-to-delete viruses and malware. In case the malicious software is set to load automatically when the PC starts, shifting into this particular mode may prevent it from doing so. In order to get into Safe Mode or Safe Mode with Networking, press the F8 key while the computer is starting up or run MSCONFIG and look for the “Safe Boot” options under the “Boot” tab. Once you’re in safe mode, you can try to install your anti-malware software program without the hindrance of the virus. Now, you can run the anti-malware scan to remove viruses and malware without hindrance from another application.
Web-based malware could be environment-specific, targeting a particular browser or attacking specific versions of the browser. If you appear to have a virus attached to Internet Explorer, then switch to a different browser with built-in safety features, such as Firefox or Chrome, to download your preferred antivirus program – Safebytes.
Another solution is to store and operate an antivirus software program entirely from a Thumb drive. Adopt these measures to use a USB drive to clean your corrupted PC.
1) Download the anti-malware on a virus-free PC.
2) Plug the Flash drive into the uninfected computer.
3) Double-click the Setup icon of the anti-malware software to run the Installation Wizard.
4) When asked, select the location of the pen drive as the place where you would like to put the software files. Follow the instructions on the computer screen to finish off the installation process.
5) Transfer the USB drive from the uninfected computer to the infected computer.
6) Double-click the EXE file to run the Safebytes program right from the pen drive.
7) Hit the “Scan Now” button to start the malware scan.
If you’re looking to purchase anti-malware for your computer, there are various brands and utilities for you to consider. A few of them are excellent, some are ok types, and some will damage your computer themselves! While looking for antivirus software, choose one that provides reliable, efficient, and complete protection against all known viruses and malware. Amongst few good applications, SafeBytes Anti-Malware is the highly recommended software for the security-conscious user.
SafeBytes can be described as a highly effective, real-time antivirus application that is created to assist the regular computer end user in protecting their computer from malicious threats. This tool can easily identify, remove, and protect your PC from the most advanced malware intrusions including spyware, adware, trojan horses, ransomware, worms, PUPs, parasites along other potentially harmful software applications.
Best AntiMalware Protection: By using a critically acclaimed malware engine, SafeBytes offers multilayered protection that is designed to catch and remove viruses and malware that are concealed deep inside your computer system.
Real-Time Protection: SafeBytes gives round-the-clock protection for your computer limiting malware attacks instantly. This utility will always monitor your PC for suspicious activity and updates itself regularly to keep abreast of the latest threats.
Safe Browsing: Safebytes allots all websites a unique safety score that helps you to get an idea of whether the website you’re about to visit is safe to view or known to be a phishing site.
Fast Multi-threaded Scanning: SafeBytes’s virus scan engine is one of the fastest and most efficient within the industry. It's targeted scanning tremendously increases the catch rate for viruses that are embedded in various computer files.
Light-weight Tool: SafeBytes is a lightweight and easy-of-use antivirus and anti-malware solution. As it uses minimal computer resources, this application leaves the computer’s power exactly where it belongs to: with you.
Premium Support: You will get 24/7 technical support to quickly resolve any issue with your security tool.
SafeBytes will keep your computer safe from most advanced malware threats automatically with hardly any input needed from you again. Now you may understand that this software does more than just scan and remove threats on your PC. If you’re trying to find a comprehensive anti-malware program that’s still simple enough to use, SafeBytes Anti-Malware is exactly what you will need!
If you don’t want to use a malware removal software and prefer to get rid of CinematicFanatic manually, you may do so by going to the Windows Add/Remove Programs menu in the Control Panel and delete the offending program; in cases of web browser plug-ins, you could remove it by going to the browser’s Add-on/Extension manager. It is also recommended to factory reset your web browser settings to their default state.
Lastly, check your hard drive for all of the following and clean your registry manually to get rid of leftover application entries after uninstallation. Please note that only professional users should try to manually edit the registry because removing any single critical system file leads to a serious problem or even a system crash. In addition, some malware is capable of replicating itself or preventing its deletion. It is advised that you do the removal process in Windows Safe Mode.
Files:
%UserProfile%\Local Settings\Application Data\Google\Chrome\User Data\Default\Sync Extension Settings\bpkmogbhibhnpebcaipnknfkgibdheoc
%LOCALAPPDATA%\Google\Chrome\User Data\Default\Local Extension Settings\bpkmogbhibhnpebcaipnknfkgibdheoc
%UserProfile%\Local Settings\Application Data\Google\Chrome\User Data\Default\Local Extension Settings\bpkmogbhibhnpebcaipnknfkgibdheoc
%LOCALAPPDATA%\Google\Chrome\User Data\Default\Extensions\bpkmogbhibhnpebcaipnknfkgibdheoc
%UserProfile%\Local Settings\Application Data\Google\Chrome\User Data\Default\Extensions\bpkmogbhibhnpebcaipnknfkgibdheoc
%LOCALAPPDATA%\CinematicFanaticTooltab
%UserProfile%\Local Settings\Application Data\CinematicFanaticTooltab
Registry:
HKEY_LOCAL_MACHINE\Software\CinematicFanatic
HKEY_LOCAL_MACHINE\Software\Wow6432Node\CinematicFanatic
HKEY_LOCAL_MACHINE\Software\[APPLICATION]\Microsoft\Windows\CurrentVersion\Uninstall..Uninstaller
CinematicFanaticTooltab Uninstall Internet Explorer

 BigTech platforms Google and Facebook were hit with a series of antitrust lawsuits by the US federal government and states on charges they are operating monopolies and abusing their power.
Below is the status of the cases, as well as government probes of Apple and Amazon in their current states
BigTech platforms Google and Facebook were hit with a series of antitrust lawsuits by the US federal government and states on charges they are operating monopolies and abusing their power.
Below is the status of the cases, as well as government probes of Apple and Amazon in their current states
 When the personalization setting opens go-to color tab on left and scroll down until you find 2 checkboxes under "show accent color on the following surfaces:"
 check ones you wish to apply the effect to and you are done. Now your START menu and/or title bars are using the color scheme of your choice.
 Corsair is well known for RAM memory modules for PC but then it has expanded to PC peripherals and even selling some pre-build computers as well in past few years. New Corsair expansion now includes a laptop line, starting with their new gaming laptop Voyager.

Voyager laptop is packed with a mechanical keyboard and MacBook-like touch bar for your typing and pointing needs. It is built with a 16-inch QHD+ screen packing 240Hz that is run by Radeon 6800M GPU. Also inside lurks AMD 16 thread Ryzen 9 6900HS CPU, Wi-Fi 6E support, Dolby Atmos audio, and full HD 1080p WEB camera.
The keyboard has low-profile mechanical Cherry MX switches with per-key RGB lightning and above is what Corsair calls a macro bar, with 10 shortcut buttons and a small LCD in the center.
Corsair is also including a few features that tie in with its other products. Many of the company’s keyboards, mice, and other accessories use the ‘Slipstream’ USB wireless adapter, which is built into the Voyager laptop. The macro bar is also configured using the same software used for the Elgato Stream Deck, a popular product sold by Corsair.
Anxiety from all these digital threats lurking everywhere? An antivirus program can help put your mind at ease.
A virus is malicious software that can affect pretty much any device and does so in a variety of ways. Be it your computer, your phone or your smart lightbulb - as long as there’s access to the internet, malware can get to it.
How exactly does this kind of attack manifest itself? Well, there’s a wide variety of effects ranging from mild to severe. Among other things, they depend on which type of malware attacks your device - a virus, spyware, ransomware, adware or something else.
These are some of the things you can expect to happen:
It really can be the stuff of nightmares. So, if you want to sleep peacefully knowing that your devices are completely safe, you should definitely consider getting an antivirus.
P.S. don’t let its name fool you - an antivirus does indeed protect your devices against more than just viruses.
Antivirus software is designed to help you battle and ward off malware. Basically, it scans your device to detect any suspicious activity and offers tools to get rid of the culprit.
At first, antiviruses were developed to fight against viruses only, but nowadays they cover a lot more ground. Here are some of the biggest benefits of getting yourself a powerful defender.
Look, constant ads that pop up everywhere aren’t the absolute worst thing that can happen on your computer. If anything, they are annoying, like when you’re trying to sleep but that one fly in your room just won’t stop buzzing.
Now, there’s a free, well-established solution for that - installing an ad blocker. And we’re about a hundred and ten percent sure you’ve already done that on each and every browser you use.
However, “if I can’t see it, it doesn’t exist” isn’t the most ideal approach for your online safety. Ad blockers can’t block everything and they won’t protect you from potential adware. An antivirus on the other hand offers that layer of protection against malware snuck into pop-ups and spammy websites.
Hackers don’t target government institutions only. They’ll target regular people too if they have something to gain.

There are different types of hacking, such as phishing e-mails, transmission of malicious programs, credential reuse, denial of service and more. In any case, they take control of your device and hijack your data.
The good thing is that, as threats evolve, antiviruses evolve too and there are tons of quality programs on the market that can keep you secure for an affordable price.
When malware enters your device, it can target pretty much any file and get access to any and all data.
Installing an antivirus program will make sure that every single file, new or old, is monitored at all times, warning you against threats immediately. That way, you can make sure to react before your other files become infected and data is lost or stolen.
Another great thing for data protection is that the best antivirus software normally comes with a password manager, so no one can use malware to steal your passwords.
As we already stated, malicious attacks can be performed in many ways and malware comes in in different shapes an sizes, such as:

Nowadays, antivirus software is designed to fight against all of these types. That’s why more often than not we hear the term 'antivirus' used interchangeably with 'anti-malware,' like in this article.
You can’t keep your eyes on your kid every second of the day and you can’t protect them from everything. But at least you can limit their exposure to the threats they can encounter at every corner of the digital world.
An antivirus program will block harmful or suspicious websites and ads, which is great both for you and your children. To take it a step further, though, many such programs come with special parental controls and offer monitoring as well. It’s a great solution for keeping your kids safe online without sounding like the irritating, overbearing, controlling parent who “just doesn’t get it!”
There are definitely lots of different antivirus programs out there, both free and paid. We recommend you look for a paid option, since free ones are unfortunately a lot more susceptible to being compromised through malicious attacks.
Now, there are a few factors to consider when choosing the right software. If you use your PC for basic things then a basic antivirus will suffice. However, the more complex your use and the more sensitive the data you deal with, the stronger it needs to be.
It’s also crucial that you take into account the features it includes. As we already mentioned, some programs have additional security options. For example, depending on the package you select, Bitdefender provides:
Some are included in plans and some are separate products, so make sure to check out all the offers.
And don’t worry if you have multiple PCs or you’re looking for protection for your smartphone or tablet as well; Bitdefender has suitable solutions for your needs. Of course, you can also just pick their classic antivirus software if you’re not in need of advanced protection.
Another important point is how regularly the software is updated and enhanced. The more frequent the updates the better, as bugs can make the program more vulnerable. Other things we advise you consider are user-friendliness, impact on performance, reputation (user reviews especially) and, of course, price.
Fact is: anyone can be a malware victim. Don’t let it be you.
You can’t put a price on peace and security, so don’t be reluctant to pay for yours - especially since a lot of options out there are extremely affordable. Is $159.00 a year really too much to pay for cross-platform protection for up to 10 devices? We don’t think so.
Explore your options and protect your files and data before it’s too late.
Free Download Manager is a software program developed by FreeDownloadManager.ORG. According to the publisher:
This software downloads files and converts videos. Its features include integration with all browsers, support of downloads from RapidShare, BitTorrent support, adjusting traffic usage, resuming broken downloads, and adds BitTorrent support, flash video download, upload manager, portable mode, and remote control.
During setup, the program creates a startup registration point in Windows in order to automatically start when any user boots the PC. It adds a browser extension to help it cache files you are downloading over your browser. The software is designed to connect to the internet and adds a Windows Firewall exception in order to do so without being interfered with. It also hooks up to start automatically and cache every download even if it's turned off.
This software comes bundled with video converters that some anti-virus programs marked as malware and therefore it is considered a potentially unwanted program.
 Error Causes
Steam Autumn sale is still raging and other storefronts like EPIC and GOG have also had their go, and as the year slowly closes we reflect on the best games released this year.
The games presented are not in any particular order and as sales are still raging pick one for you for a good time.
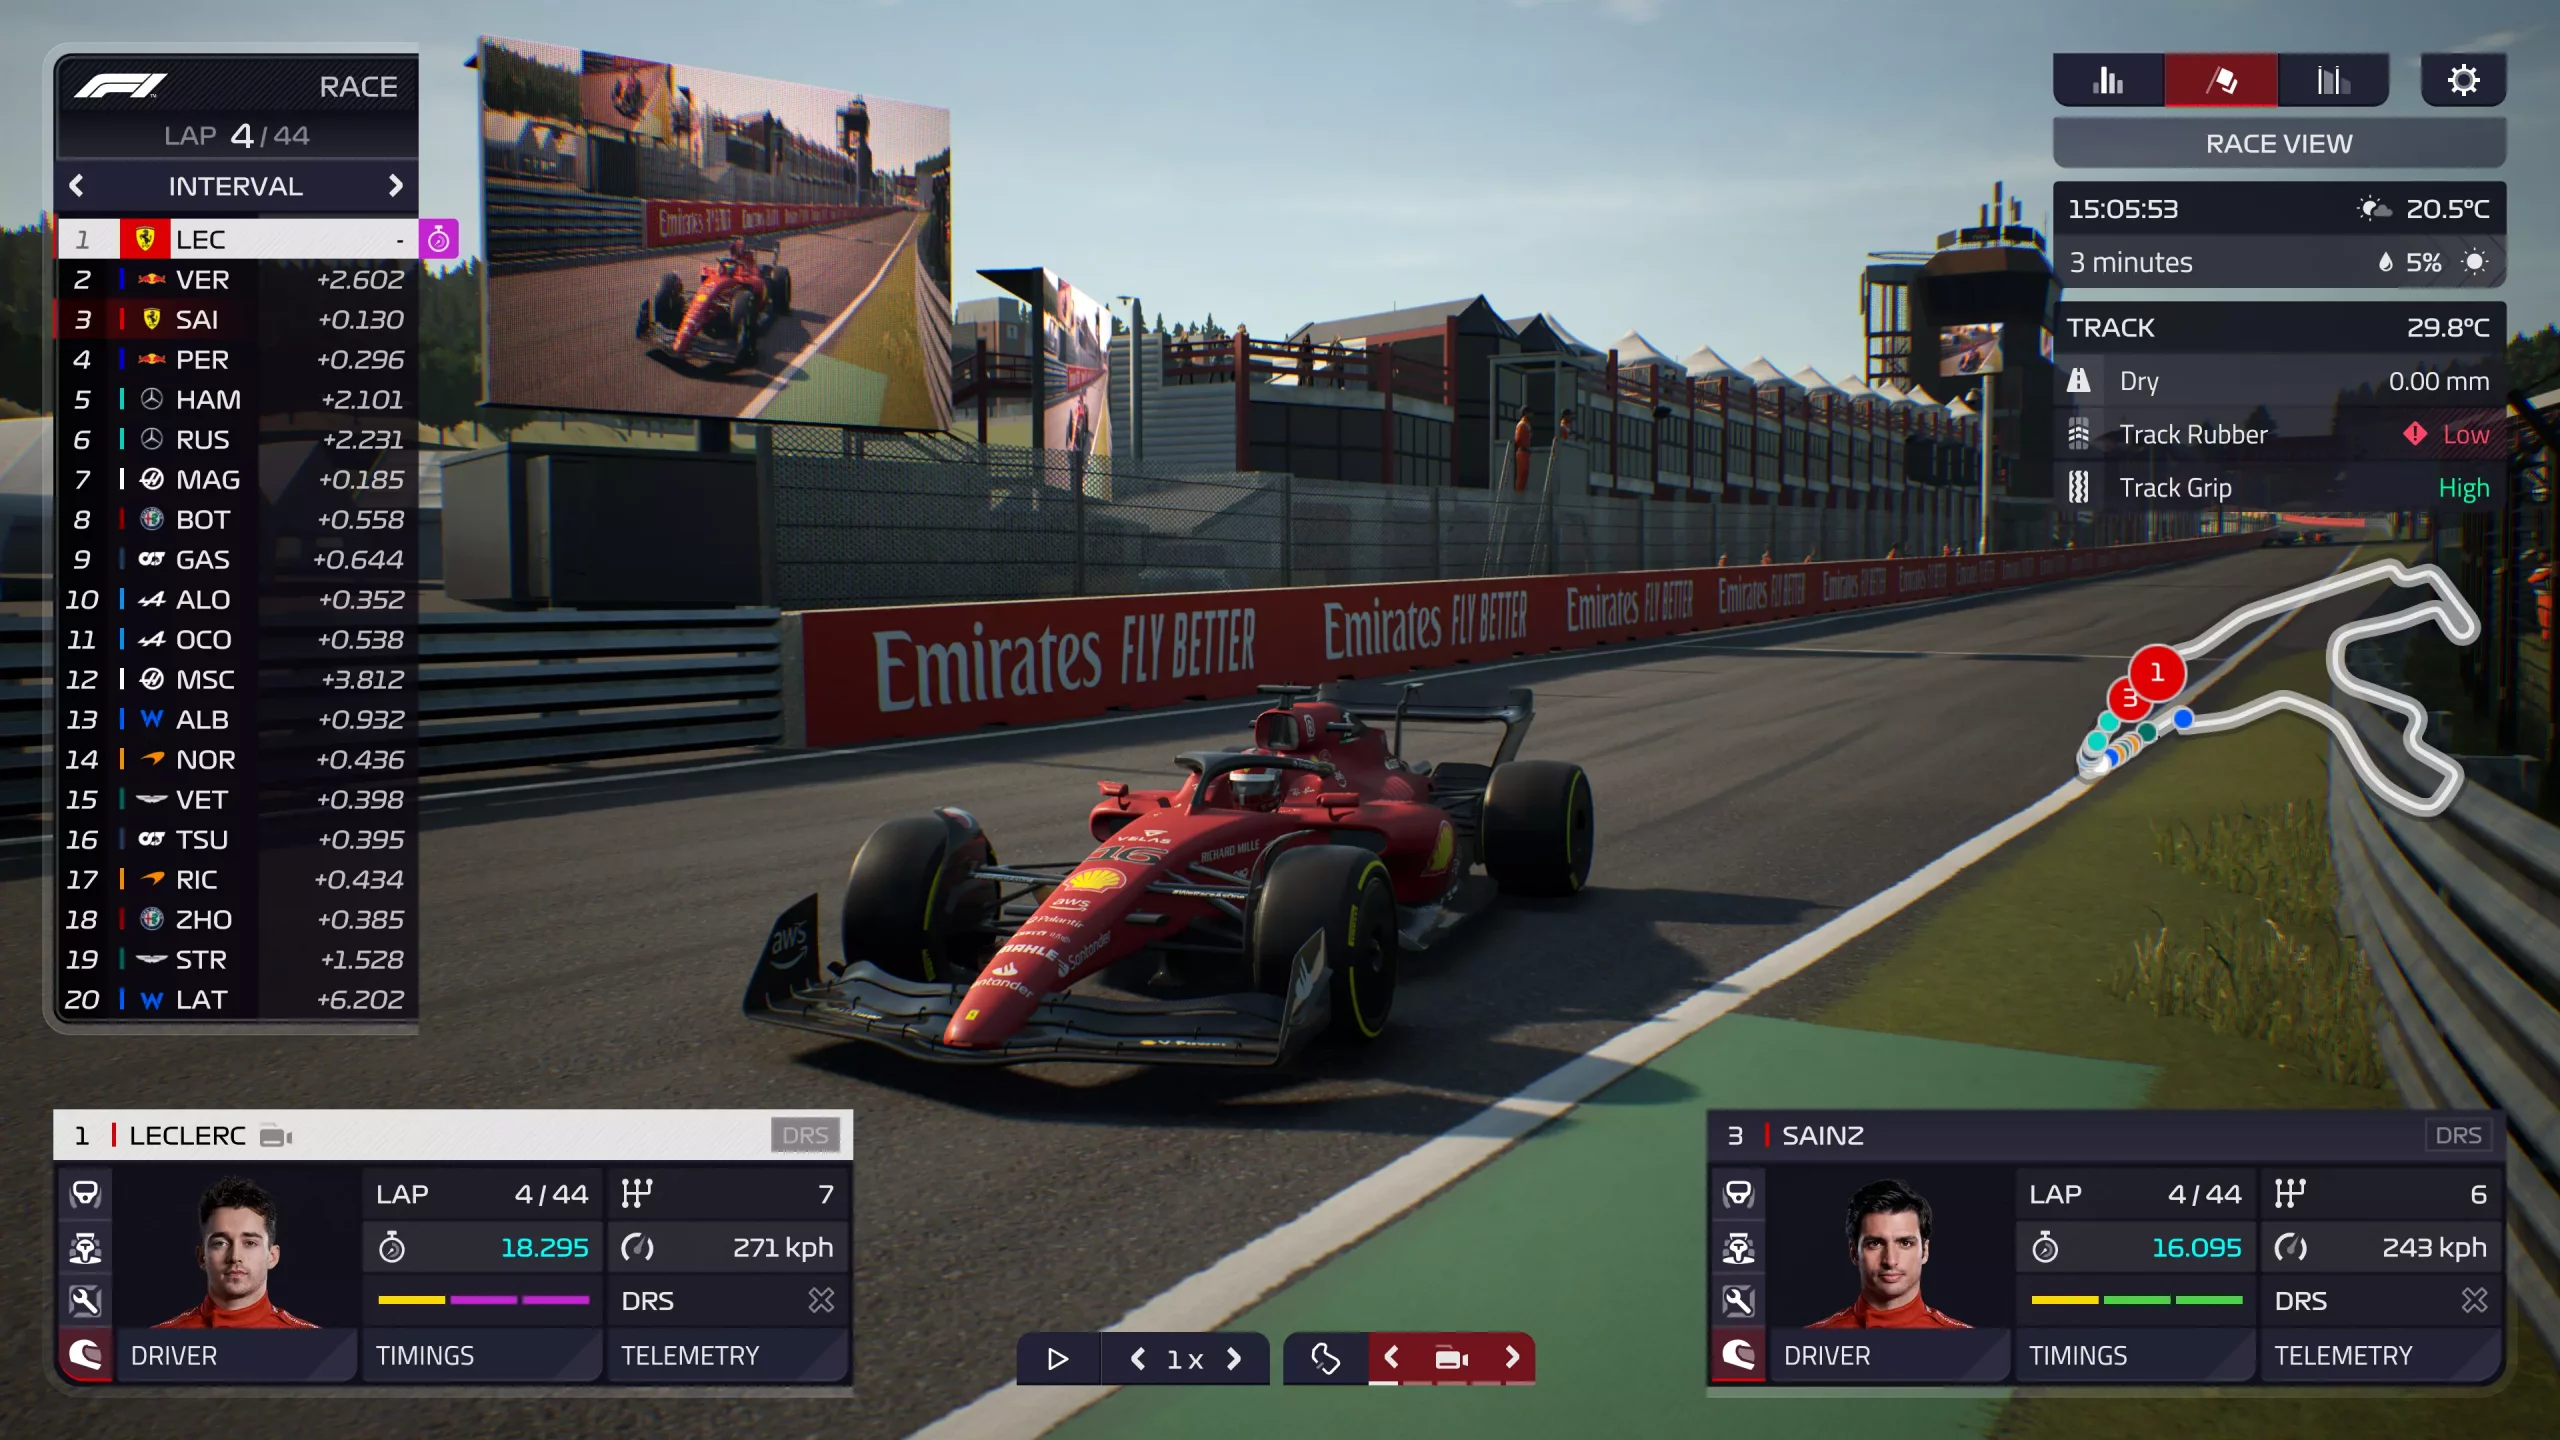
If you are into formula racing this new manager is something we will wholeheartedly recommend. How it has been a very long time since a good F1 manager has been released this one is breath of fresh air. Masterfully done and fun to play, also licensed with real teams and cars get it here: https://store.steampowered.com/app/1708520/F1_Manager_2022/

I like cats, but this game is on another level from its competitors. Unique approach, great storyline, and of course orange cat as the main character! Set in a cyberpunk environment following the story of some unfortunate androids you can do most cat things like playing in boxes, etc but essentially the game is a puzzle platformer which in my opinion is a great thing. Meow your things and get the game while it is discounted: https://store.steampowered.com/app/1332010/Stray/
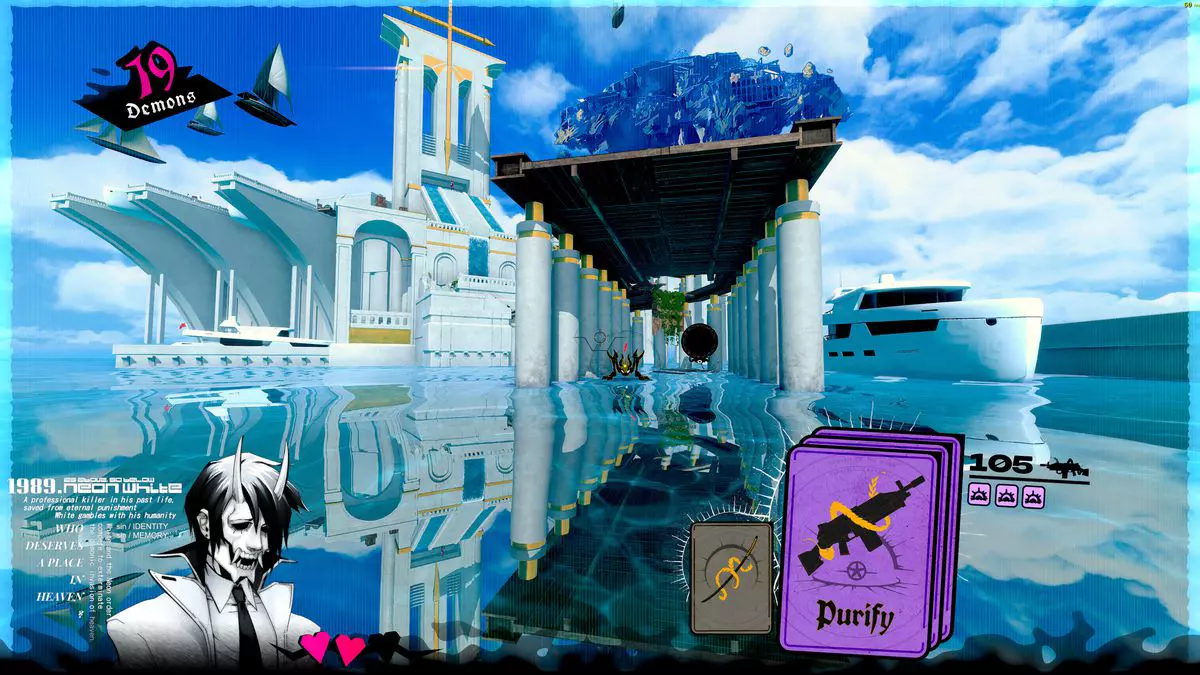
Mirror's Edge was the very unique game when it was released introducing parkour into the gaming world, and Neon white brings it one level up. With competitive parkour FPS gameplay this game is great for killing some time and competing with your friends but most of all it is fun to play experience. Get it here: https://store.steampowered.com/app/1533420/Neon_White/
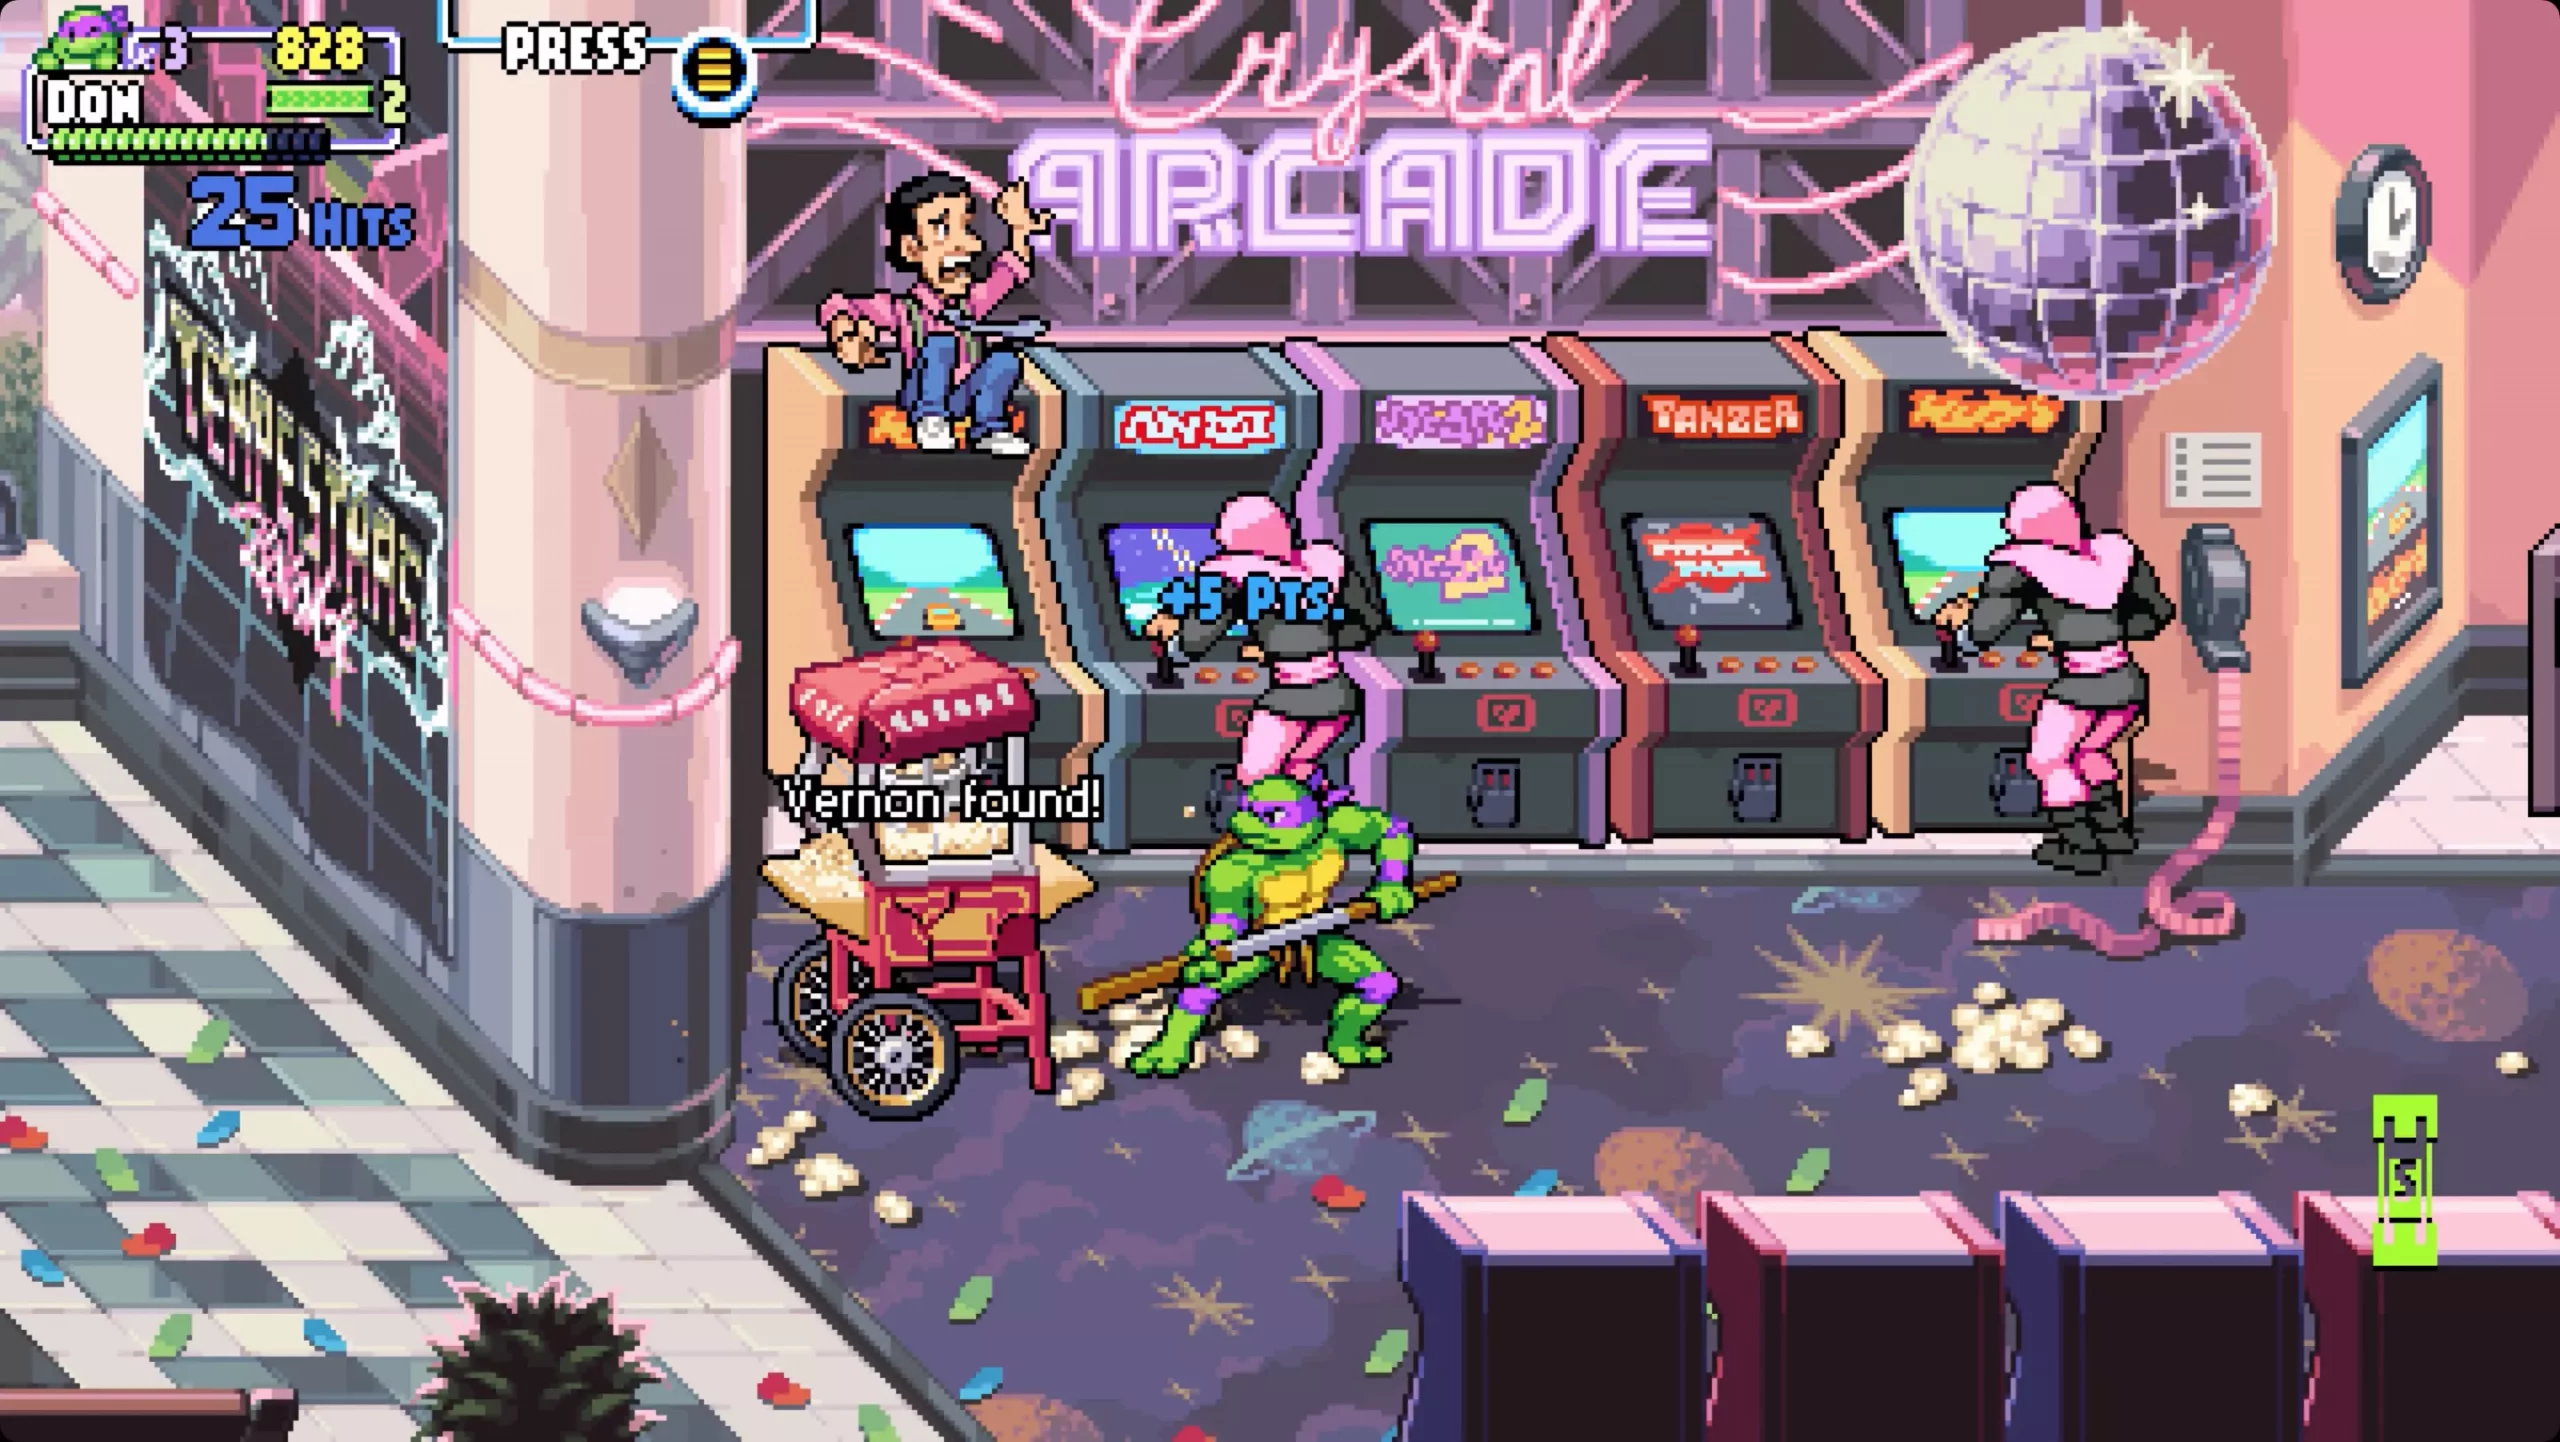
Shredder's revenge is a love letter to classic beat-them-up games found in old dusty arcades back in old times. Fast frenzy action, pixel art graphics, and tons of fun!!! Get it now and start partying like it was 1980: https://store.steampowered.com/app/1361510/Teenage_Mutant_Ninja_Turtles_Shredders_Revenge/
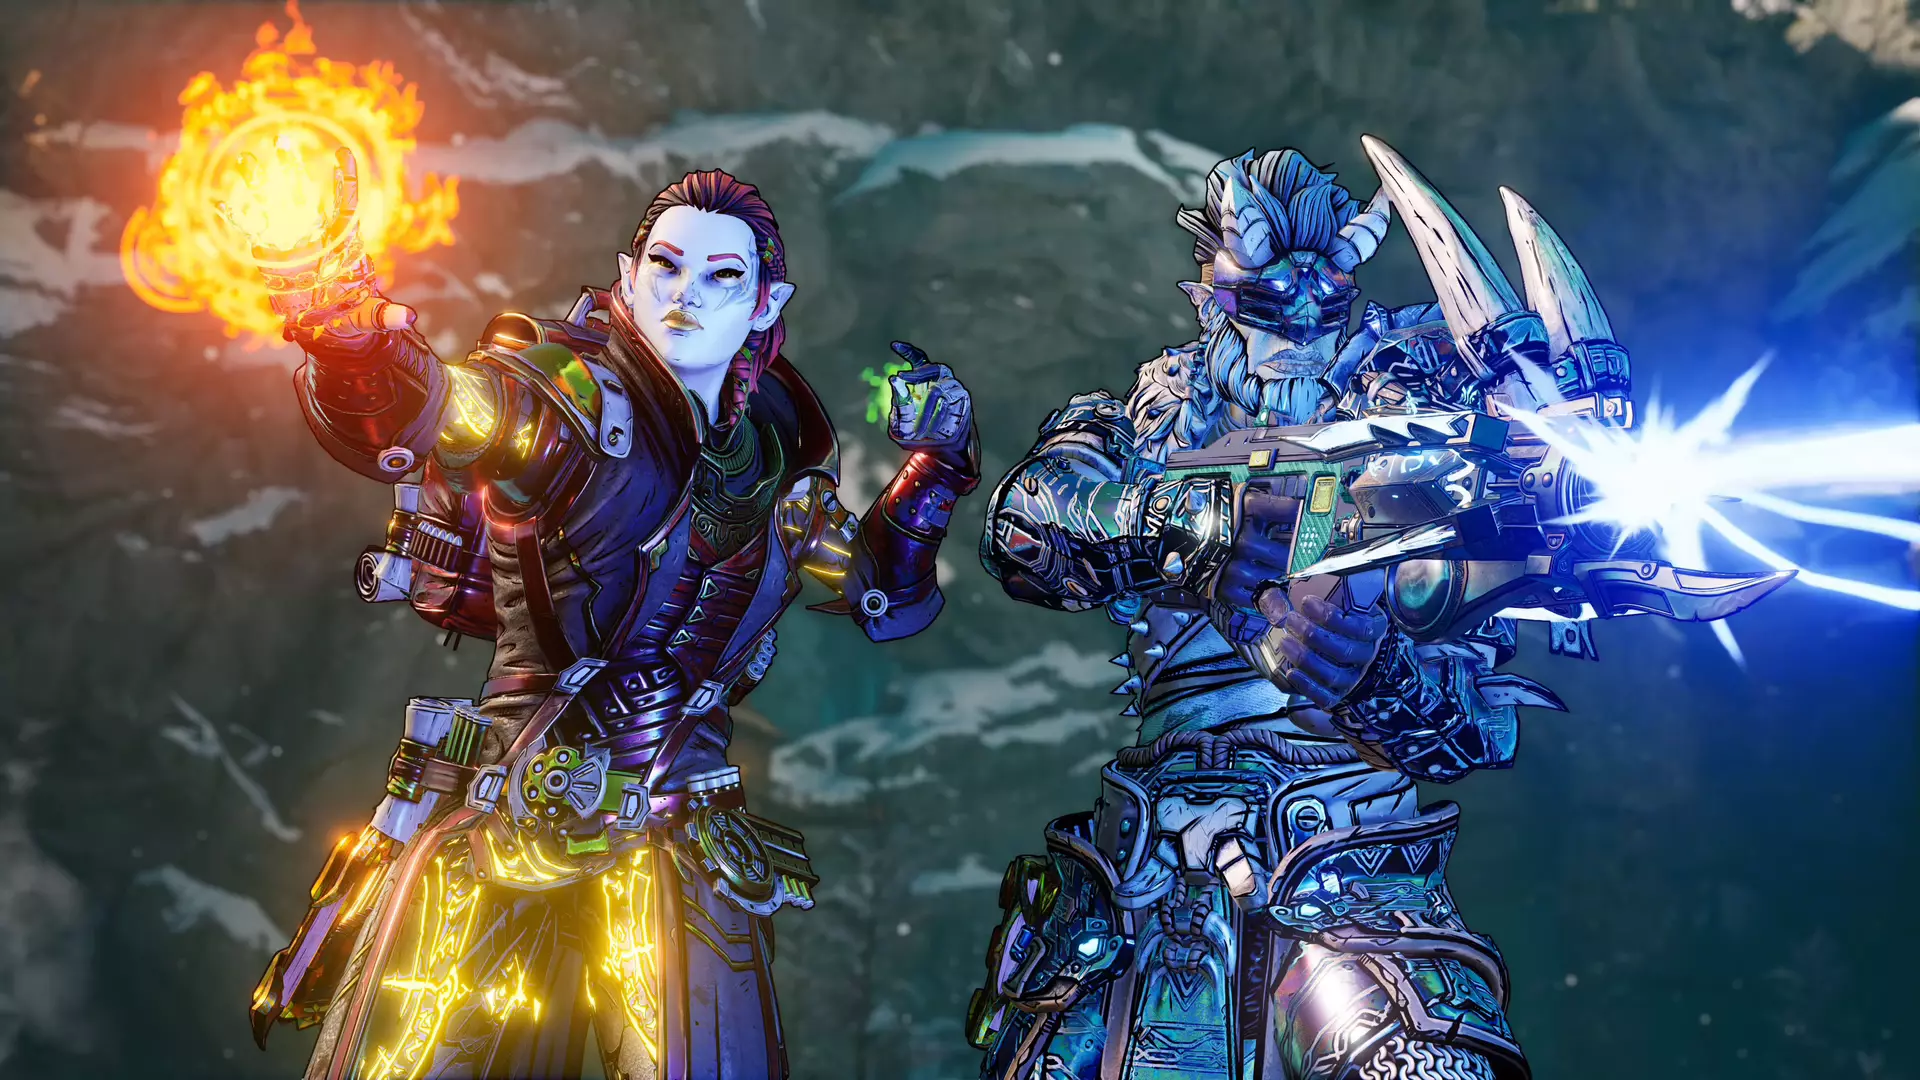
This game needs to be experienced in order to fully grasp its magnitude and quirkiness. From the creators of borderlands comes a new IP fusion of fantasy, guns, and crazy ideas all wrapped into an action RPG looter shooter with a recognizable borderlands style of graphics. https://store.steampowered.com/app/1286680/Tiny_Tinas_Wonderlands/

Winner of multiple awards, Norco is a classic point-and-click adventure game with a great sci-fi story with a lot of environmental focus. Story and atmosphere are the main selling points for the game and if you enjoy good stories with interesting characters give this one a go: https://store.steampowered.com/app/1221250/NORCO/

Expansion for Massive multiplayer online roleplaying game brings so much to the table that we just could not oversee it and place it aside. Technically not full standing game since it is the expansion it still delivers on many fronts and since it is supposedly the last expansion now is the best time to pick it up and give a final fantasy 14 a go: https://store.steampowered.com/app/1592500/FINAL_FANTASY_XIV_Endwalker/

Of course, the list would not be complete if we did not include Elden ring, a great example of how a difficult but well-executed game can go over and beyond. With a story on par with great epics and compact as in dark souls, this title will provide you with many hours of gameplay and content. https://store.steampowered.com/app/1245620/ELDEN_RING/