There is a lot of software on the market today, but from time to time we discover something extraordinary and unique worth sharing and today we have a threat for you. Ventoy is a tool that will help you with system reinstallations and system maintenance once and for all.
If you are a computer user that has multiple operating systems or you are installing and maintaining different hardware via different OS there is a high chance that you have multiple USB sticks with different operating systems on them.
Now the problem with that is that there are probably too many unlabeled sticks around or you do not have enough so you keep making system USBs depending on which one you might need.
Ventoy solves all of these problems by letting you have as many operating systems images as your USB has capacity. The only thing you need to do is get the software here: https://www.ventoy.net/en/index.html and make a USB with it, then you can freely just copy your ISO images onto the USB and once it is inserted into the computer you will be given a menu to choose which one you would like to start with, simple as that.
Researchers have discovered 16 vulnerabilities in Bluetooth connections that could be exploited and make from minor to some serious damage to your device. The flaw can be used on chips manufactured by Intel, Qualcomm, and Texas Instruments while connecting to external devices like speakers, headphones, keyboards, mice, etc.
Who is affected?
Mentioned chips are used by many in a vast range of devices including big players with their products like Microsoft Surface laptops, Dell desktops, Samsung Phones, Google Pixel, and OnePlus handsets.
The Bluetooth bug affects a wide range of devices, including smartphones, laptops as well as smart home gadgets. In total, more than one billion devices that rely on Bluetooth are believed to be impacted.
What is the damage?
The amount of damage possible with this flaw depends on the type of device with the chipset. Some devices can only be crashed after a specially crafted packet is sent to the flawed chip. If that's the case with your gadget, it can be easily resolved with a simple restart.
With other devices, hackers can take advantage of the Bluetooth Classic flaw to remotely run malicious code. That could allow malware to be installed remotely. Researchers say vendors were informed about these issues months ago before the findings were published.
The good news is this should have given plenty of time for the relevant patches to be pushed out that remedy the flaws. However, you'll need to make sure that you're running the latest version of the operating system to be protected by the patch crafted by the manufacturers.
Android Bluetooth threat
The researchers emphasize the lack of basic tests in Bluetooth certification to validate the security of Bluetooth Low Energy (BLE) devices. The BrakTooth family of vulnerabilities revisits and reasserts this issue in the case of the older, but yet heavily used Bluetooth classic (BR/EDR) protocol implementations.
We would also advise users to disable Bluetooth on devices that do not need it. This way you can prevent attackers from sending you malformed LMP packets. Since BrakTooth is based on the Bluetooth Classic protocol, an adversary would have to be in the radio range of the target to execute the attacks. So, in a safe environment Bluetooth can be enabled.
Microsoft just released Windows 11 ISo file, based on the latest Insider Preview Build 22000.132. Inside build, you can try all-new features like clock updated app, snip tool, and everything releases so far via various patches. You can also use Windows 11 ISO file to do a clean install on your computer, but if you go with this option all of your existing files will be deleted.
Microsoft says it added the ability to name your PC during the setup experience. You’ll also get to experience the Get Started app that’s designed to help you get going on your new Windows 11 PC (even if it’s not actually a new one).
Download ISO
Go to the Windows Insider Downloads page. You will need to sign in with a Microsoft account registered with the Insider Program.
Scroll down to Select Edition and select the build you want to download. You will most likely want the one at the top from the developer channel, as this is where Windows 11 should arrive first. So far, only Windows 10 builds are available. Click confirm.
Select your preferred language. Not all languages available for Windows are compatible with the Insider program, so you may have to stop depending on where you are from.
Click the download button and the ISO file will start downloading.
This is definitely an easier method, but unfortunately, it is not available yet. We will update this article once Windows Insider ISOs are available. Later, once Windows 11 64 bit is available to everyone, you can also download the stable build of Windows 11 iso. Microsoft offers the Media Creation Tool and Upgrade Assistant, which usually do just that. It will be some time before Windows 11 versions of the tools are available, as the operating system is only getting closer to this holiday.
Kindle is, without doubt, a great piece of hardware, perhaps it is the closest thing to a book within the domain of digital devices. With its low price and usability, it has found itself in many homes and within the grasp of many readers in the world. You can buy digital books in the Amazon store for fraction of a regular price if it digital Kindle edition. You keep your library in the cloud and download just books you want to read on your device.
In this article, we will explore how you can send your existing PDF or any other supported file that you already have to your kindle device so you can read it on it.
Before we begin, you should make sure the file you're trying to convert is compatible with the Kindle:
HTML
RTF
JPEG
GIF
PNG
BMP or
PDF
The compatible file types cover most formats you're likely using, but if you find the document you want on your Kindle isn't compatible, there are a few ways to convert it. In the program it typically opens into, like Microsoft Word for .doc files or an image editing apps for .PNG ones, select 'Save As', and in the drop-down menu, see if any of the compatible options are available.
If not, you could try a PDF converter tool. There are plenty of great paid options and a few good free ones too.
Transfering PDF
To get a PDF on a Kindle, you're going to need to know your Kindle's email address. You'll need to head over to the Amazon website and sign in first. Select 'Your devices and content', click 'Manage Devices'. You should see a list of the books you have assigned to your Kindle account, above this list, in a toolbar should be some options - you'll currently be on 'Content', which should be followed by 'Devices', 'Preferences' and 'Privacy Settings'. Click on 'Devices', and in the next menu, select the option for the Kindle you want the document on. You'll be brought to a Device Summary page which tells you your Kindle email as well as the type of device it is.
You now need to approve your personal email, so that when the Kindle receives your PDF, it knows to download this. Make sure the email you approve is the one you're planning to send documents to your Kindle from otherwise it won't work. To approve your email address follow the steps for finding your Kindle email address but instead of selecting 'Devices' in the top bar, click 'Preferences'.
Scroll down this list until you find Personal Document Settings, and select this option so it expands into more options. From here, scroll down until you find 'Approved Personal Document E-mail List'. This list will show people who can email stuff to your Kindle, Below the emails is an option to 'Add a new approved e-mail address', which you should select. Enter your email address and click 'Add address' to get yourself approved.
Head over to your email client of choice, attach the file to an email, and send the email to your Kindle email address. You're able to send multiple documents at once, so if you have loads of files you want on your Kindle, you don't need to send separate emails. If you're sending over a PDF file, you can ask Amazon to automatically convert the file into a Kindle one, which lets you annotate the sections and change the font size. Simply put the word 'convert' as the subject line and the rest will be handled for you. 'Sync Your Kindle'.
There is a built-in tool in Windows 10 the Disk Cleanup Utility which can help you restore hard disk space by removing temporary files, Thumbnails, old Windows files, Windows Upgrade logs, Delivery optimization files, and many more. However, from time to time, this built-in tool also experiences some issues. One of these issues is when it gets stuck on Windows Update Cleanup. Read on to find out what you can do in such a case.
When the Disk Cleanup Utility is stuck on the Windows Update Cleanup, the process could be slow and take a long time to complete when purging the files. If this happens, click on Cancel to close the dialog box. After that, try running the Disk Cleanup Tool again as administrator and check if the files that you want to clean is still there or not. If it isn’t there, then this means that the cleanup has been done, otherwise, you need to refer to the options given below.
Option 1 – Try to manually delete the contents in the SoftwareDistribution folder
Open the WinX Menu.
From there, open Command Prompt as admin.
Then type in the following command – don’t forget to hit Enter right after typing each one of them.
net stop wuauservnet start cryptSvcnet start bitsnet start msiserver
After entering these commands, it will stop the Windows Update Service, Background Intelligent Transfer Service (BITS), Cryptographic, and the MSI Installer
Next, go to the C:/Windows/SoftwareDistribution folder and get rid of all the folders and files thereby tapping the Ctrl + A keys to select them all and then click on Delete. Note that if the files are in use, you won’t be able to delete them.
After resetting the SoftwareDistribution folder, you need to reset the Catroot2 folder to restart the services you just stopped. To do that, follow these steps:
Type each one of the following commands.
net start wuauservnet start cryptSvcnet start bitsnet start msiserver
After that, exit Command Prompt and restart your computer and then try to run Windows Update once more.
Option 2 – Try to manually delete the contents of the Windows.old folder
The Windows.old folder is the one that holds the older version of Windows when you upgrade. It comes really useful when you want to revert to the previous version of Windows 10. Thus, you can delete the Windows.old files in case the cleanup tool is stuck.
Option 3 – Try running Disk Cleanup in a Clean Boot State or Safe Mode
Another thing you can try is to restart your computer in a Clean Boot State or Safe Mode. Chances are, there are some programs that are preventing the Disk Cleanup Utility tool to run properly. After you restart your computer in a Clean Boot State or Safe Mode, try to run the Disk Cleanup tool again and then see if it now works or not.
Option 4 – Run the Windows Update Troubleshooter
You might also want to run the Windows Update Troubleshooter as it could also help in fixing this issue. To run it, go to Settings and then select Troubleshoot from the options. From there, click on Windows Update and then click the “Run the troubleshooter” button. After that, follow the next on-screen instructions and you should be good to go.
Option 5 – Run the DISM tool to fix the corruption in the Component Store
You can try running the Deployment Imaging and Servicing Management or DISM tool to fix the Wdf01000.sys Blue Screen error. Using this built-in tool, you have various options such as the “/ScanHealth”, “/CheckHealth”, and “/RestoreHealth”.
Open the Command Prompt with admin privileges.
Then type in the following commands and make sure to hit Enter right after you type each one of them:
Dism /Online /Cleanup-Image /CheckHealth
Dism /Online /Cleanup-Image /ScanHealth
exe /Online /Cleanup-image /Restorehealth
Do not close the window if the process takes a while as it will probably take a few minutes to finish.
One of the most useful tools you can use to repair bad or corrupted sectors in the hard disk of your computer is the CHKDSK utility. However, there are also instances when this Disk Checking tool could encounter some issues and one of them is the error that states, “The type of the file system are RAW, CHKDSK is not available for RAW drives”.
This kind of issue is due to the RAW file format which is not recognized by the Windows operating system that you’ve installed which explains why you’re getting this error when running the CHKDSK utility. You can also encounter this error in case there is something wrong with the drive encryption.
To fix this error, you have to change the File System of the drive. How? Refer to the steps given below.
Step 1: The first thing you need to do is create a bootable Windows 10 media.
Step 2: After that, click on Repair your computer on the first Windows 10 installation setup window.
Step 3: Next, you have to select the operating system partition from the given options and then click on Next.
Step 4: Now select Command Prompt from the System Recovery Options box and then type the following command and tap Enter to initiate the Diskpart utility inside Command Prompt.
diskpart
Step 5: Afterwards, type in either of the following commands to help you in either listing all the Disk connects or all the partitions on those disks formed.
diskpart or list volume
Step 6: Next, you need to select any of the two given commands below depending on the list you entered on the previous step.
select disk # or select volume #
Step 7: After you enter the command, it will select the Disk or the Partition you want to select. Now you have to type and enter the following command to clean your drive.
clean
Step 8: Now enter any of the two following commands.
list disk or list volume
Step 9: Then type the next command below to create a specified partition.
create partition primary
Step 10: Once done, type in the following command to select the newly created partition.
select partition 1
Step 11: Next, type the following command to mark the selected partition as active.
active
Step 12: Finally, restart your computer to successfully apply the changes made and then see if it has fixed the problem or not.
There are times when you might notice that the Drive letter from the File Explorer is missing, right after you install an update in your Windows 10 computer. So if you are facing this issue right now, then you’ve come to the right place as this post will guide you on what to do to fix it.
In case you don’t know, a drive letter represents a single alphabetic character which is through A-Z typically. This could be assigned to a physical disk partition, floppy disk drive or the removal device/ CD-ROM/ mapping network drive in your PC.
In most cases, the drive letter “C:” is assigned to the first disk partition where the running Windows is installed. Thus, if the assigned letter is missing from either the Disk Management or the Windows File Explorer, it could result in inconveniences or will leave the partition inaccessible. To fix this problem, you can try to show the missing drive letters manually or make sure that the drive has a drive letter assigned in the Disk Management as well as assign the letter using a tweak in the Windows Registry. For more details, refer to the options provided below.
Option 1 – Try to show the missing drive letters manually
Open the Folder Options from the Start Search and go to the View tab,
Next, scroll down on the list of given options until you see the “Show drive letters” option and then check the box that’s marked against this option.
After that, click on the Apply and OK buttons and then go back to the “This PC” window. You should now see the drive letters
Option 2 – Make sure that the drive has a drive letter assigned in Disk Management
As you know, every drive is assigned a drive letter in Disk Management. However, if it goes missing, you can still get it back through Disk Management. To do so, follow the steps below.
Open Disk Management and from there, right-click on the menu of a partition or volume and you should see a function named “Change Drive Letter and Paths”.
Note: This function allows you to add the drive letter, remove the drive letter and change the drive letter. If the last option, namely, “Remove”, is selected and applied, the letter of the drive will be removed and won’t appear in Disk Management. Thus, this could be one of the reasons why a drive letter is missing.
You need to click on “Add” to assign a letter to the selected drive in order to reverse the change. Note that you must assign the drive with the original letter because if not, the programs that rely on the original letter might not work as expected.
If the original letter is already taken by a new drive, you need to change the letter of that new drive to another available letter.
Then allocate the released letter of the targeted drive.
Option 3 – Try assigning the letter using a Registry tweak
The next thing you can do to fix the problem is to assign the letter using a tweak in the Windows Registry but before you do that, make sure that you create a System Restore point first, after that, follow these steps:
Tap the Win + R keys to open Run and type “Regedit” in the field and then tap Enter to open the Registry Editor.
Next, navigate to this registry path: HKEY_LOCAL_MACHINESYSTEMMountedDevices
From there, check if a device is shown as being mounted at the specific drive letter and then right-click on that drive letter.
Select the “Rename” option from the right-click menu to change the letter to any other available letter.
Exit the Registry Editor and restart your computer.
Option 4 – Try to format the destination drive
Formatting the drive can also help you resolve the error. To format it, follow these steps:
To get started formatting your drive, tap the Win + E keys and then go to the access page of the drive.
Next, right-click on the drive and select Format.
After that, uncheck the “Quick Format” option and then format your drive properly.
Now once the formatting process is finished, unplug the drive and plug it back in afterward.
Check if the error is already fixed. If the drive is not initialized, tap the Win + R keys and hit Enter.
After opening the Run dialog box, type “diskmgmt.msc” and hit Enter to open Disk Management.
From there, right-click on the drive volume and select initialize disk.
Next, select the correct partition type and proceed.
If you connected headphones to your Windows 10 computer to listen to audio but when you check it in the playback devices, you’re not able to find it, read on as this post will guide you in what you can do to figure out what exactly caused this kind of problem and how you can resolve it.
This kind of issue could simply be with the headphone itself or the headphone port or your operating system. So if it turns out that the problem is with the hardware, you might have to replace the components. However, it is recommended that you troubleshoot the problem first before doing that. The most basic thing you can do is to try changing the headphone port, although this can be quite difficult since most computers don’t have any extra port for headphones if your computer has one, then give it a go. If it still didn’t work, follow each one of the options provided below.
Option 1 – Try to run the Playing Audio troubleshooter
Since the Windows 10 operating system has the Playing Audio Troubleshooter, you can use this troubleshooter to try and fix the problem with the “No Audio Output Device is installed” error. You can access this tool in the Control Panel or in the Taskbar Search and even on the Troubleshooters page of Windows 10.
Run this troubleshooter and see if it can fix the issue or not.
Option 2 – Try to update the Audio driver
If the error has something to do with software, chances are it might be related to the audio driver – it could be that the newest version of your Windows 10 does not work well with the old version of the driver. This is why you have to update your audio driver to the newest available version.
Tap the Win + R keys to open the Run dialog box and then type in MSC and tap Enter or click OK to open the Device Manager.
Expand the section of the Audio inputs and outputs.
And then from the drop-down menu, select the Update Driver option and follow the on-screen instructions to install the latest version of the driver.
Then also click on the option, “Search automatically for updated driver software.
Restart your PC after the installation.
Note: If updating the Audio driver didn’t work, you can go to the website of your PC manufacturer and look for the support section where you can download the drivers for your computer. You just need to take note of your PC’s correct model and model number so you can find the appropriate driver.
Option 3 – Try enabling the headphones from the playback devices
Tap the Win + R keys to open the Run dialog box and type the “CPL” command.
Tap Enter to open the Playback devices.
Next, right-click on any open space section and check the boxes for the “Show Disconnected Devices” and “Show Disabled Devices” options.
After that, this should help in displaying the headphones in the section of Playback devices.
And if they are disabled, you can just right-click them to have them enabled.
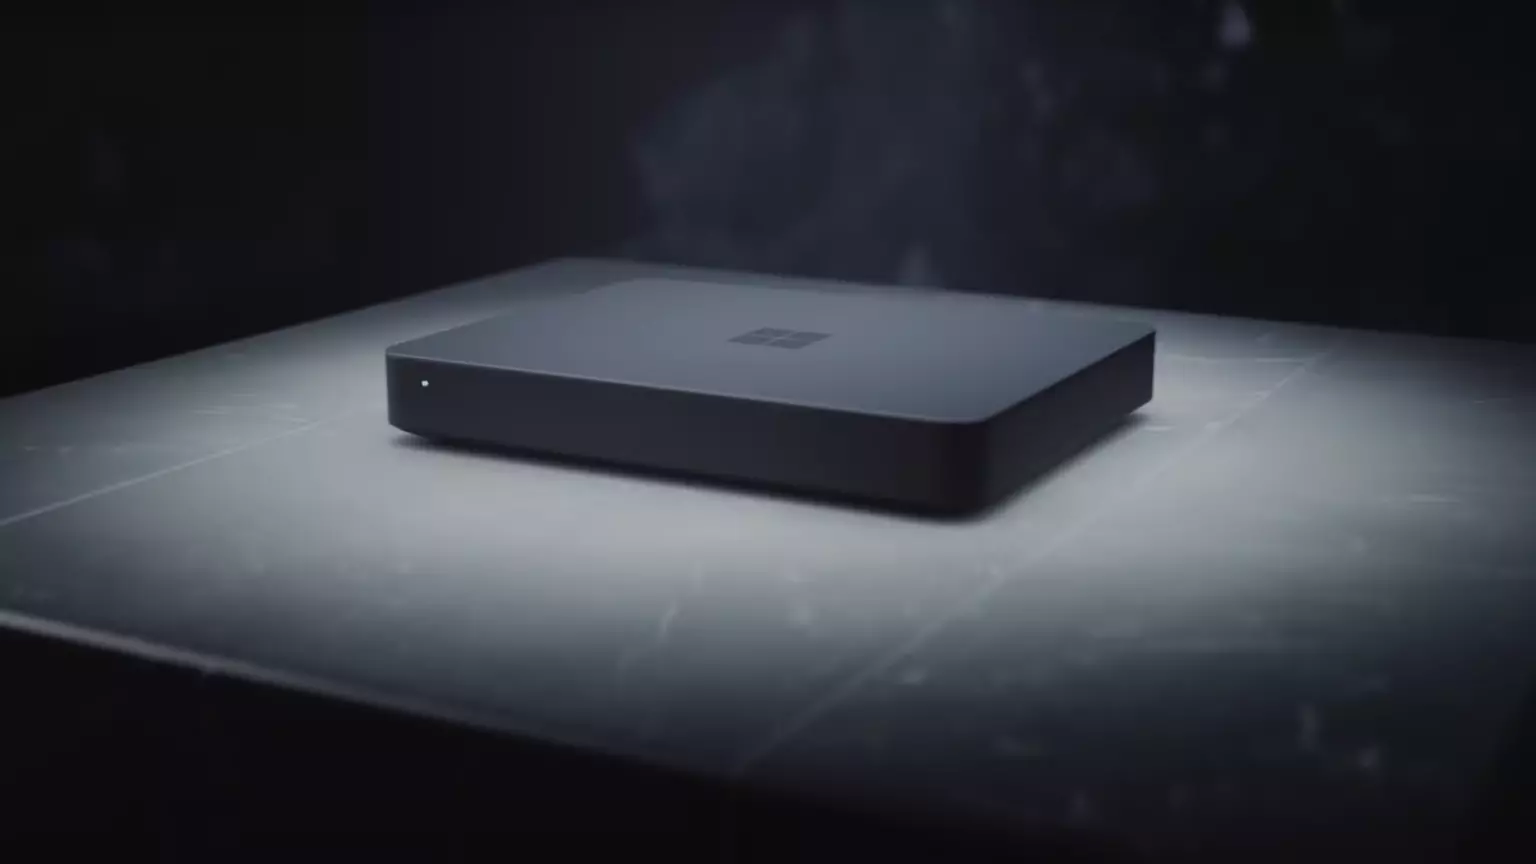
Microsoft will soon offer 4 CPU computer specifically aimed at developers and its name is Volterra. The machine as stated will come with 4 processors but the strange thing is that they will be ARM-based instead of x86.
CEO of Microsoft, mister Satya Nadella has introduced the product and Microsoft has released a youtube video promoting it.
https://youtu.be/yICVNta8jMU
The computer system will have Qualcomm's NPU or built-in neural processing unit to use AI's power to help developers write and produce better and faster code. The sad news is that besides processors used there is no other information on other components that will go into this system.
As seen in the video, the computer reminds me a lot of the apple MAC mini with its size and design, and as stated it is made from recycled plastic which in our opinion will bring the price under $1000.
Microsoft has not provided an official price tag for Volterra, but our hope is that it will be more affordable than building your own development PC. Also, there was nothing said about computer availability, we suspect that the selling model will be typical Microsoft one with first models available only in the USA and moving forward slowly opening it to other markets.
Volterra specifications
As previously said nothing except the number of CPUs and their type has been officially said but we managed to get some information about some other specific things not including its inside components.
The unit will have a fan inside of it for cooling purposes and better performance and that is what was officially stated by Microsoft. On the outside, it is known that the computer will have three USB-A ports, a mini DisplayPort, and an ethernet input. All of these will be positioned on the back of the device, on its left side there will be two USB-C ports.
The unit itself will be running on Windows 11 but it was not disclosed anything about the version, we presume since this is a model aimed for professional use that it will come with Windows 11 PRO version.
Currently available tools for ARM
Since this product is aimed at developers logically support for developing software is a must-have and at the time of this writing software that will come and that will run on Volterra is:
Visual Studio 2022
Visual Studio Code
Visual C++
Modern .NET 6 & JAVA
Classic .NET
Windows Terminal
Windows Subsystem for Android
Windows Subsystem for Linux
Conclusion
Once MAC studio has been released it showed that specific builds have their audience and can be sold for less of a price than full-fledged custom-made workstations. There is no doubt that Microsoft Volterra will find its audience but will that be enough to have more versions of this compact computer only time will tell.
Following a two-year investigation by the California Department of Fair Employment and Housing, the state has filed a lawsuit against Activision Blizzard for fostering a "frat boy" culture in which female employees are allegedly subjected to unequal pay and sexual harassment.
As reported by Bloomberg, Activision Blizzard is being accused by the state of California of discriminating against female employees at nearly all levels of employment, including in regards to compensation, promotion, assignments, and termination. The state alleges Activision Blizzard’s leadership has failed to address any of these outstanding issues or prevent them from occurring within the workplace. You can read the full details of the lawsuit here.
The suit, filed Tuesday in the Los Angeles Superior Court, says Activision Blizzard, which is made up of about 20 percent women, assigns women, and women of color, to "lower paid and lower opportunity levels" with lower starting pay for similar work as their male counterparts.
The documents also accuse Activision Blizzard of fostering a "pervasive 'frat boy' workplace culture in the office. Male employees are said to drink "copious amounts of alcohol" as they make their way through cubicles and "often engage in inappropriate behavior toward female employees."
Male employees are said to come to work hungover, play video games during work "while delegating their responsibilities to female employees, engage in banter about their sexual encounters, talk openly about female bodies, and joke about rape."
The lawsuit also cites one particular incident where a female employee, who was already subjected to intense sexual harassment at the company, committed suicide during a work trip with a male supervisor who allegedly brought inappropriate, sexual items with him on the trip.
The lawsuit is asking for an injunction that will force Activision Blizzard to comply with workplace protections, as well as deliver unpaid wages, pay adjustments, back pay, and lost wages and benefits for female employees.
An Activision Blizzard spokesperson sent the following statement in response to the allegations:
We value diversity and strive to foster a workplace that offers inclusivity for everyone. There is no place in our company or industry, or any industry, for sexual misconduct or harassment of any kind. We take every allegation seriously and investigate all claims. In cases related to misconduct, the action was taken to address the issue.The DFEH includes distorted, and in many cases false, descriptions of Blizzard’s past. We have been extremely cooperative with the DFEH throughout their investigation, including providing them with extensive data and ample documentation, but they refused to inform us what issues they perceived. They were required by law to adequately investigate and to have good faith discussions with us to better understand and to resolve any claims or concerns before going to litigation, but they failed to do so.Instead, they rushed to file an inaccurate complaint, as we will demonstrate in court. We are sickened by the reprehensible conduct of the DFEH to drag into the complaint the tragic suicide of an employee whose passing has no bearing whatsoever on this case and with no regard for her grieving family. While we find this behavior to be disgraceful and unprofessional, it is, unfortunately, an example of how they have conducted themselves throughout the course of their investigation. It is this type of irresponsible behavior from unaccountable State bureaucrats that are driving many of the State’s best businesses out of California.The picture the DFEH paints is not the Blizzard workplace of today. Over the past several years and continuing since the initial investigation started, we’ve made significant changes to address company culture and reflect more diversity within our leadership teams. We’ve updated our Code of Conduct to emphasize a strict non-retaliation focus, amplified internal programs and channels for employees to report violations, including the “ASK List” with a confidential integrity hotline, and introduced an Employee Relations team dedicated to investigating employee concerns.We have strengthened our commitment to diversity, equity, and inclusion and combined our Employee Networks at a global level, to provide additional support. Employees must also undergo regular anti-harassment training and have done so for many years.We put tremendous effort into creating fair and rewarding compensation packages and policies that reflect our culture and business, and we strive to pay all employees fairly for equal or substantially similar work. We take a variety of proactive steps to ensure that pay is driven by non-discriminatory factors. For example, we reward and compensate employees based on their performance, and we conduct extensive anti-discrimination training including for those who are part of the compensation process.We are confident in our ability to demonstrate our practices as an equal opportunity employer that fosters a supportive, diverse, and inclusive workplace for our people, and we are committed to continuing this effort in the years to come. It is a shame that the DFEH did not want to engage with us on what they thought they were seeing in their investigation.
Conclusion
We will see how things work out, but I am not too optimistic for Activision Blizzard, truth to be told these reports are really bringing up some disturbing news on the sunlight. I just hope that all responsible will be brought to justice.
Windows 11 is getting adopted more and more each day, and how more and more users are installing it some smaller bugs show up. One of the things that have manifested lately is that in some cases installation assistant is not working throwing error 0x8007007f at you while you try to finish the update of Windows.
If you are one of the users that are experiencing this kind of annoyance, we have a solution for you. Follow this guide as presented and repair this annoying error.
Run installation assistant as administrator
This is the most simple solution that can solve problems right away and it is advised to be tried first.
Download standalone Installation assistant installer from Microsoft website here
Go to the location where you had the file downloaded
Right-click on file
Click on Run as administrator
On the permission box, click YES
Disable antivirus and/or firewall software
Antivirus or firewall software can sometimes interfere with Windows’s update and prevent for any reason download or installation of files they consider not safe. If the first solution has not provided success turn off your antivirus or firewall software and try again to install updates by running them as administrator.
Now, how many different antivirus or firewall applications are unique pieces of software it would take too much time to cover all of them but usually and most commonly if you right-click on the taskbar icon of security app most of the time you will have either option to open it and close it or simply just to snooze it for some time.
Set the compatibility
If you are still having issues with installing updates try setting compatibility mode for the installer.
Download standalone Installation assistant installer from Microsoft website here
Go to the location where you had the file downloaded
Right-click on file
Click on properties
Go to the Compatibility tab
Click on Run this program in compatibility mode for:
Choose Windows 7
Click on APPLY
Run installer
Run SFC scan
If you are still facing installation issues there is a high chance there is something wrong with Windows system files. Luckily Windows itself has a built-in tool to address these issues and fix them.
Open command prompt as administrator by pressing Start and searching for the command prompt and then on right-clicking on run as administrator
Once the command prompt opens type in SFC / SCANNOW and press ENTER
Wait for the whole process to complete and then restart your system


 Researchers have discovered 16 vulnerabilities in Bluetooth connections that could be exploited and make from minor to some serious damage to your device. The flaw can be used on chips manufactured by Intel, Qualcomm, and Texas Instruments while connecting to external devices like speakers, headphones, keyboards, mice, etc.
 Microsoft just released Windows 11 ISo file, based on the latest Insider Preview Build 22000.132. Inside build, you can try all-new features like clock updated app, snip tool, and everything releases so far via various patches. You can also use Windows 11 ISO file to do a clean install on your computer, but if you go with this option all of your existing files will be deleted.
Microsoft says it added the ability to name your PC during the setup experience. You’ll also get to experience the Get Started app that’s designed to help you get going on your new Windows 11 PC (even if it’s not actually a new one).
Microsoft just released Windows 11 ISo file, based on the latest Insider Preview Build 22000.132. Inside build, you can try all-new features like clock updated app, snip tool, and everything releases so far via various patches. You can also use Windows 11 ISO file to do a clean install on your computer, but if you go with this option all of your existing files will be deleted.
Microsoft says it added the ability to name your PC during the setup experience. You’ll also get to experience the Get Started app that’s designed to help you get going on your new Windows 11 PC (even if it’s not actually a new one).
 Following a two-year investigation by the California Department of Fair Employment and Housing, the state has filed a lawsuit against Activision Blizzard for fostering a "frat boy" culture in which female employees are allegedly subjected to unequal pay and sexual harassment.
As reported by Bloomberg, Activision Blizzard is being accused by the state of California of discriminating against female employees at nearly all levels of employment, including in regards to compensation, promotion, assignments, and termination. The state alleges Activision Blizzard’s leadership has failed to address any of these outstanding issues or prevent them from occurring within the workplace. You can read the full details of the lawsuit here.
The suit, filed Tuesday in the Los Angeles Superior Court, says Activision Blizzard, which is made up of about 20 percent women, assigns women, and women of color, to "lower paid and lower opportunity levels" with lower starting pay for similar work as their male counterparts.
The documents also accuse Activision Blizzard of fostering a "pervasive 'frat boy' workplace culture in the office. Male employees are said to drink "copious amounts of alcohol" as they make their way through cubicles and "often engage in inappropriate behavior toward female employees."
Male employees are said to come to work hungover, play video games during work "while delegating their responsibilities to female employees, engage in banter about their sexual encounters, talk openly about female bodies, and joke about rape."
The lawsuit also cites one particular incident where a female employee, who was already subjected to intense sexual harassment at the company, committed suicide during a work trip with a male supervisor who allegedly brought inappropriate, sexual items with him on the trip.
The lawsuit is asking for an injunction that will force Activision Blizzard to comply with workplace protections, as well as deliver unpaid wages, pay adjustments, back pay, and lost wages and benefits for female employees.
Following a two-year investigation by the California Department of Fair Employment and Housing, the state has filed a lawsuit against Activision Blizzard for fostering a "frat boy" culture in which female employees are allegedly subjected to unequal pay and sexual harassment.
As reported by Bloomberg, Activision Blizzard is being accused by the state of California of discriminating against female employees at nearly all levels of employment, including in regards to compensation, promotion, assignments, and termination. The state alleges Activision Blizzard’s leadership has failed to address any of these outstanding issues or prevent them from occurring within the workplace. You can read the full details of the lawsuit here.
The suit, filed Tuesday in the Los Angeles Superior Court, says Activision Blizzard, which is made up of about 20 percent women, assigns women, and women of color, to "lower paid and lower opportunity levels" with lower starting pay for similar work as their male counterparts.
The documents also accuse Activision Blizzard of fostering a "pervasive 'frat boy' workplace culture in the office. Male employees are said to drink "copious amounts of alcohol" as they make their way through cubicles and "often engage in inappropriate behavior toward female employees."
Male employees are said to come to work hungover, play video games during work "while delegating their responsibilities to female employees, engage in banter about their sexual encounters, talk openly about female bodies, and joke about rape."
The lawsuit also cites one particular incident where a female employee, who was already subjected to intense sexual harassment at the company, committed suicide during a work trip with a male supervisor who allegedly brought inappropriate, sexual items with him on the trip.
The lawsuit is asking for an injunction that will force Activision Blizzard to comply with workplace protections, as well as deliver unpaid wages, pay adjustments, back pay, and lost wages and benefits for female employees.
 If you are one of the users that are experiencing this kind of annoyance, we have a solution for you. Follow this guide as presented and repair this annoying error.