Logo

Diablo 2 Resurrected facing server issues

It has been some time since the release of Diablo 2 resurrected and overall reception was pretty good. People are enjoying the old classic game in hi-def. resolution and with new and improved visuals. Sadly some server issues are present still until this day and somewhat spoil the experience for players.

diablo 2 server statusThe greatest lag and server crashes are pinpointed to game-creating events. When a player creates a new online game, the server needs to pull a lot of details from the database and make a game, due to some legacy code present this process takes some time and it is demanding a bit on the server-side, and although code was optimized to cater to more modern approach some legacy code still remains.
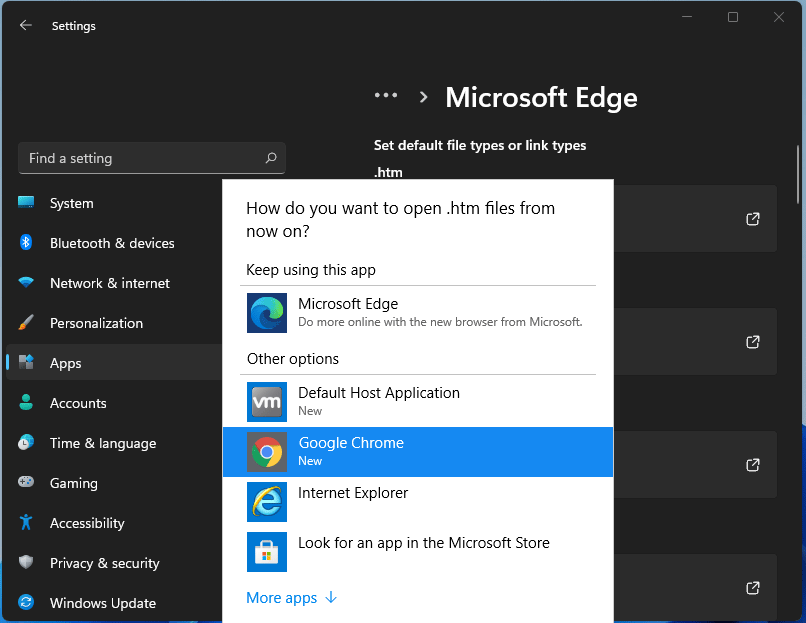
Another thing that was spotted to affect performance itself is player behavior, to be more specific, modern gamer behavior. Where players find good builds and runs on the internet and then go to farm-specific areas or bosses for loot or experience points, which in return boils down to making plenty and short runs that are made by creating games and after run eliminating them. Now pair that with the previous statement about legacy server and database code and you can add 1 and 1 and see how this might be an issue.

A lot of short games over legacy code are placing games in a state it was not designed for back in 2001 and therefore we have issues. Sadly solutions without completely rewriting the whole code are not very promising and they include rate limiting, which will prevent players to create many games in succession in a short period of time and maybe even login queues to drop a load on servers.

Blizzard reached to people in the whole company, even old diablo 2 developers to ask for advice and they say that they are working on solutions so they could lift limitations and have everything running fine.

Do You Need Help with Your Device?

Our Team of Experts May Help
Troubleshoot.Tech Experts are There for You!
Replace damaged files
Restore performance
Free disk space
Remove Malware
Protects WEB browser
Remove Viruses
Stop PC freezing
GET HELP
Troubleshoot.Tech experts work with all versions of Microsoft Windows including Windows 11, with Android, Mac, and more.

Share this article:

You might also like

0x80071771, The specified file could not ...
If you are tried encrypting or decrypting a file using the default EFS engine but you receive an error message instead saying, “Error Applying Attributes, An error occurred applying attributes to the file: The specified file could not be decrypted”, read on as this post will help you sort out the problem. If you encounter this error you can use the error code in it. You will most likely get error code 0x80071771. This kind of error occurs when the File Explorer’s copy and paste feature was not able to read the source file being encrypted or decrypted. It could also occur if you try to access a file that has been on another computer previously.

To fix error code 0x80071771 when decrypting or encrypting a file, refer to the instructions provided below.

Step 1: You need to check first if you can decrypt the files encrypted by EFS. However, if you can’t, just proceed and then take full control of the file. Step 2: To take control of the file, open File Explorer and right-click on the partition, and then click on Properties. Step 3: After that, click on the Edit button under the Security tab. Step 4: Next, make sure that “Everyone” is selected under the Group or user names section. Step 5: Afterwards, the Permissions for Everyone section will be activated. Just make sure that all the checkboxes for Allow are checked and then click on the Apply button. Step 6: Once you’re done, click on the Advanced button. This will open a new window labeled Advanced Security Settings. From there, click on the Change link under the Owner section. Step 7: Now type your account name in the field and click on Check Names to verify the account name and click OK. Step 8: After that, select the “Replace owner on sub-containers and objects” option and then click OK. Step 9: Next, select Administrators in the Group or User names list and select Full Control in the Permissions for Administrators panel and click OK.
Read More
Pixel's fast emergency dialer

Google's Pixel smartphone is one if not the best Android smartphone on the market. It regularly gets updates and Google is really trying to keep it as a top choice for Android smartphone users. One of the new things that Google has released for its smartphone series is a new emergency dialer.

google pixel 6

With an emergency dialer, you will be able to quickly access local contact information for police, fire, and medical services. This dialer is able to contact before mentioned services even when the phone is locked and when you are traveling.

The idea is to quickly access the default emergency number no matter in which country you are currently in, service will find the appropriate number and set it as default so if you need it there is no delay in searching for the appropriate number and dialing it.

Once the service is enabled on the device you can swipe up and tap Emergency call without unlocking your phone or you can press and hold the power button for five seconds and tap Emergency.

If you have a Pixel smartphone go to the Google support page and follow instructions on how to enable this service. It costs nothing and it could potentially even save your life.

Read More
How to Fix DCOM Error 1084 on Windows
Distributed Component Object Model or DCOM is a module on Windows computers that allows computers to run programs over a network to another computer. It is a software component from Microsoft that allows COM objects to communicate with each other while that program is remotely running over the network. The COM Model is another extension of the DCOM model which both work together in order for the intended task to be executed. To make this module work, there are three components needed such as the Class Identifier or CLSID, the Programmatic Identifier or PROGID, and the Application Identifier or APPID. However, DCOM does not always work as expected as it could still encounter some errors. One of them is error 1084. Because of this error, the execution of programs in a remote computer on the network would be interrupted. So if you encounter the DCOM error 1084 when you try to start a service like running the DISM tool or in other scenarios on your Windows 10 computer, then this post could help you. Refer to the instructions given below to start troubleshooting the problem.

Option 1 – Try checking the status of DCOMLAUNCH Service or DCOM Server Process Launcher and its 3 dependencies

The DCOM Server Process Launcher service launches both COM and DCOM servers in response to object activation requests. This is why if this service is stopped or disabled, the programs that are using COM and DCOM won’t properly function. So you need to make sure that the DCOMLAUNCH service is running.
  • In the Cortana search box, type “services” and click on the Services icon to open the Services Manager. Alternatively, you can also tap the Win + R keys to launch the Run prompt and then type “services.msc” in the field and hit Enter to open the Services Manager.
  • Next, check the following services:
    • DCOM Service Process Launcher
    • Background Tasks Infrastructure Service
    • Local Session Manager
    • Remote Procedure Call (RPC)
  • Then right-click on each one of the services and click on their Properties.
  • After that, select Automatic from the drop-down menu of Startup Type and make sure that all the aforementioned services are Running.
  • Now click OK for each one of the services.

Option 2 – Troubleshoot the problem in a Clean Boot State

There are instances that some conflicting programs installed in your computer might be the one that’s causing DCOM error 1084. To identify which program is causing the problem, you need to put your computer in a Clean Boot State. To do so, follow the steps below.
  • Log onto your PC as an administrator.
  • Type in MSConfig in the Start Search to open the System Configuration utility.
  • From there, go to the General tab and click “Selective startup”.
  • Clear the “Load Startup items” check box and make sure that the “Load System Services” and “Use Original boot configuration” options are checked.
  • Next, click the Services tab and select the “Hide All Microsoft Services” check box.
  • Click Disable all.
  • Click on Apply/OK and restart your PC. (This will put your PC into a Clean Boot State. And configure Windows to use the usual startup, just simply undo the changes.)
  • From there, start to isolate the problem by checking which one of the programs you installed recently is the root cause of the problem.

Option 3 – Try to use the DISM tool

You might want to repair potentially corrupted files in your system as having them could also trigger the DCOM error 1084. To repair these corrupted system files, you can run the DISM commands:
  • Tap the Win + X keys and click on the “Command Prompt (Admin)” option.
  • After that, input each one of the commands listed below sequentially to execute them:
    • Dism /Online /Cleanup-Image /CheckHealth
    • Dism /Online /Cleanup-Image /ScanHealth
    • Dism /Online /Cleanup-Image /RestoreHealth
  • Once you’ve executed the commands given above, restart your computer and check if the DCOM error is now fixed.

Option 4 – Reset your computer

  • Tap the Win key or click on the Start button located in the Taskbar.
  • Then click on the Power button at the bottom right portion of the screen.
  • Next, press and hold the Shift key on your keyboard and then click on Restart. This will restart your Pc into the Advanced Startup options.
Note: Once you have access to the Advanced Startup options, you have to go to the setting which allows you to Reset your Windows 10 PC. All you have to do is select Troubleshoot > Reset this PC to reach the following screen Afterward, select either the “Keep my files” option and then proceed to the next on-screen instructions that follow to reset your Windows 10 computer without losing your files.
Read More
Use the Installation Media to Repair or Boot
If you are not able to access the Windows 10 Advanced troubleshooting options within Windows then you’ve come to the right place as this post will guide you on how you can repair or boot the Windows 10 installation without losing data using the bootable installation USB or DVD media. To repair or boot Windows 10 using the installation media, you have to download the Windows ISO, create a bootable USB or DVD drive, boot from the media and select “Repair your computer” and then select Startup Repair under Advanced troubleshooting. To get started, follow the given steps below carefully. Step 1: Frist, download the Windows ISO. Although this is not necessarily needed, it’s still better if you download the Windows ISO first so make sure that you download the same ISO version as installed on your computer. Step 2: Next, create a bootable USB or DVD drive.
  • Insert your USB drive into your PC.
  • Tap the Win + R keys to open the Run dialog box and type in “cmd” and tap Enter to open the Command Prompt. Alternatively, you can also search for “cmd” in the Cortana search box to open Command Prompt.
  • Once you’ve opened CMD, type in this command to open the DISPART utility – diskpart
  • After that, you should see a new black and white window that would say, “DISKPART>”.
  • Next, type in “list disk” in the command line and tap Enter to see the list of all the Storage devices as well as your hard disk connected to your PC. Here, you have to identify your disk’s number.
  • Type in this command where “X” is the disk number you have identified and then tap Enter – disk X
  • Type in this command and hit Enter to clear the table records and all the visible data on the drive – clean
  • Now you have to recreate a new primary partition of the drive so you’ll have to type in this command and tap Enter right after – create part pri
  • A new primary partition has been created so you have to select it by typing this command and tapping Enter – select part 1
  • Now you have to format it to make it visible to normal users by typing – format fs=ntfs quick
Note: If your platform supports the Unified Extensible Firmware Interface or UEFI, replace the “NTFS” with “FAT32” in the command on Step 10.
  • After that, type in this command and tap Enter after – active
  • Finally, type this command and hit Enter to exit the utility – exit
  • After you prepare the image for the operating system, save it to the root of your USB Storage device.
Step 3: After creating a bootable drive, boot from the media and select the “Repair your computer” option. Once you boot from the USB drive, it will start the Windows 10 installation right away. So you must not keep on clicking Next as you will end up installing Windows. You need to look for the “Repair your computer” link on the first installation screen and click on it and then boot your computer into Advanced Recovery. Step 4: Select Startup Repair under the Advanced options screen
  • Once you’re at the Advanced Recovery screen, select Advanced Options and select Troubleshoot.
  • After that, look for the Startup Repair and click on it and then follow the next on-screen instructions. This solution will help you fix issues that do not allow you to boot into your computer.
  • On the next screen, you will see the admin account with its name. Click on it and verify using the account password associated with the email.
  • After verification, it will start to diagnose your computer and automatically resolve any detected issues related to boot.
  • After the issue is fixed, your computer should reboot normally and you should now be able to use it. Note that your personal files are still intact since the process didn’t delete or wipe them out.
Read More
How to remove FindWide

FindWide is a browser add-on for Internet Explorer. This addon Hijacks your home page and internet search provider changing it to search.findwide.com. Alternate versions change the homepage to search.us.com.

This addon monitors your user activity while you are surfing the web. It collects user and browsing data, that it uses to better display targeted ads. While browsing with this addon enabled you will see additional ads, sponsored links, and even sometimes pop-up ads displaying throughout your browsing sessions.

Several anti-virus programs have marked this addon as a Browser Hijacker and is therefore not recommended to keep on your computer.

From the Author: Each search engine has its own method of searching and each will return different results. Findwide.com looks at all of them, decides which are most relevant to your search, eliminates duplicates, and reveals them to you. In the end, you get a list of results more complete than using any one search engine alone.

Help! Malware Blocking Antivirus Installation And Access To The Internet

Viruses could cause plenty of damage to your computer. Some malware is meant to restrict or block things that you wish to do on your personal computer. It may well not permit you to download anything from the net or it will stop you from accessing some or all websites, especially the anti-malware websites. If you’re reading this, you probably have got infected by a virus that prevents you from installing a computer security program like Safebytes Antimalware on your PC. Even though this kind of problem can be tougher to get around, there are some steps you can take.

Download the application in Safe Mode with Networking

If any virus is set to run automatically when Microsoft Windows starts, entering Safe Mode could block the attempt. Since only the bare minimum applications and services launch in safe mode, there are seldom any reasons for conflicts to take place. To launch your Windows XP, Vista, or 7 PCs in Safe Mode with Networking, follow the instructions below. 1) Press the F8 key continuously as soon as your computer boots, but before the big Windows logo comes up. This will bring up the Advanced Boot Options menu. 2) Choose Safe Mode with Networking using arrow keys and press ENTER. 3) When you are into this mode, you will have online access again. Now, utilize your browser to download and install Safebytes. 4) Following installation, do a full scan and let the software get rid of the threats it discovers.

Switch over to an alternate web browser

Certain malware might target vulnerabilities of a specific web browser that obstruct the downloading process. In the event you suspect that your Internet Explorer has been hijacked by malware or otherwise compromised by hackers, the best course of action is to switch over to an alternate internet browser such as Chrome, Firefox, or Safari to download your chosen computer security application – Safebytes Anti-Malware.

Install antivirus on a USB drive

Here’s another solution which is using portable USB anti-malware software that can scan your computer for malicious software without needing installation. Follow these steps to run the anti-malware on the affected computer system. 1) Download Safebytes Anti-Malware or MS Windows Defender Offline onto a clean computer. 2) Plug the Flash drive into the uninfected computer. 3) Double-click the exe file to open the installation wizard. 4) When asked, select the location of the pen drive as the place in which you want to put the software files. Follow the directions to complete the installation process. 5) Transfer the USB drive from the clean PC to the infected PC. 6) Double-click the anti-malware software EXE file on the thumb drive. 7) Press the “Scan” button to run a full computer scan and remove malware automatically.

Protect Your PC & Privacy With SafeBytes Anti-Malware

To help protect your computer or laptop from various internet-based threats, it is very important to install anti-malware software on your computer system. However, with countless numbers of antimalware companies in the marketplace, nowadays it is actually challenging to decide which one you should obtain for your laptop. A few are good ones, some are decent, while some are simply just fake anti-malware software that will harm your PC themselves! You must be careful not to choose the wrong product, especially if you buy a premium program. Among few good applications, SafeBytes Anti-Malware is the highly recommended program for security-conscious people. SafeBytes anti-malware is a trustworthy tool that not only protects your PC completely but is also very easy to use for people of all skill levels. With its cutting-edge technology, this application can help you eliminate multiples types of malware like computer viruses, trojans, PUPs, worms, ransomware, adware, and browser hijackers. SafeBytes anti-malware offers an array of advanced features which sets it apart from all others. The following are some typical features present in this computer software: Real-time Threat Response: Malware programs attempting to enter the system are discovered and stopped as and when detected by the SafeBytes active protection shields. This tool will always monitor your PC for any suspicious activity and updates itself continuously to keep current with the latest threats. Robust Anti-malware Protection: By using a critically acclaimed anti-malware engine, SafeBytes offers multilayered protection that is made to catch and eliminate threats that are concealed deep inside your computer. Web Filtering: Through its unique safety score, SafeBytes alerts you whether a website is safe or not to visit it. This will assure that you’re always certain of your safety when browsing the net. Lowest CPU/Memory Usage: SafeBytes is well-known for its low effect on computer resources and great detection rate of countless threats. It runs quietly and efficiently in the background so you are free to use your computer at full power all the time. Fantastic Technical Support: Support service is accessible 24 x 7 x 365 days via chat and email to answer your queries. To conclude, SafeBytes Anti-Malware is really great for securing your computer against all sorts of malware threats. Once you’ve installed SafeBytes Anti-Malware, you will no longer have to bother about malware or other security concerns. If you’re searching for a comprehensive antivirus program that’s still easy to use, SafeBytes Anti-Malware is just what you need!

Technical Details and Manual Removal (Advanced Users)

If you do not wish to use an automated tool and like to eliminate FindWide manually, you could possibly do so by going to the Windows Add/Remove Programs menu in the Control Panel and deleting the offending program; in cases of browser plug-ins, you can uninstall it by visiting the browser’s Add-on/Extension manager. You might also want to reset your home page and search engine providers and also clear your browser cache and cookies. Finally, examine your hard disk for all of the following and clean your Windows registry manually to remove leftover application entries following uninstalls. But bear in mind, this is often a complicated task and only computer professionals could perform it safely. In addition, some malware is capable of replicating or preventing removal. Carrying out this malware-removal process in Safe Mode is suggested.
Files: C:\Documents and Settings\%USERNAME%\Local Settings\Application Data\TNT2.0.0.1599\Autorun.inf C:\Documents and Settings\%USERNAME%\Local Settings\Application Data\TNT2.0.0.1599\crx.tar C:\Documents and Settings\%USERNAME%\Local Settings\Application Data\TNT2.0.0.1599\ffassist.1.dll C:\Documents and Settings\%USERNAME%\Local Settings\Application Data\TNT2.0.0.1599\GLOBALUNINSTALL.TNT C:\Documents and Settings\%USERNAME%\Local Settings\Application Data\TNT2.0.0.1599\hmac.1.dll C:\Documents and Settings\%USERNAME%\Local Settings\Application Data\TNT2.0.0.1599\iehpr.1.dll C:\Documents and Settings\%USERNAME%\Local Settings\Application Data\TNT2.0.0.1599\iestage2.1.dll C:\Documents and Settings\%USERNAME%\Local Settings\Application Data\TNT2.0.0.1599\IEToolbar.dll C:\Documents and Settings\%USERNAME%\Local Settings\Application Data\TNT2.0.0.1599\IEToolbar64.dll C:\Documents and Settings\%USERNAME%\Local Settings\Application Data\TNT2.0.0.1599\INSTALL.TNT
Read More
Troubleshooting Epic Games Launcher issues
If you are having trouble using the Epic Games Launcher, here are some troubleshooting steps that usually fix common problems.

Check the Epic Games server status

Check the Epic Games Server Status page to make sure all systems are operational. If the Epic Games Launcher is affected by an outage or system-wide issue, your issue may be fixed when the outage is resolved.

Clear your launcher’s webcache

Clearing the webcache often resolves display issues that may prevent you from using the launcher. Follow these steps to clear your webcache:

Windows

  1. Exit the Epic Games Launcher by right-clicking the system tray icon in the bottom-right corner, and then clicking Exit.
  2. Press Windows key + R, type “%localappdata%”, and then press Enter to open a File Explorer window.
  3. Open the Epic Games Launcher folder.
  4. Open the Saved folder.
  5. Click the webcache folder, and then delete it.
  6. Restart your computer, and then relaunch the Epic Games Launcher.

Mac

  1. Exit the Epic Games Launcher.
  2. Open Finder.
  3. Click on Go then Go to Folder...
  4. Type ~/Library/Caches/com.epicgames.EpicGamesLauncher and press Enter.
  5. Drag the webcache folder to the Trash.
  6. Press control and click on Trash.
  7. Click on Empty Trash.
  8. Relaunch the Epic Games Launcher.

Run the launcher as an administrator

Running the launcher as an administrator elevates its permissions so it can avoid problems with downloading games, for example. Follow these steps to run the launcher as an administrator:
  1. Right-click your Epic Games Launcher shortcut.
  2. Click Run as Administrator.

Update graphics card drivers

Making sure the player is using the latest graphics card drivers may resolve the launcher crashing. Review this article for steps on how to do update their graphics drivers.

Reinstall the Epic Games Launcher

Note: The following process will remove all of your installed games.

On Windows: 

Run system file checker then reinstall the Epic Games Launcher.
  1. Close the Epic Games launcher by right-clicking the system tray icon in the bottom right corner and then clicking Exit.
  2. Click Start.
  3. Type "cmd", right-click Command Prompt, and then click Run as administrator.
  4. In the window that opens, type "sfc /scannow", and then press Enter.  This may take a little while.
  5. Restart your computer.
  6. Click Start.
  7. Type "Add or Remove Programs", and then press Enter.
  8. Select Epic Games Launcher from the list of programs.
  9. Click Uninstall.
  10. Go to www.epicgames.com and click Get Epic Games in the top right corner to download the latest installer.

On Mac:

  1. Close the Epic Games Launcher.
  2. Verify there are no processes associated with the Epic Games Launcher by checking Activity Monitor.
  3. Open the Applications folder.
  4. Click and drag the Epic Games Launcher application to the Trash.
  5. Verify all the following directories no longer have any Epic Games Launcher folders or files:
    • ~/Library/Application Support
    • ~/Library/Caches
    • ~/Library/Preferences
    • ~/Library/Logs
    • ~/Library/Cookies
  6. Go to www.epicgames.com and click Get Epic Games in the top right corner to download the latest installer.

Launcher freezing on macOS 10.15.1 or earlier

If your launcher is freezing on macOS 10.15.1 or earlier, follow the steps above to reinstall the Epic Games Launcher on your Mac.

Verify system requirements

Make sure your computer meets the system requirements to run the Epic Games Launcher using this article here. The system requirements for the Epic Games Launcher are here.

Blinking Epic Games Launcher icon on the taskbar

If you can't start the Epic Games Launcher and see a blinking icon on your taskbar, use these steps to try and fix this:
  1. Right-click your Epic Games Launcher shortcut.
  2. Click Properties.
  3. Select Normal Window from the drop-down menu next to Run.
  4. Click the Compatibility tab.
  5. Uncheck any boxes, and then click Apply then OK.
  6. Click Start, then type "Graphics Settings" and press Enter.
  7. Select Classic app from the drop-down under Graphics performance preference.
  8. Click Browse.
  9. Navigate to the Epic Games Launcher installation directory. By default, this is C:/Program Files (x86)/Epic Games/Launcher/Portal/Binaries/Win64.
  10. Click the EpicGamesLauncher.exe file, and then click Add.
  11. Click Options.
  12. Select Power Saving.
  13. Click Save.
  14. Relaunch the Epic Games Launcher.
Read More
Disabling Absolute Volume in Windows 10
As you know, Bluetooth headphones allow users to connect to their mobile devices wirelessly. This allows you to talk on your mobile device or listen to music without having to connect any cords or wires. Additionally, it even allows you to adjust the volume of a left or right speaker. However, Bluetooth headphones in Windows 10 are another story as their scope is limited. For instance, the left and right pieces can’t have different volume levels. But if you still want to change the dual control of the volume of headphones separately in Windows 10. And in this post, you will be guided on how exactly you can do that. In addition, in this post, you will also be guided on what you can do if the Windows Update messed with the Bluetooth volume control and what you can do to disable the absolute volume in Windows 10. In case you don’t know, the Absolute Volume feature is actually incompatible with a number of Bluetooth devices which can result in the inability of the Bluetooth device to adjust its volume. Thus, if you experience this kind of issue, you’ll notice that the volume slider in the taskbar and the device volume control neither have any effect in adjusting the volume. And each time you try to adjust the volume level for one speaker, the volume of another speaker also automatically changes. In such a case, it would be difficult for you to separately change the dual volume control headphones. Worry not for there is an easy registry tweak you can try to make this possible to do. But before you proceed with the instructions provided below, make sure that you create a System Restore first. Once you have that covered, follow the steps below carefully. Step_1: Tap the Win + R keys to open the Run dialog box and type “Regedit” in the field and hit Enter to open the Registry Editor. Step_2: Next, navigate to this registry path: HKEY_LOCAL_MACHINESYSTEMControlSet001ControlBluetoothAudioAVRCPCT Step_3: After that, look for the entry named “DisableAbsoluteVolume” which should be located in the right pane. But if you’re unable to find this entry, you can just create it by right-clicking on the CT key and selecting New > DWORD (32-bit) value, and then assign “DisableAbsoluteVolume” as its name. Step_4: Once done, double click on the “DisableAbsoluteVolume” DWORD and set its value from 0 to 1. Step_5: Now exit the Registry Editor and restart your computer. On the other hand, you can also disable or enable the Absolute Volume feature by executing a command in the Command Prompt.
  • If you want to disable the Absolute Volume feature, just execute this command: reg add HKLMSYSTEMControlSet001ControlBluetoothAudioAVRCPCT /v DisableAbsoluteVolume /t REG_DWORD /d 1 /f
  • If you want to enable the Absolute Volume feature, just execute this command: reg add HKLMSYSTEMControlSet001ControlBluetoothAudioAVRCPCT /v DisableAbsoluteVolume /t REG_DWORD /d 0 /f
After you execute the command, just restart your computer.

After your computer restarts.

Once you’re done executing the given instructions above, you have to right-click on the speaker icon located in the system tray and select Open Sound Settings and click on Manage device settings – the same controls will be visible to you like earlier. Now when you change the volume level for one speaker, the other speaker should now remain as it is and won’t change alongside the speaker.
Read More
Fix 0xc000014C Boot Configuration Data error
If you receive the error code 0xc000014C while you boot up your computer, then this post might be of help. This kind of error usually points to the Registry of your computer that might be corrupted. As a result, the operating system was not able to read the BCD file and throws the 0xc000014C error. The error code 0xc000014C is triggered when your computer encounters an error in the first booting sector. You might receive any of these error messages:
“Info: An error occurred while attempting to read the boot configuration data.” with File: as “BootBCD” “File: Windowssystem32configsystem Info: Windows failed to load because the system registry file is missing or is corrupt” “Info: The Boot Configuration Data for your PC is missing or contains errors.”
To fix the error code 0xc000014C when booting your computer, you can check out the suggestions provided below.

Option 1 – Try running System Restore in Advanced Startup Options

Since you probably can’t boot into your Windows 10 computer, you can try to run System Restore again in the Advanced Startup Options.
  • Boot your computer into the Advanced Startup Options screen.
  • From there, you will see some options to troubleshoot when you can’t log in to Windows in the usual way.
  • Now select Troubleshoot > Advanced Options > Command Prompt.
  • After that, type “rstrui” and hit Enter to execute the command which will start the System Restore process.

Option 2 – Try to rebuild the BCD files

You can also try rebuilding the BCD files to resolve error 0xc000014C for corrupted Boot Configuration Data
  • You can start by booting into the installation environment for Windows 10 from an installation media.
  • After that, click on Repair your computer and on the blue screen, select Troubleshoot and then select the Advanced options menu.
  • From there, select Command Prompt and once you open it, enter each one of the commands given below by sequence.
    • bootrec /FixMbr
    • bootrec /FixBoot
    • bootrec /ScanOS
    • bootrec /RebuildBcd
  • Once you’re done executing the commands given above, type “exit” to close the Command Prompt window and then restart your computer and see if it fixed error code 0xc000014c.

Option 3 – Try restoring the default and uncorrupt Registry Values

This option is a bit tricky as you have to be sure about what you are doing here. However, if you are not sure, you might want to seek out a technician to fix the problem for you. But if you can handle it, then carefully follow the steps below.
  • You have to first physically remove the hard drive of the computer that’s not booting up. You can refer to it as Hard drive 1 and Computer 1, respectively.
  • After that, you need to have another computer which you can refer to as Computer 2, and refer to its hard drive as Hard drive 2. Make sure that this second computer is working properly.
  • Next, you have to attach Hard drive 1 to Computer 2 with the Hard drive 2 attached as well.
  • After that, boot Computer 2 from Hard drive 2 where Hard drive 1 will act as the second storage unit.
  • Then navigate to the following location in the System Partition of the Hard drive 2.
C:/Windows/System32/config/RegBack
  • From there, you have to replace all the files. Once you’re done, shut down your computer and then take out the Hard drive 1 from Computer 2 and put it back to Computer 1 as the only hard drive.
  • Now boot your computer normally and check if the problem is fixed.
Read More
Best fitness trackers for your health needs
fitness trackerIf this unfortunate COVID-19 worldwide pandemic has managed to teach us, I would argue it is that our health is the most important thing. So in that spirit, we will continue in this article reviewing some of the best fitness trackers that can be found in the time of writing this article in 2021. Now the market for fitness trackers is not small by any means and offerings are also not small, from no-name manufacturers costing only a few bucks to more serious one’s going slightly over 100 USD there is a fitness tracker for everyone. In this particular article, we will not focus on cheap few dollars no-name ones, instead, we will be offering top ones in the field among some in the middle range simply because we can stand behind them considering quality and precision.

Fitbit Charge 4 fitness and activity tracker

Fitbit is not a pioneer company in the world of fitness trackers and it shows. Charge 4 model offers maybe the best quality, performance, and features for its price. It stands out with implemented GPS meaning that you will need your phone for tracking workouts. It also offers step tracking, sleep tracking, automatic workout-tracking, active zone minutes, etc. It weighs 30g and has 1 inch grayscale OLED. Battery life is said to hold up to 4 days if you use built-in GPS regularly, if you decide to use GPS constantly device will last only 5 hours. Without GPS it can last up to 7 days and it is water-resistant and waterproof up to 50 meters.

Amazfit Band 5

Amazon’s offering of fitness tracker is aimed at beginners and as such, it is lacking some advanced features including an automated working tracker or GPS, also the model does not have replaceable bands so customization is not an option. It does however offer activity and sleep tracking, heart rate monitoring and it is the only model that integrates with Alexa. The manufacturer states that the battery can last up to 15 days depending on usage which places Amazfit Band 5 as a device that has a longer life of use. The device itself is packed with a 1.1-inch color OLED and it weights 12g. It is splash-resistant, not water-resistant.

Xiaomi Mi Band 6

Xiaomi tracker is the best budget version on this list including in it 30 sport modes like running, cycling, yoga, swimming, and more. Battery life is not bad also packing up to 14 days of life but only if the device is not used constantly. It has activity and sleep tracking, a heart rate monitor, sleep tracking, customizable replicable bands and it is water-resistant up to 50m. It comes in a 1.56 inch AMOLED color display and it weighs 63g. The device also has menstrual health tracking making it a great device for women.

Samsung Galaxy Fit 2 fitness tracker

Now we are getting into serious and little more expensive ones. Galaxy Fit 2 is among the top-notch trackers currently on the market. It of course can work along with Samsung’s smartwatches and mobile phones. Packed in the military-grade 1.1-inch casing with color AMOLED and weighing 91g with battery life up to 21 days and water resistance up to 50m this bracelet is an absolute beast. It comes packed with features from standard sleep tracking to automated workout-tracking but it also has a connection to Samsung’s Health mobile app to choose from over 90 workouts, it monitors heart rate and stress levels making it really one of the complete solutions for serious fitness enthusiasts.

Garmin Vivosmart 4 fitness tracker

Last on our list is Garmin vivosmart 4. The device itself is not very impressive, 7 days battery life with 0.7 inch OLED display and 17g weight packed with 50m water resistance is nothing spectacular, Samsung’s model is packing better hardware and way more battery life but all of the mentioned devices fall flat if we compare software to Garvin. Garvin’s Vivosmart 4 software is best on the list, it keeps track of your steps, sleep, calories burned, floors climbed, various exercises, and heart rate as standard features but you'll have advanced sleep tracking with REM sleep. It can also gauge blood oxygen saturation levels during the night with its wrist-based Pulse Ox sensor. In addition, a relaxation breathing timer complements the all-day stress tracking feature. Lastly, the "Body Battery" monitor helps optimize your daily activities based on your energy levels making it truly the only complete tracking solution on this list. That's it for our review of fitness trackers of today, be sure to come back each day to find more interesting articles and tips for your everyday digital life.
Read More
How to Fix Error Code 0x8007232B

Error Code 0x8007232B (Code 0x8007232B) – What is it?

Error code 0x8007232B (Code 0x8007232B) is an error that occurs when you attempt to activate Windows Server 2008 or Windows Vista.

Common symptoms include:

  • Attempting to activate Windows 7, Windows 8, or Windows Server 2012 and you receive an error message.
  • The error message says: “Windows could not be activated. Key management services host could not be located in domain name system, please have your system administrator verify that a KMS is published correctly in DNS”
  • The error message says “The directory name, file name, or volume label syntax is incorrect”.

Error Causes

  • Error Code 0x8007232B occurs when you attempt to use media that is volume licensed to install: Windows 8, Windows 7, Windows Vista Enterprise, Windows Vista Business, Windows Server 2012, Windows Server 2008, Windows Server 2008 R2.
  • This error code also occurs when the activation wizard is unable to connect to a Key Management Service host computer.

Further Information and Manual Repair

Error code 0x8007232B can be seen when you are trying to activate windows, on several different operating systems. This problem can usually be easily corrected, but in the event that it can't, please contact a computer repair technician. When you try to install any of the previously mentioned Windows products, they use a generic product key to install the volume-based license software. If you do have a KMS host computer configuration and see these error codes, that means the correct DNS entries are not being seen on the computer. If there is not a KMS host computer setup, you need to do this setup, otherwise switch to a MAK product key method, and activate the volume license installation that way.

Method One:

Using a Multiple Activation Key as opposed to KMS activation

  1. Click the Start icon, click on All Programs, click on Accessories, right-click on Command prompt.
  2. Click on “Run as administrator”. Type in the password or provide confirmation if prompted for administrator password or confirmation.
  3. When asked for the command prompt, enter in the following and then hit the Enter buuton: slmgr -ipk xxxxx-xxxxx-xxxxx-xxxxx-xxxxx  Note: this placeholder represents the MAK product key.

Method Two:

Configure a KMS host server for the clients to activate against.

A KMS host server needs to be configured for the clients to activate against. When there are no KMS host servers configured near you, install and activate a KMS server key. After this, configure a computer on the network to host this KMS software and publish the Domain Name System (DNS) settings.

Method Three:

When the client cannot locate a KMS host on the network for activation:

1. Verify that your computer has the KMS host installed and activated by using a KMS key that is registered in DNS. You will follow these steps to do that:

  1. Click the Start button, click on All Programs, click Accessories, and then right-click on Command Prompt.
  2. Click on Run as Administrator. Type the password or provide confirmation if you are asked for an administrator password or for confirmation.
  3. In the command prompt box, type the following command and press ENTER: nslookup -type=all _vlmcs.tcp>kms.txt
  4. Then open the KMS.txt file generated by this command. The file will contain at least one entry that relays the SRV service location.

2.  A KMS host server registers a DNS SRV record once every 24 hours by default. You should check the registry to see if the KMS host server is registering with the DNS. Follow these steps to do so:

  1. Click on Start, type in regedit, and then press Enter.
  2. Locate HKEY_LOCAL_MACHINESOFTWAREMicrosoftWindowsNTCurrentVersionSL and then click on it.
  3. The KMS server does not register in DNS if the DisableDnsPublishing subkey is existing and has a value of 1. If this subkey is missing altogether, create a DWORD value called the DisableDnsPublishing. If the dynamic registration is suitable, the subkey value should be changed to 0. Right-click DisableDnsPublishing, click on Modify, enter 0 into the Value data box, and click OK.
Read More
1 2 3 171
Logo
Copyright © 2023, ErrorTools. All Rights Reserved
Trademark: Microsoft Windows logos are registered trademarks of Microsoft. Disclaimer: ErrorTools.com is not affiliated with Microsoft, nor claims direct affiliation.
The information on this page is provided for information purposes only.
DMCA.com Protection Status