Logo

Can’t remove Bluetooth mouse & keyboard

Windows 10 supports various devices to get connected to which makes it quite a flexible operating system. The connection varies on the fact that the device can be connected either with Bluetooth or other wireless and wired connection. However, no matter how great the features are, there a few times when they bring in some bugs too. One of these bugs won’t allow you to either remove or reinstall the Bluetooth mouse and keyboard device from your Windows 10 computer. So if you are currently experiencing this problem, read on as this post will guide you in fixing it.

Before you go over the suggestions laid out below, you need to create a System Restore Point first since, in one of the options, you will be making some changes with the registry files as well as some critical Windows settings. Once you have that covered, refer to the following options.

Option 1 – Configure the Bluetooth Services

The first thing you can do is configure Bluetooth Services.

  • Tap the Win + R key combination to open the Run dialog box.
  • After that, type “services.msc” in the field and hit Enter to open the Windows Services Manager.
  • You will then see a list of services and from there, look for the following services and make sure that their default values are set as follows:
    • Bluetooth Audio Gateway Service – Manual (Triggered)
    • Bluetooth Support Service – Manual (Triggered)
    • Bluetooth User Support Service – Manual (Triggered)
  • Now click on the Start button to start all the aforementioned services and then check if you can now remove or reinstall the Bluetooth mouse and keyboard device.

Option 2 – Try running the Bluetooth Troubleshooter

As you know, Windows 10 has various troubleshooters with user-friendly interfaces where you can utilize them to fix issues in your PC. And since you’re dealing with some Bluetooth problem, you have to run the Bluetooth Troubleshooter.

  • Open the Windows 10 Settings.
  • Then go to Update & Security > Troubleshoot.
  • You should find the option for Bluetooth on your right-hand side – click on it then click on the “Run the troubleshooter” option.
  • Now follow the next screen options.

Option 3 – Try to reinstall or update the Bluetooth driver

The issue might have something to do with the Bluetooth drivers. It could be that it is outdated and needs to be updated or that you recently updated it and since then you have trouble removing the Bluetooth device and so to fix the issue, you can update, roll back or uninstall the Bluetooth drivers. How? Follow the steps below.

  • Tap the Win + X keys to open the Device Manager.
  • Next, look for the Bluetooth device and right-click on it.
  • Select the option “Update driver”.
  • After that, a new popup window will appear. In there, select the option, “Search automatically for updated driver software”.

Note: Checking the update may take a few minutes so you’ll have to wait until it finishes. If it is able to find an update, you must install it.

Option 4 – Get rid of any interference

If you have several wireless devices in the same room as your PC then it might have caused interference with the current connection in your PC which is why you have to switch off all the other devices and then try removing reinstalling the Bluetooth mouse and keyboard devices again.

Option 5 – Remove or reinstall the Bluetooth devices in a Clean Boot State

You might want to uninstall or remove the Bluetooth Devices while your computer is in a Clean Boot State. Putting your computer in this state will surely help especially if there are some processes that prevent the Bluetooth devices from being removed or reinstalled.

  • Log onto your PC as an administrator.
  • Type in MSConfig in the Start Search to open the System Configuration utility.
  • From there, go to the General tab and click “Selective startup”.
  • Clear the “Load Startup items” check box and make sure that the “Load System Services” and “Use Original boot configuration” options are checked.
  • Next, click the Services tab and select the “Hide All Microsoft Services” check box.
  • Click Disable all.
  • Click on Apply/OK and restart your PC. (This will put your PC into a Clean Boot State. And configure Windows to use the usual startup, just simply undo the changes.)
  • After that, try to reinstall or remove the Bluetooth mouse and keyboard devices again.

Do You Need Help with Your Device?

Our Team of Experts May Help
Troubleshoot.Tech Experts are There for You!
Replace damaged files
Restore performance
Free disk space
Remove Malware
Protects WEB browser
Remove Viruses
Stop PC freezing
GET HELP
Troubleshoot.Tech experts work with all versions of Microsoft Windows including Windows 11, with Android, Mac, and more.

Share this article:

You might also like

How to always run the app in admin mode in W11
Each time you open an application inside your Windows 11 operating system, it is opened with standard privileges. Now, please note that your account privileges and application privileges are two different things, you might be the administrator of the system but when you open the app, it still opens with standard privilege. admin privileges
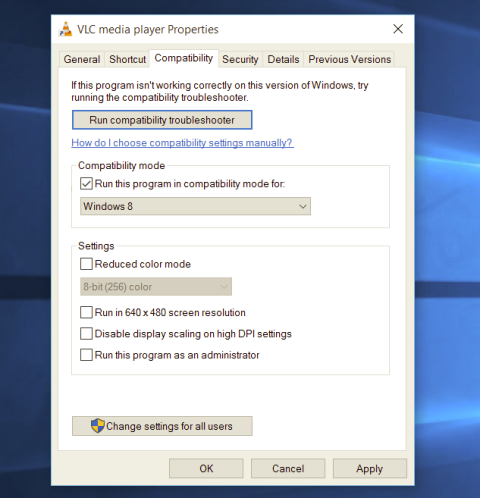
Most of the time running applications with typical settings is fine but from time to time we might have some applications that will require running with administrator privilege in order to work properly. In this case, it is very easy to do it, you just right-click and choose run as administrator. Although a very easy solution, it can be quite annoying if running the app is on a daily basis or even more times per day. If this is the case then right-clicking and choosing to run as administrator can be a daunting task, sometimes you can even forget to run it like this in heat of work and some unforeseen consequences might occur. Luckily there is an easy hack so you can open the chosen application each time as an administrator with a simple double click each time.

Setting application to run as administrator always

  1. Locate application executable file
  2. Right-click on in and choose properties
  3. Click on the Compatibility tab
  4. Check the box next to Run this Program as an Administrator
  5. Click on Apply
  6. Click on OK
From now on each time you open an application normally with a double click, it will be opened as administrator privileges.
Read More
Ways to lose your Facebook account to hackers
Facebook graphicsToday most people have Facebook accounts where they keep in touch with friends and family. But large Facebook network of users is also very interesting to another party as well, hackers. There are many ways hackers can steal your data via direct hacks, trickery, and social engineering in order to get your credentials, emails, and many other things using them to wreak further havoc. Once a hacker has needed information it is very difficult to minimize impact and all of your information could be compromised from a list of friends to credit card numbers. Keep on reading to learn how can you protect yourself against these attacks and learn about common practices that hackers use in order to steal your data.

Stealing Facebook data via email

A couple of years ago there was a lot of talk about not opening suspicious emails. Well, it still holds today. The difference is that today’s fake emails have become very difficult to differentiate from official ones since hackers put the effort into creating them copying fonts and layout, making them identical to original ones. So if emails look and feel like original ones how do you know if it is fake? Very simple, you do not click anything in it. If Facebook or for that matter any company wants to contact you they will do via their platform. Clicking inside a hacker's email will lead you probably to a fake Facebook website replica where you will have to type in your username and password providing an attacker with your login credentials, etc. If you receive this kind of mail where there are threats about terminating an account, missing payments, etc. it is always the best thing to go directly to Facebook and see if you have any kind of notifications there. Do not trust any emails that ask for account information, request money, or threaten to suspend your account.

Phishing attacks

As stated previously if you click on the link inside fake mail it will probably lead you to a website replica of the original. Although hackers can pretty much copy all things from an original website like layout, fonts, colors, etc. There is one thing that he cannot, web address. Take a good look into your browser address bar to see if there is a typo or anything strange in the address of a website. Also, make sure to check for the secure icon in the web address before signing in.

Fake Facebook buttons

If by any chance and for whatever reason, you end up on a fake Facebook site be vary careful about like and other buttons since buttons themselves behave and act like links inside your browser. IF when you click on like you get a prompt to sign in, it is almost 100% that you ended up on a phishing fake website.

Password brute force attack

Having complex and long passwords is a must. If your Facebook password is 12345 there is a very high chance that if a hacker wants he can easily guess it via trying out the most used and simple passwords via simple guessing. To avoid being hacked just for having poor passwords try to think of something longer, combine letters and numerical characters, place special characters inside it or just simply as the best solution use a password manager and create passwords with it.

Password grab outside Facebook

If you use the same password for multiple accounts which is a big no-no and you should not do it then hackers can use passwords from other services and login into your Facebook in order to steal data. Avoid these situations by having different passwords for different accounts or use a password manager to keep everything in order.

Hacking via key logger

Some time ago we have made an article which explained in detail everything you need to know about key loggers here: https://errortools.com/windows/how-to-know-if-you-have-keylogger-in-windows/ Anyway, this is a more advanced hacking technique in order for hackers to steal your data and it includes placing malicious applications into your system that records your keystrokes and sends them directly to hackers. Since this is an application best protection against this type of attack is to have a security suite installed and active on your PC or device you use to go to Facebook.

Connecting and surfing on an unsecured network

Using no password and unsecured WI FI or any other type of network is risky at least. You can have all protection installed on your device and have a strong password but hackers also logged in to the same network can track all outgoing stuff going through mentioned network leaving you again exposed to attacks. It is better to connect to your mobile operator network than on free WI FI, at least there is some level of security in your operator network while free WI FI is completely unsecured. Getting a virtual private network or VPN is also one thing you could think about for protection since almost all VPN services will encrypt your data thus providing you with a security layer even on unsecured Wi-FI.

Conclusion

Hacking and stealing have come a long way from their infant stages and in today’s world when we use a lot of gadgets and have plenty of online presence taking some steps for security is a must. I hope that you have found anything here informational and helpful so you can avoid getting your data compromised.
Read More
How to Enable Last Active Click feature
Microsoft has started to use group along with every open window in the Taskbar ever since the release of Windows 10. Early on, they used to show an individual entry for each one of the windows after grouping them which makes the taskbar look cleaner and organized. However, the main issue lies in the fact that you have to hover on your desired window to get on to them. At the time of writing, you need to tap the Ctrl key and click on the taskbar icon to open the last active window but you have to only click on the program’s taskbar icon after you apply the tweak given in this post for the last active window to open. Take note that the “Last Active” windows feature will only work if the taskbar buttons are combined. Before you get started doing the instructions given below, you need to create a System Restore Point first since you will be dealing with registry files and modifying some of the critical settings in Windows 10. Once you’ve done this, proceed to the given steps below. Step 1: Tap the Win + R keys to open the Run dialog box and then type “Regedit” in the field and hit Enter to open the Registry Editor. Step 2: If a User Account Control or UAC prompt appears, just click on Yes to proceed to open the Registry Editor. Step 3: Next, navigate to the following registry path:
HKEY_CURRENT_USERSoftwareMicrosoftWindowsCurrentVersionExplorerAdvanced
Step 4: From there, right-click on the right side of the panel and select New > DWORD (32-bit) and then name it “LastActiveClick”. Step 5: After that, double click on the newly created DWORd to modify its value. Put “1” as its value data. Step 6: Then click OK and close the Registry Editor. Step 7: Now restart your computer to successfully apply the changes made. Note: In case you want to revert back to the default configuration, all you have to do is set the value data of LastActiveClick to “0” or simply delete that DWORD and restart your computer to successfully apply the changes made.
Read More
Runtime Error How to Fix

A runtime error is commonly an error that's created after the PC is operating software and encounters a problem of some form. For instance, a runtime error like run-time error code 7 reveals an "out of memory" dilemma.

Solution

Error Cause

Run-time errors are normally brought on by clashes with TSR (Terminate and Stay Resident) applications or additional operating applications, software problems, storage problems, or pc viruses.

Troubleshooting a Run-time Error

First, enter the run-time error signal into a search engine to see what info you will get about the precise runtime issue you are receiving. Next, end - job all running applications and TSRs to make sure these aren't the origin of the issue. You can certainly do so by obtaining the job manager by striking Control Alt Delete.

In case your issue is regularly occurring with a unique program, go to that system programmer's site and obtain any upgrades and patches. If unavailable, try uninstalling the application involved and reinstalling it.

In the event the issue is occurring with the os, you may consider reinstalling it although it is a huge commitment. A much better idea would be to try a fix for both Windows XP or Windows 2,000. It is possible to fix and scan files by typing : sfc / scannow, heading to the Begin switch, Run, and then pushing enter. Make certain to put an area between sfc and the reduce.

You might have an equipment or storage dilemma if these measures have not resolved your run-time errors. If that is the situation, contact the support of the application under consideration for potential support accompanied by the pc or motherboard manufacturer.

Many run-time problems can be solved by upgrading the application that's creating the problem. This is only because the programmer's frequently releasing patches and improvements for their applications as insects are found and repaired.

Storage problems may frequently be fixed by rebooting the pc. Consider a reboot a short-term repair. Rebooting clears the memory but in case your COMPUTER does not have adequate memory for your applications you're operating, or sufficient hard-drive space you'll immediately run out of memory again. Something less than this sum may cause memory issues since the computer's swap file isn't in a position to expand in dimension as required.

To assess the quantity of free area, available My Computer and right-click on the HDD, generally the D: drive. Select Attributes in the menu and see the disc's ability. Perform the disk clean-up function by following prompts and pressing the Disk Clean-up button, if the room is reduced.

You may be getting run-time errors, in case your storage chip is really failing. Eliminating and changing the awful memory chip will solve the difficulty. If you're encountering other runtime-related errors, like an install runtime issue, try cleaning away the portions of the registry with some software solution. 

Read More
How to remove ListenToTheRadioNow from your PC

ListenToTheRadioNow is a Browser Extension that allegedly lets you listen to radio from your browser. However, all this extension does is add links to the popular radio stations on your home page. This extension hijacks your home page and changes your default search provides to MyWay. While running it monitors browsing data from your browser, mining information such as website visits, clicked links, and sometimes even personal information. This information is later used to display targeted ads through your browser. Several anti-virus scanners have marked this extension as a possible Browser Hijackers, and due to its data mining nature, it is not recommended to keep it on your computer.

About Browser Hijackers

Browser hijacking is a type of unwanted software, commonly a browser add-on or extension, which then causes modifications in the web browser’s settings. Browser hijackers could do more than just modifying homepages. In most cases, browser hijacking is used for earning ad revenue that comes from forced advert clicks and website visits. Even though it may seem naive, all browser hijackers are dangerous and therefore always regarded as security threats. They don’t just ruin your internet browsers, but browser hijackers could also modify the system registry to make your PC susceptible to other malicious programs.

How you can know whether the browser is hijacked?

There are several symptoms of browser hijacking: 1. home-page is changed 2. new bookmarks pointing to porn websites have been added to your bookmarks 3. the default internet search engine and/or the default web browser settings are altered 4. find new toolbars that you did not add 5. unstoppable flurries of popup ads show up on your PC screen 6. webpages load very slowly and often incomplete 7. you have prohibited entry to certain web pages, for example, the site of an anti-malware software firm like SafeBytes.

So how does a browser hijacker infect a PC

A browser hijacker could be installed on your computer or laptop if you visit an infected website, click on an e-mail attachment, or download something from a file-sharing website. They also come from add-on programs, also referred to as browser helper objects (BHO), browser plug-ins or toolbars. Also, some shareware and freeware can put the hijacker inside your computer through “bundling”. A good example of some popular browser hijackers includes Babylon, Anyprotect, Conduit, SweetPage, DefaultTab, Delta Search, and RocketTab, but the names are regularly changing.

Tips on how to get rid of a browser hijacker

Some hijackers can be removed by uninstalling the freeware they were included with or by eliminating any extension you’ve recently added to your computer. However, most hijacking codes are not very easy to eliminate manually, since they go deeper into your operating system. Furthermore, manual removal expects you to perform several time-consuming and tricky actions that are hard to do for new computer users. Professionals always recommend users to get rid of any malicious software including browser hijacker with an automatic malware removal tool, which is simpler, safer, and faster than the manual removal technique. One of the top tools for correcting browser hijacker malware is SafeBytes Anti-Malware. It can help you eliminate any pre-existing malicious software in your computer and provides you real-time monitoring and protection from the latest internet threats. Employ a PC optimizer along with your anti-malware software to correct various registry problems, remove computer vulnerabilities, and improve your computer overall performance.

Help! Malware Preventing Antivirus Installation And Access To The Internet

All malware is bad, but certain kinds of malware do a lot more damage to your computer than others. Some malware sits in between the computer and the net connection and blocks some or all internet sites that you want to check out. It will also prevent you from installing anything on your system, especially anti-virus applications. If you’re reading this, chances are you’re stuck with a malware infection that is preventing you to download and install the Safebytes Anti-Malware program on your computer. Do as instructed below to get rid of the malware by alternate methods.

Install the anti-malware in Safe Mode

Safe Mode is actually a special, basic version of Windows in which just minimal services are loaded to counteract viruses and other troublesome programs from loading. In the event, the malicious software is set to load automatically when the computer boots, switching to this mode may well prevent it from doing so. To start the computer into Safe Mode, hit the “F8” key on your keyboard just before the Windows logo screen comes up; Or right after normal Windows boot up, run MSConfig, check Safe Boot under Boot tab, and click Apply. Once you’re in Safe Mode, you can attempt to download and install your antivirus software application without the hindrance of the virus. After installation, run the malware scanner to get rid of most standard infections.

Download the security program using an alternate web browser

Some malware mainly targets particular browsers. If this sounds like your case, use another web browser as it could circumvent the virus. If you appear to have a virus attached to Internet Explorer, then switch over to an alternate browser with built-in security features, such as Firefox or Chrome, to download your preferred anti-malware program – Safebytes.

Install and run anti-virus from the Thumb drive

Another solution is to store and operate an anti-malware program entirely from a Pen drive. Do these simple steps to clear up your affected PC using a portable antivirus. 1) Download the anti-malware on a virus-free PC. 2) Insert the USB drive onto the same system. 3) Run the setup program by double-clicking the executable file of the downloaded software, with a .exe file format. 4) Choose the drive letter of the pen drive as the place when the wizard asks you where you would like to install the antivirus. Follow the instructions on the computer screen to complete the installation process. 5) Unplug the pen drive. You may now utilize this portable anti-virus on the affected computer. 6) Double-click the EXE file to open the Safebytes software right from the pen drive. 7) Click the “Scan” button to run a full system scan and remove viruses automatically.

Protect Your PC and Privacy With SafeBytes Anti-Malware

To help protect your laptop or computer from many different internet-based threats, it’s important to install an anti-malware program on your laptop. However, with so many antimalware companies in the marketplace, nowadays it is hard to decide which one you should buy for your laptop. Some of them are great and some are scamware applications that pretend as genuine anti-malware software waiting to wreak havoc on your computer. While looking for an anti-malware tool, choose one that offers dependable, efficient, and complete protection against all known computer viruses and malware. On the list of recommended software by industry analysts is SafeBytes Anti-Malware, a popular security application for Windows computers. SafeBytes anti-malware is really a powerful, highly effective protection software made to assist users of all levels of computer literacy in finding and removing harmful threats from their computer. Through its cutting-edge technology, this software protects your computer against infections caused by different kinds of malware and similar threats, including spyware, adware, viruses, worms, trojans, keyloggers, ransomware, and potentially unwanted program (PUPs). SafeBytes anti-malware provides a myriad of advanced features that sets it apart from all others. Below are some of the great features included in the tool. Robust Anti-malware Protection: Built on a highly acclaimed anti-virus engine, this malware removal application can find and get rid of many obstinate malware threats like browser hijackers, PUPs, and ransomware that other common antivirus applications will miss. Live Protection: SafeBytes provides complete and real-time security for your computer. This software will continuously keep track of your computer for suspicious activity and updates itself continuously to keep current with the latest threats. Web Filtering: Through its unique safety rating, SafeBytes informs you whether a site is safe or not to visit it. This will make sure that you’re always certain of your safety when browsing the web. Faster Scanning: SafeBytes Anti-Malware possesses a multi-thread scan algorithm that works up to five times faster than any other antivirus software. Lightweight Application: SafeBytes gives you complete protection from online threats at a fraction of the CPU load due to its enhanced detection engine and algorithms. 24/7 Live Expert Support: You will get 24/7 technical support to promptly resolve any issue with your security application. SafeBytes can keep your PC safe from most advanced malware threats automatically, thus keeping your online experience secure and safe. Malware issues can become a thing of the past when you put this application to use. If you want sophisticated forms of protection features & threat detections, buying SafeBytes Anti-Malware will be worth the dollars!

Technical Details and Manual Removal (Advanced Users)

If you do not wish to use malware removal software and like to get rid of ListenToTheRadioNow manually, you might accomplish this by going to the Windows Add/Remove Programs menu in the control panel and deleting the offending software; in cases of web browser plug-ins, you could remove it by visiting the browser’s Add-on/Extension manager. You will likely also want to reset your web browser. Finally, check your hard drive for all of the following and clean your Windows registry manually to get rid of leftover application entries after uninstalls. Please keep in mind that only experienced users should attempt to manually edit the system files because removing any single critical registry entry results in a serious problem or even a system crash. In addition, certain malware is capable of replicating or preventing removal. It is highly recommended that you carry out the removal process in Safe Mode.
Files: %LOCALAPPDATA%\Google\Chrome\User Data\Default\Sync Extension Settings\mlpfmcjpkbijcpegdbkplcddgacjlgpf %UserProfile%\Local Settings\Application Data\Google\Chrome\User Data\Default\Sync Extension Settings\mlpfmcjpkbijcpegdbkplcddgacjlgpf %LOCALAPPDATA%\Google\Chrome\User Data\Default\Extensions\mlpfmcjpkbijcpegdbkplcddgacjlgpf %UserProfile%\Local Settings\Application Data\Google\Chrome\User Data\Default\Extensions\nhpggpakfcgbidnmlheodkbccemlenag %LOCALAPPDATA%\Google\Chrome\User Data\Default\Extensions\nhpggpakfcgbidnmlheodkbccemlenag %USERPROFILE%\AppData\Local\Google Registry: HKEY_LOCAL_MACHINE\Software\ListenToTheRadioNow\Microsoft\Windows\CurrentVersion\Uninstall..Uninstaller ListenToTheRadioNow
Read More
A Quick Guide to Fixing Error Code 0x80070057 in Windows 10

Error Code 0x80070057 – What is it?

Error code 0x80070057 occurs when Windows users are having problems installing updates on their machines. The error code may result due to issues affecting Windows Update, for instance, problems with system files or settings that can be accessed or modified using the registry in Windows. Error code 0x80070057 affects multiple versions of the Windows operating system including Windows 10. Common symptoms manifested when this error code and other update error codes occur include the following:

  • Inability to complete the installation of updates via Windows Update
  • Presence of error code message box

Error Causes

Update error codes like error code 0x80070057 occur when there are issues related to system files, programs or malicious software is present on one’s machine. To combat these issues, users may need to implement manual repair procedures, depending on the specific error code present on their device.

Solution

Restoro box imageFurther Information and Manual Repair

Windows users can fix error code 0x80070057 by manually repairing or deleting subkeys and values within the Windows registry. This enables Windows Update to function as the proper modification of settings and other information present in the registry can fix problems associated with certain error codes.

The manual repair procedures also enable users to address specific problems on the devices that may not be fixed through the use of other methods.

Method One: Back-Up Registry in Windows

The Windows registry contains information regarding applications installed on the version of Windows you use on your device. This information as well as settings related to hardware are all accessible to users and can be useful when combating problems like error code 0x80070057.

However, users will need to be very careful when making modifications within the registry in Windows. This is due to the fact that errors made while accessing the registry can lead to serious issues on your PC. Backing up your registry before you modify it is crucial since it will provide protection against any problems that may arise if you make an error. This is the first step in resolving error code 0x80070057. Follow the steps below to back up your registry properly.

  • Step one: Type regedit.exe in the search box near the Start button.
  • Step two: Type the appropriate password or provide confirmation if you are prompted to do so
  • Step three:  Locate Registry Editor
  • Step four: Select registry key or subkey that you want to back up
  • Step five: Click File > Export
  • Step six:  In the Export Registry File dialog box, choose a location where you will save the backup copy
  • Step seven: Name the backup file then select Save.
In the case of fixing error code 0x80070057, the registry file or subkey you will need to back up relates to this: HKEY_LOCAL_MACHINE. This contains configuration details or information related to your machine regardless of the user. Also note that the registry, once you have created a backup file, will be protected, thus enabling you to move to the manual method mentioned below.

Method Two: Make Changes to the Windows Registry

The execution of modifications to the registry can be a complex procedure, especially if you are an average Windows 10 user who lacks technical knowledge. Thankfully, even non-technical users can access the solutions they need by simply following the instructions provided in this article.

You may also contact a Windows repair technician as well, in case you have trouble implementing the steps mentioned for modifying your Windows registry or if other problems arise while you are proceeding with these instructions.

Step one: Access the Windows Registry Editor by typing regedit.exe in the search box near the Start button.

Step two: Type the appropriate password or provide confirmation if you are prompted to do so

Step three:  Locate Registry Editor

Step four: Enter the following:

[HKEY_LOCAL_MACHINESOFTWAREMicrosoftWindowsUpdateUX] "IsConvergedUpdateStackEnabled"=dword:00000000

[HKEY_LOCAL_MACHINESOFTWAREMicrosoftWindowsUpdateUXSettings] "UxOption"=dword:00000000

After making these modifications in the Windows registry, restart your machine. You can then check Windows Update to see if the problem has been resolved. If the modifications to the registry have proven successful, you will no longer see the error code 0x80070057 message box. You will also be able to complete all updates via Windows Update.

Method Three: Download an Automated Tool

If you wish to always have at your disposal a utility tool to fix these Windows 8 and other related issues when they do arise, download and install a powerful automated tool.

Read More
Disable Telemetry & Data Collection in Windows
The Windows 10 Telemetry and Data Collection features are auto-enabled and they collect all sorts of user activity and sends it to Microsoft. Microsoft says that the data collected only enhances the overall user experience and Windows functionality better but the number of data breaches happening across the globe has forced users to be extra cautious about their data privacy. So naturally, from stronger passwords and other services management, it is only logical to turn off Windows data gathering. To do so:
  • Press ⊞ WINDOWS + R to open the run dialog.
  • In the Run dialog type: taskschd.msc
  • Press CTRL + SHIFT + ENTER key combo to open Task Scheduler in admin mode.
  • On the left pane, navigate to the: Task Scheduler Library > Microsoft > Windows > Customer Experience Improvement Program
  • At the location, on the middle pane, right-click on the task named Consolidator and select Disable from the context menu...
  • Repeat the process with all other tasks listed in the middle pane.
  • Exit Task Scheduler.
Read More
Fix Invalid file handle Error during ...
If you encounter an error saying, “Invalid file handle” when you try to rename, copy, delete a file or other operations in your Windows 10 computer, then read on as this post will guide you in what you can do to fix it. This kind of error pops up when the operating system tries to carry out an operation on a folder or file using the following words:
CON, PRN, AUX, NUL, COM1, COM2, COM3, COM4, COM5, COM6, COM7, COM8, COM9, LPT1, LPT2, LPT3, LPT4, LPT5, LPT6, LPT7, LPT8, and LPT9
When you rename or create a folder or file using the reserved words given above, you could encounter an error that says, “The specified device name is invalid”. This occurs since these words are Windows system reserved words that you can’t use, unlike any other words. Thus, if you have a folder or file which contains any of the reserved words on another computer that runs a non-Windows operating system and you try to copy or rename it Windows, then it’s no wonder why you’re getting this error message. In such cases, you can always click on the Skip button to stop the operation. However, if there are various folders or files, you can just use the Command Prompt to carry out the task. All it takes is a simple command that will get rid of the folder as well as the files in it. How? Refer to the instructions given below. Step 1: Tap the Win + R keys to open the Run utility. Step 2: Next, type “cmd” in the field and then tap Enter to open Command Prompt. Step 3: After opening Command Prompt, execute the following command:
rd \.file-folder-path /S /Q
Note: The “rd” command will remove the directory or the folder while the “\.” command will select the current computer. The “/S” command, on the other hand, helps you in removing all the sub-directories and the files that are in the CON folder. The “/Q” command is not really mandatory since it helps you remove everything silently without any confirmation message. For example, if you have a folder named “CON” located on your Desktop, the path will be like this “C:/Users/<username>/Desktop/CON”. In this case, the command should be like this:
rd \.C:Users<username>DesktopCON /S /Q
However, if the error pops up for a whole different reason, you could use the following command instead to remove the reparse point extended functionality. Once you’ve entered the given command below, you should now be able to delete the file.
FSUTIL reparsepoint delete C:Users<username>DesktopFileName DEL C:Users<username>DesktopFileName
Read More
How to Fix Failed to load DLL file Error
If your operating system cannot or is not able to load a required DLL file on your Windows startup and you encounter a message saying, “Failed to load DLL”, then you’ve come to the right place as this post will guide you in fixing this problem. When you encounter this kind of issue, you will see either of the following error messages on your screen:
“The dynamic library dll failed to load.” “Failed to load dll library.”
This kind of error can occur when your Windows operating system fails to locate the DLL library which the system needs to access during startup. It can also occur when the DLL file is not in a directory specified in the path or when the DLL file is corrupted or has gone missing. Moreover, you can also encounter this error if the DLL file is infected with some malware. Whatever the case is, here are some suggestions you have to check out to resolve the problem.

Option 1 – Try to reinstall the program

The first thing you can do is to reinstall the program that’s giving you this error. Once you’ve uninstalled the program, download its latest setup file from its official site and then install it again.

Option 2 – Try checking the startup programs

You might also want to check the startup programs on your computer, especially the Windows Registry startup paths, and then remove the startup entry to the concerned DLL file.

Option 3 – Try to re-register the problematic DLL file

You may have to re-register the ntdll.dll file using the regsvr32.exe before you can successfully install the program and fix the ntdll.dll file crash error. The Regsvr32 tool is a command-line utility that can be used to register and unregister OLE controls like DLL and ActiveX (OCX) control in the Windows operating system. Follow the steps below to use it.
  • Open Command Prompt as admin from the WinX menu.
  • Next, type the following commands in the elevated Command Prompt and hit Enter to execute the command. This will re-register the affected DLL file using the Windows operating system tool, regsvr32.exe.
    • exe /[DLL file]
    • exe [DLL file]
Note: Replace “[DLL file]” with the name of the DLL file that was pointed out in the error.
  • After you execute the given commands, you should see a message saying, “DllRegisterServer in vbscript.dll succeeded” if the Regsvr32 tool was able to run successfully. After that, try to install the program again and see if it now works.

Option 4 – Try to replace the DLL file with a trusted source

  • First, you need to get the new DLL file from another computer with preferably the same file version number.
  • After that, you need to boot your PC into Safe Mode and navigate to the paths listed below and then replace the file using a USB drive or other external storage devices.
    • x86: This PC > C:/Windows/System32
    • x64: This PC > C:/Windows/SysWOW64
  • Next, type “cmd” in the Cortana search box and right-click on Command Prompt, and select “Run as administrator” to open it with administrator privileges.
  • Now type the “regsvr32 ntdll.dll” command and hit Enter.
  • Restart your PC and check if the error is now fixed.

Option 5 – Try checking the details in the Event Viewer

Checking the details in the Event Viewer can also help you find out the root cause of the problem as the Event Viewer usually contains detailed information about the error.

Option 6 – Try running the DISM tool

You might want to repair potentially corrupted files in your system as having them could also trigger the “Failed to load DLL” error. To repair these corrupted system files, you can run the DISM commands:
  • Tap the Win + X keys and click on the “Command Prompt (Admin)” option.
  • After that, input each one of the commands listed below sequentially to execute them:
    • Dism /Online /Cleanup-Image /CheckHealth
    • Dism /Online /Cleanup-Image /ScanHealth
    • Dism /Online /Cleanup-Image /RestoreHealth
  • Once you’ve executed the commands given above, restart your computer and check if the “Failed to load DLL” error is now fixed.

Option 7 – Try scanning your computer using Windows Defender

The DLL file might also be infected with malware or virus and to eliminate it which could explain why you’re getting the “Failed to load DLL” error. Thus, you have to scan your computer using security programs like Windows Defender.
  • Tap the Win + I keys to open Update & Security.
  • Then click on the Windows Security option and open Windows Defender Security Center.
  • Next, click on Virus & threat protection > Run a new advanced scan.
  • Now make sure that Full Scan is selected from the menu and then click the Scan Now button to get started.
Read More
Fix NETWORK_FAILED error in Chrome
Although the Google Chrome browser is one of the most used browsers, a lot of things could still go wrong when browsing the web using it. One of the errors you might encounter is the “ NETWORK_FAILED ” error. This kind of error in Chrome indicates that Chrome wasn’t able to send your request through the network connection. It could be that your computer has trouble connecting to a stable internet connection or there is some plugin in your Chrome browser that is causing the issue. The worst-case would be malware. But worry not for this post will guide you on what you can do when you encounter the NETWORK_FAILED error in Google Chrome. Make sure to follow each one of the options given below and see which one of them worked best for you.

Option 1 – Disable or remove any unwanted extensions in Chrome

As you know, browser extensions help in enhancing the browsing experience but there are also times when it does exactly the opposite, and such is the case with the NETWORK_FAILED error in Chrome. It could be that one of the extensions in your browser is the one that’s causing the trouble. To disable or remove these unwanted extensions, here’s what you have to do:
  • Launch Google Chrome, press Alt + F, move to More tools, and click Extensions.
  • Look for Search.tb.ask.com or any other unwanted add-ons, click the Recycle Bin button, and choose Remove.
  • Restart Google Chrome, then tap Alt + F, and select Settings.
  • Navigate to the On Startup section at the bottom.
  • Select “Open a specific page or set of pages”.
  • Click the More actions button next to the hijacker and click Remove.

Option 2 – Run the Malware Scanner and Cleanup tool in Chrome

If removing or disabling the unwanted extension didn’t help in fixing the error, you can try using the built-in malware scanner and cleanup tool in Google Chrome. These tools help you get rid of any unwanted pop-ups, ads, unusual Startup pages, toolbars, and even malware.

Option 2 – Run the Malware Scanner and Cleanup tool in Chrome

  • Launch Google Chrome and then tap the Alt + F keys.
  • After that, click on Settings.
  • Next, scroll down until you see the Advanced option, once you see it, click on it.
  • After clicking the Advanced option, go to the “Restore and clean up the option and click on the “Restore settings to their original defaults” option to reset Google Chrome.
  • Now restart Google Chrome.

Option 3 – Try to disable the Proxy

If you are using a proxy, you might want to consider disabling it as it could have something to do with the NETWORK_FAILED error.
  • Tap the Win + R keys to open the Run dialog box.
  • Then type “cpl” and hit Enter or click OK to open the Internet Properties.
  • After that, go to the Connections tab where you should see the LAN settings. Click on it.
  • Next, uncheck the “Use a Proxy Server for your LAN” and ensure that the “Automatically detect settings” option is checked as well.
  • Then click Ok and then Apply to save the changes made.
  • Restart your PC.

Option 4 – Flush DNS and reset TCP/IP

  • Click the Start button and type in “command prompt” in the field.
  • From the search results that appear, right click on Command Prompt and select the “Run as administrator” option.
  • After opening Command Prompt, you have to type each one of the commands listed below. Just make sure that after you type each command, you hit Enter
    • ipconfig /release
    • ipconfig /all
    • ipconfig /flushdns
    • ipconfig /renew
    • netsh int ip set dns
    • netsh winsock reset
After you key in the commands listed above, the DNS cache will be flushed and the Winsock, as well as the TCP/IP, will reset.
  • Now restart your computer and open Google Chrome then try opening the website you were trying to open earlier.

Option 5 – Delete the WLAN Profiles

Deleting the WLAN Profiles might be a good idea if you are not able to connect to the internet on your computer and if you’re using Wi-Fi. It could be that the networks that were connected previously have gone rogue which is why it is not connecting properly. And so deleting the WLAN profiles would be for the best. That should do it.
Read More
1 2 3 171
Logo
Copyright © 2023, ErrorTools. All Rights Reserved
Trademark: Microsoft Windows logos are registered trademarks of Microsoft. Disclaimer: ErrorTools.com is not affiliated with Microsoft, nor claims direct affiliation.
The information on this page is provided for information purposes only.
DMCA.com Protection Status