Logo

What to do if Windows 10 Store is not downloading Apps

The store is not downloading Apps: As you know, the Windows Store is one of the places where you can download Windows apps. However, there are times when you might not be able to do so for some reason. For instance, if you search for an app and click on the get it now button, instead of downloading the app, nothing happens and there are also cases when the download will start but the page will refresh after half a second. When this issue happens, you won’t be seeing any error message or warning at all. So you’ll just have to look at the download get started where the page will refresh and you’ll be back at the Get button.

This issue in the Windows 10 Store only happens for a few apps so even though you are able to download some apps, you might be able to do on other ones. Note that the apps affected are random and there is no specific set of apps that cause this issue while downloading and that this problem will repeat again each time you click on the Get it now button. This issue is definitely caused by Windows itself and has something to do with a bug in the Windows store which was brought by the latest Windows Update. It’s already a known issue among other Windows 10 users who are also suffering the same dilemma. So until Microsoft releases another update to fix this bug, you will have no choice but to deal with it in the meantime. On the other hand, you can also try a couple of suggestions laid out in this post. Follow the steps in every option given below to fix the issue with the Windows 10 Store.

Option 1 – Try signing out from the Microsoft Store

A lot of Windows 10 users were able to resolve the problem by simply signing out and signing back into the Microsoft Store. How? Follow these steps:

  • Go to the Microsoft Store.
  • Next, go to the Get page of the app you were trying to download.
  • And then click on your account picture located in the top right corner of the window and select your account.
  • Sign out from your account and after that, click the Get button to download the app.
  • After that, a new window will appear where you’ll have to select your account and click on Continue.
  • Now enter your credentials. Once you do, the app should be downloaded automatically after you’re signed in. And that’s about it.

Note: Keep in mind that this option is merely a temporary solution to the problem and once you close the Microsoft Store and open it back again, you will be back to square one.

Option 2 – Wait for the Windows Update

As mentioned, this is already a known issue and a lot of Windows 10 users have already complained about it to Microsoft so a bug fix will be soon released in the latest Windows Updates.

Do You Need Help with Your Device?

Our Team of Experts May Help
Troubleshoot.Tech Experts are There for You!
Replace damaged files
Restore performance
Free disk space
Remove Malware
Protects WEB browser
Remove Viruses
Stop PC freezing
GET HELP
Troubleshoot.Tech experts work with all versions of Microsoft Windows including Windows 11, with Android, Mac, and more.

Share this article:

You might also like

Hardware review: Bytezone Advanced desk
If you spend a large amount of time gaming or working on a computer gaming chair is a very important asset. One other thing that is mostly looked past but could help greatly is a good desk. A great chair accompanied by a great desk can make your long sitting sessions more pleasant and more healthy which is very important in the long run. Hey, but it is only a desk, what is so special about having an expensive desk? Well truth to be told desk is just a desk and any kind of desk can serve the purpose of hosting a keyboard, mice, and screen. But a good desk will offer some other advantages that may not seem so important but they could mean a lot like adjusting desk height so it fits perfectly on your size and sitting position making long hours more pleasant and lower stress on hands sitting on it.

bytezone gaming desk
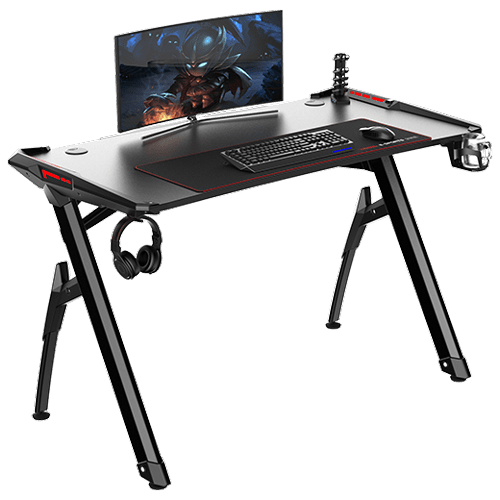
Advanced desk features

Bytezone might not be a company that will sound familiar to you, mostly because they manufacture gaming chairs and desks, now in the gaming chairs world there are a lot of competitors and Bytezone has managed to make a name for itself despite this fact. But they are more popular in their gaming and office modern-looking desk category. The advanced desk is made from carbon steel and plastic combination, it is very durable and it weighs 27kg. Now that is not really light but it is not very heavy if we compare it to wood desks. The top layer of the table is made from easy-to-clean material and the desk comes with a large mouse and keyboard pad. The table itself includes a cup holder, headphones bracket under the table and it has a cable management drawer in the back. The desk is sized 66x120x76 cm. Also for anyone interested desk itself comes also with RGB lights for that true gaming feel.
Read More
Microsoft Surface Dial fails to pair with PC
One of the most interesting innovations that were released by Microsoft is the Surface Dial. This only goes to show that Microsoft is very competent not just in hardware but in overall innovation. Although it’s quite a piece of technology and as far as the consensus is concerned, it works pretty well, there are still some issues encountered by users. One of the particular issues experienced by users is that the Surface Dial fails to pair with every Windows 10 PC. At a time of writing, it is still not clear what the cause of the problem really is. However, their possible solutions are provided in this post that might help you resolve the problem. Before you get started troubleshooting the problem, make sure that there are two AAA batteries fitted inside properly.

Option 1 – Check if your PC supports Bluetooth 4.0 LE

In case you don’t know, the Surface Dial only works with the Windows 10 Anniversary Update and later PCs that support Bluetooth 4.0 LE. Thus, you have to check if this is supported or not before you troubleshoot further.
  • Tap the Win + R keys on your keyboard to open the Run dialog box.
  • Next, type “devmgmt.msc” in the field and hit Enter to open the Device Manager.
  • From there, click on Bluetooth and select “Microsoft Bluetooth LE Enumerator” from the drop-down menu. However, if it is not there, then it simply means that your computer does not support this standard which is most likely why you were unable to pair with other Windows 10 PCs. On the other hand, if you were able to see it, then proceed to the next troubleshooting steps below.

Option 2 – Check if Bluetooth is on

The next thing you have to do is to check if Bluetooth is turned on. As you know, the Surface Dial connects to your computer using Bluetooth and so you need to check if it’s really on or not. Aside from that, you also have to verify pairing.
  • Tap the Win + I keys to open Windows Settings.
  • Next, select Devices from the menu and click on Bluetooth.
  • After that, make sure that the toggle switch for Bluetooth is turned on.
  • Now all you have to do is to verify pairing by pressing and holding the pairing button located beside the batteries and then wait for a few seconds until the Bluetooth light begins to flash.
  • Then go back to the Bluetooth section and click on Bluetooth or other devices.
  • From there, click on Add Bluetooth and select Surface Dial.
  • Follow the next instructions on the screen and click on Done once everything is completed. That should fix the problem.

Option 3 – Check if Surface Dial is connected to another PC

If you think that connecting a Bluetooth device to two different PCs at the same time is wise, then think again as it does not really bode well for the overall user experience. Thus, you need to disconnect the Surface Dial from the system that you are currently using. On the other hand, if everything fails, then it’s most likely that the Bluetooth adapter is the one at fault. So you may have to get a third-party device that connects to your system via USB and then see if it works or not.
Read More
How to Get Rid of Email Access Online

Email Access Online is a browser extension published by Polarity Technologies Ltd. That offers users quick and easy access to emails and weather reports. While this might sound interesting and useful, there is nothing this extension offers that cannot be solved with a few simple bookmarks.

While installed Email Access Online monitors the user's browser activity and records visited websites, clicked links, and bought products, this data is later used to serve partner ads if the user looks for the covered categories, additionally, it will hijack your new tab page, changing your search engine to Yahoo to allow easier ad placement.

Browsing the internet with this extension enabled will result in additional ad placement, pop-up ads, and sponsored links throughout your browsing sessions.

Upon further investigation, it was discovered that this extension is a repack of MyEmailXP, which was a repack of Fast Email Checker. Due to its suspicious delivery methods and information gathering, several anti-virus scanners have marked this extension as a browser hijacker and it is recommended to remove it from your computer.

About Browser Hijackers

Browser hijacking means that a malicious code has taken control over and modified the settings of your web browser, without your consent. Browser hijacker malware is designed for many different reasons. The idea is to force users to visit specific websites which are aiming to increase their visitor traffic and generate higher advertisement income. It may appear naive, but the majority of such websites are not legitimate and can present a significant risk to your online safety. In a worst-case scenario, your internet browser could be hi-jacked to download malicious software that can do a lot of damage to your PC.

Major signs that your internet browser has been highjacked

There are many signs that could indicate a browser hijacking: 1. the home page of the web browser is changed suddenly 2. you observe new unwanted bookmarks or favorites added, usually directed to ad-filled or porn websites 3. the default search engine is changed and the web browser security settings have been brought down without your knowledge 4. you see unwanted new toolbars added 5. your internet browser will display constant pop-up windows 6. your web browser starts running sluggishly or presents frequent errors 7. Inability to navigate to particular sites, especially anti-malware and other computer security software websites.

So how does a computer get infected with a browser hijacker

There are a number of ways your computer can get infected by a browser hijacker. They usually arrive through spam e-mail, via file sharing websites, or by a drive-by-download. They could also come from add-on software, also referred to as browser helper objects (BHO), web browser extensions, or toolbars. Browser hijackers sneak to your computer in addition to free software application downloads that you unintentionally install along with the original. The presence of any browser hijacker on your system could substantially diminish the web browsing experience, monitor your internet activities that lead to critical privacy concerns, create system stability problems and finally cause your PC to slow down or to a practically unusable condition.

How to repair a browser hijack

Certain kinds of browser hijackers can be effortlessly removed from your PC by deleting malicious software programs or any other recently installed shareware. However, most hijacking codes are certainly not very easy to remove manually, as they go deeper into your operating system. And there’s no denying the very fact that manual repairs and removal methods can certainly be a difficult job for an inexperienced PC user. Besides, there are several risks connected with fiddling around with the system registry files. Anti-malware program is incredibly effective when it comes to discovering and removing browser hijackers that regular anti-virus application has missed. To get rid of any kind of browser hijacker from your computer, you can download the following certified malware removal application – SafeBytes Anti-Malware.

What you can do if Virus Stops You From Downloading Antivirus?

Practically all malware is bad, but certain kinds of malicious software do much more damage to your PC than others. Some malware goes to great lengths to stop you from downloading or installing anything on your personal computer, especially anti-malware software. If you are reading this right now, you’ve probably realized that virus infection is the reason behind your blocked net traffic. So what to do when you want to install an anti-malware application such as Safebytes? There are a few actions you can take to circumvent this issue.

Make use of Safe Mode to fix the issue

If the malware is set to run automatically when Windows starts, getting into safe mode may block this attempt. Since only the bare minimum programs and services start-up in “Safe Mode”, there are rarely any reasons for conflicts to happen. You will need to do the following to remove malware in Safe mode. 1) At power on/start-up, tap the F8 key in one-second intervals. This will bring up the Advanced Boot Options menu. 2) Use the arrow keys to choose Safe Mode with Networking and press ENTER. 3) When you are into this mode, you will have access to the internet again. Now, use your internet browser normally and navigate to https://safebytes.com/products/anti-malware/ to download Safebytes Anti-Malware. 4) Once the software is installed, let the diagnostic scan run to remove viruses and other threats automatically.

Obtain the antivirus software in an alternate browser

Certain viruses may target vulnerabilities of a particular web browser that obstruct the downloading process. If you seem to have a virus attached to Internet Explorer, then switch to an alternate browser with built-in safety features, such as Firefox or Chrome, to download your favorite antivirus program – Safebytes.

Run anti-virus from a pen drive

Here’s yet another solution which is using a portable USB anti-malware software package that can scan your computer for viruses without needing installation. Follow these steps to run the anti-malware on the infected PC. 1) Make use of another virus-free computer to download Safebytes Anti-Malware. 2) Plug the Flash drive into the uninfected computer. 3) Double-click on the downloaded file to run the installation wizard. 4) Choose the drive letter of the USB drive as the location when the wizard asks you exactly where you want to install the anti-virus. Follow activation instructions. 5) Now, insert the USB drive into the infected system. 6) Double click the Safebytes Anti-malware icon on the thumb drive to run the software. 7) Click on “Scan Now” to run a complete scan on the infected computer for malware.

Let's Talk About SafeBytes Anti-Malware!

Nowadays, anti-malware software can protect your PC from different forms of internet threats. But wait, how to select the right one among plenty of malware protection application that is available on the market? As you may be aware, there are numerous anti-malware companies and tools for you to consider. Some of them are good, some are ok types, while some will affect your computer themselves! When looking for an antivirus program, select one which gives solid, efficient, and full protection against all known computer viruses and malware. On the list of the recommended tool by industry experts is SafeBytes Anti-Malware, well-known security software for Microsoft Windows. SafeBytes anti-malware is really a powerful, highly effective protection software intended to help end-users of all levels of IT literacy in identifying and removing malicious threats from their computers. Once you have installed this tool, SafeBytes advanced protection system will ensure that absolutely no viruses or malware can seep through your personal computer.

SafeBytes possesses a plethora of amazing features that can help you protect your computer from malware attacks and damage. The following are some of the great features included in the application.

Real-time Active Protection: SafeBytes offers a totally hands-free active protection and is set to observe, prevent and wipe out all threats at its first encounter. It’ll constantly monitor your pc for hacker activity and also gives users superior firewall protection. Anti-Malware Protection: Using its advanced and sophisticated algorithm, this malware removal tool can detect and remove the malware threats hiding in your PC effectively. High-Speed Malware Scanning Engine: This computer software has got one of the fastest and most efficient virus scanning engines in the industry. The scans are extremely accurate and take a short amount of time to complete. Web Security: SafeBytes gives an instant safety rating on the pages you are about to check out, automatically blocking risky sites and making sure that you’re certain of your online safety while browsing the web. Lowest Memory/CPU Usage: SafeBytes gives you complete protection from online threats at a fraction of the CPU load due to its enhanced detection engine and algorithms. Fantastic Tech Support Team: For any technical inquiries or product guidance, you could get 24/7 expert assistance through chat and email. SafeBytes will keep your personal computer protected from most advanced malware threats automatically, thus keeping your online experience safe and secure. You now may know that this particular software does more than just scan and delete threats on your computer. If you want advanced forms of protection features and threat detections, buying SafeBytes Anti-Malware could be well worth the dollars!

Technical Details and Manual Removal (Advanced Users)

To remove Email Access Online manually, navigate to the Add/Remove programs list in the Windows Control Panel and choose the program you want to remove. For browser plug-ins, go to your browser’s Addon/Extension manager and choose the plug-in you want to remove or disable. You will probably also want to reset your internet browser. To make sure of complete removal, find the following Windows registry entries on your system and eliminate it or reset the values accordingly. However, this is a difficult task and only computer professionals can perform it safely. Additionally, certain malware is capable of replicating itself or preventing deletion. You’re suggested to do this process in Windows Safe Mode.
Registry: HKEY LOCAL MACHINE\SOFTWARE\Microsoft\Internet Explorer\SearchScopes\675942D5-E956-4670-9ADE-6982CF23558F
Read More
Managing the Local Users and Groups
As you know, Windows PowerShell is a useful command-line utility in Windows 10 that can be used to manage the Local Users and Groups which affirms the multiuser operating system principle of Windows 10. Although there are other GUI-based utilities used to manage the Local Users and Groups, there are some system administrators that would still like to use the command-line utility to manage these Local Users and Groups. So in this post, you will be guided on how exactly you can manage the Local Users and Groups using PowerShell on your Windows 10 computer. To get started, refer to the options provided below to manage both the Local Users and Groups using Windows PowerShell.

Option 1 – Manage the Local Users via Windows PowerShell

  • You need to first open Windows PowerShell as an admin. To do that, just tap the Win + X keys and select the Windows PowerShell (Admin) option.
  • After opening PowerShell, you need to execute the “Get-LocalUser” cmdlet so that you can find all the details about all the local user accounts in your computer which would include the Account Name, Enabled status, as well as description.
Note: On the other hand, you can also get the customized data about several objects that are related to your account. For instance, if you want to check when was the last time the Local account’s password was set, then you need to execute the “Get-LocalUser -Name root | Select-Object PasswordLastSet” cmdlet. Thus, the structure for this cmdlet is “Get-LocalUser -Name root | Select-Object *”. Here are the objects you can use to get different sorts of data:
  • AccountExpires
  • Description
  • Enabled : True
  • FullName
  • PasswordChangeableDate
  • PasswordExpires
  • UserMayChangePassword
  • PasswordRequired
  • PasswordLastSet
  • LastLogon
  • Name
  • SID
  • PrincipalSource
  • ObjectClass

Option 2 – Manage the Local User Groups using Windows PowerShell

  • Like what you did earlier, open Windows PowerShell as admin and then execute the “Get-LocalGroup” cmdlet so you can get all the information about all the groups of all the local user accounts.
  • Now if you want to create a new Local User Group, just execute the “New-LocalGroup -Name <NAME OF THE GROUP> -Description '<ENTER THE DESCRIPTION OF THE GROUP HERE>'” cmdlet.
  • And if you want to add Local User Accounts to a specific group, just execute the “Add-LocalGroupMember -Group '<NAME OF THE GROUP' -Member ('NAME 1','NAME 2','<ROLE>') -Verbose” cmdlet. You could also use the “Get-Localuser -Name john | Add-LocalGroupMember -Group '<NAME OF THE GROUP>'” cmdlet for the same purpose.
  • If you want to display all the User Accounts of a specific group, just use the “Get-LocalGroupMember –Group ‘ ’” cmdlet.
  • Now if you want to remove a local user account from a group, all you have to do is use the “Remove-LocalGroupMember -Group '<NAME OF THE GROUP>' –Member <NAME OF THE LOCAL USER ACCOUNT>” cmdlet.
Read More
How to remove EasyDocMerge from your System

EasyDocMerge Toolbar is a Browser Hijacker for Google Chrome. Usually, such browser extensions are installed without your knowledge. These types of Browser Hijackers are often the cause of many problems while surfing the Internet. The most common problems are unwanted pop-ups, underlined words, additional ads, sponsored links, to generate web traffic and earn revenue of the advertising networks by gathering the users browsing data and sending it back to the Mindspark ads network.

When installed this extension will hijack your home page setting it to MyWay.com, it will also change your new tab page to EasyDocMerge (Powered by MyWay.com Search).

About Browser Hijackers

Browser hijacking is a form of an unwanted program, commonly a web browser add-on or extension, which then causes modifications in the browser’s settings. Browser hijacker malware is developed for a variety of reasons. It redirects you to the sponsored internet sites and inserts adverts on your browser that assist its creator to generate earnings. A lot of people think that the browser hijacker is only a harmless website but that is not the case. Nearly every browser hijacker poses an existent threat to your online safety and it’s important to classify them under privacy dangers. They don’t just mess up your browsers, but browser hijackers can even modify the computer registry, leaving your computer susceptible to various other types of attacks.

Key symptoms that your web browser has been hijacked

There are various signs of web browser hijacking: the home page of the web browser is changed unexpectedly; new bookmarks pointing to porn websites are added to your favorite pages; the essential web browser settings are modified and unwanted or insecure resources are added to the trusted sites list; you’ll see many toolbars on your web browser; you see a lot of pop-up ads on your computer screen; your web browser has become unstable or starts running sluggishly; Inability to navigate to particular sites, particularly anti-malware and other computer security software sites.

How they infect computers

Browser hijackers infect computer systems by numerous means, including via a file-share, a drive-by download, or an infected e-mail attachment. They can also originate from any BHO, extension, add-on, toolbar, or plug-in with malicious intent. A browser hijacker may also come bundled up with some free software that you unintentionally download to your computer, compromising your internet security. Typical examples of browser hijackers include CoolWebSearch, Conduit, Coupon Server, OneWebSearch, RocketTab, Searchult.com, Snap.do, and Delta Search. Browser hijackers may record user keystrokes to gather potentially important information that leads to privacy issues, cause instability on computers, drastically disrupt user’s browsing experience, and finally slow down the system to a point where it will become unusable.

Removal

Certain browser hijacking could be simply reversed by discovering and eliminating the corresponding malware software from your control panel. In some cases, it can be a difficult job to identify and eliminate the malicious component because the associated file might be running as part of the operating system process. You should consider carrying out manual fixes only if you are a tech-savvy person, as potential risks are associated with tinkering with the system registry and HOSTS file. Installing and running antivirus programs on the affected computer could automatically erase browser hijackers and other malicious applications. Safebytes Anti-Malware contains a state-of-the-art anti-malware engine to help you prevent browser hijacking in the first place, and clean up any pre-existing issues

What you can do if Virus Prevents You From Downloading Or Installing Anything?

Practically all malware is bad, but certain kinds of malware do a lot more damage to your computer than others. Some malware sits in between your computer and the internet connection and blocks a few or all internet sites that you would like to visit. It will also prevent you from adding anything to your PC, especially antivirus software. If you’re reading this now, you might have probably recognized that a malware infection is the real cause of your blocked web connectivity. So how to proceed if you need to install an antivirus application such as Safebytes? Although this kind of problem can be difficult to get around, there are a few steps you can take.

Eliminate viruses in Safe Mode

If any virus is set to run automatically when Microsoft Windows starts, stepping into Safe Mode could block this attempt. Only minimal required programs and services are loaded when you boot your laptop or computer in Safe Mode. You will need to do the following to eliminate malware in Safe mode. 1) At power on/start-up, hit the F8 key in 1-second intervals. This should bring up the Advanced Boot Options menu. 2) Select Safe Mode with Networking using arrow keys and press ENTER. 3) When this mode loads, you should have the internet. Now, utilize your browser normally and navigate to https://safebytes.com/products/anti-malware/ to download and install Safebytes Anti-Malware. 4) Once the software is installed, allow the diagnostic scan to run to eliminate viruses and other threats automatically.

Obtain the security program using an alternate web browser

Some malware might target vulnerabilities of a specific web browser that obstruct the downloading process. The best way to avoid this problem is to pick a web browser that is renowned for its security features. Firefox has built-in Phishing and Malware Protection to help keep you secure online.

Run anti-malware from your USB drive

To effectively get rid of the malware, you need to approach the problem of running antivirus software on the infected computer from a different angle. Abide by these steps to run the anti-virus on the affected computer. 1) On a virus-free PC, download and install Safebytes Anti-Malware. 2) Plug the Flash drive into the clean computer. 3) Double-click the Setup icon of the antivirus program to run the Installation Wizard. 4) Choose the flash drive as the destination for saving the file. Follow the on-screen instructions to finish the installation process. 5) Remove the pen drive. You can now utilize this portable anti-virus on the infected computer system. 6) Double-click the antivirus program EXE file on the USB flash drive. 7) Simply click “Scan Now” to run a complete scan on the affected computer for viruses.

Protect Your Computer Against Viruses and Malware With SafeBytes Security Suite

Today an anti-malware program can protect your laptop or computer from different types of internet threats. But how to select the best one amongst countless malware protection software that is available out there? As you might be aware, there are several anti-malware companies and tools for you to consider. A few are really worth your money, but many aren’t. You need to choose one that is dependable, practical, and has a strong reputation for its malware source protection. Among few good applications, SafeBytes Anti-Malware is the strongly recommended software program for the security-conscious user. SafeBytes anti-malware is a powerful, highly effective protection application made to help end-users of all levels of computer literacy in detecting and removing harmful threats from their computer. After you have installed this software, SafeByte's sophisticated protection system will ensure that no viruses or malicious software can seep through your personal computer.

SafeBytes has fantastic features when compared to various other anti-malware programs. Listed below are some of the great features included in the software.

Real-time Active Protection: SafeBytes gives you round-the-clock protection for your personal computer limiting malware intrusions instantly. It will examine your PC for suspicious activity at all times and safeguards your PC from illegal access. Antimalware Protection: Safebytes is made on the best virus engine in the industry. These engines can identify and get rid of threats even during the initial phases of a malware outbreak. “Fast Scan” Features: SafeBytes’s high-speed malware scanning engine minimizes scanning times and extends the life of the battery. Simultaneously, it will effectively find and get rid of infected files or any internet threat. Web Protection: SafeBytes checks and gives a unique safety rating to every website you visit and block access to webpages known to be phishing sites, thus protecting you against identity theft, or known to contain malicious software. Low CPU Usage: SafeBytes is a lightweight application. It consumes an extremely small amount of processing power as it runs in the background so you are free to use your Windows-based computer the way you want. 24/7 Premium Support: Professional technicians are at your disposal 24/7! They will immediately fix any technical issues you may be encountering with your security software. Simply put, SafeBytes has formulated a meaningful anti-malware solution that is aimed to protect your computer against various malware. Malware trouble will become a thing of the past once you put this software to use. For top protection and the best value for money, you can’t get better than SafeBytes Anti-Malware.

Technical Details and Manual Removal (Advanced Users)

If you want to manually remove EasyDocMerge without using an automated tool, it may be possible to do so by removing the application from the Microsoft Windows Add/Remove Programs menu, or in cases of browser plug-ins, going to the browsers AddOn/Extension manager and removing it. You’ll likely also want to totally reset your browser to its default configuration settings. To be certain of complete removal, find the following registry entries on your computer and remove them or reset the values appropriately. However, this is a tricky task and only computer experts can perform it safely. Moreover, some malicious programs are capable to defend against its removal. It is highly recommended that you do the removal process in Windows Safe Mode.
Files: %UserProfile%\Local Settings\Application Data\EasyDocMergeTooltab %LOCALAPPDATA%\Google\Chrome\User Data\Default\Extensions\mabloidgodmbnmnhoenmhlcjkfelomgp %UserProfile%\Local Settings\Application Data\Google\Chrome\User Data\Default\Extensions\mabloidgodmbnmnhoenmhlcjkfelomgp %PROGRAMFILES(x86)%\EasyDocMerge_ex %PROGRAMFILES%\EasyDocMerge_ex %USERPROFILE%\Application Data\EasyDocMerge_ex %USERPROFILE%\AppData\LocalLow\EasyDocMerge_ex %UserProfile%\Local Settings\Application Data\EasyDocMerge_ex Registry: HKEY_CURRENT_USER\Software\AppDataLow\Software\EasyDocMerge_ex HKEY_CURRENT_USER\Software\EasyDocMerge_ex HKEY_LOCAL_MACHINE\SOFTWARE\Wow6432Node\Microsoft\Internet Explorer\Low Rights\ElevationPolicy\5e3ee57e-7d53-458f-a124-16aab06de2d6 HKEY_LOCAL_MACHINE\SOFTWARE\Wow6432Node\Microsoft\Internet Explorer\Low Rights\ElevationPolicy\64366ff9-336f-4002-a665-406a1d259cd3 HKEY_LOCAL_MACHINE\SOFTWARE\Wow6432Node\Microsoft\Internet Explorer\Low Rights\ElevationPolicy\87008eb3-6282-4075-9889-62f381451926 HKEY_LOCAL_MACHINE\SOFTWARE\Wow6432Node\Microsoft\Internet Explorer\Low Rights\ElevationPolicy\96107269-cd2e-4175-a61a-5c2e8540e8a5 HKEY_LOCAL_MACHINE\SOFTWARE\Microsoft\Internet Explorer\Low Rights\ElevationPolicy\2741d16e-6298-4345-8988-7979ffd45266 HKEY_LOCAL_MACHINE\SOFTWARE\Microsoft\Internet Explorer\Low Rights\ElevationPolicy\5e3ee57e-7d53-458f-a124-16aab06de2d6 HKEY_LOCAL_MACHINE\SOFTWARE\Microsoft\Internet Explorer\Low Rights\ElevationPolicy\64366ff9-336f-4002-a665-406a1d259cd3 HKEY_LOCAL_MACHINE\SOFTWARE\Microsoft\Internet Explorer\Low Rights\ElevationPolicy\87008eb3-6282-4075-9889-62f381451926 HKEY_CURRENT_USER\Software\Microsoft\Internet Explorer\DOMStorage\easydocmerge.dl.tb.ask.com HKEY_CURRENT_USER\Software\Microsoft\Internet Explorer\SearchScopes\8bf0dd5e-ea06-48db-97a4-df286e054079 HKEY_CURRENT_USER\Software\Microsoft\Internet Explorer\Approved Extensions, value: 389672DB-CD13-4CF2-AED1-3170BC0DD6EC HKEY_LOCAL_MACHINE\SOFTWARE\Wow6432Node\Microsoft\Internet Explorer\SearchScopes\8bf0dd5e-ea06-48db-97a4-df286e054079 HKEY_CURRENT_USER\Software\EasyDocMerge HKEY_CURRENT_USER\Software\Microsoft\Internet Explorer\LowRegistry\DOMStorage\easydocmerge.dl.myway.com
Read More
Increase your Internet Speed in Windows 10
If you are dissatisfied with your internet speed on your computer but do not want to shell out more money for a faster package or simply there is not a faster package, lay down and enjoy this article where we will go through some common practices and tweaks which will result in increasing your internet speed. Please note that this guide will not be able to go beyond the limits of your internet provider's physical speed, this guide is made you can squeeze the maximum from your existing plan and eliminate speed drops.
      1. Modify IRPStackSize

        Press ⊞ WINDOWS + R to open the run dialog keyboard with windows and r markedIn run dialog type RegEdit and press ENTER run dialog with regeditIn registry editor find HKEY_LOCAL_MACHINE\SYSTEM\CurrentControlSet\Services\LanmanServer\Parameters Right-click on Parameters> New> DWORD 32 Name it IRPStackSize and change the value to 32 Save and reboot your computer.
      2. Add a Default TTL

        Press ⊞ WINDOWS + R to open the run dialog keyboard with windows and r markedIn run dialog type RegEdit and press ENTER run dialog with regeditIn registry editor find a key Computer\HKEY_LOCAL_MACHINE\SYSTEM\CurrentControlSet\Services\Tcpip\Parameters Right-click on Parameters> New> DWORD 32 Name it DefaultTTL and change the value to 64 Save and Reboot
      3. Close Background Applications which are using the internet

        If some applications are running in the background that are using the internet, your speed will be much lower. CLose them to gain speed.
      4. Modify the TCP1323Opts value

        Press ⊞ WINDOWS + R to open the run dialog keyboard with windows and r markedIn run dialog type RegEdit and press ENTER run dialog with regeditIn registry editor find a key Computer\HKEY_LOCAL_MACHINE\SYSTEM\CurrentControlSet\Services\Tcpip\Parameters There should be a DWORD Value, TCP1323Opts, if not, then create it. Right-click on Parameters> New> DWORD (32-bit) Value. Double-click on it and change its value to 1 Save and reboot
      5. Scan system for Viruses and other malware

        Viruses and malware applications can not only slow your entire system, but they can also reduce your internet speed as well. Do a complete scan of your system to be sure you do not have any malicious software on it.
Read More
Fix Windows Update Error 0x80240034
There are cases when you encounter some issues while updating your Windows 10 computer. One of these issues is the error 0x80240034. This particular error is a Windows Update Error that appears on the Windows Update pane every time an update fails to install. When this happens, your Windows Update will only get stuck at 1% and nothing happens afterward and eventually fails. If you click on the View Installed Update History, you will see the error code 0x80240034 for the failed updates. You will see this error each time you try to update your Windows PC. Take note that this issue doesn’t only happen to a specific version of the Windows Update but on various different Windows builds based on many users. What’s more, is that some users are also seeing a different error code when their Windows Update fails but they still end up seeing the error code 0x80240034 when they check the Windows Update history. At the time of writing, it isn’t determined yet what really causes this error but it’s most likely due to some corrupted files in the computer which is why the most common solution you can try is resetting the Windows Update cache. On the other hand, other users also resolved the issue by using the ISO and selecting the “Do not keep previous settings” option during the Windows Update so it might be something to do with transferring the previous settings through the update client. For clear instructions in fixing this issue, refer to the two options provided below.

Option 1 – Try to clear the Windows Update Cache/Distribution Folder

As mentioned earlier, a lot of users tried clearing the Windows Update cache to fix the problem and so far it has worked. Like them, you can try clearing the Windows Update cache by simply deleting the contents of the folder named “SoftwareDistribution” since Windows apparently can’t clear and re-download the update contents once they are corrupted. Thus, deleting the contents of this folder will make Windows download the contents again which will fix the problem. To do that, follow the steps below.
  • Step 1: Tap the Windows key once.
  • Step 2: Next, type in “command prompt” in the Windows Start Search, and from the search results that appear, right-click on Command Prompt and select the “Run as administrator” option from the context menu.
  • Step 3: After opening Command Prompt, type in “net start wuauserv” and hit Enter.
  • Step 4: Then type in “rmdir %windir%SoftwareDistribution /S /Q” and hit Enter.
  • Step 5: Now type in “net start wuauserv” and hit Enter. Once it’s done, try updating your Windows PC again, it should now work just fine.

Option 2 – Update Windows via ISO file

If option 1 didn’t work for you, you can try this second option of updating your Windows 10 computer using an ISO file which means that you will have to create a Windows 10 bootable media and use it to install the latest Windows 10 version. The most user reported that this option works and the reason why it does have something to do with the Windows Update client since the Windows Updates downloaded from the regular Windows Update client seems to create issues such as the error 0x80240034. However, issues like this one don’t occur when the very same Windows Updates are downloaded and installed via an ISO file. Take note that when using a Windows ISO file, you will be asked to choose what you want to do with the previous settings and apps. A lot of users opted for the “Not to keep the old Windows settings” option which has resolved the issue. So if you want to keep the previous settings then you must try to update Windows first while keeping the old settings. However, if it doesn’t work, you have to try installing the latest version of Windows without keeping the previous settings.
  • Step 1: Click this link and then click the Download Tool Now button.
  • Step 2: Next, click the “Use the tool to create installation media (USB flash drive, DVD, or ISO file)…” option and follow the next given instructions on the screen.
  • Step 3: Now select the ISO file option in step 5.
  • Step 4: After that, you should now have an ISO file.
  • Step 5: Next, go to the location where you’ve downloaded the ISO file.
  • Step 6: Then right-click on the Windows 10 ISO file and select the Open with an option and then select File Explorer.
  • Step 7: Now click on “setup.exe” and follow the next instructions that appear on the screen. When asked, you have to select either: Nothing (clean install) or Keep personal files only option. Take note that you must not select the “Keep personal files, apps, and Windows settings since it doesn’t really work.
Read More
Fix Windows Activation Error 0xC004F212
Microsoft allows its users to download a copy of Windows to install on PCs. However, when you enter the key after the installation and you got the Activation Error 0xC004F212 instead, then it means that the license key and the Windows version you’ve just installed, do not match. When you encounter this error, you will see the following error message on your screen:
“The product key used on this PC didn’t work with this edition of Windows. Activation Error 0xC004F212.”
Every time Microsoft generates a license for a copy of Windows, it is associated with one particular Windows variant. Windows comes in many editions like Enterprise, Home, Professional, and so on. For instance, if you bought a license for Windows 10 Enterprise but you have installed Windows 10 Professional instead, then the activation will surely fail and you’ll encounter the Activation Error 0xC004F212. You will be asked to select which edition you want to install when you reinstall Windows 10 using a digital license. If you opted for an edition other than the one you are licensed to use, then you will most likely get the Activation Error 0xC004F212. If you have purchased your license key from a store or some website, you might want to check back with them about the exact version of Windows. Doing so will help you narrow down the problem. And if you have second thoughts about the license key’s validity, you can just reach out to a Microsoft Support agent to check the validity of the license key. Also, if have bought it from the store, there should be an option to get a refund. That way you can choose to buy the right version of Windows.

Option 1 – Try running the Windows 10 Activation Troubleshooter

The first thing you can do to resolve the Activation Error 0xC004F212 is to run the Windows 10 Activation Troubleshooter. To do so, follow these steps:
  • Go to Settings and then select Activation.
  • After that, click on the Windows Activation and then troubleshoot. This will help you address most of the commonly found activation issues in Windows devices.
The Windows 10 Activation Troubleshooter will determine if your license key is a valid Windows 10 digital license for an edition that is not currently installed. If it turns out that it’s not, then the troubleshooter will show you how to install the correct edition.

Option 2 – Try forcing Windows 10 ISO to use the right version

You can also try to force Windows 10 ISO to use the correct version depending on the product key. Note that this option only works between Windows 10 Home and Professional version since they both have a common ISO. So if it’s Enterprise, then this option won’t work for you.
  • Extract the Windows 10 ISO files using an extractor.
  • Then browse to the folder you created and go to the sources folder.
  • From there, you need to create a text file named “PID.txt” and make sure to follow the exact format given below:
[PID] Value=xxxxx-xxxxx-xxxxx-xxxxx-xxxxx
Note: “xxxxx” is the KEY to your Windows version.
  • Next, you need to create the ISO again or bootable media that will repack everything and then create the Media file. You can use the Media Creation tool for this.
Note: Windows will check the key during the installation and will figure out the right version of Windows.

Option 3 – Contact Microsoft Support for assistance

If you’re at your wits’ end in trying to update your Windows 10 computer, you should consider contacting Microsoft Support for help as they can offer you various options that would make fixing Windows Activation Error 0xC004F212 a lot easier and faster.
Read More
Fix user account is not authorized
If you encounter an error message saying, “The connection was denied because the user account is not authorized for remote login” when you try to establish a remote connection, read on as this post will help you resolve the problem. This kind of error occurs when the targeted host does not allow you to access that system remotely. Based on the error, you are not authorized to log in remotely which means that you need to obtain the correct permission. There are several potential fixes you can try for this error. You can try to check the Remote Desktop Users group or add users to the Security group or check the Remote Desktop Service itself. Refer to the options provided below for more detailed instructions to fix the “The connection was denied because the user account is not authorized for remote login” error.

Option 1 – Try checking the Remote Desktop Users group

You can encounter this error when the Remote Desktop Users group does not have any permission for your user account that you are using to establish a remote connection. Thus, you need to make sure that your user account is a member of the Remote Desktop Users group. How? Refer to these steps:
  • Tap the Win + R keys on your keyboard and then type “cmd” in the field and tap Enter or click OK to open Command Prompt.
  • After opening Command Prompt, type the “lusrmgr.msc” command and tap Enter to execute it.
  • Alternatively, you can also search for “lusrmgr.msc” in the Start Search and once you’ve opened it, select Users and then double click on your user name to open its Properties.
  • From there, switch from the “General” tab to the “Member Of” tab.
  • Next, if you can’t see any Remote Desktop Users group under the Administrator, you have to add it. To do that, just click on the Add button.
  • After that, on the newly opened window, click on the Advanced and Find Now buttons, respectively.
  • And in the Search results box, double click on Remote Desktop Users.
  • Now click on the OK button to save the changes made and check if you can now connect to a remote host or not.

Option 2 – Try to add a user to the Security group

You can actually block or allow a user from logging on through the Remote Desktop Services. However, if you do not have the right setting, you won’t be able to use this functionality. Thus, you need to confirm this setting. To do that, follow the steps below.
  • In the Start Search, type “secpol.msc” in the field and tap Enter to open the Local Security Policy panel.
  • From there, go to User Rights Assignment.
  • Next, look for a policy named “Allow log on through Remote Desktop Services” located on your right-hand side and then double click on it to open its Properties.
  • If you were not able to find the Remote Desktop Users under Administrator, then you have to add it by simply clicking on the Add User or Group button.
  • After that, enter “Remote Desktop Users” in the blank field and click the OK button to save the changes made.
  • Now restart your computer and try connecting again to the remote host.

Option 3 – Try checking the Remote Desktop Users group

There is a service that’s supposed to be running and needs to be set up correctly for you to connect to the remote host. And so you need to ensure that this service is up and running. To do so, follow these steps:
  • Tap the Win + R keys to launch the Run utility.
  • Then type “services.msc” in the field and hit Enter or click OK to open the Services Manager.
  • Next, look for the Remote Desktop Services and double click on it to open its Properties.
  • After that, go to the “Log On” tab and select the “This account” option and then click on the Browse button.
  • On the next screen that appears, look for the Advanced button and click on it and use the Find Now button to search.
  • You will see “NETWORK SERVICE”. Double click on it and then save the changes you’ve made to the settings.
  • Finally, restart your PC and see if the problem is now fixed.
Read More
How to Resolve the Sqlite3.dll Error Code

Sqlite3.dll Error - What is it?

Sqlite3.dll error is a typical example of DLL errors. This error message occurs when the system fails to access Sqlite3.dLL (Dynamic Link Library) files shared by certain programs to run on the PC. The error is displayed in the following format:

"Cannot find the file sqlite3.dll (or one of its components)"

Followed by:

"Error starting program.. A required .DLL file sqlite3.dll was not found."

Solution

Restoro box imageError Causes

The sqlite3.dll error message may pop up on your computer screen due to the following reasons:
  • Missing sqlite3.dll files
  • DLL files affected due to viruses and malware on your system
  • Registry overloaded with invalid entries
  • Disk fragmentation
Whether the cause for the sqlite3.dll error code on your PC is malware invasion or registry issues, it is recommended to resolve it immediately before the damage sets in. Such errors can expose your PC to serious threats like privacy errors, data breaches, identity thefts, cybercrime, system failure, crashes, and valuable data loss.

Further Information and Manual Repair

When it comes to fixing sqlite3.dll error code, you don’t always need to hire a professional and spend hundreds of dollars on the repair. Here are some simple and do it yourself solutions that you can try and resolve the error on your system for free.

1. Check inside recycle bin and restore the deleted file

If this error popped on your computer screen after installing a certain program, then you need to check your recycle bin. This is because DLL files are shared by multiple programs, it might be possible that the program you just deleted also used the sqlite3.dll file to run on your system. And so when you uninstalled the program, the sqlite3.dll file also got removed. To resolve this, check your recycle bin for the file. If you find it, restore it. Once the files is restored, try running the application that was generating the sqlite3.dll error message. If the error still persists, then this means the cause of the sqlite3.dll error is deeper. It could be due to malware or the registry.

2. Remove Malware

To remove malware, run an antivirus. This will help scan for such malicious software on your system affecting DLL files and remove them. However, the drawback is that it may slow down the speed of your PC significantly. And when running it, you may have to stop all other activities on your system.

3. Repair and Restore the Registry

If the cause of the sqlite3.dll error is the registry corrupted with invalid entries and disk fragmentation, then you need to repair and restore the registry. The best way to do this is to download Restoro. Restoro is a powerful and highly functional registry cleaner. It scans your entire PC and detects all registry issues in seconds. It wipes out all the unnecessary and obsolete files including the junk files, invalid registry entries, bad registry keys, temporary internet files, cookies, and browser history. It clears up hard disk space and frees it of clutter. Furthermore, this registry cleaner also repairs the damaged DLL files and restores the registry. Restoro is not only a registry cleaner but is also a system optimizer. This means you can also run it to scan and remove malware on your PC and system instability issues. It boosts your PC’s speed and performance. It runs smoothly on all Windows versions. It is safe, efficient and user-friendly. The layout is neat and the interface is easy to use and intuitive. In just a few clicks you can resolve the sqlite3.dll error and resume using your desired programs. Click here to download Total System Care on your PC to resolve sqlite3.dll error pop-ups.
Read More
1 2 3 171
Logo
Copyright © 2023, ErrorTools. All Rights Reserved
Trademark: Microsoft Windows logos are registered trademarks of Microsoft. Disclaimer: ErrorTools.com is not affiliated with Microsoft, nor claims direct affiliation.
The information on this page is provided for information purposes only.
DMCA.com Protection Status