Logo

Videos folder missing from File Explorer

As you know, the Videos folder can be found under “This PC” by default on your Windows 10 computer. However, as per the reports of some users, there are a few occasions where it somehow gets replaced by the Documents folder. In other words, the Videos folders are replaced by a duplicated copy of the Documents folder. Out of the two Documents folder, one Document folder will contain all the usual files and subfolders while the second one is empty. Although when you click the Documents icon on your Desktop (if you have a shortcut), it will still take you to the right Documents folder.

To fix this particular issue and get the Videos folder back in the File Explorer, here are some potential fixes that should help.

Option 1 – Run System Restore

The first thing you can try to do to resolve the problem is to run System Restore. This can help you go back to the previous state of your computer before the issue with the Videos and Documents folder.

  • Tap the Win + R keys to open the Run dialog box.
  • After that, type in “sysdm.cpl” in the field and tap Enter.
  • Next, go to the System Protection tab then click the System Restore button. This will open a new window where you have to select your preferred System Restore point.
  • After that, follow the on-screen instructions to finish the process and then restart your computer and check if the problem is fixed or not.

Option 2 – Try to restore Defaults

The next thing you can do is to restore Defaults. How? Refer to these steps:

  • Open File Explorer and then right-click on any of the two Documents folders.
  • After that, select the Properties option from the context menu and switch to the Location tab and click on Find target.
  • Next, copy the address and paste it in the field above the “Find target” option, and then click the “Restore Default” button.

Option 3 – Try to change the Registry Path

  • Tap the Win + R keys to open the Run dialog box.
  • Then type “Regedit” in the field and tap Enter to open the Registry Editor.
  • Next, navigate to this registry path: HKEY_CURRENT_USERSoftwareMicrosoftWindowsCurrentVersionExplorerUser Shell Folders
  • After that, edit the path for {35286A68-3C57-41A1-BBB1-0EAE73d76C95} under the “User Shell Folders” key to match the path shown for My Videos: %USERPROFILE%Videos.
  • Once you’re done, open the folder under “This PC” that has the Documents icon and tap Shift + right-click in the folder background, and then select the “Open PowerShell window here” option to fix the naming of the Documents folder. The path should read: “C:users<UserName>Documents.
  • Next, execute this command: ri desktop.ini –force
  • The command you entered will delete the files and folders and so when added for Documents, it will get rid of the empty Documents folder.
  • Now all you that’s left to do is to find where the target location is going to be for both folders and check if anyone foes to the user name location.
  • Then delete the one which goes to the incorrect location.

Do You Need Help with Your Device?

Our Team of Experts May Help
Troubleshoot.Tech Experts are There for You!
Replace damaged files
Restore performance
Free disk space
Remove Malware
Protects WEB browser
Remove Viruses
Stop PC freezing
GET HELP
Troubleshoot.Tech experts work with all versions of Microsoft Windows including Windows 11, with Android, Mac, and more.

Share this article:

You might also like

File is Too Large for the Destination Error
The file is too large for the destination file system is the error when you try to copy a file larger than 4GB on a drive formatted in the FAT32 file system. FAT32 is the old file system used in previous Windows versions and it was replaced by superior NTFS, altho FAT32 is still used because of its compatibility fact that it could be accessed in various operating systems its disadvantage among others is that it can not hold files larger than 4GB in size. This refers to the size of a single file, so if you have a file that is this large and when you try to copy or move it on a drive formatted in FAT32 you will get this message, and the operation will not be able to complete.

Format drive

In order to actually transfer the file in its glorious size, I am afraid that you will need to format destination drive in NTFS or if you have data on drive which you do not want to lose with formatting, use third-party software to convert file system from FAT32 to NTFS without losing data. I would recommend AOMEI partition assistant, it is a free and proven application letting you both manage your partitions and convert any one of them into another file system without data loss. You can get AOMEI here.

Split file

Another option if you are not keen on installing third-party tools or formating is to divide large files into smaller ones that are less than 4GB in size. You can use any archiving application since built-in Windows ZIP support will not let you split file into various different sizes. The best tool in my humble opinion is WinRAR, but you can choose any proven one. When file is split into parts less than 4GB in size, you will have no issues copying or move the file to the destination drive.
Read More
Fix DRIVER_VERIFIER_DETECTED_VIOLATION
Driver Verifier is a built-in tool in Windows 10 that monitors device drivers on your computer, if it detects issues with drivers, it will attempt to fix the issue. If you are encountering Blue Screen for a Driver and after running Driver Verifier you get another with message DRIVER_VERIFIER_DETECTED_VIOLATION ten follow this article step by step in order to solve it. There is a chance that you will maybe even have to do this in safe mode, if that is your case, login into safe mode and proceed, otherwise proceed normally.
  1. Update Device Drivers

    the most common issue with the blue screen is old Drivers, in most cases, graphical drivers, update all Drivers with the latest versions and see if this will resolve the issue.
  2. Stop or uninstall Virtualization software

    Virtua machine software is a great way to have a safe environment and to experiment while preserving your Windows installation intact, however sometimes due to the nature of these applications they can be a case for blue screen errors. Stop virtualization software to see if it will remove the issue. If that is the case, try another virtualization application
  3. Disable Driver Verifier

    Press ⊞ WINDOWS + X to open the secret menu Click on Command Prompt (admin) Inside command prompt type: verifier and press ENTER Select the Delete existing settings radio button Click Finish Reboot your computer
  4. Reset Driver Verifier

    Press ⊞ WINDOWS + X to open the secret menu Click on Command Prompt (admin) Inside command prompt type: verifier /reset and press ENTER Reboot your computer
  5. Use system restore

    Rollback Windows to the previous state where everything was working fine.
Read More
How to Remove FileShareFanatic

FileShareFanatic is a browser extension developed by Mindspark Inc. This extension offers users the ability to quickly access some of the most popular file-sharing websites. While this may sound tempting and useful at start, using this extension might prove more annoying then useful.

When installed FileShareFanatic hijacks your new tab page changing your default search engine to search.myway.com. Additionally it monitors user activity, recording visited websites, clicked links, viewed products, and whatever other information that can be used by the Ad network to display targeted Ads.

While browsing the internet with this extension you will notice an increase of ads on pages, especially in search results. This extension injects additional ads, sponsored links, and even displays pop-up ads in order to gain revenue.

FileShareFanatic has been marked as a Browser Hijacker by several top anti-virus scanners, and is scheduled for deletion.

About Browser Hijackers

Browser hijacking is considered the web’s constant danger that targets browsers. It is a kind of malicious software that modifies your internet browser’s configuration settings so that you are redirected to websites or pages that you had no intention of visiting. Browser hijackers can do more than simply modifying homepages. It redirects you to the sponsored sites and inserts advertisements on your browser which helps its developer generate earnings. It might appear naive, but most of these websites are not legitimate and will pose a major risk to your online safety. Browser hijackers can even let other vicious programs without your knowledge to further damage your PC.

Symptoms of browser hijack

There are numerous symptoms of browser hijacking: 1. you see unauthorized modifications to your internet browser’s homepage 2. you get re-directed to internet sites you never meant to visit 3. default online search engine is modified 4. discover new toolbars which you did not add 5. you observe lots of pop-ups on your screen 6. your web browser gets slow, buggy, and crashes frequently 7. Inability to navigate to certain sites, especially anti-malware as well as other security software webpages.

How they infect computers

Browser hijackers attack computers via malicious email attachments, downloaded infected documents, or by visiting infected internet sites. Many internet browser hijackings originate from add-on software, i.e., browser helper objects (BHO), toolbars, or extensions added to browsers to give them extra features. A browser hijacker could also be installed as a part of freeware, demoware, shareware and pirated programs. Browser hijackers can interrupt the user’s web browsing experience significantly, track the websites visited by users and steal sensitive information, cause difficulty in connecting to the internet, and eventually create stability problems, making software programs and computer to crash.

Removal

The one thing you can try to get rid of a browser hijacker is to find the malware within the “Add or Remove Programs” list in the Microsoft Windows Control Panel. It may or may not be there. If it is, try to uninstall it. But, most hijacking codes aren’t very easy to eliminate manually, as they go deeper into your operating system. Besides, browser hijackers could modify the Computer registry so that it could be very hard to repair manually, especially when you’re not a very tech-savvy individual. You can choose automatic browser hijacker removal by just installing and running reliable anti-malware software. If you need to get rid of persistent browser hijackers effectively, install the top-rated Anti-Malware software Safebytes Anti-Malware.

Find Out How To Install Safebytes Anti-Malware On An Infected PC

Malware can cause a lot of damage to your PC. Some malware types alter internet browser settings by including a proxy server or change the PC’s DNS configuration settings. When this happens, you’ll be unable to visit certain or all of the sites, and thus unable to download or install the required security software to remove the infection. If you are reading this, you may have infected by a virus that prevents you from downloading a security program such as Safebytes Antimalware on your PC. There are some actions you can take to circumvent this issue.

Download the application in Safe Mode with Networking

If the virus is set to load immediately when Microsoft Windows starts, entering Safe Mode could very well block the attempt. Since only the bare minimum programs and services launch in safe mode, there are hardly any reasons for conflicts to occur. To start your Windows XP, Vista or 7 computer in Safe Mode with Networking, please do as instructed below. 1) At power on, hit the F8 key before the Windows splash screen starts to load. This will bring up the Advanced Boot Options menu. 2) Choose Safe Mode with Networking with arrow keys and hit ENTER. 3) Once this mode loads, you will have the internet. Now, utilize your browser to download and install Safebytes Anti-malware. 4) As soon as the application is installed, allow the scan run to eliminate viruses and other malware automatically.

Switch to an alternate internet browser

Web-based viruses can be environment-specific, aiming for a particular web browser or attacking specific versions of the browser. The best solution to avoid this problem is to opt for a browser that is known for their security measures. Firefox comprises built-in Phishing and Malware Protection to keep you safe online.

Run antivirus from a USB drive

Another option is to make a portable antivirus program onto your USB thumb drive. To run antivirus from a thumb drive, follow these simple steps: 1) Download Safebytes Anti-Malware or Microsoft Windows Defender Offline onto a clean computer system. 2) Plug the Thumb drive into the uninfected computer. 3) Double-click the Setup icon of the anti-malware software to run the Installation Wizard. 4) Select the drive letter of the USB drive as the place when the wizard asks you exactly where you would like to install the anti-virus. Follow the directions to finish the installation process. 5) Unplug the pen drive. Now you can utilize this portable antivirus on the affected computer. 6) Double-click the anti-malware program EXE file on the thumb drive. 7) Simply click “Scan Now” to run a complete scan on the infected computer for malware.

SafeBytes Anti-Malware Features

To protect your personal computer from many different internet-based threats, it’s important to install an anti-malware application on your computer system. However, with countless numbers of anti-malware companies in the marketplace, nowadays it is challenging to decide which one you should purchase for your PC. Some are good ones, some are decent, and some are simply just fake anti-malware applications that could harm your personal computer themselves! You should choose one that is trustworthy, practical and has a strong reputation for its malware source protection. On the list of strongly recommended software by industry analysts is SafeBytes Anti-Malware, the most dependable program for Windows computers. SafeBytes anti-malware is a powerful, very effective protection application made to help users of all levels of computer literacy in finding and eliminating malicious threats from their computer. Once you’ve installed this program, SafeBytes state-of-the-art protection system will ensure that absolutely no viruses or malware can seep through your PC.

SafeBytes anti-malware takes PC protection to a totally new level with its enhanced features. These are some of the highlighted features included in the software.

World-class AntiMalware Protection: Built on a greatly acclaimed anti-virus engine, this malware removal tool can identify and get rid of several obstinate malware threats such as browser hijackers, potentially unwanted programs, and ransomware that other typical antivirus programs will miss. Real-time Threat Response: Malware programs attempting to get into the computer are discovered and stopped as and when detected by the SafeBytes active protection shields. It’ll examine your PC for suspicious activity at all times and its unrivaled firewall protects your computer from unauthorized access by the outside world. Safe Browsing: Safebytes assigns all sites a unique safety ranking that helps you to get an idea of whether the webpage you’re just about to visit is safe to browse or known to be a phishing site. Lowest Memory/CPU Usage: SafeBytes is a lightweight tool. It consumes a really small amount of processing power as it operates in the background therefore you will not see any computer performance difficulties. 24/7 Guidance: SafeBytes provides 24/7 technical support, automatic maintenance and updates for best user experience. All in all, SafeBytes Anti-Malware is a solid program as it has lots of features and could identify and remove any potential threats. Once you have downloaded and installed this software, you no longer need to worry about malware or any other security worries. So if you’re searching for the best anti-malware subscription for your Windows-based computer, we recommend SafeBytes Anti-Malware tool.

Technical Details and Manual Removal (Advanced Users)

If you wish to carry out the removal of FileShareFanatic manually instead of using an automated software tool, you may follow these measures: Proceed to the Windows Control Panel, click the “Add or Remove Programs” and there, choose the offending application to uninstall. In cases of suspicious versions of web browser plug-ins, you can easily get rid of it via your web browser’s extension manager. You’ll probably also want to reset your browser. To be certain of complete removal, find the following registry entries on your computer and remove it or reset the values appropriately. Having said that, editing the registry can be a complicated job that only advanced users and professionals should try to fix it. Furthermore, some malware is capable of replicating or preventing removal. It is advisable that you carry out the removal process in Windows Safe Mode.
Files: %UserProfile%\Local Settings\Application Data\FileShareFanaticTooltab %LOCALAPPDATA%\FileShareFanaticTooltab Registry: HKEY_LOCAL_MACHINE\Software\Microsoft\Internet Explorer\Approved Extensions, value: FB8C7587-6C03-425D-821D-65339B3E249E HKEY_CURRENT_USER\SOFTWARE\Wow6432Node\Microsoft\Windows\CurrentVersion\explorer\Browser Helper Objects\FB8C7587-6C03-425D-821D-65339B3E249E HKEY_CURRENT_USER\SOFTWARE\Microsoft\Windows\CurrentVersion\explorer\Browser Helper Objects\FB8C7587-6C03-425D-821D-65339B3E249E HKEY_CURRENT_USER\SOFTWARE\Wow6432Node\Microsoft\Windows\CurrentVersion\explorer\Browser Helper Objects\EA89EC10-2255-42A6-9AA7-84B4441C2DCA HKEY_CURRENT_USER\SOFTWARE\Microsoft\Windows\CurrentVersion\explorer\Browser Helper Objects\EA89EC10-2255-42A6-9AA7-84B4441C2DCA HKEY_LOCAL_MACHINE\Software\Microsoft\Windows\CurrentVersion\Ext\Stats\FB8C7587-6C03-425D-821D-65339B3E249E HKEY_LOCAL_MACHINE\Software\Microsoft\Windows\CurrentVersion\Ext\Stats\EA89EC10-2255-42A6-9AA7-84B4441C2DCA HKEY_LOCAL_MACHINE\Software\Microsoft\Windows\CurrentVersion\Ext\Settings\6E4DF5E6-A1D8-48E0-BA5A-91C5DBD6AAF1 HKEY_CURRENT_USER\SOFTWARE\Wow6432Node\Microsoft\Internet Explorer\SearchScopes\BDF4A303-E4F0-42F0-B235-351F6C8F6C1A HKEY_LOCAL_MACHINE\Software\Microsoft\Internet Explorer\SearchScopes\BDF4A303-E4F0-42F0-B235-351F6C8F6C1A HKEY_CURRENT_USER\SOFTWARE\Wow6432Node\Microsoft\Tracing\FileShareFanatic_RASMANCS HKEY_CURRENT_USER\SOFTWARE\Microsoft\Tracing\FileShareFanatic_RASMANCS HKEY_CURRENT_USER\SOFTWARE\Wow6432Node\Microsoft\Tracing\FileShareFanatic_RASAPI32 HKEY_CURRENT_USER\SOFTWARE\Microsoft\Tracing\FileShareFanatic_RASAPI32 HKEY_CURRENT_USER\SOFTWARE\Microsoft\Internet Explorer\DOMStorage\filesharefanatic.dl.myway.com HKEY_LOCAL_MACHINE\Software\FileShareFanatic
Read More
Fix 169 IP address error in Windows 10
169 IP address error can stop your computer from connecting to the internet which could be a very frustrating experience. In this guide, we will cover simple but effective tips on how to fix this error so you can continue with internet use.
  1. Reconnect your Modem or Router

    Simple and sometimes effective solution, unplug and plug back in modem or router so IP is fetched again, it is very likely that computer will pick right IP address with this stunt.
  2. Use built-in Windows Network troubleshooter

    Press ⊞ WINDOWS + X top open secret menu Go to settings Go to Network & Internet Inside click on Network troubleshooter Follow onscreen instructions After the troubleshooter ends reboot your PC
  3. Reconfigure IP address

    Press ⊞ WINDOWS + R to open the run dialog Inside run dialog type ncpa.clp and press ENTER Right-click on your network adapter and select properties Uncheck Internet Protocol Version 6 (TCP/IPv6) and click on OK Now press ⊞ WINDOWS + X and click on Command prompt (admin) In command prompt type and after each line press ENTER netsh winsock reset catalog netsh int ip reset reset.log ipconfig /release ipconfig /renew Reboot your computer
  4. Restart DHCP client

    Press ⊞ WINDOWS + R to open the run dialog In run dialog type services.msc and click on OK Find DHCP client Right-click on it and choose Restart Reboot PC
  5. Reinstall Network Adapter

    Press ⊞ WINDOWS + X to open the windows menu Click on Device Manager Expand Network Adapter and right-click on wireless or ethernet adapter, click on Uninstall device Reboot the computer to automatically reinstall the device driver
  6. Reset IP and subnet mask

    Press ⊞ WINDOWS + R to open the run dialog In run dialog type in ncpa.cpl and press OK Right-click on your network adapter and select properties Uncheck Internet Protocol Version 6 (TCP/IPv6) Double click on Internet Protocol Version 4 (TCP/IPv4) Select Use the following IP address and change it to 192.168.0.1 Change Subnet mask to 255.255.255.0 Leave default gateway blank Click OK to save changes
Read More
Windows 365, what it is, and how you can get it
Windows 365
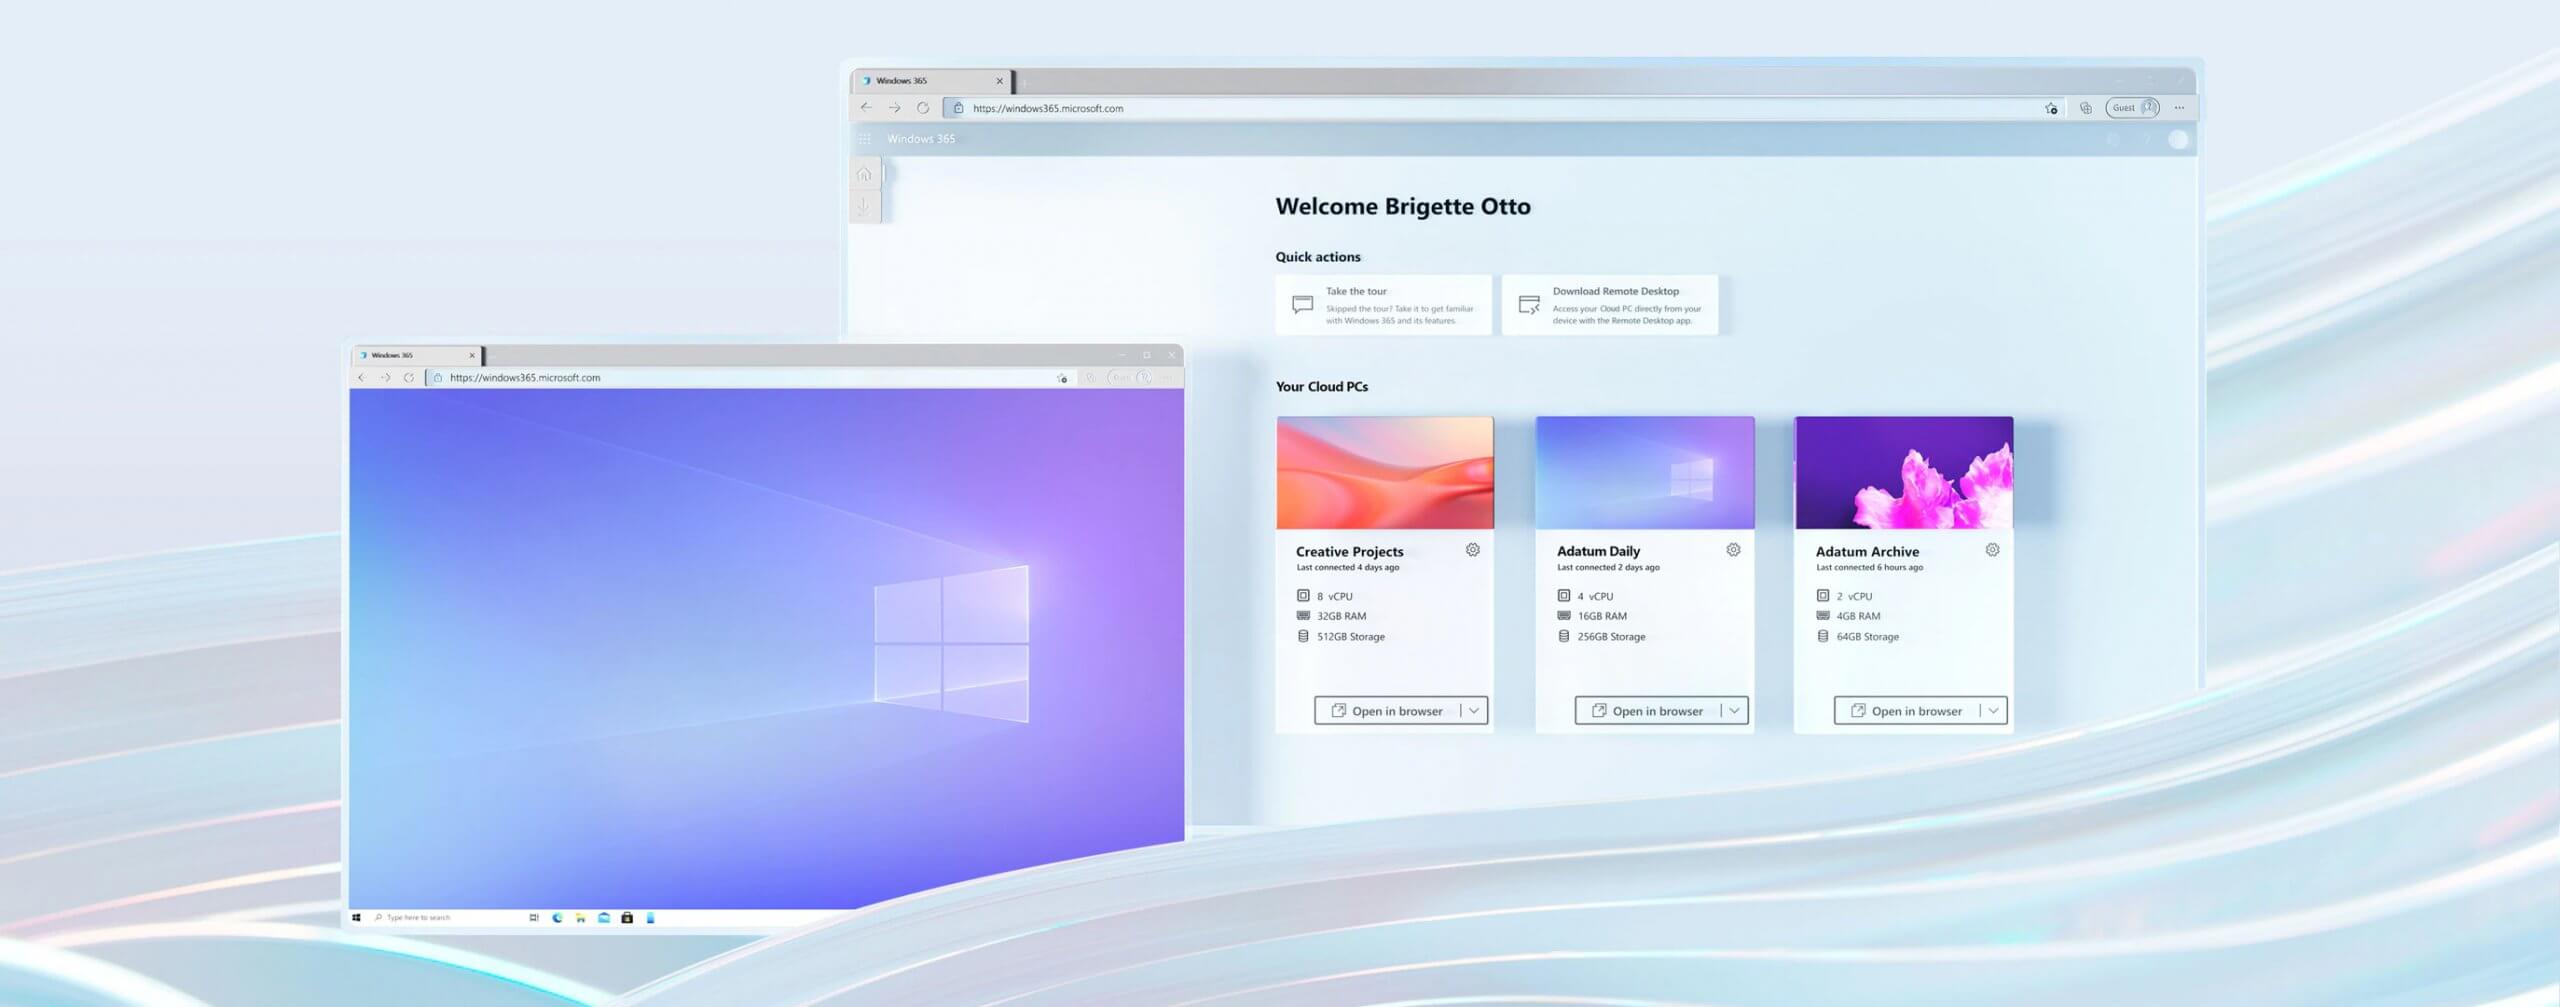
Microsoft has announced Windows 365, a new cloud-based operating system aimed mainly at businesses of all sizes. Just after Windows 11 announcement and presentation, we are seeing another Windows announcement from Microsoft. Dive into the following text in order to find out what exactly is new Windows 365, its role in today's IT world, and do you need it?

What is Windows 365 and when it is coming out?

Windows 365 is planned to be released this year (2021) on August 2nd. It is the first Microsoft cloud-based operating system meaning that OS itself will be installed on the cloud server and it will be accessed by the user via a web browser. Essentially you are accessing a remote PC with Windows on it, you can install whatever Windows application you want and use it as it was on your computer. When you disconnect from the cloud computing and reconnect again from the same or another device you will continue exactly where you left off. Cloud PC will remember the state it was left off and will greet you in that same state once it is awakened again. This of course offers some great benefits like moving from laptop to desktop and continuing exactly where you left off.

How can I access Windows 365?

Any device which has a web browser will be able to access Windows 365 making it a really great solution for business on the move or for anyone who switches devices during the day. That being said it is clear to see that Windows 365 can be accessed via Linux, macOS, iOS, Android, or any other operating system on any computer, tablet or phone.

Who is this OS made for?

Microsoft’s general idea is that Windows 365 is primarily made for business which in their minds can benefit most out of it. So far it is not made for a single user although there is a possibility that even a one-man business can subscribe and create accounts for it.

Price and technical characteristic

Microsoft will bill Windows 365 on a per-user, per-month basis. In other words, businesses will pay a fixed amount per employee every month. There will be two tiers: Windows 365 Business and Windows 365 Enterprise. Microsoft also said it will offer different performance tiers. Businesses can choose to pay for more CPU, RAM, and storage resources for certain cloud PCs depending on their needs. Microsoft told me the smallest configuration would be one CPU, 2GB of RAM, and 64GB of storage. The largest will be eight CPUs, 32GB of RAM, and 512GB of storage. After a business has chosen its plan tier and performance options, that business will pay a fixed amount every month. This is unlike Azure Virtual Desktop, which Windows 365 is built on. With Azure Virtual Desktop, companies pay on a usage model, depending on how much the remote system is used every month.

Conclusion

Windows 365 is around the corner and if you are a business no matter small or large with the need for software on the go, Windows 365 might be a worthwhile investment and a great asset to your business.
Read More
Fix Windows Update Error 0x80070103
This post will guide you in fixing the error 0x80070103 when installing Windows Update. According to users who encountered this problem, Windows Update (WU) fails to install several different updates. This kind of Windows Update error is can mostly be seen in the Windows Update screen inside the update reports although it is also known to occur when a user attempts to install a peripheral driver – only if the Windows Update offers to update the driver through a prompt and when you click Yes. There are several possible causes for this error, it could be that Windows Update is trying to install a particular driver for the second time already which happens when it gets confused by an additional piece of identical hardware like the graphics adapter. Aside from that, the Windows Update might have already installed the driver which is known to occur with unsuitable versions of the already installed driver. In addition, the error could also be due to a third-party program interference like a security program or a utility program that is using the same driver and conflicts with the Windows Update. Here are some suggestions that might help in fixing the Windows Update error 0x80070103.

Option 1 – Install the updates in a Clean Boot State

You might want to try putting your computer in a Clean Boot state and then install Windows Updates again without any trouble. During this state, you can start the system with a minimum number of drivers and startup programs that will surely help you in isolating the root cause of the issue.
  • Log onto your PC as an administrator.
  • Type in MSConfig in the Start Search to open the System Configuration utility.
  • From there, go to the General tab and click “Selective startup”.
  • Clear the “Load Startup items” check box and make sure that the “Load System Services” and “Use Original boot configuration” options are checked.
  • Next, click the Services tab and select the “Hide All Microsoft Services” check box.
  • Click Disable all.
  • Click on Apply/OK and restart your PC. (This will put your PC into a Clean Boot State. And configure Windows to use the usual startup, just simply undo the changes.)
  • After that, try to install the Windows Updates or upgrade again.

Option 2 – Try installing the failing driver without using Windows Update

If installing the updates in a clean boot state didn’t help, you can try a manual approach to yield much better results using the Device Manager or by downloading the driver from the manufacturer’s website manually.
  • Tap the Win + R keys to launch Run.
  • Type in msc into the box and tap Enter or click OK to open the Device Manager.
  • After that, a list of device drivers will be displayed. Look for the device driver you and then select either “Update driver” or “Uninstall device”. And if you find any “Unknown device”, you need to update it as well.
  • Select the “Search automatically for updated driver software” option and then follow the instructions to complete the process.
  • If you have chosen to uninstall the driver, follow the screen options to complete the process and then restart your PC.
Note: You also have the option to go directly to the website of your device driver manufacturer and go to the section called Drivers then check if there’s a new available update – if there is, download and install it.

Option 3 – Try to run the Windows Update Troubleshooter

You might also want to run the built-in Windows Update Troubleshooter in Windows that could help you in resolving the Windows Update error 0x80070103. All you have to do is go to Settings > Update& security > Troubleshoot > Windows Update. From there, click on the Run the troubleshooter button and follow the next one-screen instructions that appear. After that, restart your computer and check if the error is now fixed or not by trying to install the update once again.
Read More
Fix Error codes 12002-4, 12007-4, 12152-4
If you are trying to install Office but got an error saying, “Something went wrong, Sorry we ran into a problem” with error codes 12002-4, 12007-4, or 12152-4 instead, this indicates that you have a problem with your internet connection. Aside from internet connection issues, the problem could also be due to some programs that block the installation files to be downloaded so when they time out, you get these error codes. There are several options you can try to fix the 12002-4, 12007-4, or 12152-4 error codes. You can try to install Office offline or turn off the proxy server or VPN (if you’re using one). You can also try to temporarily disable your antivirus program or Firewall. Refer to the given potential fixes below to troubleshoot and fix the problem.

Option 1 – Try to install Office offline

The first thing you can do if you encounter the error codes 12002-4, 12007-4, or 12152-4 when installing Office is to download an offline copy of Office especially when you’re certain that your internet connection is slow. Once you’ve downloaded it, install it again. The offline installer will download both the 32 and 64-bit versions of Office. Keep in mind that you must download the correct version.

Option 2 – Disable the Proxy server

The first thing you can do is to try disabling the Proxy server as it might be the reason why you’re getting error 0x80244022 for Windows Updates. To disable the proxy server, refer to the steps below.
  • Tap the Win + R keys to open the Run dialog box.
  • Then type “inetcpl.cpl” in the field and hit Enter to pull up the Internet Properties.
  • After that, go to the Connections tab and select the LAN settings.
  • From there. Uncheck the “Use a Proxy Server” option for your LAN and then make sure that the “Automatically detect settings” option is checked.
  • Now click the OK and the Apply buttons.
  • Restart your PC.
Note: If you are using a third-party proxy service, you have to disable it. In addition, if you are also using a VPN, you can try to disable it as well.

Option 3 – Temporarily disable the Antivirus and Firewall

As mentioned earlier, the downloading of the installation files could be blocked by either the antivirus program or Firewall or it could be both especially when the link seems suspicious. To fix this problem, you have to disable both the antivirus like Windows Defender and the Firewall or any third-party software you might be used temporarily and then download the installation files again. Once the download is completed, make sure to turn on the antivirus program and the Firewall again. On the other hand, you can also try downloading in a different location which also means that you have to try a different network. It could be that the load on the current system is too high which is why it’s not able to offer enough bandwidth to download the installation files of Microsoft Office.
Read More
Fix Realtek HD audio driver issue
Realtek sound device not playing sound is a common Windows issue.  It happens occasionally and luckily it can be solved with a little effort and in a short time period. Today in this article we will explore the most common reasons and solutions for driver malfunction for Realtek inside Windows 10. If you have this particular problem, go from step 1 to the last step since all steps are meant to go from simplest to the most complex. All of that being said let us fix your Realtek driver issue.
  1. Check Speakers or/and Headphones first

    The first thing would in any troubleshooting be to check are your speakers turned on or are your headphones connected and the volume or switch on them is set properly. Nothing more embarrassing than spending an hour or so troubleshooting only to find out that issue was in a malfunction of speakers or them not being turned on.
  2. Check the Volume control in Windows

    Same as the previous step where you have checked hardware, now it is time to check to see if the volume control is set properly and not by any chance muted or volume is brought all the way down.
  3. Check if the Device Manager is reporting an error and update the driver

    If both hardware is functioning properly and volume control in Windows is set correctly then the issue might be in Windows not detecting device or driver malfunction. In any case, the Device Manager will be the one who will report this problem. In order to check to see if the driver is properly working press ⊞ WINDOWS + X to open the hidden start menu. keyboard with windows and x marked Once it opens, click on Device Manager to open it, realtek audio driver in device menager If you have a driver device error inside Windows, you should see it immediately when entering the Device Manager, it will have a yellow exclamation mark beside it. Right-click on it and choose update driver.
  4. Reinstall driver

    If driver update failed or you already have the latest drivers, reinstalling them could fix the issue since drivers might have corrupted during installation of some update or application. Follow steps from point 3 to get to the driver in Device Manager, then right-click on it but instead of update choose to uninstall. Reboot Windows once the driver is uninstalled and Windows will install a new one.
  5. Check Windows update

    Check to see if the latest Windows update is installed, update your Windows if needed
  6. Fix driver issue with DRIVERFIX

    If everything else fails, get DRIVERFIX, a premium solution for your PC issues, and fix driver errors.
Read More
FreeMaps Removal Tutorial

FreeMaps is a google chrome extension by Mindspark powered by Ask or MyWay. This extension offers users a quick and easy way to find the routes or locations that they desire. While all of this may seem appealing, this extension was classified as a Browser Hijacker by many anti-virus applications and was marked for removal.

When installed FreeMaps will change your home page, new tab and default search engine to MyWay.com, it will monitor your browsing activity and send it back to Mindspark ad servers. This data is later used/sold to better display targeted ads depending on your search queries.

While browsing the internet with this extension active you will see additional pop-up ads, sponsored links, and injected ads displaying throughout your browsing sessions, and even injected into websites that should be ad-free. Due to poor code optimization, these ads can sometimes cover a part of the page, making it unreadable or inaccessible.

About Browser Hijackers

Browser hijacking is a form of unwanted software, commonly a browser add-on or extension, which then causes modifications in the web browser’s settings. Browser hijackers are capable of doing more than simply changing home pages. These are typically used to force hits to a specific site, manipulating web traffic to earn ad revenue. It could seem naive, but most of such websites aren’t legitimate and could present a major threat to your online safety. As soon as the malware attacks your laptop or computer, it begins to mess things up a whole that slows your computer down to a crawl. In the worse case, you will be forced to tackle serious malware threats too.

How you can know whether the browser is hijacked?

Signs that your web browser is hi-jacked include: your browser’s homepage is suddenly different; bookmark and the new tab are likewise modified; default web engine is modified; find new toolbars which you didn’t add; unstoppable flurries of popup adverts show up on your computer screen; your browser has instability issues or exhibits frequent errors; you cannot visit specific websites such as home pages of anti-malware software.

Exactly how browser hijacker finds its way onto your computer

A browser hijacker could be installed on your PC if you check out an infected website, click an e-mail attachment, or download something from a file-sharing website. They can also be deployed via the installation of a web browser toolbar, extension, or add-on. Some browser hijackers spread in user’s computer systems by using a deceptive software distribution method known as “bundling” (usually through freeware and shareware). Typical examples of browser hijackers include Conduit, CoolWebSearch, OneWebSearch, Coupon Server, RocketTab, Searchult.com, Snap.do, and Delta Search. Browser hijackers can record user keystrokes to gather potentially invaluable information that leads to privacy issues, cause instability on systems, drastically disrupt user’s browsing experience, and eventually slow down the system to a point where it becomes unusable.

Tips on how to remove browser hijackers

Some types of browser hijackers can be removed from your PC by deleting malicious software applications or any other recently installed shareware. Having said that, many hijackers are very tenacious and require specialized tools to eliminate them. You should think of carrying out manual repairs only if you are a tech-savvy person since there are dangers associated with messing around with the computer registry and HOSTS file. Professionals always suggest users to remove any malicious software including browser hijacker with an automatic malware removal tool, which is better, safer and faster than the manual removal procedure. One of the best tools for repairing browser hijacker malware is SafeBytes Anti-Malware. It will help you remove any pre-existing malicious software in your pc and provides you real-time monitoring and protection against the latest threats.

How To Install Safebytes Anti-Malware On An Infected Computer

All malware is inherently harmful, but certain kinds of malware do a lot more damage to your computer or laptop than others. Certain malware goes to great lengths to prevent you from downloading or installing anything on your PC, especially antivirus applications. So what should you do if malware prevents you from downloading or installing Safebytes Anti-Malware? Follow the instructions below to get rid of the malware in alternate ways.

Start Windows in Safe Mode

In the event the malware is set to run at Windows start-up, then booting in safe mode should avoid it. Only the bare minimum required programs and services are loaded when you start your PC in Safe Mode. Here are the steps you should follow to start your computer into the Safe Mode of your Windows XP, Vista, or 7 computers (visit Microsoft website for directions on Windows 8 and 10 computers). 1) Hit the F8 key repeatedly as soon as your PC boots, however, before the big Windows logo or black screen with white texts comes up. This should bring up the Advanced Boot Options menu. 2) Use the arrow keys to choose Safe Mode with Networking and press ENTER. 3) As soon as this mode loads, you will have an internet connection. Now, obtain the malware removal software you want by utilizing the internet browser. To install the program, follow the directions within the setup wizard. 4) After installation, run a full scan and let the program get rid of the threats it discovers.

Obtain the anti-malware software in a different internet browser

Some malware mainly targets specific browsers. If this sounds like your case, employ another web browser as it could circumvent the virus. If you appear to have malware attached to Internet Explorer, then switch to an alternate internet browser with built-in safety features, such as Chrome or Firefox, to download your preferred antivirus program – Safebytes.

Install antivirus on a flash drive

Here’s yet another solution which is using portable USB anti-malware software that can scan your system for viruses without the need for installation. Abide by these steps to run the anti-virus on the affected computer system. 1) Download Safebytes Anti-Malware or Microsoft Windows Defender Offline onto a virus-free PC. 2) Insert the USB drive into the clean PC. 3) Double click on the exe file to open the installation wizard. 4) Select the flash drive as the location for saving the software file. Follow activation instructions. 5) Transfer the thumb drive from the uninfected computer to the infected PC. 6) Double-click the Safebytes Anti-malware icon on the pen drive to run the program. 7) Press the “Scan Now” button to start the virus scan.

Protect your PC from Malware With SafeBytes Security Suite

In order to protect your computer from many different internet-based threats, it is important to install an anti-malware application on your laptop. However, with so many anti-malware companies out there, these days it’s tough to decide which one you should purchase for your PC. Some of them are great while some are scamware applications that pretend as legit anti-malware programs waiting around to wreak havoc on your PC. You have to be very careful not to pick the wrong product, especially if you purchase a premium application. When it comes to commercial anti-malware software options, the majority of people go with popular brands, like SafeBytes, and they are very happy with it. SafeBytes anti-malware is a highly effective and user-friendly protection tool that is designed for end-users of all levels of computer literacy. This program could easily detect, remove, and protect your PC from the latest malware intrusions including adware, spyware, trojan horses, ransomware, parasites, worms, PUPs, along with other potentially harmful software applications.

SafeBytes has fantastic features when compared with other anti-malware programs. The following are some of the great features included in the software.

Live Protection: SafeBytes gives real-time active supervision and protection from all known viruses and malware. It’ll continuously monitor your pc for hacker activity and also provides end-users with advanced firewall protection. World-class AntiMalware Protection: Safebytes is built on the best virus engine in the industry. These engines will detect and remove threats even during the initial stages of a malware outbreak. Safe Browsing: SafeBytes inspects the hyperlinks present on a web page for possible threats and tells you whether the website is safe to explore or not, through its unique safety rating system. “Fast Scan” Features: Safebytes AntiMalware, using its advanced scanning engine, gives ultra fast scanning which can quickly target any active online threat. Lowest CPU/Memory Usage: This software is lightweight and can work quietly in the background, and will not impact your computer efficiency. Premium Support: You can get 24/7 technical assistance to immediately resolve any issue with your security application. To conclude, SafeBytes Anti-Malware is really great for securing your laptop or computer against all kinds of malware threats. Now you may realize that this particular software does more than just scan and eliminate threats in your PC. If you’re searching for the best malware removal application out there, and if you don’t mind spending some dollars for it, go for SafeBytes Anti-Malware.

Technical Details and Manual Removal (Advanced Users)

If you’d like to manually get rid of FreeMaps without the use of an automated tool, it may be actually possible to do so by removing the program from the Microsoft Windows Add/Remove Programs menu, or in cases of browser extensions, going to the browser’s AddOn/Extension manager and removing it. It’s also suggested to factory reset your browser settings to their default state. If you opt to manually remove the system files and registry entries, use the following list to ensure that you know precisely what files to remove before executing any actions. Please remember that this is for professional users only and may be challenging, with incorrect file removal resulting in additional PC errors. In addition, certain malware is capable of replicating or preventing removal. Completing this task in Safe Mode is advised.
Files: %LOCALAPPDATA%\FreeMapsTooltab\TooltabExtension.dll %TEMP%\nsf516A.tmp\nsDialogs.dll %TEMP%\nsf516A.tmp\System.dll %APPDATA%\Microsoft\Windows\Cookies\[email protected][1].txt %LOCALAPPDATA%\Microsoft\Internet Explorer\Recovery\High\Active\RecoveryStore.E9B13F93-5957-11E6-93FC-0A00273BA4BE.dat %LOCALAPPDATA%\Microsoft\Windows\Temporary Internet Files\Content.IE5\T1CS2ORS\installerParams[1].jhtml %TEMP%\nsf516A.tmp\installerParams
Read More
Some Steam tips and tricks for easy life
steamSteam has cemented itself as the largest digital game shop in the World. First, release all the way back on September 12th, 2003, it was meant to be a standalone software client aimed to deliver updates to Valve’s games. It was soon expanded to include titles from third parties. The greatest Steam expansion and its popularity started in 2004 with the release of Half-life 2. Steam allowed prepurchased editions to be downloaded before the official release of the game making it available for play the moment it was officially out. Very soon after Steam gained its popularity, Valve has opened doors to other developers and offered them to use Steam as means for a digital distribution platform. Today it hosts over 30000 different game titles, not including DLC or applications. And how soon Valve’s steam deck is coming out soon we would like to share some great tips and tricks about Steam itself for easy everyday gaming.

Steam guard account security

Security of any of your accounts should be something that you really take seriously. So as always use a strong password for Steam but if you want an extra layer of security for it, and you should, use the Steam built-in feature: Guard Account Security. In order to activate Security Guard go to Steam>Settings>Account>Manage Steam Guard Account Security. Once enabled you will be able to use the Steam mobile application for special code when opening Steam or your email address.

Use Steam beta feature

Once a Steam account is created by default you will download and install the client. In the client, you will have the latest features available but there are more Steam features than default ones, beta features that can offer some improved and new functionality, and do not worry, they are stable and bug-free. I have been in Steam beta for years and not even once have I had any issues with the client itself but I have always had the latest features that will come to regular users later. To enable beta participation to go to Steam>Settings>Account, open the drop-down Beta participation menu, and choose Steam Beta Update. Confirm on OK and restart the Steam client. You will now get all the latest features first.

Manage your library via Collections

The collection is a neat idea for organizing your large game library into different collections or sections easily expanded and contracted for easier navigation and organization. To add the game to a collection just right-click on it and select Add To>New Collection, make a name for a collection like action, RPG, or whatever rocks your boat, and you are done. Once the collection is created other games can be added to it simply just by dragging it into the desired collection.

Make shelves

Shelves are ways to see your collections in the larger areas of the Steam clients. By clicking Add Shelf>Choose a Shelf, you can now add your collection to a shelf on the larger part of the client as a horizontal scrolling container with your chosen games. There are also some predefined shelves like All Games, Recent friend activity, and more.

Hide Game from Library

By right-clicking on a game and selecting Manage>Hide This Game you will remove the game from the active view of your Steam library. Note that the game will still be owned and a part of your library, you will just not be able to see it. This is a great feature when for example you have some things that came as a part of the game pack you are not really interested in when you have 2 different versions of the same game as for example standard and deluxe edition or just by simply not wanting to have game visible in the library. You can find a hidden game by typing its name in the search box and from there you can unhide it.

Play game soundtracks inside Steam

Some games offer you to purchase their soundtracks if you like music from them and some even include OST with a regular purchase. Steam lets you play these soundtracks and even lets you import your own music library folder into it in order to play all of your music inside the client itself. It has even options to automatically stop music playing once the game is run and you can make playlists as well. Your purchased game soundtracks are automatically included, the rest you will need to add by pointing Steam to the folder where you keep music in.

Configure gamepad

Inside Steam, you can configure your gamepad’s general settings, big picture settings, desktop settings, etc. Steam embraced the idea that many OC users these days own and play with gamepads so it has implemented configuration options inside it. To configure your pad go to Steam>Settings>Controller.

Use big picture Steam mode

Big picture mode is Steam's idea of making Steam an entertainment center. Once it is activated it switches from the application into full-screen mode aimed at large TV screens or monitors. You can easily navigate through it via gamepad, mouse, keyboard, or other devices. You have access to the store, your game library, etc. Same as your typical steam app but a little different. You can easily activate it via View> Big Picture Mode and see for yourself is this something you prefer over a standard application layout.

Enable Steam Cloud

Steam Cloud is a great feature that uses cloud storage to save your game progress meaning that you can easily switch to another PC, install games there and continue where you have left off. Many games support this feature instead of keeping saves locally and it is a great feature worth turning it ON. To turn and use Steam Cloud service go to Steam>Settings>Cloud>Enable Steam Cloud Synchronization. Just remember to check does game you are playing supports this option.

Share your Games via Family sharing

Family sharing is a Steam feature allowing you to share your game library with up to 5 accounts on up to 10 different devices. This is a great way to let other members of your family or even close friends enjoy some games you have or vice versa. They will get as well their own save games so you can sleep safe knowing that your progress can not be changed or hindered. Family sharing can be turned ON by logging into PC Steam client where you would like to share your library and navigate to Steam>Settings>Family and then clicking on Authorize Library Sharing On This Computer.

Refund a game

Sometimes the game is not the same as advertised, sometimes it will not work on your PC, sometimes hardware specifications are too high making the game unplayable, etc. For whatever reason, you might have Steam offers you a full game price refund if you wish to do so, you only need to meet 2 criteria, the game must have been purchased within 2 weeks period, older purchases cannot be refunded, and your game playtime must not be over 2 hours of game time. If you fit into this category all you need to do in order to get the full money back is going to Help>Steam Support, pick a recent game from the eligible list, and ask for a refund.

Gift a game

As you can buy gifts for your friends or loved ones in real life, Valve made sure you can do it in digital as well. Gifting game via Steam is simple and straightforward. Choose a game you wish to gift, go to your shopping cart and instead of clicking Purchase for myself, click on Purchase As a Gift, from there you will be taken to your friend list to choose to whom you would like to gift a game along with the option to write a little note to the receiver like happy birthday, enjoy or whatever.

Stream games in Steam itself

Although Steam is not there yet in streaming as Twitch or Facebook gaming is, there is an option to stream your game sessions on it. Click on Steam>Settings>Broadcast to make all adjustments and start streaming. You can also watch streams from your friend list and Steam is now broadcasting popular streams directly to its client if you want to watch it.

Take a game screenshot

By pressing F12, you can take a screenshot from any game and save it inside your Steam cloud library. You can change of course this default screenshot key via Settings>In-Game and if you would like to see your screenshots you can always do it under View Screenshot Library on a game’s page. That’s it, our Steam tips and tricks for easy and good gaming life, I hope to see you soon on errortools.com for your daily articles, tips, and tricks.
Read More
1 2 3 171
Logo
Copyright © 2023, ErrorTools. All Rights Reserved
Trademark: Microsoft Windows logos are registered trademarks of Microsoft. Disclaimer: ErrorTools.com is not affiliated with Microsoft, nor claims direct affiliation.
The information on this page is provided for information purposes only.
DMCA.com Protection Status