Logo

TitleBar, Minimize, Maximize and Close missing

In case you don’t know, the Title bar comes with the Maximize, Minimize, as well as the Close button. However, there are instances when you might notice that the Title bar, Maximize, Minimize and Close buttons are missing in the File Explorer. This kind of problem might be due to some glitch in the computer, or it could also be caused by some built-in tool or an installed program in your computer. Moreover, there are also other factors that you have to consider such as corruption in the system files as well as errors in the user profile which is generated on a domain network, and so on.

There are several suggestions you can check out to fix the problem. You can try to boot your computer in a Clean Boot State to see if a third-party program is the root cause of the problem. You can also try to run built-in tools like System File Checker and the DISM tool. You could also get the video buffer emptied, reset or reinstall the program, or recreate the User Profile.

Option 1 – Put your computer in a Clean Boot State

As pointed out, it is possible that some third-party program or service is the one that’s behind the problem. To isolate this possibility and to identify the culprit, you have to put your computer into a Clean Boot State. To do so, follow the steps below.

  • Log onto your PC as administrator.
  • Type in MSConfig in the Start Search to open the System Configuration utility.
  • From there, go to the General tab and click “Selective startup”.
  • Clear the “Load Startup items” check box and make sure that the “Load System Services” and “Use Original boot configuration” options are checked.
  • Next, click the Services tab and select the “Hide All Microsoft Services” check box.
  • Click Disable all.
  • Click on Apply/OK and restart your PC. (This will put your PC into a Clean Boot State. And configure Windows to use the usual startup, just simply undo the changes.)
  • You need to disable one third-party app after the other to really isolate the issue. And once you’ve narrowed down the problem, you can either disable the third-party app that’s causing the problem or remove it.

Option 2 – Run System File Checker scan

You might also try running the System File Checker or SFC scan to fix the issue. System File Checker is a command utility built into your computer that helps restore corrupted files and missing files. Refer to the following steps to run it:

  • Hit the Win + R keys to launch Run.
  • Type in cmd in the field and tap Enter.
  • After opening Command Prompt, type in sfc /scannow

The command will start a system scan which will take a few whiles before it finishes. Once it’s done, you could get the following results:

  1. Windows Resource Protection did not find any integrity violations.
  2. Windows Resource Protection found corrupt files and successfully repaired them.
  3. Windows Resource Protection found corrupt files but was unable to fix some of them.
  • Restart your computer and see if the System32 folder still pops up at startup or not.

Option 3 – Try running the DISM tool

You can try running the Deployment Imaging and Servicing Management or DISM tool to fix the Windows Upgrade problem. Using this built-in tool, you have various options such as the “/ScanHealth”, “/CheckHealth”, and “/RestoreHealth”.

  • Open the Command Prompt with admin privileges.
  • Then type in the following commands and make sure to hit Enter right after you type each one of them:
    • Dism /Online /Cleanup-Image /CheckHealth
    • Dism /Online /Cleanup-Image /ScanHealth
    • exe /Online /Cleanup-image /Restorehealth
  • Do not close the window if the process takes a while as it will probably take a few minutes to finish.

Option 4 – Try to empty the Vide buffer

These kinds of problems could also be due to bad data in the Video Buffer. Thus, you can try to empty the Video buffer to resolve the problem. All you have to do is tap the Shift + Ctrl + Win key + B keys on your keyboard. After that, leave your computer idle for about 10 seconds until you notice it blink once. Now you try using your computer as usual and see if the glitch is now fixed or not.

Option 5 – Try to reset or reinstall the program

Another thing you can do to fix the issue is to reset or reinstall the program where you encounter the problem. Chances are, you are running the application in the Full-screen mode but you can exit it by simply tapping the Esc or F11 key. However, if nothing changed, then consider resetting or reinstalling the program. Just go to the Windows 10 Settings app and navigate to Apps > Apps & Features. From there, look for the entry of the application you’re having problems with and select it and then click on the Advanced options. After that, click on the Reset button under the Reset section.

Option 6 – Try recreating the User Profile

You might also want to try recreating the User Profile on your computer since some errors in the creation of a User Profile can result in problems like this one. Thus, you have to try deleting the User Profile and then recreate it.

Do You Need Help with Your Device?

Our Team of Experts May Help
Troubleshoot.Tech Experts are There for You!
Replace damaged files
Restore performance
Free disk space
Remove Malware
Protects WEB browser
Remove Viruses
Stop PC freezing
GET HELP
Troubleshoot.Tech experts work with all versions of Microsoft Windows including Windows 11, with Android, Mac, and more.

Share this article:

You might also like

Fix Failed to register a VB Script DLL file on Windows 10
When you try to open Outlook 20016 and other programs on your Windows 10 PC and end up getting an error instead saying, “Failed to register a VB Script DLL. Reinstall or run Regsvr32.exe Vbscript.dll to self-register”, read on as this post will help you resolve the problem and help you re-register the vbscript.dll file. Follow each one of the steps below carefully to fix the problem.
  • Step 1: In the Start search, type “cmd” and from the search results that appear, right-click on Command Prompt and select the “Run as administrator” option from the context menu.
  • Step 2: After opening Command Prompt as admin, type the regsvr32.exe vbscript.dll command and hit Enter to execute it.
  • Step 3: After entering the command, it will re-register the concerned DLL file using the regsvr32.exe, a Windows OS tool. The Regsvr32 tool is a command-line utility that allows users to register or unregister OLE controls like the DLL and ActiveX (OCX) controls in the Windows operating system. After the command you entered has successfully run, you will see a message saying, “DllRegisterServer in vbscript.dll succeeded.”
On the other hand, if re-registering the DLL file didn’t work, you might have to log on to your computer using an administrator account and then try re-registering the DLL file once more. But before you do that, you need to create a system restore point first so that if anything goes wrong, you can always undo the changes you’ve made. After creating a system restore point, double-click on the downloaded .reg file to add its contents to the Registry. After that, try opening the program you were trying to open but weren’t able to because of the error. If it doesn’t work, you can always reinstall the affected programs that throw up the error and see if it resolves the problem. You could also seek the help of a one-click solution to fix the problem for you. This program is a useful tool that does not only repair corrupted registries and optimize your PC’s overall performance but also resolves any DLL issues like the Failed to register a VB Script DLL. Reinstall or run Regsvr32.exe Vbscript.dll to self-register” error. Aside from that, it also cleans out your computer for any junk or corrupted files that help you eliminate any unwanted files from your system. This is basically a solution that’s within your grasp with just a click. It’s easy to use as it is user-friendly. For a complete set of instructions for downloading and using it, refer to the steps below.
Read More
How to change system font in Windows 11

Windows 11 is a good-looking operating system but people love to make things personal and to their liking so we decided to help you in this mission with small customization of changing default system fonts inside Windows 11.

Since there is no really easy way to just switch the font windows is using for itself we will have to tweak a registry a little so before we start please do make a backup of the registry file and follow the steps as they are presented in order to avoid any errors and break the system.

windows 11 transparency off

So, if all precautions are made and you are ready to change your Windows appearance let's dive right into it:

Find and/or install the font that you wish to use

There are vast free font sites on the internet where you can find fonts that you like and wish to use but be very careful with your desired font selection. The font that you choose needs to be a complete typeface, meaning that it has to contain all glyphs, large and small font sizes, all special characters, etc or you will experience that in certain areas nothing will be displayed.

Once you have found the font that you like and made sure it is a complete font, install it on your system (you can skip this step if you just want to change the system font with one already installed on your system)

Create REG file

Open notepad or a similar plain text editor in order to create a file that will apply changes directly into the registry and create a new file. Inside the file paste this text:

Windows Registry Editor Version 5.00

[HKEY_LOCAL_MACHINE\SOFTWARE\Microsoft\Windows NT\CurrentVersion\Fonts]
"Segoe UI (TrueType)"=""
"Segoe UI Bold (TrueType)"=""
"Segoe UI Bold Italic (TrueType)"=""
"Segoe UI Italic (TrueType)"=""
"Segoe UI Light (TrueType)"=""
"Segoe UI Semibold (TrueType)"=""
"Segoe UI Symbol (TrueType)"=""

[HKEY_LOCAL_MACHINE\SOFTWARE\Microsoft\Windows NT\CurrentVersion\FontSubstitutes]

"Segoe UI"="NEW-FONT"

All the way to the bottom where it says: "Segoe UI"="NEW-FONT", change NEW-FONT with the font name that you have chosen or installed in the previous step. For example: "Segoe UI"="Ubuntu".

Now go to File > Save As and name your file however you want but give it REG extension so it looks like: my_new_windows_font.REG

Apply changes

Now that you have your registry entry saved, locate it and double-click on it, at this stage Windows warning will probably pop up, you can just ignore it and click on YES since you wrote the file and know what it is. After registry entry is applied reboot your PC in order for changes to take effect.

Rolling back

If you want to change the font to another one, just repeat this procedure again. If you want to roll back to using the default Windows font, repeat the process but with this code instead of the one provided in the REG file:

Windows Registry Editor Version 5.00

[HKEY_LOCAL_MACHINE\SOFTWARE\Microsoft\Windows NT\CurrentVersion\Fonts]
"Segoe UI (TrueType)"="segoeui.ttf"
"Segoe UI Black (TrueType)"="seguibl.ttf"
"Segoe UI Black Italic (TrueType)"="seguibli.ttf"
"Segoe UI Bold (TrueType)"="segoeuib.ttf"
"Segoe UI Bold Italic (TrueType)"="segoeuiz.ttf"
"Segoe UI Emoji (TrueType)"="seguiemj.ttf"
"Segoe UI Historic (TrueType)"="seguihis.ttf"
"Segoe UI Italic (TrueType)"="segoeuii.ttf"
"Segoe UI Light (TrueType)"="segoeuil.ttf"
"Segoe UI Light Italic (TrueType)"="seguili.ttf"
"Segoe UI Semibold (TrueType)"="seguisb.ttf"
"Segoe UI Semibold Italic (TrueType)"="seguisbi.ttf"
"Segoe UI Semilight (TrueType)"="segoeuisl.ttf"
"Segoe UI Semilight Italic (TrueType)"="seguisli.ttf"
"Segoe UI Symbol (TrueType)"="seguisym.ttf"
"Segoe MDL2 Assets (TrueType)"="segmdl2.ttf"
"Segoe Print (TrueType)"="segoepr.ttf"
"Segoe Print Bold (TrueType)"="segoeprb.ttf"
"Segoe Script (TrueType)"="segoesc.ttf"
"Segoe Script Bold (TrueType)"="segoescb.ttf"

[HKEY_LOCAL_MACHINE\SOFTWARE\Microsoft\Windows NT\CurrentVersion\FontSubstitutes]
"Segoe UI"=-
Read More
3 Methods To Fix Qtcore4.dll Error

Qtcore4.dll Error - What is it?

Qtcore4.dll is a dynamic link library file that helps Microsoft Windows in loading several key components of the system. The Qtcore4.dll error occurs when the Qtcore4.dll file cannot be loaded to run the application supported by this .dll file. The Qcore4.dll missing error message may occur while booting your system or launching a certain program. It is a blue screen of death error type. The Qtcore4.dll error code is often displayed as:

BLUE SCREEN ERROR - QtCore4.dll Not Found

Filei386QtCore4.dll could not be loaded. The error code is 7. Setup cannot continue. Press any key to exit.

Solution

Restoro box imageError Causes

This error code is triggered by a variety of reasons such as:
  • Windows file allocation file gets damaged
  • Your computer BIOS (Basic Input/Output System) are misconfigured
  • The Qtcore4.dll file gets corrupt
  • Registry gets damaged and corrupt
  • Non-Microsoft program not running in tandem with Windows
  • Malware attack
  • Improper hardware driver software
It is advisable to fix the Qtcore4.dll error code immediately as this error can pose serious threats to your system. Qtcore4.dll error can lead to system breakdown.

Further Information and Manual Repair

Here are some ways of fixing the Qtcore4.dll error on your system:

1. Re-install the Program Causing Qtcore4.dll error message to pop up

As dll files are shared files sometimes due to program deletion and installation .dll file settings can get misconfigured, damaged, and corrupt. In such a scenario, you can try reinstalling the program that is causing Qtcore4.dll error message to appear on the screen.

2. Reconfigure your Mis-configured BIOS

If BIOS misconfiguration is the cause of this error code on your system, then try reconfiguring your system’s misconfigured BIOS.
  • To do this boot the computer and then press the BIOS designated keys to enter the BIOS. The keys may vary from manufacture to manufacture but typically, the setup keys are F2, F10, F12, and Del.
  • Once you figure out the setup keys, press them rapidly when booting the computer.
  • After successfully hitting the setup keys, the BIOS will load and you will see the BIOS setting menu on your screen. Adjust settings. Go to SATA Operation and change RAID AHCI to RAID ATA. Save changes and then exit.

3. Scan Your PC with a Registry Cleaner and an Antivirus

However, after adjusting the BIOS if the error still pops up on your screen, then this indicates the problem is bigger than you think. It triggers either malware attack or registry corruption. If these are the underlying causes for the Qtcore4.dll error on your system then you need to scan your PC with a registry cleaner and an antivirus. Registry is the main database of your system; if this gets corrupt it is most likely to result in system failure and valuable data loss. And as for malware, the biggest concern is data security threats. Today’s advanced and lethal malware like viruses and spyware can give easy access to hackers to enter your system from a remote location, browse through your confidential and private data and manipulate it to their advantage. This has led to a surge in various types of cyber crime, data breaches, and identity theft cases over the years. To avoid all this while resolving the error code Qtcore4.dll on your PC, registry cleaning and repair and antivirus scan are needed. You can either download 2 separate tools on your system to scan your PC which by the way will take a lot of time and increase your chances of the system slow down or you can download Restoro.

Why Restoro?

  • Total System Care is an advanced, user-friendly, high, and multi-functional repair.
  • It is deployed with a powerful and intuitive registry cleaner. It also functions as a system optimizer. It spares you from downloading numerous tools to address and resolve different errors on your PC.
  • It is your one-stop solution for not only Qtcore4.dll problems but practically all PC-related issues.
  • The registry cleaner utility detects all the malicious, unnecessary, and obsolete files overloading and corrupting your RAM.
  • This includes junk and temporary files. It wipes them out thus clearing your disk space. Simultaneously, it also repairs the damaged and misconfigured dll files including the Qtcore4.dll file, and fixes the corrupt registry.
  • The privacy error utility has the properties of an antivirus. It detects and removes malware, viruses adware, and spyware from your system in seconds.
  • Total System Care resolves the Qtcore4.dll error on your system and boosts the performance of your system. It has a simple and neat interface which makes it quite easy for users to operate it, even those who are not technically adept.
  • It is compatible with all Windows versions
Click here to download Restoro and repair the Qtcore4.dll error on your PC.
Read More
Disable WEB camera with PowerShell in Windows
Windows PowerShell is a powerful tool inside the Windows environment often overlooked by typical users which is a great mistake since it can offer a large array of functionality and usability and if used well can offer a unique working experience. Today we will be using PowerShell to turn the WEB camera off so it can not be accessed, completely disabling it for use. You might want to do this for security reasons or just want to learn few new things. Whatever your reason might be, I am welcoming you to this tutorial and please do keep reading.

Finding device ID

In order to disable the WEB camera first thing we need to do is to find a matching device ID. We will find this value inside the device manager, so press ⊞ WINDOWS + X to open the secret menu. keyboard with windows and x markedIn the menu choose device manager and click on it. Windows menu device managerWhen the device manager opens, expand the Imaging devices or Cameras section. Right-click Integrated Camera or the primary webcam, and click Properties. Go to the Details tab. Under the Property section, click to select Matching device ID from the drop-down. Right-click the value and select Copy camera device managerThe next step is to download and install Windows Driver Kit (WDK)

PowerShell script

Create and run a PowerShell script with the following parameters/values to disable the camera. Substitute the <FOLDER> placeholder with the actual name of the folder where your copy of Devcon is residing
$id = (Get-CimInstance Win32_PnPEntity |

where caption -match '<PRIMARY CAMERA>').pnpDeviceID

$ppid = "{0}{1}" -f '@',$id

Set-Location c:\<FOLDER>

Devcon status $ppid

Devcon disable $ppid

Devcon status $ppid
To enable the camera device, run the command below in PowerShell:
devcon enable $ppid
Read More
Fix Gah, Your tab just crashed in Firefox
If you notice that your tabs in your Firefox browser keep on crashing recently, then there might be something wrong with your browser. Every time any of your tabs crashes, you might encounter an error message saying, “Gah, Your tab just crashed”. If you encounter this kind of error message then it is most likely that your Firefox Profile is having some issues with the existing installation of Firefox. The “Gah, Your tab just crashed” error rarely happens but when it does, it can get quite annoying as you won’t get to browse the internet peacefully. So to fix it, here are some suggestions you could check out.

Option 1 – Try disabling multi-process tabs in Firefox

Since Mozilla has one process for Firefox itself, while one process handles all the tabs, you have the option to disable these multi-process tabs in Firefox. To do that, follow these steps:
  • In the address bar of Firefox, type “about: config” and hit Enter.
  • Next, look for the following configurations and set them to false.
    • tabs.remote.autostart = false
    • tabs.remote.autostart.2 = false
  • After that, double-click on the toggle switch between true and false.

Option 2 – Try checking your Add-ons

In this option, you need to start Firefox in Safe Mode and then check if the problem is fixed. If it is, you may have to check your Firefox add-ons as well as extensions as one of them might be the one that's causing the “Gah, Your tab just crashed” error.

Option 3 – Downgrade the Firefox version you’re using

It could be that the current version of Firefox you’re using has some issues so you might have to downgrade it, especially if you are already using the latest version. To downgrade your Firefox browser, go to the directory of the other versions and languages and select an older version that worked for you. After that, you have to disable automatic Firefox updates.
  • First, click the menu button and select Preferences.
  • Next, go to the Firefox Updates section under the General panel.
  • Then select the radio button labeled “Check for updates but let you choose to install them”. This will ensure that you will not have the same issue with the new update.
Note that this is only a temporary fix since updating your programs, including browsers.

Option 4 – Try sending Crash Reports

You might want to send crash reports to Mozilla. This way, Mozilla might come up with some fix to resolve the problem. All you have to do is type “about: crashes” in the address bar. This will list all the crash reports. Now send it to Mozilla using the built-in interface. Although this won’t instantly fix the problem, a lot of user finds it useful. And besides, the issue will get fixed in future releases or with minor updates.
Read More
Fix CLOCK_WATCHDOG_TIMEOUT in Windows
If you encounter the CLOCK_WATCHDOG_TIMEOUT Blue Screen of Death error while using your Windows 10 computer then it is most likely caused by a specified processor which is not processing interrupts. This occurs when the processor is deadlocked or nonresponsive. Specifically, this kind of Stop error occurs when the processor is having a hard time with the cooperation of its threads and cores. The threads are the tasks performed by cores and some cores can have many threads at the same time. And this is where the problem begins – one thread is waiting for an adequate response from another thread or one kernel is waiting for a response from another kernel and those responses are not coming. In other words, when the processor is unable to continue the processing of tasks since its resources are occupied and are interdependent to get free, such a state is called Deadlock. The CLOCK WATCHDOG TIMEOUT bug check has a value of 0x00000101 which means that an expected clock interrupt on a secondary processor, in a multiprocessor system, was not received within the allocated interval. To troubleshoot the problem, you can check out the possible fixes provided below but before you proceed, make sure that you boot your computer into Safe Mode with Networking only.

Option 1 – Undo or disable overclocking if you have overclocked your system

  • Go to the Start Menu and open Settings.
  • Next, select Update and Security and go to the Recover tab.
  • From there, click on Restart now in Advanced startup. This will restart your computer.
  • Once you’re in the Advanced startup, go to Troubleshoot and then select the Advanced Options.
  • From there, select the UEFU Firmware Settings.
  • Now click on Restart. Once your computer has restarted, it will automatically open BIOS.
  • From the BIOS, go to the Advanced tab and navigate to Performance and then look for Overclocking.
  • Once you’ve found Overclocking, make sure that it is disabled. If it’s not, then disable it and then save the changes made by tapping the F10 key.
  • Start your computer normally and check if the CLOCK_WATCHDOG_TIMEOUT 0x00000101 error is now fixed.

Option 2 – Try running the Memory Diagnostic Tool

The Memory Diagnostic tool in windows can help resolve the CLOCK_WATCHDOG_TIMEOUT 0x00000101 Blue Screen error by checking and automatically fixing any memory-based issues. To run it, refer to these steps:
  • Tap the Win + R keys to open Run and type mdsched.exe and hit Enter to open the Windows Memory Diagnostic Tool.
  • After that, it will give two options such as:
    • Restart now and check for problems (Recommended)
    • Check for problems the next time I start my computer
  • Once your computer has restarted, perform a basic scan or you could also go for the “Advanced” options such as “Test mix” or “Pass count”. Simply tap the F10 key to start the test.

Option 3 – Try to rollback, update or disable drivers

The next thing you can do to fix the CLOCK_WATCHDOG_TIMEOUT 0x00000101 Stop error is to roll back, or update, or disable device drivers. It is most likely that after you updated your Windows computer that your driver also needs a refresh. On the other hand, if you have just updated your device drivers then you need to roll back the drivers to their previous versions. Whichever applies to you, refer to the steps below.
  • Open the Devices Manager from the Win X Menu.
  • Then locate the device drivers and right-click on them to open the Properties.
  • After that, switch to the Driver tab and click on the Uninstall Device button.
  • Follow the screen option to completely uninstall it.
  • Finally, restart your computer. It will just reinstall the device drivers automatically.
Note: You can install a dedicated driver on your computer in case you have it or you could also look for it directly from the website of the manufacturer.

Option 4 – Try running the Blue Screen Troubleshooter

The Blue Screen troubleshooter is a built-in tool in Windows 10 that helps users in fixing BSOD errors like CLOCK_WATCHDOG_TIMEOUT 0x00000101. It can be found on the Settings Troubleshooters page. To use it, refer to these steps:
  • Tap the Win + I keys to open the Settings panel.
  • Then go to Update & Security > Troubleshoot.
  • From there, look for the option called “Blue Screen” on your right-hand side and then click the “Run the troubleshooter” button to run the Blue Screen Troubleshooter and then follow the next on-screen options. Note that you might have to boot your PC into Safe Mode.

Option 5 – Try to disconnect or disable newly installed hardware

In this option, you will have to disable or remove the hardware you’ve just installed recently since external devices could be the one that’s causing the Blue Screen of Death error to appear. To do that, just disconnect any external device that’s connected to your computer physically and then check if it fixes the CLOCK_WATCHDOG_TIMEOUT Blue Screen error.

Option 6 – Troubleshoot the BSOD error in Clean Boot State

You can also troubleshoot the Blue Screen error in a Clean Boot state. There are times when third-party applications cause BSOD errors. Putting your computer in this state can help you identify which program is the culprit and thus isolates the problem. In a Clean Boot state, your computer will start using only the pre-selected minimal set of drivers and startup programs. Note that you have to disable and enable one process at a time.
  • Log onto your PC as an administrator.
  • Type in MSConfig in the Start Search to open the System Configuration utility.
  • From there, go to the General tab and click “Selective startup”.
  • Clear the “Load Startup items” check box and make sure that the “Load System Services” and “Use Original boot configuration” options are checked.
  • Next, click the Services tab and select the “Hide All Microsoft Services” check box.
  • Click Disable all.
  • Click on Apply/OK and restart your PC. (This will put your PC into a Clean Boot State. And to configure Windows to use the usual startup, just simply undo the changes.)
  • From there, start to isolate the problem by checking which one of the programs you installed recently is the root cause of the problem.

Option 7 – Try to update the BIOS

Updating the BIOS can help you fix the CLOCK_WATCHDOG_TIMEOUT BSOD error but as you know, BIOS is a sensitive part of a computer. Even though it is a software component, the functioning of the hardware depends on it largely. Thus, you must be careful when modifying something in the BIOS. So if you don’t know much about it, it’s best if you skip on this option and try the other ones instead. However, if you are well-versed in navigating the BIOS, then follow the steps below.
  • Tap the Win + R keys to open the Run dialog box.
  • Next, type “msinfo32” in the field and press Enter to open System Information.
  • From there, you should find a search field on the bottom where you have to search for the BIOS version and then press Enter.
  • After that, you should see the developer and version of the BIOS installed on your PC.
  • Go to your manufacturer’s website and then download the latest version of BIOS on your computer.
  • If you are using a laptop, make sure that you keep it plugged in until you have updated the BIOS.
  • Now double click on the downloaded file and install the new BIOS version on your computer.
  • Now restart your computer to apply the changes made.
Read More
Fix Origin Not Loading in Windows 10
Lately on EA forums question has appeared on what to do when Origin client does not load library. It seems that the latest update for the Origin client has brought some issues as not properly showing one library which appears empty. Do not worry, we have a solution for you, several to be precise and it will fix the issue guaranteed. It is advisable to try solutions in order how they are presented since they go from the most simple and fastest and most common ones.
  1. Delete the cache

    Close origin client completely Press ⊞ WINDOWS + R to bring the run dialog In the run dialog type in %ProgramData%/Origin and press ENTER Go into the Origin folder Delete all files and folders except the LocalContent folder Press ⊞ WINDOWS + R to bring the run dialog In the run dialog type in %AppData% and press ENTER Delete the Origin folder In the address bar click on AppData Go into the local folder Delete Origin folder Reboot your PC
  2. Clear the temporary files

    Press ⊞ WINDOWS + R to bring the run dialog In the run dialog type in %AppData% and press ENTER Go into the roaming folder Delete Origin folder Go to the AppData folder and delete the Origin folder from there also Reboot system
  3. Try Windows built-in tools to check compatibility

    Locate where Origin is installed and right-click on the executable file Click on properties Go to the compatibility tab Click on Run the compatibility troubleshooter and follow on-screen instructions
  4. Update Origin

    Rarely this is the case but check manually to see if you can update your Origin client. Sometimes due to network issues client does not update automatically and can cause this strange behavior.
  5. Add origin as an exception to antivirus and firewall

    Not rarely game clients can be detected as some form of malicious software and antivirus along with firewall can automatically block it. Go to your security software settings and add it as the exception.
  6. Reinstall Origin

    If everything else fails, reinstall the Origin client
Read More
Resize icons on desktop quickly in Windows 10
Resize icons on desktop in Windows 10 in a matter of seconds! Hello everyone and welcome to today's quick tip. If you have ever been dissatisfied with icon size on your desktop and any of the default sizes like small, medium large, etc have not been appropriate know that there is a quick way to resize icons on your desktop in between sizes. All that you have to do in order to use this built-in feature is: Press and hold CTRL and scroll with the mouse. That's it! Find your appropriate size for icons and enjoy. icons on desktop
Read More
Best fitness trackers for your health needs
fitness trackerIf this unfortunate COVID-19 worldwide pandemic has managed to teach us, I would argue it is that our health is the most important thing. So in that spirit, we will continue in this article reviewing some of the best fitness trackers that can be found in the time of writing this article in 2021. Now the market for fitness trackers is not small by any means and offerings are also not small, from no-name manufacturers costing only a few bucks to more serious one’s going slightly over 100 USD there is a fitness tracker for everyone. In this particular article, we will not focus on cheap few dollars no-name ones, instead, we will be offering top ones in the field among some in the middle range simply because we can stand behind them considering quality and precision.

Fitbit Charge 4 fitness and activity tracker

Fitbit is not a pioneer company in the world of fitness trackers and it shows. Charge 4 model offers maybe the best quality, performance, and features for its price. It stands out with implemented GPS meaning that you will need your phone for tracking workouts. It also offers step tracking, sleep tracking, automatic workout-tracking, active zone minutes, etc. It weighs 30g and has 1 inch grayscale OLED. Battery life is said to hold up to 4 days if you use built-in GPS regularly, if you decide to use GPS constantly device will last only 5 hours. Without GPS it can last up to 7 days and it is water-resistant and waterproof up to 50 meters.

Amazfit Band 5

Amazon’s offering of fitness tracker is aimed at beginners and as such, it is lacking some advanced features including an automated working tracker or GPS, also the model does not have replaceable bands so customization is not an option. It does however offer activity and sleep tracking, heart rate monitoring and it is the only model that integrates with Alexa. The manufacturer states that the battery can last up to 15 days depending on usage which places Amazfit Band 5 as a device that has a longer life of use. The device itself is packed with a 1.1-inch color OLED and it weights 12g. It is splash-resistant, not water-resistant.

Xiaomi Mi Band 6

Xiaomi tracker is the best budget version on this list including in it 30 sport modes like running, cycling, yoga, swimming, and more. Battery life is not bad also packing up to 14 days of life but only if the device is not used constantly. It has activity and sleep tracking, a heart rate monitor, sleep tracking, customizable replicable bands and it is water-resistant up to 50m. It comes in a 1.56 inch AMOLED color display and it weighs 63g. The device also has menstrual health tracking making it a great device for women.

Samsung Galaxy Fit 2 fitness tracker

Now we are getting into serious and little more expensive ones. Galaxy Fit 2 is among the top-notch trackers currently on the market. It of course can work along with Samsung’s smartwatches and mobile phones. Packed in the military-grade 1.1-inch casing with color AMOLED and weighing 91g with battery life up to 21 days and water resistance up to 50m this bracelet is an absolute beast. It comes packed with features from standard sleep tracking to automated workout-tracking but it also has a connection to Samsung’s Health mobile app to choose from over 90 workouts, it monitors heart rate and stress levels making it really one of the complete solutions for serious fitness enthusiasts.

Garmin Vivosmart 4 fitness tracker

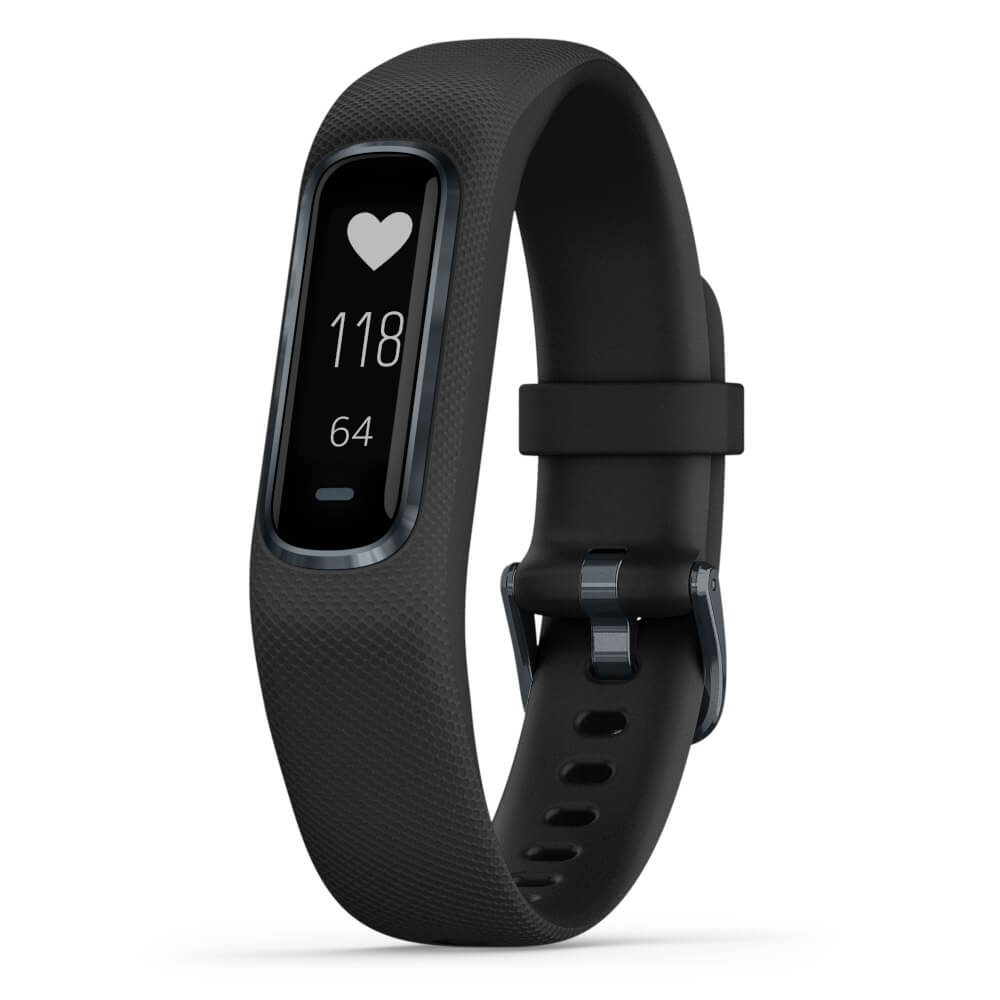
Last on our list is Garmin vivosmart 4. The device itself is not very impressive, 7 days battery life with 0.7 inch OLED display and 17g weight packed with 50m water resistance is nothing spectacular, Samsung’s model is packing better hardware and way more battery life but all of the mentioned devices fall flat if we compare software to Garvin. Garvin’s Vivosmart 4 software is best on the list, it keeps track of your steps, sleep, calories burned, floors climbed, various exercises, and heart rate as standard features but you'll have advanced sleep tracking with REM sleep. It can also gauge blood oxygen saturation levels during the night with its wrist-based Pulse Ox sensor. In addition, a relaxation breathing timer complements the all-day stress tracking feature. Lastly, the "Body Battery" monitor helps optimize your daily activities based on your energy levels making it truly the only complete tracking solution on this list. That's it for our review of fitness trackers of today, be sure to come back each day to find more interesting articles and tips for your everyday digital life.
Read More
Fix NETWORK_FAILED error in Chrome
Although the Google Chrome browser is one of the most used browsers, a lot of things could still go wrong when browsing the web using it. One of the errors you might encounter is the “ NETWORK_FAILED ” error. This kind of error in Chrome indicates that Chrome wasn’t able to send your request through the network connection. It could be that your computer has trouble connecting to a stable internet connection or there is some plugin in your Chrome browser that is causing the issue. The worst-case would be malware. But worry not for this post will guide you on what you can do when you encounter the NETWORK_FAILED error in Google Chrome. Make sure to follow each one of the options given below and see which one of them worked best for you.

Option 1 – Disable or remove any unwanted extensions in Chrome

As you know, browser extensions help in enhancing the browsing experience but there are also times when it does exactly the opposite, and such is the case with the NETWORK_FAILED error in Chrome. It could be that one of the extensions in your browser is the one that’s causing the trouble. To disable or remove these unwanted extensions, here’s what you have to do:
  • Launch Google Chrome, press Alt + F, move to More tools, and click Extensions.
  • Look for Search.tb.ask.com or any other unwanted add-ons, click the Recycle Bin button, and choose Remove.
  • Restart Google Chrome, then tap Alt + F, and select Settings.
  • Navigate to the On Startup section at the bottom.
  • Select “Open a specific page or set of pages”.
  • Click the More actions button next to the hijacker and click Remove.

Option 2 – Run the Malware Scanner and Cleanup tool in Chrome

If removing or disabling the unwanted extension didn’t help in fixing the error, you can try using the built-in malware scanner and cleanup tool in Google Chrome. These tools help you get rid of any unwanted pop-ups, ads, unusual Startup pages, toolbars, and even malware.

Option 2 – Run the Malware Scanner and Cleanup tool in Chrome

  • Launch Google Chrome and then tap the Alt + F keys.
  • After that, click on Settings.
  • Next, scroll down until you see the Advanced option, once you see it, click on it.
  • After clicking the Advanced option, go to the “Restore and clean up the option and click on the “Restore settings to their original defaults” option to reset Google Chrome.
  • Now restart Google Chrome.

Option 3 – Try to disable the Proxy

If you are using a proxy, you might want to consider disabling it as it could have something to do with the NETWORK_FAILED error.
  • Tap the Win + R keys to open the Run dialog box.
  • Then type “cpl” and hit Enter or click OK to open the Internet Properties.
  • After that, go to the Connections tab where you should see the LAN settings. Click on it.
  • Next, uncheck the “Use a Proxy Server for your LAN” and ensure that the “Automatically detect settings” option is checked as well.
  • Then click Ok and then Apply to save the changes made.
  • Restart your PC.

Option 4 – Flush DNS and reset TCP/IP

  • Click the Start button and type in “command prompt” in the field.
  • From the search results that appear, right click on Command Prompt and select the “Run as administrator” option.
  • After opening Command Prompt, you have to type each one of the commands listed below. Just make sure that after you type each command, you hit Enter
    • ipconfig /release
    • ipconfig /all
    • ipconfig /flushdns
    • ipconfig /renew
    • netsh int ip set dns
    • netsh winsock reset
After you key in the commands listed above, the DNS cache will be flushed and the Winsock, as well as the TCP/IP, will reset.
  • Now restart your computer and open Google Chrome then try opening the website you were trying to open earlier.

Option 5 – Delete the WLAN Profiles

Deleting the WLAN Profiles might be a good idea if you are not able to connect to the internet on your computer and if you’re using Wi-Fi. It could be that the networks that were connected previously have gone rogue which is why it is not connecting properly. And so deleting the WLAN profiles would be for the best. That should do it.
Read More
1 2 3 171
Logo
Copyright © 2023, ErrorTools. All Rights Reserved
Trademark: Microsoft Windows logos are registered trademarks of Microsoft. Disclaimer: ErrorTools.com is not affiliated with Microsoft, nor claims direct affiliation.
The information on this page is provided for information purposes only.
DMCA.com Protection Status