Logo

What to do if JPEG files won’t open in Windows 10

As you know, “JPEG” is one of the commonly used formats for image files which is a compression of digital images. It is one of the topmost used file formats by mobile phones and digital cameras and usually achieves a 10:1 compression with little visible loss in the quality of the image.

There are tons of cases as of late, most particularly after the latest Windows 10 update where users were not able to open JPEG files on their PCs. Every time they try to open any JPEG file, they either get an error or nothing happens at all. This issue could be due to the default handler application for JPEG applications not being set or there could be some third-party image viewer not working properly. To fix this issue with JPEG files, refer to the troubleshooting options below.

Option 1 – Try to change the file type association

You need to check if the file type association of the JPEG files are correctly set or not since there are tons of third party programs that change the file type association automatically to themselves without your permission the instant they are installed and so if any of these third-party programs are broken, then naturally, your JPEG files won’t really open. That’s why you can try changing the setting to the default photo viewer instead of the third-party one. To do so, follow the steps below.

  • Tap the Win + R keys to open the Run dialog box.
  • Then type in “control panel” in the field and hit Enter to open the Control Panel.
  • After opening Control Panel, click on the Programs category and select the “Default Programs” option from the menu.
  • Next, select the second option “Associate a file type or protocol with a program” and then select the “Choose default apps by file type” option.
  • After that, click on the .jpg file extension and choose the option from the pop-up.
  • Now restart your PC to refresh all your programs and then see if it has fixed the problem or not.

Option 2 – Try to update your computer

Microsoft frequently releases updates to target bugs and improve users’ experience. And this particular error where JPEG files won’t open is already acknowledged by Microsoft so you need to make sure that your Windows 10 PC is updated to the latest released update and that there are no pending updates.

  • Tap the Win + S keys to open Search and then type in “update” in the field and open the system setting from the search results.
  • After that, check for updates and then download and install them if needed.
  • Now restart your PC once the update is done and check if you can now open JPEG files.

Option 3 – Try to reset the Photos app via Settings

Resetting the Photos app could also help you in fixing the problem. Note that this option will reset all the configurations and your data associated with your Photos and makes the application go into a state when you first started using it and that this option will fix any discrepancies that your application might be experiencing right now.

  • Tap the Win + S keys to open the search bar.
  • Then type in “settings” in the field to open the Settings application.
  • After opening Settings, click the “Apps” category.
  • From there, a list of applications installed on your computer will appear.
  • Navigate through these applications until you find the Photos app and then click on the Advanced options.
  • Afterward, click the Reset button that appears on the next screen. Then a new pop-up comes up and will warn you that all the preferences, as well as sign-in information, will be lost. Click on “Reset” anyway to proceed in resetting the Photos app.
  • Restart your PC once the reset is done.

Option 4 – Try to reinstall the Photos app

Before you start using other third-party image viewers just yet, you can try to reinstall the Photos app first. Thus, if there is something wrong with it, it will instantly get fixed right after it reinstalls. Just take note that this option requires administrative privileges so you need to be logged in as an administrator.

  • The first thing you have to do is tap the Windows + S keys and type in “PowerShell”.
  • Next, right-click on the file and click on the “Run as administrator” option from the context menu.
  • Once PowerShell is opened, execute this command: get-appxpackage *Microsoft.Windows.Photos* | remove-appxpackage
  • The command you just entered will remove the Photos app. After the process is done, go to the Microsoft Store and look for Microsoft Photos then download and install it again.

Do You Need Help with Your Device?

Our Team of Experts May Help
Troubleshoot.Tech Experts are There for You!
Replace damaged files
Restore performance
Free disk space
Remove Malware
Protects WEB browser
Remove Viruses
Stop PC freezing
GET HELP
Troubleshoot.Tech experts work with all versions of Microsoft Windows including Windows 11, with Android, Mac, and more.

Share this article:

You might also like

Software review series: Adobe Photoshop
From photo editing and compositing to digital painting, animation, and graphic design you can do it all in Photoshop. Bring ideas to life across desktop and iPad. Magically transform images with the power of AI. Learn new skills and share your projects via Livestream. Started as a photo editing application, photoshop has surpassed the original ideas and designs in the following years growing with each release and including more tools and flexibility not matched in other applications. Photoshop was the first to introduce many new features and set standards for other applications. How years have passed product grew and innovation was pushed forward, it took some time but eventually, photoshop was able to set itself as the industry-standard application for pixel editing and it holds that position even today. Throughout the world artist all over the globe are using it to create digital art in various fields be that illustrations, film, photography, texturing, etc. Its vast majority of tools and possibilities as well as its extensibility with plugins, actions, brushes have cemented it in the highest place in any designer or artist toolkit. Today you can get it as a part of a creative suite for a monthly fee on the official adobe website and even if you do not need other creative suite applications photoshop is worth the fee alone. Simply you have to try it, learn it, and then harvest its power. If you would like to read more helpful articles and tips about various software and hardware visit errortools.com daily.
Read More
Making your own Minecraft server in Windows
Minecraft has taken the world like a storm and if you tried it, you could tell why, procedurally created worlds, various modifications available and fun gameplay are just some of the things this game offers and it is non wonder why kids and adults are enjoying it. Minecraft is even more fun when you play with your friends on dedicated servers, where you all can adventure and build together. Sadly as everything costs, so does the Minecraft servers as well. Lucky you can create your own Minecraft server on your computer so your friends can join and play with you free of charge with just a little time you need to spend reading this guide and building one for yourselves. Without further delay let's dive right into it.

1. Install the most recent Java version

In order to run your personal server, you will need to own and have Minecraft: JAVA edition, not Windows 10 one. If you have this version of the game and it is already running it means that you already have JAVA as well but we will need to check to see if it is the latest version of JAVA, to check this do the following:
  • Press Windows and type in configure java followed by ENTER
  • Under the update tab, click on the update now button
  • If you have the latest version you are all good, if not follow the onscreen instruction on how to update it.
If by any chance you do not have JAVA installed you can get it here.

2. Prepare a dedicated location for your Minecraft server files

You can use any folder you like for your Minecraft server folder but it is highly recommended to create a new folder whose sole purpose will be to hold and run Minecraft server files. this will be very beneficial in the future when server files need to be updated or configured. Having things in one isolated space is always a good idea and keeping things organized is also a good idea.

3. Download, install and start the Minecraft: Java Edition server file

It is now time to download server files, you can get them here. Download the server.jar file and place it inside your server folder. Once everything is downloaded and prepared do the following:
  • Run the server.jar file, the first time it runs, the file will create some configuration files.
  • After additional files appear, there should be a text document called eula.txt. Open it with a text editor then change eula=false to eula=true.

4. Enable port forwarding on your router

This sep is required if you want to have people to play with you that are outside your router network, for example, if you want them to connect to your server from their home. If you do not wish to do this and want only people on your serves from your router network you can skip this step. Unfortunately, to enable port forwarding, you’ll need to make your computer on your local network to be accessible by other computers over the internet via a router. This will effectively make your port to be an open portThis can make your system vulnerable to malicious attacks. Once you’ve enabled it, set the default server port to 25565. You’ll need the Server IP address, which you can get by opening Command Prompt or PowerShell and run ipconfig. Your IP address is usually listed as IPv4 or IPv6 Address.

5. Run the Minecraft server

Simply double-click the server.jar file to run the server. If you want to have more control over it, use the command line.
  • Navigate to your Minecraft server directory using file explorer.
  • We will be using PowerShell instead of Command Prompt to enter commands. Hit Shift + Right-click on the directory window and select “Open PowerShell window here.
  • Once you are in the right directory, write the following command:
java -Xms1024M -Xmx1024M -jar {server file name} nogui
  1. Replace the {server file name} with the full name of .jar file. The command above will make the server run with no Graphical User Interface (GUI) and use 1024MB of allocated RAM space.
  2. If you want to enable the GUI, remove the nogui command. Additionally, you can edit the memory allocation for the server by changing the Xms and Xmx value.
  3. After the server is up, invite your friends to play by sharing your local or public IP address, depending on whether you are using a local or public network. For a local network, you can give the IPv4 or IPv6 Address earlier. For public networks, go to Google and type “what is my ip” to get the address.
Read More
Fixing PowerShell: File cannot be loaded ...
If you are using Windows PowerShell and it suddenly throws an error message saying, “File cannot be loaded because running scripts is disabled on this system”, then read on as this post will guide you on how you can fix this issue your Windows 10 computer. This kind of error in PowerShell is most likely due to the fact that your user account does not have the required permissions to execute the script. Although this does not mean that you need to have administrator-level permissions as it could also indicate that you have to be unrestricted to run these types of PowerShell scripts or cmdlets. Thus, to fix the error and carry out the task, you have to set the execution policy to be unrestricted. And to do that, you need to use the steps provided below as a reference. Step 1: To get started, you have to check what policies are set for the individual user groups on your computer by tapping the Win + X key combination or by right-clicking on the Start button and clicking on Windows PowerShell (Admin). You can also search for PowerShell in the Start Search and then right-click on Windows PowerShell and select Run as administrator. Step 2: If a User Account Control or UAC prompt appears, just click Yes to proceed. Once you’ve pulled up Windows PowerShell, type the following command to get the List of Execution Policy for all the scopes on your computer.
Get-ExecutionPolicy –List
Step 3: After you execute the command, it will give you a list of the User Groups as well as their Execution Policy status, and under the Scope column, look for “LocalMachine”. Once you find its Execution Policy you will notice that it’s either set to Undefined or Restricted. Step 4: Now that you’ve determined the Execution Policy, you need to set it to Unrestricted if it is set to Restricted. To do that, you have to enter the following command in the very same PowerShell window.
Set-ExecutionPolicy Unrestricted
Step 5: After you execute the command, you will see a message that asks for various permissions for which you either have to tap Y to say Yes to each one of the messages individually or tap the A key to say Yes to all the messages to once. However, if the command throws another error, you can just force the Execution Policy to change by executing the following command.
Set-ExecutionPolicy Unrestricted -Force
Step 6: Once you’re done, it will finally set the Execution Policy for the Windows PowerShell scripts as well as cmdlets to be Unrestricted and fix the “File cannot be loaded because running scripts is disabled on this system” error.
Read More
What happened to Facebook and why it is down?
Usually when online service is not working or when something goes wrong online it is DNS, well that is what most of the time is the case. And yes, DNS or Domain Name Server seems to be an issue with Facebook being completely down along with Instagram and wassap. facebook downThe true cause is that there is no working Border Gateway Protocol (BGP) routes into Facebook's sites. BGP is the standardized exterior gateway protocol used to exchange routing and reachability information between the internet top-level autonomous systems (AS). Most people, indeed most network administrators, never need to deal with BGP. Cloudflare VP Dane Knecht was the first to report the underlying BGP problem. This meant, as Kevin Beaumont, former Microsoft's Head of Security Operations Centre, tweeted, "By not having BGP announcements for your DNS name servers, DNS falls apart = nobody can find you on the internet. Same with WhatsApp btw. Facebook has basically de-platformed themselves from their own platform." Many people are very annoyed by this and with the fact that they cannot use their social media platforms but it seems that Facebook employees are in even bigger annoyance as it was reported that Facebook employees can't enter their buildings because their "smart" badges and doors were also disabled by this network failure. If true, Facebook's people literally can't enter the building to fix things. Reddit user u/ramenporn, who claimed to be a Facebook employee working on bringing the social network back from the dead, reported, before he deleted his account and his messages: "DNS for FB services has been affected and this is likely a symptom of the actual issue, and that's that BGP peering with Facebook peering routers has gone down, very likely due to a configuration change that went into effect shortly before the outages happened (started roughly 1540 UTC). There are people now trying to gain access to the peering routers to implement fixes, but the people with physical access is separate from the people with knowledge of how to actually authenticate to the systems and people who know what to actually do, so there is now a logistical challenge with getting all that knowledge unified. Part of this is also due to lower staffing in data centers due to pandemic measures." Ramenporn also stated that it wasn't an attack, but a mistaken configuration change made via a web interface. Both BGP and DNS are down, the "connection to the outside world is down, remote access to those tools don't exist anymore, so the emergency procedure is to gain physical access to the peering routers and do all the configuration locally." Technicians on site don't know how to do that and senior network administrators aren't on site. It seems that it will all be down for a couple of more hours before the issue is resolved.
Read More
A Quick Guide to Resolving Error 2738

Error 2738 - What is it?

The error code 2738 typically occurs either when you attempt to install a program or uninstall it on Windows Vista and 7. The error message is displayed in the following format:
“Error 2738. Could not access VBScript run time for custom action.”
It is a type of runtime error associated with VB (Visual Basic) Script. It indicates that the VB script engine is not correctly registered on your computer.

Solution

Restoro box imageError Causes

The error 2738 may occur due to multiple reasons. These include:
  • Windows VB Script engine is not properly installed or is disabled on your PC
  • Registry keys are incorrect
  • Corrupt registry entries
  • Poor PC maintenance
As this error code may be generated due to registry issues, it is advisable to fix it immediately as it may pose serious threats to your system like system failure, crash and valuable data loss. And complete data retrieval is often the hardest task.

Further Information and Manual Repair

To avoid such threats and to resolve the error 2738 on your PC immediately, here are some solutions that you can try:

Register the VB Script Engine Correctly on Your PC

This can be done by running the command prompt as administrator:-
  • Simply go to the start menu, click all programs, and select accessories.
  • Right-click on Command Prompt and select ‘run as Administrator’.
  • Navigate to the folder that contains the DLL. If you are using Windows 32 bit version, then type cd %windir%system32 into the Command Prompt and then press enter.
Nonetheless, if you are using 64-bit version Windows then type the following command: regsvr32 vbscript.dll and then press enter. This will help you register the VB script engine correctly and resolve the issue.

Download and Run Restoro

If the error still persists, then this means the underlying cause of the error 2738 could be invalid and corrupt registry keys. To resolve either of the causes in seconds, it is advisable to install and run Restoro. Restoro is an advanced, innovative, and multi-functional PC Fixer. This tool is embedded with multiple utilities including a powerful registry cleaner, an antivirus and a system optimizer.  The registry cleaner is a powerful utility that instantly detects all registry issues and resolves them right away. The registry saves all activities performed on the PC. It stores all types of files including invalid registry keys, cookies, internet history, junk files and temporary files. If these unnecessary files are not removed and cleared from the PC, it not only takes a lot of disk space but also damages the registry and dll files. The registry cleaning utility detects all such files and removes them. It wipes out all invalid registry entries and bad keys clean the registry and restores it. In addition to this, this tool can also be used to remove viruses and optimize the system speed. It is a user-friendly and highly functional PC repair tool. It is compatible with all Windows versions Click here to download Restoro on your PC and resolve error 2738 right away!
Read More
How to be a healthy PC gamer

Spending a large amount of time working or gaming in front of the computer can take a toll on your health. And as someone who indeed spends a large amount of time in front of the computer, I would like to share some insights about how can you be happy and healthy at the same time by incorporating some practices and habits.

gaming

Get good chair

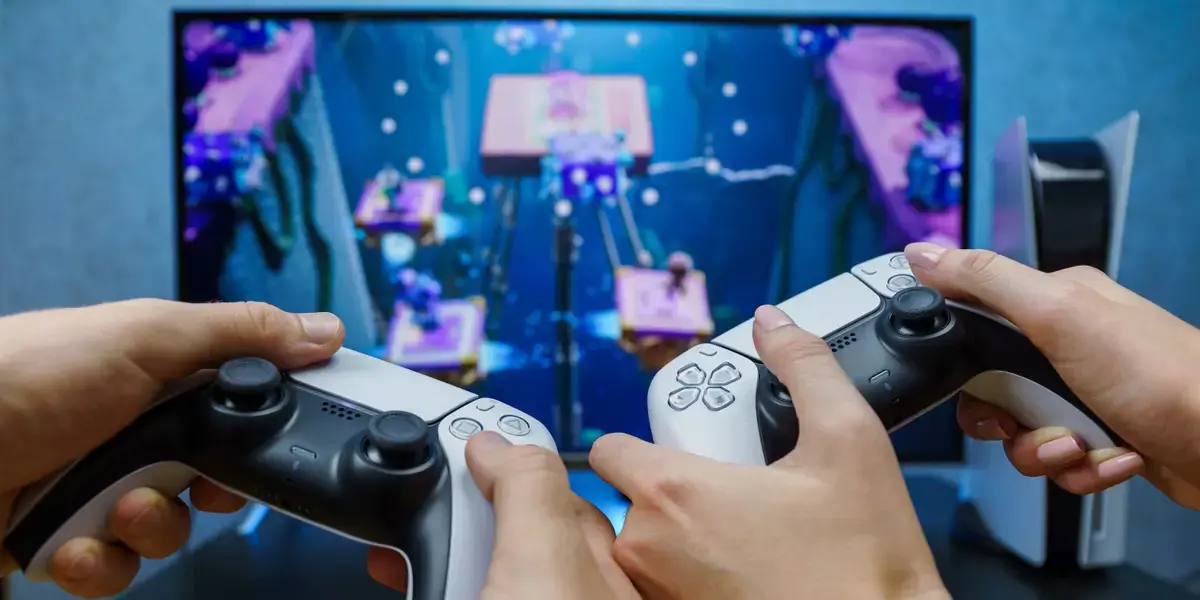
This is first on the list because it matters the most. A proper sitting chair is essential for back health. If your budget allows it, do yourself a favor and get an anatomic sitting chair or gaming chair with lumbar support. It costs but it is worth it.

Learn to sit properly

As the important chair is, sitting properly is also as important as much. Your spine believe it or not is a very important part of your body and you need to take care of it. Sadly long periods of sitting sessions are bad for muscles around the spine that could reflect on the spine itself. Keep your back straight and keep your head not down nor up, place it in a position like when you are walking so the spine that is going from your head is in line with the spine on your back.

Stretch

By medical standards, each hour of sitting should be accompanied by a stretch session since sitting itself is placing too much pressure on certain muscles and blood circulation is lowered. Changing leg position and doing just a little stretch each hour can be really beneficial for your health in long run.

Take breaks

Yes, playing games is fun and most of the time we do not want to stop playing, especially if we are winning but taking breaks is essential for your personal health. Old saying goes that overdoing anything is bad and this applies true even to things that we do for pleasure and relaxation. Take periodic breaks to stretch, stand up and maybe even walk just a little.

Drink water

During long work hours or long gaming sessions, it is not uncommon that we are so focused on our activity that we forget to take our water intake. Approximately 2liters of water per day is needed for an adult person to function properly during that day and if you spend long times in front of a PC do not forget to drink water.

Do not neglect your daily tasks

As enjoyable as it is gaming can make us forget about our daily tasks, do not neglect your life and your tasks. Remember, gaming is only OK if it does not interfere with the daily things that you need to do. Do not postpone going for groceries because of gaming, do not switch shower for another level in the game. Do all of the things you must do first and then sit and game.

Take care of yourself mentally

Having mental health is as important as having a physical one. Playing games is fun, but playing games with someone is even better, do not forget to socialize and invite some friends so you can share some fun times together. Also, detach yourself from outcomes that will come because of gaming, this is very important for gamers that do a lot of PVP games and get annoyed and angry when they lose or when some other player is talking trash. Remember, gaming is for you to relax and enjoy, not to stress you.

Read More
MS will release single office apps in MS Store
It seems that Microsoft is going to offer subscription and sales of individual office applications in the Windows Store. The office package will still be available as a package but for the first time, we will get single applications as standalone ones available for purchase. ms officeThis is a very interesting decision by Microsoft and I fully support it, this time users will be able to pay less and to choose only applications that they need instead of paying for the whole package and not using it.
Read More
Operation did not complete successfully
It is common knowledge that when you open a file that contains viruses, it will automatically infect the operating system. This is why most antivirus programs like Windows Defender won’t allow the opening of a file or execution of any associated program if they detected that the file or program could potentially harm the computer. In situations like this, you may get an error stating, “Operation did not complete successfully because the file contains a virus”. In addition, it is also possible that this error message can pop up even for known programs. To open the program or file that triggered the error, you will be given a couple of options in this post but make sure that the program or file is really safe to open and does not contain any virus. You can open the file or execute the program by disabling the Windows Defender or any antivirus program temporarily. You could also try to add an exclusion in your antivirus program or repair File Explorer or run the Disk Cleanup tool. For more details, refer to each one of the options provided below.

Option 1 – Try to temporarily disable the Windows Defender program

Although you could encounter this error with any antivirus program, it is more common in Windows Defender. Thus, you can try to disable it for a while when you open the file or execute the program. To do so, follow these steps:
  • First, click on the Start button and go to Settings > Update and Security > Windows Security.
  • Here, select the “Open Windows Security” option located in the right pane.
  • After that, click on the “Virus and threat protection” option.
  • Next, click on Manage settings under the Virus and threat protection settings.
  • Then turn off the switch for both Real-time protection and Cloud-delivered protection.
  • Now restart your computer and try to open the file or execute the program again and see if it works.
  • Note: Do not forget to enable the Real-time protection and Cloud-delivered protection back in Windows Defender.

Option 2 – Try adding an exclusion in the Windows Defender program

  • Open the Windows Defender Security Center from the system tray area.
  • Next, click the “Virus & threat protection” option and then open the “Virus and threat protection settings”.
  • After that, scroll down until you find the “Exclusions” and click on the “Add or remove exclusions” option.
  • Then click the plus button and select the type of exclusion you want to add and from the drop-down list, select Folder.
  • Next, navigate to the path where the file or program is located.
  • When a User Account Control or UAC prompt, just click on Yes to proceed.
  • Now try to run the program or file again and see if it worked. If it did, then make sure to turn on your antivirus. However, if it didn’t work, proceed to the next given options below.

Option 3 – Try to run a System File Checker scan

System File Checker or SFC is a built-in command utility that helps in restoring corrupted files as well as missing files. It replaces bad and corrupted system files with good system files that might be the cause why you’re getting the errors 0x8024a11a and 0x8024a112. To run the SFC command, follow the steps given below.
  • Type “cmd” in the Start search and then right-click on the appropriate search result.
  • Next, select “Run as administrator” to open Command Prompt with admin privileges.
  • After opening Command Prompt, type in sfc /scannow
The command will start a system scan which will take a few whiles before it finishes. Once it’s done, you could get the following results:
  1. Windows Resource Protection did not find any integrity violations.
  2. Windows Resource Protection found corrupt files and successfully repaired them.
  3. Windows Resource Protection found corrupt files but was unable to fix some of them.
 Now restart your computer and see if the problem is fixed or not.

Option 4 – Run the Disk Cleanup tool

You can also try using the Disk Cleanup tool. To use it, refer to these steps:
  • Tap the Win + R keys to open the Run dialog box and then type “cleanmgr” in the field and hit Enter to open the Disk Cleanup window.
  • After that, select the drive you want to clean.
  • Now click OK to clean the disk and restart your computer.
Read More
MMC.exe has been blocked for your protection
When trying to run Computer Management, or when running mmc.exe or compmgmt.msc from a command prompt you get the error that the application has been blocked for your protection then keep reading in order to solve the issue. This is a permission issue where if a regular user tries to run such system tools will result in saying that it has been blocked. Along with this, you may have a Group Policy issue. This can be fixed, but you will need admin permission to achieve it. It’s because when they are run from the command prompt with elevated privileges, it works.
  1. Change Group Policy Settings

    If your account is an admin account, and you are still facing the issue, then change the group policy settings: Open Group Policy Settings by typing gpedit.msc in the run prompt followed by pressing ENTER Navigate to User Configuration > Administrative Templates > Windows Components > Microsoft Management Console > Restricted/Permitted snap-ins Locate Computer Management policy, and double click to open it Enable it, exit Group Policy. When Enabled: The snap-in is permitted and can be added into the Microsoft Management Console or run from the command line as a standalone console. When Disabled: The snap-in is prohibited and cannot be added into the Microsoft Management Console or run from the command line as a standalone console. An error message is displayed stating that the policy is prohibiting the use of this snap-in.
  2. Temporarily disable UAC

    UAC is the user access control panel, and if you need to run the command right away, you can choose to disable it for some time. Click on the Start button, and then type UAC to find the User Account Control Settings. Click to open, and then slide down the notification setting at the bottom. It will temporarily allow launching the application as there is no check. However, make sure to switch to default once you are done.
Read More
What is and how to Remove Shortcut Virus
Shortcut virus is an easily spreadable and annoying combination of Worm and Trojan that hides all of your files and folders and then replaces them with shortcuts that look identical to replaced files and folders. Shortcut virusOnce disguised it will wait patiently for a user's click and once that happens it will replicate itself and further infect the system. This rapid spread can lead to stolen personal data, some system hick-ups, and other system-related issues. This malware mainly affects physical file transfer devices like for example and most USB drives, hard drives, and SD memory cards and it can easily transfer itself to the computer. The advantage of this shortcut virus comparing it to others is that it is mostly undetected by a vast variety of antivirus software. So running just anti-virus software maybe not be enough to remove it from your system. Luckily for all unfortunate users that have caught this annoyance, it can be easily removed fully manually in a short time.

How to Remove Virus from USB and other removable media

Firstly plugin USB, SD, or removable drive. The infection will transfer to your computer when the infected drive is plugged in so before we go to clean the computer itself, clean each removable drive that you have. Also know that infection will spread from computers into removable devices as well if it is not cleaned. Open the File Explorer and remember under which letter is removable drive registered. Open Command prompt but with administrator privileges and go to infected rive by typing its letter followed with “:” (for example D:) and press ENTER Once you have successfully gone to infected drive type in command prompt: Attrib -s -r -h /s /d *.* This will unlock all original files back into removable storage, next copy all files to your computer, and format the removable drive. Once the format is complete, unplug the removable device. Continue to clean all devices with the same method.

How to Permanently Remove a Shortcut Virus from Your PC

Now once we have cleaned all removable devices it is time to fully clean the PC Firstly open the task manager ( CTRL + SHIFT + ESC ), in the process tab find wscript.exe or wscript.vbs, right-click on it (or both if present), and select End Task. Now close the task manager and press Start. Inside start typing in registry editor to search for it and once found open it. Find the following key inside the registry editor: HKEY_CURRENT_USER/Software/Microsoft/Windows/CurrentVersion/Run In the right panel, look for any strange-looking key names, such as odwcamszas, WXCKYz, OUzzckky, etc. For each one, run a Google search to see if it's related to shortcut viruses. If any returns a positive match, right-click on them and select Delete. !!! Accidentally deleting an important key can cause Windows to become unstable, so double-check everything !!!. Close the Registry Editor Now press ⊞ WINDOWS + R to open the run dialog and type in it Msconfig followed by ENTER. Once the System Configuration window opens go to the Startup tab. In the Startup tab, look for any strange-looking .EXE or .VBS programs, select each one and click Disable. Close the Window. Once again open the run dialog and type inside %TEMP% and press ENTER in order to open the Windows temp folder. Inside this folder delete everything. Next in the File explorer go to C:\Users\[username]\AppData\Roaming\Microsoft\Windows\Start Menu\Programs\Startup Look for any strange-looking .EXE or .VBS files and delete them.
Read More
1 2 3 171
Logo
Copyright © 2023, ErrorTools. All Rights Reserved
Trademark: Microsoft Windows logos are registered trademarks of Microsoft. Disclaimer: ErrorTools.com is not affiliated with Microsoft, nor claims direct affiliation.
The information on this page is provided for information purposes only.
DMCA.com Protection Status