One of the popular tools that allow a user to offer or obtain remote assistance on a computer is the TeamViewer. It is available on all the major computer and mobile platforms which makes it a lot useful to every kind of user, even on the go. If you are one of the users who frequently use TeamViewer, then you must be familiar with this one sentence that states, “Initializing display parameters”. In common cases, this sentence will appear for a second and load the other user’s screen. However, some users reported that TeamViewer gets stuck on that stage and did not move ahead even a bit. If you experience the same problem, read on as this post will guide you in fixing this issue with TeamViewer on your Windows 10 computer.
At the time of writing, the cause of this issue is still unclear. It could be due to the quality of internet connection, conflicts in process, misconfiguration of Remote Access, and many more. To fix this issue, you can try to update TeamViewer for both the users or have it reinstalled with Unattended Remote Access, or reconfigure the Remote Access. You can also try to kill any conflicting processes or optimize your internet connection. For more details, refer to the given options below.
Option 1 – Reboot your router
The first thing you can try to do to fix the error is to simply restart your router. All you need to do is reboot the router from its Admin panel or you can also turn it off manually and turn it back on after a couple of seconds so that it can completely reboot. Once you’re done, try accessing your server again and see if the error is now fixed.
Option 2 – Try to update TeamViewer on both users’ end
You might have to update the TeamViewer on both ends and to do that, you need to start the TeamViewer installer again. Once it is installed, run the program and click on the Help option in the Menu ribbon and then select the “Check for updates…” option. If an update is found, you will be notified within a couple of seconds through a pop-up mini window. From there, click on Update and then follow the next onscreen instructions that appear and choose your TeamViewer version to update.
Option 3 – Try reinstalling TeamViewer via the Unattended Remote Access
If the first two given options didn’t work, you might have to reinstall TeamViewer from the Windows 10 Settings app or Control Panel.
- Tap the Win + R keys to launch the Run utility and type “regedit” in the field and hit Enter to open the Registry Editor.
- Here, navigate to this registry key: Computer HKEY_LOCAL_MACHINE SOFTWARE Wow6432Node TeamViewer
- Next, look for the TeamViewer key and right-click on it, and select Delete.
- After that, restart your PC to apply the changes made and then start TeamViewer again, and then click on Connection > Open Management Console.
- Then sign in or sign up to get registered and select the Add new device radio button under Add > Add computer located on the top-right corner and then select the Download now option.
- Now follow the next onscreen instructions that appear to complete the installation and then check if it fixes the problem or not.
Option 4 – Try reconfiguring the Remote Access
You can also try to reconfigure Remote Access in case there is some misconfiguration that might have caused the problem with TeamViewer.
- On your Desktop, right-click on This PC and click on Properties.
- Next, go to the left side of the navigation panel and click on Remote Settings.
- From there, make sure that the “Allow Remote Assistance Connections to this computer” checkbox is checked under the Remote Assistance section.
- Once done, click on the Advanced button. This will open a new mini window where you’ll have to check the “Allow this computer to be controlled remotely” option under the Remote Control section.
- Then click on OK and see if it fixed the problem.
Option 5 – Try to kill any conflicting processes
- Tap the Ctrl + Shift + Esc key combination to open the Task Manager.
- Then navigate to the Processes tab and right-click on the BGInfo process.
- Now select the End Task option to kill its process and then start TeamViewer again and check if the problem is resolved.
Option 6 – Try to optimize the quality of connection
You need to take care of two things under this option – first, you have to disable the loading of the Wallpaper of the computer which is the one that you’re trying to access remotely. To do that, you have to select the Extras menu from the menu ribbon and then select Options. And under the Remote Control section, check the “Remove remote wallpaper” option. The next thing you have to do is to optimize the quality for the speed by selecting the “Optimize Speed” for the menu of Quality still under the Remote Control section.

 When you are in settings, on the left side move toward the bottom until you run into a tab that says On Startup and click on it. On right, a new section will open, click on Open a specific page or set of pages.
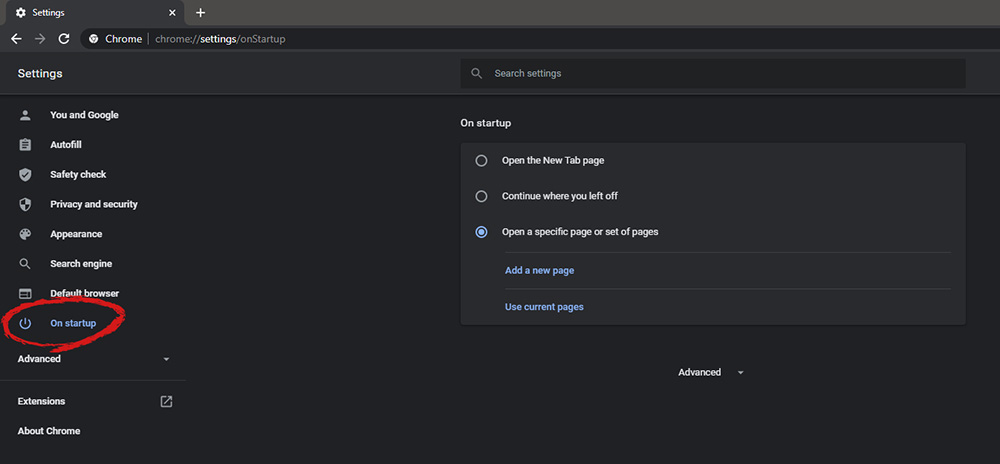 You will be presented with the option to add a new page by typing its URL or getting it from bookmarks or using a specific opened one. You can repeat this process until you have added all pages that you wish to be automatically opened once Chrome is opened for the first time.
 What exactly is TPM?
 The Clear Linux Project creates an operating system and software stack that offers highly optimized performance, security, versatility, and manageability.
Clearly optimized for Intel CPUs and based on GNOME it will offer you incredible speeds if you are on Intel CPU.
The big news, though, is that Clear Linux sports the shiny new Gnome 40. This is a fresher Gnome than you'll find even on Ubuntu's more experimental 21.04 release. The only big names that let you test drive Gnome 40 are Fedora and Arch Linux.
The Clear Linux Project creates an operating system and software stack that offers highly optimized performance, security, versatility, and manageability.
Clearly optimized for Intel CPUs and based on GNOME it will offer you incredible speeds if you are on Intel CPU.
The big news, though, is that Clear Linux sports the shiny new Gnome 40. This is a fresher Gnome than you'll find even on Ubuntu's more experimental 21.04 release. The only big names that let you test drive Gnome 40 are Fedora and Arch Linux.