Being a streamer altho popular is a very demanding call, there is a lot of technical knowledge involved and one of this knowledge is setting your web camera equipment. On the internet, you can find how to install certain devices and register them in Windows but with little to no information on how to set everything for streaming. In this article, we will try to address as many of this as we can so you can start using your camera right away.
Features of the Logitech C922 Pro Stream Webcam
In the package of your Logitech C922 Pro Stream Webcam, you should have the camera itself with a USB hookup, tripod, and user manual. Tripod, of course, is meant to stabilize the camera for recording using high zoom values so visual shaking of the picture is eliminated.
The camera itself captures natural light without any distortion in full HD and if placed on top of the monitor it can accommodate the field of view to capture two people. Also when in a low-light room, autofocus will correct light and it will sharpen an image in order to compensate for lack of light. The camera also features a dual microphone for clarity of sound.
Assembling the Logitech C922 Webcam
Of course, the first thing when the camera is unpacked is to assemble it. Basically, there are two ways for the camera to be assembled:
On top of monitor and
On tripod
The next section will cover both assemblings
Mounting camera on the monitor:
The Logitech C922 Pro Stream Webcam can be used to capture up-close images or video from the top of any computer monitor or TV.
To set up your Logitech C922 Webcam on top of a monitor or TV:
Completely extend the mounting stand until it reaches the top width of your monitor or TV
Turn the bottom piece of the mounting stand, so it matches the angle of the back of your monitor or TV
Place the mounting stand on top of your monitor or TV and tighten the bars until they’re flush with each surface
Pivot the webcam up, down, or to the sides to center the camera angle
After you have securely mounted the C922 to your monitor or TV, it’s ready to be plugged in and used with any recording application on your computer.
Mounting camera on the tripod
You can set up your Logitech C922 Pro Stream Webcam to record a 78-degree view of a room for presentations or live streams by attaching it to the tripod.
To set up your Logitech C922 Webcam with a tripod:
Unfold and extend the legs of your tripod
Place the webcam on top of the tripod, aligning the swivel bolt with the webcam mounting hole
Swivel the bolt by turning a small knob on the tripod
Once you have assembled your Logitech C922 Pro Stream Webcam on your tripod, plug it into your computer and load up your favorite recording application.
How can you use your Logitech C922 Pro Stream Camera?
Altho this camera is designed and built to be used in a live stream environment it can also be used to record video offline to a file. In this next segment, we will explore further applications in which the camera is meant to be used.
Live video
The Logitech C922 Pro Stream Webcam allows content creators to share content in high definition with thousands of viewers in real-time. Stream full 1080p at 30 frames per second and 720p at 60 frames per second live on platforms such as Twitch or YouTube.
Stream video games or entertainment in real-time
Create live presentations for work, customers, or followers
Discuss matters of interest in live talk shows or podcasts
Video call family or friends on Skype, Facetime, or Google Hangouts
Capture crystal-clear, 78-degree video with the Logitech C922 autofocus lens. With two microphones attached on each end, you can stream any live video with little to no audio drops.
Offline recordings
The Logitech C922 Pro Stream Webcam can be used with desktop recording software to create professional videos or snapshots. After you’ve finished recording, you can edit specific spots in the video and add custom presentation details.
Product demonstrations and tutorials
Educational or promotional presentations
Video game or entertainment videos
Personal vlogs
Talk shows or podcasts
Desktop or laptop technical walkthroughs
Complete offline recording in high definition at 1080p. Use QuickTime Player (Mac) or Microsoft Camera App (Windows) to take photos or record videos offline.
Setting up Logitech C922 Pro Stream Camera using XSplit Broadcaster
XSplit Broadcaster offers live stream support for several platforms, which include Facebook Live, YouTube Live, and Twitch. After you hook up your webcam and create profiles for each platform, you can begin a live stream with XSplit Broadcaster.
Twitch Streaming
Enable Two-Factor Authentication on Twitch: Navigate to the settings of your profile and the Security and Privacy tab. Before you can start broadcasting with XSplit, you must set up Two-Factor Authentication.
Set Up Twitch Streaming Profile in XSplit: In XSplit Broadcaster, navigate to Broadcast > Set up a new output > Twitch. Select an account to authorize with XSplit and proceed.
XSplit automatically chooses a resolution to record based on target server connection quality.
A settings window opens before you complete the setup, which allows you to customize the server and video recording options. Once you have completed the setup, your Twitch profile is set up in XSplit. You can begin a stream by navigating back to Broadcast and clicking on the new Twitch profile.
YouTube Streaming
Enable YouTube Streaming Live: Click on your YouTube profile picture to open a dropdown and click on YouTube Studio Beta.
On the left side of the page, navigate to Other features and click on Live events in the dropdown.
Click on Enable live streaming to set up live streaming for your YouTube profile.
Set Up YouTube Streaming Profile in XSplit: In XSplit Broadcaster, navigate to Broadcast > Set up a new output > YouTube. Select an account to authorize with XSplit and proceed.
Once YouTube Live Properties window pops up, click Authorize to connect your Google account. You can also change any settings as needed before you begin a live stream. Once you’re ready to broadcast live with XSplit, navigate back to Broadcast and click your new YouTube Live profile.
Facebook Live Streaming
Set Up Facebook Live Streaming Profile in XSplit: In XSplit Broadcaster, navigate to Broadcast > Set up a new output > Facebook Live.
A prompt opens in XSplit to log in to your Facebook profile.
Log in and set up permissions and posting options as you’d like them to appear whenever you stream live on Facebook. After you’ve completed the permission process, your Facebook Live profile is ready to use in XSplit. You can navigate anytime back to Broadcast and select your new Facebook Live profile in XSplit to begin a live stream.
Using OBS with Logitech C922 Pro Stream Webcam
OBS live streaming application offers high-quality audio and video performance and video capturing in real-time. This application offers full control over every detail and it is a very good choice for both cases.
Setting up Logitech C922 with OBS
Add Logitech C922 as a Capture Device: Click the + under the Sources section. Once you are in the drop-menu, select Video Capture Device.
When this menu pops up, click Create New and hit OK.
From the Device bar, you can select your Logitech C922 as a default Video Capture Device. Set any configurations up how you want them and click OK before exiting.
Changing Resolution or Frames Per Second: With OBS open, click on Settings in the bottom-right portion of the screen and then on the Video tab on the next page. Here you can set up the screen resolution, downscale filter, and frames per second defaults for all videos recorded with OBS. Click Apply before exiting.
After you’ve finished applying the initial settings, you can begin recording or streaming in the bottom right-hand corner of the main menu.
If you like to schedule different tasks on your Windows 10 computer and automate them, then you would find the Windows Task Scheduler very useful. It is commonly used by a lot of users to schedule various tasks like scheduling periodic execution of scripts and some programs to make sure that the intended tasks are automatically carried out. Apart from being a preinstalled application, the Task Scheduler is already available on your computer. However, there are times when you might encounter some errors while using it. One of these errors is error 0xFFFD0000. You can encounter this error while executing some PowerShell scripts. It can occur to any tasks as well especially to the ones that have a file executed using a particular program. And just like the PowerShell script, files also use PowerShell to be executed.
To fix Error 0xFFFD0000, you need to follow the instructions provided below carefully.
Step 1: In the Start Search, type “task scheduler” and click on Task Scheduler from the results to open it.
Step 2: After opening Task Scheduler, right-click on the task that’s giving you the error and then click on Properties.
Step 3: After that, navigate to the Actions tab in the new mini window that appears.
Step 4: From there, select the action for the task and click on the Edit button which will open another mini window.
Step 5: Next, make sure that the path to the executing program is properly typed inside the field of Program/script. Note that it should be set to the executable file for that particular program. For instance, you have to set it to “C:WindowsSystem32WindowsPowerShellv1.0powershell.exe” for the Windows PowerShell program.
Step 6: You can also utilize the Browse button and navigate through Windows Explorer to locate that particular executable file for the program.
Step 7: Now make sure to use the file argument in the Add arguments field followed by the path of the file to be executed. It should look like this:
Step 8: Once done, click on OK to save the changes made and see if the task is still giving you an error or not.
On the other hand, if you are still getting the same error, you can try to repair the Task Scheduler by deleting corrupted tasks. Note that a single corrupted file can cause big problems so this option is quite important. And for you to delete a corrupted task or any task from the Task Scheduler, you have to use the Registry Editor if you are not able to use the Task Scheduler interface. To do so, follow these steps:
Tap the Win + R keys to open the dialog box for Run.
Next, type in regedit and click on OK or tap Enter to open the Registry Editor.
Then navigate to this path: ComputerHKEY_LOCAL_MACHINESOFTWAREMicrosoftWindows NTCurrentVersionScheduleTaskCacheTree
Note: In this path, you can see all the tasks that are currently set in the Task Scheduler. And since it would be hard to tell which one of them is corrupted, you have to delete the latest one in Task Scheduler last. But before you do so, make sure that you take a note of the ID of the tasks. And for you to get the ID, you have to select the task you wish to delete and double click on the ID string located on your right-hand side, and then copy it in the Notepad.
Right-click on the task name and then delete it.
After that, delete the very same GUID which you have copied earlier from these folders:
Update and Shutdown/Restart is not working. As you have probably noticed, every time a new update is released and is downloaded on your Windows 10 computer, the operating system replaces the Restart and Shut down button with “Update and Restart” as well as “Update and Shut down”. This is most likely done so that you won’t miss the update. However, some users noticed that there are times when these buttons still continue to display the same message even if they’ve already performed the required operations such as shutting down or restarting their PCs. Cases like this happen when an update wasn’t installed properly or has failed which is why your computer keeps on prompting you to Update and Shutdown every time. To fix this dilemma, follow the options laid out below.
Option 1 – Try restarting the File Explorer
Restarting the File Explorer can definitely help you fix lots of issues especially when there is some issue with the user interface including this one.
On the right side of the Taskbar, right-click on any open spot.
Then click on Task Manager.
Next, scroll down until you see Windows Explorer.
After that, right-click on it and select Restart.
If you are able to kill its process, you have to tap the Win + R keys to open the Run dialog box and type “explorer.exe” in the field, and hit Enter to launch the Windows Explorer.
Option 2 – Try running the Windows Update Troubleshooter
As you know, Windows 10 has various auto-repair built-in tools to help users fix small issues which used to get fixed manually. And in this case, you will need the Windows Update Troubleshooter to fix the issue.
Go to Settings and click on Update and Security.
From there, click Troubleshoot and click on Windows Update and then click the “Run the troubleshooter” option.
After that, it will try to detect and automatically fix common issues in the Windows Updates which can be resolved by Windows itself. Note that the process may take several minutes before it completes so you need to wait until it’s done. Once it’s done, in case you have some pending update that wasn’t realized by the system early on, it will apply the fix right away and restart the Windows Update service.
Option 3 – Try setting the Power button to Shut down
In case the first two options didn’t work out, you can try changing what the power button does. To do that, refer to these steps:
Go to Control Panel > Power Options.
From there, select the “Choose what the power buttons do” option from the left side.
Then set the Power button setting the “When I press the power button” option to “Shut down”. After that, it will shut your computer down without installing the updates but obviously, this is only a temporary fix.
Option 4 – Turn off your PC instantly without updating it
Tap the Win + R keys to open the Run dialog box.
Type in “shutdown -s -f -t 0” in the field and hit Enter if you really want to turn off your computer without any delay.
You could also tap the Ctrl + Alt + Del keys and select Shut down from the bottom right menu.
Just like the third option, this is also only a temporary fix.
Option 5 – Try running the Windows Module Installer
The Windows Module Installer is a built-in service in Windows 10 that allows you to fix the stuck Windows Updates in your computer. To use it, follow these steps:
In the Cortana search box, type in “cmd” and from the search results that appear, right-click on Command Prompt and select the “Run as administrator” option from the context menu.
Once you’ve opened Command Prompt as admin, type the SC config trustedinstaller start=auto command and tap Enter.
After the command is executed, you will see the “[SC] ChangeServiceConfig SUCCESS” message displayed on the Command Prompt console.
Now exit Command Prompt and then check if the buttons are now back to normal.
Option 6 – Put your PC in a Clean Boot State
Log onto your PC as an administrator.
Type in MSConfig in the Start Search to open the System Configuration utility.
From there, go to the General tab and click “Selective startup”.
Clear the “Load Startup items” checkbox and make sure that the “Load System Services” and “Use Original boot configuration” options are checked.
Next, click the Services tab and select the “Hide All Microsoft Services” check box.
Click Disable all.
Click on Apply/OK and restart your PC. (This will put your PC into a Clean Boot State. And configure Windows to use the usual startup, just simply undo the changes.)
After putting your PC in a Clean Boot State, try creating a system restore point and see if the problem still occurs. Clean Boot troubleshooting is designed to help you isolate the problem. For you to execute a clean boot troubleshooting, you must do a couple of actions (the steps are given above) and then restart your PC after every action. You might have to disable one third-party app after the other to really isolate the issue. And once you’ve narrowed down the problem, you can either disable the third-party app that’s causing the problem or remove it. Note that you must switch your PC back into the Normal Startup mode after you’re done troubleshooting the problem. Here’s how you can do it:
From the “Start” menu, go to System Configuration.
After that, switch to the General tab and click the option for “Normal Startup”.
Next, go to the Services tab and clear the checkbox for “Hide all Microsoft services”.
Then find and click “Enable all” and if prompted, you have to confirm.
Afterward, go to the Task Manager and enable all the Startup programs and confirm the action.
Today most users have an SSD drive, times have changed and SSD has become your typical computer equipment.
A lot of time has passed from the first SSD hard drives up to today and technology has evolved and improved but still, there are some cool tricks and tips to speed up and extend the lifespan of your SSD hard drive.
That being said let us dive right into what I would like to call the essentials of having an SSD hard drive.
Keep your SSD firmware up to date.
This one really is a no-brainer, keeping your firmware updated at all times will ensure longer life and SSD stability. The trick here is that each SSD manufacturer has its own ways of updating firmware so this is not something universal, you will have to go to the official website of your SSD manufacturer and get firmware updates and instructions from them directly.
Enable ACHI.
Advanced controller host interface or short ACHI is a feature that will ensure that your Windows will support all of the features that come with running SSD on your computer. It controls the TRIM feature which is crucial in helping Windows itself in its garbage collection on your hard drive. In order to enable ACHI, you will have to do it from your BIOS and it would be very good if the feature is enabled before Windows itself is installed so it can take full advantage of it.
Enable TRIM.
TRIM feature is vital in extending your SSD lifespan and it should be enabled by default in Windows but you can never be too cautious and double-check and enable if needed. To make sure it is enabled, open your command prompt and type in: fsutil behavior set disabledeletenotify 0
Make sure your system restore is enabled.
In the first SSD days, system restore was really a feature that you wanted to be disabled in order to prevent and extend the life span of your SSD drive, but we came a long way from there and today there is no reason to keep this feature turned off since it can be helping many ways with both your system and SSD.
Disable Indexing in Windows.
A large portion of the speed of your SSD drive is used for indexing files in Windows. Of course, the indexing feature is great if you store everything on your SSD drive but if by any chance you have another drive for your backup, pictures, music, etc. it would be highly beneficial for you to turn it off on your SSD. To turn indexing off click on your start menu, click on the computer. Right-click on your SSD and then click on properties. De-select boxthat says: Allow files to have contents indexed in addition to file properties and click OK. Once you do this the operating system will apply this to all the files and folders on the drive. If you see a dialog telling you that it couldn’t remove a file from the index, click Ignore All.
Keep Windows defrag ON.
This also was the option in early SSD days which was better to be OFF, but as said before since technology has been making progress and Windows has been improved and made aware of SSD drives, defrag has evolved as well, and now it is more of optimization tool then defragmenter which was once.
Disable Prefetch and Superfetch.
Windows is placing information in both physical and virtual memory for applications that you are not currently using but they are used often in order to speed their response time. If you are running low on space or having struggles with virtual memory it would be best to turn them both off. Go to registry manager and find: HKEY_LOCAL_MACHINE\SYSTEM\CurrentControlSet\Control\Session Manager\Memory Management\PrefetchParameters, there you have 2 values: EnablePrefetcher and EnableSuperfetch, set both values to 0.
Disable Search and Superfetch services.
Disabling Superfetch in the registry is not all work, Press WINDOWS + R to bring run dialog, type in it services.msc, Find both Search and Superfetch and disable them.
Configure Write Caching.
Write caching can be enabled and disabled in the device manager by expanding disk drives, right-clicking on SSD, then click properties, select the policies tab. In the tab, there is the option to Enable write caching on the device. Now trick in this is that you will need to try and benchmark your SSD with both options turned ON and OFF since different manufacturers have different performances with this option being ON or OFF.
Disable CleanPageFileAtShutdown and LargeSystemCache.
Page file and a large cache of page files are not something that we longer need, since SSD writes with great speed in its flash memory both of these options can be disabled and you will both speed up shut down the process of your system and save some SSD life since page files will not be written. Find both options in the registry under the key: Computer\HKEY_LOCAL_MACHINE\SYSTEM\CurrentControlSet\Control\Session Manager\Memory Management set both to 0
Set high performance in Power options.
This option in power management will prevent your SSD from constantly shutting down and bringing it up increasing speed without sacrificing its life span.
These are tips and tricks for having great and longer life as well as speed for your SSD drive. We hope that you have found them useful and that you will come again to check new articles published daily for easier IT life.
The Control Panel is one of the most important tools in Windows which allows users to control and change various settings. However, there are cases when it experiences some problems like when users aren’t able to open it. Recently, a lot of users complained about not being able to open the Control Panel. To be more specific, users were able to open it but only lasted for a second, and then it’s gone. This is not just some issue you can ignore as this will prevent you from accessing some major settings in your computer and you won’t be able to perform some important task without it.
According to security experts, this issue is most likely caused by a bug in the Windows Update. If you have installed an update recently, then it’s most likely the culprit. Aside from the Windows Update, there are also other things that can cause this issue. Some of them are the IDT audio panel and a control panel file that causes conflicting issues with the control panel that leads to this problem. Aside from these aforementioned cases, the Windows Error reporting services could also be one of the causes of this issue. As you can see, since there are a lot of possible causes for this problem, this post prepared a lot of options as well which you have to check out. Follow each one of them and see which one worked best for you.
Option 1 – Try updating your Windows 10 PC
If you haven’t updated your PC to the latest version of Windows 10, then you should. A lot of users found that the issue with the Control Panel was fixed right after they updated their Windows 10 PCs. This is probably because Microsoft has probably released a fix on one of the latest updates.
Option 2 – Try uninstalling the IDT Audio Panel
For some users, uninstalling the IDT Audio Panel from their PCs did the trick. You can also try doing the same thing to fix the vanishing Control Panel. According to these users. The IDT audio panel was the one that’s causing the issue. To uninstall the IDT audio panel, here’s what you have to do:
Tap the Win + R keys at the same time to open the Run dialog box.
Then type in “appwiz.cpl” in the field and tap Enter to open the “Uninstall or change a program” screen of the Control Panel.
From there, look for the IDT audio panel, select it and then select the Uninstall option and follow the next on-screen instructions that appear.
Note: If you are unable to locate the IDT audio panel or you simply can’t access the Uninstall or change program screen or you can’t keep Control Panel open for a long time, here’s what you can do:
Tap the Win + R keys at the same time once again to open the Run dialog box.
And in the field, type in “devmgmt.msc” and hit Enter to open the Device Manager.
After opening the Device Manager, look for the “Sound, video and game controllers” option and double-click on it.
From there, locate the IDT audio panel or “IDT High Definition CODEC” and select Uninstall and follow the next instructions that appear.
Option 3 – Try deleting or renaming IDTNC64.cpl
IDTNC64.cpl is a control file in the control panel. However, it might be the one that’s causing the problem as it could be conflicting with the control panel. As a result, the control panel crashes after a second or more. Many users have fixed the problem by either renaming or deleting this file – the safer option would be is renaming it.
Tap the Win + E keys to open File Explorer.
In the address bar located at the top, type in “C:\Windows\System32” and tap Enter to open this folder.
From there, look for the IDTNC64.cpl file, right-click on it and select the Rename option.
You can name the file anything you want but it’s better if you rename it to “oldcpl”.
After you rename the file, try opening the Control Panel again. It should work fine now.
Option 4 – Try to disable the Windows Error Reporting Service
As mentioned earlier, the Windows Error Reporting Service is also known to cause the issue so some users disable it and got the issue fixed.
Tap the Win + R keys.
In the field, type in “MSConfig” and hit Enter to open System Configuration.
After opening System Configuration, go to the Services tab and look for the Windows Error Reporting Service and uncheck its checkbox.
Click the Apply button and click OK. You should now see a date in the Disable Date column. Then check if the Control Panel is now working properly if not, restart your computer and check once more. That should fix the problem.
Option 5 – Try opening Control Panel via Run
This option is more of a workaround than a solution as it does not really fix the issue with the Control Panel but rather helps you in accessing the controls at the very least.
Tap the Win + R keys to open Run.
Type in “appwiz.cpl” in the field and tap Enter to open the Uninstall or change program screen of the Control Panel.
Next, copy and paste “Control panel all control panel items” on the address bar located at the top-mid part of your screen. You must not type the given address and simply copy and paste it. After that, you will see a list of control panel controls you can use.
This post will help you fix the ERR_CONNECTION_RESET error in Google Chrome. This error indicates that the Chrome browser wasn’t able to establish a stable connection or that there really is no connection at all with the website you are trying to open. This error does not occur on all websites though. When you encounter this kind of error message you will see the following message on your Google Chrome browser:
“This website is not available, The connection to example.com was interrupted, Error 101 (net:: ERR_CONNECTION_RESET): The Connection was reset.”
Note: You need to follow the options given below to fix the ERR_CONNECTION_RESET error and make sure to reload the webpage each time you complete following each one of the fixes.
Option 1 – Check the Network Cables and restart the router then reconnect
Of course, the first thing you can try is to check if the network cables connected to your computer or router are properly connected. And if your computer is connected via Wi-Fi, you need to make sure to restart your router once. In addition, you can also forget the Wi-Fi your computer is currently connected to and then try reconnecting again to see if it would work.
Option 2 – Try removing the Proxy
Removing the Proxy might also help you in fixing the ERR_CONNECTION_RESET error in Chrome. Here’s how you can do it:
Tap the Win + R keys to open the Run dialog box.
Then type “inetcpl.cpl” in the field and hit Enter to pull up the Internet Properties.
After that, go to the Connections tab and select the LAN settings.
From there. Uncheck the “Use a Proxy Server” option for your LAN and then make sure that the “Automatically detect settings” option is checked.
Now click the OK and the Apply buttons.
Restart your PC.
Note: If you are using a third-party proxy service, you have to disable it.
Option 3 – Try to increase the Maximum Transmission Unit (MTU)
You can also try increasing the Maximum Transmission Unit to fix the error. To do so, follow these steps:
Open Settings and go to Network & Internet > Ethernet.
From there, take off the Active Wireless / Wired Network Connection.
Next, open Command Prompt as admin.
Then type the “netsh interface IPv4 set subinterface “Ethernet 4” mtu=1472 store=persistent” command and hit Enter to execute it.
Option 4 – Flush the DNS and reset TCP/IP
Flushing the DNS and reset TCP/IP could also help in fixing the ERR_CONNECTION_RESET error in Chrome. To do so, refer to these steps:
Click the Start button and type in “command prompt” in the field.
From the search results that appear, right-click on Command Prompt and select the “Run as administrator” option.
After opening Command Prompt, you have to type each one of the commands listed below. Just make sure that after you type each command, you hit Enter
ipconfig /release
ipconfig /all
ipconfig /flushdns
ipconfig /renew
netsh int ip set dns
netsh winsock reset
After you key in the commands listed above, the DNS cache will be flushed and the Winsock, as well as the TCP/IP, will reset.
Option 5 – Disable the AppEx Networks Accelerator feature
The AppEx Networks Accelerator is known to slow down network connections. Some users reported that it slows down the network speed by 70% up to 80% which is why you need to disable it. Here’s how you can do it:
Go to Settings and select Network & Internet and from there select Ethernet > Change adapter options.
Next, right-click on the network connection and select Properties.
Then look for AppEx Networks Accelerator and uncheck its checkbox.
Now click the OK button to save the changes and then check if the error is now fixed.
Option 6 – Delete the WLAN Profiles
Deleting the WLAN Profiles might be a good idea if you are not able to connect to the internet on your computer and if you’re using Wi-Fi. It could be that the networks that were connected previously have gone rogue which is why it is not connecting properly. And so deleting the WLAN profiles might help you in fixing the ERR_CONNECTION_RESET error.
Option 7 – Reinstall the Network Adapter Drivers
Tap the Win + R keys to launch the Run window and then type in the “devmgmt.msc” command and hit Enter to open the Device Manager window.
Under the Device Manager, you will see a list of drivers. From there, look for the Network Adapters and expand it.
Then right-click on each one of the Network drivers and select “Uninstall device”.
Restart your PC.
Option 8 – Try to disable the Wi-Fi Miniport
In the Cortana Search box, type “command prompt” then right-click on the search result and select “Run as administrator”.
After opening Command Prompt with admin privileges, type the commands listed below and hit Enter right after you key in each one of them.
netsh wlan stop hostednetwork
netsh wlan set hostednetwork mode=disallow
Now exit Command Prompt and tap the Win + R keys to open the Run dialog box.
Type “cpl” in the field and hit Enter to open Network Connections.
From there, look for Microsoft Virtual Wi-Fi Miniport and right-click on it, and then select Disable.
Option 9 – Start Chrome in Safe Mode
The same with Windows Safe Mode, starting Chrome in Sage mode will open the browser but without all the user settings and extensions. And then try opening the website you were trying to open earlier.
Option 10 – Reset Google Chrome
Open Google Chrome, then tap the Alt + F keys.
After that, click on Settings.
Next, scroll down until you see the Advanced option, once you see it, click on it.
After clicking the Advanced option, go to the “Restore and clean up the option and click on the “Restore settings to their original defaults” option to reset Google Chrome.
Afraid of the growing threats online? As you should be. But we’re here to show you what kinds of malware are out there and what you can do to keep them at bay.
Malware definition
Malware comes from the term malicious software. It’s software designed to attack and exploit devices and networks to the advantage of the hacker who made it.
Malware can be transmitted in different ways. Most commonly this happens via infected USB drives, downloadable files or malicious websites. Depending on the type and ultimate goal, the consequences of a malware attack can range from negligible to catastrophic.
Credit: Ed Hardie on Unsplash
What kinds of malware are there?
1. Virus
A virus is typically spread via infected files, websites or links. It’s one of the oldest malware types and one of the most difficult to get rid of. That’s because, once activated, it replicates itself - hence the name.
It can perform different kinds of attacks, depending on what the creator wants to achieve. The main characteristic of a virus is that it really doesn’t show itself until you activate the host. So that’s a scary thought for sure.
2. Adware
Sometimes an ad blocker isn’t enough to fight off unwanted ads. And some of them can, unfortunately, be malicious. They may redirect you to infected sites or prompt downloads of risky files. Even just opening a malicious site can lead to data theft.
So, definitely be careful when clicking around. Even if an ad seems completely legitimate, you can never be too sure.
3. Ransomware
Through ransomware, cybercriminals gain access to a user’s data and use it to extort them for money. Basically, the user is threatened with data deletion or even exposure if a ransom isn’t paid by a specific deadline.
This is a particularly nerve-wracking type of malware. If it targets an individual, it preys upon their sense of anxiety, fear, guilt and even shame. If it targets a business (which is a lot more common), it preys upon not only that business’s profit but also every single one of their customers and their data.
4. Trojans
This type of malware disguises itself very well as a legitimate-looking program. Once you download it, hackers can get full access and control of your device, data and network. They can even be hidden in games, apps and attachments. They cannot self-replicate, though, so we guess that’s… good news?
5. Worms
Worms can replicate, just like viruses, but you don’t need to actually activate the infected program for them to get going. They can be used for various purposes, ranging from data deletion to file encryption to support a ransomware attack.
Credit: Growtika on Unsplash
6. Spyware
Spyware refers to malicious software that stays hidden on your computer and monitors your activity. The best-known type is keyloggers. This can be used to steal sensitive data like passwords and banking information.
7. Rootkits
Rootkits are among the most dangerous types of malware. They allow administrative access and full control of a device, which lets hackers continue hijacking all your data and monitoring your activity without your knowledge.
8. Botnets
Botnets are networks made up of bots - computers that cybercriminals have infected with malicious software. Bots and botnets give hackers remote access to users’ devices and allow them to spy on your camera, take screenshots, memorize passwords and launch Distributed Denial of Service attacks. This one truly makes your hair stand on end.
What can you do about it?
You know the old adage - better safe than sorry. And trust us, malware attacks are such a pain in the you-know-what that you really don’t want to be sorry.
Luckily, there are simple solutions that can shield you from most digital threats these days. What you want to be looking at is a solid antivirus program. Well, technically, you need an antimalware program, but since the latter evolved from the former, we still mostly refer to them as antivirus software. The majority of antimalware programs these days don’t just shield you from potential risks online, but include additional features as well. For example, some Bitdefender antivirus packages also include parental control and a VPN. And Bitdefender is not just for PCs either - it offers protection for your beloved iPhone or Android as well. You can throw in a password manager in there too, for an additional layer of security.
Credit: Dan Nelson on Unsplash
If you aren’t too concerned about all these various threats or feel like you don’t need extra security, you can at least take a step to protect your information from being exposed to lurking cybercriminals as you’re browsing. This can be done through a good VPN like Surfshark, which hides your identity in the digital space and prevents your data from being tracked.
Choosing the right protective software is especially important if you have children with access to the Internet, since they’re unfortunately even more vulnerable to malicious attacks. If you aren’t sure what the right kind of antimalware program is right for you, you can reach out to us and we’ll be happy to help keep your entire household or office digitally secure.
The bottom line
The truth is that there’s no way to be 100% protected in the online world. Hackers are constantly coming up with new ways to infiltrate our devices. But malware-battling software evolves along with them and there’s still plenty you can do to keep risks away. Stay safe!
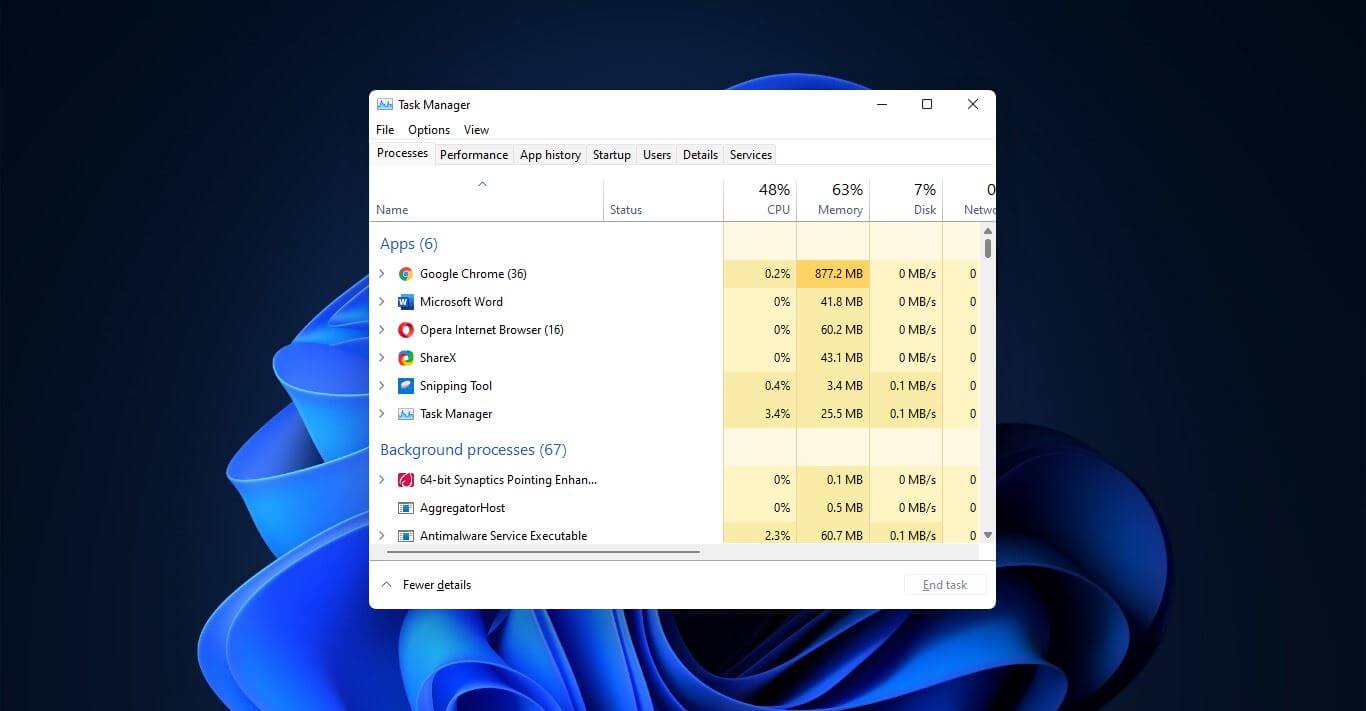
Something we are used to doing in a certain way inside Windows 10 is slightly changed in Windows 11. One of those things is how you open task manager, well kind of.
Option to right-click on the taskbar and launch task manager is gone but do not worry there are other same and simple ways you can launch it.
Press CTRL + SHIFT + ESC or CTRL + ALT + DEL
Right-click on the START button
Type task manager in start search on top in the start menu
Type taskmgr in command prompt
Press ⊞ WINDOWS + R to open run dialog and type in taskmgr
And that’s it, now depending on your situation, you might use different methods to evoke task manager.
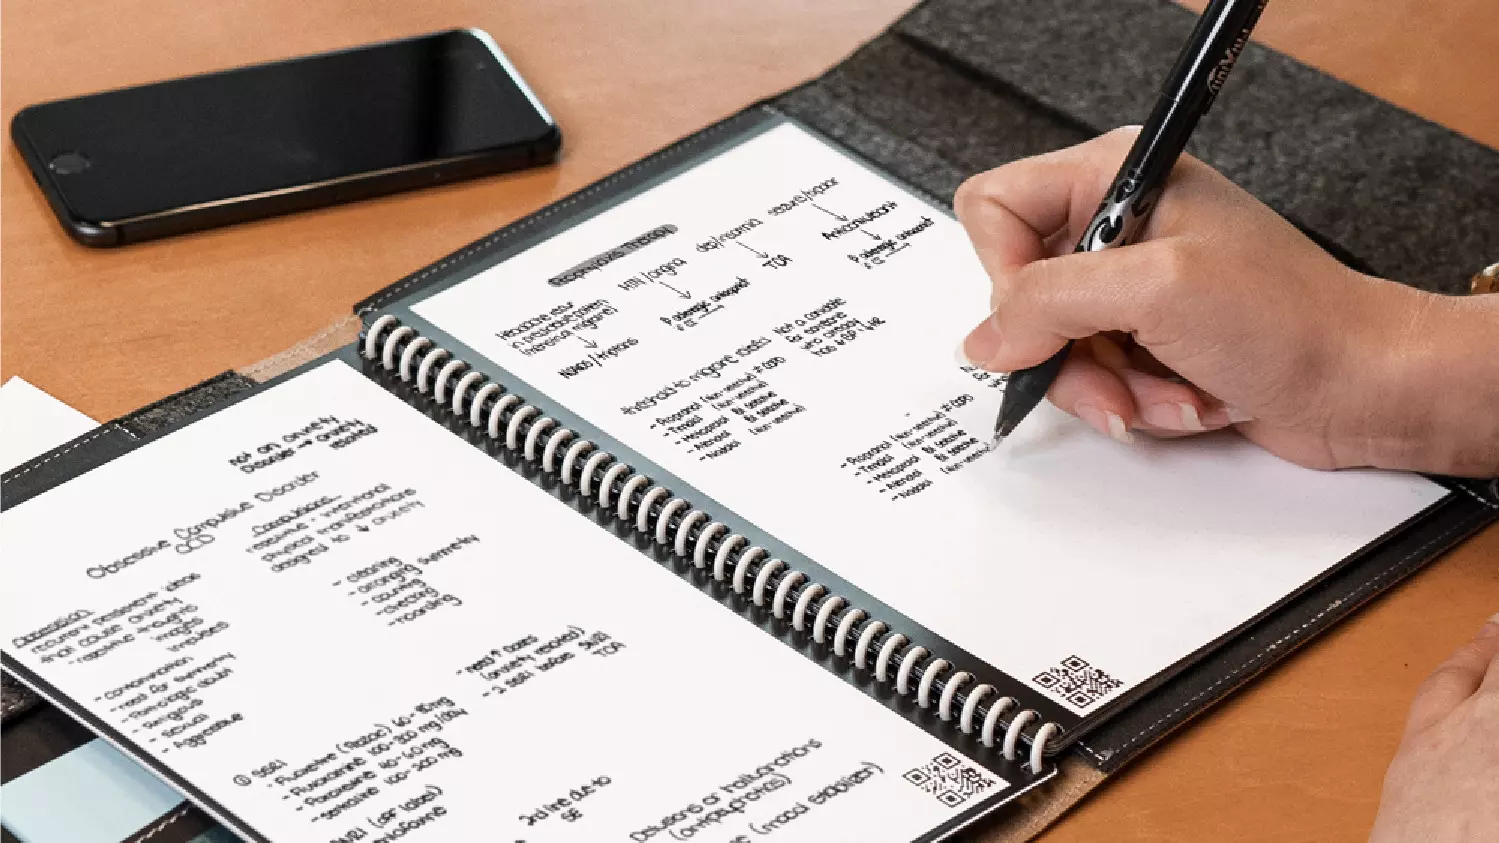
In today's age of smart gadgets and complete replacement of even some simple things with their smart counterpart, it is not really a surprise to see some strange innovations that try to take advantage of modern technology.
One of these innovations is a smart book, or to be more precise smart note, a reusable notebook that could be connected to your phone.
Why Rocketbook Fusion smartbook
One thing that could justify, well it should justify buying Rocketbook is the preservation of trees and the environment since it can be reused. The second argument would be its price since it is not expensive considering what it offers.
On top of all, you also have a free application for your phone in order to take full advantage of it.
What is a smartbook?
Imagine this scenario, you have a notebook of 42 pages with several different page styles inside. You write in it and after it is filled you upload its content to your email or cloud service of your choice, get a cloth, erase everything and start again from zero.
So as mentioned notebook comes with 42 pages of various page styles. Most of the pages are either lined or dotted but the notebook also includes a monthly calendar, two-week detailed calendar pages, and three pages for project or idea tracking. Since everything can be erased this is enough variety to cover all basis and eliminate any need for another workbook ever.
When you feel like you want to save work or once it is filled you can easily upload and save the workbook from the scan page option in the free Rocketbook app. Once scanned pages can be uploaded to your preferred cloud service or sent to your email.
Now in order to write and be able to erase any of Rocketbook's notebooks, you will have to use Pilot's Frixion writing pens. They will dry around 15s on the page and can be of course easily wiped with a damp microfiber cloth that is included with the purchase. One pen also comes with a workbook when purchased.
Application
Application has cool features, of course, the most important and most useful one is setting your upload scan destination so when you scan your pages they get automatically uploaded to your chosen destination.
In the application settings, you can also toggle some handwriting recognition features that will allow you to easily search your uploaded documents. For example, you can search through documents just by writing now or two words. There is also a Smart List feature as well that will take your checklist and make it into a virtual checklist.
The app also has a fun Explore section where you can find all sorts of fun hacks and different ideas on how to use your Rocketbook.
Portable small Bluetooth speakers are nothing new on the market, most of the time they have given the opportunity for music listening during picnics and walks in nature and also replaced some car speaker systems. The latest star in small portable speakers in JBL Clip 4, small in size, waterproof, and with an incredible high-quality sound.
Performance and quality
Out of the box and after first look speaker looks great, it has excellent design and is very intuitive to work with. Everything is laid out logically and you can start using it right away without reading instructions.
The sound quality is surprisingly very good and clear. I must say I have not expected this clarity and power from a speaker of this size. The volume range is also incredibly good and will fill most needs even on small picnics outdoors where you can hear it loud enough. One thing to mention is that even on their loudness levels sound is still clear without distortion which, to be honest, is to be expected from someone like JBL.
Where you can take JBL Clip 4
You can take it where ever you want, Its size and clip make it perfect for beach and pool trips. Speaker is waterproof and gas IP67 rating, meaning that sand and dirt will not affect it either. Do not take this speaker to your diving adventures since that will break it but a depth around 1 meter underwater should be safe. After your trip do not forget to wash Clip 4 with clean water so all dirt, salt, and other stuff are properly cleaned for longer life of the device.
How long it will play?
JBL claims that the battery will last 10 hours of continuous play. Note that this is meant probably on the largest volume setting so when you use it on lower settings battery is lasting longer. Playing of course on low volumes will extend playback time even longer but here we come at one feature that I do not like, there is no indication of any kind how much battery is left in the speaker, the only indication is a red light when the battery is almost empty which means you could be outside at that point and did not know that low battery was there in the first place when you were packing. Some battery indication would be a great addon.
More stability for JBL Clip 4
The clip itself has been improved from the previous Clip 3 model, it is wider, it goes all the way around the casing, and feels overall better and more stable. Since the clip is now all around casing this means a wider opening can be made making it fit around stuff Clip 3 was not able to.
Conclusion
All in all, Clip 4 is an incredible speaker and one that would highly recommend, the price goes around 79 USD but it can be found even as low as 50 USD on discounts and promotions and if you manage to get one at that price it is a great buy. Sound is good, portability is great, dirt and waterproof are excellent and battery life is really good.
Recently, a number of users reported an error when they tried to open graphic-intensive apps like video games. According to users, when they tried to open an app, they get the “Display driver failed to start” error instead. Thus, if you encounter the same error, then you’ve come to the right place as this post will guide you on how exactly you can fix it.
Here’s the full content of the error message:
“Display driver failed to start; using Microsoft Basic Display Driver instead. Check Windows Update for a newer display driver.”
This kind of error could be due to several factors. It is possible that it could be a result of a corrupted or outdated graphics driver. Aside from that, it could also be due to some issues with the system settings. Worry not though for there are potential fixes that can help you fix the problem. But before you troubleshoot the problem, you need to update your Windows 10 computer first and if it didn’t help fix the problem, then here are the potential fixes that should help resolve the “Display driver failed to start” error.
Option 1 – Try to restart the Graphics driver
Although Windows 10 can recover the graphics driver on its own when it crashes, there are times when it fails to do its job. To restart the graphics driver in your computer, simply tap the Win + Ctrl + Shift + B key combination. After that, the graphics driver will be back in less than a second.
Option 2 – Try running the Hardware and Devices troubleshooter
Running the built-in hardware and devices troubleshooter can also help you in fixing the “Display driver failed to start” error.
The first thing you need to do is click on Start and then on the gear-like icon to pull up the window for Settings.
After opening Settings, look for the Update and Security option and select it.
From there, go to the Troubleshoot option located on the left-hand side of the list.
Next, select Keyboard from the list and open the Troubleshooter and run it. Once it is doing its job, wait for it to complete the process and then restart the system.
After the system restarts, check if the problem’s now fixed. If not, refer to the next option given below.
Option 3 – Try to update or rollback the Graphics driver
You can try to update your Graphics card driver using the Device Manager in your computer to resolve the “Display driver failed to start” error or you can also go directly to the website of your graphics card manufacturers like NVIDIA, Intel, or AMD and go to the section called Drivers then check if there’s a new available update – if there is, download and install it.
To update your Graphics driver via Device Manager, refer to these steps:
First, boot your computer into Safe Mode.
After that, tap the Win + R keys to launch Run.
Type in devmgmt.msc into the box and tap Enter or click OK to open the Device Manager.
After that, a list of device drivers will be displayed. From there, look for the Display Adapters and click on them.
After that, right-click on each entry under the Display Adapters and select the “Uninstall Device” option from the menu.
Now restart your computer.
After restarting your computer, go to the Settings app and Check for Updates in the Windows Update section.
Option 4 – Try setting your system for maximum performance
If the first three options didn’t fix the error, you can try setting your computer for maximum performance since Windows 10 allows you to choose the effects you want to activate your system and you can do this by adjusting the performance ratio. Adjusting the performance ratio can be done via a certain setting in your computer – and this setting should be set to “Maximum Performance” to resolve the error.
In the Windows Search bar, type in “performance” and from the search results that appear, select the “Adjust the appearance and performance of Windows” option.
Next, a mini window will appear and from there, click on the radio button that says, “Adjust for best performance”.
Once done, click on the Apply and OK buttons to save the changes made. This should resolve the problem.


 Option to right-click on the taskbar and launch task manager is gone but do not worry there are other same and simple ways you can launch it.