Logo

Remove or join a Domain from Windows

As you know, networks that are domain-based are common in organizations and companies. These domain-based networks require multiple computers to be controlled through a single node known as a server. And the one that sets certain policies and restrictions on every system that is joined to the domain is the server administrator.

So if you want to add your computer to a domain, you need to have the following information available:

  • The domain name
  • A user account name that’s registered in the active directory associated with the server
  • Windows Enterprise, Pro, or education version

In this post, you will be guided on how you can join or remove a domain. To get started, follow the given instructions below.

Option 1 – Joining a domain

  • First, you need to connect your computer to the network associated with the server since your computer and the server have to be on the same network.
  • Next, click the Start button and then click on the gear-like icon for Settings to open it.
  • After that, navigate to this path: Accounts > Access work or school.
  • Then click on Connect. This will open a new dialog box and from there, select the “Join this device to a local Active Directory domain” option.
  • Afterward, you will be asked to enter the username and password of your domain account.
  • Now select your Account type and when you proceed, you have to restart your computer. Your domain account should now be created.

Option 2 – Removing a domain

  • You need to open the Windows 10 Settings app.
  • And from there, go to this path: Accounts > Access work and school.
  • Next, select the account you want to remove from the domain and then click on Disconnect.
  • A prompt will then appear that says, “Are you sure you want to remove this account? This will remove your access to resources like email, apps, network, and all content associated with it. Your organization might also remove some data stored on this device”. Just click on Yes.
  • This will give you a Disconnect from the organization prompt.
  • Now click on Disconnect and select Restart now to restart your computer. This will complete the removal process of the domain.

Do You Need Help with Your Device?

Our Team of Experts May Help
Troubleshoot.Tech Experts are There for You!
Replace damaged files
Restore performance
Free disk space
Remove Malware
Protects WEB browser
Remove Viruses
Stop PC freezing
GET HELP
Troubleshoot.Tech experts work with all versions of Microsoft Windows including Windows 11, with Android, Mac, and more.

Share this article:

You might also like

Installing Wi-Fi drivers in Windows
If you don’t have the required drivers installed in your computer, the hardware that you try to connect to your computer will most likely fail. In order to keep the operating system running on your computer, manufacturers develop drivers that can work harmoniously with your devices and applications. However, internet Wi-Fi connections can fail if suitable drivers are not installed. Worry not though for this post will guide you in installing Wi-Fi drivers on your Windows 10 computer. As you know, a driver is an essential piece of software designed for a specific operating system like Windows 10, Linux, and many more. The operating system uses it to communicate with other hardware devices such as printers and mice. Most hardware manufacturers feature a support page of their own product where you can look for the necessary drivers available for download. You will see that the Windows operating system has a set of drivers that are already installed and you do not have to do anything except plug in the device. So if the driver is not locally available, it will pull it down from its web server and automatically install it for you after you connect the device. However, there are instances when you might encounter some issues while using your Wi-Fi and during these times, you might have to reinstall your Wi-Fi drivers so read on as this post will provide you guidelines in installing Wi-Fi drivers in Windows 10. Refer to the steps below to do so. Step 1: First, go to your manufacturer’s website and look for the right driver you want to install to download your Wi-Fi driver. Step 2: After that, you have to download the correct Wi-Fi driver if it’s available. You have to know the exact name and version of the driver so that you can download it and this information can be found from the Device Manager. Just make sure that you have the right wireless adapter driver downloaded. Step 3: Once done, open the setup of the new driver that you’ve downloaded earlier and run the file and then follow the next on-screen instructions that appear right after. Step 4: You’re not done yet as you need to verify if you have downloaded and installed the correct Wi-Fi driver. Refer to the sub-steps below to do so:
  • First, right-click on the Start button and select the Device Manager to open it.
  • From there, look for the Network Adapters and expand its category to make all the network adapters visible including the wireless adapter.
  • You can easily spot the wireless adapter as it has the “wireless” term in its entry.
  • Next, right-click on the wireless driver entry in the Device Manager and select Network adapters, and then click on Properties to check the version number of the driver.
  • Now select the Driver tab and view the details. If it looks well then it means that you have the right version of the driver installed.
Step 5: Restart your computer.
Read More
Fix Failed to create a graphics device Error
As you know, the Windows 10 operating system has support for a dedicated high-end graphics processor that brings in capabilities inside to support Graphics Cards from NVIDIA or AMD. This helps the operating system to function in a much better way by segregating the graphics-intensive operations from the CPU to a dedicated processor. However, there are times when it also experiences some issues that lead to some errors like the “Failed to create a graphics device” error. It is possible that your computer has more than one screen or graphics card which is why you’re getting this error. To fix it, you need to try reinstalling DirectX or reinstall the Graphics Card driver. You could also try to manually check the hardware or power cycle of your computer. To start troubleshooting the “Failed to create a graphics device” error, follow the given suggestions below.

Option 1 – Try running the DirectX Diagnostic Tool

Since the error has something to do with the DirectX Graphics APIs, you can run the DirectX Diagnostic tool to resolve the problem.

Option 2 – Try updating or re-installing DirectX

If the DirectX Diagnostic tool didn’t work, you can try to update or reinstall DirectX instead. This can help in fixing the problem because when you reinstall or update DirectX, it will replace the incompatible or corrupted components of DirectX from your computer.

Option 3 – Update or reinstall the Graphics card drivers

  • First, boot your computer into Safe Mode.
  • After that, tap the Win + R keys to launch Run.
  • Type in MSC into the box and tap Enter or click OK to open the Device Manager.
  • After that, a list of device drivers will be displayed. From there, look for the Display Adapters and click on them.
  • After that, right-click on each entry under the Display Adapters and select the “Uninstall Device” option from the menu.
  • Now restart your computer.
  • After restarting your computer, go to the Settings app and Check for Updates in the Windows Update section.
Note: You also have the option to go directly to the website of your graphics card manufacturers like NVIDIA, Intel, or AMD and go to the section called Drivers then check if there’s a new available update – if there is, download and install it.

Option 4 – Try to physically check the hardware of your computer

You might also want to check the physical status of the hardware in your computer. You can clean the dust off the hardware components like the Graphics Card of the computer. In doing so, you have to use a small blower or you could also use a soft cloth and run the components gently. Make sure that you don’t damage any parts with moisture or cause harm to any circuits while you carry out this task.

Option 5 – Try to power cycle your computer

You could also try to power cycle your computer to fix the error. To do that, you have to turn off your computer in a way that the power is completely cut off and all the fresh configurations of files are loaded when your computer is booted up. The first thing you have to do is to shut down your computer and if you are using a laptop with a removable battery, you must remove the battery for a couple of minutes before you plug it back in and boot your laptop. On the other hand, if you are using a desktop computer, press and hold the power button until the CPU goes off and take out the power cable for a minute or so and then plug it back in. Boot your computer and see if the error has been resolved.
Read More
Fix GDI32.DLL error in Windows 10
The GDI32.DLL is a DLL (Dynamic Link Library) file that was developed by Microsoft. It is an essential file of the Windows OS as it contains instructions and information for exe files to follow. These DLL files also use to store the various procedures and codes for the Windows programs. It is considered an essential component of Windows because it ensures that all the programs on Windows are operating properly. So, if the gdi32.dll not found on your computer, then it can negatively impact your computer and the associated programs. Though DLL files used to be so efficient and convenient, they are extremely vulnerable to errors and issues.
  1. Perform SFC scan

    Press ⊞ WINDOWS + X to open the Windows menu keyboard with windows and x marked From the menu choose command prompt (admin) Windows menu command prompt adminIn command prompt type sfc /scannow and press ENTER Leave the computer for the operation to be completed and Reboot your computer
  2. Run DISM

    Press ⊞ WINDOWS + X to open the Windows menu keyboard with windows and x markedFrom the menu choose command prompt (admin) Windows menu command prompt adminin command prompt type: DISM.exe /Online /Cleanup-image /Restorehealth and press ENTER wait for the process to be finished and Reboot your computer
  3. Update device driver

    Go to your manufacturer's website and update drivers for your components with the latest versions.
  4. Update Windows

    If you have an update ready for Windows, update it and see if this will remove the error
  5. Scan computer for malware

    Perform a full PC scan for malware to see if this is causing issues with the GDI32.DLL error.
  6. Download file

    One solution is to download a file from the official site and place it in the corresponding folder.
  7. Perform System restore

    Rollback system restore before the issue happened and your Windows will be working as intended
Read More
What to do if Remote Desktop is not working or won’t connect in Windows 10
One of the biggest annoyances in Windows 10 is that it’s upgrading from one version to another. Although these upgrades are necessary to fix some bugs or improve user experience, some of them actually bring bugs into the computers instead. And in one of the recent Windows 10 updates, a lot of issues were found especially for users who use Remote Desktop on a daily basis. The error stacks up as Windows 10 Remote Desktop Protocol client is not working or won’t connect and can’t find the computer HOSTNAME generally. Based on the reports by users who experienced this issue, there are two cases around it:
  1. Users who try to reach a specific website or folder on the network
Some users encounter this error when they try to run the Network Troubleshooter. Even when they add the server name inside it, it still won’t identify the problem, and unpredictably, the driver seems to appear and disappear every now and then. And even after connecting, the network commands don’t work at all. This is really troublesome for users who have lots of PCs and all the other systems do not appear on the network.
  1. Remote Desktop isn’t able to find the computer HOSTNAME
Some other users reported that the error appeared when they use the classic remote desktop software. It keeps on failing and throwing the error message, “Remote Desktop can’t find the computer “HOSTNAME”. If this is the same scenario you are having, it means that “HOSTNAME” does not belong to the specified network. So you need to verify the computer name and domain where you are trying to connect to. There are times when it used to work after some users tried connecting to the domain a couple of times. However, when users try to use the UWP version of Remote Desktop, it seems to connect most of the time. This kind of problem is definitely a DNS issue. It could be that there are two different records on the DNS server which is why it connects and other times it doesn’t. When it is able to resolve the correct address, the drives connect to the PC however, after a couple of minutes, they will suddenly go missing. Using “nslookup” for the hostname, multiple times, you can check this and see if you’ll get identical results all the time.
nslookup [–SubCommand …] [{ComputerToFind| [–Server]}]
If you’ve determined that the drives disappear each time, you may have to change the DNS server or ask your admin to resolve the problem for you. Alternatively, you can also check out another option that has worked for a lot of users. This second option is disabling the IPv6 on the network adapter. In case you don’t know, Windows 10 prefers IPv6 over IPv4 so if you now have issues using IPv6 to connect to the servers, you can change your computer’s settings so that it’ll only use IPv4 instead of IPv6. To do so, follow these instructions:
  • Open Settings > Network and Internet > Ethernet > Change Adapter options.
  • From there, right-click on the adapter for where you want to disable it and then select Properties.
  • Next, look for the checkbox labeled, “Internet Protocol Version 6 (TCP/IPv6)” then uncheck it.
  • Now click on OK and restart your PC to save the changes made.
Read More
New MS Surface coming in October

In the Windows ecosystem, MS Surface laptops are among the best laptops on the market, they are regarded as equivalent to Apple MAC laptops but for Windows. Microsoft Fall 2022 Event will be held on October 12th at 10 AM. The event itself will be held right before it kicks off its annual, developer-focused Ignite event in Seattle from that same day through October 14.

ms surface pro

This event is the first in-person event that Microsoft has held since the beginning of the pandemic. We expect the launch of the Surface Pro 9 and the Surface Laptop 5, and maybe Surface Studio 3 as well. There are also some rumors about products themselves like choices between an ARM or x86 CPU but nothing is confirmed so far, we can just wait and see.

Read More
Win 11 update brings one click browser change
After a lot of backlash about choosing the default Windows browser, Microsoft has officially backed up and brought back a one-click browser change into Windows 11. default browser inside windows 11
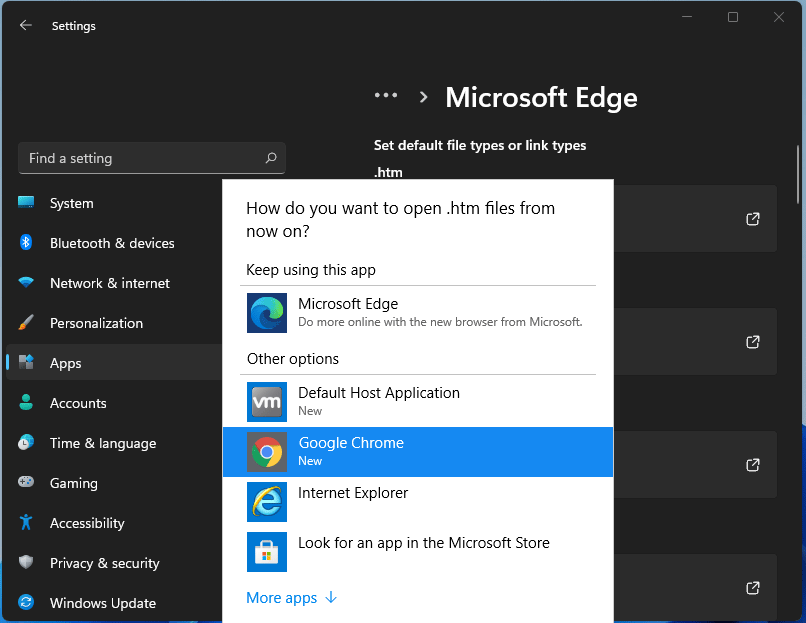
For anyone who is not aware, when Windows 11 was released if you wanted to switch to another browser you had to go into the settings app and choose the default browser for different types of file extensions like HTML, HTM, PDF for opening on the web, etc. Of course, this was completely unnecessary and it was not well received by users. So after some time, Microsoft backpedaled to standard one click, choose your default browser solution that existed in the previous version of Windows OS. Altho sometimes Microsoft knows how to irritate its users base, it is good to know that they can also listen and fix things that are required.
Read More
Fix False Notifications in Action Center
There is a central location in Windows 10 that allows users to view all the notifications from its Action Center. Aside from viewing notifications, users can also manage them and take necessary actions in just one single place. Notifications in Windows 10 look similar to a message icon but can be at variance in function. However, recently, a number of users reported that even though they receive notifications about new actions but when opening them, they see nothing. In other words, the notification is false, and to fix this, read on as this post will provide you a couple of workarounds. The Windows 10 Notifications and Action Center notification messages might show a mismatch. For instance, Windows 10 may say that you have some notifications but when you open Action Center, you find it empty and there are actually no notifications there. Take the case of the following screenshot, the Windows 10 Notification says that there are 6 new notifications available for viewing but the Action Center says otherwise. Before you troubleshoot the problem, you might want to run System Restore especially if you’ve made some changes in your computer prior to this issue which might have messed with the Windows 10 Notifications and Action Center. To perform System Restore, refer to these steps:
  • First, press the Win + R keys to open the Run dialog box.
  • After that, type in “sysdm.cpl” in the field and tap Enter.
  • Next, go to the System Protection tab then click the System Restore button. This will open a new window where you have to select your preferred System Restore point.
  • After that, follow the on-screen instructions to finish the process and then restart your computer and check if the problem is fixed or not.
If the problem wasn’t fixed and you’re still getting false notifications, you might want to troubleshoot the problem further using the options given below.

Option 1 – via Windows PowerShell

  • In the Start search, type “PowerShell” in the field and hit Enter to pull up the Windows PowerShell window.
  • Next, copy and paste this command and hit Enter to execute it: Get-AppxPackage | % { Add-AppxPackage -DisableDevelopmentMode -Register “$($_.InstallLocation)AppxManifest.xml” -verbose }
  • After that, reboot your computer and check if the false notifications are now gone.

Option 2 – Try renaming the Usrclass.dat file

DAT errors like the ones that are associated with the Usrclass.dat file, most likely occur during computer startup, program startup, or while you try to use a specific function in your program. Even so, it can easily be fixed. How? Refer to the given steps below.
  • Tap the Win + R keys to open the Run dialog box.
  • Then type %localappdata%MicrosoftWindows and hit Enter to get to the location of the UsrClass.dat file.
  • After that, look for a file named UsrClass.dat and once you’ve found it, right-click on it and select the Rename option.
  • Now rename the file to UsrClass.old.dat and then restart your computer and see if the problem is now fixed or not.
Read More
Close non responsive application in Windows
We have all been there, unfortunately, the application freezes, and sometimes it can even freeze whole windows. Well if the whole Windows freezes because of the application there is not much we can do except hard reset but if only the application freezes we can still kill it and return the PC in working condition. The first thing you can try is to press ALT + F4, this shortcut is for closing the program, if the application is frozen Windows will try to close it when using this shortcut, and if it succeeds you will find yourself on the desktop environment in Windows with non-responsive application taken care of. If however, this fails and the application is not closed, try ending it in the task manager. To open task manager press CTRL + SHIFT + ESC, locate unresponsive application select it, and click on the end task button on the bottom right.
Read More
Fix THREAD_STUCK_IN_DEVICE_DRIVER 0x000000EA
If a program tried and failed to use the Graphics rendering capabilities of a computer, Windows 10 will most likely throw a Blue Screen error that says, “ THREAD_STUCK_IN_DEVICE_DRIVER ”. 0x000000EA is the Stop code for this particular Blue Screen error and could be caused by a bad display driver or bad video card. Whatever the cause is, here are some suggestions you need to check out to resolve this Blue Screen error.

Option 1 – Try to rollback, update, or disable the Graphics card drivers

Since the THREAD_STUCK_IN_DEVICE_DRIVER Blue Screen error has something to do with Graphics card drivers, you can either roll back, update or disable them depending on your preference in order to resolve the error.
  • First, boot your computer into Safe Mode.
  • After that, tap the Win + R keys to launch Run.
  • Type in devmgmt.msc into the box and tap Enter or click OK to open the Device Manager.
  • After that, a list of device drivers will be displayed. From there, look for the Display Adapters and click on them.
  • After that, right-click on each entry under the Display Adapters and select the “Uninstall Device” option from the menu.
  • Now restart your computer.
  • After restarting your computer, go to the Settings app and Check for Updates in the Windows Update section.
Note: You also have the option to go directly to the website of your graphics card manufacturers like NVIDIA, Intel, or AMD and go to the section called Drivers then check if there’s a new available update – if there is, download and install it.

Option 2 – Try removing hardware or drivers that you’ve installed recently

If you have recently installed some hardware or drivers, you might want to disable or remove them since external devices are proven to be one of the factors that trigger Blue Screen errors like THREAD_STUCK_IN_DEVICE_DRIVER. All you have to do is physically disconnect any external devices that are connected to your computer and then check if it fixes the BSOD error or not.

Option 3 – Run System File Checker at boot time

  • Once you get to the Welcome Screen part, click on Next.
  • Afterward, click on the Repair your computer option located on the bottom-left part of the window.
  • Then click on Troubleshoot.
  • Next, select the Advanced Options and then Command Prompt.
  • After opening Command Prompt, type the “sfc /scannow” command and hit Enter to run the System File Checker scan.
  • Wait until the process is completed and type “exit” to close Command Prompt and then restart your computer to successfully apply the changes made.

Option 4 – Try to run the Blue Screen Troubleshooter

As you know, the Blue Screen troubleshooter is a built-in tool in Windows 10 that helps users in fixing BSOD errors like the THREAD_STUCK_IN_DEVICE_DRIVER error. It can be found in the Settings Troubleshooters page. To use it, refer to these steps:
  • Tap the Win + I keys to open the Settings panel.
  • Then go to Update & Security > Troubleshoot.
  • After that, look for the option called “Blue Screen” on your right-hand side and then click the “Run the troubleshooter” button to run the Blue Screen Troubleshooter and then follow the next on-screen options. Note that you might have to boot your PC into Safe Mode.

Option 5 – Try to manually check the Graphics Card hardware

You might also want to check the physical status of your Graphics card and you can do this by disconnecting the Graphics card or any other external device connected to your computer. Once you’ve removed the external device, check it for any damages. If there’s none, connect it back to your computer and check if the THREAD_STUCK_IN_DEVICE_DRIVER Blue Screen error is fixed or not.

Option 6 – Uninstall any faulty drivers

You can also uninstall any faulty drivers via Device Manager. How? Refer to these steps:
  • Tap the Win + R keys to launch the Run dialog box.
  • Then type “devmgmt.msc” in the field and tap Enter to open the Device Manager.
  • From there, look for any faulty drivers. You can identify them easily as they will be marked with a yellow exclamation point. And then check which entries would not affect the normal functioning of your PC.
  • Now click on the entries of every faulty driver and click on the Uninstall option.
  • Once you’ve uninstalled them, restart your computer to allow your computer to reinstall the faulty drivers you’ve just removed.
Read More
Fix Your PC can’t project to another screen
In case you don’t know, Windows 10 comes with a native ability to project to another screen, be it wireless or wired. All it takes to do that is by tapping the Win + P key combination to display options to manage the extended display. However, there are times when you might encounter errors when you do that like the “Your PC can’t project to another screen” error. This kind of error stops you from projecting your computer to the other screen. Here’s the full content of the error message:
“Your PC can’t project to another screen, Try reinstalling the driver or using a different video card.”
This error could be due to loosely connected hardware or the display adapter. It is also possible that a recent Windows Update has messed up its settings. To resolve this issue, you can try several suggestions that will be given in this post. You can try to check the hardware cable connections or run the Hardware and Devices troubleshooter. You could also update or reinstall the display adapters or replace the graphics card.

Option 1 – Try checking the hardware connections

The first thing you have to do before you further troubleshoot the problem is to check the hardware connections of your computer and see if there are damaged ones, just like with the ports as it would also affect the overall connectivity of the device with the computer. You also have to make sure that no pin is missing from the ports. So if you notice some irregularities in the connecting cable physically, you might have to buy another one and replace it and then see if it fixes the problem or not.

Option 2 – Run the Hardware and Devices Troubleshooters

  • The first thing you need to do is click on Start and then on the gear-like icon to pull up the window for Settings.
  • After opening Settings, look for the Update and Security option and select it.
  • From there, go to the Troubleshoot option located on the left-hand side of the list.
  • Next, select Hardware and Devices from the list and open the Troubleshooter and run it. Once it is doing its job, wait for it to complete the process and then restart the system.
  • After the system restarts, check if the problem’s now fixed. If not, refer to the next option given below.

Option 3 – Try to update or reinstall the display adapters

You might also want to update the drivers for Display adapters and Monitors or you might also have to update or reinstall your NVIDIA driver if you’re using one. To update or reinstall the display adapters, follow these steps:
  • Tap the Win + R keys to open the Run dialog box and then type in MSC and tap Enter or click OK to open the Device Manager.
  • Expand the section for Display Adapters.
  • And then select the Display Driver and right-click on it.
  • From the drop-down menu, select the Update Driver option and follow the on-screen instructions to install the latest version of the Display Driver.
  • Restart your PC after the installation.
If you find that updating the drivers does not help, you can try to reinstall them. How? Simply follow the steps below.
  • Tap the Win + X keys and select the Device Manager.
  • After that, look for the affected driver in the Device Manager window. And if you see a yellow exclamation mark beside it, right-click on it and select the option “Rollback” to roll back the driver.
  • And if the Rollback option is not available, just select Uninstall and then restart your PC.
  • Finally, open the Devices Manager once again and select the option “Scan for hardware changes” to install the driver.

Option 4 – Consider replacing the graphics card

You might also want to consider replacing the graphics card of your computer to resolve the problem if the options provided above didn’t work.
Read More
1 2 3 171
Logo
Copyright © 2023, ErrorTools. All Rights Reserved
Trademark: Microsoft Windows logos are registered trademarks of Microsoft. Disclaimer: ErrorTools.com is not affiliated with Microsoft, nor claims direct affiliation.
The information on this page is provided for information purposes only.
DMCA.com Protection Status