Logo

Prevent screen from shutting down in Windows

You left your computer to go to the bathroom or to fetch something to eat, maybe you have to answer the phone or open door to a friend and after some time you get back to your computer see the black screen, you move the mouse and it starts to come from sleep slowly.

I am the kind of person who gets annoyed by this kind of behavior, I like my PC to be ON all time when I want it to be ON and my power plan on best performance so naturally, I have turned this sleep feature OFF. If you are interested to see how you to can turn off your screen sleeping follow this easy guide.

  1. Press ⊞ WINDOWS to open the start menu and click on the settings
    Windows 10 Start menu with marked settings icon
  2. On settings, screen click on system
    Windows settings with System section selected
  3. When the system dialog opens go to Power & Sleep and on the right side change all values to never.
    windows settings power and sleep

Please note that after each update Windows tend to reset these settings so you will sadly have to return to this after each major update.

Do You Need Help with Your Device?

Our Team of Experts May Help
Troubleshoot.Tech Experts are There for You!
Replace damaged files
Restore performance
Free disk space
Remove Malware
Protects WEB browser
Remove Viruses
Stop PC freezing
GET HELP
Troubleshoot.Tech experts work with all versions of Microsoft Windows including Windows 11, with Android, Mac, and more.

Share this article:

You might also like

MS Mariner, new OS for servers based on Linux
mariner installerWell if anyone told me just a few years ago that I will see the day when Microsoft releases a new OS based on Linux I would be very amused, but that day has come. Mariner is the newest OS out of nowhere. Microsoft’s new Linux Distro, dubbed Common Base Linux (CBL)-Mariner, isn’t the type of distro you’d want to install directly on any old machine. It’s primarily meant for cloud infrastructure and edge products. Specifically Microsoft’s Cloud and Edge products. But if you are curious, it’s possible to run. Juan Manuel Rey, a Microsoft Senior Program Manager for Azure VMware, recently published a guide to ISO CBL-Mariner image. With that, you can easily get it up and running. And you can build CBL-Mariner on an Ubuntu 18.04 desktop. So you can try it out since it is free. You can get it from here: https://github.com/microsoft/CBL-Mariner It is obvious that Microsoft aims to set itself as a leader in enterprise server environments with this move and it is very likely that it may succeed or at least give a good shake to its competitors, mainly red hat and Suse which are two dominant distros in that field. Many believe that they can win over by providing regular updates and package delivery via their already established system and that feature could be a turning point for some. In any case, time will tell and we shall see.
Read More
How to Fix the TWCU.EXE Failed to Load Library File Error in Windows 10
The TWCU.EXE or TP-LINK Wireless Client Utility is a configuration application required to run wireless adapters successfully. The TP-LINK Wireless Client Utility application only exists on computers that are using the TP-LINK adapters. Upon the installation of this application, the service will be automatically added to the Windows service list that will continuously run in the background. The Twcu.exe is placed at the C:\Program Files\TP-LINKTP-LINK\Wireless Utility folder and is used by TP-LINK to connect to the internet. The name of the main executable file is twcu.exe and can be viewed in the Services tab of the Task Manager. If you are one of the users who just upgraded to Windows 10 from the previous Windows versions, then you’ll most likely see an error saying, “Failed to load the library file!” that has something to do with twcu.exe or TWCU. This error pops up when you go to your desktop and every time you log into your Windows 10 PC. Like pointed out, this error is related to the TP-LINK Wireless Client Utility and every user who is using the TP-LINK Wireless Client Utility is experiencing this problem which may be due to some compatibility issues especially when you start getting this error right after you upgraded to Windows 10. To fix this problem, follow each one of the options given below.

Option 1 – Try running in Compatibility Mode

The best thing you can do is to run the TP-LINK Wireless Client Utility in the compatibility mode since the problem is due to some compatibility issue. To run this utility in the compatibility mode, here’s what you have to do:
  • Look for the TP-LINK Wireless Client Utility which should be located on your desktop.
  • Once you find it, right-click on it and select Properties from the context menu.
  • After that, go to the Compatibility tab and mark the checkbox for “Run this program in compatibility mode for:” and from the drop-down list, select either Windows 7 or Windows 8.
  • Click the Apply button and then click OK to save the changes made and check if it has resolved the issue or not.

Option 2 – Try troubleshooting compatibility

This option is almost the same as the first one except it is an alternative way of fixing the TP-LINK Wireless Client Utility in case the first one didn’t work. In this option, you will troubleshoot the compatibility issue of the TP-LINK Wireless Client Utility.
  • Look for the TP-LINK Wireless Client Utility which as mentioned, is on your desktop.
  • Then right-click on it and select the “Troubleshoot compatibility” from the context menu.
  • After that, click on the “Try recommended setting” option. Once the process is done, the error message should be gone.
Read More
Proven Solutions For Error Code 0x80131700

Error Code 0x80131700 - What is it?

0x80131700 is a Windows 7 error that occurs when there is a problem with the Troubleshooting Wizard. The wizard fails to function and with an error message displaying the following message on the computer screen:

‘An unexpected error has occurred’- The troubleshooting wizard can’t continue

Error code: 0x80131700'

Windows 7 features Troubleshooting Wizard, an automated tool that helps users resolve several PC-related problems such as accessing shared files or internet connectivity to name a few.

Error Causes

The error code 0x80131700 largely occurs because of two reasons:
  • The .NET framework is not properly installed on your system
  • Mis-configured System Files and Registry Issues

Further Information and Manual Repair

0x80131700 Windows error is rated easy to fix error code. Thus, repairing this error code is not difficult. It is so easy to fix that you don’t need any technical expertise or professional help for that matter. To begin with, there are 2 methods to resolve the 0x80131700 error code. Let’s take a look at the solutions:

Cause: The .NET framework not properly installed on your system

Solution: If the underlying cause for the error code 0x80131700 is the improper installation of .NET framework on your PC, then the best and easy way to resolve this error is to reinstall it. By default, the built-in version of the .NET framework in Windows is 3.5.1 to reinstall this again on your system follow the steps given below:
  1. Go to the Start menu and type: features in the search box
  2. Now Choose the option ‘Turn Windows Features on or off’ and then press Enter
  3. After this, look for Microsoft .NET framework 3.5.1 and uncheck the box
  4. Once you uncheck it, restart your computer
  5. Repeat the step 1 and 2
  6. Now check the box before .NET framework 3.5.1
  7. Restart your system
  8. Now try using the Troubleshooting Wizard.

Cause: Mis-configured System Files and Registry Issues

Solution: If the error code 0x80131700 triggered due to misconfigured files and registry issues, then the easiest way to fix this error on your system is to download Restoro
Read More
Setting default applications in Windows 11
Setting default applications in Windows 11Same as in previous Windows versions, Windows 11 will also use certain applications as default ones for opening certain file types and file extensions. And yes, same as in previous versions it will come preconfigured for certain file types and associated applications like for example photos for pictures. Of course, users usually have their own favorite applications for certain file types and much more prefer to open them inside the application of their choice instead of the default one. We can change the default application like in previous Windows versions but this time there are two ways and overall more control of this process. Windows 11 has settings for choosing default file type applications and default file extension applications giving you more control of this process.

The opening setting for apps

Whatever you wish to change default application or default extension application you will need to open settings for default application. Follow steps to quickly go into it.
  1. Press ⊞ WINDOWS + I to open settings
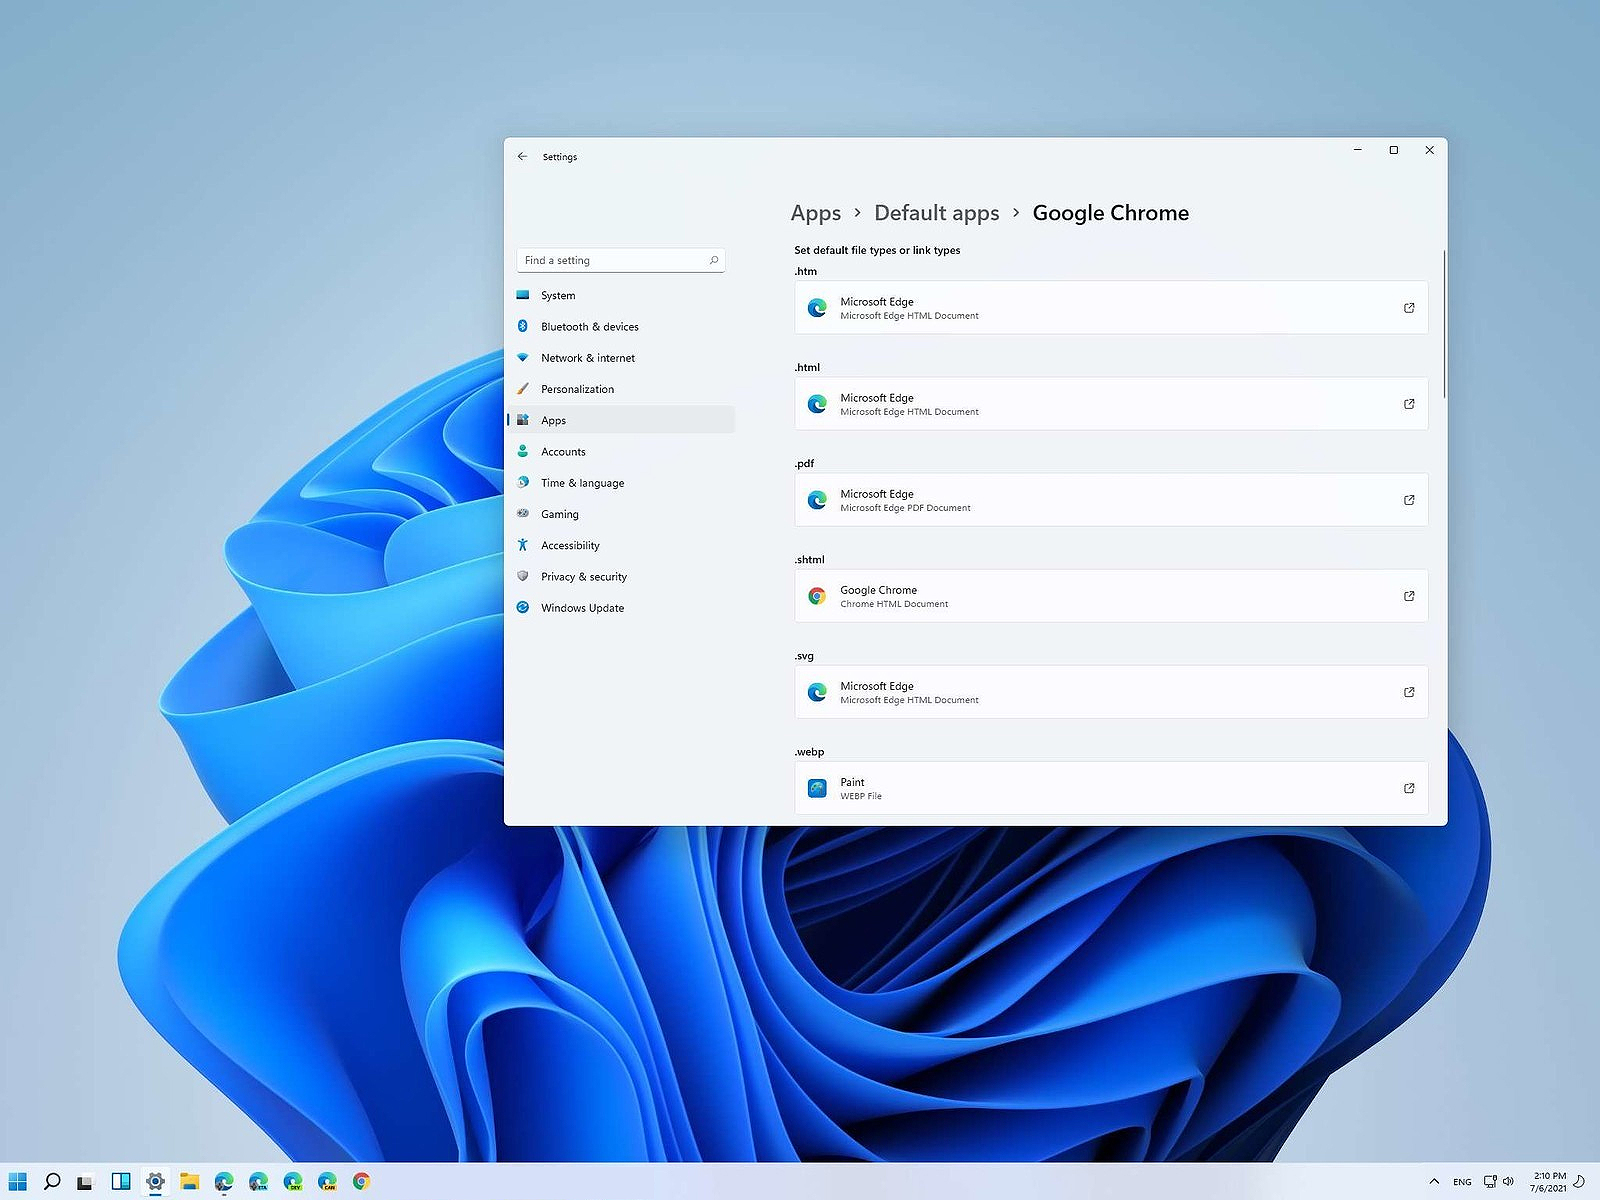
  2. Select Apps on left
  3. On the right part select Default Apps
Now you are in settings for choosing default applications

Choosing default application by file type extension

This is considering by Microsoft as a typical way to set default applications inside Windows 11. Once you are inside the settings app there is a box labeled Enter a file type or link type. Inside the search box, type in file extension that you wish to associate the application with like .JPG, .TXT, or other. If the file extension is not associated with any application you will be presented with a Choose a Default button, if however, the file extension is already associated with the app, you will need to click on the app box itself. In any case, a pop-up will appear and ask How do you want to open YOUR FILE EXTENSION files from now on? Choose Application from the list of presented ones and click on OK.

Choosing default file type

Another method is to select the default application by file type selecting application for it. In the settings screen, under the search box, you will have a list of installed applications. Choose the application that you would like to associate a file type with and click on it. On the next details screen scroll down and select the file type that you want to associate with the selected application and click on OK.

Other/third method

There is also the third method for choosing the default application for file type but it includes some surfing on your hard drive and it can be more time-consuming for first-time settings. But it is fairly quick when you need to only use it once on some new file type (for example you have a new application installed and want to switch just one file type extension to that application). Locate the file that you want to associate with the application and right-click on it. Select Open With from the menu and then Choose Another App. Pop up will appear, select the application that you would like to use, and check the box beside Always use this app to open CHOOSEN EXTENSION files followed by clicking on the OK button.
Read More
Fix Google Chrome screen flickering issue
If you are using your Google Chrome browser and suddenly notice a constant flickering after you’ve upgraded your Windows 10 computer, read on as this post will help you sort out the issue. A lot of users have reported this screen flickering issue in Chrome after having upgraded their devices to a recent Windows 10 build. The bizarre thing about this problem is that it only affects the Google Chrome browser and when it occurs, the Chrome browser will start to flash or flicker. According to users who experience the problem in Chrome, it seems to get worse when they try to play videos on YouTube or other streaming sites. To resolve this problem, many users tried to use Chrome in Incognito Mode, cleared the browser cache as well as cookies. They even tried resetting the browser settings and reinstall Chrome but nothing seems to work. Worry not though as there are still other options you can try to fix the problem and they’re easy ones so you’ll have no problem following them. The screen flickering problem in Chrome appears to be related to the Windows background and color settings as well as incompatible display drivers. This is why it is advised that you have both the video card drivers and Chrome browser updated to prevent the same problem from happening again. To get started troubleshooting the screen flickering issue in Chrome, refer to the following options.

Option 1 – Try modifying the background and colors settings

  • Tap the Win + I keys to open the Settings app.
  • From Settings, go to Personalization to load the Background Preferences and if this window does not appear, just select the Background option from the left side panel.
  • Next, select a Solid Color as the new background from the drop-down menu.
  • After that, check if the problem is fixed. This should be fixed especially if the one that’s causing screen flickering is the Windows automatic background switching.
  • Once you’ve selected the Solid color as the background preference, go to the Colors tab under Personalization. This will open a new window and from there, check the box of the “Automatically pick an accent color from my background” option.
  • Now close the Settings app and open Chrome again.

Option 2 – Try to update or rollback the Graphics driver

You can try to update your Graphics card driver using the Device Manager in your computer to resolve the blank dialog boxes problem or you can also go directly to the website of your graphics card manufacturers like NVIDIA, Intel, or AMD and go to the section called Drivers then check if there’s a new available update – if there is, download and install it. To update your Graphics driver via Device Manager, refer to these steps:
  • First, boot your computer into Safe Mode.
  • After that, tap the Win + R keys to launch Run.
  • Type in devmgmt.msc into the box and tap Enter or click OK to open the Device Manager.
  • After that, a list of device drivers will be displayed. From there, look for the Display Adapters and click on them.
  • After that, right-click on each entry under the Display Adapters and select the “Uninstall Device” option from the menu.
  • Now restart your computer.
  • After restarting your computer, go to the Settings app and Check for Updates in the Windows Update section.
Note: If updating the Graphics driver didn’t fix the problem, you can also try to roll back to its previous version and see if that helps.

Option 3 – Try to disable the Hardware Acceleration

For better performance, Google Chrome uses the Hardware Acceleration by default. Unfortunately, there are just some cases when your hardware, GPU to be specific, might not be able to cope with the requirements, resulting in the black screen issue. And if this is your case, you should try to disable the hardware acceleration from your Google Chrome browser settings panel. To do so, follow the steps below.
  • Open the Google Chrome settings page.
  • Click on the Advanced button to get more options.
  • Look for the option called “Use hardware acceleration when available” and then disable it by toggling the button to the left.
  • After that, check if the screen flickering issue in Chrome is fixed.

Option 4 – Try to disable “Smooth Scrolling” in Chrome

Disabling “Smooth Scrolling” in Chrome might also help you fix the issue. To do so, follow these steps:
  • Open Chrome and type “chrome://flags” and hit Enter.
  • Next, look for a flag named “Smooth Scrolling”. You can scroll down until you find it or search it in the Search Flag bar. Note that Smooth Scrolling is enabled by default in the newer versions of Chrome.
  • After that, select the drop-down menu and select Disabled.
  • Then click on the “Relaunch Now” button.
Read More
Clipboard history in Windows 10
Copy & Paste is an essential part of Operating and working on a computer. We copy and paste a lot of different stuff through our workday, moving stuff from application to application. In an earlier article today we have explored troubleshooting and how to repair copy-paste stopped responses, this time we are going to focus on a little feature of Windows 10 called Clipboard history. Clipboard history is a built-in feature in Windows 10 which lets you store multiple copies of different types and then selectively pasting them into another application. Let's say you have multiple copies of different text from different websites and you then paste everything or just some into a Word processor. If this feature sounds interesting to you then let's turn it on. Press the start button and then on settings. Windows 10 Start menu with marked settings iconIn settings window click on System Windows settings with System section selectedin system dialog click on the clipboard and on the right screen turn ON CLipboard history. Windows settings for Clipboard
Read More
Can’t remove Bluetooth mouse & keyboard
Windows 10 supports various devices to get connected to which makes it quite a flexible operating system. The connection varies on the fact that the device can be connected either with Bluetooth or other wireless and wired connection. However, no matter how great the features are, there a few times when they bring in some bugs too. One of these bugs won’t allow you to either remove or reinstall the Bluetooth mouse and keyboard device from your Windows 10 computer. So if you are currently experiencing this problem, read on as this post will guide you in fixing it. Before you go over the suggestions laid out below, you need to create a System Restore Point first since, in one of the options, you will be making some changes with the registry files as well as some critical Windows settings. Once you have that covered, refer to the following options.

Option 1 – Configure the Bluetooth Services

The first thing you can do is configure Bluetooth Services.
  • Tap the Win + R key combination to open the Run dialog box.
  • After that, type “services.msc” in the field and hit Enter to open the Windows Services Manager.
  • You will then see a list of services and from there, look for the following services and make sure that their default values are set as follows:
    • Bluetooth Audio Gateway Service – Manual (Triggered)
    • Bluetooth Support Service – Manual (Triggered)
    • Bluetooth User Support Service – Manual (Triggered)
  • Now click on the Start button to start all the aforementioned services and then check if you can now remove or reinstall the Bluetooth mouse and keyboard device.

Option 2 – Try running the Bluetooth Troubleshooter

As you know, Windows 10 has various troubleshooters with user-friendly interfaces where you can utilize them to fix issues in your PC. And since you’re dealing with some Bluetooth problem, you have to run the Bluetooth Troubleshooter.
  • Open the Windows 10 Settings.
  • Then go to Update & Security > Troubleshoot.
  • You should find the option for Bluetooth on your right-hand side – click on it then click on the “Run the troubleshooter” option.
  • Now follow the next screen options.

Option 3 – Try to reinstall or update the Bluetooth driver

The issue might have something to do with the Bluetooth drivers. It could be that it is outdated and needs to be updated or that you recently updated it and since then you have trouble removing the Bluetooth device and so to fix the issue, you can update, roll back or uninstall the Bluetooth drivers. How? Follow the steps below.
  • Tap the Win + X keys to open the Device Manager.
  • Next, look for the Bluetooth device and right-click on it.
  • Select the option “Update driver”.
  • After that, a new popup window will appear. In there, select the option, “Search automatically for updated driver software”.
Note: Checking the update may take a few minutes so you’ll have to wait until it finishes. If it is able to find an update, you must install it.

Option 4 – Get rid of any interference

If you have several wireless devices in the same room as your PC then it might have caused interference with the current connection in your PC which is why you have to switch off all the other devices and then try removing reinstalling the Bluetooth mouse and keyboard devices again.

Option 5 – Remove or reinstall the Bluetooth devices in a Clean Boot State

You might want to uninstall or remove the Bluetooth Devices while your computer is in a Clean Boot State. Putting your computer in this state will surely help especially if there are some processes that prevent the Bluetooth devices from being removed or reinstalled.
  • Log onto your PC as an administrator.
  • Type in MSConfig in the Start Search to open the System Configuration utility.
  • From there, go to the General tab and click “Selective startup”.
  • Clear the “Load Startup items” check box and make sure that the “Load System Services” and “Use Original boot configuration” options are checked.
  • Next, click the Services tab and select the “Hide All Microsoft Services” check box.
  • Click Disable all.
  • Click on Apply/OK and restart your PC. (This will put your PC into a Clean Boot State. And configure Windows to use the usual startup, just simply undo the changes.)
  • After that, try to reinstall or remove the Bluetooth mouse and keyboard devices again.
Read More
Should you buy used GPU in current market?
Things have stirred lately with Chinas ban on crypto mining and many used GPUs will flow the market probably. But should you buy a used GPU? Short answer: NO, long answer: keep on reading to find out why.

GPU 1080tiGPU shortage and its cause

As you all know by now, we live sadly in a world struck by a global Pandemic. Due to this awful disease and measures taken against it, many people are either working from home or are at home making the manufacturing of new chips problematic while demand on the market has raised. Throw into that mix crypto mining which has raised in popularity and you have, well today's market where we have GPU shortage. Now with the latest news that China has banned the mining of cryptocurrency, there is to be expected that at some point in time mining cards used there will fit the market in the whole world. Sadly even with a large quantity of GPUs that will become available, the overall price of cards will not be much lowered I am afraid since demand is still very high and many people would not want to purchase used mining cards and neither should you.

Be prepared for the worst scenario

Although this sounds very pessimistic and in most cases, it will not turn out to be true, you should always prepare yourself mentally that you might be in that lower percentage that will end up with a really bad GPU. What has come up to be absolutely true when considering GPU that were mining is that if anything at all can be done to GPU in order to increase performance, it has been done. Miners want to optimize and almost every GPU if could be overclocked, it was overclocked. Extensive mining also means that thermal paste has been dried and it is pretty useless at this point and there is a very high chance that fans and heat sinks will need much cleaning or even replacement raising the price of the card itself for mentioned paste, fans, and heat sinks. There's no way to tell what the previous owner might have done with a graphics card when you're shopping online, so our advice is to assume the worst. Don't trust the seller to give truthful information. Any listing that says it was "never used for mining" at this point is probably a lie.

Age of the GPU matters

Date when GPU itself has manufactured really matters. Newer cards even if used extensively have been used for a much shorter period of time and are not so damaged were ones produced a few years ago have seen a lot of action. Let’s say that you get RTX 3060, In the worst-case scenario it has been mining since late February of 2021 and basically, it is still under warranty so it should behave OK and put some good work in gaming even in that state. On another hand, if we take for example GTX 1080Ti which is 4 years old GPU things start to change drastically. 4 years GPU could be worn out even if it was used just for extensive gaming sessions let alone for mining.

No return policy and seller rating

Most of the time you will run into a product that cannot be returned or no refunds policy. This should bring a red flag right away and deter you from purchase. Sellers with the highest ratings are more trustworthy since many of them will not want to destroy their reputation but these will probably not even have these kinds of merchandise in their store. Buying with a poor rating seller and no return policy on a product is just asking for trouble. And although some stores do have arbitration and will stand on the customer side there is no guarantee for that and it will take too much time to process.

If you really must buy a second-hand GPU

Of course in these troubled times sometimes due to malfunction or any other reason, there would not be another choice than to buy a second-hand GPU. In this case, if there is no other option consider sellers with many positive ratings. If you can buy locally that would even be better or the best-case scenario would be if you could visually see and inspect GPU itself in order to see in what state it is. Look for warranty stickers to see if they are thorn and the card has been tampered with. Also take a good look at screws, if they have scratches card has been opened, probably to replace fan or heating sinks which means that it has worked a lot.

Conclusion

It is very difficult to give the best possible advice on this situation since of GPU shortage, but I would much prefer a new GPU with lower performance than a hi-performance one which was mining.
Read More
Fix Windows Activation Error 0xC004F211
If you got an Activation Error 0xC004F211 after having installed or upgraded your Windows 10 PC, then this indicates that some hardware in your computer has changed which’s causing the error to pop up. Windows might not be able to determine if the key is used on a new computer or if it’s still the same one if you have just removed or upgraded old hardware. But worry not for this post will guide you in fixing the Windows Activation Error 0xC004F211 on your Windows 10 computer. When you encounter this error, you will see the following error message on your screen:
“Cannot activate Windows 10. Try activating again later. If that doesn’t work, contact support. Error code: 0xC004F211.”
Note that although hardware changes cause this error, the minor ones don’t really cause any issues with activation, however, if you have made any significant hardware change such as replacing your motherboard, it will most likely cause the activation error. In such cases, the Windows Activation system will treat this as new hardware and you will need a new license for that. Even if your Windows 10 computer has a genuine key, it might still fail to get activated which results in the Windows Activation Error 0xC004F211. Thus, before you do other troubleshooting steps, you need to run the Windows 10 Activation Troubleshooter first. To do so, follow these steps:
  • Go to Settings and then select Activation.
  • After that, click on the Windows Activation and then troubleshoot. This will help you address most of the commonly found activation issues in Windows devices.
In addition, there is an exception offered by Microsoft – if you are connected to a Microsoft account prior to the hardware change, then you can most certainly use the same license key to reactivate Windows 10 again. Microsoft calls this an “Exception path” which should be fixed easily by the Windows Activation Troubleshooter as pointed out earlier. However, if the Windows Activation Troubleshooter isn’t able to resolve the error you can try purchasing a new license. In such rate case, even if you do have a Microsoft account available on your Windows 10 computer, and if Windows was never activated, this solution will not work. And if you haven’t connected your Microsoft account with your Windows 10 computer prior to the major hardware change, then your only option left is to purchase a new license. For you to do that here are some steps you can follow.
  • To purchase a new Windows license, the first thing you have to do is click on the Start button > Settings > Update & Security.
  • From there, go to Activation and select the “Go to Microsoft Store” option.
  • After receiving your new license, you need to go back to Update & Security then go to Activation and select the “Change product key” option.
  • Now update your Windows 10 computer using the new key and it should automatically activate your computer.
  • Next, you have to create a Microsoft account or connect your existing local account to your online account.
  • Once the system links the key and the account, you need not buy a new license in case something like this happens again.
Note: If you are an IT administrator, you need to keep in mind that there is a limit to the number of times you can reactivate Windows on your computer. Moreover, if you don’t see any option to reactivate the license, and it is a work computer, you need to contact your organization’s tech support.
Read More
Copy and Paste feature is not working
One of the most basic and commonly used features in the Windows operating system is the copy and paste feature that helps users accomplish tasks in a faster and easier way. However, if you notice that it’s not working properly for some reason, then this post might be of help as it will provide you with options you can check out to resolve the problem. You can encounter this kind of problem with the copy and paste feature if some system files are corrupted or if there’s some third-party application or process that interferes with this function. Worry not though for there are some options you can check out to fix this. You can try to restart the rdpclip.exe process or the explorer.exe process. You could also try to reinstall the program where you encountered the issue with the Copy and Paste function. In addition, you could try clearing the clipboard history or run the built-in tools like the DISM tool and SFC scan. You could also troubleshoot the problem in a Clean Boot State or use the Refresh Windows tool. For more information, refer to each one of the options below.

Option 1 – Try to restart the rdpclip.exe and the explorer.exe processes

The first thing you can do to resolve the problem is to restart certain processes namely, the rdpclip.exe process and the explorer.exe process via Task Manager.
  • First, right-click on your Taskbar and select the Task Manager.
  • Next, look for the rdpclip.exe process and right-click on it, and select the End process option.
  • After that, click on the File tab > Run new task and then type “rdpclip.exe” and tap Enter.
  • This should help fix the problem. If not, you could also try to restart the explorer.exe process – just look for the explorer.exe process in the Task Manager and right-click on it, and then select the Restart option.

Option 2 – Try reinstalling the concerned program

If you only experience this issue on a particular program, you might want to uninstall this program and install it back again, and then see if it fixed the problem or not.

Option 3 – Try to clear the clipboard history

You could also try clearing the clipboard history as it has been known to help in fixing this kind of issue. You can clear the clipboard history using the command line.
  • Tap the Win + R keys to launch the Run dialog box and type “cmd” in the field and hit Enter to open Command Prompt.
  • Next, execute this command: echo off | clip
  • After that, check if the Copy and Paste function is now working properly or not.

Option 4 – Try running the DISM tool

You can run the DISM tool as well to help fix the “Tile Database is corrupt” error. Using this built-in tool, you have various options such as the “/ScanHealth”, “/CheckHealth”, and “/RestoreHealth”.
  • Open the Command Prompt with admin privileges.
  • Then type in the following commands and make sure to hit Enter right after you type each one of them:
    • Dism /Online /Cleanup-Image /CheckHealth
    • Dism /Online /Cleanup-Image /ScanHealth
    • DISM.exe /Online /Cleanup-image /Restorehealth
  • Do not close the window if the process takes a while as it will probably take a few minutes to finish.
  • Once it’s done, check if it was able to fix the corrupted Start Menu or not.

Option 5 – Try to run System File Checker or SFC scan

  • Tap Win + R to launch Run.
  • Type in cmd in the field and tap Enter.
  • After opening Command Prompt, type in sfc /scannow and hit Enter.
  • Once done, restart your computer.

Option 6 – Restart your computer in a Clean Boot State

If a third party program like antivirus is the one that’s causing the problem, you can try to put your computer in a Clean Boot State to isolate the issue by following these steps:
  • Log onto your PC as an administrator.
  • Type in msconfig in the Start Search to open the System Configuration utility.
  • From there, go to the General tab and click “Selective startup”.
  • Clear the “Load Startup items” check box and make sure that the “Load System Services” and “Use Original boot configuration” options are checked.
  • Next, click the Services tab and select the “Hide All Microsoft Services” check box.
  • Click Disable all.
  • Click on Apply/OK and restart your PC. (This will put your PC into a Clean Boot State. And configure Windows to use the usual startup, just simply undo the changes.)
  • Now try to connect your device or copy the files to your external device again and check if the problem with the Copy and Paste function is fixed.
Read More
1 2 3 171
Logo
Copyright © 2023, ErrorTools. All Rights Reserved
Trademark: Microsoft Windows logos are registered trademarks of Microsoft. Disclaimer: ErrorTools.com is not affiliated with Microsoft, nor claims direct affiliation.
The information on this page is provided for information purposes only.
DMCA.com Protection Status