Logo

A Quick Guide to Fixing Ntdll.dll Error Code

Ntdll.dll Error - What is it?

Ntdll.dll is a type of DLL (Dynamic Link Library) error. DLL errors are some of the most common but complicated errors to troubleshoot and resolve by PC users. The Ntdll.dll error message is displayed in the following formats:

  • "STOP: 0xC0000221 unknown hard error C:WinntSystem32Ntdll.dll
  • "NTDLL.DLL Error!"
  • "STOP: C0000221 unknown hard error SystemRootSystem32ntdll.dll"
  • "[PROGRAM NAME] caused a fault in module NTDLL.DLL at [ANY ADDRESS]"
  • "AppName: [PROGRAM NAME] ModName: ntdll.dll"
  • "Crash caused in ntdll.dll!"
  • "Unhandled exception at [ANY ADDRESS] (NTDLL.DLL)"

You may come across the ‘Ntdll.dll error’ pop-up either when you try to run a program or after using it or while the program is running. It may also appear when Windows starts or shutdowns or even during Windows installation.

Solution

Restoro box imageError Causes

The Ntdll.dll error code can be triggered due to numerous reasons such as:

  • DLL file corruption due to hard drive bad entries
  • Missing DLL files
  • Corrupt hardware drivers
  • Viruses
  • DLL file misconfiguration

It is recommended to resolve this error code immediately on your PC to avoid inconvenience and serious PC damages like program lockouts, system failure, freeze, and crash

Further Information and Manual Repair

All the causes for ‘Ntdll.dll’ are linked with the registry.

The registry is the main database of your system. It saves all the activities and files on your PC including the important data file and unnecessary files such as the junk files, temporary internet files, and obsolete files, files of the programs installed, bad entries, invalid registry keys, and cookies.

These files take up also hard drive space thereby causing dll file damage, disk fragmentation, and data overload. Ntdll.dll error may also occur to due viral infection and malware attack.

There are 2 ways to resolve the Ntdll.dll error. One is to install 2 separate tools, the registry cleaner, and antivirus, and run them separately to scan for errors. This option is time-consuming and running an antivirus can also slow down the speed of your computer.

Therefore we recommend that you opt for the second alternative that is to download Restoro.

Why Restoro.

  • This is an advanced, innovative, and multi-functional PC repair tool embedded with several powerful PC repair utilities like a registry cleaner, an antivirus, and a system optimizer. This is a one-stop solution for all your PC errors.
  • It is user-friendly, safe, efficient, and compatible with all Windows versions. The registry cleaning feature scans for all registry issues.
  • It wipes out all the unnecessary files from the hard drive, repairs the damaged dll files, and restores the registry, thereby resolving the Ntdll.dll error code right away.
  • The privacy error utility functions like an antivirus. It detects and removes all the malicious software like viruses, malware, Trojans, and spyware. Simultaneously, the system optimizer feature boosts the PC speed.

Click here to download Restoro and resolve the Ntdll.dll error on your PC today!

Do You Need Help with Your Device?

Our Team of Experts May Help
Troubleshoot.Tech Experts are There for You!
Replace damaged files
Restore performance
Free disk space
Remove Malware
Protects WEB browser
Remove Viruses
Stop PC freezing
GET HELP
Troubleshoot.Tech experts work with all versions of Microsoft Windows including Windows 11, with Android, Mac, and more.

Share this article:

You might also like

Business Email Etiquette
Hello and welcome to our Business Email Etiquette. Most people have experience in writing emails at some point before in their lives. However, the emails an average person writes are probably personal emails and not mails for work purposes. Emails you send to friends are incredibly different in content and context to business emails you would send to customers or employers or even other colleagues in your workforce. So, if you have a job that involves you writing emails to people in business style, learning business email etiquette is an absolute must for you.

 1. Heading layouts

When you are sending emails to friends, you generally lay them out like a memo. This means there is very little detail in the layout besides basic greetings and paragraphs, usually starting with the greetings. However, with a business email, it is best to lay it out exactly like you would lay out a formal letter. You need to put the company’s address in the right-hand corner and the date as well. Only then must you go on to the greetings. This will make your email look more formal, making you seem like a professional who knows what they are doing as opposed to someone who just couldn’t be bothered spending the extra time to get the layout right.

 2. Proper greetings

 When you are sending an email to a friend, you usually greet them informally. If their name was Mary Johnson, you’d probably start your letter with a ‘Hey Mary’ or a ‘Hello Mary.’ However, this is not considered a professional way to write an email to a customer or other important person in your business. Again, you must use the proper method that you would greet someone with were you writing them a formal letter instead. If your customer is Mary Johnson again, you should greet her with respect. ‘Dear Ms. Johnson’ would be the most appropriate way to start off your letter’s actual body in this case. If you do not know the recipient’s name, then you should start with a simple ‘Dear Sir or Madam.’ Politeness will always get you incredibly far, no matter what line of work you are in.

 3. Informal language

 You should get straight to the point with your email. Don’t dawdle on with it like you would if chatting to a friend and don’t write it how you would speak either. You use language that sounds impressive and smart while not using such obscure language that your recipient doesn’t know what you are saying. All the time, you must keep it informal where possible, possibly even impersonal as well. It will make you seem very professional in the long run.

 4. Signing off

When you are sending your email, you must end it as you would with a letter also. Don’t just say ‘Bye’ and your first name; that is too personal. You need to say ‘yours sincerely if you know the name of the recipient and ‘yours faithfully’ if you do not. Then you should end with your full name and whatever position you have at the company. (CEO, technical staff etc.) So there you have it! All you need to do now is to show your boss that you can handle the emails from now on!
Read More
How to reset TCI/IP stack in Windows

TCI/IP or as known as Internet protocol is one that controls packets that are sent over the internet and makes sure that each one has reached its destination so you can pleasantly browse your favorite websites. The setting for the given protocol is stored locally on your machine and most of the time, everything works fine and good, but sometimes, these settings can get corrupted.

tcp/ip reset protocol

Malware or other software can temper with setting making TCP/IP making it wrong and throwing nondescript connection errors in your face. If you are faced with this issue worry not because fixing this issue is really easy.

Before we actually go and fix the issue please do scan your system with your protection suite just to be sure that if there is any kind of malware on the system it is properly removed from it.

Resetting TCP/IP

First thing is to open search and find PowerShell, press the Windows key on the keyboard, and type in PowerShell so search results are shown. Click on Run as administrator to open PowerShell in elevated mode.

Once PowerShell is opened type indie it:

netsh IP reset and press ENTER. The task will start executing and at this point you will see a lot of Resetting, OK! messages. Once everything is finished restart your PC and you are good to go.

Read More
A Quick Guide to Fixing Ntdll.dll Error Code

Ntdll.dll Error - What is it?

Ntdll.dll is a type of DLL (Dynamic Link Library) error. DLL errors are some of the most common but complicated errors to troubleshoot and resolve by PC users. The Ntdll.dll error message is displayed in the following formats:
  • "STOP: 0xC0000221 unknown hard error C:WinntSystem32Ntdll.dll
  • "NTDLL.DLL Error!"
  • "STOP: C0000221 unknown hard error SystemRootSystem32ntdll.dll"
  • "[PROGRAM NAME] caused a fault in module NTDLL.DLL at [ANY ADDRESS]"
  • "AppName: [PROGRAM NAME] ModName: ntdll.dll"
  • "Crash caused in ntdll.dll!"
  • "Unhandled exception at [ANY ADDRESS] (NTDLL.DLL)"
You may come across the ‘Ntdll.dll error’ pop-up either when you try to run a program or after using it or while the program is running. It may also appear when Windows starts or shutdowns or even during Windows installation.

Solution

Restoro box imageError Causes

The Ntdll.dll error code can be triggered due to numerous reasons such as:
  • DLL file corruption due to hard drive bad entries
  • Missing DLL files
  • Corrupt hardware drivers
  • Viruses
  • DLL file misconfiguration
It is recommended to resolve this error code immediately on your PC to avoid inconvenience and serious PC damages like program lockouts, system failure, freeze, and crash

Further Information and Manual Repair

All the causes for ‘Ntdll.dll’ are linked with the registry. The registry is the main database of your system. It saves all the activities and files on your PC including the important data file and unnecessary files such as the junk files, temporary internet files, and obsolete files, files of the programs installed, bad entries, invalid registry keys, and cookies. These files take up also hard drive space thereby causing dll file damage, disk fragmentation, and data overload. Ntdll.dll error may also occur to due viral infection and malware attack. There are 2 ways to resolve the Ntdll.dll error. One is to install 2 separate tools, the registry cleaner, and antivirus, and run them separately to scan for errors. This option is time-consuming and running an antivirus can also slow down the speed of your computer. Therefore we recommend that you opt for the second alternative that is to download Restoro.

Why Restoro.

  • This is an advanced, innovative, and multi-functional PC repair tool embedded with several powerful PC repair utilities like a registry cleaner, an antivirus, and a system optimizer. This is a one-stop solution for all your PC errors.
  • It is user-friendly, safe, efficient, and compatible with all Windows versions. The registry cleaning feature scans for all registry issues.
  • It wipes out all the unnecessary files from the hard drive, repairs the damaged dll files, and restores the registry, thereby resolving the Ntdll.dll error code right away.
  • The privacy error utility functions like an antivirus. It detects and removes all the malicious software like viruses, malware, Trojans, and spyware. Simultaneously, the system optimizer feature boosts the PC speed.
Click here to download Restoro and resolve the Ntdll.dll error on your PC today!
Read More
A Guide to Quickly Fixing Error 103

What Is Error 103?

Error 103 is an error that is usually encountered by those who use Google Chrome. This error is usually generated because of a conflict arising between Google Chrome and the antivirus program running on the user’s computer. Primarily, error 103 is an incompatibility issue. It is not critical in nature. However, since it will disrupt the smooth functioning of the browser, it is strongly advised to rectify this error that is generated due to any temporary conflicts between the logic of the two programs namely Google Chrome and antivirus. In layman's terms, it would be only justified to say that this error has a lot to do with the way programs react to each other in real-time.

Solution

Restoro box imageError Causes

When the error is displayed to the user, it usually states something like ‘chrome error 103 connection aborted’, ‘chrome error 103 err_connection_aborted’ or ‘Error 103 (net: ERR_CONNECTION_ABORTED): Unknown error. This begs the question, what triggers this error? Here it is important to understand that Google Chrome constantly applies to upgrade. In most instances, the upgrades almost go unnoticed. In the meanwhile, there are other programs running on any system such as firewall, Antispyware, or antivirus programs. All such programs govern the functionality of the web browser. Now, when the web browser attempts to update and any programs on the system view the update as a threat, the connection to the internet will be terminated. It is also important to understand that these programs will keep you from upgrading or from doing anything with your browser.

Further Information and Manual Repair

google chrome error 103Before we move on to the discussion of fixing the underlying causes for error 103, it is important to understand all those programs that are most likely to generate this error. A list of all such programs is outlined below as follows.
  • Kaspersky Pure 3.0
  • Kaspersky ONE
  • Kaspersky small office security 2013
  • Kaspersky internet security 2013
  • Kaspersky antivirus 2013
A downside associated with error 103 is that it won’t disappear on its own. That’s why it is important to make some manual changes as there are no tools available online to rectify this error automatically. Follow the steps listed below to easily fix the problem.
  • Click on the Start button.
  • In the search box, enter ‘expand.exe’.
  • Right-click on the file that appears and select the option ‘Open Folder Location’.
  • Now, copy the file and paste it at the destination ‘C:\Windows\System32’.
  • If you are not able to find the file, it is advised you copy it from Windows Installation Disk.
  • Now, click on the ‘Start’ button again.
  • Find and select ‘Run’.
  • Now enter ‘C: ’ in the search box and press Ok.
  • Now right-click anywhere on the screen, select new, and then select folder.
  • Rename this folder. Change the name from ‘New Folder’ to ‘Temp’.
  • Now go to the Start button again.
  • Select ‘Run’ once again.
  • Type ‘cmd.exe’ in the command prompt and press Ok.
  • Now type Command. Press enter.
  • Now type this code as it is: ‘set TMP=C:temp’ and press enter.
  • Now restart the browser.
  • If it fails, install Google Chrome once again.
  • Just make sure everything is in sync to avoid any data loss.
Read More
How to Fix Windows 10 Upgrade Compare Exchange128 Error Message

Compare Exchange128 error – What is it

Some Windows 7 and Windows 8.1 users reported experiencing a Compare Exchange128 error when trying to upgrade to Windows 10. The error reads, “You can’t install Windows 10 because your processor doesn’t support CompareExchange128”. In order to upgrade to Windows 10 (64-bit), the CMPXCHG16B instruction must be present. If you receive this error, this mostly means that your CPU doesn’t have the CMPXCHG16B instruction.

Solution

Restoro box imageError Causes

The CompareExchange128 error normally occurs due to two possible reasons:

  • CPU lacks CMPXCHG16b Instruction
  • Old & Outdated BIOS – Even if your CPU has the CMPXCHG16b instruction, the CompareExchange128 issue can still occur if you have an older BIOS.

Further Information and Manual Repair

One main requirement to upgrade to Windows 10 is for your CPU to have the CMPXCHG16b instruction. You also need the right BIOS version to guarantee a smooth installation. See below on how to manually fix this issue.

NOTE: If you don’t feel confident using the manual methods listed below, it’s highly advisable to get help from an expert technician. If you don’t know someone, you can also use an automated tool to fix this.

Before performing any fixes, try to determine first if the cause of the error is due to your CPU lacking the CMPXCHG16b instruction. You can use a CPU Info tool that provides complete details about your processor, memory, and motherboard. If you’re looking for more in-depth information, you might also try command-line utilities. But, the safest and easiest way to check this is by simply searching online. Try using the search query: <CPU Model> CMPXCHG16b

Method 1 – Update your BIOS

This method will download the latest BIOS from your motherboard’s manufacturer. This makes sure your CPU has the CMPXCHG16b instruction needed to complete the Windows 10 64-bit installation. To update your computer’s BIOS, complete the following steps:

  1. Determine first the current BIOS you have on your computer. Open System Information Windows app and type msinfo32 in the search bar. The BIOS version will appear under the processor speed. Record it somewhere.
  1. Go to the support page of your motherboard’s manufacturer. Find if there’s any update on the BIOS that you’re currently using. If you find one, download the BIOS update file available. Make sure that you’re looking into the right model and you download all the necessary documentation. Otherwise, the BIOS update might not work.
  1. Update your BIOS. Most BIOS update steps are straightforward. Just make sure to follow the steps provided.

Method 2 – Install Windows 10 32-bit version

If updating the BIOS doesn’t work, what you can do is install a 32-bit version of Windows 10 instead of the 64-bit version. Here’s how to do this:

  1. Download and install the 32-bit version of Windows you currently have. If you have a Windows 7 64-bit version, get the 32-bit version of Windows 7. The same goes for Windows 8.1. When you do this, you might want to back up your files first. Remember that installing the 32-bit version works like other installations, and could delete some of your files.
  1. After installing the 32-bit version, go to Updates and install all the necessary updates. This includes upgrading to Windows 10 if you’re asked to.
  1. When you installed the Windows 10 upgrade, you’ll now have the Windows 10, 32-bit version installed. This will be the version activated on Microsoft servers. Despite this, the activated version stored is only applicable to your computer’s hardware, not the version of Windows 10.
  1. Download Windows 10, 64-bit version.
  1. Prepare an empty DVD or USB flash drive. Use Creation Media software then click the Create Installation Media for Another PC option.
  1. Install the 64-bit Windows 10 version you downloaded from Step 4. Make sure not to put anything when you’re asked to input the serial number.
  1. Once the installation is complete, you’ll have the 64-bit version of Windows 10.

Method 3 – Buy a new processor/motherboard

If the above two methods don’t work, there’s a great chance that this error occurs because of an outdated processor/motherboard. Your next possible solution is to buy an updated model that’s fully compatible with 64-bit Windows 10.

Method 4 – Download an automated tool

If all else fails, you might want to consider using this powerful automated tool to quickly fix the problem and any other computer-related issues.

Read More
Fix DRIVER_VERIFIER_DETECTED_VIOLATION
Driver Verifier is a built-in tool in Windows 10 that monitors device drivers on your computer, if it detects issues with drivers, it will attempt to fix the issue. If you are encountering Blue Screen for a Driver and after running Driver Verifier you get another with message DRIVER_VERIFIER_DETECTED_VIOLATION ten follow this article step by step in order to solve it. There is a chance that you will maybe even have to do this in safe mode, if that is your case, login into safe mode and proceed, otherwise proceed normally.
  1. Update Device Drivers

    the most common issue with the blue screen is old Drivers, in most cases, graphical drivers, update all Drivers with the latest versions and see if this will resolve the issue.
  2. Stop or uninstall Virtualization software

    Virtua machine software is a great way to have a safe environment and to experiment while preserving your Windows installation intact, however sometimes due to the nature of these applications they can be a case for blue screen errors. Stop virtualization software to see if it will remove the issue. If that is the case, try another virtualization application
  3. Disable Driver Verifier

    Press ⊞ WINDOWS + X to open the secret menu Click on Command Prompt (admin) Inside command prompt type: verifier and press ENTER Select the Delete existing settings radio button Click Finish Reboot your computer
  4. Reset Driver Verifier

    Press ⊞ WINDOWS + X to open the secret menu Click on Command Prompt (admin) Inside command prompt type: verifier /reset and press ENTER Reboot your computer
  5. Use system restore

    Rollback Windows to the previous state where everything was working fine.
Read More
Win 11 update brings one click browser change
After a lot of backlash about choosing the default Windows browser, Microsoft has officially backed up and brought back a one-click browser change into Windows 11. default browser inside windows 11
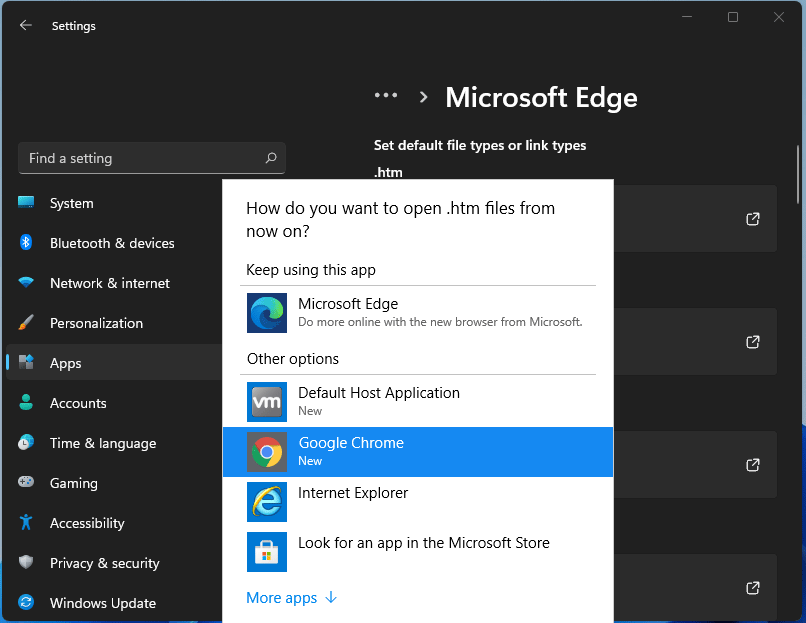
For anyone who is not aware, when Windows 11 was released if you wanted to switch to another browser you had to go into the settings app and choose the default browser for different types of file extensions like HTML, HTM, PDF for opening on the web, etc. Of course, this was completely unnecessary and it was not well received by users. So after some time, Microsoft backpedaled to standard one click, choose your default browser solution that existed in the previous version of Windows OS. Altho sometimes Microsoft knows how to irritate its users base, it is good to know that they can also listen and fix things that are required.
Read More
How to Get Rid of GifsGalore

The GifsGalore Toolbar from Mindspark Interactive Network, Inc. is proposed to active Web users who like to embed GIFs into their emails and share entertaining GIFs with friends via social media services. The GifsGalore software can be added to your Internet client for free but you need to be using Google Chrome, Internet Explorer or Mozilla Firefox for the GifsGalore Toolbar to be activated.

When installed it hijacks your New tab page and default search engine changing them to search.myway.com. This extension also monitors user browsing activity recording information such as: visited websites, clicked links, viewed products, etc. This information is later used to better target ads. While browsing the internet with this extension enabled you will see additional pop-up ads, as well as sponsored links and injected ads throughout your browsing session, especially in search results.

About Browser Hijackers

Browser hijacking is actually a form of unwanted software program, often a browser add-on or extension, which causes modifications in web browser’s settings. There are various reasons why you may experience an internet browser hijack; however commercial, advertising, and marketing are definitely the main reasons for their creation. The idea would be to force users to visit specific sites that are aiming to improve their site visitor traffic and generate higher ad earnings. It could seem naive, but most of these sites are not legitimate and could present a serious risk to your online safety. Browser hijackers can even let other vicious programs without your knowledge further damage the computer.

Find out how to identify a browser hijack

When your web browser is hijacked, the following can happen: the browser’s homepage is modified; bookmark and the new tab are also changed; the default search engine has been changed and your browser security settings have been lowered without your knowledge; you see unwanted new toolbars added; unstoppable flurries of popup ads appear on your computer screen; your web browser gets sluggish, buggy, crashes very often; you are prohibited access to particular web pages, including the site of an anti-malware software developer like SafeBytes.

How browser hijacker finds its way onto your computer system

Browser hijackers might use drive-by downloads or file-sharing networks or perhaps an email attachment to reach a targeted computer. They may also come from any BHO, browser extension, toolbar, add-on, or plug-in with malicious purpose. Other times you might have unintentionally accepted a browser hijacker as part of an application package (usually freeware or shareware). Examples of well-known browser hijackers are Fireball, CoolWebSearch. save, Ask Toolbar, RocketTab, and Babylon Toolbar.

Removal

Some browser hijacking could be quite easily reversed by discovering and removing the corresponding malware software from your control panel. Yet, certain hijackers are far harder to find or eliminate since they might get themselves associated with some crucial computer files that enable them to operate as a necessary operating system process. Additionally, manual removals demand deep system knowledge and therefore can be a very difficult job for novices. Installing and running an anti-malware program on the affected computer could automatically erase browser hijackers and other malicious applications. Safebytes Anti-Malware has a sophisticated anti-malware engine to help you prevent browser hijacking in the first place, and mop up any pre-existing problems. And use a PC optimizer, like Total System Care, to get rid of all related files in the registry and repair browser issues.

What you can do if Malware Stops You From Downloading Or Installing Anything?

All malware is bad, but certain types of malware do a lot more damage to your computer than others. Some malware is created to restrict or prevent things that you want to do on your PC. It may well not let you download anything from the internet or stop you from accessing some or all websites, particularly the antivirus websites. If you’re reading this article, you may have infected by a virus that stops you from installing security software such as Safebytes Antimalware on your PC. There are some actions you can take to circumvent this problem.

Remove malware in Safe Mode

The Windows OS includes a special mode known as “Safe Mode” in which just the bare minimum required programs and services are loaded. If the malware is obstructing internet access and affecting the computer, launching it in Safe Mode allows you to download anti-virus and run a scan whilst limiting possible damage. To enter into Safe Mode or Safe Mode with Networking, press the F8 key while the computer is starting up or run MSConfig and find the “Safe Boot” options in the “Boot” tab. After you restart into Safe Mode with Networking, you can download, install, as well as update the anti-malware program from there. At this point, you could run the antivirus scan to remove computer viruses and malware without any interference from another application.

Download the security software using an alternate web browser

Web-based viruses can be environment-specific, aiming for a particular browser or attacking specific versions of the browser. If you are not able to download the anti-malware software program using Internet Explorer, it means the virus could be targeting IE’s vulnerabilities. Here, you should switch over to a different browser like Firefox or Chrome to download the Safebytes Anti-malware program.

Install and run antivirus from your USB drive

Another solution is to create a portable anti-malware program onto your USB stick. Adopt these measures to run the antivirus on the affected computer system. 1) Make use of another virus-free computer to download Safebytes Anti-Malware. 2) Plug the Thumb drive into the uninfected computer. 3) Double click on the executable file to run the installation wizard. 4) Select flash drive as the place when the wizard asks you where you wish to install the software. Do as instructed on the screen to finish up the installation process. 5) Now, transfer the USB drive to the infected computer system. 6) Double click the Safebytes Anti-malware icon on the thumb drive to run the software. 7) Click on “Scan Now” to run a complete scan on the affected computer for malware.

How SafeBytes Anti-Malware Keep your Computer Virus Free

If you’re planning to purchase anti-malware for your desktop, there are plenty of brands and utilities for you to consider. A few of them are good but there are lots of scamware applications that pretend as legit anti-malware programs waiting around to wreak havoc on your computer. You need to go with a tool that has obtained a strong reputation and detects not only viruses but other kinds of malware as well. Amongst few good applications, SafeBytes Anti-Malware is the strongly recommended software program for the security-conscious individual. SafeBytes anti-malware is a trusted tool that not only protects your PC completely but is also extremely user-friendly for people of all ability levels. With its cutting-edge technology, this application can help you remove multiples types of malware which include viruses, trojans, PUPs, worms, ransomware, adware, and browser hijackers.

SafeBytes anti-malware provides a myriad of enhanced features that sets it aside from all others. Below are a few of the good ones:

Robust, Anti-malware Protection: Built upon a greatly acclaimed anti-virus engine, this malware removal tool can identify and remove several stubborn malware threats like browser hijackers, PUPs, and ransomware that other common antivirus software will miss. Live Protection: SafeBytes gives you round-the-clock protection for your personal computer restricting malware intrusions instantly. They’re extremely effective in screening and removing numerous threats because they are regularly improved with new updates and alerts. Web Filtering: SafeBytes inspects the links present on a web page for possible threats and alerts you whether the website is safe to browse or not, through its unique safety ranking system. Fast Scan: SafeBytes’s virus scan engine is one of the quickest and most efficient in the industry. It's targeted scanning greatly increases the catch rate for viruses which is embedded in various computer files. Very Low CPU and RAM Usage: SafeBytes is a lightweight and easy-of-use anti-virus and anti-malware solution. Since it uses low computer resources, this application leaves the computer power exactly where it belongs to: with you. 24/7 Premium Support: You will get 24/7 technical support to quickly resolve any issue with your security tool. To sum it up all, SafeBytes Anti-Malware offers superb protection combined with very low system resource usage with both great malware detection and prevention. You now may realize that this particular software does more than just scan and eliminate threats from your computer. You’ll get the best all-around protection for the money you spend on SafeBytes AntiMalware subscription, there isn’t any doubt about it.

Technical Details and Manual Removal (Advanced Users)

To remove GifsGalore manually, go to the Add or Remove programs list in the Windows Control Panel and select the program you want to get rid of. For internet browser extensions, go to your web browser’s Addon/Extension manager and choose the add-on you would like to remove or disable. You’ll probably also want to reset your web browser. If you choose to manually delete the system files and registry entries, use the following list to make sure you know precisely what files to remove before undertaking any actions. However, editing the registry is usually a difficult task that only experienced users and professionals should try to fix it. Moreover, some malware is capable of replicating or preventing deletion. Carrying out this malware-removal process in Safe Mode is recommended.
Files: %LOCALAPPDATA%\GifsGaloreTooltab %UserProfile%\Local Settings\Application Data\GifsGaloreTooltab %UserProfile%\Local Settings\Application Data\Google\Chrome\User Data\Default\Sync Extension Settings\fnjgjdfhhakkbojkgmiihabbbjhgbchh %UserProfile%\Local Settings\Application Data\Google\Chrome\User Data\Default\Extensions\fnjgjdfhhakkbojkgmiihabbbjhgbchh %LOCALAPPDATA%\Google\Chrome\User Data\Default\Sync Extension Settings\fnjgjdfhhakkbojkgmiihabbbjhgbchh Registry: HKEY_LOCAL_MACHINE\Software\[APPLICATION]\Microsoft\Windows\CurrentVersion\Uninstall..Uninstaller GifsGaloreTooltab Uninstall Internet Explorer HKEY_CURRENT_USER\Software\Microsoft\Internet Explorer\LowRegistry\DOMStorage\gifsgalore.dl.tb.ask.com HKEY_CURRENT_USER\Software\Microsoft\Internet Explorer\LowRegistry\DOMStorage\gifsgalore.dl.myway.com HKEY_CURRENT_USER\Software\GifsGalore
Read More
Fix FAULTY_HARDWARE_CORRUPTED_PAGE
If you got the FAULTY_HARDWARE_CORRUPTED_PAGE Blue Screen error on your Windows 10 computer then it is most likely caused by various factors. It could be caused by an incomplete installation or uninstallation of some applications or program, or it could also be caused by some exploit that intervenes with the normal functioning of the computer, as well as bad sectors on the hard disk, damaged system files, malfunctioned system drivers, modified Windows Registry files, or a Blue Screen occurrence during a Windows Update and many more. Getting this bug check means that a single-bit error was found on this page. It also indicates that this is a hardware memory error and to resolve it, you need to follow the suggestions laid out below but before that, it is recommended for you to create a System Restore Point first so that if anything goes wrong, you can always go back to the previous state.

Option 1 – Run a Memory Check to test RAM

Since the problem might have something to do with hardware memory, you need to test RAM by running a Memory Check using the Windows Memory Diagnostic. Refer to these steps to do so.
  • Tap the Win + R keys to open the Run dialog box.
  • Then type “mdsched.exe” in the field and hit Enter to open the Windows Memory Diagnostic.
  • After that, the Windows Memory Diagnostic will give out two options such as:
  1. Restart now and check for problems (recommended)
  2. Check for problems the next time I start my computer
  • Select any of the given options. After that, your computer will restart and check for memory-based issues upon the restart. If there are any issues, it will automatically them.

Option 2 – Run the System File Checker

System File Checker or SFC is a built-in command utility that helps in restoring corrupted files as well as missing files. It replaces bad and corrupted system files with good system files that might be the cause why you’re getting the FAULTY_HARDWARE_CORRUPTED_PAGE Blue Screen error. To run the SFC command, follow the steps given below.
  • Tap Win + R to launch Run.
  • Type in cmd in the field and tap Enter.
  • After opening Command Prompt, type in sfc /scannow
The command will start a system scan which will take a few whiles before it finishes. Once it’s done, you could get the following results:
  1. Windows Resource Protection did not find any integrity violations.
  2. Windows Resource Protection found corrupt files and successfully repaired them.
  3. Windows Resource Protection found corrupt files but was unable to fix some of them.

Option 3 – Check for conflicting or incompatible programs by putting your PC in a Clean Boot state

As mentioned, the FAULTY_HARDWARE_CORRUPTED_PAGE Blue Screen error might be caused by some problematic programs that clash with your existing operating system. Several users reported that numerous programs that are supposedly designed to enhance computer performance are causing conflict in the system instead. To identify which program is causing the problem, you need to put your computer in a Clean Boot State. To do so, follow the steps below.
  • Log onto your PC as an administrator.
  • Type in MSConfig in the Start Search to open the System Configuration utility.
  • From there, go to the General tab and click “Selective startup”.
  • Clear the “Load Startup items” checkbox and make sure that the “Load System Services” and “Use Original boot configuration” options are checked.
  • Next, click the Services tab and select the “Hide All Microsoft Services” checkbox.
  • Click Disable all.
  • Click on Apply/OK and restart your PC. (This will put your PC into a Clean Boot State. And configure Windows to use the usual startup, just simply undo the changes.)
  • From there, start to isolate the problem by checking which one of the programs you installed recently is the root cause of the problem.

Option 4 – Update or rollback drivers

If the first few options didn’t work for you, then it’s time to either update or roll back the device drivers. It is most likely that after you updated your Windows computer that your driver also needs a refresh. On the other hand, if you have just updated your device drivers then you need to roll back the drivers to their previous versions. Whichever applies to you, refer to the steps below.
  • Open the Devices Manager from the Win X Menu.
  • Then locate the device drivers and right-click on them to open the Properties.
  • After that, switch to the Driver tab and click on the Uninstall Device button.
  • Follow the screen option to completely uninstall it.
  • Finally, restart your computer. It will just reinstall the device drivers automatically.
Note: You can install a dedicated driver on your computer in case you have it or you could also look for it directly from the website of the manufacturer.
Read More
There was a problem resetting your PC
If you’ve tried resetting your Windows 10 computer using the Reset This PC option in order to restore your computer’s factory settings and the process suddenly fails for some reason and you got an error message instead stating, “There was a problem resetting your PC, No changes were made on your Windows 10 computer”, then this post might help you resolve the problem. Carefully follow each one of the options given below to resolve the “There was a problem resetting your PC error on Windows 10.

Option 1 – Try renaming the System and Software hive

  • If you’re still able to boot to the desktop of your Windows 10 PC, open an elevated Command Prompt from the WinX menu.
  • Now use the CD command and change the directory to Windows\System32\config folder. Simply type in the following command and hit Enter:
cd %windir%system32config
  • After that, you have to rename the System and Software registry hives to “System.001” and “Software.001”, respectively. To do that, just type each one of the following commands and hit Enter after you type each of them.
    • ren system system.001
    • ren software software.001
On the other hand, if your Windows 10 PC isn’t able to boot to the desktop, you can just access Command Prompt from the Advanced Startup options or you can also boot into Sage Mode and open Command Prompt from there and then run the given commands above. Note: If you only want to use the Refresh your PC option, you must only rename System hive and not Software hive. On the other hand, if the Software hive is really corrupted, you might not be able to use the Refresh your PC option in such a case. Thus, you really need to rename the Software hive as well. Once you’ve renamed the Software hive, you won’t be able to use the Refresh your PC option but only the Reset your PC option.
  • Type “exit” to close the Command Prompt and then restart your PC and try resetting your PC again.

Option 2 – Try to disable and re-enable the Windows Recovery Environment

If the first option didn’t help, you can try disabling the Windows Recovery Environment and then enable it back again. To configure a Windows Recovery Environment or Windows RE boot image and recovery options, you have to use the REAgentC.exe tool.
  • Tap the Win + S key and type “REAgentC.exe” to open the REAgentC.exe tool.
  • After that, type the following command and hit Enter to disable the Windows RE:
reagentc /disable
  • After disabling the Windows RE, you need to enable it back by typing the following command:
reagentc /enable

Option 3 – Try to boot the USB recovery drive

If the two previous options failed, you need to try another workaround which is to boot to the USB recovery drive > Troubleshoot > Recover from a drive. From there, follow the on-screen instructions and you should be good to go.
Read More
1 2 3 171
Logo
Copyright © 2023, ErrorTools. All Rights Reserved
Trademark: Microsoft Windows logos are registered trademarks of Microsoft. Disclaimer: ErrorTools.com is not affiliated with Microsoft, nor claims direct affiliation.
The information on this page is provided for information purposes only.
DMCA.com Protection Status