Logo

Fix UTCSVC high CPU and Disk usage in Windows

There is a lot of high resource utilization by any process that slows down a Windows operating system and one of the services that could cause such a thing is the utcsvc.exe process. This particular process at times can cause high CPU and disk usage. So if you are currently facing this problem, read on as this post will guide you on how you can resolve the problem.

UTC which stands for Universal Telemetry Client is a software that runs a service named Diagnostic Tracking Service or DiagTrak. This service is used by Microsoft to collect customer feedback, analyze customer’s problems, and push resolution via updates in order to make the Windows 10 operating system better. This service is an executable file that could be translated to Service Host and even though the process does not usually cause problems, there are actually times when it does especially if it results in high resource utilization. In such cases, you might want to consider disabling it to fix its high CPU and disk usage.

According to Microsoft:

“We collect information about you, your devices, applications and networks, and your use of those devices, applications, and networks. Examples of data we collect include your name, email address, preferences, and interests; browsing, search and file history; phone call and SMS data; device configuration and sensor data; and application usage.”

There are several ways you can disable the utcsvc.exe process. You can disable it using the Service Manager, Registry Editor, and Group Policy Editor. For more details, refer to the instructions laid out below.

Option 1 – Disable the Connected User Experience & Telemetry Service via Service Manager

Note that this option is for standalone systems, so if you’re not using one, refer to the next given options below.

  • Tap the Win + R keys to open the Run dialog box.
  • Then type “services.msc” in the field and tap Enter or click OK to open the Services Manager.
  • From the given list of services, look for the Connected User Experience service. Once you found it, click on it and you’ll see its description which states:

“The Connected User Experiences and Telemetry service enables features that support in-application and connected user experiences. Additionally, this service manages the event-driven collection and transmission of diagnostic and usage information (used to improve the experience and quality of the Windows Platform) when the diagnostics and usage privacy option settings are enabled under Feedback and Diagnostics.”

  • Next, right-click on it and select Properties.
  • Now, change its Startup Type to Disabled and click on the Apply and OK buttons to save the changes made.

Option 2 – Disable the Connected User Experience & Telemetry Service via Registry Editor

  • Tap the Win + R keys to launch the Run utility and type “Regedit” in the field and click OK to open the Registry Editor.
  • Next, navigate to this registry path: HKEY_LOCAL_MACHINESOFTWAREPoliciesMicrosoftWindowsDataCollection
  • After that, right-click on the folder named “DataCollection” and select New > DWORD (32-bit) Value.
  • Now name the new value “AllowTelemetry” and make sure that its Value data is “0” and then click on OK to save the changes made.
  • Restart your computer.

Option 3 – Disable the Connected User Experience & Telemetry Service via Group Policy Editor

If you have to disable the service related to the Universal Telemetry Client for company-managed systems, then you can do that using the Group Policy Editor.

  • Tap the Win + R keys to open the Run utility and type “gpedit.msc” in the field and hit Enter to open the Group Policy Editor.
  • Next, navigate to this path: Computer Configuration > Administrative Templates > Windows Components> Data Collection and Preview Build
  • After that, double-click on Data Collection and Preview Build to open its settings.
  • From there, look for the “Allow Telemetry” item and double click on it to open its Properties.
  • Next, set the radio button to Disabled and then click on the Apply button to save the changes made.
  • Restart your computer.

Option 4 – Run the Hardware and Devices Troubleshooter or the Performance Troubleshooter

Hardware and Devices Troubleshooter:

  • The first thing you need to do is click on Start and then on the gear-like icon to pull up the window for Settings.
  • After opening Settings, look for the Update and Security option and select it.
  • From there, go to the Troubleshoot option located on the left-hand side of the list.
  • Next, select Hardware and Devices from the list and open the Troubleshooter and run it. Once it is doing its job, wait for it to complete the process and then restart the system.
  • After the system restarts, check if the problem’s now fixed. If not, refer to the next option given below.

Performance Troubleshooter:

  • Tap the Win + R keys to open the Run dialog box.
  • Type “exe /id PerformanceDiagnostic” in the field and hit Enter to open the Performance troubleshooter.
  • Then click on Next to get started. Wait until the process is completed.

Do You Need Help with Your Device?

Our Team of Experts May Help
Troubleshoot.Tech Experts are There for You!
Replace damaged files
Restore performance
Free disk space
Remove Malware
Protects WEB browser
Remove Viruses
Stop PC freezing
GET HELP
Troubleshoot.Tech experts work with all versions of Microsoft Windows including Windows 11, with Android, Mac, and more.

Share this article:

You might also like

File is Too Large for the Destination Error
The file is too large for the destination file system is the error when you try to copy a file larger than 4GB on a drive formatted in the FAT32 file system. FAT32 is the old file system used in previous Windows versions and it was replaced by superior NTFS, altho FAT32 is still used because of its compatibility fact that it could be accessed in various operating systems its disadvantage among others is that it can not hold files larger than 4GB in size. This refers to the size of a single file, so if you have a file that is this large and when you try to copy or move it on a drive formatted in FAT32 you will get this message, and the operation will not be able to complete.

Format drive

In order to actually transfer the file in its glorious size, I am afraid that you will need to format destination drive in NTFS or if you have data on drive which you do not want to lose with formatting, use third-party software to convert file system from FAT32 to NTFS without losing data. I would recommend AOMEI partition assistant, it is a free and proven application letting you both manage your partitions and convert any one of them into another file system without data loss. You can get AOMEI here.

Split file

Another option if you are not keen on installing third-party tools or formating is to divide large files into smaller ones that are less than 4GB in size. You can use any archiving application since built-in Windows ZIP support will not let you split file into various different sizes. The best tool in my humble opinion is WinRAR, but you can choose any proven one. When file is split into parts less than 4GB in size, you will have no issues copying or move the file to the destination drive.
Read More
Fix The update isn’t applicable in Windows
There are times when you install a Windows update to your Windows 10 computer but you only got an error message saying, “The update isn’t applicable to your computer”. This is unusual as Windows was the one that downloaded them in the first place. To understand the reason behind this error, read on as this post will also give you a couple of suggestions you can try to fix the problem. One of the main reasons why this error occurs is that your computer might not have the required installed updates and many more. Other reasons include:
  1. The update might be replaced. There are instances when a newer Windows version is already available on the computer and that the version you are trying to manually install is an older version which is why the Windows update failed.
  2. The update might already be installed. There are times when the update process is still in progress and the earlier payload might have already been installed.
  3. It could also be that it’s a wrong update for architecture. As you know, updates are designed accordingly based on the architecture of the computer so if the update you are trying to install does not match the architecture of your CPU then it’s no wonder you’re getting an error message.
  4. Your computer might be missing a prerequisite update. There are Windows updates that depend on other updates so if you missed one and you’re installing another one, it could be the reason why you’re getting the error.
To fix the problem, here are some suggestions that might help.

Option 1 – Try verifying the package and the Processor Architecture

As pointed out earlier, updates are made according to the Windows versions. Thus, if one of the updates failed to install, you need to check if it’s applicable or not. The best way to do that is by searching the Windows update name on the official website of Windows. It could be that the Processor Architecture is not compatible with the Windows Update you are trying to install. If you have an X86-based processor, you can’t install x64-based installations of Windows and vice-versa. This usually happens when you’ve downloaded the update manually and then tried installing it.

Option 2 – Try checking if the update is old

The issue might be because you are trying to install an old Windows update which is why it didn’t work. To check, go to Settings > Update and Security > View Update history. From there, you can look for the update.

Option 3 – Try checking if the update is already installed

To verify the update, just go to the Windows Update history once more as you did in option 2, and then see if the update is already installed or not.

Option 4 – Try checking the prerequisites

AS mentioned earlier, there are some updates that depend on other updates before they get installed on your computer. The best way to verify is by checking the Microsoft Knowledge Base (KB). And to verify if the prerequisite updates are installed or not, just run the command below in PowerShell:
get-hotfix KB1111111, KB2222222, KB3333333
Note: In the command given above, you need to replace “KB1111111, KB2222222, KB3333333” with the actual update KB numbers.

Option 5 – Try running the Windows Update Troubleshooter

As you know, Windows 10 has various auto-repair built-in tools to help users fix small issues which used to get fixed manually. And in this case, you will need the Windows Update Troubleshooter to fix the issue.
  • Go to Settings and click on Update and Security.
  • From there, click Troubleshoot and click on Windows Update and then click the “Run the troubleshooter” option.
  • After that, it will try to detect and automatically fix common issues in the Windows Updates which can be resolved by Windows itself. Note that the process may take several minutes before it completes so you need to wait until it’s done. Once it’s done, in case you have some pending update that wasn’t realized by the system early on, it will apply the fix right away and restart the Windows Update service.
Read More
isapnp.sys, gv3.sys, storahci.sys, myfault.sys
One of the common causes of Blue Screen of Death or BSOD errors is system driver files due to varying reasons. So if you encounter a Stop error caused by some system driver files such as isapnp.sys, gv3.sys, storahci.sys, or myfault.sys, on your Windows 10 PC, then this post should help you fix the problem. These system driver files are associated with different error codes. The isapnp.sys file is related to the following error codes:
  • SYSTEM SERVICE EXCEPTION
  • PAGE FAULT IN A NONPAGED AREA
  • KERNEL DATA INPAGE
  • SYSTEM THREAD EXCEPTION NOT HANDLED
  • IRQL NOT LESS EQUAL
  • KMODE EXCEPTION NOT HANDLED.
While the gv3.sys file is related to the following BSOD error codes:
  • IRQL NOT LESS EQUAL
  • KMODE EXCEPTION NOT HANDLED
  • PAGE FAULT IN NONPAGED AREA.
On the other hand, the storahci.sys file is related to these error codes:
  • IRQL NOT LESS EQUAL
  • KMODE EXCEPTION NOT HANDLED
  • PAGE FAULT IN NONPAGED AREA.
And the myfault.sys file is associated with this error code: SYSTEM SERVICE EXCEPTION. Although this system driver file causes different kinds of Blue Screen errors, some of their potential fixes are quite the same so you need not carry out tons of troubleshooting steps. But before you troubleshoot the problem, you might want to check out System Restore first, especially if you create a System Restore point from time to time. To perform System Restore, follow these steps:
  • Tap the Win + R keys to open the Run dialog box.
  • After that, type in “sysdm.cpl” in the field and tap Enter.
  • Next, go to the System Protection tab then click the System Restore button. This will open a new window where you have to select your preferred System Restore point.
  • After that, follow the on-screen instructions to finish the process and then restart your computer and check if the problem is fixed or not.
If System Restore didn’t help in fixing the Blue Screen error, now’s the time for you to resort to the troubleshooting tips provided below but before you get started, make sure that you create a System Restore point first and boot your computer into Safe Mode.

Option 1 – Use the System Configuration utility

Note that this first fix is only applicable for Blue Screen errors associated with the myfault.sys file.
  • In the Cortana Search box, type “MSConfig” and click on the “System Configuration” entry to open it.
  • After opening System Configuration, go to the Processes tab.
  • Then scroll down and look for the “Digital Line Detection” process and disable it.
  • Now restart your computer and check if the Stop error is fixed or not.

Option 2 – Try to update, rollback or disable related device drivers

Incompatible and outdated drivers can also cause computer malfunctioning or crashing as well as Blue Screen errors. To fix that, you can update, roll back or disable the device drivers in your computer.
  • Tap the Win + R keys to launch the Run window and then type in the “devmgmt.msc” command and hit Enter to open the Device Manager window.
  • After opening the Device Manager, from the list of device drivers, look for the “WIN ISA Bus Driver” if you are facing a Stop error related to the isapnp.sys file. While you have to look for the Sony Recovery CDs PCG-Z1RAP Series device drivers if you face a Stop error concerning the gv3.sys file. For the storahci.sys, on the other hand, look for any outdated drivers and update them.
  • To update or roll back or disable these drivers, just right-click on each one of them, and depending on your preference, you can either select “Update driver”, “Disable device” or “Uninstall device”.
  • After that, restart your PC and see if it helped in fixing the Blue Screen error.

Option 3 – Use System File Checker

One of the built-in tools in Windows that you can use to fix Blue Screen errors is the System File Checker. This built-in command utility can help you restore corrupted or missing files as well as replace bad and corrupted system files. Chances are, any of the aforementioned system driver files might be corrupted so to fix them, use System File Checker.
  • First, right-click on the Start button and click on the “Command Prompt (Admin) option.
  • Next, type in the sfc /scannow command and hit Enter to execute it.
The command will start a system scan which will take a few whiles before it finishes. Once it’s done, you could get the following results:
  1. Windows Resource Protection did not find any integrity violations.
  2. Windows Resource Protection found corrupt files and successfully repaired them.
  3. Windows Resource Protection found corrupt files but was unable to fix some of them.
  • Now restart your computer.

Option 4 – Run the Blue Screen Troubleshooter

Troubleshooting Blue Screen of Death errors wouldn’t be complete without the Blue Screen troubleshooter. As you know, it is a built-in tool in Windows 10 that helps users in fixing BSOD errors. You can find it in Settings, under the Troubleshooters page. To use it, refer to these steps:
  • Tap the Win + I keys to open the Settings panel.
  • Then go to Update & Security > Troubleshoot.
  • From there, look for the option called “Blue Screen” on your right-hand side and then click the “Run the troubleshooter” button to run the Blue Screen Troubleshooter and then follow the next on-screen options.
  • Note that you might have to boot your PC into Safe Mode.
Read More
How to Delete your data from the internet
The Internet has come a long way from its infant stages and has become so large and huge that it has gained the status of basic human rights. There are very useful information and a lot of great content on it and among them, there are social media websites and other types of websites where you have, most likely placed some personal pictures or other information. One day you might want to cancel some of the services or you would like to take a break from it all. In this guide we will show you how to do exactly that, to delete and remove your data from the internet.

How to Delete Your Google Account

Google is arguably one of the most visited places on the Web. It stores a huge amount of data for delivering personalized content. It saves personal information, web searches, watched videos, location data, etc. You can view a summary of the data saved by different Google services by visiting your Google Dashboard.
To delete personal data from Google, go to myactivity.google.com. Select the Delete activity by from the left menu to start deleting activities.
Select All time to delete all of your activities from different Google services. You can also delete files saved to Google services, such as Google Photos, Google Drive, and Keep. Just visit the site, select the files, and delete them. Note that Google retains some information even after you delete all data. They do this to meet business needs and legal requirements. These will be deleted when you delete your Google account altogether.

How to Delete Your Facebook Account

Facebook stores a huge amount of data for each user. Some of the personal information stored in Facebook’s databases includes name and email, check-ins, location, images, videos, events, etc. You can view and download all of your personal data using Facebook’s information download tool. However, you will need to delete your account altogether for removing your personal data from Facebook. Follow the below steps to delete your Facebook account.
  1. Log in to your Facebook account and go to Settings & privacy > Setttings.
  2. Select Your Facebook Information.
  3. Select Deactivation and Deletion.
  4. Select Delete Account.
  5. Select Continue to Account Deletion.
  6. Select Delete Account.
  7. Enter your password and click Continue.
It can take up to 90 days for Facebook to delete your personal data from the Internet. You will not be able to access any of the data once the deletion starts. However, you can cancel this within the first 30 days.

How to Delete Your Twitter Account

Twitter has also followed in the footsteps of Facebook when it comes to harvesting your personal data. It utilizes this information for delivering personalized ads and tweets. You can download an archive of all of your personal data from Twitter. It makes it easy to monitor what information is available to the platform. Click the More button from the left menu and head over to Settings and privacy. Follow the below steps to download your personal information.
  1. Select Download an archive of your data from the Your Account section.
  2. Select Request archive from under the Twitter data section. Enter your password when prompted.
  3. It will take some time for Twitter to make the data available to you. You’ll receive an email once the data is ready to be downloaded.
It would be best if you also restrict data sharing and off-site activities. Head over to Privacy and safety and inspect the options under the Data sharing and off-Twitter activity section.
Look in the Interests and Your advertiser list sections from the Ads preferences tab. You can disable Twitter from tracking you in the Off-Twitter activity tab. Uncheck the options from the Data sharing with business partners and Location information tabs.
Finally, you need to deactivate your account for deleting all personal information from Twitter. You’ll have 30 days to reactivate the account. After that, Twitter will begin erasing your information from its systems. Note that they can still retain some information subjected to platform regulations.

How to Delete Your Instagram Account

Instagram has risen to prominence in the last couple of years. The company collects a huge amount of personal information from its users, including media, name, email, and much more. You’ll need to deactivate your account altogether if you want to delete everything Instagram knows about you.
Head over to the Delete your account page and select the reason you want to delete it. Enter your Instagram password to verify your identity, then click on the Delete button. Instagram will hide your account details for the next 30 days and delete all personal data after the given period.

How to Delete Your TikTok Account

TikTok is another emerging platform that has become quite popular among millennials. Users share a lot of personal information through personalized music videos. You need to delete your TikTok account permanently to remove all personal data from TikTok.
To do this, head over to Me, then tap on the icon in the top-right corner of the window. Select Delete account from under the Manage Account section. Follow the instructions provided there to continue deactivating your account. Like Instagram, TikTok also offers a 30-day time period to allow users to change their minds. It will delete your personal data from the Internet after this period.

How to Delete Your Snapchat Account

  1. Go to Snapchat’s Accounts Portal and log in with your name and password.
  2. Select the Delete My Account option.
  3. You’ll be taken to the Delete Account page directly.
  4. Retype your password once more.
  5. Click on the yellow Continue button.
Do keep in mind that Snapchat will hold on to your data for another 30 days, just in case you change your mind and decide to return. If you do decide to come back, all you need to do is visit the Accounts Portal again and log in to your account. This will reactivate your account. While your account is in this deactivated phase, your friends will not be able to contact you or interact with you in any manner on Snapchat. After the 30-day period has elapsed, your account will be permanently deleted.
Read More
Fix Black border or bar on Monitor
If you suddenly see a black border in your computer’s display then you might be wondering how come this happened but worry not for this post will give you a couple of suggestions that could help you resolve the problem. The black bar could appear at the bottom or just the sides of the screen. Whichever it may be, there are options you can check out. Refer to the options givens below and make sure to follow them carefully.

Option 1 – Try checking the screen resolution

You might want to try checking the resolution of your screen.
  • Open the Windows 10 Settings and go to Display.
  • Next, go for the “100% (Recommended)” option under Scale and layout for the size of the text, apps, and other items.
  • After that, select the Recommended setting again under Resolution.
Now check to see if the black bars are still there. They should be gone at this point, but if for some strange reason nothing has changed, then attempt the steps below.

Option 2 – Try updating Graphics & Monitor drivers

You might want to try updating your graphics and monitor drivers if you haven’t updated them for some time now. To do that, refer to these steps:
  • First, boot your computer into Safe Mode.
  • After that, tap the Win + R keys to launch Run.
  • Type in devmgmt.msc into the box and tap Enter or click OK to open the Device Manager.
  • After that, a list of device drivers will be displayed. From there, look for the Graphics drivers or the Monitor drivers and then click each one of them.
  • After that, right-click on each entry and select the “Uninstall Device” option from the menu.
  • Now restart your computer.
  • After restarting your computer, go to the Settings app and Check for Updates in the Windows Update section.
Note: You can also try to roll back the graphics and monitor drivers back to their previous versions if updating them didn’t work. You can also try visiting the manufacturer’s website and download the graphics or monitor driver setup for your operating system.

Option 3 – Try to run the DISM tool

You can also run the DISM Tool as it might also help in getting rid of the black border or bar on your Windows 10 computer. Using this built-in tool, you have various options such as the “/ScanHealth”, “/CheckHealth”, and “/RestoreHealth” which could help you resolve the problem.
  • Open the Command Prompt with admin privileges.
  • Then type in the following commands and make sure to hit Enter right after you type each one of them:
    • Dism /Online /Cleanup-Image /CheckHealth
    • Dism /Online /Cleanup-Image /ScanHealth
    • exe /Online /Cleanup-image /Restorehealth
  • Do not close the window if the process takes a while as it will probably take a few minutes to finish.

Option 4 – Troubleshot the problem in a Clean Boot State

There are some instances that some conflicting programs installed in your computer might be the one that’s causing the Black border issue. To identify which program is causing the problem, you need to put your computer in a Clean Boot State. To do so, follow the steps below.
  • Log onto your PC as an administrator.
  • Type in MSConfig in the Start Search to open the System Configuration utility.
  • From there, go to the General tab and click “Selective startup”.
  • Clear the “Load Startup items” check box and make sure that the “Load System Services” and “Use Original boot configuration” options are checked.
  • Next, click the Services tab and select the “Hide All Microsoft Services” check box.
  • Click Disable all.
  • Click on Apply/OK and restart your PC. (This will put your PC into a Clean Boot State. And configure Windows to use the usual startup, just simply undo the changes.)
  • From there, start to isolate the problem by checking which one of the programs you installed recently is the root cause of the problem.
Read More
Fix Gah, Your tab just crashed in Firefox
If you notice that your tabs in your Firefox browser keep on crashing recently, then there might be something wrong with your browser. Every time any of your tabs crashes, you might encounter an error message saying, “Gah, Your tab just crashed”. If you encounter this kind of error message then it is most likely that your Firefox Profile is having some issues with the existing installation of Firefox. The “Gah, Your tab just crashed” error rarely happens but when it does, it can get quite annoying as you won’t get to browse the internet peacefully. So to fix it, here are some suggestions you could check out.

Option 1 – Try disabling multi-process tabs in Firefox

Since Mozilla has one process for Firefox itself, while one process handles all the tabs, you have the option to disable these multi-process tabs in Firefox. To do that, follow these steps:
  • In the address bar of Firefox, type “about: config” and hit Enter.
  • Next, look for the following configurations and set them to false.
    • tabs.remote.autostart = false
    • tabs.remote.autostart.2 = false
  • After that, double-click on the toggle switch between true and false.

Option 2 – Try checking your Add-ons

In this option, you need to start Firefox in Safe Mode and then check if the problem is fixed. If it is, you may have to check your Firefox add-ons as well as extensions as one of them might be the one that's causing the “Gah, Your tab just crashed” error.

Option 3 – Downgrade the Firefox version you’re using

It could be that the current version of Firefox you’re using has some issues so you might have to downgrade it, especially if you are already using the latest version. To downgrade your Firefox browser, go to the directory of the other versions and languages and select an older version that worked for you. After that, you have to disable automatic Firefox updates.
  • First, click the menu button and select Preferences.
  • Next, go to the Firefox Updates section under the General panel.
  • Then select the radio button labeled “Check for updates but let you choose to install them”. This will ensure that you will not have the same issue with the new update.
Note that this is only a temporary fix since updating your programs, including browsers.

Option 4 – Try sending Crash Reports

You might want to send crash reports to Mozilla. This way, Mozilla might come up with some fix to resolve the problem. All you have to do is type “about: crashes” in the address bar. This will list all the crash reports. Now send it to Mozilla using the built-in interface. Although this won’t instantly fix the problem, a lot of user finds it useful. And besides, the issue will get fixed in future releases or with minor updates.
Read More
Cortana can’t connect to the Internet
One of the most sophisticated Artificial Intelligence or AI assistants there is in the market is Cortana. However, no matter how sophisticated this AI assistant may be, there are still times when you encounter issues with it. So if your Cortana is not connecting to the internet, worry not for this post will guide you in fixing the problem. This connection issue in Cortana might have something to do with the settings, network connectivity, or your Microsoft account. In addition, it could also be that the Firewall or antivirus program interferes with its connection. Whichever the case is, here are some possible solutions that could help you resolve the problem.

Option 1 – Try to power cycle the modem, router, and computer

  • Connect the modem, router, and the PC hard-wired and then switch all of these three devices off.
  • Turn on the modem and wait for 30 seconds.
  • Turn on the router and wait for 30 seconds as well.
  • Finally, turn on the computer and check if you can now successfully connect to the internet.

Option 2 – Check if your router or ISP is properly working

Since the basis for this issue is that Cortana is not connecting to the internet even though you are able to access websites using your browser, you might want to check your router or ISP (Internet Service Provider) and see if they’re functioning properly.

Option 3 – Try changing your internet connection

You can also try changing your internet connection and see if it fixes the problem. If you are using Ethernet, you can try connecting to a Wi-Fi connection and see if Cortana is able to connect or not.

Option 4 – Try to run the Search and Indexing troubleshooter

You might also want to run the Search and Indexing troubleshooter in Windows 10 as it checks whether the settings for Cortana are in place and automatically corrects any issues if the update or software installation has changed the settings. To run it just click on the Start button and select Settings > Updates and Security > Troubleshoot. From there, select the Search and Indexing Troubleshooter. Note: You can also run the Network Troubleshooter as it can also help in resolving the issue especially if the problem is in the network.

Option 5 – Try to remove Proxy

Removing the Proxy might also help you in fixing the connection issue in Cortana. Here’s how you can do it:
  • Tap the Win + R keys to open the Run dialog box.
  • Then type “inetcpl.cpl” in the field and hit Enter to pull up the Internet Properties.
  • After that, go to the Connections tab and select the LAN settings.
  • From there. Uncheck the “Use a Proxy Server” option for your LAN and then make sure that the “Automatically detect settings” option is checked.
  • Now click the OK and the Apply buttons.
  • Restart your PC.
Note: If you are using a third-party proxy service, you have to disable it.

Option 6 – Verify your Microsoft account

In some cases, Cortana might not be able to connect to the internet because your Microsoft account is no longer verified. This usually happens when you use a two-step authentication system with your Microsoft account. To verify it, just open Settings and click on Accounts. After that, check if you have a Verify hyperlink under your Microsoft account or not then click on Verify. Afterward, follow the next on-screen prompts to verify your Microsoft account. Once your account is verified, restart your computer.

Option 7 – Try resetting Cortana

  • Open Cortana and go to the Settings section where you’ll see the “Turning off Cortana clears what Cortana knows on this device, but won’t delete anything from the Notebook. After Cortana is off, you can decide what you’d like to do with anything still stored in the cloud” option. Turn this option off.
  • Restart your PC.
  • After your computer boots, launch Cortana again and check.

Option 8 – Try to reinstall Cortana

If none of the options given above works, you must consider reinstalling Cortana.
  • First, right-click on the Start button and click on the Windows Powershell (Admin) option from the list.
  • Next, type the following command and hit Enter to execute it:
Get-AppXPackage -Name Microsoft.Windows.Cortana | Foreach {Add-AppxPackage -DisableDevelopmentMode -Register "$($_.InstallLocation)AppXManifest.xml"}
  • Restart your computer and check if Cortana is now able to connect.
Read More
Windows 11 was released in beta for all
windows 11 betaMicrosoft has released Windows 11 as a public beta release for all the people that are not willing to be in the insider program. Beta release as of this moment is identical to Insider Preview build 22000.100. and updates will not roll so fast as in insider preview and it is marked as unstable release, same as insider build. I would not install Windows 11 beta on the main PC since some drivers still have issues and may lead to some blue screens. Be aware that the beta build will have all Windows 11 system requirements including TPM 2.0. This is a big difference from insider build which can be installed on systems lacking official requirements. So basically if you have a spare PC that could run Windows 11 install it so you can see what it brings and feel it so you can make a decision will upgrade once it is released later this year.
Read More
Proton Drive, privacy-first cloud storage

In 2014 Proton mail started as an end-to-end encrypted email service offering secure and private email services. Proton mail is still live and going with the same dedication to privacy and security but the company has expanded its offering into cloud storage drive services.

Starting as a public beta at the end of 2020, Proton Drive is keeping its privacy and security policy philosophy with the new service. Proton Drive is the newest service besides Proton Calendar, Proton VPN, and Proton Mail.

proton drive

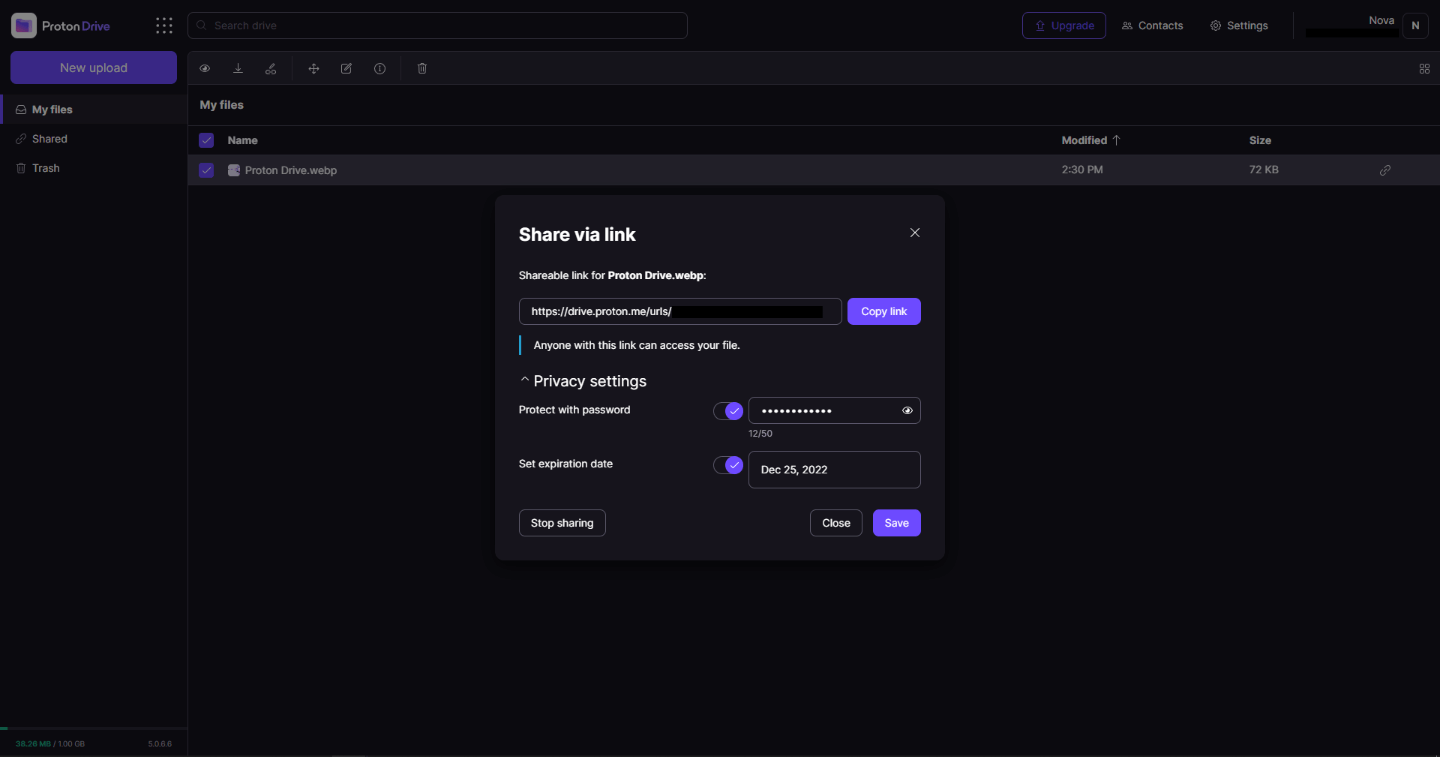
Drive has end-to-end encryption for everything on it including files themselves, filenames, folder structure, folder names, extensions, and file sizes. This means that you and only you can access your files. Servers are located in Geneva, Switzerland and they are under Swiss privacy laws making sure that your files are protected. Proton services in general are all open source so anyone can take a look at them to be sure that nothing is lurking under the hood. For now, sync is done either via the android app or web interface but the desktop client will come soon since currently, it is under development.

Sadly free plan of Proton Drive will give you only 1GB of storage which is much less than other services and sadly payments plans are also not so jaw-dropping going for $4 USD per month for a 200GB plan or with Proton ultimate subscription that will set you $10 behind but you will get 500GB of drive storage. Of course, if you value privacy for your files these options are good but if you do not mind that part other services have much better options.

All in all Proton Drive is a great cloud storage solution if you need privacy and well worth the investment. With the ultimate subscription, you will get enough space for most people and company needs with other services and guaranteed privacy and security, on the other hand, if you just need a large amount of cloud storage not caring too much about privacy other options are better.

Read More
Fix Screen Aspect Ratio issues in Windows
There are times when you upgrade or install Windows 10 on an old computer and the Aspect Ratio of the screen is in a mess. This issue occurs when a new Windows version does not support the GPU or the driver does not work in Windows 10. And in such cases, Windows uses a generic driver which does not support all the resolution as well as the correct aspect ratio. So in this post, you will be guided on how you can fix the issues with the screen aspect ratio in Windows 10. It could be that your screen has an aspect ratio of 16:9 but after the upgrade, you changed to screen resolution, and is now set to 16:!0. And later on, you found that you are unable to go back to the previous aspect ratio. Thus, you will notice that everything on the screen might look stretched. You might be wondering if it’s possible to change the aspect ratio in Windows 10 directly even if the GPU does not have the compatible driver, well it really isn’t. However there is another way to resolve the problem. Refer to the options given below to get started.

Option 1 – Try using the Compatibility Mode

The first thing you can do is to run the driver in a Compatibility Mode. Follow the steps below to do so:
  • You need to download the driver and place it on your desktop.
  • After that, right-click on it and select Properties.
  • Next, switch to the Compatibility tab where you should see two options:
    • Compatibility troubleshooter, and let Windows figure out what works best for you. If it fails, follow the next.
    • Manually choose the version of Windows it was correctly working.
  • You also have the option to change the DPI settings and see if that helps. Then click the Apply and OK buttons.
  • Now right-click on the file and select the “Run as administrator” option to install. After that, you should now be able to change your screen aspect ratio to what you were using early on.
Note: If you have other programs that won’t work on the existing version of Windows, then make sure to run the program in a Compatibility mode.

Option 2 – Try to run the Program Compatibility Troubleshooter

You might also want to run the Program Compatibility Troubleshooter. This built-in troubleshooter is available in the Windows Update & Security section. From there, select Troubleshoot. This will find a list of programs for you and since you have already downloaded the driver files, just click on Not Listed located at the top of the program list. After that, browse and select the driver files and then let the program do its job.

Option 3 – Update or rollback your device drivers

If the first option didn’t work for you, then it’s time to either update or roll back the device drivers. It is most likely that after you updated your Windows computer that your driver also needs a refresh. On the other hand, if you have just updated your device drivers then you need to roll back the drivers to their previous versions. Whichever applies to you, refer to the steps below.
  • Open the Devices Manager from the Win X Menu.
  • Then locate the device drivers and right-click on them to open the Properties.
  • After that, switch to the Driver tab and click on the Uninstall Device button.
  • Follow the screen option to completely uninstall it.
  • Finally, restart your computer. It will just reinstall the device drivers automatically.
Note: You can install a dedicated driver on your computer in case you have it or you could also look for it directly from the website of the manufacturer.
Read More
1 2 3 171
Logo
Copyright © 2023, ErrorTools. All Rights Reserved
Trademark: Microsoft Windows logos are registered trademarks of Microsoft. Disclaimer: ErrorTools.com is not affiliated with Microsoft, nor claims direct affiliation.
The information on this page is provided for information purposes only.
DMCA.com Protection Status