If you suddenly encounter the SPECIAL POOL DETECTED MEMORY CORRUPTION Blue Screen error with a bug check value of “0x000000C1” while you are using your computer then it might be due to some problem with the hardware of your Windows 10 computer. According to security experts, it is most likely caused by the physical RAM which could be due to some error in the Realtek driver for Wireless USB 2.0 as well as corruption of the files inside the RAM, and so on.
This kind of problem indicates that the driver wrote to an invalid section of the special pool. On the other hand, system files like the rtwlanu.sys or nvlddmkm.sys can also trigger the SPECIAL_POOL_DETECTED_MEMORY_CORRUPTION Blue Screen error.
To resolve this Blue Screen error, you can use the options provided below as reference but before you do that, make sure to create a System Restore point first. After you have that covered, proceed to the given options below.
Option 1 – Delete the settings of the Driver Verifier Manager
Open the Driver Verifier Manager using the Start search.
After that, select or click on the “Delete existing settings” option and then click on Finish.
Reboot your computer and see if it fixes the Blue Screen error or not.
Option 2 – Try to update or rollback your Network driver
If you have updated the driver software as of late and you suddenly got this BSOD error, you might have to roll back the device driver – in other words, switch back to the previous working version. To do that, follow these steps:
Tap the Win + R keys to launch the Run window and then type in the “msc” command and hit Enter to open the Device Manager window.
Under the Device Manager, you will see a list of drivers. From there, look for the Network Adapters and expand it.
From the list of Network Drivers, look for “Realtek <Model> Wireless LAN 802.11n PCI-E NIC” and then right-click on it and select Update Driver.
Restart your PC and see if it helped in fixing the BSOD error.
Note: If you see any of the following entries under the Network drivers, you might want to download their latest available versions from each one of their manufacturer’s websites.
Realtek High-Definition (HD) Audio Driver
Realtek Card Reader Driver
Realtek Local Area Network (LAN) Driver
On the other hand, if updating the Network driver didn’t help, you can also try to roll back to its previous version.
Open the Device Manager again and then look for Network Drivers.
Next, select Realtek <Model> Wireless LAN 802.11n PCI-E NIC from the list of Network Drivers and then double click to open a new mini window.
After that, make sure that you’re on the Driver tab and if you are not, just navigate to it then click the Roll Back Driver button to switch back to the previous version of the Realtek driver.
Now restart your computer to successfully apply the changes made.
Option 3 – Try running the ChkDsk utility
You can also run the ChkDsk utility to fix the SPECIAL_POOL_DETECTED_MEMORY_CORRUPTION Blue Screen error.
First, open This PC and right-click on your operating system partition for Windows.
Next, click on Properties and navigate to the Tools tab.
Then click on Check under the Error Checking section.
After that, a new mini window will be opened and from there click on Scan drive and let it scan your disk drive partition for any errors and then restart your computer.
Option 4 – Use the Windows Memory Diagnostics
Since the problem has something to do with the physical RAM, you need to use Windows Memory Diagnostics. To run it, refer to these steps:
Tap the Win + R keys to open Run and type exe and hit Enter to open the Windows Memory Diagnostic Tool.
After that, it will give two options such as:
Restart now and check for problems (Recommended)
Check for problems the next time I start my computer
Once your computer has restarted, perform a basic scan or you could also go for the “Advanced” options such as “Test mix” or “Pass count”. Simply tap the F10 key to start the test.
Note: After you select the option, your PC will restart and check for memory-based issues. If it finds any issues, it will automatically fix them.
Option 5 – Run the Blue Screen Troubleshooter
The Blue Screen troubleshooter is a built-in tool in Windows 10 that helps users in fixing BSOD errors like SPECIAL_POOL_DETECTED_MEMORY_CORRUPTION. It can be found in the Settings Troubleshooters page. To use it, refer to these steps:
Tap the Win + I keys to open the Settings panel.
Then go to Update & Security > Troubleshoot.
From there, look for the option called “Blue Screen” on your right-hand side and then click the “Run the troubleshooter” button to run the Blue Screen Troubleshooter and then follow the next on-screen options. Note that you might have to boot your PC into Safe Mode.
If you are using Google Chrome browser in surfing the web, you might have experienced a situation where you’re trying to connect to a website but were unable to since Chrome failed to fetch the website to the browser and throws an error that says, This webpage is not available – Err Connection Timed Out. Aside from an issue with the network connection, there are also other reasons why this error suddenly shows up, read on to fix it.
There are times when the Windows computer is responsible for this kind of issue. And it can happen not just to Google Chrome but to other browsers as well. To resolve this issue, here are some suggestions that might be of help.
Option 1 – Try checking the network cables and then restart your router and reconnect
The first thing you can do is to check if all the network cables are properly connected be it to your computer or to the router. And if your computer is connected via Wi-Fi, you need to restart your router once. And of course, you can always opt to forget the Wi-Fi details and then reconnect again just make sure that you know the password.
Option 2 – Check the Windows Host file
You can also try to cross-check the Windows Hosts file to find out if the website you are trying to open has been blocked because if it is, then it’s no wonder why you’re getting the ERR CONNECTION TIMED OUT error in Chrome. There are instances when some third-party application modifies the file and adds some websites to the blocklists. So if the website is indeed blocked, you need to remove it from the list.
Option 3 – Try removing Proxy
Removing the Proxy might also help you in fixing the ERR CONNECTION TIMED OUT error. Here’s how you can do it:
Tap the Win + R keys to open the Run dialog box.
Then type “inetcpl.cpl” in the field and hit Enter to pull up the Internet Properties.
After that, go to the Connections tab and select the LAN settings.
From there. Uncheck the “Use a Proxy Server” option for your LAN and then make sure that the “Automatically detect settings” option is checked.
Now click the OK and the Apply buttons.
Restart your PC.
Note: If you are using a third-party proxy service, you have to disable it.
Option 4 – Try to clear the browsing data of Google Chrome
If your browsing data in Chrome hasn’t been cleared for some time now then that might be the reason why you’re suddenly getting the ERR CONNECTION TIMED OUT error when you browse the web. To fix this error, you need to clear your web browsing data. Refer to the following steps to do so.
Tap the Ctrl + Shift + Delete buttons to go to the Clear browsing data section in Chrome.
Next, set the time range to “All time” and tick all the boxes and then click on the Clear data button.
After that, restart the Chrome browser and try to open the website you were trying to open earlier.
Option 5 – Flush the DNS and reset TCP/IP
You might also want to flush the DNS and reset TCP/IP as it could help in fixing the ERR CONNECTION TIMED OUT error. To do so, refer to these steps:
Click the Start button and type in “command prompt” in the field.
From the search results that appear, right-click on Command Prompt and select the “Run as administrator” option.
After opening Command Prompt, you have to type each one of the commands listed below. Just make sure that after you type each command, you hit Enter
ipconfig /release
ipconfig /all
ipconfig /flushdns
ipconfig /renew
netsh int ip set dns
netsh winsock reset
After you key in the commands listed above, the DNS cache will be flushed and the Winsock, as well as the TCP/IP, will reset.
Now restart your computer and open Google Chrome then try opening the website you were trying to open earlier.
Option 6 – Run the built-in Malware Scanner and Cleanup Tool in Chrome
In case you don’t know, there is actually a built-in malware scanner and cleanup tool in Chrome that helps you get rid of any unwanted ads, pop-ups, and even malware, as well as unusual startup pages, toolbars, and other things that could affect the performance of the browser.
Option 7 – Reset Chrome
Resetting Chrome can also help you get rid of the ERR CONNECTION TIMED OUT error. Resetting Chrome means restoring its default settings, disabling all the extensions, add-ons, and themes. Aside from that, the content settings will be reset as well and the cookies, cache, and site data will also be deleted. To reset Chrome, here’s what you have to do:
Open Google Chrome, then tap the Alt + F keys.
After that, click on Settings.
Next, scroll down until you see the Advanced option, once you see it, click on it.
After clicking the Advanced option, go to the “Restore and clean up the option and click on the “Restore settings to their original defaults” option to reset Google Chrome.
Error code 0xc004fc03 occurs when Windows users fail to activate their Windows operating system due to a networking problem. The error code’s common symptoms include the following:
Inability to activate Windows 10 operating system
Message box with error code 0xc004fc03
Solution
Error Causes
Error code 0xc004fc03 in Windows 10 usually occurs due to issues related to a Windows user’s network. Your computer may be having problems connecting to the Internet or your firewall may be blocking or interrupting your device’s ability to activate Windows 10. In some cases, users may simply need to wait a day or two to reattempt to activate their system using a valid product key, as there may be an issue with the Windows activation servers. Failure to promptly fix this error code might result in other Windows 10 error messages, such as error code 0xc004f034.
Further Information and Manual Repair
To rectify the error code, Windows 10 users will need to perform manual repair procedures that fix the underlying problems causing error code 0xc004fc03. These procedures may include reconnecting to one’s network, checking your firewall settings, or activating your Windows operating system via phone. The manual repair methods are simple and do not require technical knowledge of the Windows operating system. If your attempts at manually repairing this error code fail, however, you may need to try a few other procedures.
Method One: Verify Internet Connection
To check your Internet connection, you’ll need to access the Network & Internet tab in Windows 10. Follow the instructions below to access this tab and fix Internet connectivity issues if they are preventing you from activating Windows on your machine.
Step one: Click the Start button and select Settings
Step two: Select Network & Internet
Step three: Click the Status section of the Network & Internet tab
If your status shows that you are not connected to a network, you will need to fix your connection. Simply use the Network Troubleshooter to troubleshoot your connection. You will be able to activate your copy of Windows once your connectivity issues are resolved.
If, however, the problem persists and error code 0xc004fc03 occurs during the activation process, this simply means that the existence of the error code is not due to connectivity or networking problems. In such a case, move to the next manual repair method listed below and follow the exact instructions given.
Method Two: Check Firewall Settings
Windows Firewall protects your PC from hackers, worms, and other malicious programs. However, in some cases, it may result in error codes like error code 0xc004fc03. If your firewall is interfering with the Windows 10 activation, you’ll be able to rectify the problem by simply adjusting your settings. Follow the steps below to check – and adjust if necessary – your Windows Firewall settings.
Step one: Click search bar and type firewall
Step two: Select Windows Firewall
Step three: Select Turn Windows Firewall on or off
In some cases, Windows users may not be able to adjust settings within the Windows Firewall tab, as your firewall settings may be controlled by a third party antivirus software. If this is the case, open the antivirus software and turn off the firewall if the software does not prevent you from making such changes to its settings.
Note, however, that you will need to readjust the settings as soon as you activate your version of Windows 10. This is due to the fact that turning off your firewall settings permanently may lead to exposure to worms and other malicious programs.
Method Three: Activate Windows by Phone
Activation of Windows via phone is another option for individuals experiencing error code 0xc004fc03. The activate by phone option in the Update & Security tab will be available once you fail to activate Windows 10. To complete this manual repair method, follow the steps below.
Step one: Select Settings
Step two: Click Update & security
Step three: Select Activate by phone
Step four: Follow the instructions provided thereafter.
This is one of the most effective ways to fix error code 0xc004fc03. If the issue persists, however, you can proceed to the last resort.
Method Four: Download an Automated Tool
If you wish to always have at your disposal a utility tool to fix these Windows 8 and other related issues when they do arise, download and install a powerful automated tool.
Hello and welcome everyone, just a few years ago we had FLASH video content on the internet, we had FLASH games, full FLASH website experiences, and more, but then flash was shut down mostly due to security reasons meaning that in just a few months we have lost most of FLASH web content.
However, there is still FLASH content on the internet even today, there are still FLASH videos and flash games, but we can not play any of that content since browsers do not support FLASH and you can not get the FLASH plugin for browsers. So what might be the solution for this situation?
Ruffle and FLASH emulation
Emulation of course. We will not be able to get the flash player working, well at least not the original and official one, but we can make flash content playable again inside our browsers.
The first thing is first, we need to get an emulator package from the internet in order for this trick to work, one we will be using is RUFFLE. It is lightweight, it is free, it is open source and it is reliable, everything we need.
Download RUFFLE from its official website here.
For Chrome and Edge download the ZIP package, for Firefox, go to the Firefox section of the tutorial.
There is also a desktop version of RUFFLE there so if you are keen on playing your flash content on your desktop computer you might well grab that as well, but for the sake of this tutorial where we are enabling flash in our browsers, we will not focus on that part since it is pretty straightforward.
Now once you have downloaded the RUFFLE emulator, please extract it to the desired folder somewhere on your computer.
Once it is extracted, start your browser of choice and follow instructions.
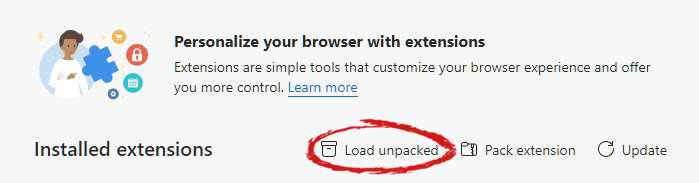
FOR CHROME:
Navigate to: chrome://extensions/
Turn ON developer mode in the top right corner
Click on Load unpacked
Navigate to the folder where you have extracted RUFFLE
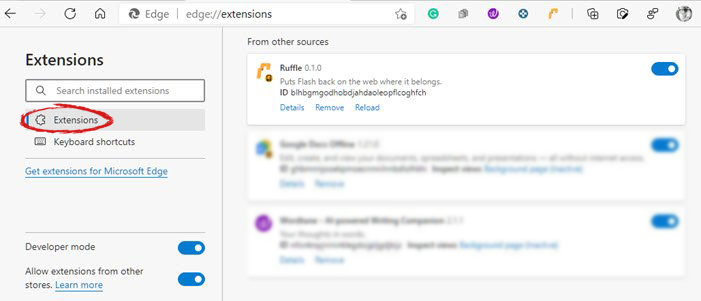
FOR EDGE:
Navigate to: edge://extensions/
Turn ON developer mode on the bottom left corner
Navigate to the folder where you have extracted RUFFLE
Turn RUFFLE ON
FOR FIREFOX:
Go to the RUFFLEdownload page, we can not use the zip package we were using for Chrome and Edge
Right-click on the Firefox download link
Save link by clicking on Save link as...
Navigate to about: debugging
Click on this Firefox
Click Load Temporary Add-on
Select the .xpi that you have downloaded
BONUS:
If you want to enable FLASH content live on your website use: <script src="path_to_ruffle/ruffle.js"></script>
We have all experienced Windows errors over time and that can range from simple ones that will do very little to no harm and can be even system breaking making us lose our work or completely making the PC unusable. No one likes them but they happen, and usually, they happen once we least expect them.
No matter how frequent and unpleasant they might be there are ways to keep them at the minimum and even avoid them.
We will discuss steps that you can take in order to do this, simple tips and guides on how to keep your computer in top form and eliminate not just Windows, but any kind of errors altogether.
Keep your hardware clean
Believe it or not, some serious Windows errors like the dreaded blue screen of death can come from hardware issues not from the software at all. It is very important to keep your computer clean and with enough air flow so it can function properly.
Keeping applications on the drive might seem harmless but sadly that is not the case. Some applications have a certain impact on the system itself after all most of them are tweaking registry entries in Windows and sometimes having too many applications means an increased possibility of conflict over certain resources even when they are not running.
Some applications like adobe creative suite, for example, will have certain services always running in the background, and more of these kinds of applications you have, more services, more places for unexpected errors when they collide. Some of them will also install certain dependencies that could be problematic.
The general idea is: if you are not using it, uninstall it and you will be safer and more resilient to errors inside OS.
Do not use pirated or cracked software
Besides moral and law implications that using pirated or cracked software might bring you there are also certain other things that might be problematic. Certain "free" software might come packet with some problematic malware, for example, it is not uncommon for attackers to use some popular software to pack their malicious application with it.
Other things might be wrong and incomplete tweaking with application in order to bypass security and thus bringing some instability due to scripts needed to run in order to achieve this goal.
Keep your drivers updated
Errors can also come from old drivers or bad drivers, device manufacturers are not all-knowing and perfect, and sometimes drivers can wreak havoc on the system. Having updated drivers can minimize any kind of unexpected behaviors inside the operating system making it more stable and reliable.
You can check your driver version in the control panel inside the Windows OS and then compare it to the ones found on the manufacturer's site, if there are newer available it is recommended to download and install them,
Keep software updated
Applications can have bugs, and bugs can lead to certain errors both in the system and when using the app as well. It is in your best interest to get the latest patch or newer version of the software in order to avoid these unpleasant experiences.
Also, certain codecs and extensions that are installed directly in Windows can also have some unpredictable behavior, updating is the best solution to keep them in line.
Keep Windows updated
Same as with drivers and applications, Windows itself is not immune from bugs and some unpredictable issues. Luckily Microsoft is always working on fixes and features of Windows but in order to actually have benefited from that work, you will need to keep Windows updated. Sometimes a bad update can introduce some errors but you can always roll back to the previous and wait for them to fix everything and then download them all.
Check the health of your hardware regularly
Hardware components have their life cycle, more quality ones tend to last longer but eventually, they will reach the end of their lifecycle. There are a lot of testers for various components in your computer that can check different things and provide you with information about the state of your components.
If you are on Windows 11, Microsoft has included a basic health app inside OS, just type PC health check in search and start the app. For some more detailed information and advanced checks, you will have to use a custom application. There are plenty of them specialized for single components like RAM, SSD, etc. A simple google search with providing you with top results and most of them are free for personal use.
Remember, a faulty component or component that is reaching its life cycle can produce many errors inside the operating system.
Error Code 0x8007041d is an error that arises during the Windows 10 Update process. In some cases, this error code can also arise during the Windows 10 Activation process. It is an error code that has been present in multiple versions of the software but usually arises when antivirus or registry issues interfere with the Windows Update or Activation software.
Common symptoms include:
Inability to download the needed Windows 10 updates
Inability to complete the Windows 10 Update process
If you are experiencing the Error Code 0x8007041d on your machine, there are several methods that you can use to attempt to resolve the problem. Several of the steps that are most successful for the resolution of this error require familiarity with registry and antivirus tools, so if you are unsure of your ability to complete these steps on your own, contact a qualified computer repair technician to assist you.
Solution
Error Causes
In most cases, Error Code 0x8007041d arises when there is a conflict between multiple antivirus or malware tools on the computer, if there is an issue in the Windows registry, or if your Windows Defender software is out of date. During the Windows Update process, the system checks to ensure that there are not any factors that are present that could introduce viruses to the system, so if there are any indicators that could present issues to the software, Error Code 0x8007041d will often arise.
Further Information and Manual Repair
For users who experience Error Code 0x8007041d, there are several steps that can be taken to resolve the issue. If the following methods are not successful for you or if you are unsure of your ability to undertake them on your own, contact a qualified Windows 10 computer technician.
Here are the best ways to attempt to fix Error Code 0x8007041d on your computer:
Method 1: Remove Additional Security Software Apart from Windows Defender
In some cases, having multiple versions of malware or antivirus software installed on your computer can cause the Windows system to create conflicts between them, which can interfere with your ability to update. During the update process, the system may attempt to determine if there is any malware present, and having multiple kinds of antivirus software present on the same machine may return mixed results.
If you currently are running antivirus software that is separate from Windows Defender, consider removing it from your computer prior to running the update software. This may allow you to successfully complete your update process without conflict. Additional software can be reinstalled after the update is complete, but make sure to keep both sets of software up to date in order to lessen the chances of encountering this error code again during future updates.
Method 2: Update Your Windows Defender Software
If you currently have Windows Defender as your primary antivirus software, check to see whether it is fully up to date. Out of date antivirus software can cause conflicts with the Windows Update process since the update to Windows 10 will not be able to be completed unless the system is free from viruses or malware.
If you are unsure of whether or not your Windows Defender is up to date, open it and run the process to check for updates, then re-attempt to run Windows Update. In some cases, you may want to restart your computer before running the Windows 10 Update process a second time.
Method 3: Run the Registry Repair Tool
Another issue that could cause Error Code 0x8007041d is a problem in the system registry. If you believe that this may be the case, run the Windows Registry Repair Tool on your machine to check for and resolve any issues. This is a fairly simple and straightforward tool to use, but it can help you to resolve any number of problems that may interfere with your ability to update your Windows 10 software.
If you have taken the steps listed above, restart your computer before attempting to proceed with the Windows Update process. If the three methods listed above are not successful in completely resolving Error Code 0x8007041d on your machine or if you are not comfortable in your ability to implement these steps on your own, contact a qualified Windows repair technician who is familiar with the Windows Update process to assist you.
If you wish to always have at your disposal a utility tool to fix these Windows 10 and other related issues when they do arise, download and install a powerful automated tool.
Hacker group recently came up with claims that they have stolen data from 100 million T-Mobile customers. T-Mobile has responded with confirmation it has been compromised and that over 40 million records were stolen, among them are not just present customers, but anyone who has applied for T-Mobile service as well as past accounts.
What has been stolen?
Report from T-Mobile states that stolen records included first and last name, date of birth, social security number, driver’s license & ID information. The company said that it has “no indication that the data contained in the stolen files included any customer financial information, credit card information, debit or other payment information.” Not really a reassuring statement meaning that they really do not know, but even if the statement is true, already stolen information is as much if even not more damaging and devastating as payment information.
What T-Mobile is planning to do now?
It is stated that the hole used for the hack has been addressed and closed so no more data can be stolen.
Considering people that had their personal information compromised, T-Mobile said it is planning to reach out to them and offer them two years of free identity protection through McAfee’s ID Theft Protection Service.
Additionally, T-Mobile recommends postpaid customers change their PIN by going online into their T-Mobile account or calling T-Mobile customer service by dialing 611 on their phone. The company also recommends a feature called Account Takeover Protection that prevents unauthorized individuals from stealing a phone number and porting it out of T-Mobile.
Finally, the company will publish a website “for one-stop information and solutions to help customers take steps to further protect themselves.”
Resize icons on desktop in Windows 10 in a matter of seconds!
Hello everyone and welcome to today's quick tip. If you have ever been dissatisfied with icon size on your desktop and any of the default sizes like small, medium large, etc have not been appropriate know that there is a quick way to resize icons on your desktop in between sizes.
All that you have to do in order to use this built-in feature is:
Press and hold CTRL and scroll with the mouse. That's it! Find your appropriate size for icons and enjoy.
Keyboard shortcuts are undeniably one of the most utilized ways and are helpful in maximizing productivity through the various applications at top speed in Windows 10. It offers the option to create custom keyboard shortcuts that allow users to launch apps, and even websites, instantly. There are already tons of keyboard shortcuts that are built-in in Windows 10 but in case you don’t know, you can actually create new ones. Doing so is not a difficult task and in this post, you will be guided on how you can exactly create custom keyboard shortcuts in your Windows 10 computer.
Most users would create desktop shortcuts or pin the apps in the taskbar to speed up the process of working on their computers. It is an easy task to do since you can easily do it by dragging an app from the Start Menu to the desktop or by simply right-clicking on the executable app and selecting the “Create Shortcut” option. However, doing so would take physical effort and there are times when you have to minimize all the apps to get to the desktop so you can click the shortcut and this is where the Custom Keyboard Shortcuts come in handy.
You can create Custom Keyboard Shortcuts in Windows 10 for various programs – from the traditional desktop apps to the new universal apps – you can fling in a shortcut so that you can instantly open them faster compared to when doing it manually and besides this also wouldn’t affect any of the ongoing system activity. To get started, you need to follow the steps provided below carefully.
To add Custom Keyboard hotkeys to a program and website desktop shortcuts, here’s what you have to do:
Step 1: First, you have to right-click on the app or website and select Properties.
Step 2: After that, go to the Shortcut tab and from there, you will see the “Shortcut key” textbox which allows you to enter a new or custom keyboard shortcut for the app or website.
Step 3: In the textbox field, input your preferred letters to set up the new hotkey. Keep in mind that this custom shortcut has to be combined with the Ctrl + Alt keys which means that if you want to select “N”, you have to tap the Ctrl + Alt + N keys.
Step 4: Once done, click on the Apply and OK buttons to save the changes made and then close the window.
Step 5: After that, tap the newly created keyboard shortcut, Ctrl + Alt + N keys again to open the app or website you’ve set up earlier.
To add Custom Keyboard hotkeys to a desktop app or an independent program that can be installed using direct download, here’s what you have to do:
Step 1: First, open the Start Menu and look for the icon/tile of the required app in the menu. However, if you are not able to find the desired app, then just click on the All Apps option to navigate through all the apps that are installed on your PC.
Step 2: Once you find the app, just right-click on it and select More and then click on the “Open file location” option.
Step 3: This will open a new window with the shortcut icon. Right-click on the app’s shortcut icon and select Properties.
Step 4: This will open the Properties window where you can add the shortcut combination. Keep in mind that just like the previous method, the custom shortcut has to be combined with the Ctrl + Alt keys. For instance, if you select E, then you also have to set a keyboard shortcut that includes Ctrl + Alt, so it will be, Ctrl + Alt + E.
Step 5: Once you’re done, click on the Apply and OK buttons to save the changes made. You should now be able to use the custom shortcut key you’ve set.
As you know, the Windows 10 operating system has support for a dedicated high-end graphics processor that brings in capabilities inside to support Graphics Cards from NVIDIA or AMD. This helps the operating system to function in a much better way by segregating the graphics-intensive operations from the CPU to a dedicated processor. However, there are times when it also experiences some issues that lead to some errors like the “Failed to create a graphics device” error.
It is possible that your computer has more than one screen or graphics card which is why you’re getting this error. To fix it, you need to try reinstalling DirectX or reinstall the Graphics Card driver. You could also try to manually check the hardware or power cycle of your computer.
To start troubleshooting the “Failed to create a graphics device” error, follow the given suggestions below.
Option 1 – Try running the DirectX Diagnostic Tool
Since the error has something to do with the DirectX Graphics APIs, you can run the DirectX Diagnostic tool to resolve the problem.
Option 2 – Try updating or re-installing DirectX
If the DirectX Diagnostic tool didn’t work, you can try to update or reinstall DirectX instead. This can help in fixing the problem because when you reinstall or update DirectX, it will replace the incompatible or corrupted components of DirectX from your computer.
Option 3 – Update or reinstall the Graphics card drivers
First, boot your computer into Safe Mode.
After that, tap the Win + R keys to launch Run.
Type in MSC into the box and tap Enter or click OK to open the Device Manager.
After that, a list of device drivers will be displayed. From there, look for the Display Adapters and click on them.
After that, right-click on each entry under the Display Adapters and select the “Uninstall Device” option from the menu.
Now restart your computer.
After restarting your computer, go to the Settings app and Check for Updates in the Windows Update section.
Note: You also have the option to go directly to the website of your graphics card manufacturers like NVIDIA, Intel, or AMD and go to the section called Drivers then check if there’s a new available update – if there is, download and install it.
Option 4 – Try to physically check the hardware of your computer
You might also want to check the physical status of the hardware in your computer. You can clean the dust off the hardware components like the Graphics Card of the computer. In doing so, you have to use a small blower or you could also use a soft cloth and run the components gently. Make sure that you don’t damage any parts with moisture or cause harm to any circuits while you carry out this task.
Option 5 – Try to power cycle your computer
You could also try to power cycle your computer to fix the error. To do that, you have to turn off your computer in a way that the power is completely cut off and all the fresh configurations of files are loaded when your computer is booted up. The first thing you have to do is to shut down your computer and if you are using a laptop with a removable battery, you must remove the battery for a couple of minutes before you plug it back in and boot your laptop. On the other hand, if you are using a desktop computer, press and hold the power button until the CPU goes off and take out the power cable for a minute or so and then plug it back in. Boot your computer and see if the error has been resolved.
A lot of Windows 10 users prefer the black theme on their computers and when you see anything but black it can get quite annoying. Such as is the case of the Taskbar which, as you know, is usually dark, however, when you take a look at the Cortana search bar, instead of seeing black, you’ll see that it has turned white. To fix this issue, read on as we will provide you some options you can try to set the Cortana search bar back to black. Before you proceed, take note that the options provided below will change all white search boxes to black and that one of these options needs administrative privileges.
Option 1 – Try changing the default App mode
As you know, Windows 10 has two modes, namely the Light and the Dark. Thus, you can switch to the Dark mode so that your Cortana search bar will be black as well. However, remember that it will completely change everything into dark mode so there will be no more Light mode elsewhere.
First, you need to click on the Start button and then click on the cog icon to open the Windows 10 Settings.
Next, from the Settings Menu, select Personalization and then select Colours from the left pane.
Then scroll down until you see the “Choose your default app mode” option and select “Dark”.
After you apply the changes, it will change the Cortana search bar into black instantly. Aside from that, you will also see the User Interface changing into dark mode.
Option 2 – Try changing the Registry value
If you are well-versed in editing registry keys, then you need to try this option. But before you go over the steps below, make sure that you create a System Restore point first so that if anything goes wrong, you can always go back to how it was before the changes were applied.
Tap the Win + R keys to open the Run prompt.
Then in the field, type in “regedit” and hit Enter to open the Registry Editor. If a User Account Control prompt appears, just click Yes.
Now that you’ve opened the Registry Editor, navigate to the following key:
After that, double-click on the “Value” key located on the right pane and set the value to “0” instead of “1” and then click Ok to save the changes made. You should now see a black or grey text box color instead of white.
Option 3 – Try changing the Region
In some forums, a lot of users stated that changing the Region also worked out for them in changing the white Cortana search bar to white. Thus, you need to change the region settings of your computer temporarily. To do so, follow the steps below.
Type in “Regional Settings” in the box and then click it as soon as it appears from the search results.
Next, make sure to select a region where Cortana is not available.
Then select apply to that region. After that, it will change the Cortana search bar color to black.
Now sign out and sign back in and revert to the original settings. But the changes you made earlier in Cortana will still remain.


 Hacker group recently came up with claims that they have stolen data from 100 million T-Mobile customers. T-Mobile has responded with confirmation it has been compromised and that over 40 million records were stolen, among them are not just present customers, but anyone who has applied for T-Mobile service as well as past accounts.