If you aren’t able to pull up any website and instead got the ERR QUIC PROTOCOL ERROR error message in Google Chrome then read on as this post will help you resolve the problem. When you encounter such an error in Chrome, you will see the following error message:
“This site can’t be reached, The webpage at [website URL] might be temporarily down or it may have moved permanently to a new web address, ERR_QUIC_PROTOCOL_ERROR”
This kind of error message pops up when the URL is down. However, if you are certain that the site is not down and you’re still seeing this error message, then troubleshoot further using the suggestions given below.
Option 1 – Try to disable the QUIC Protocol
QUIC is an experimental transport layer network protocol that is present in Google Chrome in order to establish a connection between two endpoints over UDP. So if there is any problem on the development side, you will most likely encounter ERR_QUIC_PROTOCOL_ERROR on your Google Chrome browser when you try to open any website. Thus, you have to disable the QUIC protocol in order to resolve the error. How? Simply follow the steps below.
Open your Google Chrome browser.
Now type in “chrome://flags/” in the address bar and hit Enter.
After that, look for the Experimental QUIC protocol which should be set by default.
Then expand the drop-down menu and select Disable.
Restart Google Chrome and see if the error is fixed or not.
Option 2 – Disable VPN
As mentioned, if you are using VPN, this could be the reason why you’re getting the Windows Update error 0x800F0922 so the most obvious thing to do is for you to turn off the VPN and try to run the Windows Update once more. And if you use a VPN software that works using their software, you can just completely exit or log-off from its account. On the other hand, if you are using a built-in Windows 10 VPN, you can simply turn it off or delete all the settings you have created there. Although it’s understandable that you might have to use a VPN connection to connect to the work network, you really have to disable it at least until the Windows Update is no longer stuck in the error 0x800F0922. It would be best if you do this when you are not working.
Option 3 – Disable the Proxy server
You can also try to disable the Proxy server to fix the ERR_QUIC_PROTOCOL_ERROR in Chrome. Refer to these steps to do so:
Tap the Win + R keys to open the Run dialog box.
Then type “inetcpl.cpl” in the field and hit Enter to pull up the Internet Properties.
After that, go to the Connections tab and select the LAN settings.
From there. Uncheck the “Use a Proxy Server” option for your LAN and then make sure that the “Automatically detect settings” option is checked.
Now click the OK and the Apply buttons.
Restart your PC.
Note: If you are using a third-party proxy service, you have to disable it.
Error 1512 is a type of runtime error code. This error may hamper your ability to run and load your desired programs on Windows PC. There are increased chances of runtime error 1512 occurring when system files go missing or get corrupt.
Symptoms of this error code include:
Slow PC speed
Window System freeze
Solution
Error Causes
There are several for the occurrence of runtime error 1512. These include:
Faulty or outdated drivers
Poor Program installation
Damaged Windows Registry
Viruses tampering the system settings/memory
Broken or incorrect Registry entries
Damaged Windows registry
Further Information and Manual Repair
To resolve this issue you don’t have to hire a professional and spend hundreds of dollars to get it fixed. Here are some of the best and easy do-it-yourself methods to repair error 1512 on your system in a few minutes.
These methods are very easy to work around and do not require any kind of technical expertise.
Method 1 - Uninstall and then reinstall the Same Program
Sometimes this runtime error may pop up due to poor program installation. In such an event, it is advisable to uninstall the program and then reinstall it again properly. To do so, go to the start menu, and click on control panel.
Now select the program & features option. Here you will find the option Add/Remove Program. Remove the program causing error 1512. Once the program is removed, reinstall it again.
Method 2 - Run an Antivirus Program
Computer viruses are capable of tampering with system settings. Due to this reason you might experience runtime errors like 1512 on your PC. These malicious programs usually enter the system through phishing emails or website downloads.
To resolve the issue, you need to run a powerful antivirus program. An antivirus removes all sorts of malicious programs hiding in your PC like malware, spyware, and malware that are responsible for generating runtime errors.
Method 3 - Update the Outdated Drivers on your PC
If the error still persists, then it is suggested to update outdated drivers. Faulty and outdated drivers can also trigger runtime error 1512. To do this, go to the Device Manager. Here use the Driver update wizard to make updates.
Method 4 - Remove the Invalid Registry Entries and Repair the Damaged Registry
The best way to perform both tasks is to download Restoro. It is embedded with a registry cleaner that is quite easy to use.
The registry cleaner removes all invalid entries in seconds, cleans the cluttered registry by wiping out all the redundant and unnecessary files. The damaged registry is then repaired and resumes its normal function.
Click here to download Restoro and resolve runtime error 1512.
Recently, a number of users reported an error when they tried to open graphic-intensive apps like video games. According to users, when they tried to open an app, they get the “Display driver failed to start” error instead. Thus, if you encounter the same error, then you’ve come to the right place as this post will guide you on how exactly you can fix it.
Here’s the full content of the error message:
“Display driver failed to start; using Microsoft Basic Display Driver instead. Check Windows Update for a newer display driver.”
This kind of error could be due to several factors. It is possible that it could be a result of a corrupted or outdated graphics driver. Aside from that, it could also be due to some issues with the system settings. Worry not though for there are potential fixes that can help you fix the problem. But before you troubleshoot the problem, you need to update your Windows 10 computer first and if it didn’t help fix the problem, then here are the potential fixes that should help resolve the “Display driver failed to start” error.
Option 1 – Try to restart the Graphics driver
Although Windows 10 can recover the graphics driver on its own when it crashes, there are times when it fails to do its job. To restart the graphics driver in your computer, simply tap the Win + Ctrl + Shift + B key combination. After that, the graphics driver will be back in less than a second.
Option 2 – Try running the Hardware and Devices troubleshooter
Running the built-in hardware and devices troubleshooter can also help you in fixing the “Display driver failed to start” error.
The first thing you need to do is click on Start and then on the gear-like icon to pull up the window for Settings.
After opening Settings, look for the Update and Security option and select it.
From there, go to the Troubleshoot option located on the left-hand side of the list.
Next, select Keyboard from the list and open the Troubleshooter and run it. Once it is doing its job, wait for it to complete the process and then restart the system.
After the system restarts, check if the problem’s now fixed. If not, refer to the next option given below.
Option 3 – Try to update or rollback the Graphics driver
You can try to update your Graphics card driver using the Device Manager in your computer to resolve the “Display driver failed to start” error or you can also go directly to the website of your graphics card manufacturers like NVIDIA, Intel, or AMD and go to the section called Drivers then check if there’s a new available update – if there is, download and install it.
To update your Graphics driver via Device Manager, refer to these steps:
First, boot your computer into Safe Mode.
After that, tap the Win + R keys to launch Run.
Type in devmgmt.msc into the box and tap Enter or click OK to open the Device Manager.
After that, a list of device drivers will be displayed. From there, look for the Display Adapters and click on them.
After that, right-click on each entry under the Display Adapters and select the “Uninstall Device” option from the menu.
Now restart your computer.
After restarting your computer, go to the Settings app and Check for Updates in the Windows Update section.
Option 4 – Try setting your system for maximum performance
If the first three options didn’t fix the error, you can try setting your computer for maximum performance since Windows 10 allows you to choose the effects you want to activate your system and you can do this by adjusting the performance ratio. Adjusting the performance ratio can be done via a certain setting in your computer – and this setting should be set to “Maximum Performance” to resolve the error.
In the Windows Search bar, type in “performance” and from the search results that appear, select the “Adjust the appearance and performance of Windows” option.
Next, a mini window will appear and from there, click on the radio button that says, “Adjust for best performance”.
Once done, click on the Apply and OK buttons to save the changes made. This should resolve the problem.
If you receive an error message saying, “Windows Update cannot currently check for updates because updates on this computer are controlled”, while trying to change the Windows Update preferences or manually update, then read on as this post will guide you in fixing it.
You can mostly encounter this error in managed systems where an Administrator controls the permission on the operating system. The reason why you are not able to modify the Windows Update preferences or manually update your system is that a group policy prevents you from doing so and that the only user who can do these things is none other than the administrator of the system.
Troubleshooting this kind of problem is the same as when you troubleshoot an error message that says, “Some settings are managed by your organization”. In such cases, you need to check both the Windows Update Group Policy and Registry settings.
If you’re just a standard user, you have to contact your system administrator regarding this issue and if you are the administrator, you can make adjustments to the system settings via the Registry Editor and the Group Policy Editor. Refer to the instructions given below for detailed instructions.
Option 1 – via the Registry Editor
If you are using the Home edition of Windows 10 and you want to change the policy for non-admin users on your local computer, then you can use the Registry Editor for that. Here’s how you can do it:
Tap the Win + R keys to open the Run dialog box.
Then type “Regedit” in the field and hit Enter to open the Registry Editor.
After that, navigate to the following registry key:
From there, look for the key named “WindowsUpdate” in the Windows folder and if it does not exist, you can just right-click on the Windows folder and select New > Key.
Now name the new key “WindowsUpdate” and create a new sub-key under the newly created key and input “AU” as its name.
Keep AU selected and then right-click anywhere in the right pane and select New > DWORD (32-bit) Value.
Then name the Value as “AUOptions” and right-click on AUOptions and select Modify.
Next, change the value of the Value data to “5” and click OK to save the changes made to the settings. Note that the Value Data of 5 refers to the policy to allow the local admin to choose the setting.
Now restart your computer once you’re done and check if non-admin users can now modify the Windows Update settings or update Windows.
Option 2 – via Group Policy Editor
Tap the Win + R keys to open the Run dialog box and then type “gpedit.msc” and hit Enter to open the Group Policy Editor.
Next, navigate to this folder: Computer Configuration > Administrative Templates > Windows Components > Windows Update.
Now look for the “Configure Automatic Updates” policy on the right pane and double click on it to open its Properties.
After that, shift the Radio button to “Enabled” and from the drop-down menu for Configure automatic updating, select option 5: Allow local admin to choose the setting.
Then click on Apply and OK to save the changes made to the settings.
Restart your computer and check if the problem’s fixed or not.
Researchers have discovered 16 vulnerabilities in Bluetooth connections that could be exploited and make from minor to some serious damage to your device. The flaw can be used on chips manufactured by Intel, Qualcomm, and Texas Instruments while connecting to external devices like speakers, headphones, keyboards, mice, etc.
Who is affected?
Mentioned chips are used by many in a vast range of devices including big players with their products like Microsoft Surface laptops, Dell desktops, Samsung Phones, Google Pixel, and OnePlus handsets.
The Bluetooth bug affects a wide range of devices, including smartphones, laptops as well as smart home gadgets. In total, more than one billion devices that rely on Bluetooth are believed to be impacted.
What is the damage?
The amount of damage possible with this flaw depends on the type of device with the chipset. Some devices can only be crashed after a specially crafted packet is sent to the flawed chip. If that's the case with your gadget, it can be easily resolved with a simple restart.
With other devices, hackers can take advantage of the Bluetooth Classic flaw to remotely run malicious code. That could allow malware to be installed remotely. Researchers say vendors were informed about these issues months ago before the findings were published.
The good news is this should have given plenty of time for the relevant patches to be pushed out that remedy the flaws. However, you'll need to make sure that you're running the latest version of the operating system to be protected by the patch crafted by the manufacturers.
Android Bluetooth threat
The researchers emphasize the lack of basic tests in Bluetooth certification to validate the security of Bluetooth Low Energy (BLE) devices. The BrakTooth family of vulnerabilities revisits and reasserts this issue in the case of the older, but yet heavily used Bluetooth classic (BR/EDR) protocol implementations.
We would also advise users to disable Bluetooth on devices that do not need it. This way you can prevent attackers from sending you malformed LMP packets. Since BrakTooth is based on the Bluetooth Classic protocol, an adversary would have to be in the radio range of the target to execute the attacks. So, in a safe environment Bluetooth can be enabled.
As you know, the USB security keys are a secure medium to validate a lot of components in a computer. They can be used to log in to Windows 10. Now with the advancement of APIs, you can authenticate across the website as well using the same key. However, there are times when it may not work and it could be caused by several factors. It could be due to corrupted or incompatible drivers or it could also be due to compromised integrity of the key, and many more.
So if you happen to encounter an issue with the USB security key on your Windows 10 computer, then there are several potential fixes you can try. You can try toggling the Internet Options settings or reinstall the respective USB drivers. You could also try changing the PIN of the security key or disable the antivirus program on your computer or troubleshoot the web browser. Refer to the potential fixes provided below to fix the problem.
Option 1 – Try to toggle the settings of the Internet Options
In the Windows Search box, search for Internet Options to open it.
Next, go to the Security tab and drag the security slider to the lowest possible security for all the given zones.
After that, click on OK to save the changes made and close the Internet Options.
Note that this option is only a temporary measure as it can make your computer vulnerable. Make sure to press the Reset all zones to default level button.
Option 2 – Try to update or reinstall the respective drivers
If updating the drivers of the device did not fix the problem with the USB security key, you can try to update or reinstall the Universal Serial Bus Controller drivers instead of using the Device Manager. Refer to the following steps:
First, click the Start button and type “device manager”.
Then click on the “Device Manager” from the search results to open it.
From there, look for the “Universal Serial Bus controllers” option and then right-click on each one of the USB drivers and select the Update Driver from the menu.
Note: If it is a regular USB drive, then it will be listed as a USB Mass Storage Device but if you have a USB 3.0 device, then look for a USB 3.0 Extensible Host Controller.
Restart your PC and then click the “Search automatically for updated driver software” option.
Note: If updating the USB Controller drivers didn’t work, you can try to reinstall them instead.
Option 3 – Try to change the PIN of the security key
If the first two options didn’t work, you can try changing the PIN of the security key. There are instances when the PIN for the security key might have been corrupted. Thus, resetting it can help you resolve the problem.
Option 4 – Temporarily disable Firewall and third-party antivirus
Firewall and antivirus programs are known to block the proper functioning of the USB security key. Thus, your antivirus or firewall programs might be the reason why you can’t download anything on your Windows 10 computer. To isolate the issue, you need to temporarily disable both the Firewall and antivirus programs and then check if you can now download anything from the internet. Do not forget to enable them again as disabling them can leave your computer vulnerable to cyber threats.
Option 5 – Try to troubleshoot the web browser
Troubleshooting your web browser can also help you fix the USB security key problem. You can do that by checking if your web browser supports the security key and you can do that by checking on the official website of your browser. You can also try to update your web browser to its latest version but if it didn’t help, you can try to reinstall it or switch to another web browser.
Each time you execute a command on your computer, it takes into account a number of files and space for the code in the background for the command to be executed. Thus, executing the command is not that easy which is why you could encounter some errors along the way due to various limitations or poor allocation of memory, and so on. One of the errors you might encounter when executing a command on Windows 10 and Windows Server is the “Not enough storage is available to process this command”.
There are several potential fixes you can check out to fix this error. To fix this error, you can try to delete the temporary files in your computer, run the DISM tool or apply some registry tweaks. For more details, refer to each one of the given options below.
Option 1 – Try to delete the temporary files
The error could be caused by some temporary or junk files in your computer and so you need to clear them up to fix the problem. You can achieve that using the Storage Sense feature.
Open Setting > System > Storage from the WinX Menu.
From there, you will see a list of all the local and connected storage devices along with the details on the free space. Make sure that Storage Sense is on.
Next, find a link that says “Free Up Space” and click it to open.
After that, a screen which is the built-in program in Windows 10 will appear and will scan your computer for the following junk files so you can free up disk space:
Windows Upgrade Log Files
System created Windows Error Reporting Files
Thumbnails
Temporary Internet Files
Previous Windows Installation Files
Delivery Optimisation Files
DirectX Shader Cache
Choose the files you want to get rid of and then click on the remove files option. Note that you’ll have an idea of the total size as you select any of the junk files listed above.
Now go to the “Free Up Space Now” section and click the Clean now button. This will get rid of all the temporary or junk files in your computer and should hopefully fix Error 1310.
Option 2 – Run the DISM tool
You can also run the DISM Tool as it could also help in fixing the “Not enough storage is available to process this command” error in Windows 10. Using this built-in tool, you have various options such as the “/ScanHealth”, “/CheckHealth”, and “/RestoreHealth” that could help in fixing error 0x80246019.
You can run the DISM tool via Advanced Startup Options or you could boot your computer into a Clean Boot State and then select Command Prompt.
Open the Command Prompt with admin privileges.
Then type in the following commands and make sure to hit Enter right after you type each one of them:
Dism /Online /Cleanup-Image /CheckHealth
Dism /Online /Cleanup-Image /ScanHealth
exe /Online /Cleanup-image /Restorehealth
Do not close the window if the process takes a while as it will probably take a few minutes to finish. Once it’s done, restart your computer and try again. If it didn’t work, you can try to use the “/StartComponentCleanup” parameter: Dism /Online /Cleanup-Image /StartComponentCleanup
Option 3 – Try to use the Registry Editor
The memory range allocated for the tasks and commands to be executed is associated with the IRPStackSize DWORD. Thus, to fix the error, you need to extend the range by applying some registry tweak. Before you proceed, make sure that you create a System Restore point first. Once you’re done, follow these steps:
Tap the Win + R keys to open the Run dialog box and type “Regedit” in the field and tap Enter to open the Registry Editor.
Next, navigate to this registry key: ComputerHKEY_LOCAL_MACHINESYSTEMCurrentControlSetServicesLanmanServerParameters
From there, look for the DWORD named “IRPStackSize” and right-click on it. If you can’t find this DWORD, just right-click on any empty space and select New > DWORD (32-bit) Value.
Input “IRPStackSize” as the DWORD name and double click on it and set its Value data to be greater than its default value. Note that the maximum value allowed is “0xc” and the range starts from “0x1”.
Now click on OK and exit the Registry Editor and then restart your computer and see if the error is fixed.
Stable Diffusion is a machine learning model developed by Stability AI to generate digital images from natural language descriptions. The model can be used for different tasks like generating image-to-image translations guided by text prompts and upscaling images.
Unlike competing models like DALL-E, Stable Diffusion is open source and does not artificially limit the images it produces. Stable diffusion was trained on a subset of the LAION-Aesthetics V2 data set. It can run on most consumer hardware equipped with a modest GPU and was hailed by PC World as "the next killer app for your PC".
Since Stable Diffusion is run locally and not in the cloud, as mentioned there is no limit to the number of images that you can produce but in order to use it you will have to get down a little dirty with setting your PC environment for it since it is not really an application, it is a command line text based descriptor that will use python to generate your images, so there is no install nor GUI.
In this guide, we will show you how to both install and run Stable Diffusion on your local PC so you can start producing some cool images all by yourself.
Hardware and software requirements
Make no mistake, Stable Diffusion will not run on a potato PC, in order to harvest the power of AI-generated imagery this is what you will need:
A GPU with at least 4GB of VRAM
10GB of hard disk space
Python and libraries (Miniconda3 installer will install everything you need)
The Stable Diffusion files
Git
Any OS (Windows, Linux, macOS)
Installing components
For this tutorial, we are covering the installation and running of Stable Diffusion on Windows PC. The steps presented here are presented in a way that installation can be performed on any operating system but precise instructions will be for Windows OS.
GIT
The first thing to do is to install GIT. It is a tool that will let you easily maintain and install repos from the internet. to install it go to: https://git-scm.com/ and click on download. Follow the instructions for your version of the operating system. If you are a developer you are familiar with GIT and if you already have it installed you can skip this step.
One thing that is important when installing GIT locally is to select to use it via the command line (the second option that says "Git from the command line and also from 3rd-party software").
Miniconda3
Now when we have GIT installed, next thing is to use Miniconda3 to install python and all required libraries that are needed. Get the installer at: https://docs.conda.io/en/latest/miniconda.html
Miniconda3 is basically an easy installer so you do not have to install tons of stuff manually from different websites and sources, it is nicely packaged in the installer that will take care of everything.
Stable Diffusion
After the previous two steps, we are ready now to actually install Stable Diffusion. Go to https://huggingface.co/CompVis/stable-diffusion#model-access and install the latest library (as of the writing of this article currently it is stable-diffusion-v1-4-original, the last one on the right), the library is almost 5GB in size so be prepared for big download.
Once downloaded click on the Windows start button and type in Miniconda3 and click on open. Create a folder and name it how you want on a drive of your choice. For this example, we will install it all in disk C under folder AI_art, follow the instructions below but use your own names and destination instead. Do not close Minicoda3 after typing commands!!!
cd c:/
mkdir AI_art
cd AI_art
Extract GitHub files that you have downloaded into your new folder and get back to Minicoda3 and type the next commands:
Let the whole process finish, some files are large and it might take a while. After the whole process is finished and completed, copy the checkpoint file that you have downloaded into: C:\AI_art\stable-diffusion-main\models\ldm\stable-diffusion-v1
After the file is copied rename it to model.ckpt and you are finished.
Running Stable Diffusion
The created environment is needed in order to actually use Stable Diffusion to create images. Each time you want to use it you will have to run it, so go into Miniconda3, and inside it type:
conda activate ldm
cd C:\AI_art\stable-diffusion-main
after we are inside the folder call the script with the parameters:
python scripts/txt2img.py --prompt "TXT DESCRIPTION OF IMAGE THAT YOU WANT TO CREATE" --plms --n_iter 5 --n_samples 1
and that's it, your image is created and it is located in C:\AI_art\stable-diffusion-main\outputs\txt2img-samples\samples
DRIVER_IRQL_NOT_LESS_OR_EQUAL will cause your computer to go to the blue screen of death but do not worry there are solutions around this and we are here to instruct you on how to solve this.
Uninstall and install network drivers
DRIVER_IRQL_NOT_LESS_OR_EQUAL is most commonly tied to bad network drivers, whatever that be a corruption of the driver files or their incompatibility. So first thing is to check if this is the case.
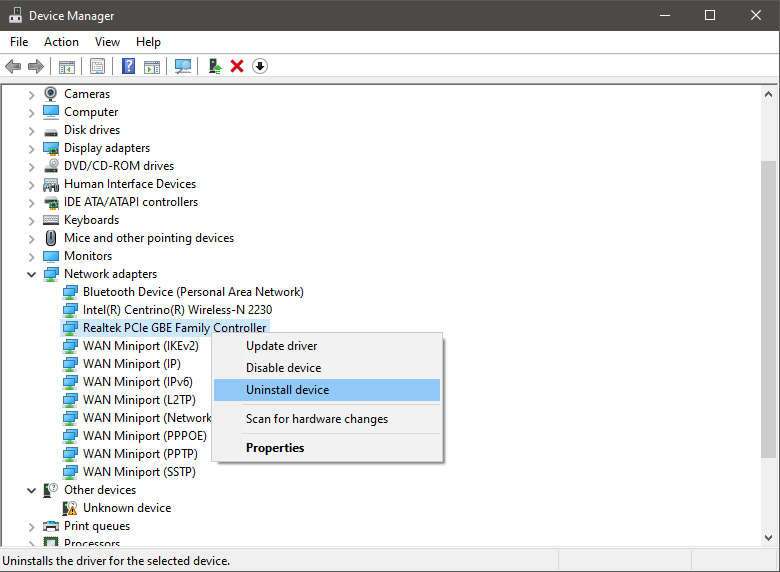
Press ⊞ WINDOWS + X to open the hidden menu in Windows and click on Device Manager.
In the Device Manager expand Network adapters, choose adapter, right-click on it and choose Uninstall.
Install latest driver or reboot so Windows will install the driver automatically
Update driver
If you do not want to reinstall the driver or you are unable to for whatever reason updating the driver might do the trick. To update driver:
Press ⊞ WINDOWS + X to open the hidden menu in Windows and click on Device Manager.
In the Device Manager expand Network adapters, choose adapter, right-click on it and choose Update Driver.
Fix via Command prompt
If both of the beforementioned solutions fail, try running the command prompt and fix the issue from there.
Press ⊞ WINDOWS + X to open the hidden menu in Windows and click on Command Prompt (administrator)
In command prompt type next line and press ENTERDEL /F /S /Q /A “C:\Windows\System32\drivers\mfewfpk.sys
Reboot the system
Scan your PC for malware
Sometimes corruption in the system is caused by malware, Scan your system for malware, viruses, etc.
Check connections or other hardware issues
If all methods fail, open your PC case and check to see if connections everywhere are properly connected and tight. Clean your PC and turn it back ON
Use system restore
If anything fails, use Windows system restore and bring back computer into a state where everything was working fine.
Error code 0xc004f210 occurs when Windows 8 users fail to activate their Windows operating system. Users will be able to identify error code 0xc004f210 because of the following common symptoms which occur:
If you enter an invalid product key or do not have a digital entitlement for the edition of Windows you are attempting to activate, you may experience error code 0xc004f210. Since this error usually occurs due to these main reasons, you will most likely find success resolving this issue by ensuring you use a valid product key or activate an appropriate edition of Windows based on the edition of your digital entitlement.
Further Information and Manual Repair
Error codes can be resolved through manual repair procedures that seek to fix the underlying issues causing the error. In the case of error code 0xc004f210, you should be able to resolve this error by using the methods below. You may also consider contacting a Windows repair technician if you have difficulty resolving the error code.
Method One: Enter Valid Product Key
To successfully activate your operating system and resolve error code 0xc004f210, you will need to enter a valid product key in the Update & security section of Windows. Follow the instructions below to enter the product key.
Step one: Click the Start button then select Settings
Step two: Select Update & security then Activation
Step three: Click the Change product key
Step four: Enter a valid product key
If the issue causing error code 0xc004f210 is related to the use of an invalid product key, you should be able to successfully activate your Windows operating system. Should the problem persist, however, you will need to attempt the next manual repair method explained below? Note: Failure to fix this error code might result in other Windows 10 error messages.
Method Two: Ensure Edition of Windows Matches Your Digital Entitlement
Digital entitlement allows Windows users to access activation without using a product key. This digital entitlement only affects Windows 8 users who are attempting to activate versions of Windows 10 that include Windows 10 Pro. Once you are using a genuine copy of Windows 8.1 and your edition of Windows matches your entitlement, you may proceed with the instructions below.
Step one: Click the Start button then select Settings
Step two: After selecting Settings, click Update & Security
Step three: Select Windows Update then the Check for updates tab
Step four: Click activate Windows 10 update
You should be able to activate your Windows update once you follow the instructions above. Remember error code 0xc004f210 is an activation code related to product keys or your digital entitlement so once these issues are rectified, you should have no problem activating your operating system of choice and enjoying the benefits it offers. If, however, the problem remains unresolved after you have attempted both manual repair methods, there may be unusual issues affecting your system. Contact Microsoft to rectify the issue or get help from a Windows repair technician.
Method Three: Download an Automated Tool
If you wish to always have at your disposal a utility tool to fix these Windows 8 and other related issues when they do arise, download and install a powerful automated tool.
If you have a laptop that is slowing down and some usual tasks are sluggish you probably mean that it is time to change it and get a new one. Altho it is a good solution and it will guarantee that you will be able to do your tasks with more speed and comfort, straight purchasing is not always the best thing to do.
There are things you can do and some upgrades that are cheaper and will bring your laptop back into the game and extend its usage for a few more years.
1. Clean it
The most common issue for slowing down of computer is dust and dirt that accumulates over time and usage. If the laptop has not been properly cleaned in a while, cleaning it and placing new thermal paste on the CPU can do wonders. If you are not keen on doing this yourself or do not possess the required skillset take it to your local IT center for cleaning.
2. Uninstall software that you are not using
Various software can have speeding effects on computers, it can have some services running in the background and thus take precious resources slowing the whole system. If you are not using software, uninstall it.
3. Do not install the latest software
If you are using your computer for basic tasks there is no really need to install the latest and best. A lot of new software will require new hardware and things that offer are not so much better nor even required to justify the upgrade. Let us take office, for example, if you are using it to just write some text and not using any advanced options there is really no need to switch to a newer version, the old one will do just fine tasks that you are in need of.
4. Replace HD
Now this fits in the domain of upgrading your hardware but still it is much cheaper than replacing the whole laptop. Windows 10 works much better with SSD and SSD itself is faster than your standard HD, especially if it is slower model spinning in only 5400RPM. Operation of HD replacement is simple and straightforward and anyone can do it but the benefits of replacement will be visible right away. With a new SSD instead of an old mechanical one, you will have the feeling that you actually bought a new laptop.
5. Add more RAM
This is basically the last thing you can do in order to speed up your old laptop that will not break your bank account. Upgrading RAM was always the thing that can push your computer to have more power and to behave better while you are doing tasks. One important thing here is to first see how much RAM you have in your computer. If you are packing already 8GB then upgrading will not do much but if you have only 4GB, raising it to 6GB or 8GB will be beneficial. Also, check if the model of the laptop supports more RAM in the first place.
Conclusion
We have covered here a vast array of options in order to get your laptop back into the game with variability between hardware upgrades to taking care of your software. Whatever option you choose to do it will speed up your computer but among all of them, replacing the hard drive will do the most.

 Error Causes
 Researchers have discovered 16 vulnerabilities in Bluetooth connections that could be exploited and make from minor to some serious damage to your device. The flaw can be used on chips manufactured by Intel, Qualcomm, and Texas Instruments while connecting to external devices like speakers, headphones, keyboards, mice, etc.


 In the Device Manager expand Network adapters, choose adapter, right-click on it and choose Uninstall.
 Install latest driver or reboot so Windows will install the driver automatically
 In command prompt type next line and press ENTERDEL /F /S /Q /A “C:\Windows\System32\drivers\mfewfpk.sys
Reboot the system
In command prompt type next line and press ENTERDEL /F /S /Q /A “C:\Windows\System32\drivers\mfewfpk.sys
Reboot the system