Logo

Fix ERR_UNSAFE_PORT error on Chrome

As you know, one of the most useful web browsers all over the globe is Google Chrome. However, it is not without flaws as you could encounter errors while using it. One of these errors is the ERR_UNSAFE_PORT error. This kind of error is caused by the data being accessed using a port that isn’t recommended. When you encounter this kind of error in Chrome, you will see the following error message on your screen:

“The webpage is not available, The webpage at <Address> might be temporarily down or it may have moved permanently to a new address. Error code: ERR_UNSAFE_PORT”

In this post, you will be guided on how you can fix the ERR_UNSAFE_PORT error in Google Chrome on your Windows 10 computer. You can try to set allowed ports or reset or reinstall Google Chrome. For more details, refer to the given options below.

Option 1 – Try to set allowed ports

  • To get started, open Google Chrome.
  • After that, go to the Shortcut tab and type the following after the whole address in the field named Target: --explicitly-allowed-ports=xxx
  • It should look like this “C:/Documents and Settings/User/Local Settings/Application Data/Google/Chrome/Applicationchrome.exe --explicitly-allowed-ports=6666”.
  • Now click on Apply and click OK to save the changes made.

Option 2 – Reset Chrome

Resetting Chrome can also help you fix the error. This means that you will be restoring its default settings, disabling all the extensions, add-ons, and themes. Aside from that, the content settings will be reset as well and the cookies, cache, and site data will also be deleted. To reset Chrome, here’s what you have to do:

  • Open Google Chrome, then tap the Alt + F keys.
  • After that, click on Settings.
  • Next, scroll down until you see the Advanced option, once you see it, click on it.
  • After clicking the Advanced option, go to the “Restore and clean up option and click on the “Restore settings to their original defaults” option to reset Google Chrome.
  • Now restart Google Chrome

Option 3 – Try to clean reinstall Chrome

There are instances when programs leave files behind after you’ve uninstalled them and the same thing can happen to Chrome so before you reinstall Chrome, you have to make sure that you have deleted the User Data folder. To do so, refer to the following steps:

  • Hit the Win + R keys to open the Run dialog box.
  • Next, type “%USERPROFILE%AppDataLocalGoogleChromeUser Data” in the field and hit Enter to open the User Data folder.
  • From there, rename the default folder and name it something else, e.g. “Default.old”.
  • After that, install Google Chrome again and check if the issue is now fixed.

Do You Need Help with Your Device?

Our Team of Experts May Help
Troubleshoot.Tech Experts are There for You!
Replace damaged files
Restore performance
Free disk space
Remove Malware
Protects WEB browser
Remove Viruses
Stop PC freezing
GET HELP
Troubleshoot.Tech experts work with all versions of Microsoft Windows including Windows 11, with Android, Mac, and more.

Share this article:

You might also like

Windows requires a digitally signed driver
Device drivers are needed in order for the hardware and software to communicate in an operating system. Some of these drivers are digitally signed. These kinds of drivers are drivers that are signed by their issuing authority in a way that the end-user or any third party won’t be able to modify them. And there are times when you encounter an error that says, “Windows requires a digitally signed driver” when you try to install or update device drivers. Driver Signing is the process of associating a digital signature with a driver package. Digital signatures are used in Windows device installations to verify the identity of the vendor providing the driver packages as well as to verify the integrity of the driver packages. All the drivers you usually install on your PC from Windows Update, Original Equipment Manufacturers, or some other third-party driver download software and so on must be verified digitally by Microsoft through the digital signature. A digital signature is an electronic security mark that verifies the publisher for the driver and all the relevant information related to it. That’s why Windows won’t run a driver if it isn’t certified by Microsoft, be it a 32-bit or 64-bit system – this is called the Driver Signature Enforcement. The only Kernel-mode drivers that Windows 10 will load are the ones that are digitally signed by the Dev Portal. However, the changes only affect the new installations of the operating system with Secure Boot on while the non-upgraded fresh installations would require drivers that are signed by Microsoft. The “Windows requires a digitally signed driver” error indicates that the driver you are trying to update or install hasn’t been signed digitally by the issuing authority, preventing you from installing or updating it. To resolve this issue, you can try to update the drivers directly from the manufacturer’s site. You could also disable driver signing via Group Policy Editor.

Option 1 – Update the device drivers directly from the manufacturer’s site

The reason why you’re getting the “Windows requires a digitally signed driver” error in the first place is that you might have downloaded the drivers from external media. It could also be that the drivers didn’t update for some time now and the issuing authority changed its policies. Thus, you can try to update the drivers straight from the manufacturer’s website and install them. If this option didn’t work, then you’ll have to disable the driver signing or its recognition in Windows 10. Keep in mind that doing so is not advisable if you have to use the concerned driver.

Option 2 – Disable driver signing via Group Policy Editor

  • Tap the Win + R keys to open the Run utility and type “gpedit.msc” in the field and tap Enter to open the Group Policy Editor.
  • After that, navigate to this policy setting: User configuration > Administrative templates > System > Driver installation
  • Next, double click on the “Code signing for device drivers” entry located on the right pane to open its properties where you’ll see the following description:
“This setting determines how the system responds when a user tries to install device driver files that are not digitally signed. It establishes the least secure response permitted on the systems of users in the group. Users can use the System in Control Panel to select a more secure setting, but when this setting is enabled, the system does not implement any setting less secure than the one the setting established. When you enable this setting, use the drop-down box to specify the desired response. “Ignore” directs the system to proceed with the installation even if it includes unsigned files. “Warn” notifies the user that files are not digitally signed and lets the user decide whether to stop or to proceed with the installation and whether to permit unsigned files to be installed. “Warn” is the default. “Block” directs the system to refuse to install unsigned files. As a result, the installation stops, and none of the files in the driver package are installed. To change driver file security without specifying a setting, use System in Control Panel. Right-click My Computer, click Properties, click the Hardware tab, and then click the Driver Signing button.”
  • Now select the radio button for “Enabled” and select Ignore from the drop-down menu under “When Windows detects a driver file without a digital signature”.
  • Then click on the Apply and OK buttons to save the changes made. This will get rid of the “Windows requires a digitally signed driver” error but take note that this will also make your system less secure.
Read More
Fix Black border or bar on Monitor
If you suddenly see a black border in your computer’s display then you might be wondering how come this happened but worry not for this post will give you a couple of suggestions that could help you resolve the problem. The black bar could appear at the bottom or just the sides of the screen. Whichever it may be, there are options you can check out. Refer to the options givens below and make sure to follow them carefully.

Option 1 – Try checking the screen resolution

You might want to try checking the resolution of your screen.
  • Open the Windows 10 Settings and go to Display.
  • Next, go for the “100% (Recommended)” option under Scale and layout for the size of the text, apps, and other items.
  • After that, select the Recommended setting again under Resolution.
Now check to see if the black bars are still there. They should be gone at this point, but if for some strange reason nothing has changed, then attempt the steps below.

Option 2 – Try updating Graphics & Monitor drivers

You might want to try updating your graphics and monitor drivers if you haven’t updated them for some time now. To do that, refer to these steps:
  • First, boot your computer into Safe Mode.
  • After that, tap the Win + R keys to launch Run.
  • Type in devmgmt.msc into the box and tap Enter or click OK to open the Device Manager.
  • After that, a list of device drivers will be displayed. From there, look for the Graphics drivers or the Monitor drivers and then click each one of them.
  • After that, right-click on each entry and select the “Uninstall Device” option from the menu.
  • Now restart your computer.
  • After restarting your computer, go to the Settings app and Check for Updates in the Windows Update section.
Note: You can also try to roll back the graphics and monitor drivers back to their previous versions if updating them didn’t work. You can also try visiting the manufacturer’s website and download the graphics or monitor driver setup for your operating system.

Option 3 – Try to run the DISM tool

You can also run the DISM Tool as it might also help in getting rid of the black border or bar on your Windows 10 computer. Using this built-in tool, you have various options such as the “/ScanHealth”, “/CheckHealth”, and “/RestoreHealth” which could help you resolve the problem.
  • Open the Command Prompt with admin privileges.
  • Then type in the following commands and make sure to hit Enter right after you type each one of them:
    • Dism /Online /Cleanup-Image /CheckHealth
    • Dism /Online /Cleanup-Image /ScanHealth
    • exe /Online /Cleanup-image /Restorehealth
  • Do not close the window if the process takes a while as it will probably take a few minutes to finish.

Option 4 – Troubleshot the problem in a Clean Boot State

There are some instances that some conflicting programs installed in your computer might be the one that’s causing the Black border issue. To identify which program is causing the problem, you need to put your computer in a Clean Boot State. To do so, follow the steps below.
  • Log onto your PC as an administrator.
  • Type in MSConfig in the Start Search to open the System Configuration utility.
  • From there, go to the General tab and click “Selective startup”.
  • Clear the “Load Startup items” check box and make sure that the “Load System Services” and “Use Original boot configuration” options are checked.
  • Next, click the Services tab and select the “Hide All Microsoft Services” check box.
  • Click Disable all.
  • Click on Apply/OK and restart your PC. (This will put your PC into a Clean Boot State. And configure Windows to use the usual startup, just simply undo the changes.)
  • From there, start to isolate the problem by checking which one of the programs you installed recently is the root cause of the problem.
Read More
Dangerous GriftHorse Trojan found on Android
There has been recently discovered in the field of malware targeting Android devices. Affecting more than 10 million users of Android phones, the malware GriftHorse is doing its attacks via phishing and premium services scams. A lot of applications have been discovered that are hosts for this malware and many of them are inside the Google store and available for download. GriftHorse
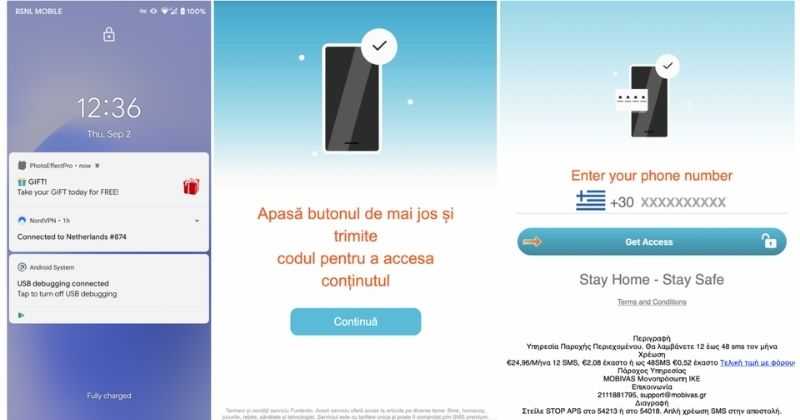
According to Zimperium zLabs, this malware that was recently detected has been doing its scams and attacks even in November of 2020 and has thus far accumulated hundreds of thousands of dollars in its scam. On the surface it looks very harmless, asking for typical permissions like internet access, calls, and other related needed functions, and then it waits. After few months the real attack happens when users get charged with premium service they never subscribed to in the first place.

List of Infected Applications that Carry GriftHorse Trojan

Zimperium zLabs listed out some of the apps with this malware. Users are advised to avoid installing them.
  •     Amazing Video Editor
  •     Bag X-Ray 100% Scanner
  •     Bus – Metrolis 2021
  •     Call Recoder Pro
  •     Call Blocker-Spam Call Blocker
  •     Cinema Hall: Free HD Movies
  •     Coupons & Gifts: InstaShop
  •     GPS Phone Tracker – Family Locator
  •     Fingerprint Changer
  •     Fitness Point
  •     Free Calls WorldWide
  •     Geospot: GPS Location Tracker
  •     GPS Phone Tracker – Family Locator
  •     Handy Translator Pro
  •     Horoscope : Fortune
  •     iCare – Find Location
  •     iConnected Tracker
  •     Instant Speech Translation
  •     Lifeel – scan and test
  •     My Chat Translator
  •     My Locator Plus
  •     Plant Camera Identifier
  •     Racers Car Driver
  •     Safe Lock
  •     Screen Mirroring TV Cast
  •     Slime Simulator
  •     Smart Spot Locator
These are only some of the many infected apps available on the internet. Zimperium zLabs also warned that GriftHorse Trojan exists in over 70 countries worldwide. The infected app quickly changes the language and displays content depending on the user’s IP address.
Read More
Delete files and folders using Command Prompt
There are times when you might find it difficult to delete folders or files in File Explorer and it could be due to many reasons. One of these reasons can be attributed to the failure that can lock down the folders or files which prevents you from deleting them. In this kind of situation, you can utilize the Command Prompt to delete the folders, sub-folders, and files on your computer, and in this post, you will be guided on how exactly you can do that. Before you proceed, keep in mind that when you use the Command Prompt incorrectly, it might affect your computer and render it inoperable, thus, you must be extra careful when executing the steps given below and it would also be better if you create a System Restore Point. After that, refer to the following instructions. Step 1: First, in the Start Search, type “command prompt” in the field and from the search results, right-click on Command Prompt and then select the “Run as administrator” option to open Command Prompt with admin privileges. Step 2: After opening Command Prompt as admin, navigate to the folder where the file you want to delete is located. Note that you have to execute the “cd” or the change directory command. Step 3: Next, execute the following command in Command Prompt:
DEL /F /A <file path with extension>
Note: In the given command, “/F” is the force delete command, while “/A” is the command that selects the files with the ready for archiving attribute. Step 4: After that, go to the location where you can find the folder you want to delete by using the “cd” command again. And then execute the following command right after:
RD /S <folder path>
Note: In the given command, “RD” is the command that removes the folder from the directory, while “/S” removes all of its sub-folders and files. On the other hand, if you also use the “/Q” parameter, you won’t see the “Y/N” confirmation but if you didn’t use it, then simply tap the Y button to proceed.
Read More
Sandbox failed to start with error 0xc030106
If you suddenly encountered an error when you try to run the Windows Sandbox that says, “Windows Sandbox failed to start, Error 0xc030106, The virtual machine or container exited unexpectedly”, read on as this post will guide you on what you can do to resolve the problem. According to security experts, this kind of error in Windows Sandbox is due to some issues with the supporting virtualization component. It could also be caused by other factors and to fix it, there are several potential fixes you need to check out. You can try running the Windows Sandbox as an administrator. You should also make sure that all the supporting processes are running properly, as well as try to install any pending Windows Updates.

Option 1– Try to run Windows Sandbox as an admin

  • In the Start Menu, scroll down until you see the entry for the Windows Sandbox.
  • Then right-click on it and select More and then select the “Run as administrator” option to open it with admin privileges.
  • Next, if a User Account Control or UAC prompt pops up, just click on Yes to proceed.
  • You should now be able to open the Windows Sandbox without the error. However, if the error persists, proceed to the next given options below.

Option 2 – Ensure that all the supporting processes and services are running properly

If running Windows Sandbox as an administrator didn’t fix the error, you have to ensure that all related processes for Windows Sandbox are running properly. To do that, follow these steps:
  • Tap the Win + R keys to launch the Run utility and type “services.msc” in the field and hit Enter to open the Windows Services Manager.
  • Next, from the list of services, look for the following services in the given order:
    • Network Virtualization Service
    • Virtual Disk
    • Hyper – V Virtual Machine
    • Hyper – V Host Compute Service
    • Container Manager Services
  • After you find the aforementioned services, restart each one of them.
  • Once done, try to open the Windows Sandbox again and see if the error is fixed or not.

Option 3 – Try to install any pending Windows Updates

If the second option still didn’t work, then you might want to check Windows Updates on your computer and see if there are any pending Windows Updates you have to install. All you have to do is go to the Windows 10 Settings app and then go to the Windows Updates section and click on the “Check for updates” button to check if there are any pending updates that are needed to be installed. This could fix the Windows Sandbox error.
Read More
Microsoft Office Windows 11 edition
Microsoft has officially announced details about the newest upgrades to its office 365 suite moving forward along with its new OS release. It seems that Microsoft has listened to its user base and feedback since Word, Excel, and PowerPoint are getting much-needed redesign taking into account many suggestions from the community. The new office should feel more like an application suite guiding focus on the interconnection of applications themselves providing users with a much more natural experience of using them.

The new office features so far

From Microsoft themselves:
“This Office visual refresh is based on feedback from customers who asked for a more natural and consistent experience within and between your applications, specifically on Windows. With this update, we deliver an intuitive, coherent, and familiar user interface, using the Fluent Design principles, across all your applications: Word, Excel, PowerPoint, OneNote, Outlook, Access, Project, Publisher, and Visio. We aligned this visual refresh with the design of Windows 11 to provide seamless experiences on your PC.”
It is always refreshing to hear when a company listens to its user base and actually does what is needed instead of trying to invent the wheel.

office appsHow to switch

Since beta is already rolling and if you have an active 365 subscription to office suite visual refresh will be automatically available to all Office insiders running beta channel builds. It can be turned on and off using the coming soon feature in the top right corner of the menu in any application. Just click on the megaphone icon to open the coming soon pane and apply settings to all office apps. Note that The Coming Soon feature is not available in Access, Project, Publisher, or Visio. If you turn on the visual refresh in any of the 4 apps mentioned above (Work Excel, PowerPoint, or OneNote), it will also be available in these 4 apps.

Difference themselves

The Home tab menu still has a familiar look with a few tweaks. For example, accessing frequently used Word commands will be a lot easier. By navigating to Designer > Show Quick Access Toolbar, users can add a customizable shortcut ribbon to Word that houses conveniently placed options. Also, the office will not match your Windows operating system color theme so if you have a dark theme enabled, the office will also have a dark color theme. Color palettes are more neutral, corners are a bit softer but customizable ribbons are a win here for me.

office dark modeConclusion

There was not much said other than visual upgrades and small tweaks that were supposed to make your life easier but then again Windows 11 itself is in the same boat. I am not sure if this is a great update offering just some visual tweaks and focus on workflow mechanics or just being plain lazy and trying to cash in visuals as a completely new product.
Read More
Fix error code 16 in Windows 10
Access denied error code 16 is tied to websites, it is an error which you will encounter when trying to visit some specific website or if you are unlucky on all of the websites. Lucky for us this error is fixable and in order for us to do this, follow this guide for possible solutions.
  1. Check Date and Time, Incorrect date and time can often interfere with services in your Windows, browsers are not different and this can cause some websites not to be shown. Check your date and time and set it correctly if needed.
  2. Try to access the website from another device. If you manage to open a website on another PC or some other device then keep reading in order to find the solution, if you can not, then the problem is on the website itself.
  3. Turn off Firewall or antivirus. New antivirus and firewall applications can sometimes mark certain websites as malicious and will cut contact with them rendering them unable to be accessed or opened. Try turning the firewall and antivirus temporarily off and then try to access the website.
  4. Try opening web site in another browser. To eliminate browser-specific issues and their configuration, try opening the website in another browser.
  5. Disable PROXI server. Some applications, especially malicious ones can change your proxi setting in LAN. go to your LAN settings and turn off proxi if it is enabled.
  6. Reset your Browser. If this issue is caused by bad data in your browser or by its settings and preferences, resetting the complete browser will solve the issue.
  7. Use VPN. Sometimes the reason for you was not able to access some website might be because the site is not available for your region, to bypass this issue use VPN and reroute your location.
Read More
How to Fix Logon.scr Application Error

Logon.scr Application Error - What is it?

To understand Logon.scr application error, it is first important to understand the function of logon.scr. Logon.scr is an important file that is located in the Windows\System32 folder. It guarantees Windows systems stability. Logon.scr application error occurs when logon.scr file gets corrupt. It is a common system error that can happen in most Windows platforms. It usually pops up during system start-ups and when trying to launch certain programs. Some of the common systems of this error code include: system halt, freeze, no application icons are visible on the desktop, random blue screen of death and system performance decreases dramatically.

Solution

Restoro box imageError Causes

Two of the most common causes of logon.scr application error is:
  • Corrupted and damaged logon.scr file
  • Viral infection
It is advisable to fix this error code immediately because it leads to serious damages. It is fatal and can result in a system crash; therefore resolve it right away.

Further Information and Manual Repair

To resolve this issue on your computer you don’t have to spend hundreds of dollars to hire a professional for the job. The good news is that it can be repaired easily and does not require any technical expertise. Here are some of the most effective and easy DIY methods to resolve the error on your screens.

Method 1 - Replace the Damaged and the Corrupted Logon.scr File

Whether the file gets corrupted or is accidentally deleted, the best way to fix the issue is to download the Logon.scr file again from a reliable website and install in the following location C:\Windows\System32. Alternatively you can also get the file copy form another proper functioning computer by using flash drive if you don’t have an internet connection to download the logon.scr file online.

Method 2 - Restore Points by Applying System Restore of Windows

Another way to resolve this is to restore points to bring back your system to the previous state before the error occurred. To do this, simply click the start button and type ‘System Restore’. Now click System Restore in the result and click next. Select the restore point in the list and click the next button to proceed. To activate changes reboot your PC.

Method 3 - Scan and Remove Viruses

If Logon.scr application error still persists, then it could be due to viruses. To resolve, install a powerful anti-virus. Scan your entire PC and remove viruses.

Method 4 - Repair the Registry

Corrupt and damaged Logon.scr file also triggers issues with the registry. DLL files and other important files like Logon.scr application files may get damage due to too many bad and invalid registry entries. Registry stores all the activities performed on the PC including unnecessary files like junk files and cookies. If these are not removed timely, these files accumulate and corrupt important files. Therefore, to fix the error it is advisable to clean and repair the registry. The best way to go about is to download Restoro. This is a user-friendly and multi-functional PC Fixer deployed with a registry cleaner. It scans for all registry errors and removes all the invalid entries. It cleans the registry and repairs the damaged files thereby resolving the issue in seconds. Click here to download Restoro and resolve the Logon.scr application error now!
Read More
Fix NETWORK_FAILED error in Chrome
Although the Google Chrome browser is one of the most used browsers, a lot of things could still go wrong when browsing the web using it. One of the errors you might encounter is the “ NETWORK_FAILED ” error. This kind of error in Chrome indicates that Chrome wasn’t able to send your request through the network connection. It could be that your computer has trouble connecting to a stable internet connection or there is some plugin in your Chrome browser that is causing the issue. The worst-case would be malware. But worry not for this post will guide you on what you can do when you encounter the NETWORK_FAILED error in Google Chrome. Make sure to follow each one of the options given below and see which one of them worked best for you.

Option 1 – Disable or remove any unwanted extensions in Chrome

As you know, browser extensions help in enhancing the browsing experience but there are also times when it does exactly the opposite, and such is the case with the NETWORK_FAILED error in Chrome. It could be that one of the extensions in your browser is the one that’s causing the trouble. To disable or remove these unwanted extensions, here’s what you have to do:
  • Launch Google Chrome, press Alt + F, move to More tools, and click Extensions.
  • Look for Search.tb.ask.com or any other unwanted add-ons, click the Recycle Bin button, and choose Remove.
  • Restart Google Chrome, then tap Alt + F, and select Settings.
  • Navigate to the On Startup section at the bottom.
  • Select “Open a specific page or set of pages”.
  • Click the More actions button next to the hijacker and click Remove.

Option 2 – Run the Malware Scanner and Cleanup tool in Chrome

If removing or disabling the unwanted extension didn’t help in fixing the error, you can try using the built-in malware scanner and cleanup tool in Google Chrome. These tools help you get rid of any unwanted pop-ups, ads, unusual Startup pages, toolbars, and even malware.

Option 2 – Run the Malware Scanner and Cleanup tool in Chrome

  • Launch Google Chrome and then tap the Alt + F keys.
  • After that, click on Settings.
  • Next, scroll down until you see the Advanced option, once you see it, click on it.
  • After clicking the Advanced option, go to the “Restore and clean up the option and click on the “Restore settings to their original defaults” option to reset Google Chrome.
  • Now restart Google Chrome.

Option 3 – Try to disable the Proxy

If you are using a proxy, you might want to consider disabling it as it could have something to do with the NETWORK_FAILED error.
  • Tap the Win + R keys to open the Run dialog box.
  • Then type “cpl” and hit Enter or click OK to open the Internet Properties.
  • After that, go to the Connections tab where you should see the LAN settings. Click on it.
  • Next, uncheck the “Use a Proxy Server for your LAN” and ensure that the “Automatically detect settings” option is checked as well.
  • Then click Ok and then Apply to save the changes made.
  • Restart your PC.

Option 4 – Flush DNS and reset TCP/IP

  • Click the Start button and type in “command prompt” in the field.
  • From the search results that appear, right click on Command Prompt and select the “Run as administrator” option.
  • After opening Command Prompt, you have to type each one of the commands listed below. Just make sure that after you type each command, you hit Enter
    • ipconfig /release
    • ipconfig /all
    • ipconfig /flushdns
    • ipconfig /renew
    • netsh int ip set dns
    • netsh winsock reset
After you key in the commands listed above, the DNS cache will be flushed and the Winsock, as well as the TCP/IP, will reset.
  • Now restart your computer and open Google Chrome then try opening the website you were trying to open earlier.

Option 5 – Delete the WLAN Profiles

Deleting the WLAN Profiles might be a good idea if you are not able to connect to the internet on your computer and if you’re using Wi-Fi. It could be that the networks that were connected previously have gone rogue which is why it is not connecting properly. And so deleting the WLAN profiles would be for the best. That should do it.
Read More
How to Fix Windows 10 Error Code 0xc0000142

Error Code 0xc0000142, What is it?

Error code 0xc0000142 is an error code that affects Windows 10 users. It often occurs when users attempt to run Windows applications. The message in the application error box allows users to recognize the error as it states that “the application was unable to start correctly (0xc0000142).” Common symptoms of this error code include the following:

  • Inability to start applications
  • Inability to completely run Windows applications
  • The appearance of error code 0xc0000142 message box

Error Causes

Error code 0xc0000142 in Windows 10 is often caused by issues related to startup programs, corrupted files or other applications. To address this issue, the source of the issue needs to be located. But how will users be able to do this while the error code is present?

Further Information and Manual Repair

To fix error code 0xc0000142 users will need to employ at least one manual repair procedure. This may include checking your system for corrupt files through tools like Microsoft’s System File Checker (SFC). If you are uncertain of your skills or prefer to get professional support, contact a Windows repair technician to assist you.

The top three methods to resolve error code 0xc0000142 include the following:

Method One: Perform a Clean Boot

A clean boot is one of the most basic procedures you can run to solve a Windows-based error code of this nature. It works by identifying whether or not conflict among startup programs is preventing Windows applications from running properly. This occurs through a clean boot process involving Windows using a minimal set of drivers and startup programs when you reboot.

Here is what you’ll need to do:

  • Step one: Go to Start and type msconfig
  • Step two: Right-click and select System Configuration
  • Step three: Select Service tab and click Hide all Microsoft Services then click Disable all.
  • Step four: Click Startup tab within the System Configuration dialog box.
  • Step five: Select Open Task Manager
  • Step six: Within the Startup tab of Task Manager, select Disable for each Startup item, then close Task Manager.
  • Step seven: Click OK on the Startup tab of System Configuration.
  • Step eight: Restart your computer.

This method resolves software conflict arising when you attempt to update, run a program or simply use your operating system. However, if error code 0xc0000142 remains unresolved after you restart your machine, follow the next step below.

Method Two: Run a System File Checker Scan

System File Checker (SFC) is a utility tool built into the Windows 10 operating system, as well as other versions of Windows, to detect and repair corrupted system files. Since corrupted system files can result in error code 0xc0000142, run this tool by following the steps below:

  • Step one: Go to Start and type Command Prompt or CMD.
  • Step two: Right-click and select Administrator
  • Step three: Check for and repair corrupted system files. Simply type sfc /scannow. (Be sure to place a space between “sfc” and “/scannow”).

Once these procedures are followed, the System File Checker tool will automatically scan your machine, and find and repair corrupted files. If this is the source or underlying cause of error code 0xc0000142 on your system, the error code will be resolved. However, if the source of the issue is not due to corruption in our system or is simply a more complicated issue try the next method highlighted below.

Read More
1 2 3 171
Logo
Copyright © 2023, ErrorTools. All Rights Reserved
Trademark: Microsoft Windows logos are registered trademarks of Microsoft. Disclaimer: ErrorTools.com is not affiliated with Microsoft, nor claims direct affiliation.
The information on this page is provided for information purposes only.
DMCA.com Protection Status