Logo

Fix Element Not Found for Bootrec /Fixboot

One of the most useful utilities for advanced users in Windows is the Windows command line or Command Prompt. It is efficient in fixing system files, checking the disk for errors as well as other intensive tasks that are made convenient using this.

One of the tasks you can carry out using Command Prompt is repairing the Windows bootup process if it encounters any issues. However, if you tried running the “bootrec/fixboot” command and you receive an error message saying, “Element not found”, read on as this post will guide you in fixing this error. This kind of error in the command line could be due to a damaged BCD or MBE, inactive system partition, or it could also be that there is no drive letter being assigned to the EFI partition. Whichever the case is, here are some possible fixes that should help you resolve the problem.

Option 1 – Try to repair BCD

As mentioned the error could be caused by a damaged BCD and so to fix the problem, you need to repair BCD by following these steps:

  • First, make sure that you have a bootable Windows 10 USB drive with you and use it to boot your computer.
  • Once you’re on the Welcome Screen, click on Next.
  • After that, click on Repair your computer located at the bottom-left portion of the window.
  • Then select Troubleshoot > Advanced Options > Command Prompt.
  • After you open the Command Prompt window, execute the following command:

bootrec /fixboot

  • Afterward, enter the next command below to rename the BCD file:

ren BCD BCD.bak

  • Next, type the following command and make sure to replace “b:” with the letter of your bootable drive attached to your computer.

bcdboot c:Windows /l en-us /s b: /f ALL

  • Now, wait until the process is completed and restart your computer to successfully apply the changes made.

Option 2 – Try assigning the drive letter to the EFI partition

  • Tap the Win + X keys or right-click on the Start button and click on Command Prompt (Admin) to open Command Prompt with admin privileges.
  • Then type the following command to start the Diskpart utility:

diskpart

  • After that, if you receive a UAC prompt, just click on Yes to proceed.
  • Next, type the following command to list all the volumes created on your PC including both types of partitions that are visible to a normal user in the File Explorer as well as the ones created by Windows 10 by default which helps it in storing the boot files and other important system files:

list volume

  • Now type the following command to select the desired volume:

select volume number

  • Then type the following command to assign a letter to the selected volume:

assign letter=<LETTER>

Note: Make sure to replace “<LETTER>” with the letter you want to allocate to that partition. Afterward, it will assign a letter to the selected volume.

  • Reboot your PC to apply the changes made.

Option 3 – Try setting the System Partition to Active

Like the first given option, you also have to make sure that you have a bootable Windows 10 USB drive before you proceed to set the System Partition to Active. Once you have it covered, refer to these steps:

  • Boot your computer using the bootable Windows 10 USB drive.
  • Next, click Next when you get to the Welcome Screen.
  • Then click on Repair your computer located at the bottom left part of the window and select Troubleshoot > Advanced Options > Command Prompt.
  • After opening Command Prompt, type the following command and hit Enter to start the Diskpart utility. It is a command line-based utility just like Command Prompt but has a UAC prompt once you provoke it. So if you encounter a UAC prompt, just click on Yes to proceed.

diskpart

  • Now type the following command:

list disk

  • From there, select your primary disk by typing the following command:

select disk number

  • After that, list all the partitions on the selected disk by entering the following command:

list partition

  • The command you just entered will list all the partitions created on your PC including both types of partitions that are visible to a normal user in the File Explorer as well as the ones created by Windows 10 by default which helps it in storing the boot files and other important system files.
  • Now type the following command to select the partition that is usually around 100 MB in size:

select partition number

  • Finally, type the following command to mark the partition active:

active

  • Then type the “exit” command to exit the disk part utility.

Do You Need Help with Your Device?

Our Team of Experts May Help
Troubleshoot.Tech Experts are There for You!
Replace damaged files
Restore performance
Free disk space
Remove Malware
Protects WEB browser
Remove Viruses
Stop PC freezing
GET HELP
Troubleshoot.Tech experts work with all versions of Microsoft Windows including Windows 11, with Android, Mac, and more.

Share this article:

You might also like

Fix rtf64x64.sys Blue Screen error on Windows
rtf64x64.sys Blue Screen error happens in random intervals but it is a regular occurrence, it can happen when playing games, when watching movies, or even when the computer is idle. in this article we will guide you on how to resolve this error from the most simple steps you could take and do not worry, altho the error seems dreadfully and scary, it is nothing to worry about. If you can boot Windows normally after error great, proceed with instructions, else reboot into safe mode or use installation media to boot.
  1. Use official Microsoft online troubleshooter Microsoft has an online blue screen troubleshooter that was made specifically for this kind of situation. Go to Troubleshoot screen error and answer questions needed. Most of the time this will be enough to solve any blue screen issue.
  2. Update network and sound drivers How is this error traced back to Realtek devices, go to the Realtek website and download drivers. Install them and reboot the system.
  3. Use a dedicated software solution DRIVERFIX is an application made for these and other kinds of driver issues and problems, it is one click automated solution for driver fixing. Visit the Driverfix site and download the application
  4. Perform system Restore If you have not managed to fix the issue with previous steps roll back to a previous restore point when everything was working.
  5. Replace network or sound card If everything failed including system restore then it is likely that it is a hardware malfunction. Replace faulty components and you should not receive errors anymore.
Read More
Remove EmailAccountLogin PUP Removal Tutorial

EmailAccountLogin is a browser extension for Google Chrome, Mozilla, and Internet Explorer. This extension enables you one-click access to your favorite email providers, allowing you to easily check your email without typing the web address.

From the author: One-Click Access to quick links to the most popular email providers.

The Email Account Login new tab extension provides convenient, one-click access to several popular email services including Gmail, Yahoo, Facebook, Outlook, and Live mail along with providing direct access to a web search.

EmailAccountLogin is a browser hijacker, this extension hijacks your home page and replaces it with its own search engine. While active this extension monitors your website visits, links, clicks, and personal information. This information is later sold/forwarded to better server ads across its network. While using EmailAccountLogin you will see additional unwanted ads injected into your search results, sponsored links, and even sometimes pop-up ads. Several anti-virus scanners have categorized EmailAccountLogin as a Browser Hijacker and therefore, for security reasons, it is not recommended to keep it on your computer.

About Browser Hijackers

Browser hijack is a very common type of online fraud where your internet browser configuration settings are modified to make it do things you don’t intend. Browser hijacker malware is developed for many different reasons. It redirects you to the sponsored sites and inserts advertisements on the browser that helps its developer generate earnings. It may seem harmless, but most of these sites are not legitimate and could present a significant threat to your online safety. As soon as the program attacks your laptop or computer, it starts to mess things up a whole that slows your PC down to a crawl. In the worst-case scenario, you may be pushed to tackle serious malware threats as well.

Browser hijacking signs and symptoms

Signs that your internet browser is hijacked include: 1. your homepage has been reset to some mysterious webpage 2. when you key in a URL, you find yourself regularly directed to a different webpage than the one you actually meant 3. default web engine is modified 4. you’re getting new toolbars you haven’t witnessed before 5. you notice numerous ads pop up on your browsers or display screen 6. your web browser starts running slowly or displays frequent errors 7. you are blocked to access the websites of computer security solution providers.

How they get into your PC

Browser hijackers may use drive-by downloads or file-sharing networks or perhaps an e-mail attachment in order to reach a targeted computer. Many browser hijackings originate from add-on applications, i.e., toolbars, browser helper objects (BHO), or extensions added to web browsers to provide them additional functionality. A browser hijacker may also come bundled up with some freeware that you inadvertently download to your computer, compromising your internet security. A good example of some notorious browser hijackers includes Anyprotect, Conduit, Babylon, SweetPage, DefaultTab, Delta Search, and RocketTab, but the names are constantly changing. Browser hijacking can bring about severe privacy issues and even identity theft, disrupt your browsing experience by taking control over outbound traffic, considerably slows down your computer by depleting lots of resources and result in system instability also.

How to repair a browser hijack

Certain hijackers can be removed by simply uninstalling the corresponding free software or add-ons from the Add or Remove Programs in the Microsoft Windows control panel. Yet, some hijackers are far harder to find or get rid of as they might get themselves connected with some critical system files which allow it to operate as a necessary operating-system process. Furthermore, manual removal demands you to execute several time-consuming and complex actions which are very difficult to do for novice computer users. Browser hijackers can be effectively removed by installing and running anti-malware software on the affected PC. Safebytes Anti-Malware has a cutting-edge anti-malware engine to help you avoid browser hijacking in the first place, and mop up any existing issues. Along with anti-virus software, a PC optimizer tool will help you repair Windows registry errors, eliminate unwanted toolbars, secure your internet privacy, and improve overall system performance.

Find Out How To Install Safebytes Anti-Malware On An Infected Computer system

All malware is bad and the effects of the damage can vary according to the specific type of malware. Some malware variants modify browser settings by adding a proxy server or change the PC’s DNS configurations. In these cases, you will be unable to visit some or all of the websites, and thus unable to download or install the necessary security software to get rid of the malware. So what should you do if malicious software keeps you from downloading or installing Safebytes Anti-Malware? Follow the instructions below to get rid of malware through alternate methods.

Install the anti-malware in Safe Mode

In Safe Mode, you may adjust Windows settings, un-install or install some software, and eradicate hard-to-delete malware. In the event, the malware is set to load automatically when the PC starts, shifting to this mode may well prevent it from doing so. To start the computer into Safe Mode, hit the “F8” key on the keyboard just before the Windows logo screen comes up; Or right after normal Windows boot up, run MSConfig, look over the Safe Boot under the Boot tab, and then click Apply. After you restart into Safe Mode with Networking, you may download, install, as well as update the anti-malware program from there. At this point, you could run the antivirus scan to eliminate viruses and malware without any interference from another application.

Utilize an alternate internet browser to download security software

Some malware might target vulnerabilities of a specific browser that obstruct the downloading process. When you suspect that your Internet Explorer happens to be hijacked by a virus or otherwise compromised by online hackers, the most effective plan of action is to switch over to a different web browser such as Chrome, Firefox, or Safari to download your chosen computer security software – Safebytes Anti-Malware.

Install and run anti-virus from your flash drive

Another option is to save and run an antivirus software program entirely from a USB drive. Do these simple measures to clear up your affected PC using portable anti-malware. 1) On a virus-free PC, install Safebytes Anti-Malware. 2) Plug the Flash drive into the uninfected computer. 3) Double-click the Setup icon of the antivirus program to run the Installation Wizard. 4) Choose the drive letter of the pen drive as the location when the wizard asks you where you would like to install the anti-virus. Follow activation instructions. 5) Transfer the flash drive from the uninfected computer to the infected computer. 6) Double-click the antivirus software EXE file on the thumb drive. 7) Click on “Scan Now” to run a complete scan on the infected computer for malware. If no other method of downloading and installing an anti-malware program works, then you’ve no other choice than to hit the final resort: a full Windows reinstallation, which can get rid of that nasty virus and help you regain internet access. If you’re unsure which method to use, simply contact our toll-free number 1-844-377-4107 to speak to our technical team. Our experts will take you step-by-step through the malware removal process on the phone and also restore your computer remotely.

SafeBytes Anti-Malware: Lightweight Malware Protection for Windows PC

If you’re looking to download an anti-malware application for your computer, there are numerous tools out there to consider nonetheless, you just cannot trust blindly anyone, irrespective of whether it is paid or free software. Some of them are excellent, some are ok types, and some will harm your PC themselves! You need to choose one that is dependable, practical, and has a strong reputation for its malware source protection. On the list of recommended software programs is SafeBytes Anti-Malware. SafeBytes has a very good history of top-quality service, and customers are very happy with it. SafeBytes anti-malware is a very effective and easy-to-use protection tool that is made for end-users of all levels of IT literacy. With its cutting-edge technology, this application can help you get rid of multiples types of malware including computer viruses, worms, PUPs, trojans, adware, ransomware, and browser hijackers. There are numerous great features you will get with this particular security product. The following are some of the features you might like in SafeBytes. Robust Anti-malware Protection: This deep-cleaning antimalware software goes much deeper than most anti-virus tools to clean your computer system. Its critically acclaimed virus engine locates and disables hard to remove malware that conceals deep inside your computer. Real-time Active Protection: SafeBytes offers real-time active monitoring and protection from all known computer viruses and malware. This software will always keep track of your computer for any suspicious activity and updates itself regularly to keep current with the latest threats. Fast Scan: This computer software has one of the fastest and most efficient virus scanning engines in the industry. The scans are highly accurate and take a little time to complete. Internet Security: SafeBytes gives an instant safety rating on the web pages you are going to check out, automatically blocking harmful sites and making sure that you’re certain of your safety while browsing the net. Lightweight: This application is not “heavy” on the computer’s resources, so you’ll not notice any overall performance problems when SafeBytes is operating in the background. 24/7 Guidance: You can obtain high levels of support round the clock if you’re using their paid software.

Technical Details and Manual Removal (Advanced Users)

If you wish to manually remove EmailAccountLogin without the use of an automated tool, it may be possible to do so by removing the program from the Windows Add/Remove Programs menu, or in cases of browser extensions, going to the browsers AddOn/Extension manager and removing it. You will likely also want to reset your browser. To ensure the complete removal, manually check your hard drive and registry for all of the following and remove or reset the values accordingly. Please note that this is for advanced users only and may be difficult, with incorrect file removal causing additional PC errors. In addition, some malware is capable of replicating or preventing deletion. Doing this in Safe Mode is advised.

The following files, folders, and registry entries are created or modified by EmailAccountLogin

Files: C:Program FilesEmail Account Login C:UserAppDataRoamingEmail Account Login C:ProgramDataEmail Account Login C:UsersUserAppDataLocalEmail Account Login %TEMP%CF49E01A-6F41-4B56-9743-DBC375176677emailaccountlogin.exe %LOCALAPPDATA%MicrosoftInternet ExplorerRecoveryHighActiveRecoveryStore.E2864823-7CB8-11E7-989D-0A00278A626A.dat %LOCALAPPDATA%MicrosoftInternet ExplorerRecoveryHighActiveE2864824-7CB8-11E7-989D-0A00278A626A.dat %LOCALAPPDATA%MicrosoftInternet Explorerframeiconcache.dat %TEMP%CF49E01A-6F41-4B56-9743-DBC375176677Commondbg.js %TEMP%CF49E01A-6F41-4B56-9743-DBC375176677Commonimggreen-btn.png %TEMP%CF49E01A-6F41-4B56-9743-DBC375176677Commonimggrey-btn.png %TEMP%CF49E01A-6F41-4B56-9743-DBC375176677Commonjquery.min.js %TEMP%CF49E01A-6F41-4B56-9743-DBC375176677Commonjson3.min.js %TEMP%CF49E01A-6F41-4B56-9743-DBC375176677Commonstats.js %TEMP%CF49E01A-6F41-4B56-9743-DBC375176677Finish.zip %TEMP%CF49E01A-6F41-4B56-9743-DBC375176677Finishindex.html %TEMP%CF49E01A-6F41-4B56-9743-DBC375176677Finishscript.js %TEMP%CF49E01A-6F41-4B56-9743-DBC375176677Finishstyles.css %TEMP%CF49E01A-6F41-4B56-9743-DBC375176677IES.zip %TEMP%CF49E01A-6F41-4B56-9743-DBC375176677IESie.png Registry: HKEY_LOCAL_MACHINESYSTEMCurrentControlSetServicesWpm HKCUSoftwareMicrosoftWindowsCurrentVersionInternet Settingsrandom HKEY_LOCAL_MachineSoftwareClasses[adware name] HKEY_CURRENT_USERSoftwareMicrosoftWindowsCurrentVersionRun .exe HKEY_CURRENT_USERSoftwareMicrosoftWindowsCurrentVersionInternet Settings CertificateRevocation = 0 HKEY_LOCAL_MACHINESOFTWAREMicrosoftWindowsCurrentVersionrunrandom HKEY_CURRENT_USERSoftwareMicrosoftInternet ExplorerMain Default_Page_URL
Read More
Reversing Mouse & Touchpad scrolling direction
As you know, aside from making computing a lot easier, mouse and touchpad, it also makes computing more efficient and less time-consuming. And so life is unimaginable without these useful devices. However, it is a known fact that you can’t customize these devices since all touchpads and mice come with their own default scrolling direction but worry not for in this post you will be guided on how you can reverse their default scrolling directions. Every user has their own different preferences when it comes to scrolling directions. You might want the scrolling directions to look like the page is being scrolled in the same direction in where you move your fingers over the touchpad or you might prefer it in an inverted way. Reversing the scroll direction for your device’s touchpad is really easy as Windows by default offers this customization. So if you are trying to find a way to reverse the scrolling direction of your mouse, then you have to follow a tricky little method which will be provided in this post. It is apparent from the number of settings the touchpad is available that it has become more customizable. You can configure everything, from its gestures, taps, sensitivity, and even its scrolling direction. And now, if you want to reverse its scrolling direction, here’s what you have to do: Step 1: Tap the Win + I keys to open Settings. Step 2: From there, go to Devices and select Touchpad from the menu. Step 3: Next, look for the Scrolling Direction setting. Step 4: Then click on the drop-down and select your preferred setting.  If you want the same direction scrolling, just select the “Downwards motion scrolls down” option, and if you want the opposite select the other one. After you carry out these steps, the settings will be applied right away and you will see the changes. On the other hand, if you want to change the scrolling direction for your mouse, the procedure is not as simple as it was for the touchpad.

To reverse the scrolling direction for a mouse, refer to these steps:

Step 1: In the Start Search, type “device manager” and click on the appropriate result to open the Device Manager. Step 2: After opening the Device Manager, look for your Mouse under the “Mice and other pointing devices” section. It is mostly listed as an “HID-compliant mouse”. Step 3: Right-click on your mouse and click Properties. Step 4: From there, go to the Details tab and from the drop-down menu, select Device Instance Path. Step 5: Now take note of the value displayed on its value field and then tap the Win + R keys to open the Run dialog box. Step 6: Type in “Regedit” in the field and hit Enter to open the Registry Editor. Step 7: Next, navigate to the following location:
HKEY_LOCAL_MACHINESYSTEMCurrentControlSetEnumHID
Step 8: From this folder, you have to start matching the values in the first part of the value you’ve taken note of. Step 9: Open the folder which has the same value and repeat this for the second part of the value. Step 10: Afterwards, click on the Device Parameters and look for a property named “FlipFlopWheel” and invert its value from 0 to 1 or 1 to 0 to reverse the scrolling direction. And then restart your PC to apply the changes made. After you restart your PC, you should see the changes in the scrolling direction of your mouse. Note that you can change the value back to its original value or just use the registry backup to undo the changes you’ve made.
Read More
5 Common Windows 11 Issues You Can Solve Super Quickly

It really sucks when you can’t fully enjoy the newest version of your favorite OS.

Windows 11 is still relatively fresh and consequently has some annoying little bugs that really ruin our experience. The good news is that you’re not alone and most of them are easy to fix.

Here are 5 commonly reported Windows 11 issues and what you can do to get rid of them.

1. Windows 11 audio problems

One of the absolute most irritating things in the world is struggling with the sound on your computer. Windows 11 users have reported facing the issue of low or no sound. If you’re currently experiencing the same frustration, you can be relieved. Chances are fixing it will only take a few minutes.

The first thing to check would be whether you accidentally muted your device by pressing the mute button on your keyboard. Yes, we know it sounds a lot like the old “have you tried turning it off and on again?” But it’s important to leave no stone unturned, and the most obvious things are usually the ones we easily overlook.

Moreover, if you have several audio output sources, check whether the right one is selected. You can do this via the Action Center or through Settings. If you want to use the same source every time, we also recommend you set it as the default one.

It’s also important to have a good, up-to-date audio driver. More often than not, this will be the true cause of your audio struggles. Make sure to update your driver, and if that doesn’t work out, you can always un- and reinstall it or install a different one. 

Lastly, if all attempts remain unsuccessful, run the audio troubleshooter to figure out what’s actually going wrong.

2. Unable to find files

Such a powerful new operating system, yet it can’t seem to do the simplest thing imaginable? The File Explorer not responding on Windows 11 is one of the most frustrating and most common problems with Microsoft’s newest iteration of its awesome OS.

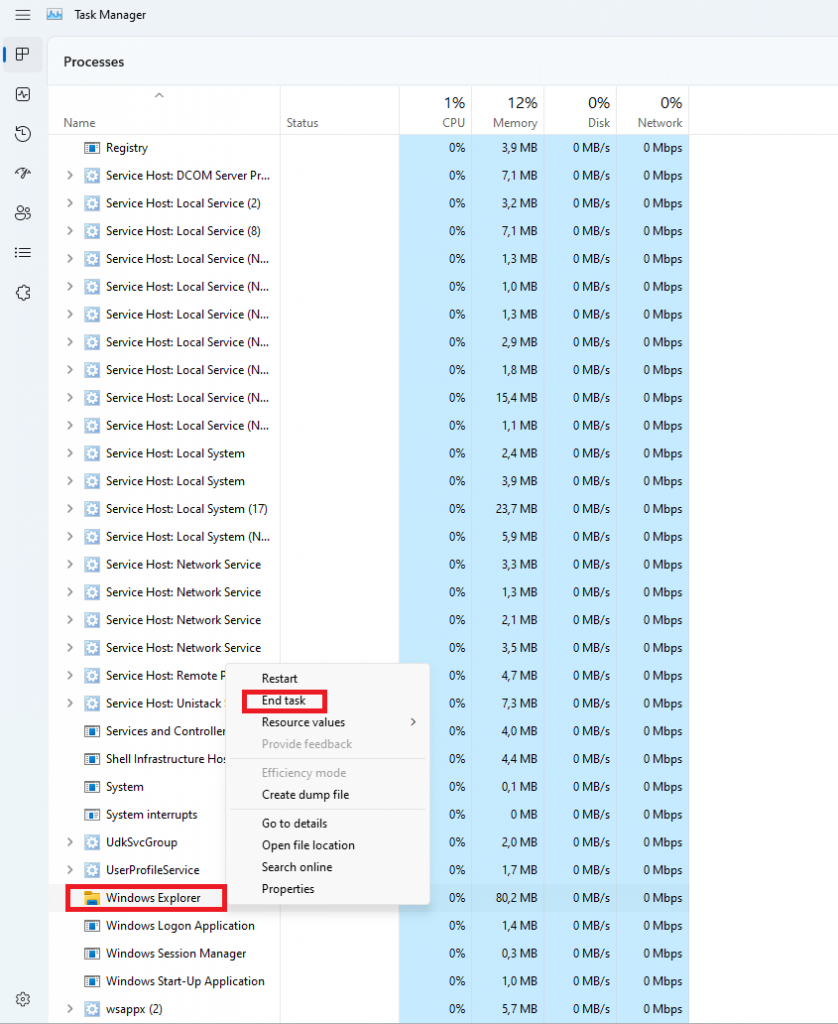
However, 9/10 times it can be fixed by simply restarting your PC. You could also try killing the Windows Explorer process in the Task Manager and then rerunning it.

If these don’t help, check whether there are any pending Windows 11 updates. A single missing update can compromise your PC’s functionality, so always make sure to install them all on time. 

Should none of that work, then there are other ways to solve the File Explorer problem. However, then the issue is probably a bit deeper and it’s no longer in the ‘easy fix’ territory.

3. Start menu not working

Just like the File Explorer, the Start menu is a fundamental element of your OS. So, it’s only natural that its malfunction grinds your gears. It may be more customizable than on previous Windows versions, but it doesn’t always work smoothly. 

If you’re facing the so-called Start menu critical error, there are a few things this could be caused by. Usually it means you turned off your system while an important update was still being installed, there is a corrupt file on your PC, or Windows forcefully stopped a program. 

Whatever the reason, the solution should be pretty simple. Try the basic steps: restarting your File Explorer (like we explained above) and signing out and back into your account. If that doesn’t do anything, you may want to try uninstalling third-party start menu apps (if you have any), since they can interfere with your default programs’ functionality.

Now, those are the easy fixes. If you get nowhere with them, you might need to identify the root cause and search for more complex solutions than that.

4. Snipping tool not working

Our beloved screenshot tool was introduced with Windows 10 and Microsoft decided to keep it. However, you were probably just as disappointed as us when you tried to run it and failed. 

Normally, this can be fixed by installing the latest Out-of-band (OOB) update, or even pending updates in general. Even if your system appears to be up-to-date, run the checker just in case.

Another cool thing Windows 11 lets you do is ‘Repair’ and ‘Reset’, which is the easiest way to troubleshoot your Snipping tool. If this fails, you can also try the good old un- and reinstall method. Simply uninstall the tool through the Control Panel and reinstall it from the Microsoft Store.

Furthermore, in the case of an upgrade from Windows 10 to 11, it may be that the old Snipping tool version is interfering with the launch of the new one. If you don’t care that much about the additional options available with the enhanced screenshot tool, you can use the old version instead.

Simply go to your C Drive, find the Windows.old folder, search for the tool and open it from there. Make sure to pin it to your taskbar as well, if you know you’re going to use it often.

5. Can’t install the latest update

The latest Windows 11 version, 22H2, has brought tons of enhancements to our dearest operating system. Unfortunately, a lot of users still haven’t had the opportunity to experience it. A mere update of your OS version should be the one thing that goes smoothly, but sometimes that’s not the case.

Failure to install 22H2 can be caused by a few things. Most commonly, the issue is caused by lack of storage space or corrupted files, but there could be other culprits.

There are a couple of things you could try. For example, it’s crucial that your drivers be up-to-date and some important services be enabled. These are: Windows Modules Installer, Background Intelligent Transfer Service, Cryptographic Service, Windows Update services.

To enable them, search ‘Services’, find the service you need and right-click on it. Open ‘Properties’ and select the startup type ‘Automatic’.

It may also be necessary to unplug all peripherals that aren’t crucial and disable third-party antivirus tools until after the update is finished. 

Ultimately, you can run the Windows Update troubleshooter to detect and fix other possible issues.

Summary

Tiny bugs like these are nothing out of the ordinary. That said, we still all hate when they happen.

Hopefully some of our solutions have helped you to a smoother Windows 11 experience. But if you’re still struggling, feel free to reach out to us. We’d be happy to help!

Read More
How to choose default applications in Windows
Hello everyone and welcome to another tutorial on errortools.com, Windows itself when it is installed has a general idea about certain file types and how to open them, for example, image files would be opened with application photos, web links with the edge, etc. So when we double click on the known file type, Windows will start the default application for that type and open the file in it. But what if we do not want to open files in applications Microsoft thinks we should? What if we want to open the website in firefox or images in photoshop, or whatever. Luckily we can easily change which application Windows uses for which file type. Click on ⊞ WINDOWS to open the start menu and choose settings. Windows 10 Star menu with marked settings iconOn the settings screen, choose Apps. Windows settings apps section markedWhen the Apps screen opens on the left click on Default apps. Windows settings default apps markedOn right, you will get a list of Windows default applications for certain types of files. Click on any application you would like to change and choose from the drop-down list a new one. Click on it and you are done.
Read More
Windows 11 vs Windows 10: Main Differences

Still sitting on the fence about upgrading to Windows 11 because you don’t know what to expect? Interestingly, the new edition somehow manages to be both a total revamp and still very similar to its predecessor in many ways. It’s really something to experience for yourself.

We do want to give you a sneak peek, though. So here’s an overview of the biggest changes Windows 11 brings to the table.

What’s different in Windows 11?

1. Visual changes

The first thing anyone will notice after switching to Windows 11 is the striking visual difference. The entire interface is smoother, cleaner and more minimalistic than on Windows 10, even resembling the macOS in some instances.
Perhaps the most obvious change in appearance is the Start menu and Taskbar location, which is now at the bottom center. It’s actually very neat, but if you’re someone who loves familiarity, don’t worry, you can move it back to the left.

Centralized Taskbar and Start menu

Moreover, you’ll notice that the Taskbar includes a Microsoft Teams icon by default (which you can, of course, remove) and that Live Tiles are gone. The News and Interests section has also been removed - or, shall we say, replaced. As opposed to Windows 10, news, weather forecasts and other information are now displayed as widgets.

To add to the cleanliness of the UI, Microsoft also enhanced the ‘Snap Layouts’ feature to help you better organize your windows and maximize screen real estate. It’s similar to app grouping on your smartphone. In Windows 10 this feature is slightly restricted, as it requires some manual resizing and dragging. In Windows 11, you can just hover over the minimize/maximize option on a window, select a layout and throw the windows in there. 

Snap Layouts
Snap Layouts

2. New accessibility features

Microsoft has certainly paid attention to accessibility with Windows 10, but Windows 11 takes this to a whole new level.

One of the ways Windows 11 has taken things up a notch is by adding the long-awaited ‘Live Captions’ feature and advanced Narrator options.

Live Captions apply both to media played on your PC as well as your own speech when you’re using the microphone. Keep in mind that, as with almost all kinds of subtitles, you have to be prepared for a potential delay. However, it’s barely noticeable and doesn’t take away from the usefulness of this awesome new feature whatsoever.

As for the Narrator, there are three new voice packs to choose from. Microsoft has tried to put emphasis on a more natural voice than we are used to. So, now you can choose between Aria, Jenny and Guy, who will read pretty much anything off your screen out loud. Aside from this, Microsoft has also expanded the list of braille displays supported by the Narrator feature. 
For users with anxiety or trouble concentrating, a welcomed addition is the Focus app, which is no longer part of the Clock app. It’s now separate and called ‘Focus Sessions’, automatically triggering the Do Not Disturb mode when activated. It blocks all pop-ups and flashes and lets you work in peace until you’re ready to switch it off.

3. Android apps

Android users may rejoice! Windows 11 supports the use of your favorite applications now. 

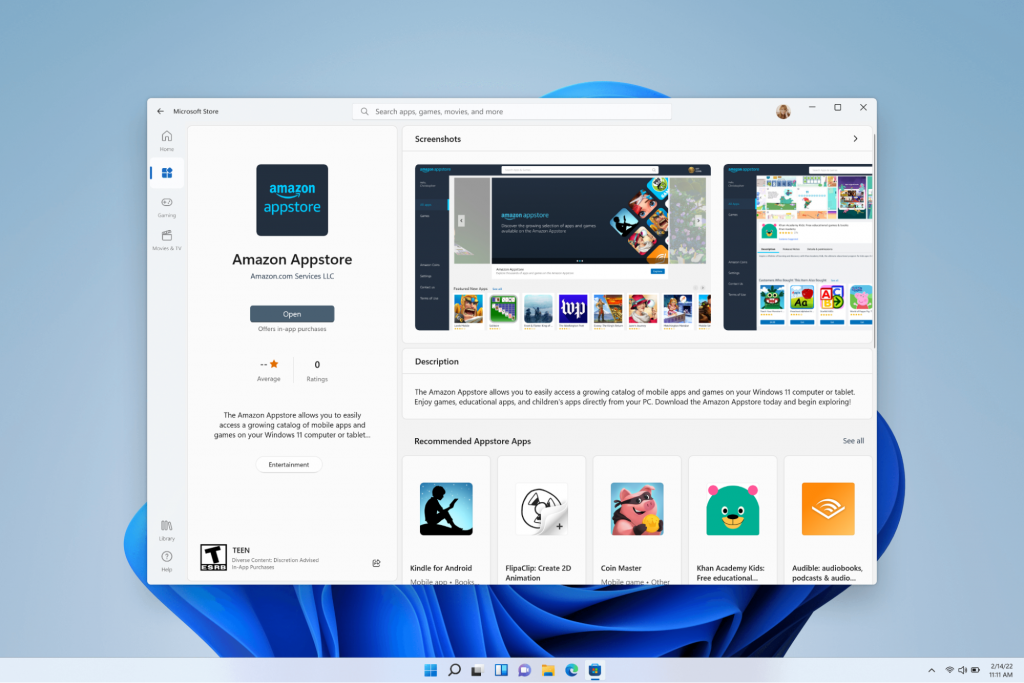
Microsoft has done this by integrating the Amazon Appstore to the Windows 11 Microsoft Store. From there, you can download your favorite Android apps and use them on your PC in a smartphone-like window.

Windows Subsystem for Android™️

Unfortunately not too many apps are supported at this time, but Microsoft is working on making the emulation possible for many more. Also, the option is only available in specific regions at this moment - check out if you’re one of the lucky ones.

4. Improved gaming performance

Avid gamers will be happy to hear that Microsoft has put some effort into streamlining Windows 11 for their gaming needs.

To give gamers a supreme visual experience, Windows 11 offers the ‘Auto HDR’ feature. As long as your monitor is HDR-compatible, this feature will automatically adjust the colors, brightness and contrast of games without any input from you. 

Another update is DirectStorage, which we were introduced to in Windows 10 already. In Windows 11, it’s been improved to tweak loading times and overall gaming performance efficiency even better. The predisposition for it to work optimally is that your device has an NVMe SSD. 

The Xbox Game Bar also helps gamers towards a smoother experience. It allows in-game screenshots, viewing processes that are running (similar to the Task Manager), monitoring the CPU and GPU performance and frame rate, integrating the Xbox App and more. There’s also a number of widgets you can now use with the Game Bar, for example the Spotify widget.

Xbox Game Bar
Xbox Game Bar

Another cool addition is the Xbox Game Pass, which unlocks hundreds of games to play on your Xbox App, with new additions coming in every month.

5. Smart App Control

Aside from a sleek new look and better accessibility for all users, Windows 11 also comes with a security power-up. Bear in mind that this feature is only available on clean Windows 11 installs. 

Smart App Control (SAC) is an AI-powered new feature designed to protect your PC from potential threats. It blocks untrustworthy apps and adware and helps detect potentially unwanted apps, maintaining your PC’s performance and keeping your system safe.

It comes with an ‘Evaluation’ mode, which you should definitely select when running SAC for the first time. That way, the app monitors your usage and assesses whether you’re a candidate for SAC. Some users need it to be on all the time, for others it might be too distracting. Evaluation mode will turn SAC on or off based on your usage.

Don’t disable SAC again unless you’re absolutely sure you don’t need it, since reenabling it will require a fresh install. We recommend you don’t turn it off, as it is a neat feature protecting your data and files from malware at all times.

Summary

Have we piqued your interest in trying Microsoft’s latest OS? It’s a pretty exciting new iteration, but we’ll let you find out for yourself. We hope you like it!

Read More
Change mouse pointer size & style in Windows11
mouse pointerWindows 11 provides several different ways to make your cursor stand out and be easier to spot inside it. You can make the mouse pointer larger, invert it, or change its color.
  1. Press ⊞ WINDOWS + I to open settings
  2. Click on Accessibility in the sidebar
  3. Select Mouse Pointer and Touch
  4. Adjust mouse cursor size with size slider by clicking on circle and dragging it left or right
  5. Under Mouse Pointer Style pick desired style from White, Black, Inverted, and Custom
    1. White: The cursor is white with a black outline (standard setting)
    2. Black: Cursor is black with a white outline
    3. Inverted: Cursor automatically changes color to an inverted version of the color it is currently hovering over
    4. Custom: You can pick the color for the cursor that you want.
And that is all about it, once you are done with pointer customization just close settings, all changes are saved automatically.
Read More
Perform Voice Activation Troubleshooting
One of the smoother things that Microsoft did with the Windows 10 operating system is to separate Cortana from Search. This means that Cortana is strictly now a voice assistant and many users have seen it coming since not everyone uses Cortana. In addition, it also paved the way for other virtual assistants like Alexa to get on board with Windows 10. And now in the newly released Windows 10 v1903, Windows has brought the Voice Activation under Privacy. In this post, you will be guided on how to perform the Voice Activation troubleshooting on your Windows 10 computer. To use Voice Activation in Windows 10, follow, in the Start Search, type “voice activation” and click on “Voice activation privacy settings” listed in the search results. And from there, you can choose to allow apps to use Microphone, like listen in the background as well as select which app can access it. Each time enabled voice assistants continue to listen via microphone for the voice keyword, the app will activate itself for the keyword and will react depending on what you ask it. So if you are using a voice assistant and it didn’t respond when you speak the keyword, just go to Settings > Privacy > Voice Activation and follow these steps:

Option 1: Check the App permission to use the voice activation feature.

You have to make sure that the toggle button for the Voice activation feature is turned on globally. It can be found under the “Allow apps to use voice activation” section. You also have to ensure that the microphone is available for apps that use this feature.

Option 2: Voice activation is not working under the lock screen.

If you tend to use the voice assistant even when your computer is locked, Microsoft has a specific setting that you have to turn on. You need to make sure that the toggle button for the “Allow apps to use voice activation when this device is locked” option is turned on. However, keep in mind that the voice assistants are not locked to only recognize your voice as they also answer to anyone who will use the voice keyword.

Option 3: Check the individual permissions of apps.

If the voice assistant is not working, you have to check each one of the apps’ permissions for voice keyword, and the option to work under locked condition works.

Option 4: Run the Microphone troubleshooter.

If you’ve verified that the settings are in place, then you have to run the Microphone troubleshooter by simply going to Settings > Privacy > Microphone. From there, make sure that the toggle button for the following options is turned on:
  • Allow apps to access your microphone
  • Enable microphone access for the voice assistant
And if it’s a desktop app, you have to enable the toggle on at the end.
Read More
Resolve Windows Update Not enough disk space
If you are trying to update your Windows 10 computer but are not able to do so since your computer is running low on storage then this obviously indicates that there is not enough disk space available on your drive where Windows 10 has been installed. As you know, when Windows 10 downloads the update packages, it extracts them in a separate folder which means that there should be enough space on that particular folder for the update to begin with. Windows do not really check systems for any adequate space requirements before it even initializes the update or upgrades and you only get to know about it right when the update process starts. On Windows 10 thin clients or the ones with embedded systems that have limited storage space, when Windows Update runs, the update initialization may fail because as pointed out, Windows does not check systems for adequate space requirements so you may have to do the work for them by making sure that your disk has enough space available. Here are some suggestions you can follow to resolve Windows 10 update issues on computers with low storage space.

Option 1 – Delete the files from the Download folder

Since you are going to delete everything manually, you need to create a backup for all your important files which you may have placed in the Download folder. After you create backup copies of important files, delete the files from this folder or you could simply tap the Shift + Del keys to remove the files permanently after you selected them all.

Option 2 – Change the Windows Update Folder location

You might have to change the Windows Update folder location where Windows download all the files need to update the operating system if you cannot really create some space on your primary driver. So all you have to do is set the drive with enough space available for the update to be completed.

Option 3 – Uninstall apps and programs you no longer use

In some cases, apps and programs take up a lot of space on your drive. So if there are programs or apps that you no longer use, you can uninstall them to save storage space. To do so, follow these steps:
  • In the search box, type in “control” and then click on Control Panel (desktop app) among the search results.
  • After that, select Programs and Features from the list which will give you a list of all the programs installed on your computer.
  • From there, look for the apps and programs that you no longer use and right-click on each one of them and click on Uninstall.

Option 4 – Move files to another drive

This is another thing you can try. You can move files, especially the ones with large sizes, to another drive to make up space on your drive. After that, install the updates once again.

Option 5 – Reduce on-drive files from Cloud services

If you are using tons of cloud backup services such as OneDrive and Dropbox, you might want to consider reducing the number of files you have on those cloud backup services. You can do what you’ve done on option number three and have those files moved to another drive to free up storage space.

Option 6 – Empty the contents in Recycle Bin

As you know, the files that are deleted from your computer goes to the Recycle Bin first. So if you have not emptied Recycle Bin for a long time now, the files you delete are still actually taking up space on your drive. Thus, you need to empty the contents in the Recycle Bin to save storage space.

Option 7 – Clean up temporary files

You can use the Windows 10 Storage Sense feature which can clean all the temporary files from your computer. To use Storage Sense, follow the steps below.
  • Open Setting > System > Storage from the WinX Menu.
  • From there, you will see a list of all the local and connected storage devices along with the details on the free space.
  • Now make sure that the Storage Sense feature is turned On then go find a link that says “Free Up Space” and click it to open.
  • After that, a screen which is the built-in program in Windows 10 will appear and will scan your computer for the following junk files so you can free up disk space:
  • Windows Upgrade Log Files
  • System created Windows Error Reporting Files
  • Thumbnails
  • Temporary Internet Files
  • Previous Windows Installation Files
  • Delivery Optimisation Files
  • DirectX Shader Cache
Choose the files you want to get rid of and then click on the remove files option. Note that you’ll have an idea of the total size as you select any of the junk files listed above.
Read More
Fix HIDCLASS.sys failed Blue Screen Error
If you were trying to print some documents but encounter the HIDCLASS.SYS Blue Screen error instead, then you’ve come to the right place as this post will guide you in fixing any Blue Screen errors related to the HIDCLASS.SYS file. HIDCLASS.SYS is a Windows operating system driver file. HID or Human Interface Device includes Keyboards, mice, and other input devices. HIDCLASS.SYS is a critical system driver file that is responsible for connecting different kinds of devices all over the system, including the functionality where a Word Processor can access the printer to print documents. This file comes under the category of kernel-mode device drivers and if the driver fails, it can result in a Stop Error. There are a lot of Stop errors related to the HIDCLASS.SYS file, such as:
  • KMODE EXCEPTION NOT HANDLED
  • SYSTEM SERVICE EXCEPTION
  • DRIVER POWER STATE FAILURE
  • PAGE FAULT IN A NONPAGED AREA
  • SYSTEM THREAD EXCEPTION NOT HANDLED
  • DRIVER VERIFIER IOMANAGER VIOLATION
  • IRQL NOT LESS EQUAL
The fixes for the Blue Screen errors related to the HIDCLASS.SYS files are pretty simple but before you troubleshoot the problem using these fixes, make sure that you boot your computer into Safe Mode with Networking first. After that, get started on these tips:

Option 1 – Update or rollback or disable concerned device drivers

To fix the HIDCLASS.SYS error, you can also try to roll back, or update, or disable the concerned device drivers.
  • Open the Devices Manager from the Win X Menu.
  • Then locate the device drivers particularly the ones that are under the sections of Keyboard, Mouse, USB, and HID Drivers.
  • Next, right-click on them to open the Properties.
  • After that, switch to the Driver tab and click on the Uninstall Device button.
  • Follow the screen option to completely uninstall it.
  • Finally, restart your computer. It will just reinstall the device drivers automatically.
Note: You can install a dedicated driver on your computer in case you have it or you could also look for it directly from the website of the manufacturer. On the other hand, if you have just updated your device drivers then you need to roll back the drivers to their previous versions or disable them.

Option 2 – Check for any incompatible devices

The next thing you can do to troubleshoot the HIDCLASS.SYS Stop error is to plug in and out each one of the different hardware that is connected to your computer. Doing so will help you determine which one of the hardware is the one that’s triggering the error to pop up. You will also know what hardware drivers or anything else that could be causing this error which includes external devices like mouse, keyboard, printer, as well as internally attached components like the Graphics card and so on.

Option 3 – Try running the ChkDsk utility

Running the ChkDsk utility can also help you resolve any Blue Screen errors related to the HIDCLASS.SYS file. To run this tool, refer to these steps:
  • First, open This PC and right-click on your operating system partition for Windows.
  • Next, click on Properties and navigate to the Tools tab.
  • Then click on Check under the Error Checking section.
  • After that, a new mini window will be opened and from there click on Scan drive and let it scan your disk drive partition for any errors and then restart your computer.

Option 4 – Try checking the Memory for any errors

  • Tap the Win + R keys to open Run and type exe and hit Enter to open the Windows Memory Diagnostic Tool.
  • After that, it will give two options such as:
    • Restart now and check for problems (Recommended)
    • Check for problems the next time I start my computer
  • Once your computer has restarted, perform a basic scan or you could also go for the “Advanced” options such as “Test mix” or “Pass count”. Simply tap the F10 key to start the test.
Note: After you select the option, your PC will restart and check for memory-based issues. If it finds any issues, it will automatically fix them.

Option 5 – Run the System File Checker

System File Checker or SFC is a built-in command utility that helps in restoring corrupted files as well as missing files. It replaces bad and corrupted system files with good system files. To run the SFC command, follow the steps given below.
  • Type “cmd” in the Start search and then right-click on the appropriate search result.
  • Next, select “Run as administrator” to open Command Prompt with admin privileges.
  • After opening Command Prompt, type in sfc /scannow
The command will start a system scan which will take a few whiles before it finishes. Once it’s done, you could get the following results:
  1. Windows Resource Protection did not find any integrity violations.
  2. Windows Resource Protection found corrupt files and successfully repaired them.
  3. Windows Resource Protection found corrupt files but was unable to fix some of them.
  • Now restart your computer and see if the Blue Screen error is fixed or not.
Read More
1 2 3 171
Logo
Copyright © 2023, ErrorTools. All Rights Reserved
Trademark: Microsoft Windows logos are registered trademarks of Microsoft. Disclaimer: ErrorTools.com is not affiliated with Microsoft, nor claims direct affiliation.
The information on this page is provided for information purposes only.
DMCA.com Protection Status