Seeing a yellow triangle with an exclamation mark on the battery symbol on the System Tray of your Windows 10 laptop is not really uncommon especially if your battery is about to run out of power. However, if you just purchased your laptop recently and the first thing you’ve noticed when you first opened it is the yellow triangle with an exclamation mark in the battery, read on as this post will help you resolve this issue.
Seeing this kind of icon on your computer does not necessarily mean that you have to replace your battery as there are still several potential fixes you can try to resolve the problem. So if you notice this icon, you can try running the Power troubleshooter as it will help you resolve any potential issues with the battery. Aside from that, you can also restore the default settings of the power plan manually or uninstall and reinstall the battery driver. For more information, refer to the given options below.
As pointed out, the Power troubleshooter can help you resolve any issues your battery might have automatically. It plans and detects system settings that can affect power usages like timeout and sleep settings, display settings, and screensavers and restores them to their default settings. To run this troubleshooter, follow these steps:
You might also want to uninstall or reinstall the battery driver as it can also resolve the problem. But before you start, you have to shut down your computer and remove the power chord as well as the battery. Once you’re done, follow these steps:

 Error Causes
Code 39 is a device driver error code that pops up when the Windows operating system cannot load the driver for the hardware you want to use.
This hampers your ability to use the hardware properly. The error code is almost always presented in the following format:
“Windows cannot load the device driver for this hardware. The driver may be corrupted or missing.” Code 39
A device driver is a software program that tells the operating system how to control a particular hardware device. Each hardware device has a different driver.
There are separate device drivers for printers, CD-ROM readers, and keyboards, to name a few.
Many device drivers are already built into the operating system. But sometimes you will need to install a new device driver when you want to use a new piece of hardware device that the operating system is not familiar with, or does not anticipate.
Regardless of whether or not the drivers are already integrated into the operating system, you may still experience code 39, typically because of the corrupted or outdated drivers.
Outdated and corrupted drivers cause hardware malfunction and failure, which trigger device driver error codes like code 39. Other causes include incorrect registry values.
Below are some of the easiest and most effective methods to resolve Device Manager error code 39 on your PC.
To follow and implement these methods, you don’t require any technical knowledge or expertise. Simply follow these instructions to fix the error right away.
There is a possibility that the error code 39 is caused by some fluke within the Device Manager or your BIOS.
If that’s the reason, then a simple PC reboot can resolve the issue immediately. Therefore, before you try anything, it is advisable to restart your system.
If it works, then that is great, but if it doesn’t, then don’t worry, try other methods given below to fix this problem successfully.
If the error code 39 is generated due to faulty or outdated drivers, then simply uninstall and remove them and then reinstall new driver versions. There are two ways to remove faulty drivers.
This method, although effective in resolving error code 39, can be time-consuming. To avoid the hassle and save time, try method 3.
Method 3 - Update Drivers Automatically with DRIVERFIX
If you would like to read more helpful articles and tips about various software and hardware visit errortools.com daily.Error Causes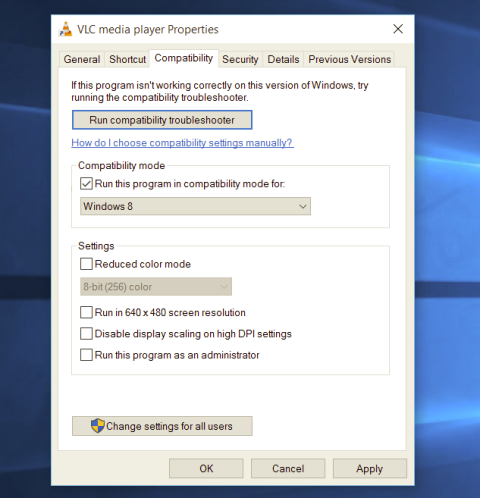 Most of the time running applications with typical settings is fine but from time to time we might have some applications that will require running with administrator privilege in order to work properly. In this case, it is very easy to do it, you just right-click and choose run as administrator.
Although a very easy solution, it can be quite annoying if running the app is on a daily basis or even more times per day. If this is the case then right-clicking and choosing to run as administrator can be a daunting task, sometimes you can even forget to run it like this in heat of work and some unforeseen consequences might occur.
Luckily there is an easy hack so you can open the chosen application each time as an administrator with a simple double click each time.
Most of the time running applications with typical settings is fine but from time to time we might have some applications that will require running with administrator privilege in order to work properly. In this case, it is very easy to do it, you just right-click and choose run as administrator.
Although a very easy solution, it can be quite annoying if running the app is on a daily basis or even more times per day. If this is the case then right-clicking and choosing to run as administrator can be a daunting task, sometimes you can even forget to run it like this in heat of work and some unforeseen consequences might occur.
Luckily there is an easy hack so you can open the chosen application each time as an administrator with a simple double click each time.
Disk Write Error in Steam is thrown at you while you try to download or update the game in your library. If you are an unfortunate user of Steam that has encountered this error do not sweat, the error is usually tied to permission in windows or file corruption and not to hardware issues and can be easily resolved.
In this guide, we will go through solutions for this specific error and it is advisable to go through solutions as they are presented since they go from the easiest and most common issues.

The easiest and quickest way of resolving this issue is just a simple restart of the Steam client. Just completely quit Steam and they run it again, if this has not solved the issue try rebooting your PC. In most cases, this can solve the issue since this error is known to be introduced with some communication issues with OS (Windows)
Disk write permissions could also cause this error because if by any chance the Steam library folder has been set or changed to the read-only client would be unable to write anything in it. To easily solve this issue completely exit the Steam client and rerun it as administrator. Just right-click on it and select Run as Administrator. If this has solved your issue run Steam always as an administrator.
To run always as an administrator right click on the steam executable, go to properties, and inside properties go to the compatibility tab. In the compatibility tab check run as administrator and click on OK.
If for any reason cache has become corrupted there is a big chance that this might be an issue why there is a disk drive error in Steam. To clear download, cache goes into your client, and on top drow down menu click on steam. Find and open settings and inside go to the downloads tab. Locate a clear download cache and immediately you will be prompted to restart Steam. After restart, you will be asked to login into steam and the issue with disk write should be gone.
Library folder issues can also be the source of disk write annoyance so let's repair them. Click steam in the top left and go to the settings. Locate and click on Downloads and then go to Steam library folders. You will be here shown all disk drivers you are using for steam games and all of the games that are downloaded.
Select the game you are getting errors with and click on three dots on the far right. From the menu choose the repair folder option. Take note that the more games you have installed, the more time the repair process will need.
Sometimes the issue is not at your end at all, servers can experience problems and outrages and this can directly reflect at your end with a disk write error. If any of the previous solutions have not resolved the issue this is the next logical step to try. If the server is facing issues then changing the download server will resolve the issue at your end.
Click on settings in the top drop-down menu and then click on the Steam library folder. Find the downloads page and then click on download region, Choose another server than one nearest to your location since that's what will Steam choose by default.
Windows Registry Editor Version 5.00 [HKEY_LOCAL_MACHINE\SOFTWARE\Microsoft\Windows NT\CurrentVersion\Fonts] "Segoe UI (TrueType)"="" "Segoe UI Bold (TrueType)"="" "Segoe UI Bold Italic (TrueType)"="" "Segoe UI Italic (TrueType)"="" "Segoe UI Light (TrueType)"="" "Segoe UI Semibold (TrueType)"="" "Segoe UI Symbol (TrueType)"="" [HKEY_LOCAL_MACHINE\SOFTWARE\Microsoft\Windows NT\CurrentVersion\FontSubstitutes] "Segoe UI"="NEW_FONT"Where in "Segoe UI"="NEW_FONT" instead of NEW_FONT you need to write the exact name of the font that you wish to use as a system font. Once you have replaced the default system font with your desired one, go to File and save as, from file type drop-down menu, choose all files and save this file as .REG type giving it whatever name you wish. When the file is saved, close notepad, right-click on the saved file and choose the merge option. Confirm with YES and click on OK. Reboot your system and your Windows will now use the font of your choice as its default system font.
Windows Registry Editor Version 5.00 [HKEY_LOCAL_MACHINE\SOFTWARE\Microsoft\Windows NT\CurrentVersion\Fonts] "Segoe UI (TrueType)"="segoeui.ttf" "Segoe UI Black (TrueType)"="seguibl.ttf" "Segoe UI Black Italic (TrueType)"="seguibli.ttf" "Segoe UI Bold (TrueType)"="segoeuib.ttf" "Segoe UI Bold Italic (TrueType)"="segoeuiz.ttf" "Segoe UI Emoji (TrueType)"="seguiemj.ttf" "Segoe UI Historic (TrueType)"="seguihis.ttf" "Segoe UI Italic (TrueType)"="segoeuii.ttf" "Segoe UI Light (TrueType)"="segoeuil.ttf" "Segoe UI Light Italic (TrueType)"="seguili.ttf" "Segoe UI Semibold (TrueType)"="seguisb.ttf" "Segoe UI Semibold Italic (TrueType)"="seguisbi.ttf" "Segoe UI Semilight (TrueType)"="segoeuisl.ttf" "Segoe UI Semilight Italic (TrueType)"="seguisli.ttf" "Segoe UI Symbol (TrueType)"="seguisym.ttf" "Segoe MDL2 Assets (TrueType)"="segmdl2.ttf" "Segoe Print (TrueType)"="segoepr.ttf" "Segoe Print Bold (TrueType)"="segoeprb.ttf" "Segoe Script (TrueType)"="segoesc.ttf" "Segoe Script Bold (TrueType)"="segoescb.ttf" [HKEY_LOCAL_MACHINE\SOFTWARE\Microsoft\Windows NT\CurrentVersion\FontSubstitutes] "Segoe UI"=-Reboot your system and your Windows will now revert the font of your choice as its default system font.
“0x8007001F-0x20006, The installation failed in the SAFE_OS phase with an error during REPLICATE_OC operation.”The error pointed out the “Safe OS phase”. It is the phase that’s initiated to install all the required Windows Updates. Thus, the possible cause for this error could have something to do with an interrupted download, internet connection, and many more. Although this error could be caused by a lot of factors, fixing it shouldn’t be that hard. You can try to reset the Windows Update Components or delete the Windows Update cache. You could also disable both the Firewall and your antivirus program temporarily or run the Windows Update in a Clean Boot state, as well as run the Windows Update troubleshooter. To get started troubleshooting the error, follow each one of the suggestions provided below.
Error Code 0x8000ffff is an error that is often experienced while attempting to install updates on a Windows machine. It has been found in Windows 10, although the error has been present in the Windows operating systems dating back to Windows Vista.
Common symptoms include:
There are several basic Windows tools that can be used to attempt to resolve Error Code 0x8000ffff on your machine. While some of these tools may be familiar for basic users, others may require advanced competency in order to be used correctly. If you are unsure of your ability to complete the methods listed below in order to resolve this error code on your system, you may need to get in touch with a computer repair technician who is competent in dealing with Windows Update repairs.
Error CausesThere are several common ways that users can attempt to resolve the appearance of Error Code 0x8000ffff on their Windows devices. If you are not sure that you can follow these steps through to completion, you would be well advised to get in touch with a qualified computer repair technician to help you to finish out the repair process.
Here are the best methods to resolve Error Code 0x8000ffff on your Windows machine:
It may sound obvious, but one of the most effective ways to resolve Error Code 0x8000ffff on your machine is to simply reboot your computer. In some cases, the error shows up because there are processes that the system believes are still running when they really aren’t. Restarting your machine also allows your system to apply any previous changes that have been made and to mark any installations that have been undertaken as being complete.
Reattempt your update installations after you have restarted your computer to see if you are able to finish them out successfully.
The Windows Registry Repair tool is an asset that can make it easy for your system to scan for potential problems in the registry and notify you as to their status. In many cases, the Registry Repair tool can fix the problems that it finds all on its own, although in some cases, you may receive a message that states an error was found that could not be resolved through the program.
The simplest way to access the Windows Registry Repair tool is to do a search for it within the search bar in the Start menu. Once you begin to run the Registry Repair tool, it can take a while to complete its scan, so be prepared to wait for some time once you start it.
Once the tool has completed its scan of your system, it’s always a good idea to reboot your computer so that all of the changes that have been made to the system can be applied successfully to the operating system.