Error Code 0x800704c7 – What is it?
Error code 0x800704c7 occurs when Windows users attempt to update their system. It affects various Windows users including those using Windows 7, Windows 8, and 8.1 and Windows 10. It usually occurs due to poor maintenance of the system and includes common symptoms such as the following:
- Inability to upgrade your Windows operating system
- Message box with error code 0x800704c7
Solution
 Error Causes
Error code 0x800704c7 in Windows 10 can occur due to several reasons. For instance, it may be due to corrupted or missing system files. It may also result from malicious programs affecting your system or occur when a program or several programs are running in the background of one’s system while the user attempts to run the update.
To correct this issue, Windows users will need to select one or a few methods, depending on the issues affecting their PC.
Further Information and Manual Repair
Some of the best solutions for error code 0x800704c7 available to Windows users including using tools to scan for missing systems files or correct other issues inherent within your system.
These methods may include the use of Command Prompt and the performance of technical repair procedures. If you are uncertain of your skills, avoid compounding the issue or causing further damage to your PC by contacting a skilled Windows repair technician. This IT professional will be best equipped to use Windows tools and other methods to resolve error code 0x800704c7.
Method One: Scan Your System for Missing or Corrupt System Files
Using System File Checker Tool (SFC), Windows users can check their system for missing o corrupt system files. These utility tools within your Windows device will be able to replace missing files and repair corrupted ones, resulting in a more efficient system. Run this tool by following the steps below:
- Step One: Go to Start and type Command Prompt or CMD.
- Step Two: Run as Administrator
- Step Three: Type sfc /scannow. (Be sure to place a space between “sfc” and “/scannow”).
After running these procedures, check if the error code has been resolved. Go to Settings > Update & security > Windows Update. Update your Windows operating system. If error code 0x800704c7 reoccurs, you will need to try the next method below.
Method Two: Restore your System
System Restore is one of the best manual repair solutions Windows users can apply when they come across error codes like error code 0x800704c7. That’s because this method requires no technical or advanced knowledge and therefore can be performed by anyone. Simply follow the steps below to restore your system to a period of time in the past where the error was not present on your system. If done correctly, this could enable you to resolve the issue with little frustration on your part.
- Step one: Type Control Panel in the search bar near the Start button
- Step two: Select Control Panel, then Recovery
- Step three: Select System Restore then click Next
- Step four: Select a restore point before appeared on your Windows 10 system
- Step five: Select Next then Finish
Note that once System Restore is enabled it will remove drivers, apps, and even updates installed after the restore point. For this reason, be careful to choose the most appropriate restore point. Also once you’ve completed this task, check to see if you are able to update your system. If the update stops before the process is complete and a message box occurs with the error code 0x800704c7, proceed to the next manual repair option below.
Method Three: Check for and Remove Malware
Viruses or other forms of malware can adversely affect your system, causing error codes and other issues to take place. To resolve error code 0x800704c7 in Windows 10, check for and remove malware using a reputable anti-malware program.
If no anti-virus software is present on your system or if you scan your device but fail to spot an issue, proceed to method four.
Method Four: Use an Automated Tool
This method involves the use of a powerful automated tool. But why is this important you might ask? A third-party tool is often the best solution when all manual repair efforts fail. Automated tools come equipped to tackle the most serious PC problems including error codes which can cause frustration and result in reduces PC performance.
 Run the Windows Memory Diagnostic tool
 Tracked as CVE-2021-34484, the “zero-day” flaw enables hackers to breach all versions of Windows (including Windows 10, Windows 11, and Windows Server 2022) and take control of your computer.
Microsoft mistakenly thought it had patched the vulnerability (which was first found in August) when it was publicly disclosed in October. But the fix itself was found to be flawed, something the company admitted, and this drew even more attention to the vulnerability. Microsoft subsequently promised to “take appropriate action to keep customers protected” but two weeks later, a new fix has still not arrived.
Luckily the third-party security specialist 0patch has beaten Microsoft to the punch with a ‘micropatch that it has now made available for all Windows users “Micropatches for this vulnerability will be free until Microsoft has issued an official fix," 0patch confirmed.
You will need to register for a 0patch account and install its download agent before the fix can be applied, but with 0patch fast becoming a go-to destination for hot fixes which beat software companies to the punch this is a no brainer. Hopes will be high that Microsoft can release an effective patch sooner rather than later but, until then, all Windows users must act now if they want to be safe.
Download 0patch here:
https://blog.0patch.com/2021/11/micropatching-incompletely-patched.html
Tracked as CVE-2021-34484, the “zero-day” flaw enables hackers to breach all versions of Windows (including Windows 10, Windows 11, and Windows Server 2022) and take control of your computer.
Microsoft mistakenly thought it had patched the vulnerability (which was first found in August) when it was publicly disclosed in October. But the fix itself was found to be flawed, something the company admitted, and this drew even more attention to the vulnerability. Microsoft subsequently promised to “take appropriate action to keep customers protected” but two weeks later, a new fix has still not arrived.
Luckily the third-party security specialist 0patch has beaten Microsoft to the punch with a ‘micropatch that it has now made available for all Windows users “Micropatches for this vulnerability will be free until Microsoft has issued an official fix," 0patch confirmed.
You will need to register for a 0patch account and install its download agent before the fix can be applied, but with 0patch fast becoming a go-to destination for hot fixes which beat software companies to the punch this is a no brainer. Hopes will be high that Microsoft can release an effective patch sooner rather than later but, until then, all Windows users must act now if they want to be safe.
Download 0patch here:
https://blog.0patch.com/2021/11/micropatching-incompletely-patched.html  Well, you can and it is not complicated as well. Follow this easy guide to see how can you get someone’s account up and running with some of your games.
 Bad or good news, depending on your view comes from RIOT for their game Valorant. It seems that Riot has decided to enforce Windows 11 TPM 2.0 feature into Valorant running on Windows 11 and there is a rumor that it will be de facto standard and that it will move to Valorant in general no matter on which system it runs.
Furthermore, there is a rumor circling around that other developers are also talking about implementing TPM 2.0 requirements so they can harvest advanced security features of Windows 11 in order to prevent hacks and other cheats in their games.
This is an interesting point to stand on, on one side, sure, advanced features that will prevent cheating and hacking is a great thing. On other hand denying access to many computers that do not support TPM 2.0 and removing them from the game can be a permanent loss of customers and therefore loss of money. It is a risk to be sure and I am not really sure that alienating gamers is a good choice for long-term income, especially when you will be able to install Windows 11 on an unsupported PC as stated by Microsoft.
We will all see how this Riot decision will reflect on their business, as not a big Valorant player myself I am not impacted too much with this decision, but it will be interesting to see if others will indeed go with this trend or they will decide to wait a while until much more PC’s are upgraded.
Bad or good news, depending on your view comes from RIOT for their game Valorant. It seems that Riot has decided to enforce Windows 11 TPM 2.0 feature into Valorant running on Windows 11 and there is a rumor that it will be de facto standard and that it will move to Valorant in general no matter on which system it runs.
Furthermore, there is a rumor circling around that other developers are also talking about implementing TPM 2.0 requirements so they can harvest advanced security features of Windows 11 in order to prevent hacks and other cheats in their games.
This is an interesting point to stand on, on one side, sure, advanced features that will prevent cheating and hacking is a great thing. On other hand denying access to many computers that do not support TPM 2.0 and removing them from the game can be a permanent loss of customers and therefore loss of money. It is a risk to be sure and I am not really sure that alienating gamers is a good choice for long-term income, especially when you will be able to install Windows 11 on an unsupported PC as stated by Microsoft.
We will all see how this Riot decision will reflect on their business, as not a big Valorant player myself I am not impacted too much with this decision, but it will be interesting to see if others will indeed go with this trend or they will decide to wait a while until much more PC’s are upgraded. 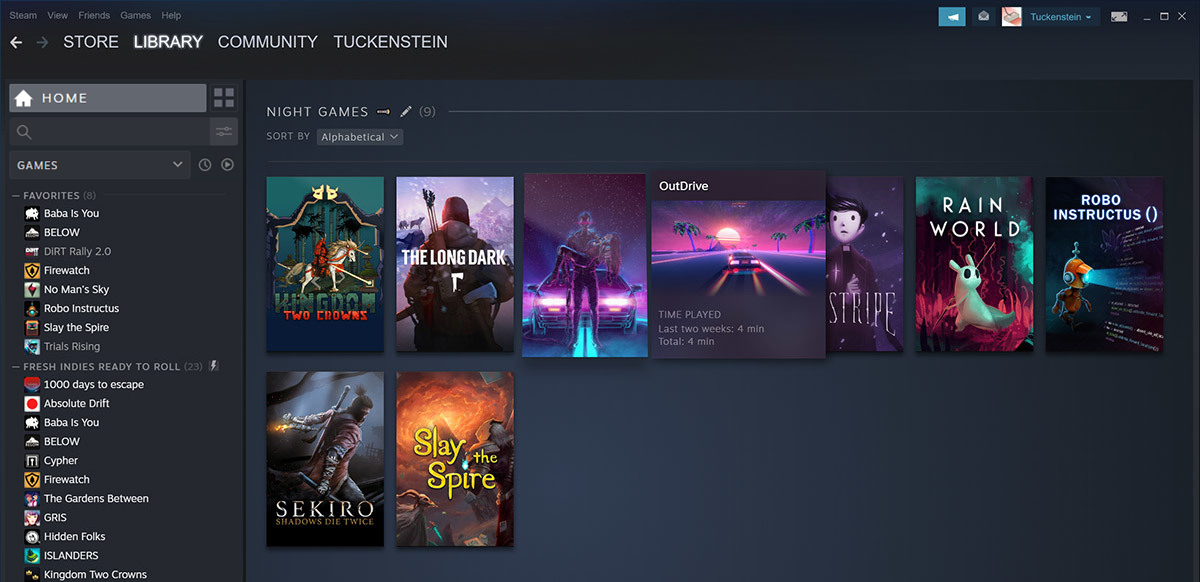 Storage management Page update
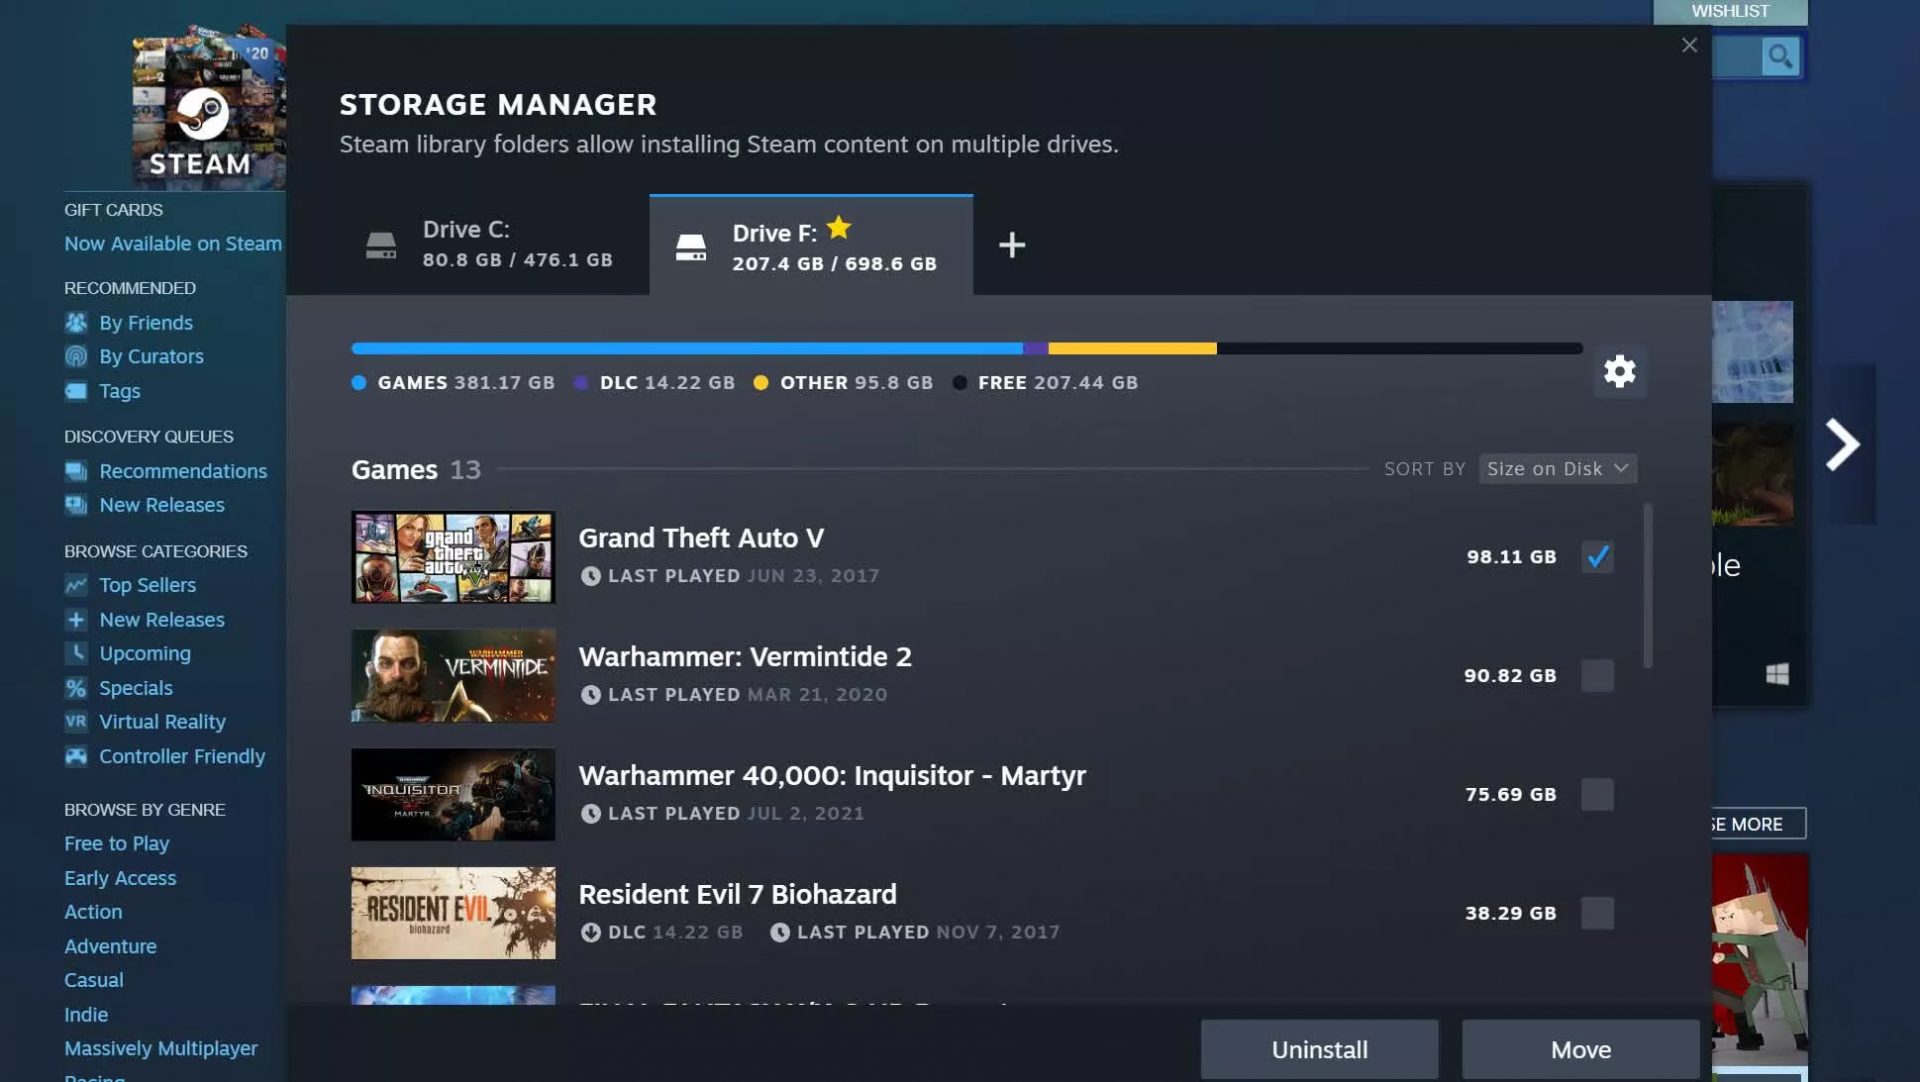 Another thing with the Steam store management page is the ability to move installation files from one location to another. Let’s say that you have two or more hard disk drivers in your machine and that you have SSD that you use for running stuff since it is fast and larger and slower one for storage. Now you can easily and quickly move one installation from one to another in order to take advantage of your faster SSD for quicker LOAD game times without making a new installation.
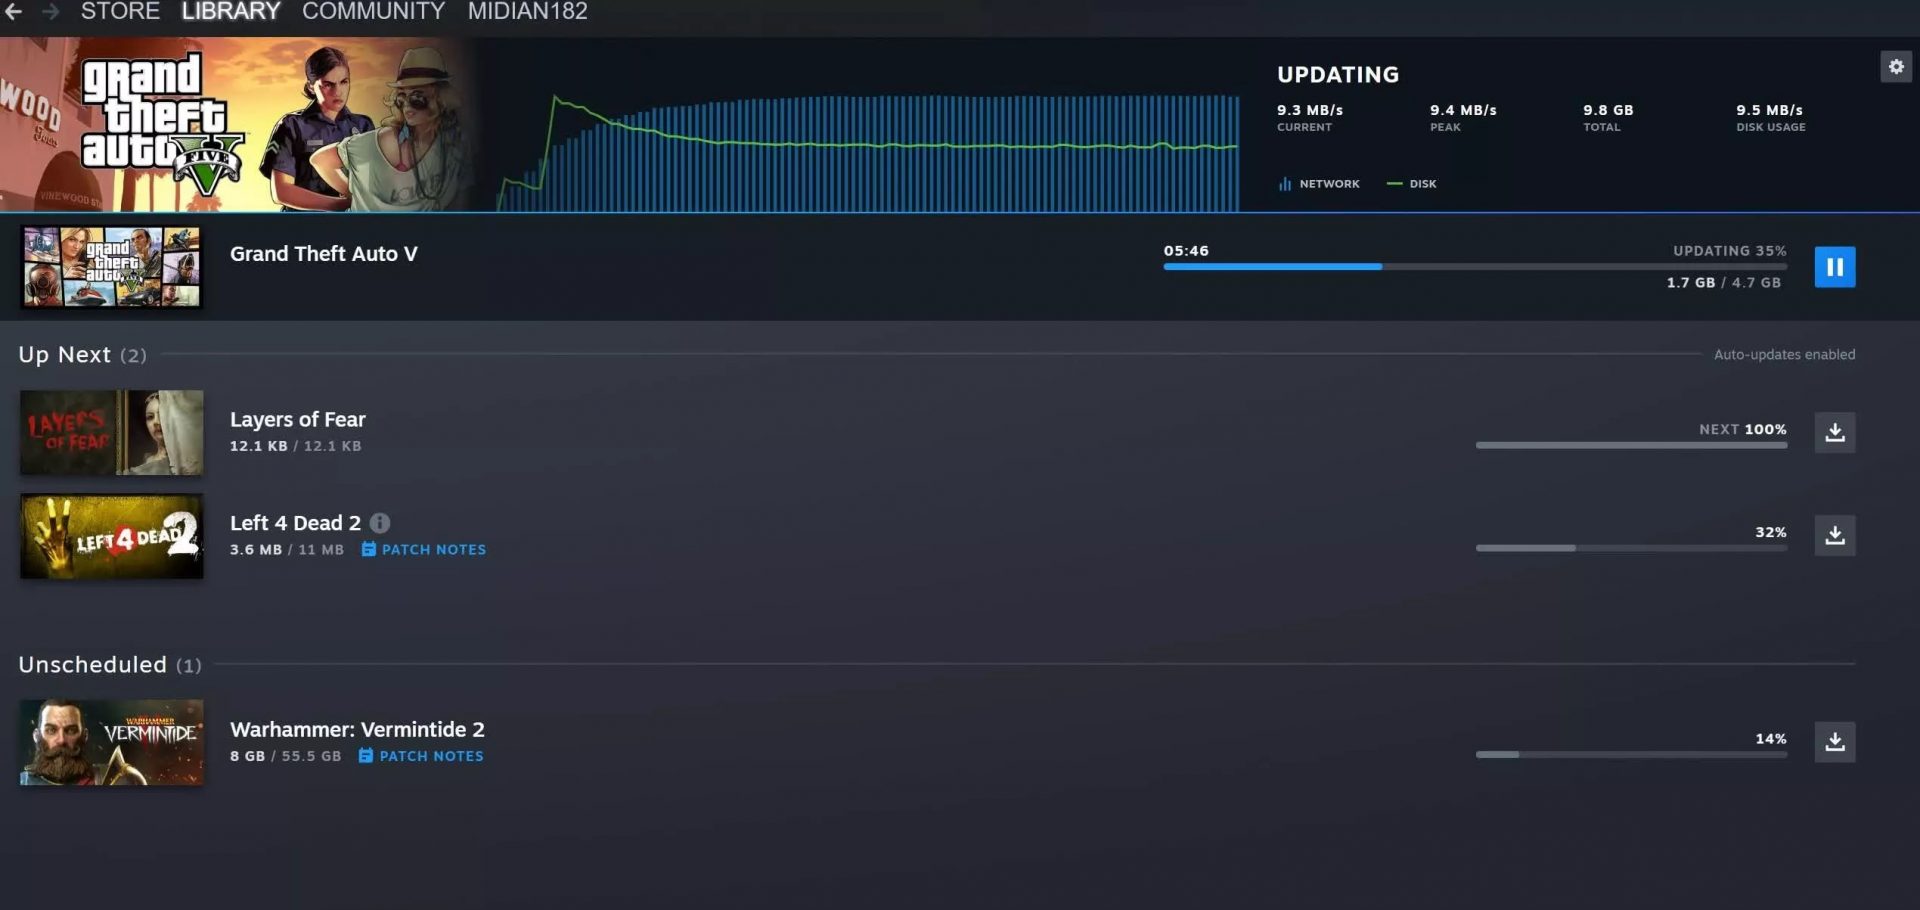 Also, you can now drag and drop items in the download bracket to reorder download orders or place them as active downloads to start downloading right away.