Logo

Fix Origin code 10.0 Error in Windows 10

Gaming on the computer has become one of the most used past-time activities among people of all ages. And since we are still in pandemic it has only risen as activity. People can acquire a lot of games at various discounts on various platforms and enjoy them at the leisure of their home.

Among many game platforms and stores, Electronic art's Origin is one of the bigger ones, and having some titles that could not be found anywhere else coupled with the ability to have access to almost the whole game catalog with one monthly subscription make it one of the most used clients.

Sadly as with every piece of software Origin's client is not perfect by any means and it can behave strangely from time to time.

Hello everyone and welcome to errortools.com, today we will fix Origin error code 10 which oddly enough can appear out of nowhere and can even appear on the very end of installation for the chosen game. If you have managed to come by this error you are in luck to be here because we have a couple of fixes for it.

I know that you might be excited to play the game so let's go and do some fixing

Check Server status

Before diving into technicality and before we start deleting files and fixing things you should check the Server status. This seems maybe like something you should not do but if the server has experienced some kind of downtime or it is in maintenance Origin will throw this error in the client. Unexpected situations can cause various server issues all of a sudden and the first thing is to check are servers online and working. There are various ways to check server status from official origin website to Electronic arts twitter channel to Reddit and many more online server status websites. If it turns out that the server is to be blamed for this error then sit back and wait for EA to resolve the issue, there is not much you can do anyway.

Delete OriginThinSetupInternal.exe

  • After some research, it has come to light that originthinsetupinternal.exe can cause this specific error. The best solution is to delete the file and then run Origin as administrator so the file is remade new.
  • First, make sure that Origin is fully closed, check the taskbar and if it lurks there right-click on it and click on quit
  • Run file explorer and go into the folder where Origin is installed, by default it is C:\Program Files (x86)\Origin
  • Locate OriginThinSetupInternal.exe and delete it
  • Then locate origin.exe and right-click on it and then click on Run as administrator

Reinstall Origin client

If the previous solution has not solved the issue then Origin might have some corrupted files inside it. It is known that the Origin client can produce some bad files if the installation has been forcefully canceled. The best thing is to reinstall the completely whole client.

  • Press ⊞ WINDOWS + R to open the run dialog
  • Inside run dialog type in Control panel and press ENTER
  • In the control panel locate programs and features group and double click on it
  • Locate Origin, click to select it, and on top click on uninstall
  • After uninstall process is completed start file explorer and go to the folder where Origin was installed, by default it is C:\Program Files (x86). Locate the Origin folder and delete it.
  • Go to the official origin website and download the new client installation.
  • After the download is finished double click on it and follow onscreen instructions.

Disable antivirus

If every solution so far has not been able to remove error then obviously something else is interfering with the origin client and installation functioning. Altho not advisable, turn OFF your security suite including both firewall and antivirus and try installing the game again. There is the possibility that the origin client or some game file has been marked as false positive by security software thus preventing it from executing properly.

Do You Need Help with Your Device?

Our Team of Experts May Help
Troubleshoot.Tech Experts are There for You!
Replace damaged files
Restore performance
Free disk space
Remove Malware
Protects WEB browser
Remove Viruses
Stop PC freezing
GET HELP
Troubleshoot.Tech experts work with all versions of Microsoft Windows including Windows 11, with Android, Mac, and more.

Share this article:

You might also like

Change position of Taskbar in Windows 10
Changing Taskbar location in your Windows 10 is an easy task but lately, Microsoft has removed the option to just drag it to one side of the screen and place it there, now in order to change location we need to do a little more work but do not worry it is not difficult at all. Right-click on the taskbar to open its properties menu taskbar settings menuin the menu, on the bottom choose taskbar settings. Once the settings dialog opens, on the right side locate the taskbar location on screen. taskbar location chooserClick on the dropdown menu and choose the desired location for the taskbar.
Read More
Error: 0x80070035. Network path was not found
As you know, Windows allows you to share files between systems that are on the same network even though they are not connected physically. All you have to do is to make sure that the folder administrator allows access to the intended use and that your computer should be connected to the internet. Once you meet these conditions, you can share files between systems. However, recently a number of users reported that despite fulfilling these conditions, they end up getting errors instead when they try to access the shared drive. The error states:
“Error code: 0x80070035. The network path was not found.”
One of the common causes of this error is the antivirus program or the Firewall installed on your computer. It could also be that the drive is not shared in the first place or there are some issues with your network drivers. Whichever the case is, here are some potential fixes you need to check out to fix the Error code: 0x80070035.

Option 1 – Try to temporarily disable anti-virus and Windows Defender Firewall

As mentioned, the error could be due to the antivirus program or the Windows Defender Firewall installed on your computer. Thus, disabling them or any security software installed in your computer is always a good idea you can try when you’re not able to access the shared drive on your computer. There are times when you encounter problems like Error code: 0x80070035 due to interference of antivirus or security programs. Thus, you have to disable both your antivirus program and Windows Defender Firewall for the meantime and check if it fixes the error or not.

Option 2 – Check if the drive is shared

Before you further troubleshoot the problem, make sure that the drive you are trying to access is shared first. To do so, follow these steps:
  • Right-click on the folder and select Properties.
  • Go to the Sharing tab and check the status of the Network File and Folder Sharing.
  • And if the status is “Not Shared”, you need to select Share.
  • Next, select the intended Network User for sharing the file and choose the permission level for the user.
  • After that, click on the Apply and OK buttons to save the changes made. You or the intended user should now be able to access the shared folder or file.

Option 3 – Try to ping the IP address of the targeted computer

Even though the shared folder or file is shared correctly, it is possible that the network channel is not connected properly which is why you have to test it by pinging the IP address of the targeted computer from the primary computer.
  • Tap the Win + R keys to launch the Run dialog box.
  • Type “cmd” in the field and tap Enter to open Command Prompt.
  • Next, type the “ipconfig/all” command and tap Enter to execute it. This will populate various details.
  • From the given details, take note of the IPv4 address.
  • Afterward, open Command Prompt on the primary computer and then type the “ping <IPv4 address of the target computer>” command and hit Enter.
  • Now check if you get 4 confirmation replies or not. If not, you can try to access the Network Adapter Troubleshooter.
To run the Network Troubleshooter, refer to these steps:
  • Open the Search bar on your computer and type in “troubleshoot” to open the Troubleshoot settings.
  • Next, scroll down and select the “Network Adapter” option from the right pane.
  • Then click on the Run Troubleshooter” button.
  • After that, your computer will check for any possible errors and will pinpoint the root cause of the problem if possible.
  • Restart your computer.

Option 4 – Verify if Network Discovery is enabled

All you have to do is go to Start > Settings > Network & Internet and from there, click on the “Change connection properties” option and shift the radio button for Network profile to Private. After that, check if folder sharing is now working.

Option 5 – Try to modify the Network Security settings

There are times when the Network Security settings interfere with the folder or file sharing process. And if that’s the case, you can modify it to resolve the problem. How? Refer to these steps:
  • Tap the Win + R keys to open the Run dialog box.
  • Then type “secpol.msc” in the field and tap Enter to open the Local Security Policy manager window.
  • After that, go to Local Policies > Security Options located on the left pane.
  • Next, double click on Network security: LAN Manager authentication level in the right pane to open its Properties.
  • And then select the “Send LM & NTLM-use NTLMv2 session security if negotiated” option from the drop-down menu.
  • Now click on Apply and OK buttons to save the changes made.
  • Reboot your computer.

Option 6 – Try to enable NetBIOS over TCP/IP

  • Tap the Win + R keys to open the Run dialog box.
  • Then type “ncpa.cpl” in the field and tap Enter to open the Network Connections window.
  • After that, right-click on your network and select Properties.
  • Next, double click on Internet Protocol Version 4 and click on the Advanced button.
  • From there, go to the WINS tab and shift the radio button to Enable NetBIOS over TCP/IP.
  • Now click OK to save the changes made and then restart your computer.

Option 7 – Update the Network Adapter drivers

You might also want to update the Network Adapter drivers by following these steps:
  • Tap the Win + R keys to launch the Run window and then type in the “MSC” command and hit Enter to open the Device Manager window.
  • Under the Device Manager, you will see a list of drivers. From there, look for the Network Adapters and expand it.
  • Then right-click on each one of the Network drivers and update them all.
  • Restart your PC and see if it helped in fixing the BSOD error.
Note: If updating the network drivers didn’t help in fixing Error code: 0x80070035, you can also try to uninstall the very same drivers and restart your Windows 10 PC. After that, the system itself will reinstall the drivers you just uninstalled. Alternatively, you can also download and install the drivers from the manufacturer’s website directly. To reinstall the network adapter driver, refer to these steps:
  • Open the Devices Manager from the Win X Menu.
  • Then locate the device drivers and right-click on them to open the Properties.
  • After that, switch to the Driver tab and click on the Uninstall Device button.
  • Follow the screen option to completely uninstall it.
  • Finally, restart your computer. It will just reinstall the device drivers automatically.
Read More
Recover or set a BIOS or UEFI Password
If you have been using Windows for quite some time now then you’re probably aware of the BIOS or UEFI password. This password lock is the one that ensures you enter the set password even before your Windows PC boots up. However, there’s just one downside with the BIOS or UEFI password – there is no recovery option, unlike your Microsoft account. Worry not though for this post will guide you on how you can set or recover a BIOS or UEFI password on your Windows computer. The BIOS or UEFI passwords are stored at the hardware level which means that unless the OEM wants or has configured a way to recover the password, it is pretty much impossible to reset it. There are times when they are so strict that the only way to get through it by contacting customer care. Note that any Windows computer with this lock can’t be unlocked by trying to reinstall Windows. In this post, you’re going to have to remove the CMOS battery temporarily, clear unknown BIOS/UEFI passwords using the bios-PW website as well as call customer care. For more details, refer to the options provided below.

Option 1 – Remove the CMOS battery temporarily

In case you didn’t know, every motherboard comes with a CMOS battery which helps the computer system to keep the clock ticking and in making sure that the BIOS settings are not lost when the computer is powered down. Every time a computer is turned on, the CMOS battery ensures that the information is available for the computer to boot up. So when you remove the CMOS battery temporarily, say about 30 seconds or a minute, the settings will be lost. There are some motherboards that are built-in ways that when you remove the battery for long, it will reset everything including the password for the BIOS or UEFI.

Option 2 – Clear the unknown BIOS or UEFI passwords using a bios-PW website

If the first option didn’t work, you can try using this BIOS Password website at http://bios-pw.org/ to clear the password.
  • When prompted by the BIOS, enter the wrong password a couple of times as doing so will lock you out of the system.
  • After that, you will see a new number or code on the screen which will include a message about System Disabled [XXXXX] Service TAG [YYYYY].
  • Next, open the BIOS Password website and enter the XXXXX code in it and make sure to tap the Shift + Enter keys or just enter.
  • Now it will open multiple unlock keys which you can use to clear out the BIOS or UEFI lock on your Windows PC.

Option 3 – Call the customer care

If the second option still didn’t work, you have to call customer care and follow their suggestions for they will walk you through fixing the problem using the service tag or might suggest that you visit a service center to make things easier for you. Note: You also have the option to set a BIOS or UEFI password. Although it isn’t recommended, you still can do it if you really want to. Remember that the BIOS or UEFI interface varies from OEM to OEM so you must find something related to either PASSWORD or SECURITY. You will have the following similar options:
  • Supervisor password – it’s the same as the master password that can change important system settings.
  • User password – with this password, any user can change minor settings.
  • Master password – you can use this password for a hard drive or as a general password.
There are several OEMs that offer micro-control where you have to enter the BIOS password. For instance, you’ll have the option to skip for a normal restart, or when you select a boot device while you might have to enter the password for unattended reboots or when your PC is powered on, etc. And if you are here to remove the password, you need to find a remove password option in the same section. You will be prompted to enter the set password once and if it’s correct, it will remove the BIOS password. After that, you have to save and exit the BIOS then restart your computer and check if the settings are properly applied.
Read More
Fix Google Chrome error “He’s dead, Jim!”
If you always use the Google Chrome browser in browsing the internet, then you might have come across an error message saying, “He’s dead, Jim!” along with a funny looking face that’s peeking its tongue out and another detailed message saying, “Either Chrome Ran out of memory or process for the webpage has terminated for some other reason. To continue, reload the webpage or go to another page”. This error message in Google Chrome is actually quite famous and it appears for various reasons but it may have something to do with a memory issue. The Google Chrome browser is known to consume a lot of memory and the more web pages you open and load, it takes up more resources. Thus, the first thing you need to do when you encounter this error is to simply click the Reload button to continue browsing the internet or close the browser and then open it again. On the other hand, if you keep seeing this error message, then that’s a whole different story as you have to take some action to prevent it from popping up again, for good. Follow the instructions given below to fix the error in Chrome.

Option 1 – Reduce Google Chrome’s memory usage

The first thing you can try is reducing the memory usage of the Chrome browser. However, this option has a bit of a disadvantage. If a website crashes, all the instances of that website will also crash although other open tabs and websites won’t be affected. This process is referred to as “Process-per-site” mode which you will have to launch Chrome within this parameter.

Option 2 – Run Google Chrome with Strict Site Isolation

Aside from reducing Chrome’s memory usage, you can also run the browser with the Strict Site Isolation which makes sure that the crashing of one tab in the browser won’t affect the entire Windows as this feature will run every website you open on its own isolated process.

Option 3 – Run the built-in Malware Scanner and Cleanup tool in Chrome

In case you don’t know, there is actually a built-in malware scanner and cleanup tool in Chrome that helps you get rid of any unwanted ads, pop-ups, and even malware, as well as unusual startup pages, toolbars, and other things that could affect the performance of the browser.

Option 4 – Reset Google Chrome

Resetting Chrome can also help you get rid of the “He’s dead, Jim!” error message for good. Resetting Chrome means restoring its default settings, disabling all the extensions, add-ons, and themes. Aside from that, the content settings will be reset as well and the cookies, cache, and site data will also be deleted. To reset Chrome, here’s what you have to do:
  • Open Google Chrome, then tap the Alt + F keys.
  • After that, click on Settings.
  • Next, scroll down until you see the Advanced option, once you see it, click on it.
  • After clicking the Advanced option, go to the “Restore and clean up the option and click on the “Restore settings to their original defaults” option to reset Google Chrome.
  • Now restart Google Chrome.

Option 5 – Perform a clean reinstall on the Chrome browser

Although reinstalling any program is easy, not so much for Google Chrome as you need to make sure that the User Data folder is deleted before you reinstall it.
  • Tap the Win + R keys to open the Run prompt.
  • Then type %LOCALAPPDATA%GoogleChromeUser Data in the field and hit Enter.
  • Next, rename the “Default” folder inside the path you were redirected to. For instance, you can rename it to “Default-old”.
  • After that, install the Chrome browser again.

Option 6 – Try to flush the DNS and reset the TCP/IP

There are instances when a network goes into haywire because of a bad DNS. Thus, a bad DNS might be the one that’s causing this headache so it’s time for you to reset the entire network to resolve the issue. To reset the network, here’s what you have to do:
  • Click the Start button and type in “command prompt” in the field.
  • From the search results that appear, right-click on Command Prompt and select the “Run as administrator” option.
  • After opening Command Prompt, you have to type each one of the commands listed below. Just make sure that after you type each command, you hit Enter
    • ipconfig /release
    • ipconfig /all
    • ipconfig /flushdns
    • ipconfig /renew
    • netsh int ip set dns
    • netsh winsock reset
After you key in the commands listed above, the DNS cache will be flushed and the Winsock, as well as the TCP/IP, will reset.
  • Now restart your computer and open Google Chrome then try opening the website you were trying to open earlier.
Note: You can also try changing the DNS server to the Google Server, i.e. 8.8.8.8, and then see if it works for you or not.

Option 7 – Disable both the antivirus and firewall temporarily

As you know, both the firewall and antivirus programs are there to protect the operating system from any malicious threats. So if they find that there is some malicious content in a website you are visiting, they will block the site right away. Thus, it could also be the reason why you’re getting the “He’s dead, Jim!” error so you need to disable both the firewall and antivirus program temporarily and then try opening the website again. If you are able to open the website, you need to add this site as an exception and then enable the firewall and antivirus program back.
Read More
How to Fix CoreFoundation dll Error

CoreFoundation dll Error – What is it?

The CoreFoundation dll error is a common error associated with Apple Software products. Most of the Apple Software products rely on this dll file to load and run. This dll file is Apple’s proprietary. The error message is prompted in the following format:
“CoreFoundation.dll was not found” or “Apple Application Support is missing’.

Solution

Restoro box imageError Causes

The CoreFoundation.dll error message is triggered because of several reasons. These include:
  • Deleted CoreFoundation dll file
  • The CoreFoundation dll file has been overwritten
  • Poor installation of the Apple software
  • Corrupt software due to viral infection
  • Registry problems

Further Information and Manual Repair

It is advisable to fix CoreFoundation dll error code right away to avoid inconvenience. This error may stop you from accessing and running your desired Apple application. Here are some of the best ways to resolve this error on your system:

1. Restore the Deleted CoreFoundation dll File

Since Dynamic Link Library is a shared program, if you happen to delete an Apple program on your PC, chances are you might have deleted that file too in the process. Therefore, the easiest way to recover and restore the CoreFoundation dll file and resolve the error is to look for the file in the recycle bin. If you can’t locate it, then another way to restore the missing CoreFoundation dll file is to download the files from the internet.

2. Reinstall  Apple Software

If the error still persists then it is advisable to re-install Apple software via iTunes or any other Apple Software that you have on your PC. For example, if you have iTunes, then to reinstall it first go to the start menu and then the control panel. Now click on Add/Remove programs and locate iTunes software. Click the Uninstall button next to iTunes. Wait for a while until the program is completely uninstalled. After the installation is complete, restart your PC and then download the latest version on iTunes and install it. Now try running the software again. Hopefully, this will resolve the issue.

3. Scan for Viruses

Another way to resolve CoreFoundation dll error on your system is to scan for viruses. Run an antivirus to detect viruses and remove them from your PC.

4. Clean Your Registry

Remember DLL file errors also indicate a corrupt registry. When you don’t clean the registry it overloads with unnecessary and obsolete files like junk files, cookies, temporary internet history, and bad /invalid registry entries. When these files accumulate, they damage the registry, dll, and system files too. It also causes disk fragmentation. To repair the registry and fix dll files again, download a registry cleaner. Whether you want to scan for viruses or clean the registry, it is advisable to download Restoro. This is a multi-functional and advanced PC Fixer deployed with an intuitive algorithm and multiple powerful utilities. These include an antivirus, a registry cleaner, Active X controls, and class scanner, and a system optimizer. The registry cleaner detects all registry issues and resolves them instantly. It wipes out the unnecessary files cluttering and damaging the registry. It fixes and restores the damaged dll files including CoreFoundation dll file thereby resolving the error. It takes a few clicks to resolve this error. The antivirus feature scans your entire PC and removes all kinds of malicious software including spyware, malware, viruses, and Trojans. To ensure the antivirus does not slow down the speed of your PC, Restoro also features a system optimizer that boosts the performance of your computer significantly. It is powerful and bug-free software with a user-friendly interface that makes it quite easy to operate. You can download it on any Windows version as it is compatible with all. Click here to download Restoro and resolve CoreFoundation dll error now!
Read More
NVIDIA Control Panel is not opening
Users who constantly use graphic-intensive applications like games or any video-rendering software need to control how their graphics card is used. There are some who always toggle their Graphic Quality settings to get the Frames Per Second or FPS up. While some tend to adjust the size, orientation, scaling, and other display settings in order to use their PCs in a more efficient way or to simply work better. And in all of that, that’s where the NVIDIA Graphics Card comes into the picture. Take note that this software only works on PCs which has NVIDIA Graphics Card attached to them. Thus, if you use another Graphics Card then this post is not for you, otherwise, proceed reading to know what you can do if the NVIDIA Control Panel is not opening on your Windows 10 PC. Here are a couple of things you can try if the NVIDIA Control Panel is not opening, not responding, or not working:
  • Restart the process of the NVIDIA Control Panel
  • Restart the NVIDIA Display Driver Service
  • Update your NVIDIA Display Drivers
For more details, refer to the instructions provided below.

Option 1: Restart the process of the NVIDIA Control Panel.

  • Tap the Ctrl + Shift + Esc keys to open the Task Manager.
  • After opening the Task Manager, look for the process named NVIDIA Control Panel Application.
  • Once you found it, expand it and right-click on the NVIDIA Control Panel sub-process, and click on End Task.
  • Now try opening the NVIDIA Control Panel from the Start Menu and see if it now works fine or not.

Option 2: Restart the NVIDIA Display Driver Service

  • Tap the Win + R keys to open the Run dialog box.
  • Then type “services.msc” in the field and hit Enter to open the Windows Services Manager.
  • After opening the Services window, you will see a list of services. From there, look for services named “NVIDIA Display Container LS” and double click on it to open its Properties.
  • Now make sure that the service is Started. If it isn’t, you need to start it, otherwise, you need to Stop it and Start It again. You also have to make sure that the Startup Type is set to Automatic.
  • Do the same for the NVIDIA LocalSystem Container service.
  • Restart your computer and check if the problem’s fixed.

Option 3: Try updating the drivers from the official site of NVIDIA

If both the first and second given options didn’t work, you can also try updating the drivers from the official NVIDIA website. And in case you don’t know the type of Nvidia graphics card that your computer is on, follow the steps below:
  • Tap the Win + R keys to open the Run dialog box.
  • Next type in “dxdiag” in the field and click OK or hit Enter to open the DirectX Diagnostic Tool.
  • From there, you can see what type of Nvidia graphics card that your system is on.
  • Take note of your graphics card information and then look for the best drivers for your operating system. Once you’ve downloaded and installed the file, restart your PC.
Read More
How to Resolve Error Code 0xd0000272 in Windows 10

Error Code 0xd0000272 – What is it?

Error code 0xd0000272 is an activation error code that occurs when Windows users are unable to activate their Windows operating system. This error code features common symptoms which include the following:

  • Inability to activate Windows 10 operating system
  • Message box with error code 0xd0000272

Solution

Restoro box imageError Causes

When error code 0xd0000272 occurs in Windows 10, it is usually due to issues related to the Windows activation servers. In such a case where the error code occurs due to an activation server that is temporarily unavailable, users may need to wait for a few hours until the activation server is available. Their copy of Windows will then be automatically activated. Once the activation process is not done accordingly, you might encounter other Windows 10 errors such as error code 0xc004f034

Further Information and Manual Repair

As is the case with many activation error codes, Windows 10 users can perform several manual repair methods to determine the cause as well as fix the error code affecting their device. Instead of passively waiting to see if your activation error code will be fixed on its own, resolve error code 0xd0000272 through the manual repair methods available. Below are simple instructions that when followed can lead to your success.

Method One: Verify Internet Connection

Check Settings to verify if your machine is connected to the Internet. This is one of the causes of various error codes which affect Windows 10. Also, this manual method is a simple process that can help Windows users recognize or eliminate factors that may or may not be affecting their system. To check your Internet connection, follow the simple instructions below.

  • Step one: Click the Start button and select Settings
  • Step two: Select Network & Internet
  • Step three: Click the Status section of the Network & Internet tab

Once you’ve been able to verify an Internet connection or troubleshoot any issues related to your network, go to Update & security. Make an attempt to activate your system. If you are successful, you will be able to access all the features and benefits offered via your copy of Windows. However, move to the next manual method below if error code 0xd0000272 reoccurs.

Method Two: Run Windows Update Troubleshooter

Your inability to activate Windows 10 may be related to an issue with Windows Update. To verify whether or not Windows Update is functioning properly, run Windows Update Troubleshooter.

You’ll need to visit the Microsoft website to access their Windows Update Troubleshoot tool. Once you’ve downloaded the troubleshooter, run the tool. After running the tool, check if you are able to access Windows Update services as well as activate Windows 10.  If the problem with error code 0xd0000272 persists, however, follow the instructions provided for manual repair method three detailed below.

Method Three: Disable Proxy Settings

Another option available to individuals experiencing error code 0xd0000272 in Windows 10 is to manually disable their machine’s proxy settings. After disabling the proxy settings, remember to open the Windows Update tab to complete the activation process. See the instructions provided below to disable proxy settings.

  • Step one: Press Windows key + R
  • Step two: Type control then click OK
  • Step three: Select Settings then go to Network & Internet
  • Step four: View connection settings
  • Step five: Click on the Network tab
  • Step six: Click Proxy -- turn off proxy

Once you have successfully disabled your proxy settings, open Windows Update. Select the activation option to access your copy of Windows 10. If you are unable to complete the activation process, however, contact a Windows repair technician.

Method Four: Use an Automated Tool

Error codes in Windows often occur due to poor maintenance of one’s PC. To improve your system and reduce your machine’s risk of experiencing error codes, download a powerful automated tool. This tool is both powerful and user-friendly, making its benefits accessible to even the most non-technical Windows users.
Read More
Fix Windows Update Error 0x8007025D-0x2000C
Recently, a number of users reported getting an error code 0x8007025D-0x2000C while updating their Windows 10 computers using an ISO or the Media Creation tool. You will also see a detailed error message saying, “The installation failed in the SAFE_OS phase with an error during APPLY_IMAGE operation” together with the error code 0x8007025D-0x2000C. This kind of issue usually occurs when there is some problem with the installation files and when Windows Update fails to apply upgrade using the Media Creation Tool or ISO. To resolve this issue, you can use the troubleshooting options given below as a reference.

Option 1 – Try recreating the Windows 10 installation USB

Recreating the Windows 10 installation USB might help in fixing the problem. You can use a USB drive to do so but make sure that it has a great read-write speed. Follow the steps below to recreate Windows 10 installation USB”
  • Click this link and then click the Download Tool Now button.
  • Next, click the “Use the tool to create installation media (USB flash drive, DVD, or ISO file)…” option and follow the next given instructions on the screen.
  • Now select the ISO file option in step 5.
  • After that, you should now have an ISO file.
  • Next, go to the location where you’ve downloaded the ISO file.
  • Then right-click on the Windows 10 ISO file and select the Open with option and then select File Explorer.
  • Now click on “setup.exe” and follow the next instructions that appear on the screen. When asked, you have to select either Nothing (clean install) or Keep personal files only option. Take note that you must not select the “Keep personal files, apps, and Windows settings since it doesn’t really work.

Option 2 – Try running the Windows Update troubleshooter

You might also want to run the Windows Update Troubleshooter as it could also help in fixing Windows Update error code 0x8007025D-0x2000C. To run it, go to Settings and then select Troubleshoot from the options. From there, click on Windows Update and then click the “Run the troubleshooter” button. After that, follow the next on-screen instructions and you should be good to go.

Option 3 – Update the BIOS

Take note that you have to be careful when modifying something in the BIOS. So if you don’t know much about it, it’s best if you skip on this option and try the other ones instead. However, if you are well-versed in navigating the BIOS, then follow the steps below.
  • Tap the Win + R keys to open the Run dialog box.
  • Next, type “msinfo32” in the field and press Enter to open System Information.
  • From there, you should find a search field on the bottom where you have to search for the BIOS version and then press Enter.
  • After that, you should see the developer and version of the BIOS installed on your PC.
  • Go to your manufacturer’s website and then download the latest version of BIOS on your computer.
  • If you are using a laptop, make sure that you keep it plugged in until you have updated the BIOS.
  • Now double click on the downloaded file and install the new BIOS version on your computer.
  • Now restart your computer to apply the changes made.

Option 4 – Try restarting the Background Intelligent Transfer Service

The Background Intelligent Transfer Service or BITS is a part of the Windows Update service and is the one that manages the background download of Windows Update, as well as scans for new updates and so on. And if Windows Update is experiencing some problems, you can try restarting BITS but make sure that you have admin privileges to do so.
  • Tap the Win + R keys to open the Run dialog box.
  • Next, type “services.msc” in the field and hit Enter to open Windows Services.
  • From the list of Services, look for the Background Intelligent Transfer Service and double-click on it to open Properties.
  • After that, you need to set the Startup type to “Automatic (Delayed Start) and click on Apply.
  • Now click the Stop button to stop BITS and then click the Start button to restart the service.
  • Click OK to save the changes made and then restart your PC.

Option 5 – Try to update Windows after a couple of minutes or an hour

There are times when the issue is from Microsoft’s end. It could be that there’s some issue with Microsoft’s server so it would be better if you give it a couple of minutes or an hour or so before trying to run Windows Update again.
Read More
Open specific pages each time Chrome starts
When we are working on our computer, we have tendencies to make it look and behave to our best needs and however, best suits us. The Internet has crawled into our lives and made itself a must-have in modern society, internet browsers as a crucial piece of software for viewing the web have also grown and made themselves to be more open for user settings and personalization, Chrome, one of the most popular browser has the option to open a specific set of pages one it is opened and that is what we will cover today in this tutorial. No matter would you like to by default open some online store, maybe an email or news website, you can open each of them or all of them once Chrome is run, making your daily routine more enjoyable and stress-free. The first thing, of course, is to start Chrome itself, once Chrome is up, click on three dots in the upper right corner of the Chrome window and select settings. Google chrome settingsWhen you are in settings, on the left side move toward the bottom until you run into a tab that says On Startup and click on it. On right, a new section will open, click on Open a specific page or set of pages. Chrome startup pages
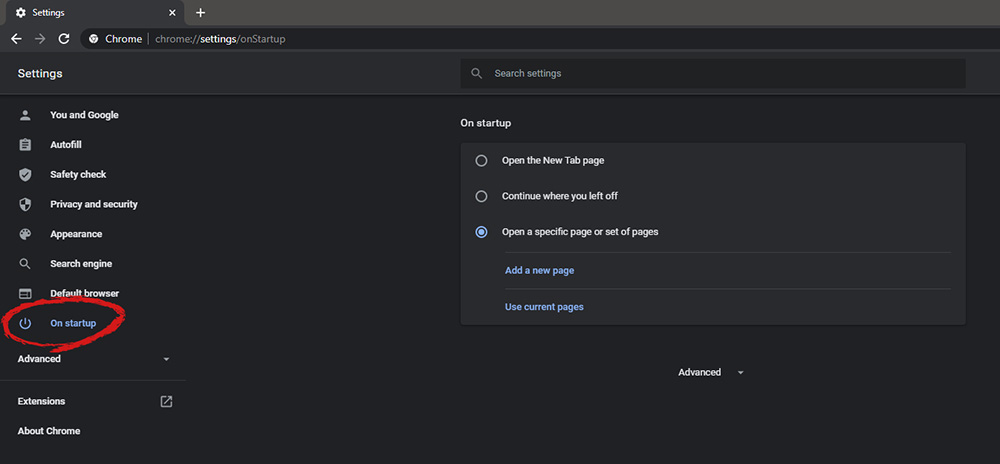
You will be presented with the option to add a new page by typing its URL or getting it from bookmarks or using a specific opened one. You can repeat this process until you have added all pages that you wish to be automatically opened once Chrome is opened for the first time.

BONUS:

If you have noticed right above the setting that we have used for opening a specific set of pages there is the option Continue where you left off, this option will open each page exactly where it was when Chrome was shut down letting you keep viewing where you have left off. This is useful if by any chance your battery ran out or you had to quickly turn the computer off for whatever reason.
Read More
Why you should upgrade your 60Hz Screen

The number of Hertz is the number of how many images your screen draws in one second. So monitor with a refresh rate of 60Hz will draw 60 images each second on your screen. To most users, this will look fine and enough but actually, if you would place them in front of a 120Hz screen difference will be visible right away.

high refresh rate monitor setup

Benefits of higher refresh rates

In most simple words just looking at a screen that has a higher refresh rate will produce a more natural feel of things, although some people would argue that flickering can not be seen on 60Hz monitors and that should be enough, I would argue that they never watched the movie, played the game or used high refresh rate screen when they can state something like that.

Yes, 60Hz might be enough to look at the web page or read some documents but long exposure to 60Hz can have a tiring effect on the eyes in the long run. 120Hz and above just feel more relaxed and it is far less demanding on the eyes. Watching movies also is much better on a higher refresh screen, with way much less motion blur in fast scenes giving the overall experience a greater natural feel.

Gaming is perhaps an area where a refresh rate of 120Hz and above will show its best. Having a higher refresh rate will be easier on your eyes and can even give you a competitive edge. When for example you have twice more images per second on your screen than your opponent his movement will be more fluid and predictable because of that and overall precision will be much higher when moving the cursor in the game since more frames per second means more precision and smoother movement.

The dark side of high refresh rates

After all the positive things that were said about the advantages of high refresh rates, it is just fair to look at some negatives or in this case only negative one and that is Computer power. As said in the previous section having a 120Hz refresh rate means having 120 frames displayed on the screen per single second. Having even higher monitors like 360Hz means even more frames per second and in order to actually see all of that frames you will need to have enough computer power to back it up. Having for example screen with a refresh rate of 240Hz means nothing if your GPU and rest of the computer are able only to push 150 frames per second, in this case, you will still have 150 frames in one second despite the monitor being able to go to 240.

Conclusion

Generally and with all of my heart I would recommend moving away from 60Hz monitors, yes they are cheaper and more affordable but at the end of the day if you are someone like me who spends most of his daily time in front of the computer you would be grateful to have higher refresh rate screen and save your eyes, and after all, why not enjoy some smoother and better movie and game experience as well as saving your eyesight.

Read More
1 2 3 171
Logo
Copyright © 2023, ErrorTools. All Rights Reserved
Trademark: Microsoft Windows logos are registered trademarks of Microsoft. Disclaimer: ErrorTools.com is not affiliated with Microsoft, nor claims direct affiliation.
The information on this page is provided for information purposes only.
DMCA.com Protection Status